
IoT sensor device with STM32 Blue Pill microcontroller, Quectel BC95-G global NB-IoT module and 18650 lithium ion battery
Advanced Topics for Visual Embedded Rust Programming
Watch what happens behind the scenes when you create a Visual Embedded Rust program
This is the companion article that explains the internals of the Visual Embedded Rust extension for Visual Studio Code that I have covered here…
Why Blue Pill? Power vs Price Compromise
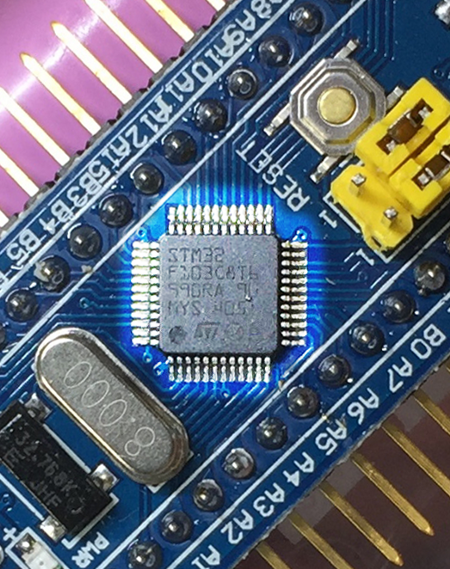
ST Microelectronics STM32F103C8T6 microcontroller on Blue Pill (And my soldering has greatly improved)
Blue Pill was chosen for the tutorial because it best represents a real-world, low-cost microcontroller with limited RAM and ROM.
The microcontroller is found in many off-the-shelf products, even flying drones!
To be clear what’s a “Blue Pill”… The heart of Blue Pill is an STMicroelectronics STM32F103C8T6 microcontroller.
That’s a tiny module surface-mounted on a Blue printed-circuit board (hence the name Blue Pill). Without the Blue (and Yellow) parts, it would be extremely difficult for us to experiment with the microcontroller. So we buy a Blue Pill and use it like an Arduino.
Thus Blue Pill is clearly a Developer Kit that marks up the cost of the microcontroller. Blue Pill retails for $2, but the STM32F103C8T6 microcontroller sells for only 40 cents! Perfect for creating millions and millions of IoT sensors!
(Actually a $2 dev kit is so affordable that it begs you to go ahead and do many many crazy things with it!)
At this price we get a 32-bit Arm processor with many goodies (GPIO, UART, I2C, SPI, USB, …) But the catch: It has only 64 KB of ROM and 20 KB of RAM. (Similar to the Apple II!)
With Blue Pill’s extremely limited RAM and ROM, we can’t code in decent programming languages like MicroPython and JavaScript (for MakeCode, which I tried and failed).
C was the only option… Until Rust came along! Rust is a systems programming language that’s as low level as C (i.e. no garbage collection). Yet it solves the painful pointer problem in C. This research paper presents an excellent comparison of C with Rust.
Read more about Blue Pill and the upgraded version, Super Blue Pill
How Small Is Rust?
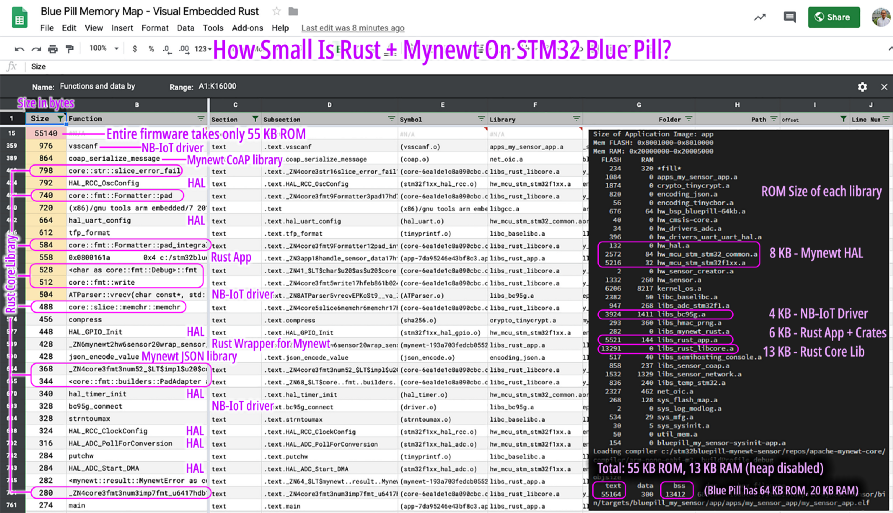
Here’s the RAM and ROM usage of the Visual Embedded Rust firmware on Blue Pill. The left section shows Rust and Apache Mynewt functions sorted by size (largest on top). The right section shows the total RAM and ROM used by each library.
Our firmware occupies 55 KB of ROM and 13 KB of RAM, out of Blue Pill’s 64 KB ROM and 20 KB RAM. (That’s 86% of ROM and 65% of RAM used)
The spreadsheet below was generated based on the Linker Memory Map created during the firmware build. Read more about memory maps
RAM and ROM usage of the Visual Embedded Rust firmware
Why Apache Mynewt? Evolution of Rust on Bare Metal
Why are we running the Apache Mynewt realtime operating system on Blue Pill together with Rust? Mynewt was built with C (and therefore susceptible to C defects)… Why not run Rust on Blue Pill without C?
This means we would be running Rust on “Bare Metal”, without any other operating system. In fact, Rust becomes the operating system. Rust would have to handle GPIO, UART, I2C, SPI, USB, … Plus multitasking and related functions like semaphores and messages queues.
Why reinvent the Rusty wheel when we already have realtime operating systems like Mynewt, FreeRTOS, Zephyr, …? It takes a lot of effort to build a new realtime operating system in Rust that supports all kinds of microcontrollers.
There’s a great team hard at work creating the Embedded Rust platform. In the meantime, I’m taking a shortcut and using Mynewt… But in a safe way, with Safe Wrappers.
I’m not solving the problem of devices crashing due to bugs in the operating system… Because I trust experienced C coders in the Mynewt community for creating high-quality kernel code. Instead I’m solving the problem of devices crashing due to bugs in the C application code… And experienced C application coders are really hard to find.
Can we solve this problem with Rust?
How Safe Is Rust? Safe Wrappers for Mynewt
Rust won’t let us use pointers
freely like in C (unless we explicitly write unsafe code).
Mynewt however is written in C and it will blindly accept any pointer we pass, even bad ones. How
shall we reconcile the two?
The solution: Create Safe Wrappers that validate all pointers passed from Rust to Mynewt and vice versa. A Safe Wrapper is a Rust function that wraps around the Mynewt API, converting the unsafe Mynewt API into a safe Rust API.
For example: When a Mynewt API
accepts a string input (const char *), we wrap the API with a
Rust function that accepts a Strn type instead.
Strn is a type I created that represents a null-terminated string.
Unlike C, Rust strings are not expected to be terminated by the null byte. So when we pass strings to
the Safe Wrapper as Strn, the wrapper verifies that the string
is indeed terminated by a null.
When Mynewt returns a string, the
Safe Wrapper also uses the Strn type to verify that the returned
string is properly terminated by null.
Read more about Mynewt Safe Wrappers in the section “Advanced Topic: Safe Wrappers for Mynewt”
Read this excellent paper that compares Unsafe Coding in C with Safe Coding in Rust
What’s Wrong With Rust? Types!
In C we would manipulate a string
as char *. In Rust it weirdly becomes &'static Strn… a reference to a static null-terminated
string. (Strn is my own helper type for embedded platforms.) Yes
Rust is 100% precise in describing types… perhaps too precise?
Many Rust learners struggle with Rust Types (I’m still struggling). The Rust Compiler helpfully suggests how to fix coding issues with types. If the Rust Compiler is really so smart, why not go all the way and fix the types for us?
Thus Visual Embedded Rust becomes an experiment in “Typeless Rust”. Visual Coding doesn’t give us much room to express precise types in our Visual Programs. (How would you visually represent a reference to a static null-terminated string?) And if Visual Rust is meant for beginners, maybe we shouldn’t even mention types, to flatten the Rust learning curve.
Rust Learners shall stroll up the Rust learning slope starting with…
1️⃣ Visual Rust, devoid of types, followed by…
2️⃣ Typeless Rust, the typeless code generated by Visual Rust, and finally…
3️⃣ Fully-Typed Rust, a.k.a. Rust 2018
More about Typeless Rust in a while…
Typeless Rust
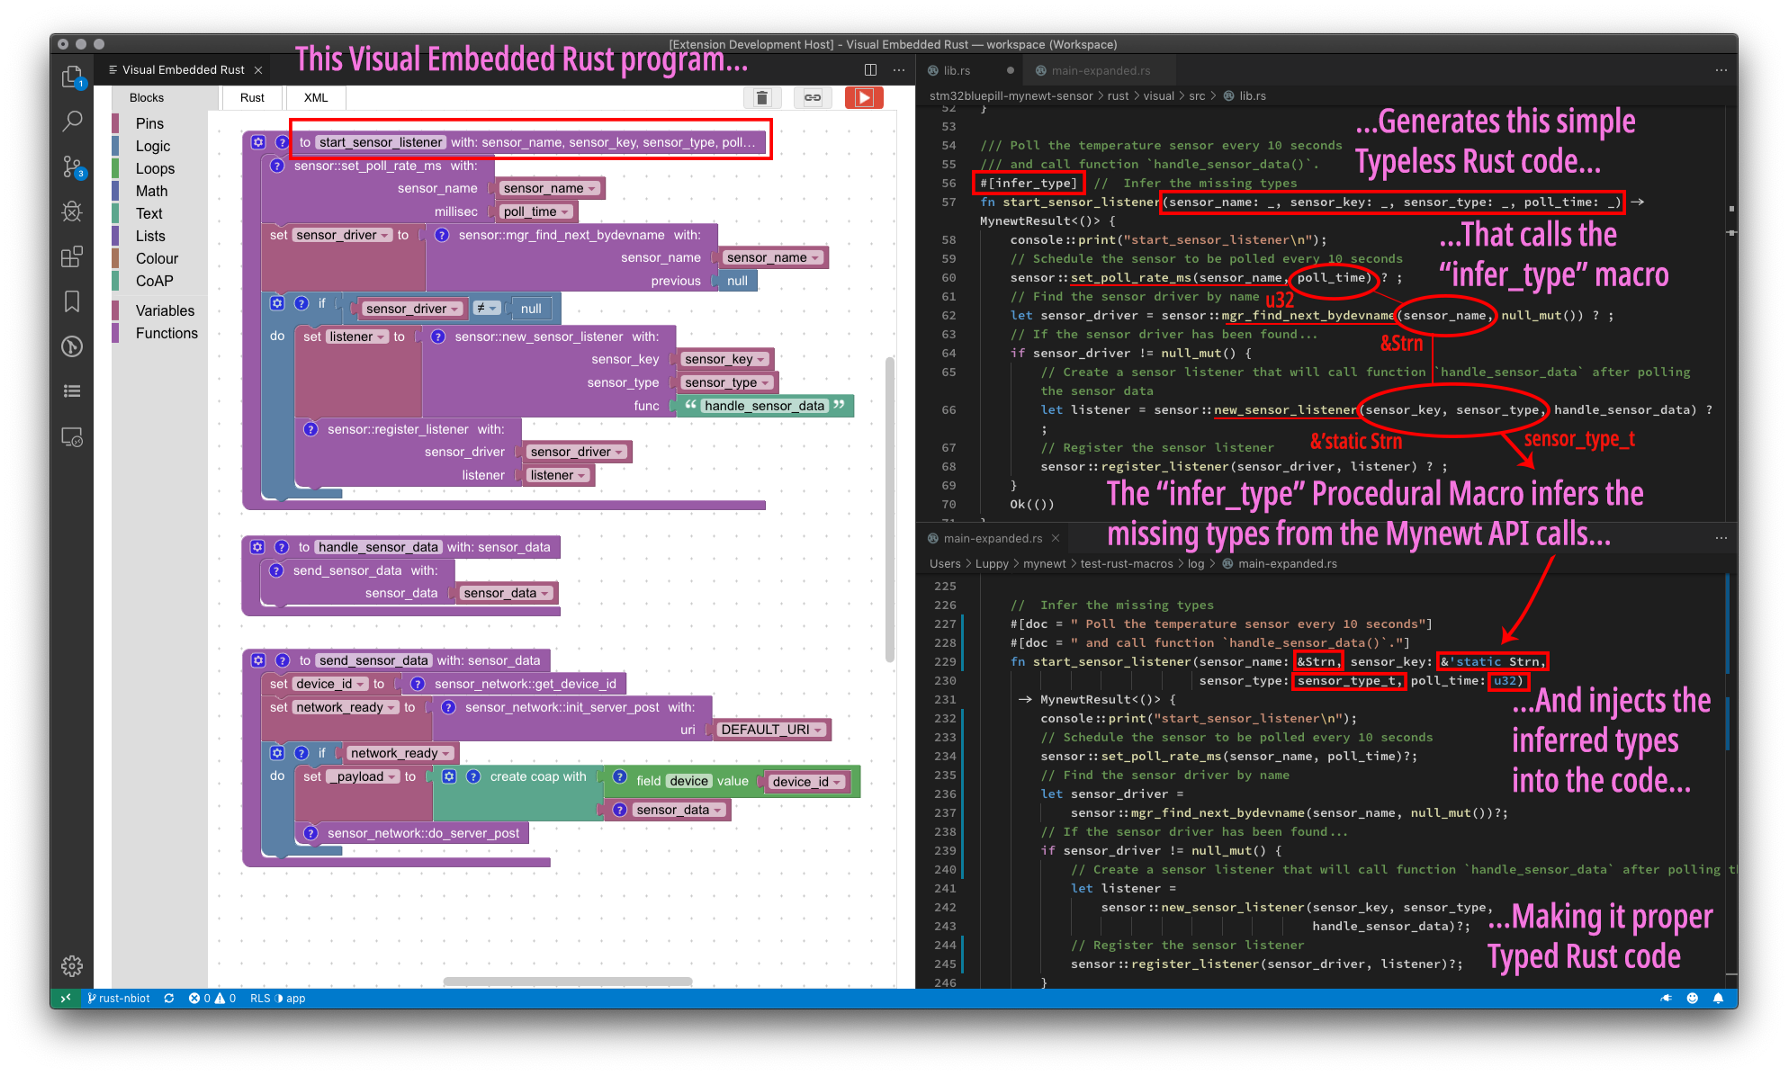
To making coding easier for beginners, the Visual Embedded Rust extension generates Typeless Rust code that looks like this…
#[infer_type]  //  Infer the missing types
fn start_sensor_listener(
    sensor_name: _, sensor_key: _, sensor_type: _, poll_time: _) ...
    //  Call Mynewt API
    sensor::set_poll_rate_ms(sensor_name, poll_time) ? ;
When the typeless code is
compiled, the infer_type Procedural Macro infers the
types by matching the variables against the Mynewt API...
//  Call Mynewt API
sensor::set_poll_rate_ms(sensor_name, poll_time) ? ;
//  `sensor_name` inferred as type `&Strn`
//  `poll_time`   inferred as type `u32`
The macro then injects the inferred types into the typeless code…
fn start_sensor_listener(
    sensor_name: &Strn, sensor_key: &'static Strn,
    sensor_type: sensor_type_t, poll_time: u32) ...
The inferred types are stored in
infer.json.
The enables the infer_type macro to infer types based on types
already inferred for other functions...
"start_sensor_listener": [
    [ "sensor_name", "&Strn" ],
    [ "sensor_key",  "&'static Strn" ],
    [ "sensor_type", "sensor_type_t" ],
    [ "poll_time",   "u32" ]
],
"send_sensor_data": [
    [ "sensor_data", "&SensorValue" ]
],
"handle_sensor_data": [
    [ "sensor_data", "&SensorValue" ]
]
This diagram illustrates the Type Inference…
How the infer_type macro infers missing types
Here’s an animation (done with
Visual Studio Code) that explains how the types were inferred by the infer_type macro. At top left are the types to be inferred. At
bottom left are the known type signatures from the Mynewt API.
The infer_type macro scans the Typeless Rust program recursively, hence
we see the roving red highlight. When the macro finds a match with the Mynewt API, the code flashes
green.
Green ticks at the top left mean that we have successfully inferred the types.
The recursive Rust code parsing
was implemented with the excellent syn crate. The quote crate was used to emit the
transformed Rust code.
How the infer_type macro infers missing types, animated in Visual Studio Code with the Visual Embedded Rust Extension
Visual Embedded Rust Extension for Visual Studio Code
Inside The Visual Embedded Rust Extension for Visual Studio Code
The source code for the Visual
Embedded Rust extension is located at github.com/lupyuen/visual-embedded-rust
The extension is published in the Visual Studio Marketplace here
The extension wraps the web-based visual code editor from Google Blockly into a VSCode WebView. Blockly uses XML to represent a visual program.
The extension is activated when
we edit a Rust source file (*.rs). Here’s a sample Rust source file
containing a Visual Program
There are two parts of the file…
Rust Source Code: Which is autogenerated by the Blockly Code Generator from the Blockly XML
Blockly
XML: The XML representation of the visual program. It’s located at the bottom of the source file,
marked by BEGIN BLOCKS … END BLOCKS
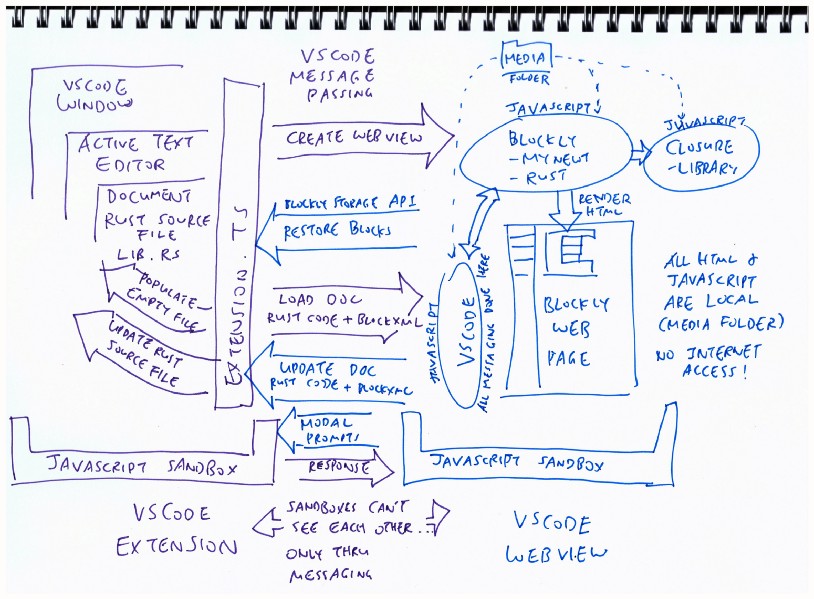
Logic Flow in the Visual Embedded Rust Extension
1️⃣ Main logic for the VSCode
Extension is in extension.ts
The extension contains two asset folders:
resources:
Contains a visual program template that
will be used to populate empty Rust source files
media:
Contains the Blockly JavaScript code that will be embedded in the WebView to render the visual editor
and generate Rust source code…
blockly-mynewt-rustcontains the Blockly JavaScript code with a custom Rust Code Generatorclosure-libraryis the Google Closure Library needed by Blocklyvscodecontains JavaScript code that enables VSCode Message Passing in the WebView to implement save/load functions and modal prompts
2️⃣ The extension creates a WebView that embeds the HTML and JavaScript code from Google Blockly.
HTML code for the WebView is here
3️⃣ The VSCode Extension and the WebView are running in separate JavaScript sandboxes.
Hence we’ll be using VSCode Message Passing to communicate between the VSCode Extension and WebView, as we shall soon see…
4️⃣ When the WebView loads, it notifies the VSCode Extension to fetch the contents of the Rust source file.
The VSCode Extension responds by passing the contents of the active Rust source file to the WebView via Message Passing.
The WebView extracts the Blockly XML embedded in the file contents (at the bottom). The WebView refreshes the Blockly workspace with the Blockly XML.
If the active Rust source file is empty, the VSCode Extension populates the file with a template containing Blockly XML
5️⃣ When the visual program is updated, the WebView sends the updated Blockly XML and the generated Rust code (via Message Passing) to the VSCode Extension.
The extension updates the Rust document in VSCode with the Blockly XML and generated Rust Code.
6️⃣ The custom-built Rust Code Generator for Blockly is here…
github.com/lupyuen/blockly-mynewt-rust/blob/master/generators/rust.js
github.com/lupyuen/blockly-mynewt-rust/tree/master/generators/rust
The Rust Code Generator for Blockly is explained in this article
Building The Visual Embedded Rust Extension
To build the extension, two
repositories need to be cloned into the media folder: blockly-mynewt-rust
and closure-library:
cd media
git clone https://github.com/lupyuen/blockly-mynewt-rust
git clone https://github.com/google/closure-library
The End…?
To make Visual Embedded Rust complete, we need…
- More features for the Rust Code Generator in Blockly
- Smarter Type Inference for Typeless Rust
- More Mynewt functions and types to be supported via Safe Wrappers
- Configuration and testing on various microcontrollers
- Better usability in Visual Studio Code
And yes we can make the extension work for Rust programs in general!
If you would like to join me in making Rust simpler for beginners, drop me a note!
References
The following files may be useful for reference…