
📝 10 Jun 2023
LVGL Feature Phone UI running on PinePhone with Apache NuttX RTOS
This article explains how we created an LVGL Graphical App for Pine64 PinePhone… By tweaking and testing in a Web Browser!
(Plus a little Zig Programming)
LVGL runs in a Web Browser?
Yep today we’ll test our LVGL App in a Web Browser with WebAssembly.
We’ll run Zig Compiler to compile LVGL Library from C to WebAssembly.
(Which works because Zig Compiler calls Clang Compiler to compile C programs)
LVGL also compiles to WebAssembly with Emscripten and SDL, but we won’t use it today.
Why Zig?
Since we’re running Zig Compiler to compile LVGL Library (from C to WebAssembly)…
Let’s write our LVGL App in the Zig Programming Language! (Instead of C)
Hopefully Zig will need fewer lines of code, because coding LVGL Apps in C can get tedious.
Why PinePhone?
Right now we’re creating a Feature Phone UI for Apache NuttX RTOS (Real-Time Operating System) on PinePhone.
(Phone Calls and Text Messages only)
This article describes how we’re creating the Feature Phone UI as an LVGL App.
We could’ve done all this in plain old C and on-device testing right?
Yeah but it’s 2023… Maybe there’s an easier way to build and test LVGL Apps? Let’s experiment and find out!
Wow that looks like a Feature Phone from 25 years ago…
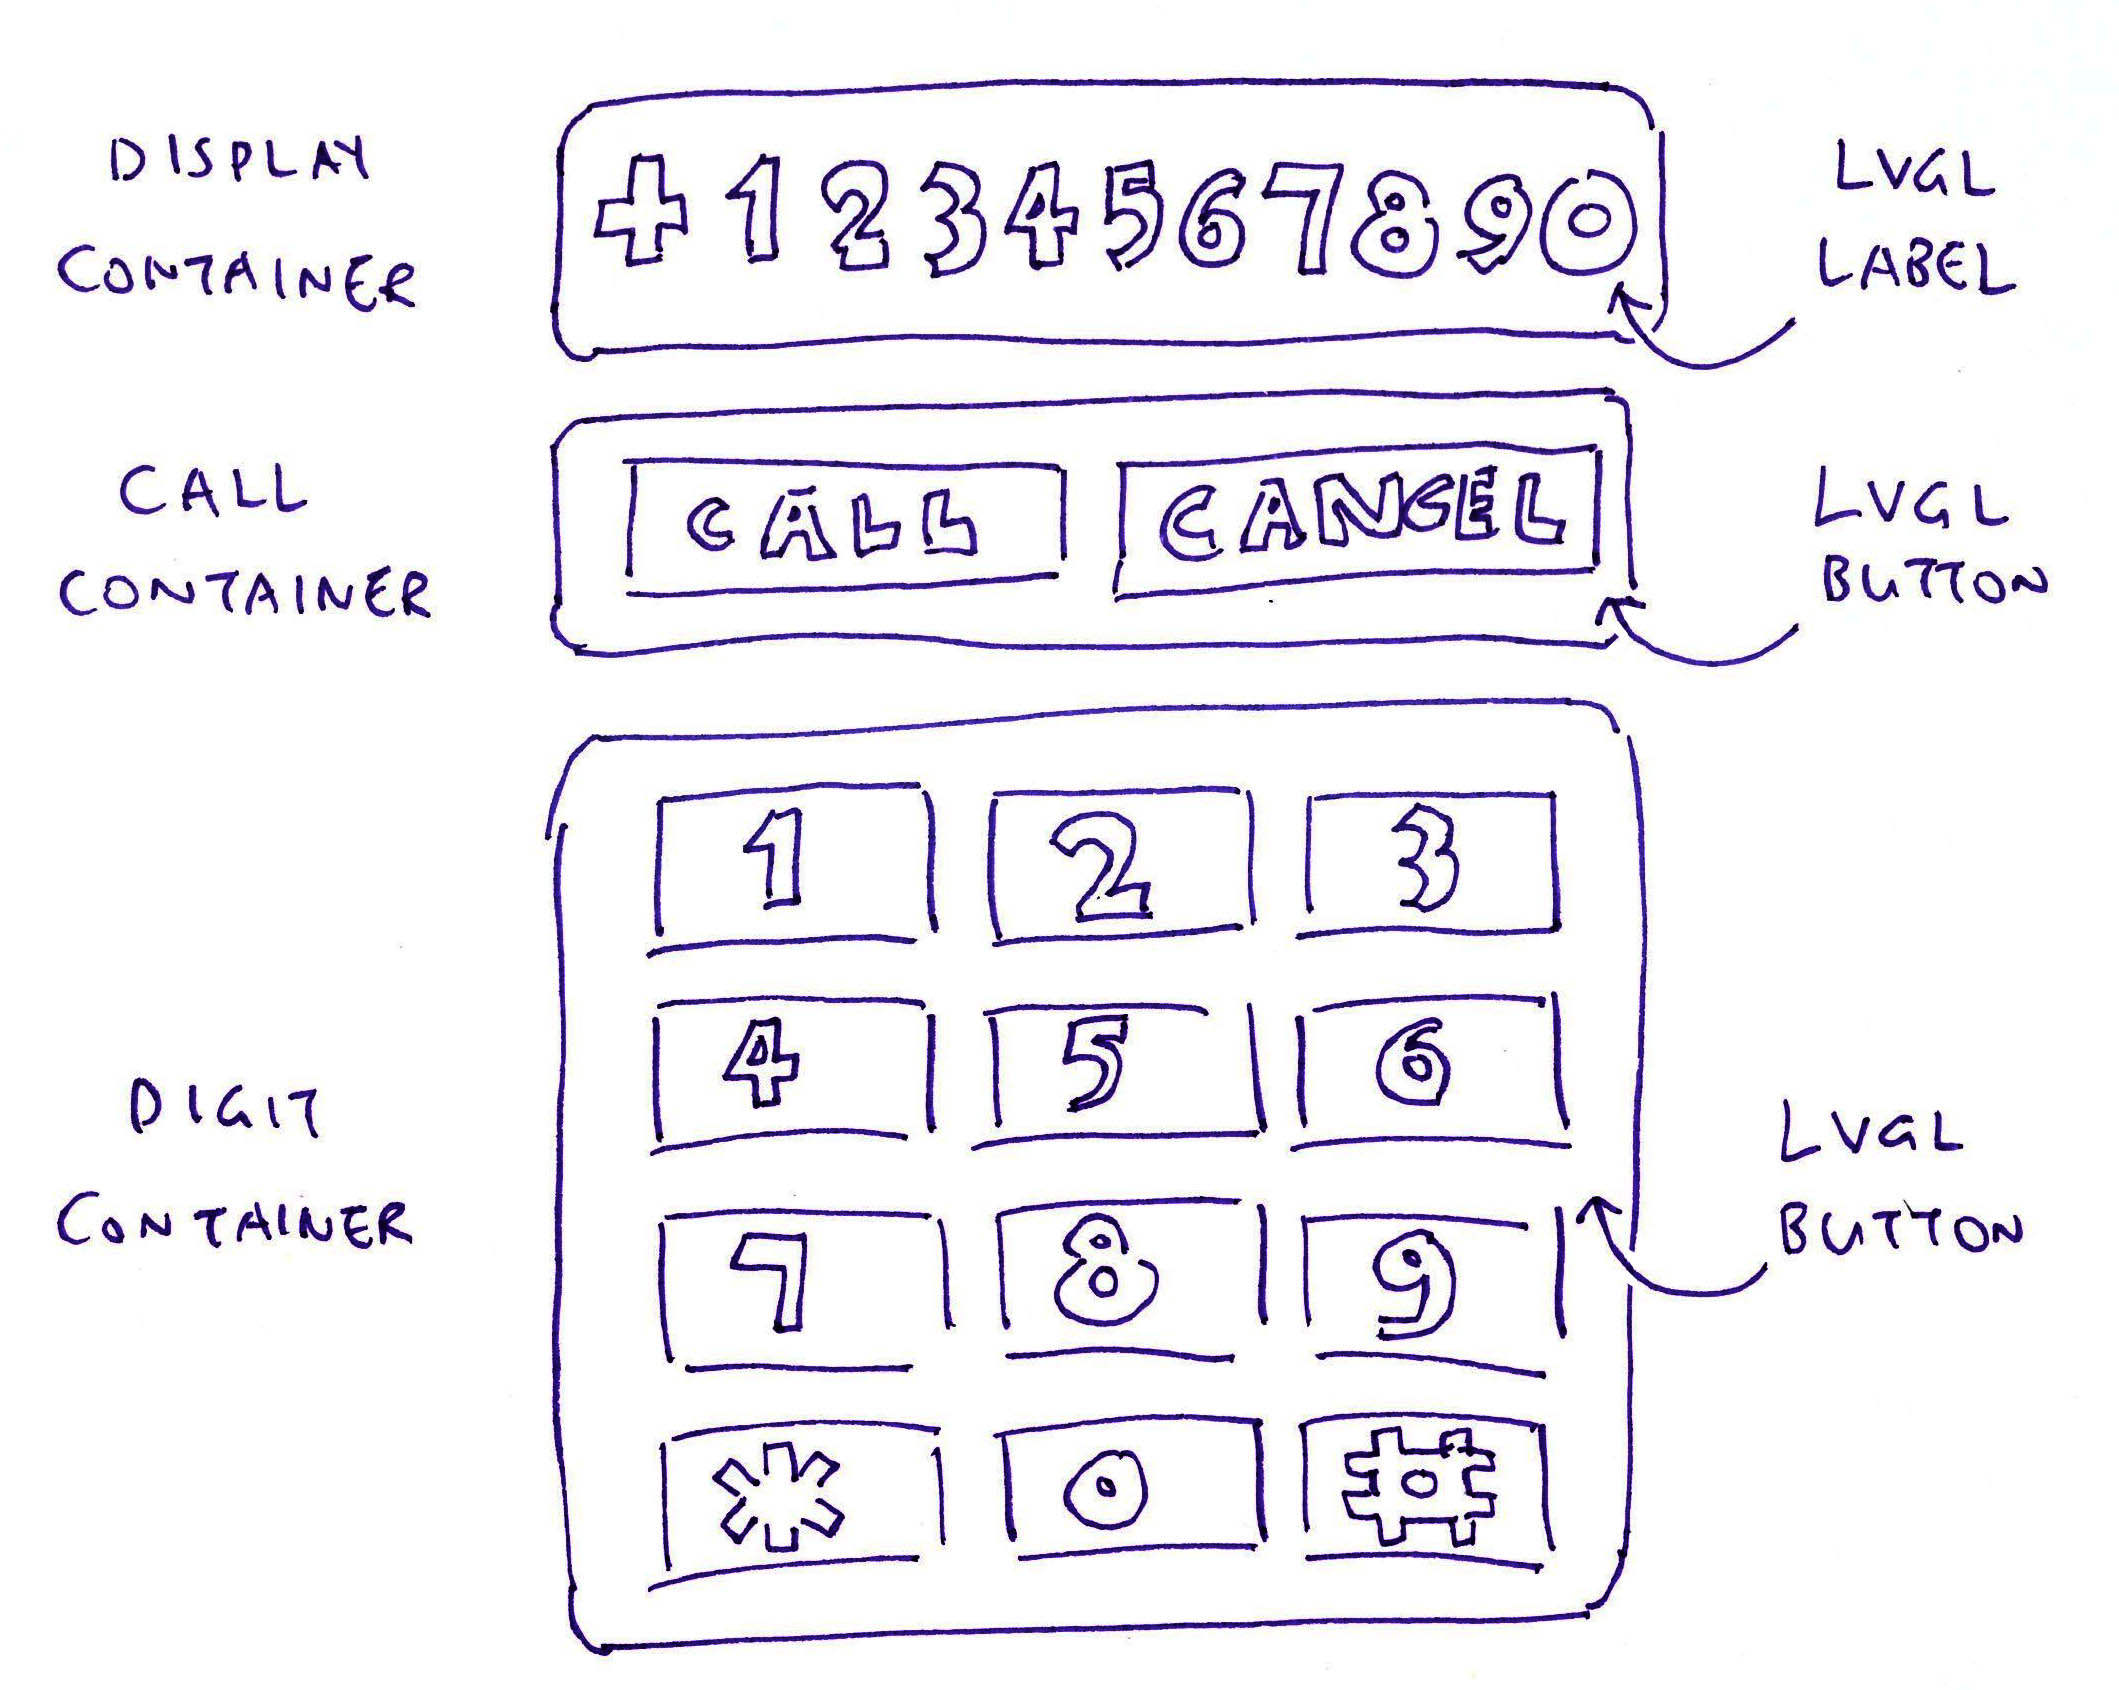
The pic above shows the Feature Phone UI that we’ll create with LVGL…
Display Containter
(For the Phone Number Display)
Call / Cancel Container
(For the Call and Cancel Buttons)
Digit Container
(For the Digit Buttons)
Let’s create the Buttons…
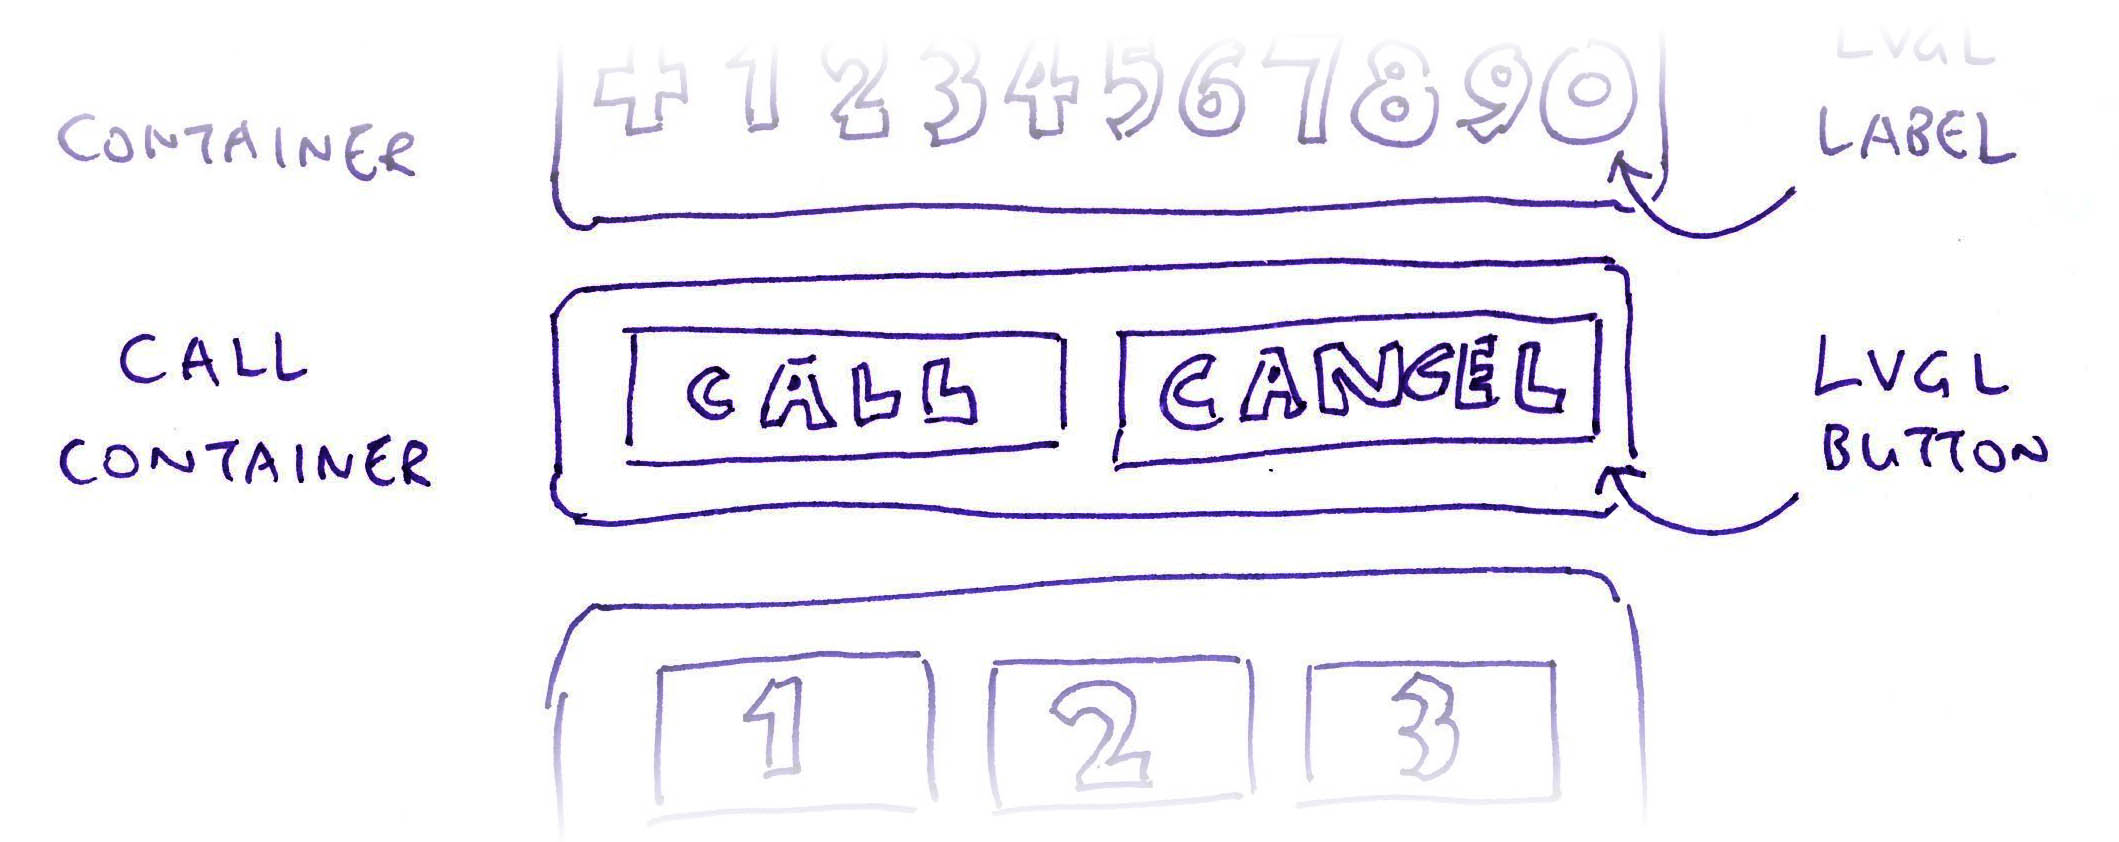
We begin with the “Call” and “Cancel” Buttons (pic above): feature-phone.zig
/// Labels for Call and Cancel Buttons
const call_labels = [_][]const u8{
  "Call",
  "Cancel"
};
This is how we create the LVGL Buttons for “Call” and “Cancel”: feature-phone.zig
/// Create the Call and Cancel Buttons
/// https://docs.lvgl.io/8.3/examples.html#simple-buttons
fn createCallButtons(cont: *c.lv_obj_t) !void {

  // For each Button: Call and Connect...
  // `text` is the Button Text
  for (call_labels) |text| {

    // Create a Button of 250 x 100 pixels
    const btn = c.lv_btn_create(cont);
    c.lv_obj_set_size(btn, 250, 100);

    // Center the Button Label: Call or Cancel
    const label = c.lv_label_create(btn);
    c.lv_label_set_text(label, text.ptr);
    c.lv_obj_center(label);

    // Convert the Button Text from Zig Pointer to C Pointer
    const data = @intToPtr(
      *anyopaque,          // Convert to `void *` C Pointer
      @ptrToInt(text.ptr)  // Convert from Zig Pointer
    );

    // Set the Event Callback Function and Callback Data for the Button
    _ = c.lv_obj_add_event_cb(
      btn,             // LVGL Button
      eventHandler,    // Callback Function
      c.LV_EVENT_ALL,  // Handle all events
      data             // Callback Data (Button Text)
    );
  }
}
(We write “c.something” to call an LVGL Function)
What’s lv_obj_add_event_cb?
lv_obj_add_event_cb tells LVGL to call our Zig Function eventHandler when the Button is clicked.
We’ll see the Event Callback Function in a while.
(“_ = something” tells Zig Compiler that we’re not using the Returned Value)
(We call @intToPtr and @ptrToInt to pass Zig Pointers as C Pointers)
What’s cont?
cont is the LVGL Container for the Call and Cancel Buttons.
We’ll create the Container when we call createCallButtons.

Now we do the same for the Digit Buttons (pic above): feature-phone.zig
/// Labels for Digit Buttons
const digit_labels = [_][]const u8{
  "1", "2", "3", "4", "5", "6",
  "7", "8", "9", "*", "0", "#"
};
This is how we create the Digit Buttons in LVGL: feature-phone.zig
/// Create the Digit Buttons
/// https://docs.lvgl.io/8.3/examples.html#simple-buttons
fn createDigitButtons(cont: *c.lv_obj_t) !void {

  // For each Digit Button...
  // `text` is the Button Text
  for (digit_labels) |text| {

    // Create a Button of 150 x 120 pixels
    const btn = c.lv_btn_create(cont);
    c.lv_obj_set_size(btn, 150, 120);

    // Center the Button Label
    const label = c.lv_label_create(btn);
    c.lv_label_set_text(label, text.ptr);
    c.lv_obj_center(label);

    // Convert the Button Text from Zig Pointer to C Pointer
    const data = @intToPtr(
      *anyopaque,          // Convert to `void *` C Pointer
      @ptrToInt(text.ptr)  // Convert from Zig Pointer
    );

    // Set the Event Callback Function and Callback Data for the Button
    _ = c.lv_obj_add_event_cb(
      btn,             // LVGL Button
      eventHandler,    // Callback Function
      c.LV_EVENT_ALL,  // Handle all events
      data             // Callback Data (Button Text)
    );
  }
}
(Or use an LVGL Button Matrix)
Again, LVGL will call our Zig Function eventHandler when the Button is clicked.
(More about this in a while)
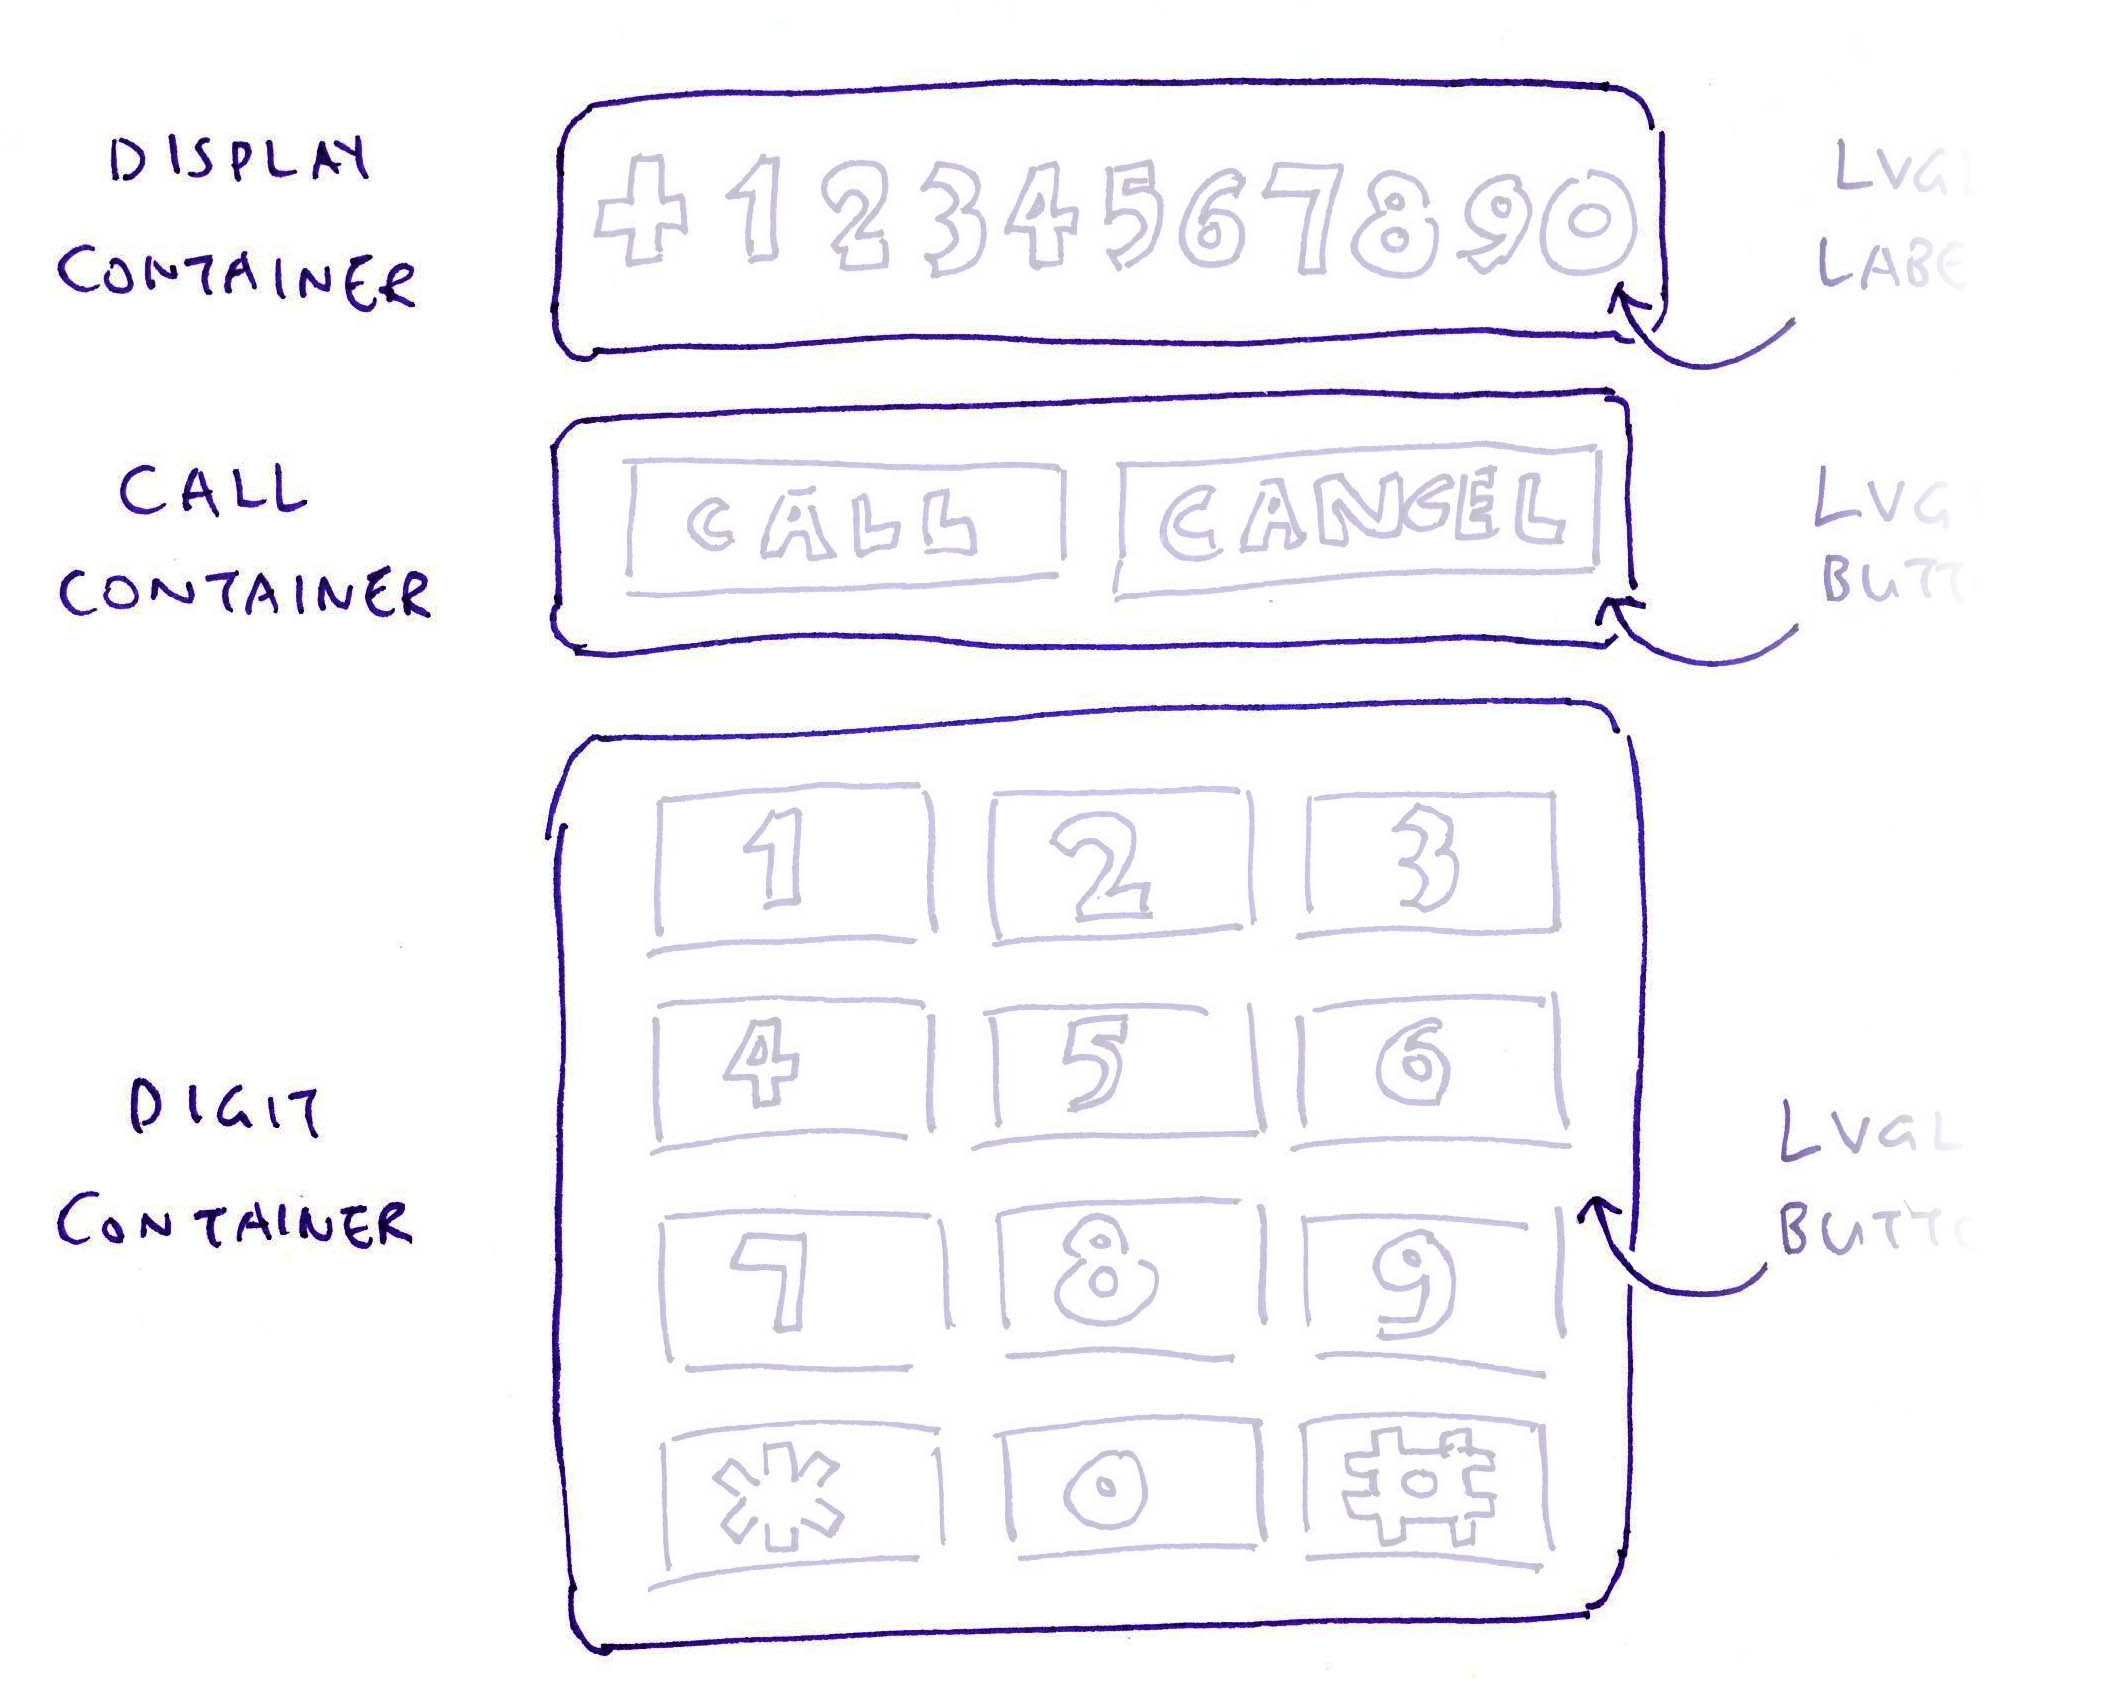
We create 3 LVGL Containers for the Display Label, Call / Cancel Buttons and Digit Buttons (pic above): feature-phone.zig
/// Create the LVGL Widgets that will be rendered on the display
fn createWidgets() !void {

  // Omitted: Create the Style for the Containers
  ...

  // Create the Container for Display
  // https://docs.lvgl.io/8.3/layouts/flex.html#arrange-items-in-rows-with-wrap-and-even-spacing
  const display_cont = c.lv_obj_create(
    c.lv_scr_act()  // Get Active Screen
  ).?;              // If a Null Pointer is returned, stop

  // Set the Container Size (700 x 150 pixels), Alignment and Style
  c.lv_obj_set_size(display_cont, 700, 150);
  c.lv_obj_align(display_cont, c.LV_ALIGN_TOP_MID, 0, 5);
  c.lv_obj_add_style(display_cont, &cont_style, 0);
In the code above, we create the LVGL Container for the Display.
(We write “.?” to check for Null Pointers)
(More about cont_style in the next section)
In the same way, we create the LVGL Containers for the Call / Cancel Buttons and Digit Buttons…
  // Create the Container for Call / Cancel Buttons (700 x 200 pixels)
  const call_cont = c.lv_obj_create(c.lv_scr_act()).?;
  c.lv_obj_set_size(call_cont, 700, 200);
  c.lv_obj_align_to(call_cont, display_cont, c.LV_ALIGN_OUT_BOTTOM_MID, 0, 10);
  c.lv_obj_add_style(call_cont, &cont_style, 0);

  // Create the Container for Digit Buttons (700 x 800 pixels)
  const digit_cont = c.lv_obj_create(c.lv_scr_act()).?;
  c.lv_obj_set_size(digit_cont, 700, 800);
  c.lv_obj_align_to(digit_cont, call_cont, c.LV_ALIGN_OUT_BOTTOM_MID, 0, 10);
  c.lv_obj_add_style(digit_cont, &cont_style, 0);
lv_obj_align_to tells LVGL to space out the Containers, 10 pixels apart.
Finally we pass the LVGL Containers when we create the Label and Buttons…
  // Create the Display Label
  try createDisplayLabel(display_cont);

  // Create the Call and Cancel Buttons
  try createCallButtons(call_cont);

  // Create the Digit Buttons
  try createDigitButtons(digit_cont);
(We’ve seen createCallButtons and createDigitButtons)
We’ll come back to createDisplayLabel. Let’s talk about the Container Style…
What’s cont_style in the previous section?
c.lv_obj_add_style(display_cont, &cont_style, 0);
c.lv_obj_add_style(call_cont,    &cont_style, 0);
c.lv_obj_add_style(digit_cont,   &cont_style, 0);
cont_style is the LVGL Style for our Containers.
The Style tells LVGL that our Containers will have Flex Layout: feature-phone.zig
// LVGL Style for Containers
var cont_style: c.lv_style_t = undefined;

// Create the Style for the Containers
// https://docs.lvgl.io/8.3/layouts/flex.html#arrange-items-in-rows-with-wrap-and-even-spacing
cont_style = std.mem.zeroes(c.lv_style_t);
c.lv_style_init(&cont_style);
c.lv_style_set_flex_flow(&cont_style, c.LV_FLEX_FLOW_ROW_WRAP);
c.lv_style_set_flex_main_place(&cont_style, c.LV_FLEX_ALIGN_SPACE_EVENLY);
c.lv_style_set_layout(&cont_style, c.LV_LAYOUT_FLEX);(std.mem.zeroes populates the struct with zeroes)
The code above says that the Buttons inside the Containers will be wrapped with equal spacing.
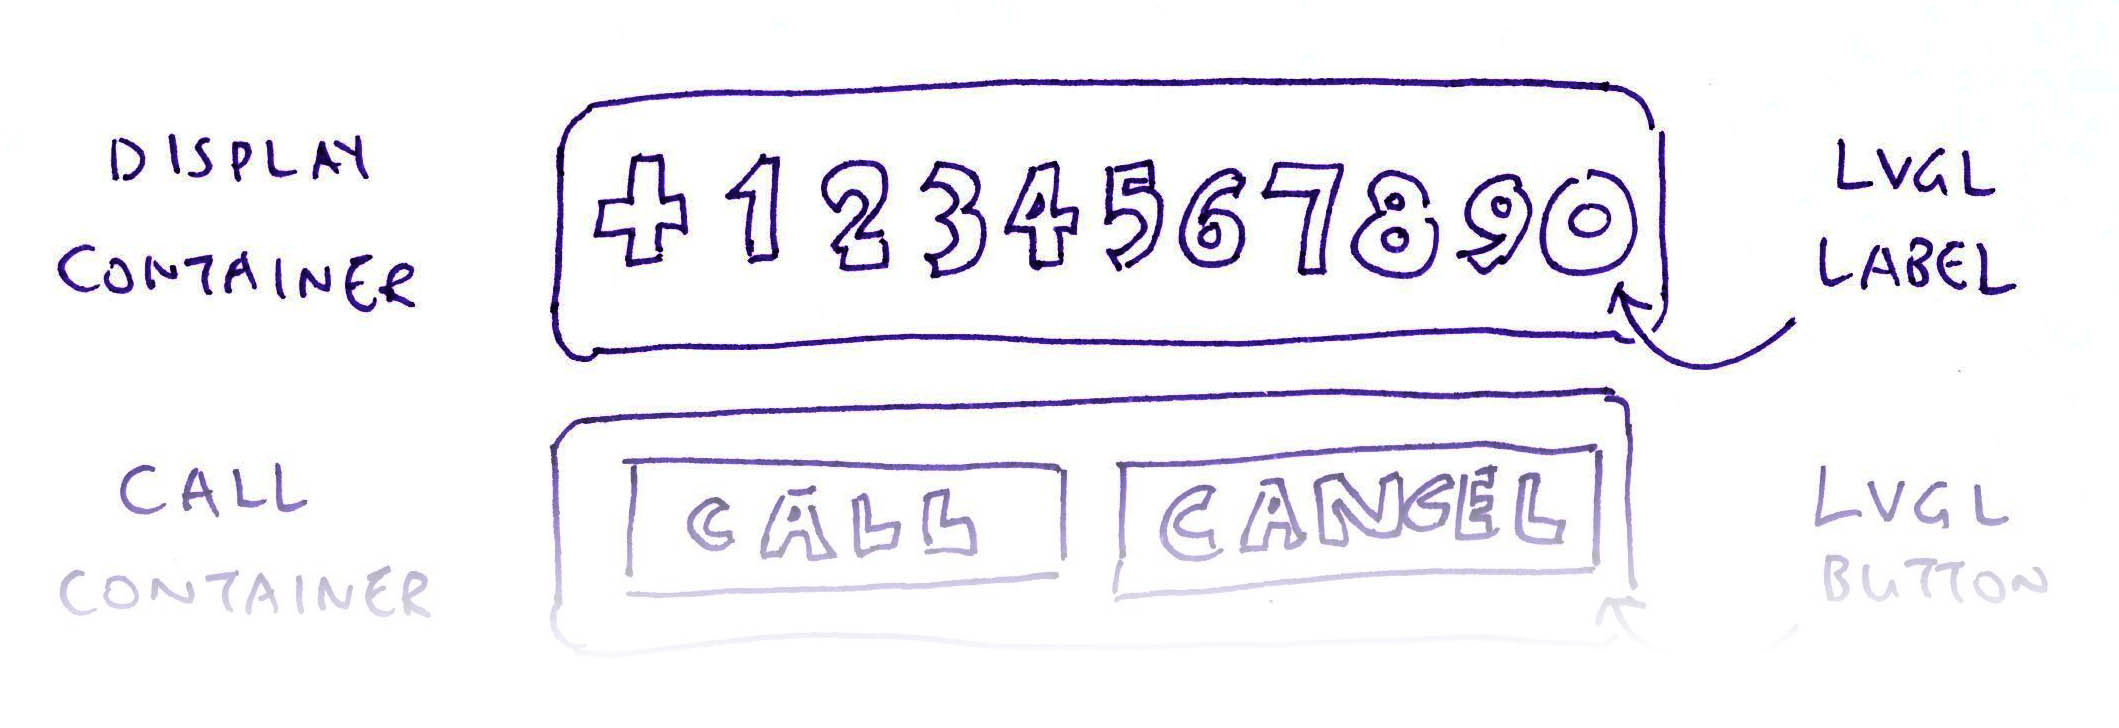
Final LVGL Widget for today is the Display Label that shows the number we’re dialing (pic above): feature-phone.zig
/// LVGL Display Text (64 bytes, null-terminated)
var display_text = std.mem.zeroes([64:0]u8);

/// LVGL Display Label
var display_label: lvgl.Label = undefined;

/// Create the Display Label
fn createDisplayLabel(cont: *c.lv_obj_t) !void {

  // Init the Display Text to `+`
  display_text[0] = '+';

  // Get the Container
  var container = lvgl.Object.init(cont);

  // Create a Label Widget
  display_label = try container.createLabel();

  // Wrap long lines in the label text
  display_label.setLongMode(c.LV_LABEL_LONG_WRAP);

  // Interpret color codes in the label text
  display_label.setRecolor(true);

  // Center align the label text
  display_label.setAlign(c.LV_TEXT_ALIGN_CENTER);

  // Set the label text and colors
  display_label.setText(
    "#ff0000 HELLO# "   ++ // Red Text
    "#00aa00 LVGL ON# " ++ // Green Text
    "#0000ff PINEPHONE!# " // Blue Text
  );

  // Set the label width
  display_label.setWidth(200);

  // Align the label to the top middle
  display_label.alignObject(c.LV_ALIGN_TOP_MID, 0, 0);
}
This code looks different from the rest?
Yep this code calls our Zig Wrapper for LVGL.
Someday we might create a Zig Wrapper for the rest of the code.
(More about Zig Wrapper for LVGL)
So many hard-coded coordinates in our code…
That’s the beauty of testing our LVGL App in a Web Browser!
With WebAssembly, we can quickly tweak the values and test our LVGL App (nearly) instantly. And after testing, we refactor the numbers to make them generic across Screen Sizes.
Let’s run our LVGL App in a Web Browser…
Feature Phone UI in the Web Browser
How to run our LVGL App in the Web Browser?
Follow the instructions from the previous article to compile the LVGL Library to WebAssembly with Zig Compiler…
Then we compile our Zig LVGL App feature-phone.zig and link it with the Compiled LVGL Library…
## Build the Feature Phone Zig LVGL App for WebAssembly
zig build-lib \
  -target wasm32-freestanding \
  -dynamic \
  -rdynamic \
  -lc \
  -DFAR= \
  -DLV_MEM_CUSTOM=1 \
  feature-phone.zig \
  display.o \
  lv_font_montserrat_14.o \
  lv_font_montserrat_20.o \
  lv_label.o \
...This produces…
Our WebAssembly Module: feature-phone.wasm
Which will be loaded by our JavaScript: feature-phone.js
// Load the WebAssembly Module `feature-phone.wasm`
// https://developer.mozilla.org/en-US/docs/WebAssembly/JavaScript_interface/instantiateStreaming
const result = await WebAssembly.instantiateStreaming(
  fetch("feature-phone.wasm"),
  importObject
);Which will be executed by our HTML Page: feature-phone.html
<html>
<body style="margin: 0; background-color: lightgrey;">
  <!-- HTML Canvas for rendering LVGL Display -->
  <canvas id="lvgl_canvas" width="720" height="1280"></canvas>
</body>
<script src="feature-phone.js"></script>
</html>Start a Local Web Server. (Like Web Server for Chrome)
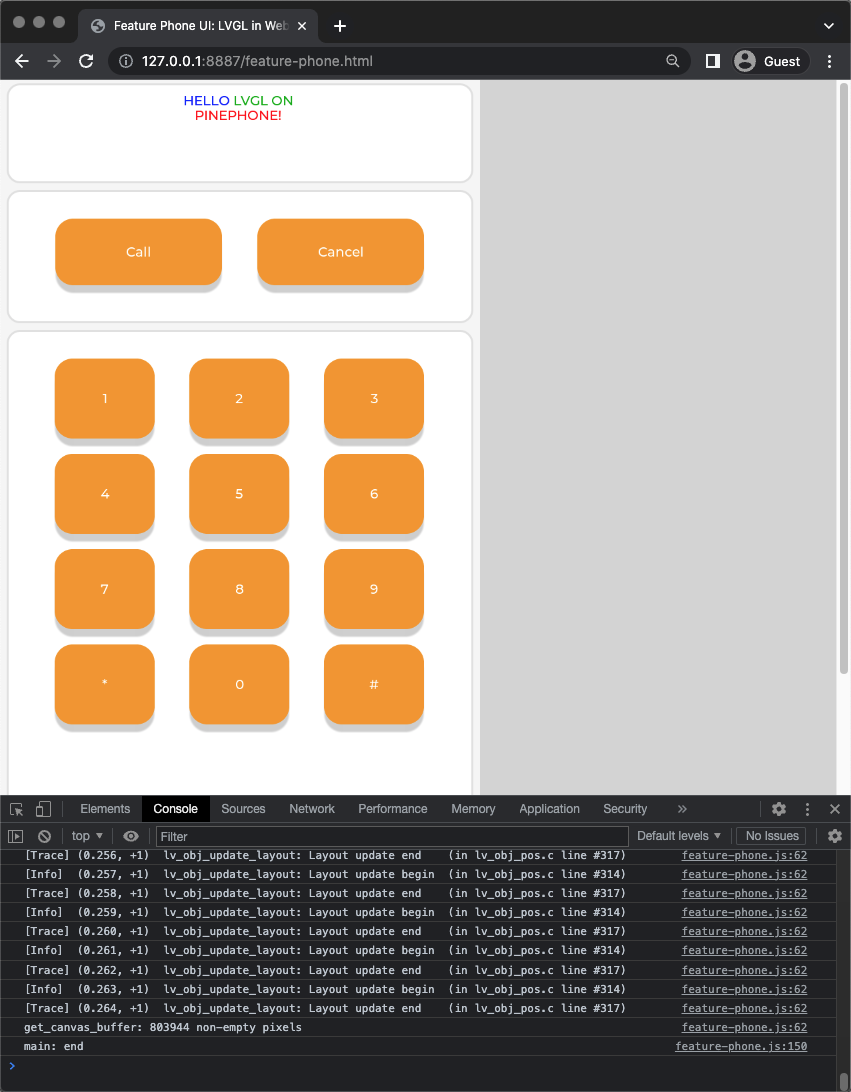
Browse to feature-phone.html. And we’ll see our Feature Phone UI in the Web Browser! (Pic above)
Earlier we created LVGL Buttons in our Zig App…
How will we handle them?
We created our LVGL Buttons like this…
// For each Button: `text` is the Button Text
for (call_labels) |text| {

  // Create a Button of 250 x 100 pixels
  const btn = c.lv_btn_create(cont);
  ...

  // Convert the Button Text from Zig Pointer to C Pointer
  const data = @intToPtr(
    *anyopaque,          // Convert to `void *` C Pointer
    @ptrToInt(text.ptr)  // Convert from Zig Pointer
  );

  // Set the Event Callback Function and Callback Data for the Button
  _ = c.lv_obj_add_event_cb(
    btn,             // LVGL Button
    eventHandler,    // Callback Function
    c.LV_EVENT_ALL,  // Handle all events
    data             // Callback Data (Button Text)
);What’s lv_obj_add_event_cb?
lv_obj_add_event_cb tells LVGL to call our Zig Function eventHandler when the Button is clicked.
In our Event Handler, we identify the Button clicked: feature-phone.zig
/// Handle LVGL Button Event
/// https://docs.lvgl.io/8.3/examples.html#simple-buttons
export fn eventHandler(e: ?*c.lv_event_t) void {

  // Get the Event Code
  const code = c.lv_event_get_code(e);

  // If Button was clicked...
  if (code == c.LV_EVENT_CLICKED) {

    // Get the length of Display Text (index of null)
    const len = std.mem.indexOfSentinel(u8, 0, &display_text);

    // Get the Button Text (from Callback Data)
    const data = c.lv_event_get_user_data(e);
    const text = @ptrCast([*:0]u8, data);
    const span = std.mem.span(text);
If it’s a Digit Button: We append the Digit to the Phone Number…
  // Handle the identified button...
  if (std.mem.eql(u8, span, "Call")) {
    // Omitted: Handle Call Button
    ...
  } else if (std.mem.eql(u8, span, "Cancel")) {
    // Omitted: Handle Cancel Button
    ...
  } else {
    // Handle Digit Button:
    // Append the digit clicked to the text
    display_text[len] = text[0];
    c.lv_label_set_text(
      display_label.obj,    // LVGL Label
      display_text[0.. :0]  // Get Null-Terminated String
    );
  }
If it’s the Cancel Button: We erase the last digit of the Phone Number…
  } else if (std.mem.eql(u8, span, "Cancel")) {
    // Handle Cancel Button:
    // Erase the last digit
    if (len >= 2) {
      display_text[len - 1] = 0;
      c.lv_label_set_text(
        display_label.obj,    // LVGL Label
        display_text[0.. :0]  // Get Null-Terminated String
      );
    }
And for the Call Button: We dial the Phone Number (simulated for WebAssembly)…
  if (std.mem.eql(u8, span, "Call")) {
    // Handle Call Button:
    // Call the number
    const call_number = display_text[0..len :0];  // Get Null-Terminated String
    debug("Call {s}", .{call_number});
When we compile our Zig LVGL App and run it in a Web Browser, the LVGL Buttons work correctly! (Pic below)
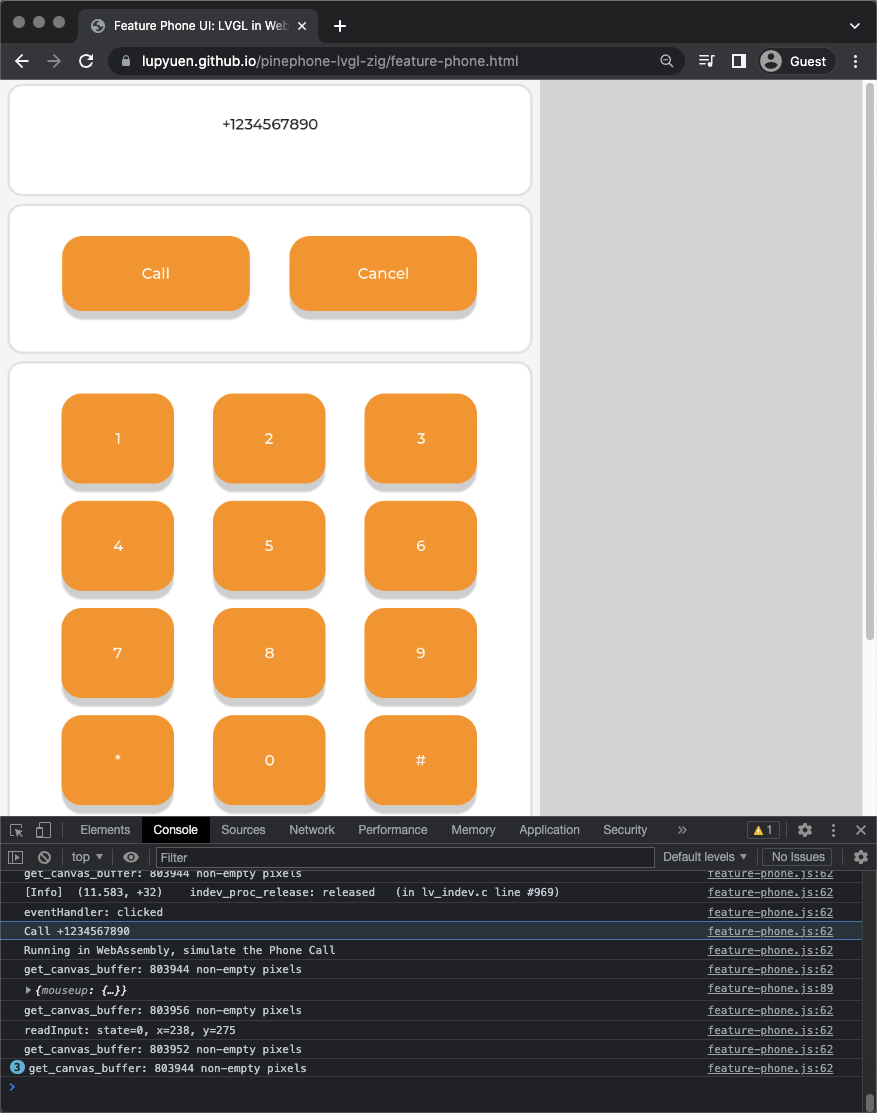
Handling LVGL Buttons in our Feature Phone UI
Our LVGL App runs in a Web Browser with WebAssembly…
Will it run on PinePhone?
Yep the exact same LVGL App runs on PinePhone with Apache NuttX RTOS!
The magic happens here: feature-phone.zig
/// Import the functions specific to WebAssembly
/// and Apache NuttX RTOS into the Global Namespace
pub usingnamespace

  // Depending on the Target CPU Architecture...
  switch (builtin.cpu.arch) {

    // Import WebAssembly-Specific Functions from `wasm.zig`
    .wasm32, .wasm64 => @import("wasm.zig"),

    // Or import NuttX-Specific Functions from `nuttx.zig`
    else => @import("nuttx.zig"),
  };
Depending on the Target CPU Architecture, our Zig LVGL App imports either…
Let’s dive into the Platform-Specific Functions…
wasm.zig defines the LVGL Functions specific to WebAssembly…
The LVGL Display and LVGL Input Functions above are called by our JavaScript…
What about PinePhone on Apache NuttX RTOS?
Thankfully most of the above LVGL Functions are already implemented by Apache NuttX RTOS.
nuttx.zig defines the following functions that are needed by the Zig Runtime…
Feature Phone UI on PinePhone and Apache NuttX RTOS
We’re finally ready to run our Feature Phone UI… On a real Phone!
We compile our Zig LVGL App for PinePhone and Apache NuttX RTOS…
(With the exact same Zig Source File tested on WebAssembly)
## TODO: Change ".." to your NuttX Project Directory
## Compile the Zig LVGL App for PinePhone
## (armv8-a with cortex-a53)
zig build-obj \
  --verbose-cimport \
  -target aarch64-freestanding-none \
  -mcpu cortex_a53 \
  -isystem "../nuttx/include" \
  -I "../apps/graphics/lvgl" \
  feature-phone.zig \
  ...

## Copy the compiled Zig LVGL App to NuttX and overwrite `lv_demo_widgets.*.o`
cp feature-phone.o \
  ../apps/graphics/lvgl/lvgl/demos/widgets/lv_demo_widgets.*.o

## Link the compiled Zig LVGL App with NuttX
## https://lupyuen.codeberg.page/articles/lvgl2#appendix-build-apache-nuttx-rtos-for-pinephone
## https://lupyuen.codeberg.page/articles/lvgl2#appendix-boot-apache-nuttx-rtos-on-pinephone
cd ../nuttx
makeWe copy the NuttX Image to a microSD Card, boot it on PinePhone.
At the NuttX Prompt, enter this command to start our LVGL App…
NuttShell (NSH) NuttX-12.0.3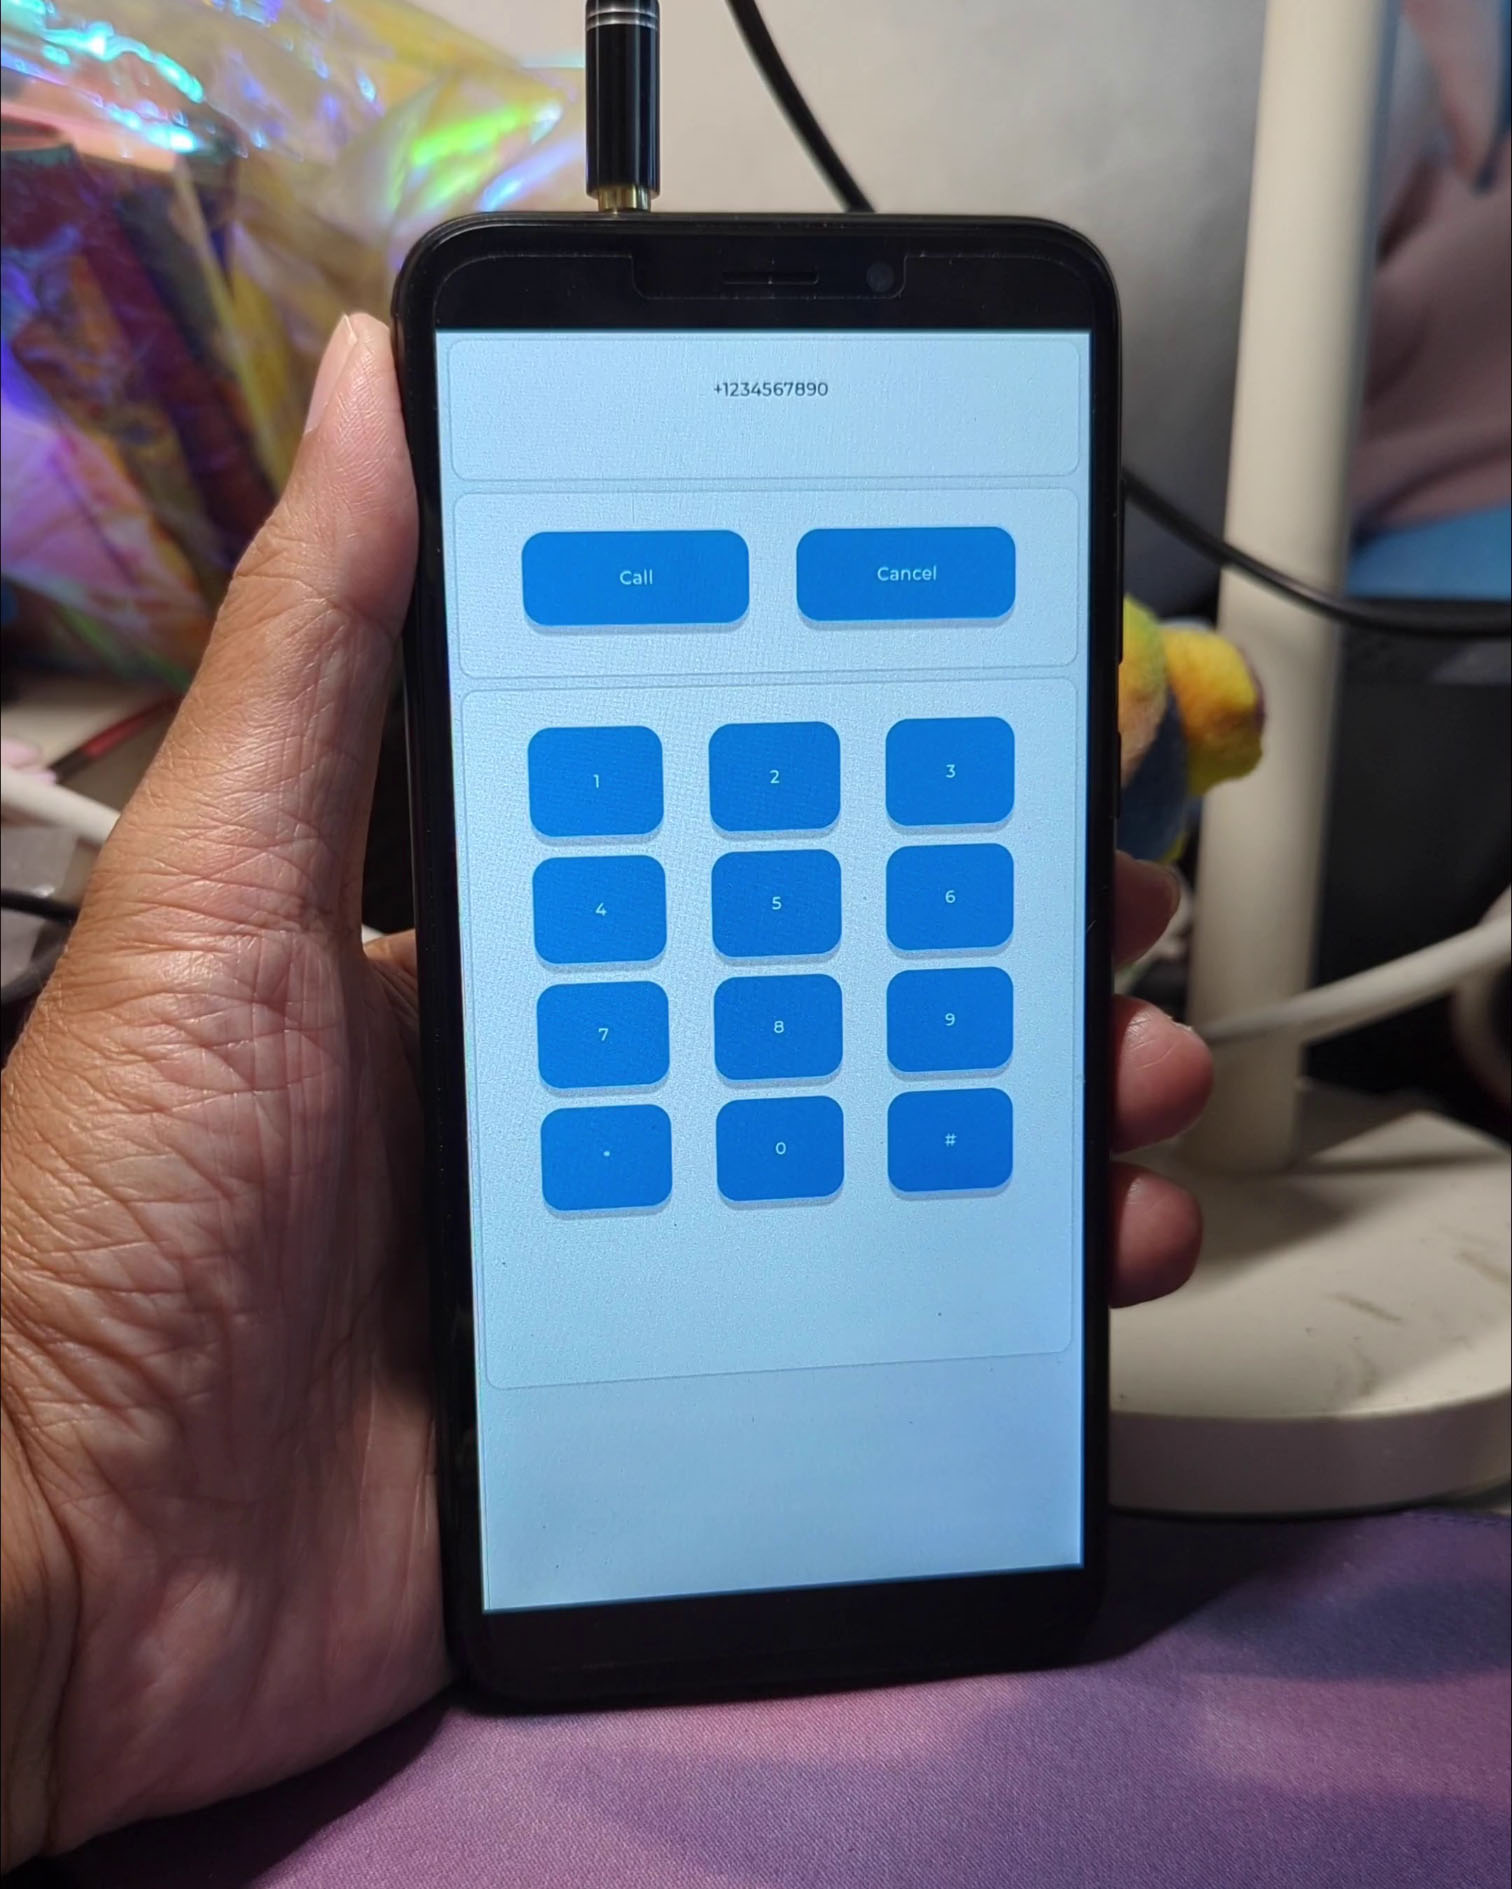
nsh> lvgldemoAnd our Feature Phone UI runs on PinePhone with NuttX yay! (Pic above)
The exact same Zig Source File runs on both WebAssembly and PinePhone, no changes needed!
Looks like a fun new way to build and test LVGL Apps…
First in the Web Browser, then on the Actual Device!
Yep potentially! But first we need to tidy up…
Live Reloading: Whenever we save our Zig LVGL App, it auto-recompiles and auto-reloads the WebAssembly HTML
Compile the entire LVGL Library to WebAssembly
Remove the dependency on NuttX Build Files
Complete our implementation of Memory Allocator
Make actual Phone Calls on PinePhone
Today we successfully created an LVGL App for PinePhone… By tweaking and testing in a Web Browser!
We compiled LVGL Library from C to WebAssembly with Zig Compiler
We wrote our LVGL App in the Zig Programming Language (instead of C)
Our LVGL App in Zig looks (somewhat) cleaner and simpler than C (except for the Opaque Types)
Exact same code runs in a Web Browser and on PinePhone with Apache NuttX RTOS
Which is super helpful for prototyping LVGL Apps
Maybe we’ve discovered the easier way to build and test LVGL Apps… Thanks to our Web Browser!
Please check out the other articles on NuttX for PinePhone…
Many Thanks to my GitHub Sponsors for supporting my work! This article wouldn’t have been possible without your support.
Got a question, comment or suggestion? Create an Issue or submit a Pull Request here…
lupyuen.github.io/src/lvgl4.md
The code in this article was tested with Zig Compiler version 0.10.0.
For new versions of Zig Compiler, check out the updates by WhiteHexagon
The Colours for PinePhone vs JavaScript Canvas are swapped, probably ARGB vs RGBA. (See this)
Loading Multiple Fonts? (See this)
What’s inside the HTML Page for our LVGL App in WebAssembly?
Our HTML Page defines a HTML Canvas for rendering the LVGL Display: feature-phone.html
<!doctype html>
<!-- From https://dev.to/sleibrock/webassembly-with-zig-pt-ii-ei7 -->
<html>
  <head>
    <title>Feature Phone UI: LVGL in WebAssembly with Zig</title>
  </head>
  <body style="margin: 0; background-color: lightgrey;">

    <!-- HTML Canvas for rendering LVGL Display -->
    <canvas id="lvgl_canvas" width="720" height="1280">
      Browser does not support HTML5 canvas element
    </canvas>

  </body>
  <!-- Load and execute the LVGL JavaScript -->
  <script src="feature-phone.js"></script>
</html>
Then our HTML Page loads and executes our JavaScript…
What’s inside the JavaScript for our LVGL App in WebAssembly?
Our JavaScript will…
Load the WebAssembly Module (compiled from Zig and C)
Import Zig Functions into JavaScript
Export JavaScript Functions to Zig
Run the Main JavaScript Function
Let’s walk through the JavaScript…
Our JavaScript loads the WebAssembly Module (feature-phone.wasm) generated by Zig Compiler: feature-phone.js
// Render LVGL in WebAssembly, compiled with Zig Compiler. Based on...
// https://github.com/daneelsan/minimal-zig-wasm-canvas/blob/master/script.js
// https://github.com/daneelsan/zig-wasm-logger/blob/master/script.js

// Load the WebAssembly Module and start the Main Function
async function bootstrap() {

  // Load the WebAssembly Module `feature-phone.wasm`
  // https://developer.mozilla.org/en-US/docs/WebAssembly/JavaScript_interface/instantiateStreaming
  const result = await WebAssembly.instantiateStreaming(
    fetch("feature-phone.wasm"),
    importObject
  );

  // Store references to WebAssembly Functions
  // and Memory exported by Zig
  wasm.init(result);

  // Start the Main Function
  main();
}

// Start the loading of WebAssembly Module
bootstrap();
Then our script imports the Zig Functions and calls the Main JavaScript Function. (See below)
Our script defines the JavaScript Module wasm that will store the WebAssembly Functions and Memory imported from Zig: feature-phone.js
// Log WebAssembly Messages from Zig to JavaScript Console
// https://github.com/daneelsan/zig-wasm-logger/blob/master/script.js
const text_decoder = new TextDecoder();
let console_log_buffer = "";

// WebAssembly Helper Functions
const wasm = {
  // WebAssembly Instance
  instance: undefined,

  // Init the WebAssembly Instance.
  // Store references to WebAssembly Functions and Memory exported by Zig
  init: function (obj) {
    this.instance = obj.instance;
  },

  // Fetch the Zig String from a WebAssembly Pointer
  getString: function (ptr, len) {
    const memory = this.instance.exports.memory;
    return text_decoder.decode(
      new Uint8Array(memory.buffer, ptr, len)
    );
  },
};
getString will be called by our Zig Logger for LVGL…
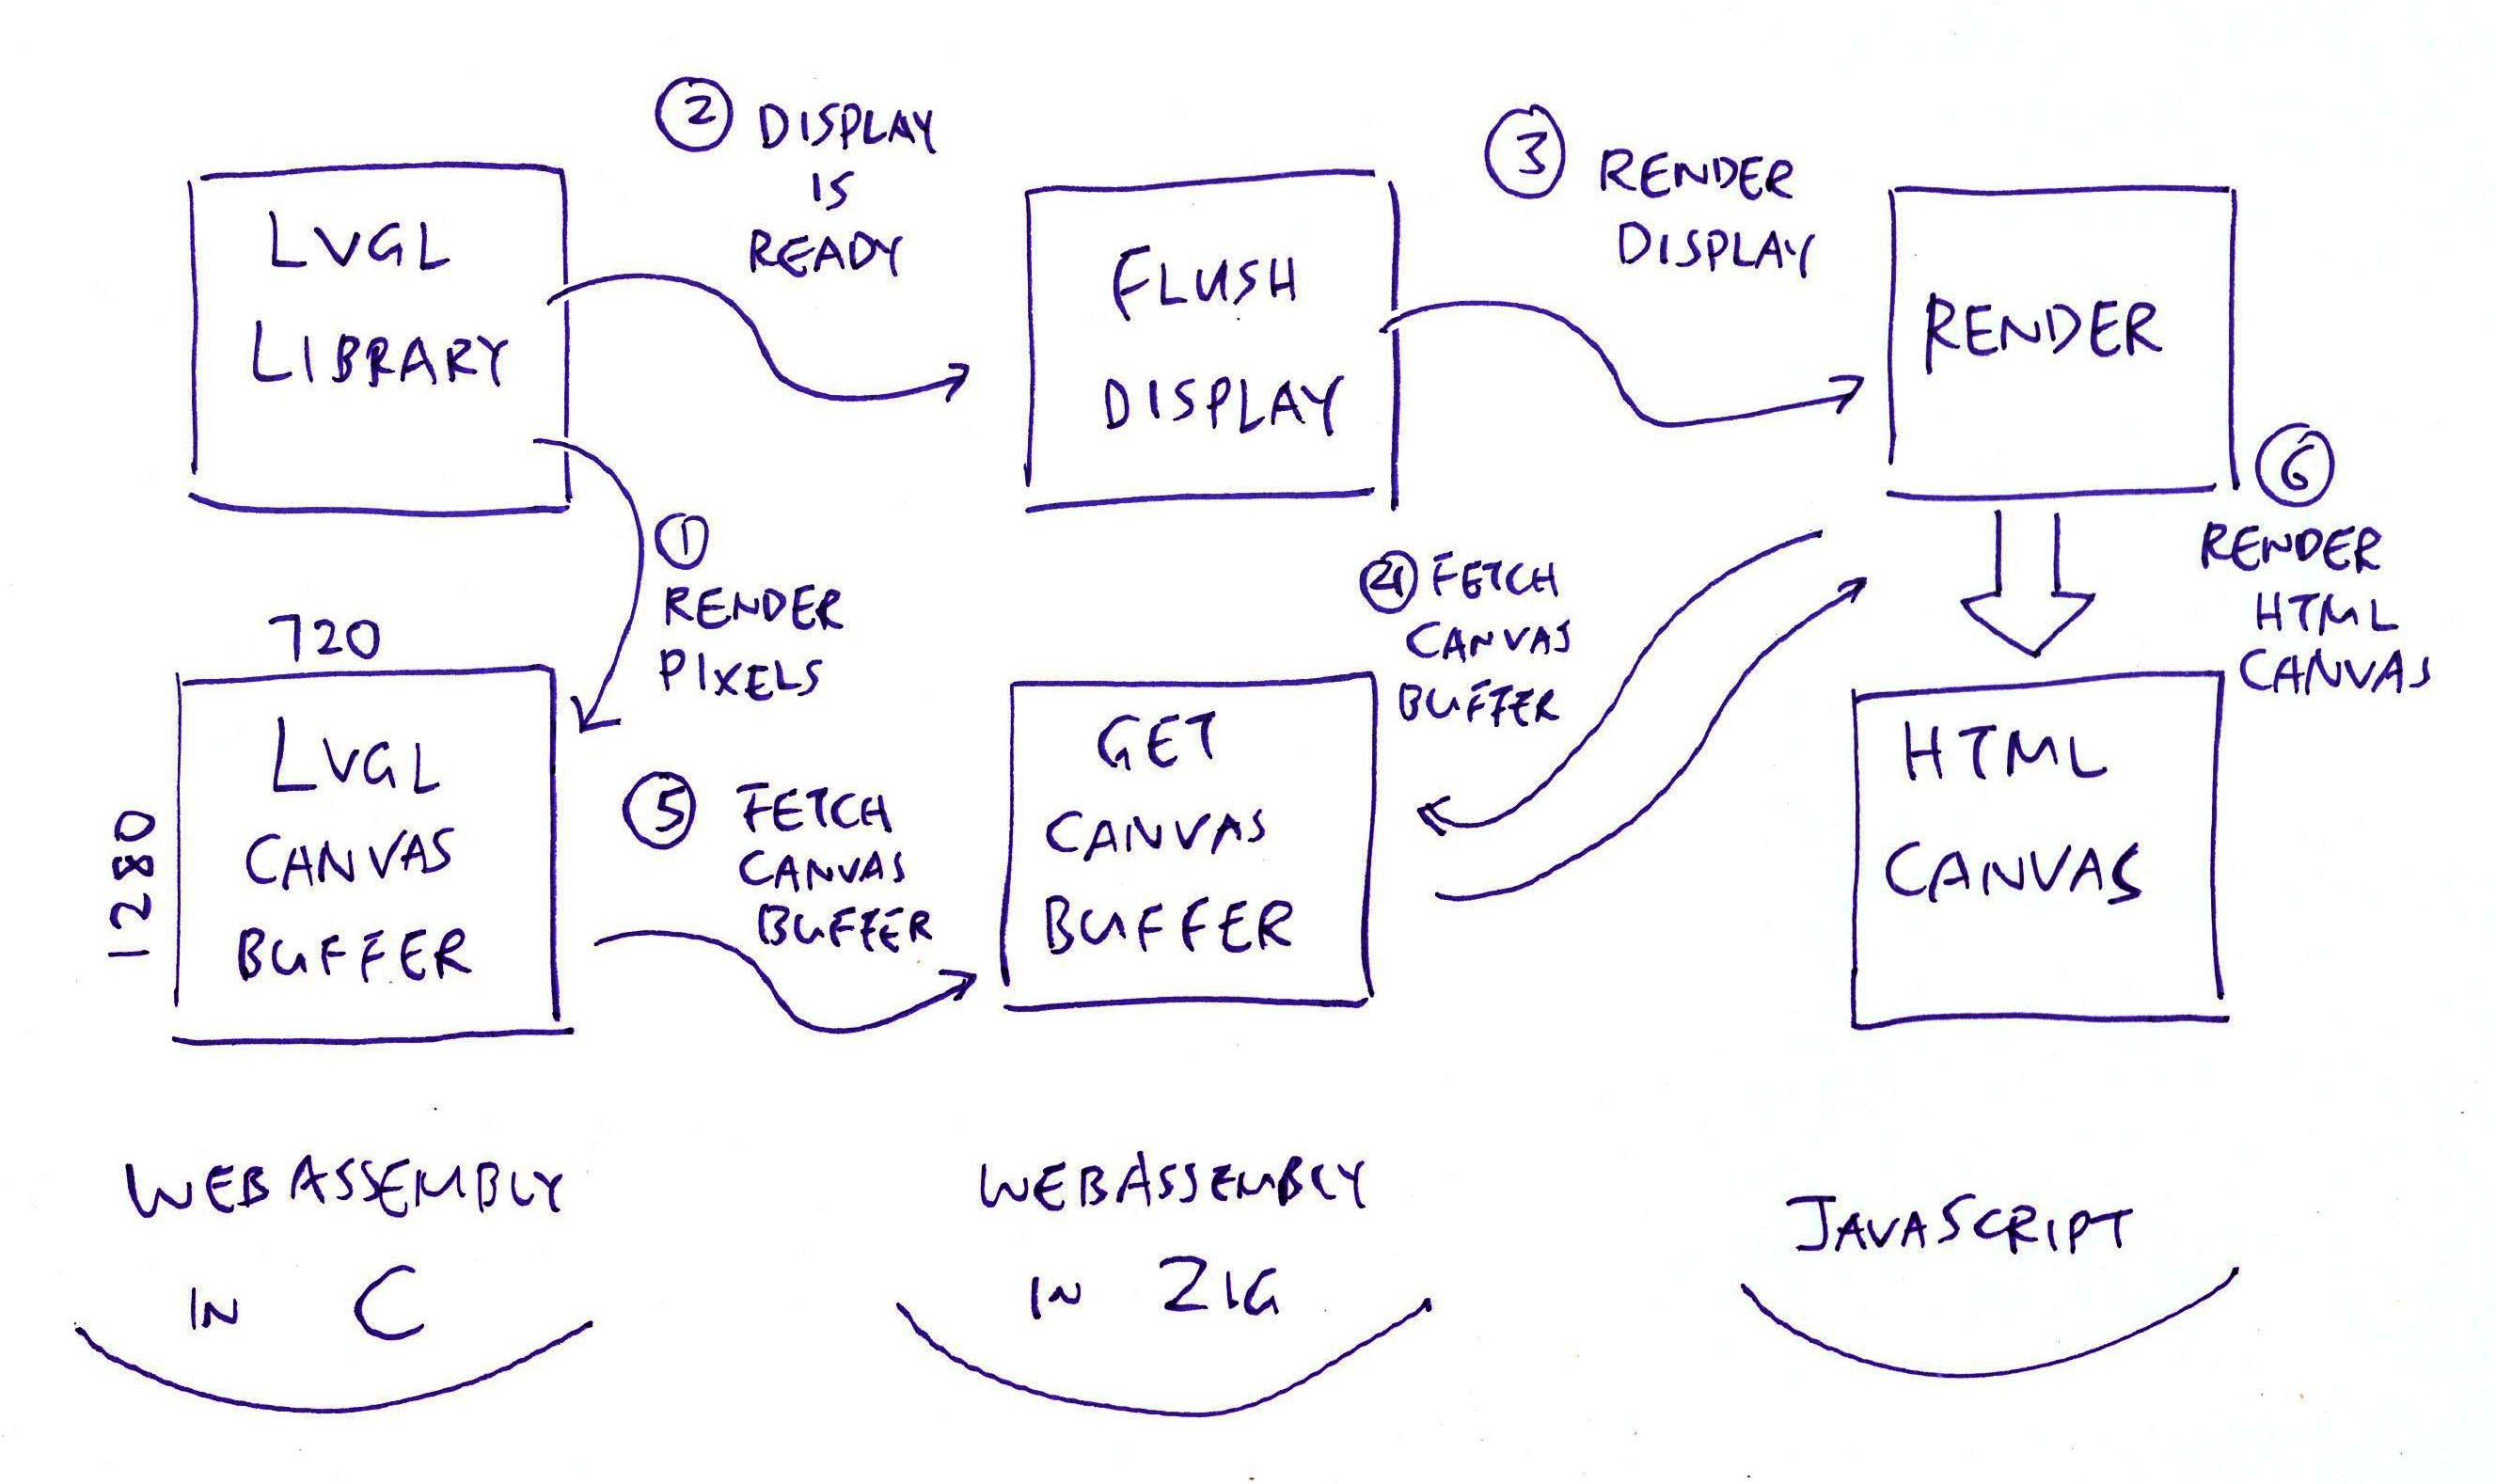
Our script exports the JavaScript Function render to Zig: feature-phone.js
// Export JavaScript Functions to Zig
const importObject = {
  // JavaScript Functions exported to Zig
  env: {
    // Render the LVGL Canvas from Zig to HTML
    // https://github.com/daneelsan/minimal-zig-wasm-canvas/blob/master/script.js
    render: function() {  // TODO: Add width and height

      // Get the WebAssembly Pointer to the LVGL Canvas Buffer
      const bufferOffset = wasm.instance.exports
        .getCanvasBuffer();

      // Load the WebAssembly Pointer into a JavaScript Image Data
      const memory = wasm.instance.exports.memory;
      const ptr = bufferOffset;
      const len = (canvas.width * canvas.height) * 4;
      const imageDataArray = new Uint8Array(memory.buffer, ptr, len)
      imageData.data.set(imageDataArray);

      // Render the Image Data to the HTML Canvas
      context.clearRect(0, 0, canvas.width, canvas.height);
      context.putImageData(imageData, 0, 0);
    },
render will be called by our Zig Function for LVGL Display…
Our script also exports the JavaScript Functions jsConsoleLogWrite and jsConsoleLogFlush to Zig…
    // Write to JavaScript Console from Zig
    // https://github.com/daneelsan/zig-wasm-logger/blob/master/script.js
    jsConsoleLogWrite: function(ptr, len) {
      console_log_buffer += wasm.getString(ptr, len);
    },

    // Flush JavaScript Console from Zig
    // https://github.com/daneelsan/zig-wasm-logger/blob/master/script.js
    jsConsoleLogFlush: function() {
      console.log(console_log_buffer);
      console_log_buffer = "";
    },
  }
};
Which will be called by our Zig Logger for LVGL…
Our Main JavaScript Function will…
Intialise the LVGL Display and Input in Zig
Render the LVGL Widgets in Zig
Handle the LVGL Timer in Zig, to execute LVGL Tasks periodically
Like so: feature-phone.js
// Get the HTML Canvas Context and Image Data
const canvas = window.document.getElementById("lvgl_canvas");
const context = canvas.getContext("2d");
const imageData = context.createImageData(canvas.width, canvas.height);
context.clearRect(0, 0, canvas.width, canvas.height);

// Main Function
function main() {
  // Remember the Start Time
  const start_ms = Date.now();

  // Fetch the imported Zig Functions
  const zig = wasm.instance.exports;

  // Init the LVGL Display and Input
  // https://lupyuen.codeberg.page/articles/lvgl4#appendix-initialise-lvgl
  zig.initDisplay();

  // Render the LVGL Widgets in Zig
  zig.lv_demo_widgets();

  // Render Loop
  const loop = function() {

    // Compute the Elapsed Milliseconds
    const elapsed_ms = Date.now() - start_ms;

    // Handle LVGL Tasks to update the display
    // https://lupyuen.codeberg.page/articles/lvgl4#appendix-handle-lvgl-timer
    zig.handleTimer(elapsed_ms);

    // Loop to next frame
    window.requestAnimationFrame(loop);
  };

  // Start the Render Loop
  loop();
};
Next we talk about LVGL Initialisation, Input and Timer…
How do we initialise LVGL Library in our JavaScript?
In our JavaScript Main Function, we call Zig Function initDisplay at startup: feature-phone.js
// Main Function
function main() {
  // Fetch the imported Zig Functions
  const zig = wasm.instance.exports;

  // Init the LVGL Display and Input
  // https://lupyuen.codeberg.page/articles/lvgl4#appendix-initialise-lvgl
  zig.initDisplay();

  // Render the LVGL Widgets in Zig
  zig.lv_demo_widgets();
initDisplay (in Zig) will…
Create the Memory Allocator (for malloc)
Set the LVGL Custom Logger (with lv_log_register_print_cb)
Initialise the LVGL Library (with lv_init)
Initialise the LVGL Display
Initialise the LVGL Input
Like so: wasm.zig
/// Init the LVGL Display and Input
pub export fn initDisplay() void {

  // Create the Memory Allocator for malloc
  // https://lupyuen.codeberg.page/articles/lvgl3#appendix-lvgl-memory-allocation
  memory_allocator = std.heap.FixedBufferAllocator.init(&memory_buffer);

  // Set the Custom Logger for LVGL
  // https://lupyuen.codeberg.page/articles/lvgl3#webassembly-logger-for-lvgl
  c.lv_log_register_print_cb(custom_logger);

  // Init LVGL
  // https://lupyuen.codeberg.page/articles/lvgl3#initialise-lvgl-display
  c.lv_init();

  // Fetch pointers to Display Driver and Display Buffer
  const disp_drv = c.get_disp_drv();
  const disp_buf = c.get_disp_buf();

  // Init Display Buffer and Display Driver as pointers
  // https://lupyuen.codeberg.page/articles/lvgl3#initialise-lvgl-display
  c.init_disp_buf(disp_buf);
  c.init_disp_drv(
    disp_drv,     // Display Driver
    disp_buf,     // Display Buffer
    flushDisplay, // Callback Function to Flush Display
    720,          // Horizontal Resolution
    1280          // Vertical Resolution
  );

  // Register the Display Driver
  // https://lupyuen.codeberg.page/articles/lvgl3#initialise-lvgl-display
  const disp = c.lv_disp_drv_register(disp_drv);
  _ = disp;

  // Register the Input Device
  // https://lupyuen.codeberg.page/articles/lvgl4#appendix-initialise-lvgl-input
  indev_drv = std.mem.zeroes(c.lv_indev_drv_t);
  c.lv_indev_drv_init(&indev_drv);
  indev_drv.type    = c.LV_INDEV_TYPE_POINTER;
  indev_drv.read_cb = readInput;
  _ = c.register_input(&indev_drv);
}
Let’s talk about LVGL Input…
How does Zig initialise LVGL Input at startup?
In the previous section we saw that initDisplay (in Zig) initialises the LVGL Input at startup: wasm.zig
/// LVGL Input Device Driver
var indev_drv: c.lv_indev_drv_t = undefined;

/// Init the LVGL Display and Input
pub export fn initDisplay() void {

  // Omitted: Register the Display Driver
  // https://lupyuen.codeberg.page/articles/lvgl3#initialise-lvgl-display
  ...

  // Init the Input Device Driver
  // https://docs.lvgl.io/8.3/porting/indev.html
  indev_drv = std.mem.zeroes(c.lv_indev_drv_t);
  c.lv_indev_drv_init(&indev_drv);

  // Set the Input Driver Type and Callback Function
  indev_drv.type    = c.LV_INDEV_TYPE_POINTER;
  indev_drv.read_cb = readInput;

  // Register the Input Device
  _ = c.register_input(&indev_drv);
}(lv_indev_drv_init initialises the LVGL Input Device Driver Struct)
This tells LVGL to call our Zig Function readInput periodically to poll for Mouse and Touch Input.
What’s register_input?
The LVGL Input Device Struct lv_indev_t is an Opaque Type, which is inaccessible in Zig.
To work around this, we define register_input in C (instead of Zig) to register the LVGL Input Device: display.c
// Register the LVGL Input Device Driver
// and return the LVGL Input Device
// https://docs.lvgl.io/8.3/porting/indev.html
void *register_input(lv_indev_drv_t *indev_drv) {
  lv_indev_t *indev = lv_indev_drv_register(indev_drv);
  LV_ASSERT(indev != NULL);
  return indev;
}
Now we can handle the LVGL Input in Zig and JavaScript…
How do we handle LVGL Mouse Input and Touch Input?
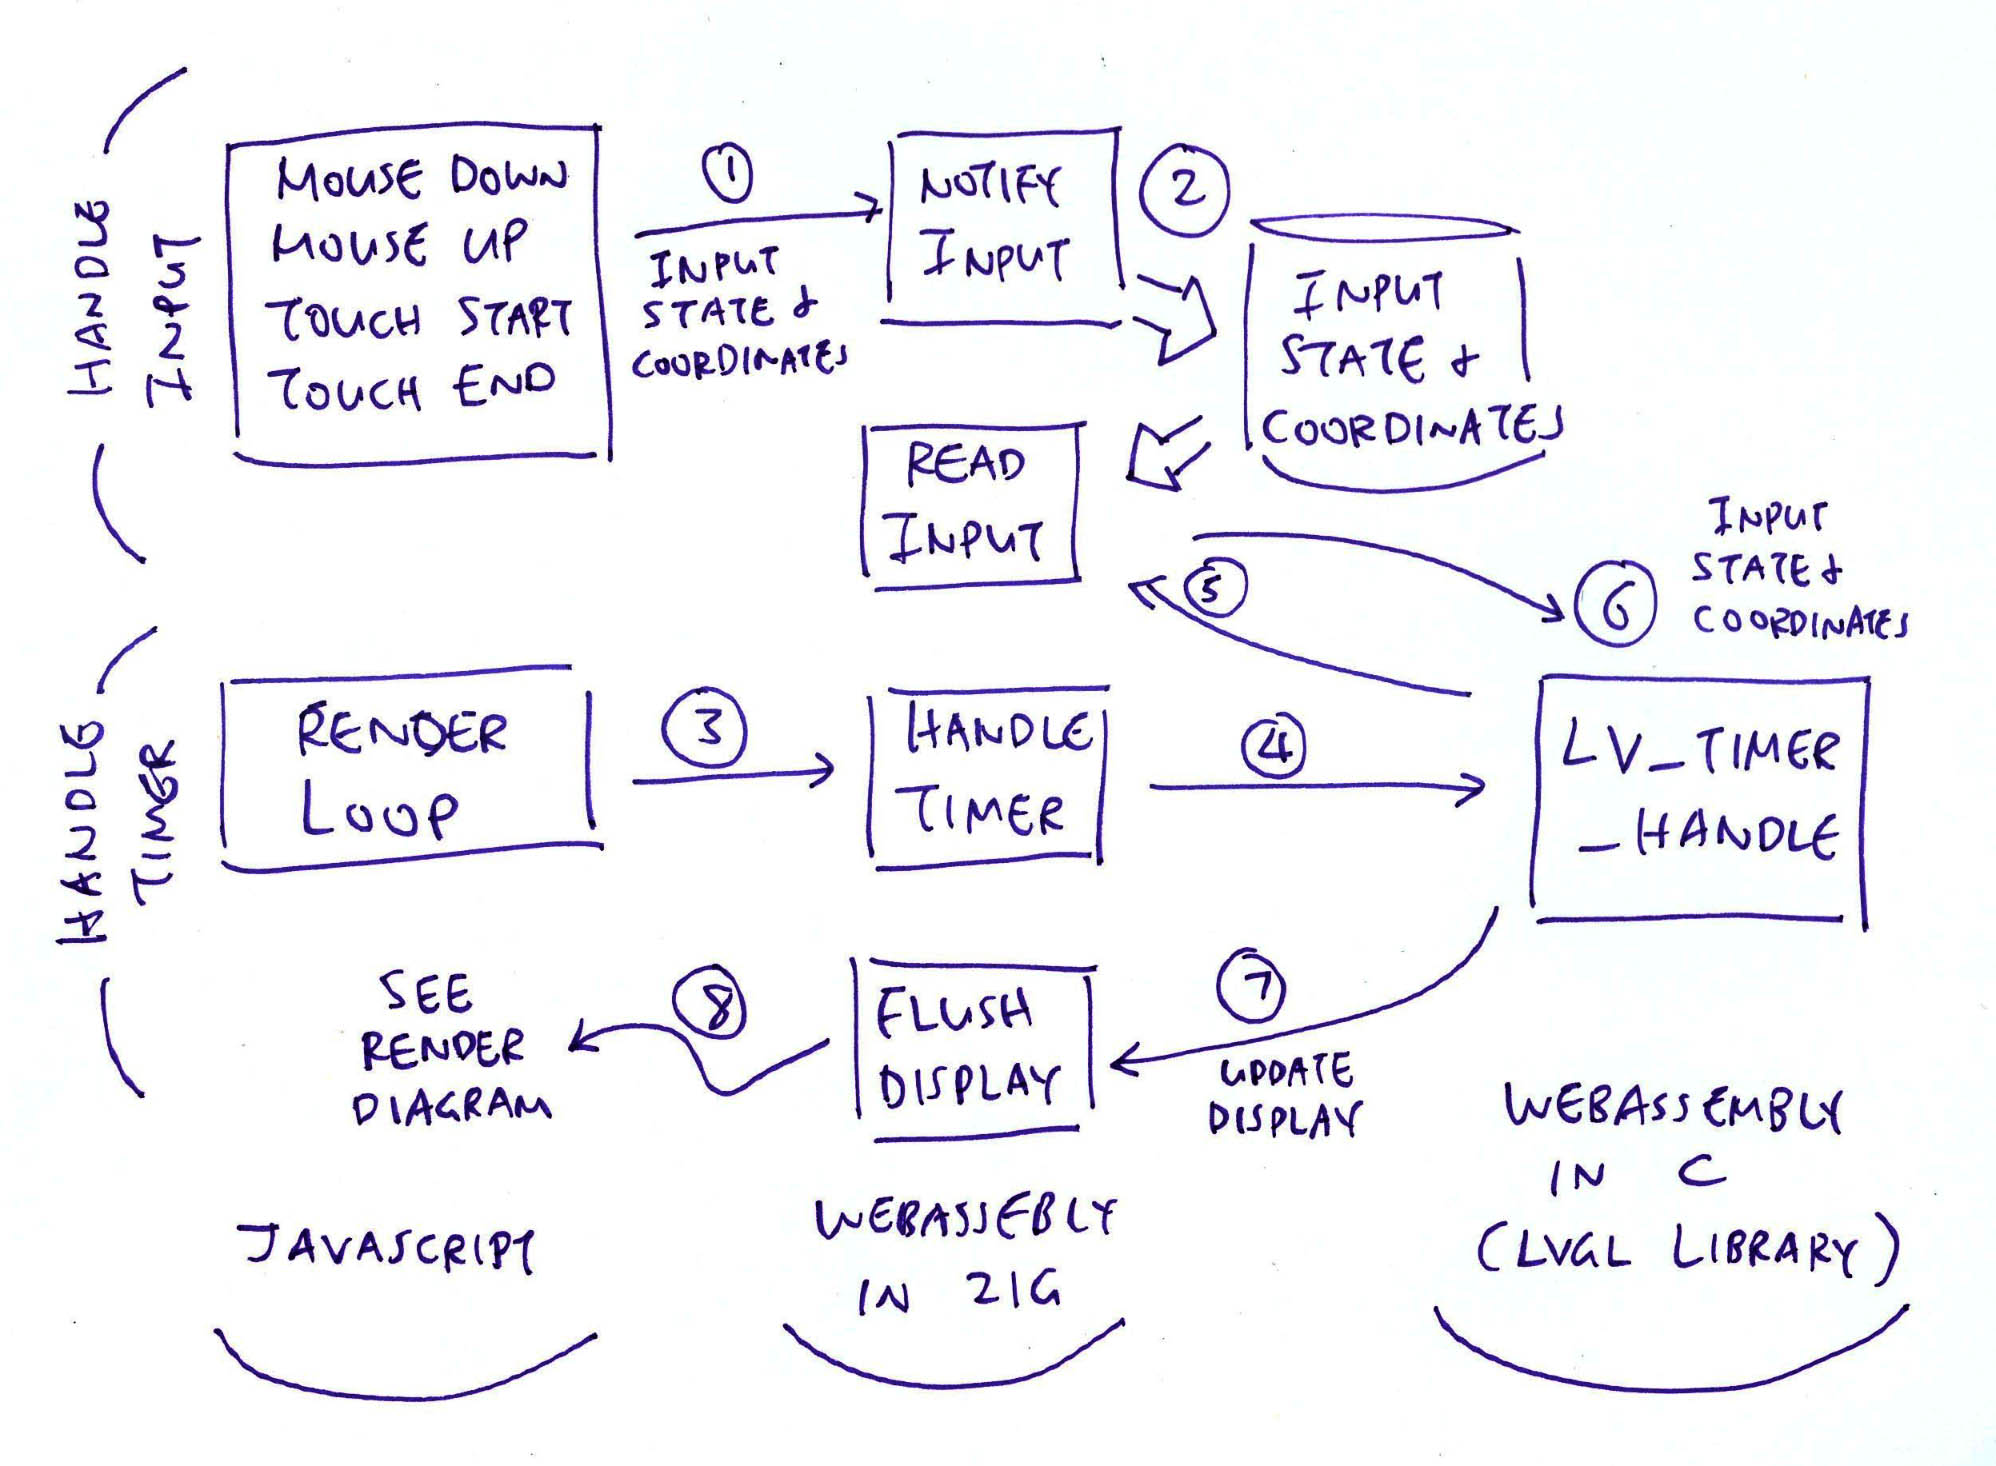
In our JavaScript, we capture the Mouse Down and Mouse Up events (pic above): feature-phone.js
// Handle Mouse Down on HTML Canvas
canvas.addEventListener("mousedown", (e) => {
  // Notify Zig of Mouse Down
  const x = e.offsetX;
  const y = e.offsetY;
  wasm.instance.exports
    .notifyInput(1, x, y);  // TODO: Handle LVGL not ready
});

// Handle Mouse Up on HTML Canvas
canvas.addEventListener("mouseup", (e) => {
  // Notify Zig of Mouse Up
  x = e.offsetX;
  y = e.offsetY;
  wasm.instance.exports
    .notifyInput(0, x, y);  // TODO: Handle LVGL not ready
});
And call notifyInput (in Zig) to handle the events, passing the…
Input State: Mouse Down or Mouse Up
Input Coordinates: X and Y
We do the same for Touch Start and Touch End events…
// Handle Touch Start on HTML Canvas
canvas.addEventListener("touchstart", (e) => {
  // Notify Zig of Touch Start
  e.preventDefault();
  const touches = e.changedTouches;
  if (touches.length == 0) { return; }

  // Assume that HTML Canvas is at (0,0)
  const x = touches[0].pageX;
  const y = touches[0].pageY;
  wasm.instance.exports
    .notifyInput(1, x, y);  // TODO: Handle LVGL not ready
});

// Handle Touch End on HTML Canvas
canvas.addEventListener("touchend", (e) => {
  // Notify Zig of Touch End
  e.preventDefault();
  const touches = e.changedTouches;
  if (touches.length == 0) { return; }

  // Assume that HTML Canvas is at (0,0)
  const x = touches[0].pageX;
  const y = touches[0].pageY;
  wasm.instance.exports
    .notifyInput(0, x, y);  // TODO: Handle LVGL not ready
});
Which will work on Touch Devices. (Like our Phones)
What happens inside notifyInput?
notifyInput (in Zig) comes from our WebAssembly-Specific Module. It saves the Input State and Input Coordinates passed by our JavaScript: wasm.zig
/// Called by JavaScript to notify Mouse Down and Mouse Up.
/// Return 1 if we're still waiting for LVGL to process the last input.
export fn notifyInput(pressed: i32, x: i32, y: i32) i32 {

  // If LVGL hasn't processed the last input, try again later
  if (input_updated) { return 1; }

  // Save the Input State and Input Coordinates
  if (pressed == 0) { input_state = c.LV_INDEV_STATE_RELEASED; }
  else              { input_state = c.LV_INDEV_STATE_PRESSED; }
  input_x = @intCast(c.lv_coord_t, x);
  input_y = @intCast(c.lv_coord_t, y);
  input_updated = true;
  return 0;
}

/// True if LVGL Input State has been updated
var input_updated: bool = false;

/// LVGL Input State and Coordinates
var input_state: c.lv_indev_state_t = 0;
var input_x: c.lv_coord_t = 0;
var input_y: c.lv_coord_t = 0;
What happens to the saved Input State and Input Coordinates?
From the previous section, we saw that Zig sets readInput as the Callback Function for our LVGL Input Device: wasm.zig
/// Init the LVGL Display and Input
pub export fn initDisplay() void {
  ...
  // Set the Input Driver Type and Callback Function
  indev_drv.type    = c.LV_INDEV_TYPE_POINTER;
  indev_drv.read_cb = readInput;
This tells LVGL to call our Zig Function readInput periodically to poll for Mouse and Touch Input.
readInput (in Zig) comes from our WebAssembly-Specific Module: wasm.zig
/// LVGL Callback Function to read Input Device
export fn readInput(
  drv:  [*c]c.lv_indev_drv_t,  // LVGL Input Device Driver
  data: [*c]c.lv_indev_data_t  // LVGL Input Data to be returned
) void {
  _ = drv;
  if (input_updated) {
    input_updated = false;

    // Set the LVGL Input Data to be returned
    c.set_input_data(
      data,         // LVGL Input Data
      input_state,  // Input State (Mouse Up or Down)
      input_x,      // Input X
      input_y       // Input Y
    );
  }
}
readInput simply returns the Input State and Input Coordinates to LVGL.
What’s set_input_data?
The LVGL Input Data Struct lv_indev_data_t is an Opaque Type, which is inaccessible in Zig.
To work around this, we define set_input_data in C (instead of Zig) to set the LVGL Input Data: display.c
// Set the LVGL Input Device Data
// https://docs.lvgl.io/8.3/porting/indev.html#touchpad-mouse-or-any-pointer
void set_input_data(
  lv_indev_data_t *data,   // LVGL Input Data
  lv_indev_state_t state,  // Input State (Mouse Up or Down)
  lv_coord_t x,            // Input X
  lv_coord_t y             // Input Y
) {
  LV_ASSERT(data != NULL);
  data->state   = state;
  data->point.x = x;
  data->point.y = y;
}
And the LVGL Button will respond correctly to Mouse and Touch Input in the Web Browser! (Pic below)

Let’s find out how the LVGL Timer triggers the reading of LVGL Input…
What’s this LVGL Timer that’s called by our JavaScript?
According to the LVGL Docs, we need to call lv_timer_handler every few milliseconds to handle LVGL Tasks, which will…
Poll for LVGL Input
Redraw the LVGL Display
To execute LVGL Tasks periodically, we do this in our JavaScript Render Loop (pic above): feature-phone.js
// Main Function
function main() {
  // Remember the Start Time
  const start_ms = Date.now();

  // Fetch the imported Zig Functions
  const zig = wasm.instance.exports;

  // Init the LVGL Display and Input
  // https://lupyuen.codeberg.page/articles/lvgl4#appendix-initialise-lvgl
  zig.initDisplay();

  // Render the LVGL Widgets in Zig
  zig.lv_demo_widgets();

  // Render Loop
  const loop = function() {

    // Compute the Elapsed Milliseconds
    const elapsed_ms = Date.now() - start_ms;

    // Handle LVGL Tasks to update the display
    zig.handleTimer(elapsed_ms);

    // Loop to next frame
    window.requestAnimationFrame(loop);
  };

  // Start the Render Loop
  loop();
};
The above Render Loop (in JavaScript) calls handleTimer (in Zig) every few milliseconds.
handleTimer (in Zig) comes from our WebAssembly-Specific Module.
It executes LVGL Tasks by calling lv_timer_handler: wasm.zig
/// Called by JavaScript to execute LVGL Tasks
/// periodically, passing the Elapsed Milliseconds
export fn handleTimer(ms: i32) i32 {

  // Set the Elapsed Milliseconds,
  // don't allow time rewind
  if (ms > elapsed_ms) {
    elapsed_ms = @intCast(u32, ms);
  }

  // Handle LVGL Tasks
  _ = c.lv_timer_handler();
  return 0;
}
Which will poll for LVGL Input and redraw the LVGL Display.
What’s elapsed_ms?
elapsed_ms remembers the number of Elapsed Milliseconds (since startup): wasm.zig
/// Return the number of elapsed milliseconds
/// https://lupyuen.codeberg.page/articles/lvgl3#lvgl-porting-layer-for-webassembly
export fn millis() u32 {
  elapsed_ms += 1;
  return elapsed_ms;
}

/// Number of elapsed milliseconds
var elapsed_ms: u32 = 0;
The Elapsed Milliseconds is returned by our Zig Function millis, which is called by LVGL periodically…
To find out how we render the LVGL Display, check out the previous article…
How did we import the LVGL Library from C into Zig?
Our Zig Wrapper for LVGL calls @cImport to import the LVGL Header Files from C into Zig: lvgl.zig
/// Import the LVGL Library from C
pub const c = @cImport({

  // NuttX Defines
  @cDefine("__NuttX__", "");
  @cDefine("NDEBUG", "");

  // NuttX Header Files
  @cInclude("arch/types.h");
  @cInclude("../../nuttx/include/limits.h");
  @cInclude("stdio.h");
  @cInclude("nuttx/config.h");
  @cInclude("sys/boardctl.h");
  @cInclude("unistd.h");
  @cInclude("stddef.h");
  @cInclude("stdlib.h");

  // LVGL Header Files
  @cInclude("lvgl/lvgl.h");

  // LVGL Display Interface for Zig
  @cInclude("display.h");
});
Together with the NuttX Functions and other C Functions.
(display.h is the C Interface for our LVGL Display and Input Functions)
(display.c is the C Implementation)
According to the code above, we imported the LVGL Functions into the Namespace “c”…
// Import into Namespace `c`
pub const c = @cImport({ ... });
Which means that we’ll write “c.something” to call LVGL Functions from Zig…
// Call LVGL Function imported from C into Zig
const btn = c.lv_btn_create(cont);
(Zig Compiler calls Clang Compiler to parse the C Header Files)
But we call the LVGL Functions in two Zig Source Files: lvgl.zig AND feature-phone.zig…
That’s why we import the LVGL Wrapper lvgl.zig into our LVGL App feature-phone.zig: feature-phone.zig
/// Import the LVGL Module
const lvgl = @import("lvgl.zig");

/// Import the C Namespace
const c = lvgl.c;
And we import the C Namespace from lvgl.zig.
Thus both Zig Source Files can call LVGL Functions.
Why not import the LVGL Functions in feature-phone.zig?
Zig Compiler doesn’t like it when we call @cImport twice from different Source Files…
Zig Compiler will think that the LVGL Types are different. And we can’t pass the same LVGL Types across Source Files.
That’s why we call @cImport once, and import the C Namespace instead.