📝 5 Nov 2023
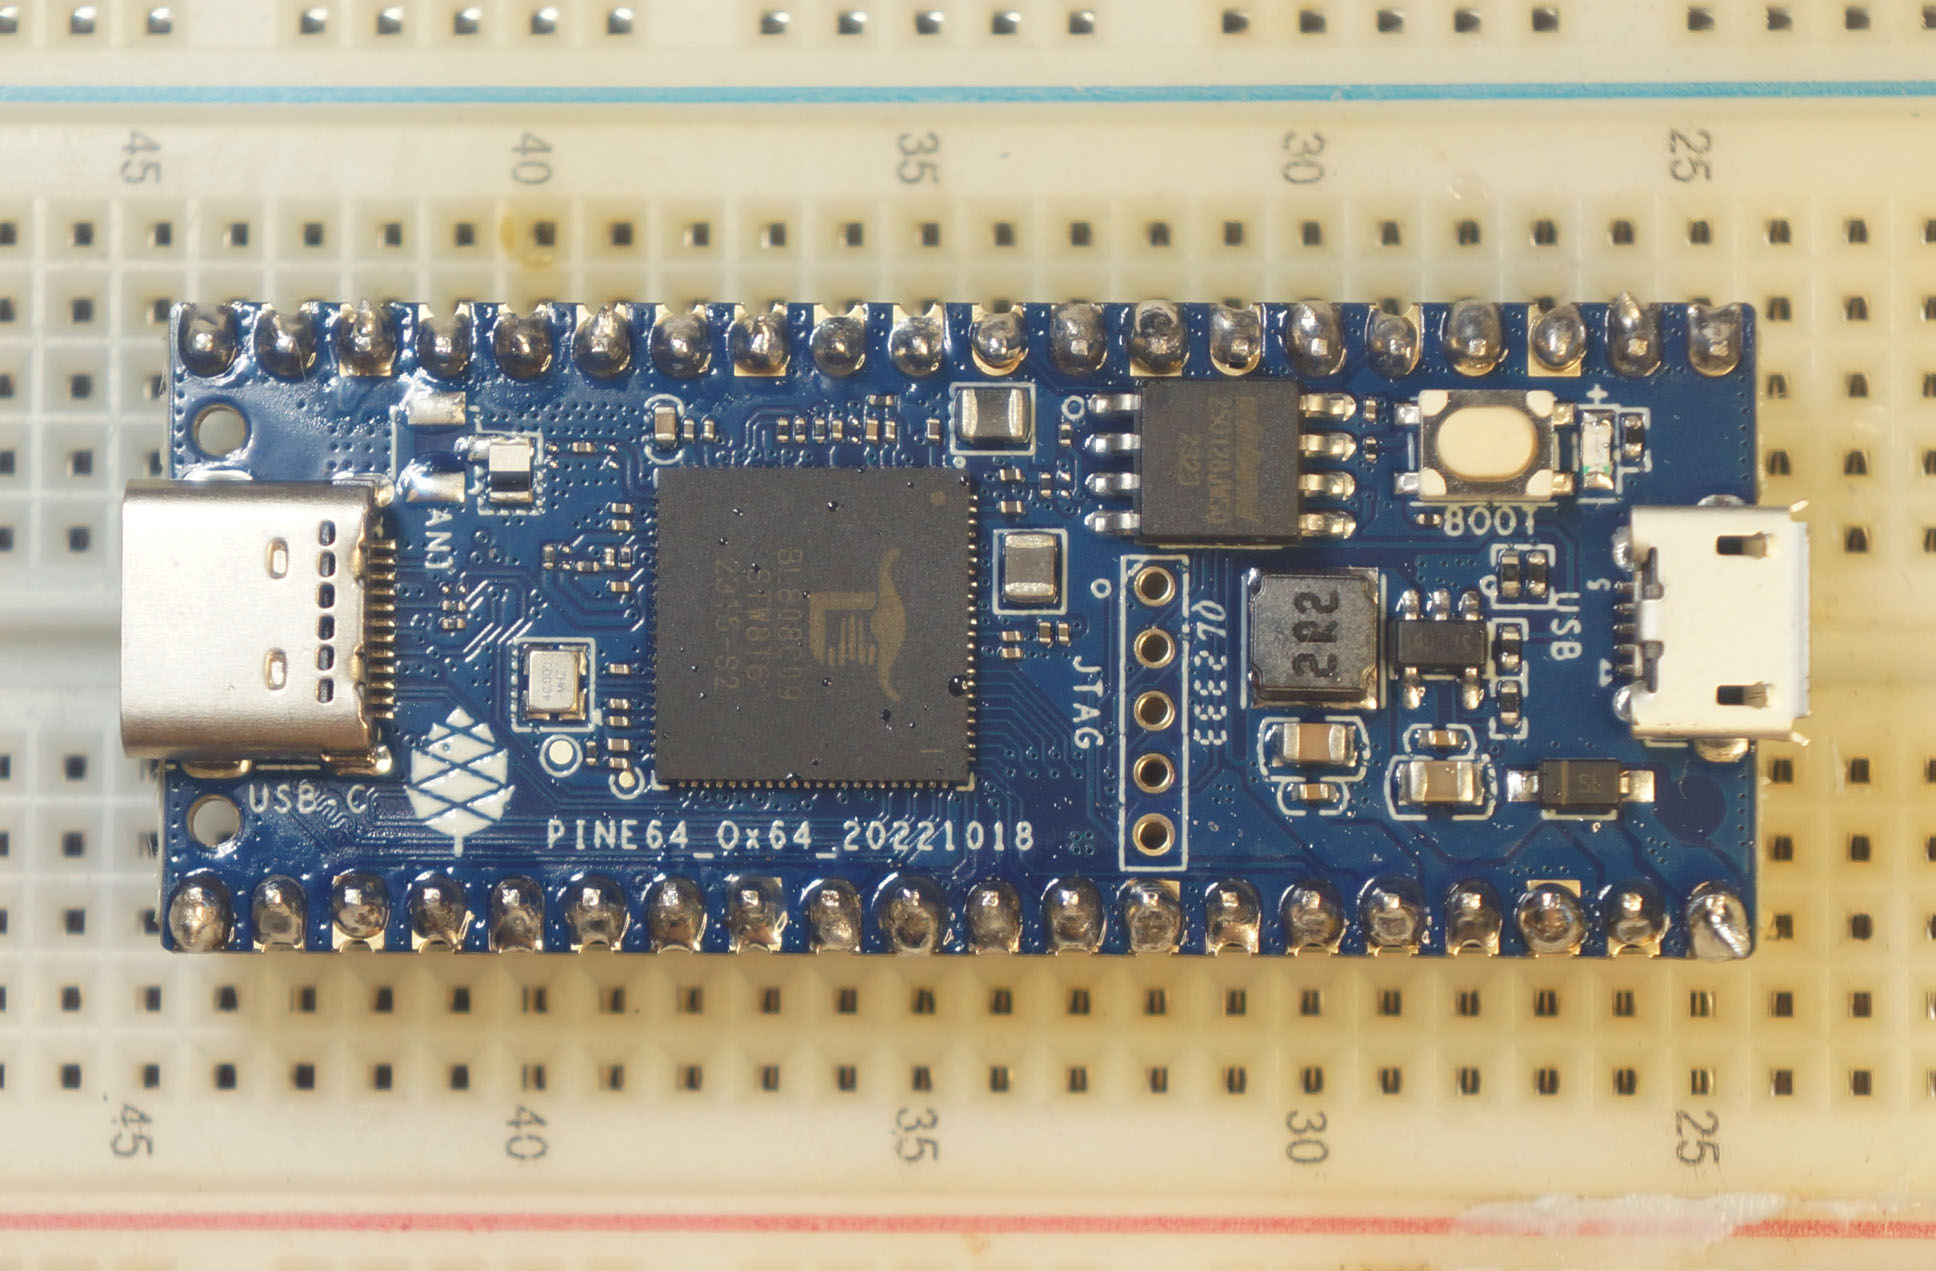
What’s this BL808? (Datasheet) (Reference Manual)
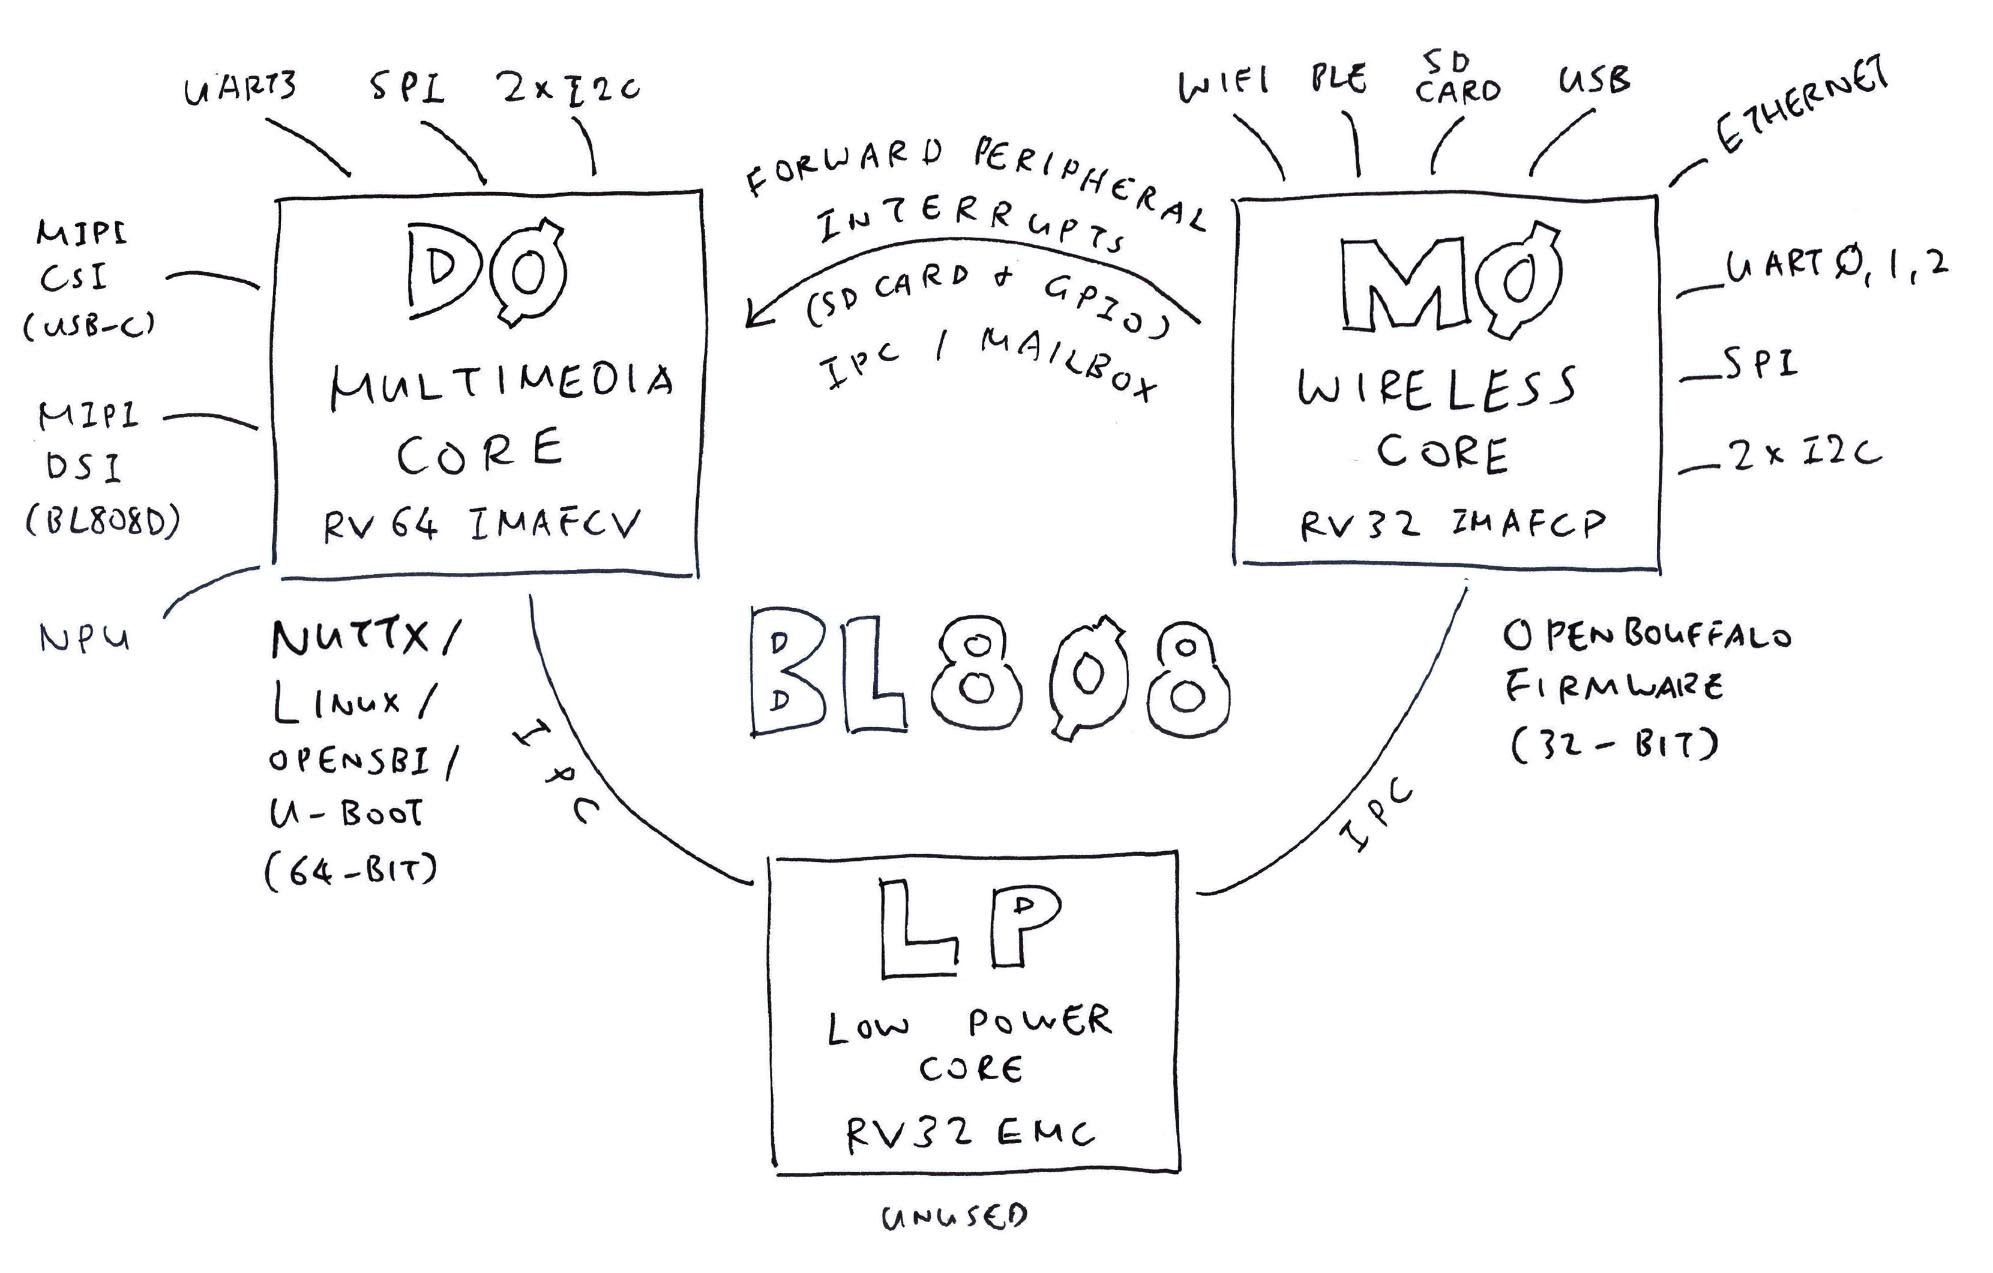
Bouffalo Lab BL808 SoC is a curiously complex creature with 3 (Asymmetric) RISC-V Cores (pic below)…
D0 Core: 64-bit T-Head C906 (RV64IMAFCV, 480 MHz)
Multimedia Core with MIPI CSI / DSI, Neural Processing Unit
Memory Management Unit is Sv39 with 128 / 256 / 512 TLB table entries. (Like Star64)
M0 Core: 32-bit T-Head E907 (RV32IMAFCP, 320 MHz)
Wireless + Peripherals Core with WiFi, Bluetooth LE, Zigbee, Audio, USB, Ethernet
Low Power Core: 32-bit T-Head E902 (RV32E[M]C, 150 MHz)
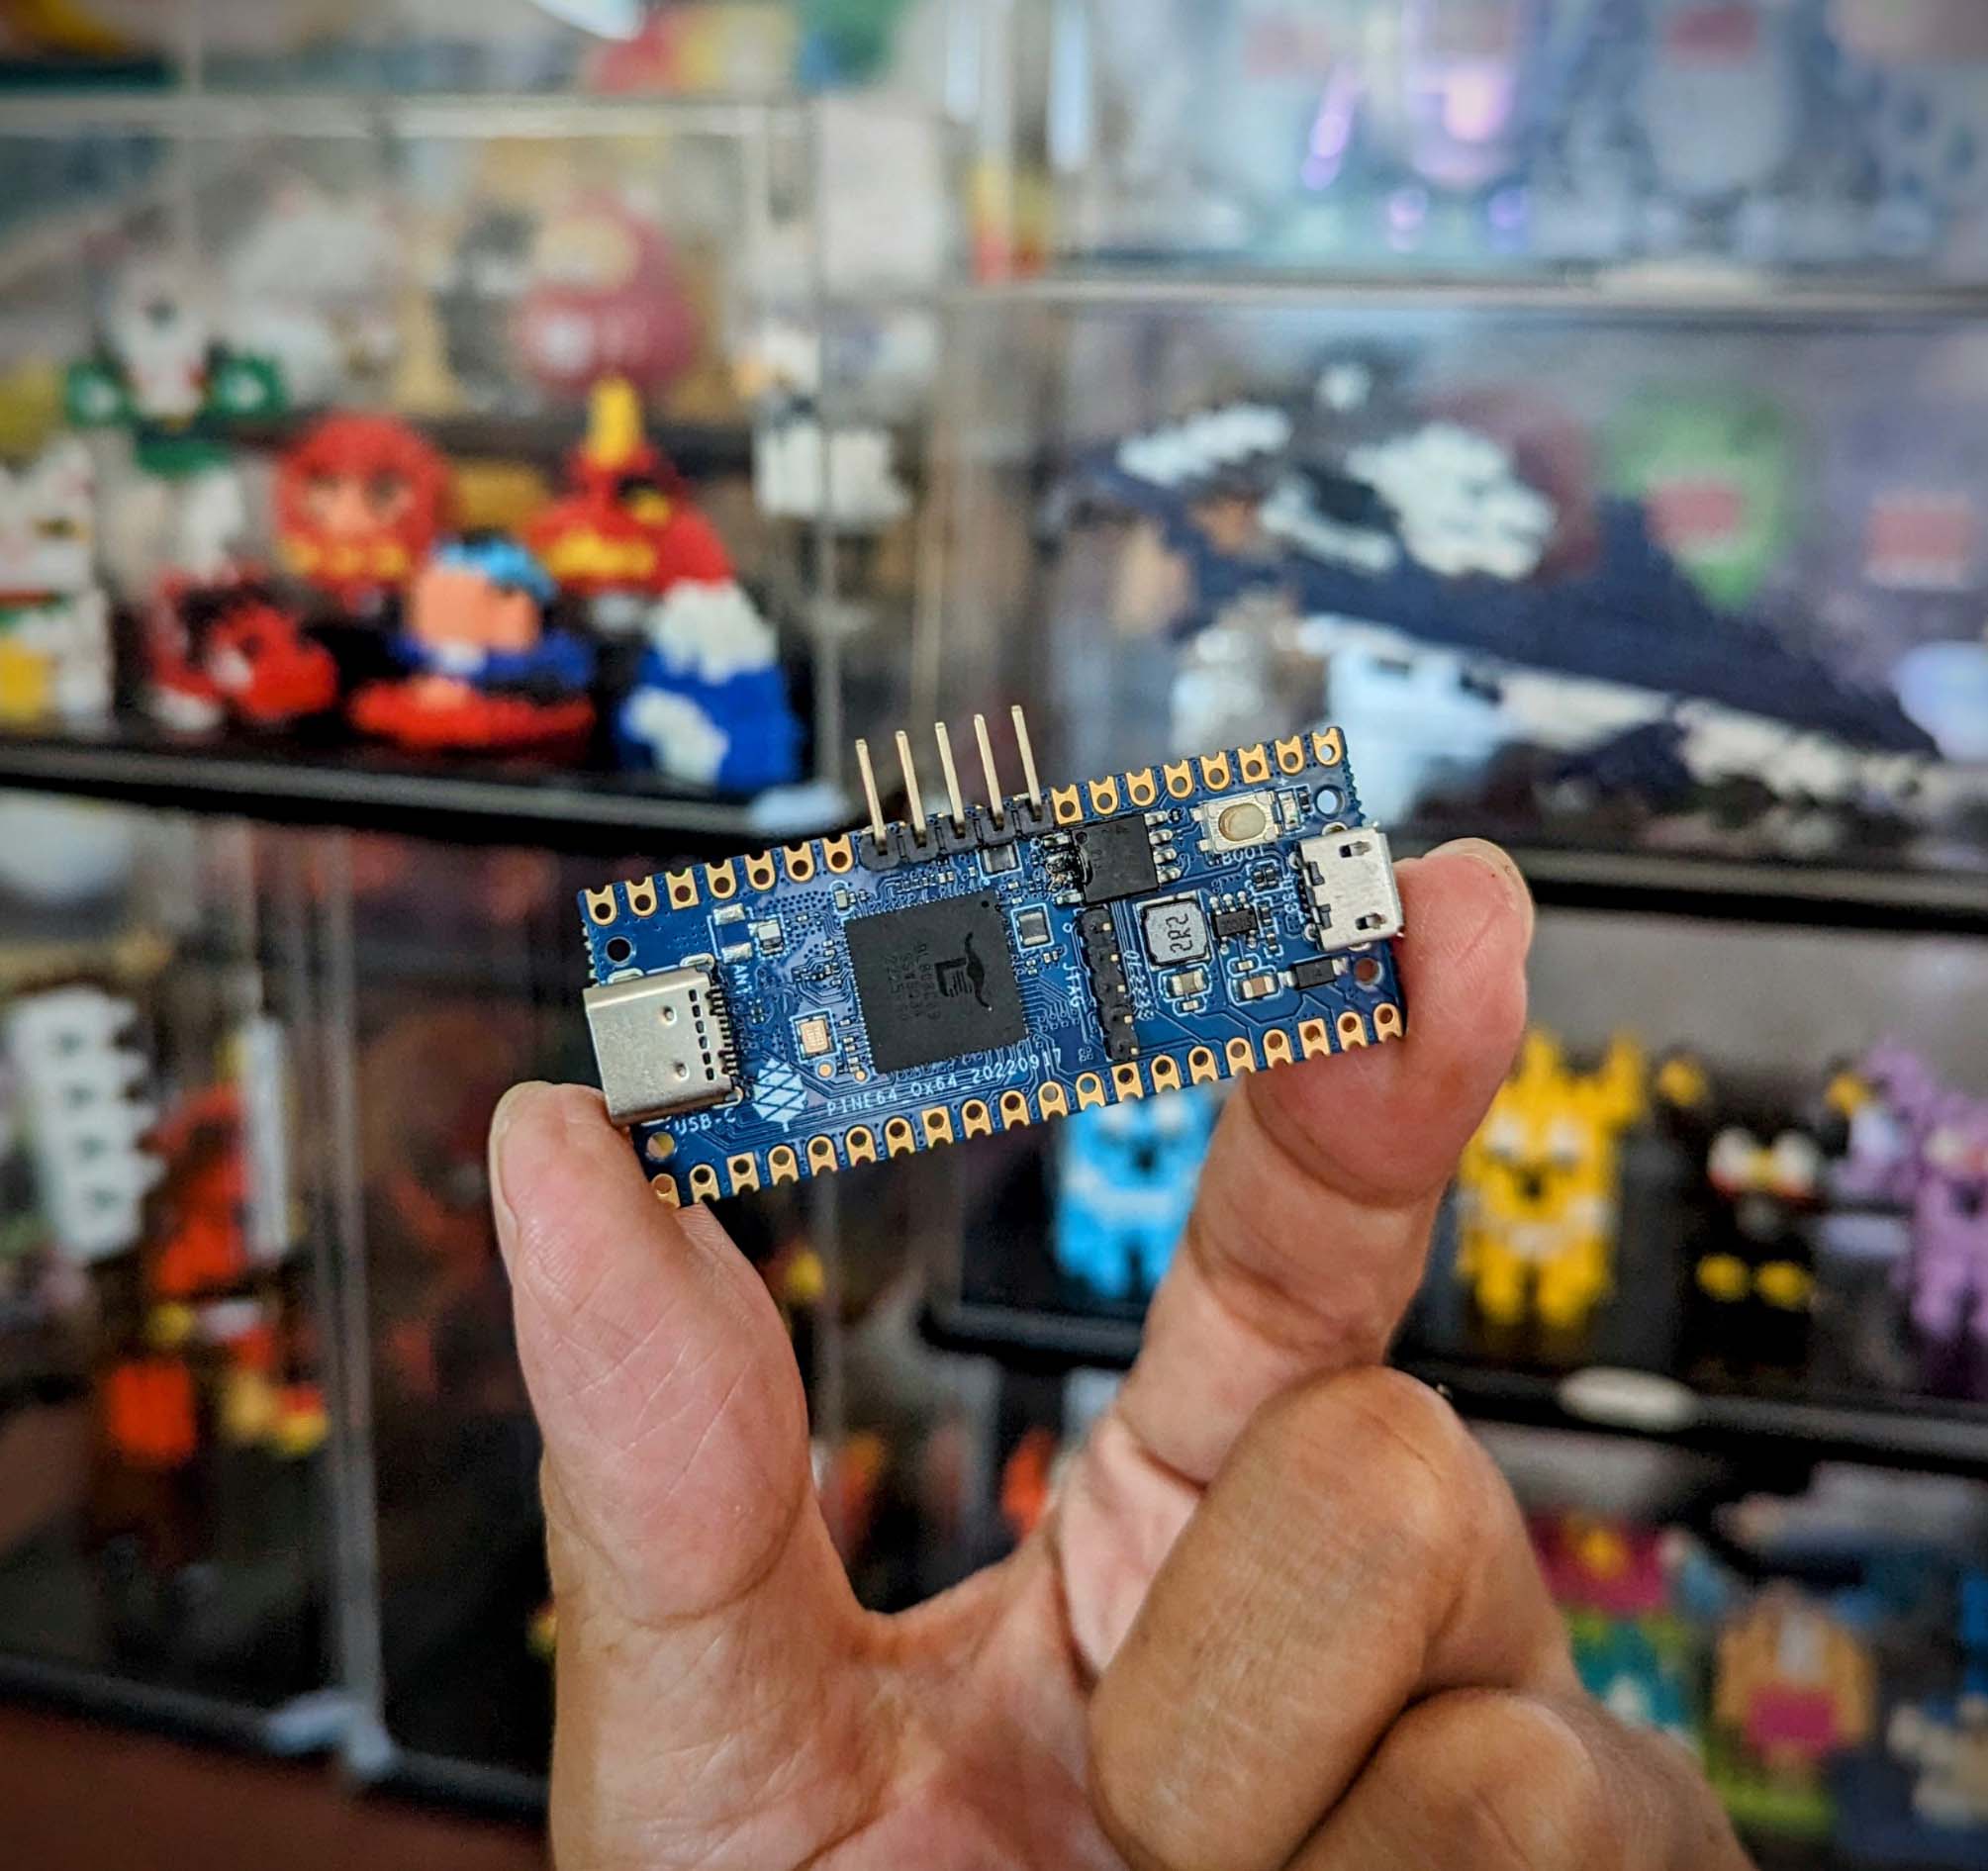
Pine64 Ox64 (128Mb) is the development board for BL808C. (Pic below)
BL808C supports MIPI CSI Cameras but not MIPI DSI Displays.
(Maybe someday we’ll see BL808D for MIPI DSI Displays)
Is Ox64 an SBC? Or an MCU Board?
Technically Ox64 boots 64-bit RISC-V Linux (via microSD). Thus Ox64 feels like a RISC-V SBC…
With USB-C Port for Camera Module (Dual-Lane MIPI CSI)
(USB-C is not for Flashing!)
And USB 2.0 support for USB OTG
(OTG “On-The-Go” means USB Host + USB Device)
UART Pins need a USB Serial Adapter for Flashing and Console I/O
But Ox64 also feels like an MCU Board…
Form Factor is similar to an MCU Board (pic below)
Limited Memory: 64 MB of RAM, 16 MB of Flash Memory
M0 Wireless Core is 32-bit RISC-V MCU
Powered by Micro USB Port
(Micro USB is not for Flashing either!)
Super Affordable: Only $8 for a 64-bit RISC-V Board!
Ox64 BL808 sounds a little tiny for 64-bit Linux?
Yeah 64-bit Linux runs with Limited RAM on the D0 Multimedia Core. But most Peripherals are hosted on the M0 Wireless Core: WiFi, BLE, BT, Zigbee, Ethernet, USB, Audio, …
So we flash M0 Wireless Core with a simple 32-bit RISC-V Firmware, to forward the Peripheral Interrupts from M0 to D0 Linux.
Perhaps Ox64 might run more efficiently with a tiny 64-bit RTOS? (Real-Time Operating System)
Why Apache NuttX RTOS?
It might be interesting to run the tiny Apache NuttX RTOS on both the D0 Multimedia Core and the M0 Wireless Core.
Then D0 and M0 can talk over OpenAMP. (Asymmetric Multi-Processing)
In this article we begin with Linux, then explore NuttX…
NOTE: The steps here will work only with the 128Mb (64KB) Version of Ox64, not the 16Mb Version that doesn’t support microSD
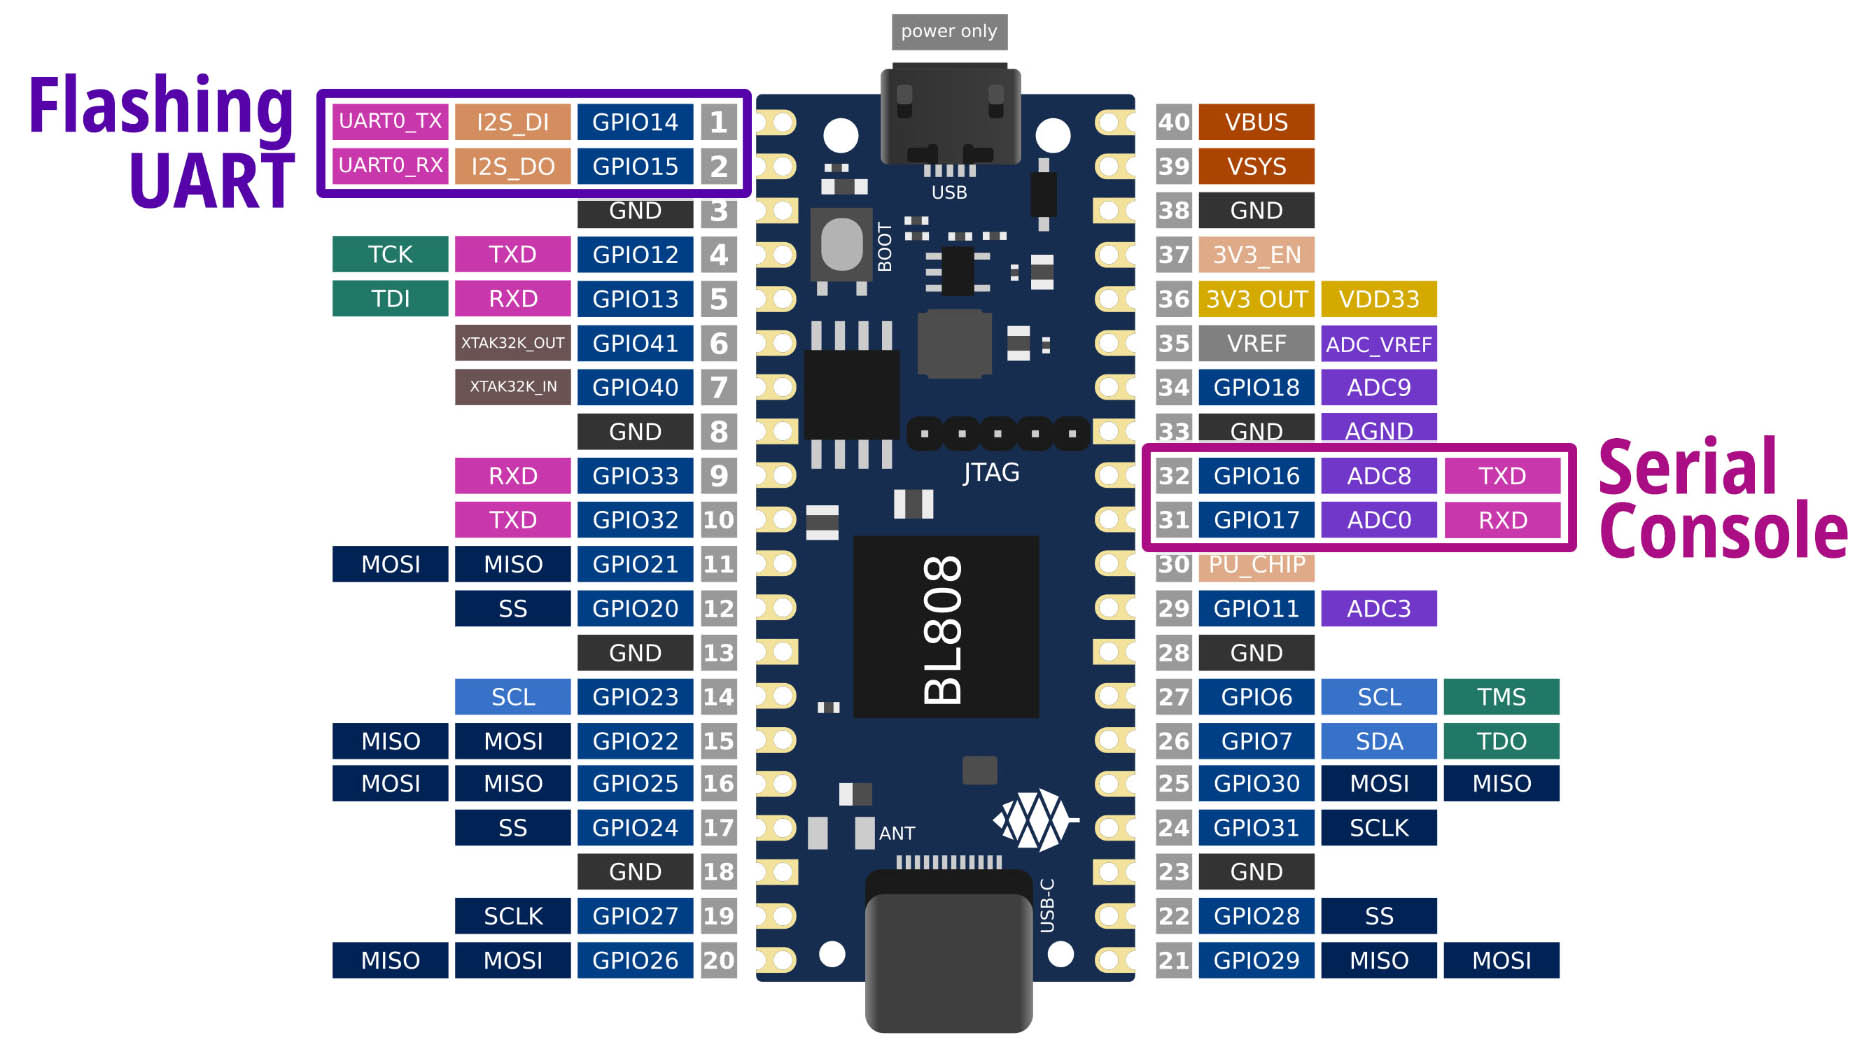
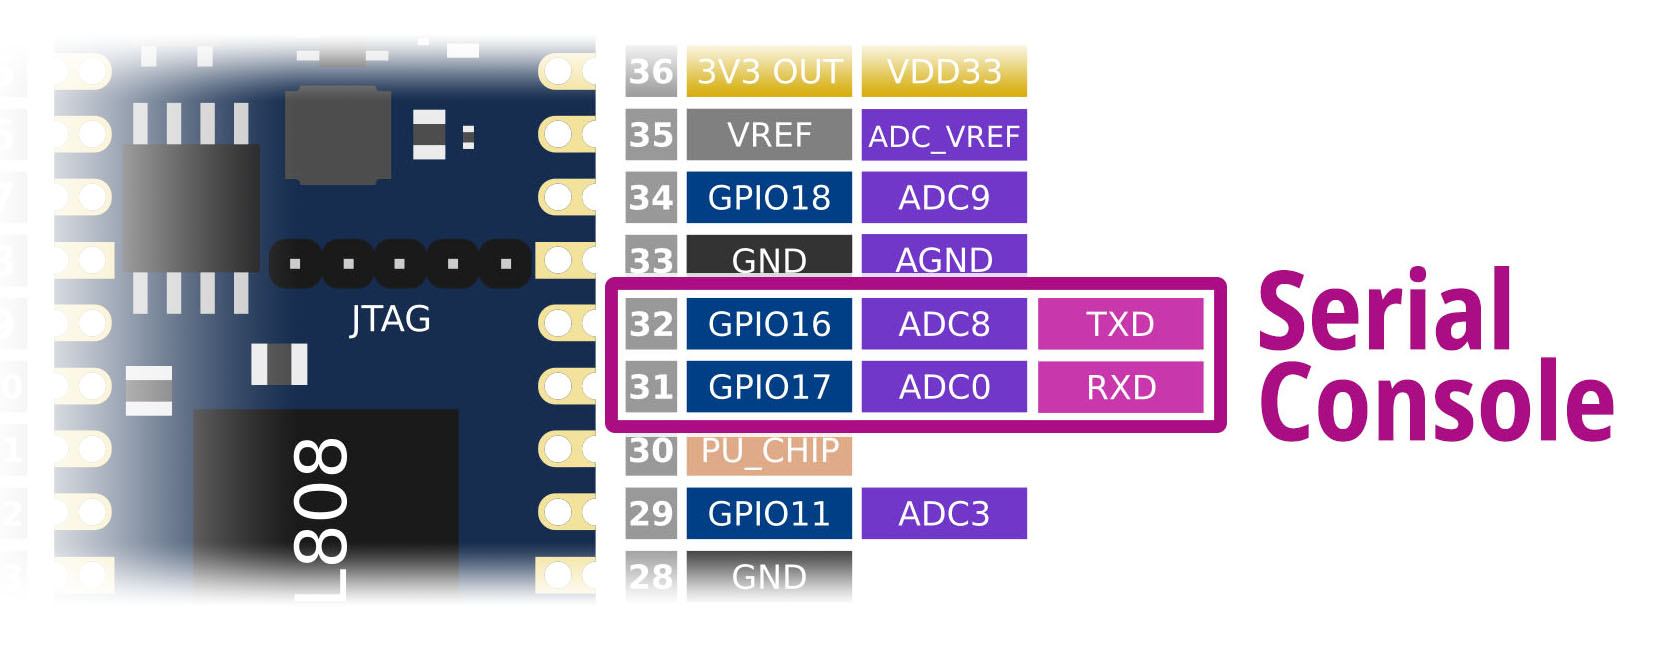
We need to connect TWO UART Ports on Ox64? (Pic above)
Yeah don’t confuse the 2 UART Ports that we’ll connect on Ox64!
Let’s give the 2 UART Ports distinctive names (like Migi & Dali)…
Ox64 Flashing UART: Used for Flashing Ox64
| USB Serial | Ox64 Pin | |
|---|---|---|
| RX | GPIO 14 (TX) | Pin 1 |
| TX | GPIO 15 (RX) | Pin 2 |
| GND | GND | Pin 3 |
Baud Rates are…
| Normal Mode: | 2,000,000 (2 Mbps) |
| Flashing Mode: | 230,400 (230.4 kbps) |
BL808 UART0 is controlled by the M0 Wireless Core. (OpenBouffalo Firmware)
Ox64 Serial Console: Used for Linux Serial Console. (Plus OpenSBI and U-Boot Bootloader)
| USB Serial | Ox64 Pin | |
|---|---|---|
| RX | GPIO 16 (TX) | Pin 32 |
| TX | GPIO 17 (RX) | Pin 31 |
| GND | GND | Pin 33 |
Baud Rate: 2,000,000 (2 Mbps)
BL808 UART3 is controlled by the D0 Multimedia Core. (Linux + OpenSBI + U-Boot)
Output is totally blank if OpenBouffalo Firmware wasn’t flashed correctly. Or if OpenSBI / U-Boot couldn’t boot.
NEITHER UART Port is accessible over USB-C or Micro USB. So yeah it’s totally counterintuitive.
(Maybe someone can create a Stackable Shield or Breadboard, that will expose the 2 UART Ports as USB Dongles? Or a UART Switcher?)
(For Pre-Production Ox64: Physical Pins are different, but GPIOs above are correct)
Why 2 Baud Rates for Flashing UART?
When we power up Ox64 in Normal Mode: (Boot Button NOT pressed)
The port for Flashing UART will show us the OpenBouffalo Firmware running on M0 Wireless Core
This M0 Firmware will forward Peripheral Interrupts to D0 Multimedia Core
M0 Firmware is hardcoded for 2 Mbps
Not really fun to watch. But we use this for testing our 2 Mbps USB Serial Adapter.
When we power up Ox64 in Flashing Mode: (Boot Button pressed)
Ox64 is ready for Firmware Flashing by the BL DevCube GUI Tool
Firmware Flashing supports various Baud Rates: 230.4 kbps, 2 Mbps, …
But 2 Mbps will fail on macOS. That’s why we Flash Firmware at 230.4 kbps.
Serial Console is always 2 Mbps?
Yeah 2 Mbps is hardcoded in Ox64 Linux. Switching to other Baud Rates will show garbled text.
Thus our USB Serial Adapter must connect reliably to Ox64 at 2 Mbps. Let’s test it…

Warning: Some USB Serial Adapters WON’T WORK!
Ox64 was tested OK with the Pine64 Woodpecker CH340G USB Serial Adapter on macOS x64.
Ox64 mandates 2 Mbps, which might be too fast for some USB Serial Adapters. (Like this CP2102 Dongle, which shows garbled text at 2 Mbps)
To test our USB Serial Adapter…
Connect the USB Serial Adapter to the port for Ox64 Flashing UART (pic above)…
| USB Serial | Ox64 Pin | |
|---|---|---|
| RX | GPIO 14 (TX) | Pin 1 |
| TX | GPIO 15 (RX) | Pin 2 |
| GND | GND | Pin 3 |
Start the USB Serial Terminal for Flashing UART. Use “putty” (Windows), “screen” (Linux) or “minicom” (Linux).
Connect at 2,000,000 bps. (2 Mbps)
sudo screen /dev/ttyUSB0 2000000For macOS: The “screen” command might not support 2 Mbps. Use CoolTerm instead.
Power up Ox64 via the Micro USB Port.
Connect the Micro USB Cable to a USB Charger. (Like a 22.5 Watt USB Charger)
Don’t connect Micro USB to your Computer’s USB Port! It might not provide sufficient power to Ox64. Flashing or booting will fail.
We should see the Ox64 Factory Test Firmware…
dynamic memory init success
sig1:ffff32ff
sig2:0000ffff
Pong!
Ping!If the text appears garbled: Try a different USB Serial Adapter. (Like these)
Pre-Flash Check: Set Ox64 to Flashing Mode…
In the USB Serial Terminal, we should see something totally different…
.Ox64 is ready for flashing!
(Paul S explains why some USB Serial Adapters won’t work)
Our USB Serial Adapter works great at 2 Mbps. What next?
Before booting Linux on Ox64, we flash…
m0_lowload for M0 Wireless Core:
Firmware that forwards Peripheral Interrupts to the D0 Multimedia Core.
d0_lowload for D0 Multimedia Core:
Basic Bootloader that loads OpenSBI, U-Boot Bootloader and Device Tree into RAM.
bl808-firmware for D0 Multimedia Core:
Binary Image for OpenSBI, U-Boot Bootloader and Device Tree.
Here are the steps, based on the Official Flashing Instructions…
Check that our USB Serial Adapter is connected to the port for Flashing UART. (Pic above)
Close the USB Serial Terminal. (To release the Flashing UART)
Set Ox64 to Flashing Mode…
Download the Ox64 Binaries…
From the latest Ox64 Linux Release…
Unzip the download and we should see…
$ ls -l firmware
   7340032  bl808-firmware.bin
     31360  d0_lowload_bl808_d0.bin
     65760  m0_lowload_bl808_m0.bin
  43859444  sdcard-pine64_ox64_full_defconfig.img.xz
We’ll run Bouffalo Lab DevCube for Flashing Ox64.
Which supports Ubuntu x64, macOS and Windows only.
(How to flash BL808 on Arm64 SBCs and Pinebook Pro? Sigh. See bflb-iot-tool / bflb-mcu-tool)
Download BL DevCube 1.8.3 from…
openbouffalo.org/static-assets/bldevcube/BouffaloLabDevCube-v1.8.3.zip
(Because 1.8.4 and later won’t work!)
Start BL DevCube, select “BL808”
We might need to Grant Execute Permission…
cd BouffaloLabDevCube-v1.8.3
chmod +x BLDevCube-macos-x86_64
./BLDevCube-macos-x86_64
Click the “MCU” Tab
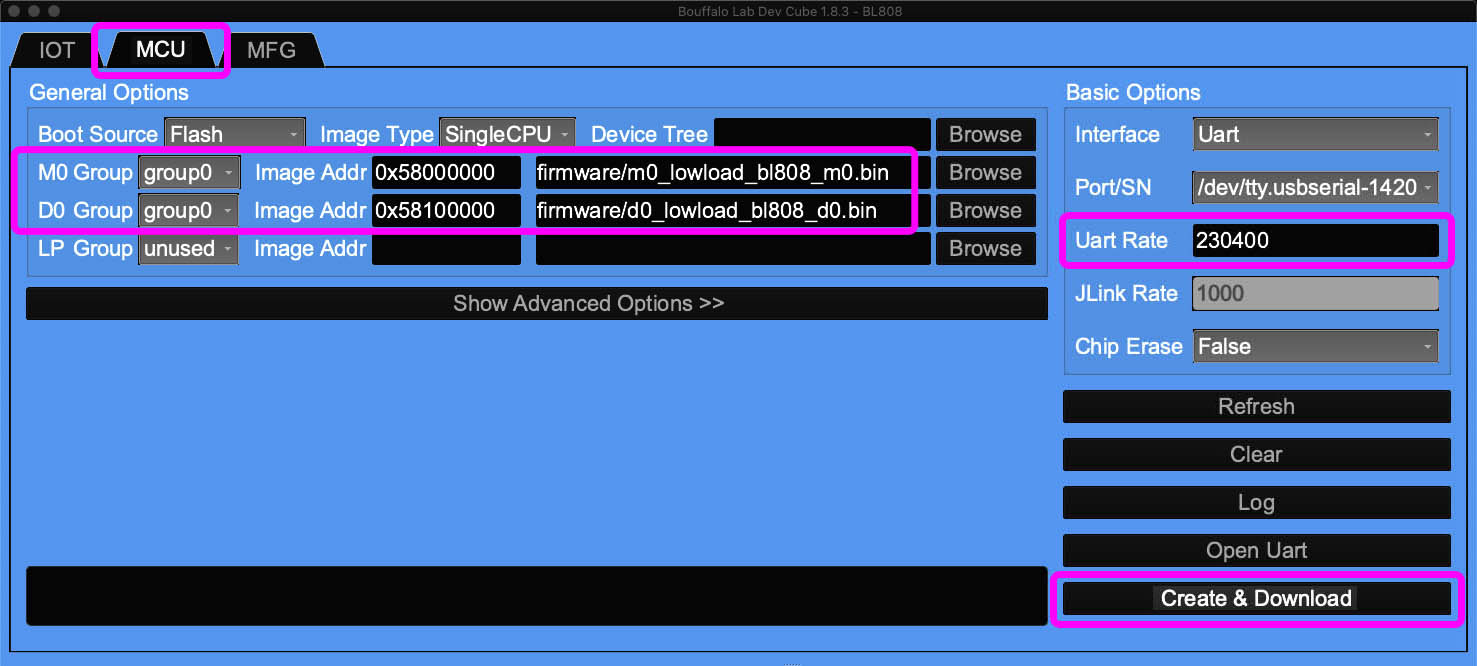
Set the Firmware for M0 Wireless Core…
| M0 Group: | group0 |
| Image Addr: | 0x58000000 |
Select the download: m0_lowload_bl808_m0.bin
Set the Firmware for D0 Multimedia Core…
| D0 Group: | group0 |
| Image Addr: | 0x58100000 |
Select the download: d0_lowload_bl808_d0.bin
Set UART Rate to 230400 (230.4 kbps)
Don’t set to 2,000,000 (2 Mbps), it will fail on macOS!
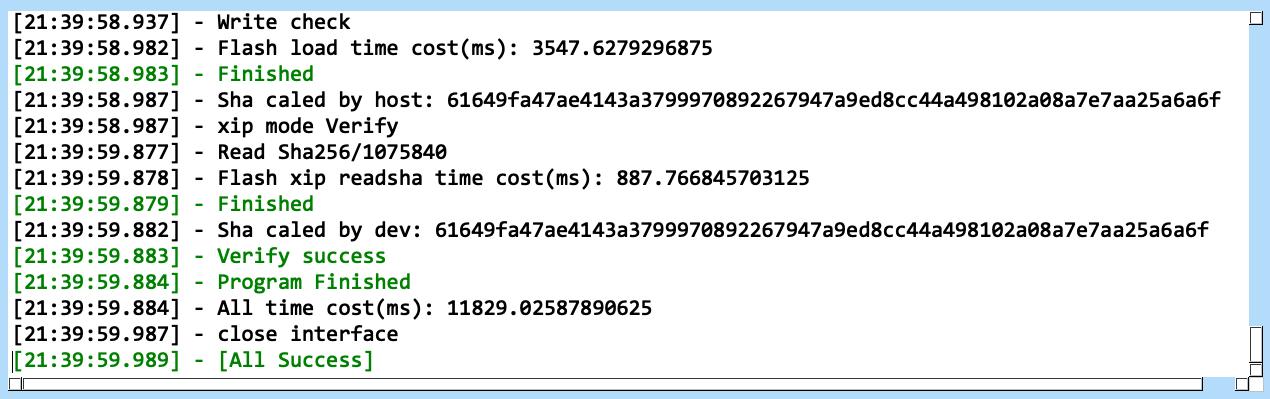
Click “Create & Download” and wait for it to complete
Click the “IOT” Tab
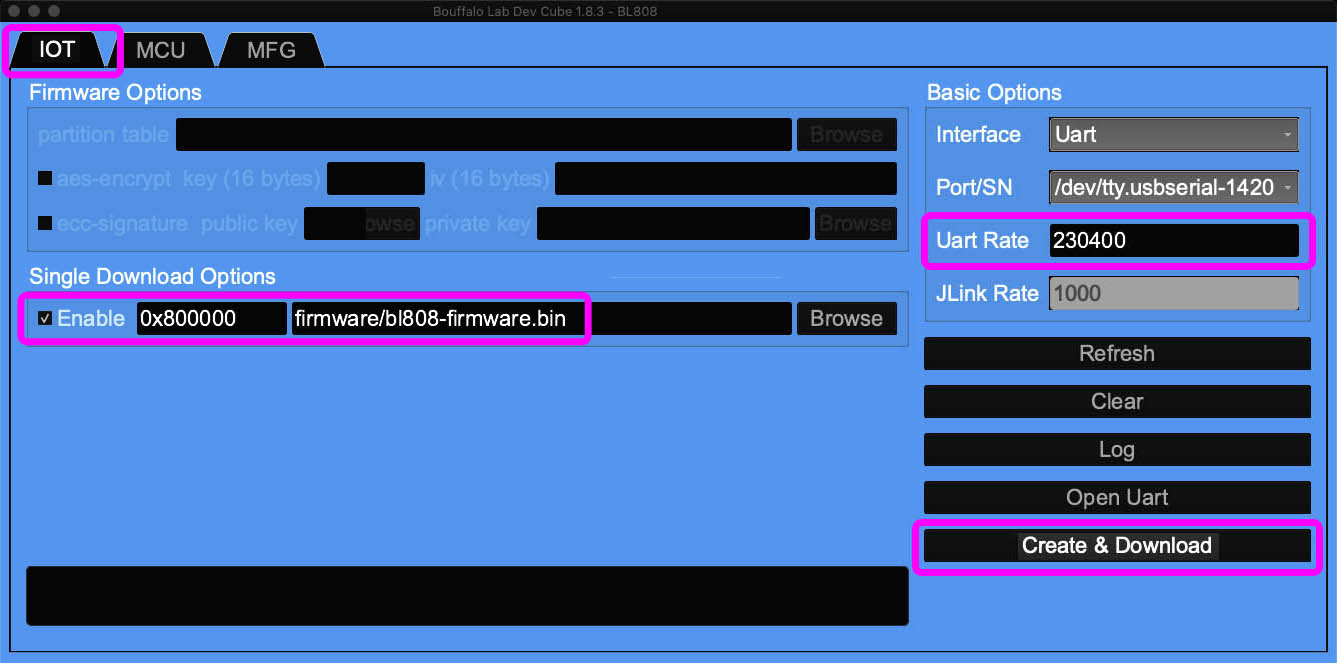
Set the Single Download Options…
Enable “Single Download”
Set Address to 0x800000
Select the download: bl808-firmware.bin
Set UART Rate to 230400 (230.4 kbps)
Don’t set to 2,000,000 (2 Mbps), it will fail on macOS!
Click “Create & Download” and wait for it to complete
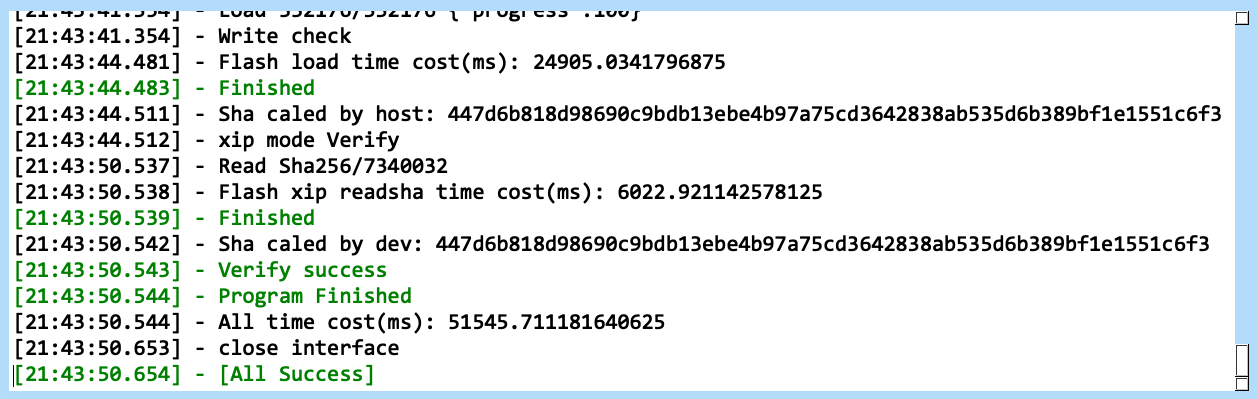
Now we check our work…
Did we flash OpenSBI and U-Boot successfully?
Let’s verify if the flashing was OK…
Check that our USB Serial Adapter is connected to the port for Flashing UART. (Pic above)
Start the USB Serial Terminal for Flashing UART. Use “putty” (Windows), “screen” (Linux) or “minicom” (Linux).
Connect at 2,000,000 bps. (2 Mbps)
sudo screen /dev/ttyUSB0 2000000For macOS: The “screen” command might not support 2 Mbps. Use CoolTerm instead.
Unplug and replug the Micro USB Port.
(Don’t press the Boot Button!)
In the USB Serial Terminal (Flashing UART), we should see…
Starting Mailbox Handlers
Forwarding Interupt SDH (33) to D0 (0x58008bbc)
Forwarding Interupt GPIO (60) to D0 (0x58008d0e)
Running...
Mailbox IRQ Stats:
.Peripheral SDH (33): 0
.Peripheral GPIO (60): 0
Unhandled Interupts: 0 Unhandled Signals 0Yep we have flashed the OpenBouffalo Firmware successfully!
Next we check the Serial Console…
Connect our USB Serial Adapter to the port for Ox64 Serial Console (pic above)…
| USB Serial | Ox64 Pin | |
|---|---|---|
| RX | GPIO 16 (TX) | Pin 32 |
| TX | GPIO 17 (RX) | Pin 31 |
| GND | GND | Pin 33 |
Start the USB Serial Terminal for Serial Console.
Connect at 2,000,000 bps. (2 Mbps)
sudo screen /dev/ttyUSB0 2000000Unplug and replug the Micro USB Port.
(Don’t press the Boot Button!)
In the USB Serial Terminal (Serial Console), we should see…
U-Boot 2023.04-rc2 (Mar 06 2023 - 11:48:40 +0000)
Card did not respond to voltage select! : -110
BOOTP broadcast
Retry time exceeded; starting againWhich is OK because U-Boot Bootloader is waiting for our microSD Card.
If nothing appears: Check that we are using BL DevCube 1.8.3
In BL DevCube, UART Rate (for MCU and IoT) should be 230400. (230.4 kbps)
Don’t set to 2,000,000 (2 Mbps), it will fail on macOS!
Let’s load Ox64 Linux into a microSD Card…
D0 Multimedia Core has been flashed with OpenSBI and U-Boot Bootloader. We’re ready to boot Linux on microSD!
Based on the Official Flashing Instructions…
Look for the microSD Image that we downloaded earlier…
sdcard-pine64_ox64_full_defconfig.img.xzUncompress the file to get…
sdcard-pine64_ox64_full_defconfig.imgFlash the Uncompressed Image to our microSD card.
Use Balena Etcher, GNOME Disks or dd.
Insert the microSD Card into Ox64. (Pic above)
Connect our USB Serial Adapter to the port for Ox64 Flashing UART (pic above)…
| USB Serial | Ox64 Pin | |
|---|---|---|
| RX | GPIO 14 (TX) | Pin 1 |
| TX | GPIO 15 (RX) | Pin 2 |
| GND | GND | Pin 3 |
Start the USB Serial Terminal for Flashing UART.
Connect at 2,000,000 bps. (2 Mbps)
sudo screen /dev/ttyUSB0 2000000Unplug and replug the Micro USB Port.
(Don’t press the Boot Button!)
We should see the same thing as earlier…
Starting Mailbox Handlers
Forwarding Interupt SDH (33) to D0 (0x58008bbc)
Forwarding Interupt GPIO (60) to D0 (0x58008d0e)
Running...
Mailbox IRQ Stats:
.Peripheral SDH (33): 0
.Peripheral GPIO (60): 0
Unhandled Interupts: 0 Unhandled Signals 0
Connect our USB Serial Adapter to the port for Ox64 Serial Console (pic above)…
| USB Serial | Ox64 Pin | |
|---|---|---|
| RX | GPIO 16 (TX) | Pin 32 |
| TX | GPIO 17 (RX) | Pin 31 |
| GND | GND | Pin 33 |
Start the USB Serial Terminal for Serial Console.
Connect at 2,000,000 bps. (2 Mbps)
sudo screen /dev/ttyUSB0 2000000Unplug and replug the Micro USB Port.
(Don’t press the Boot Button!)
We should see d0_lowload starting on D0 Multimedia Core…
D0 start...
low_load start...
Copying DTB to 0x51ff8000...0x51ffb7ea
Copying OpenSBI to 0x3ef80000...0x3ef9ad28
Uncompressing Kernel to 0x50000000...
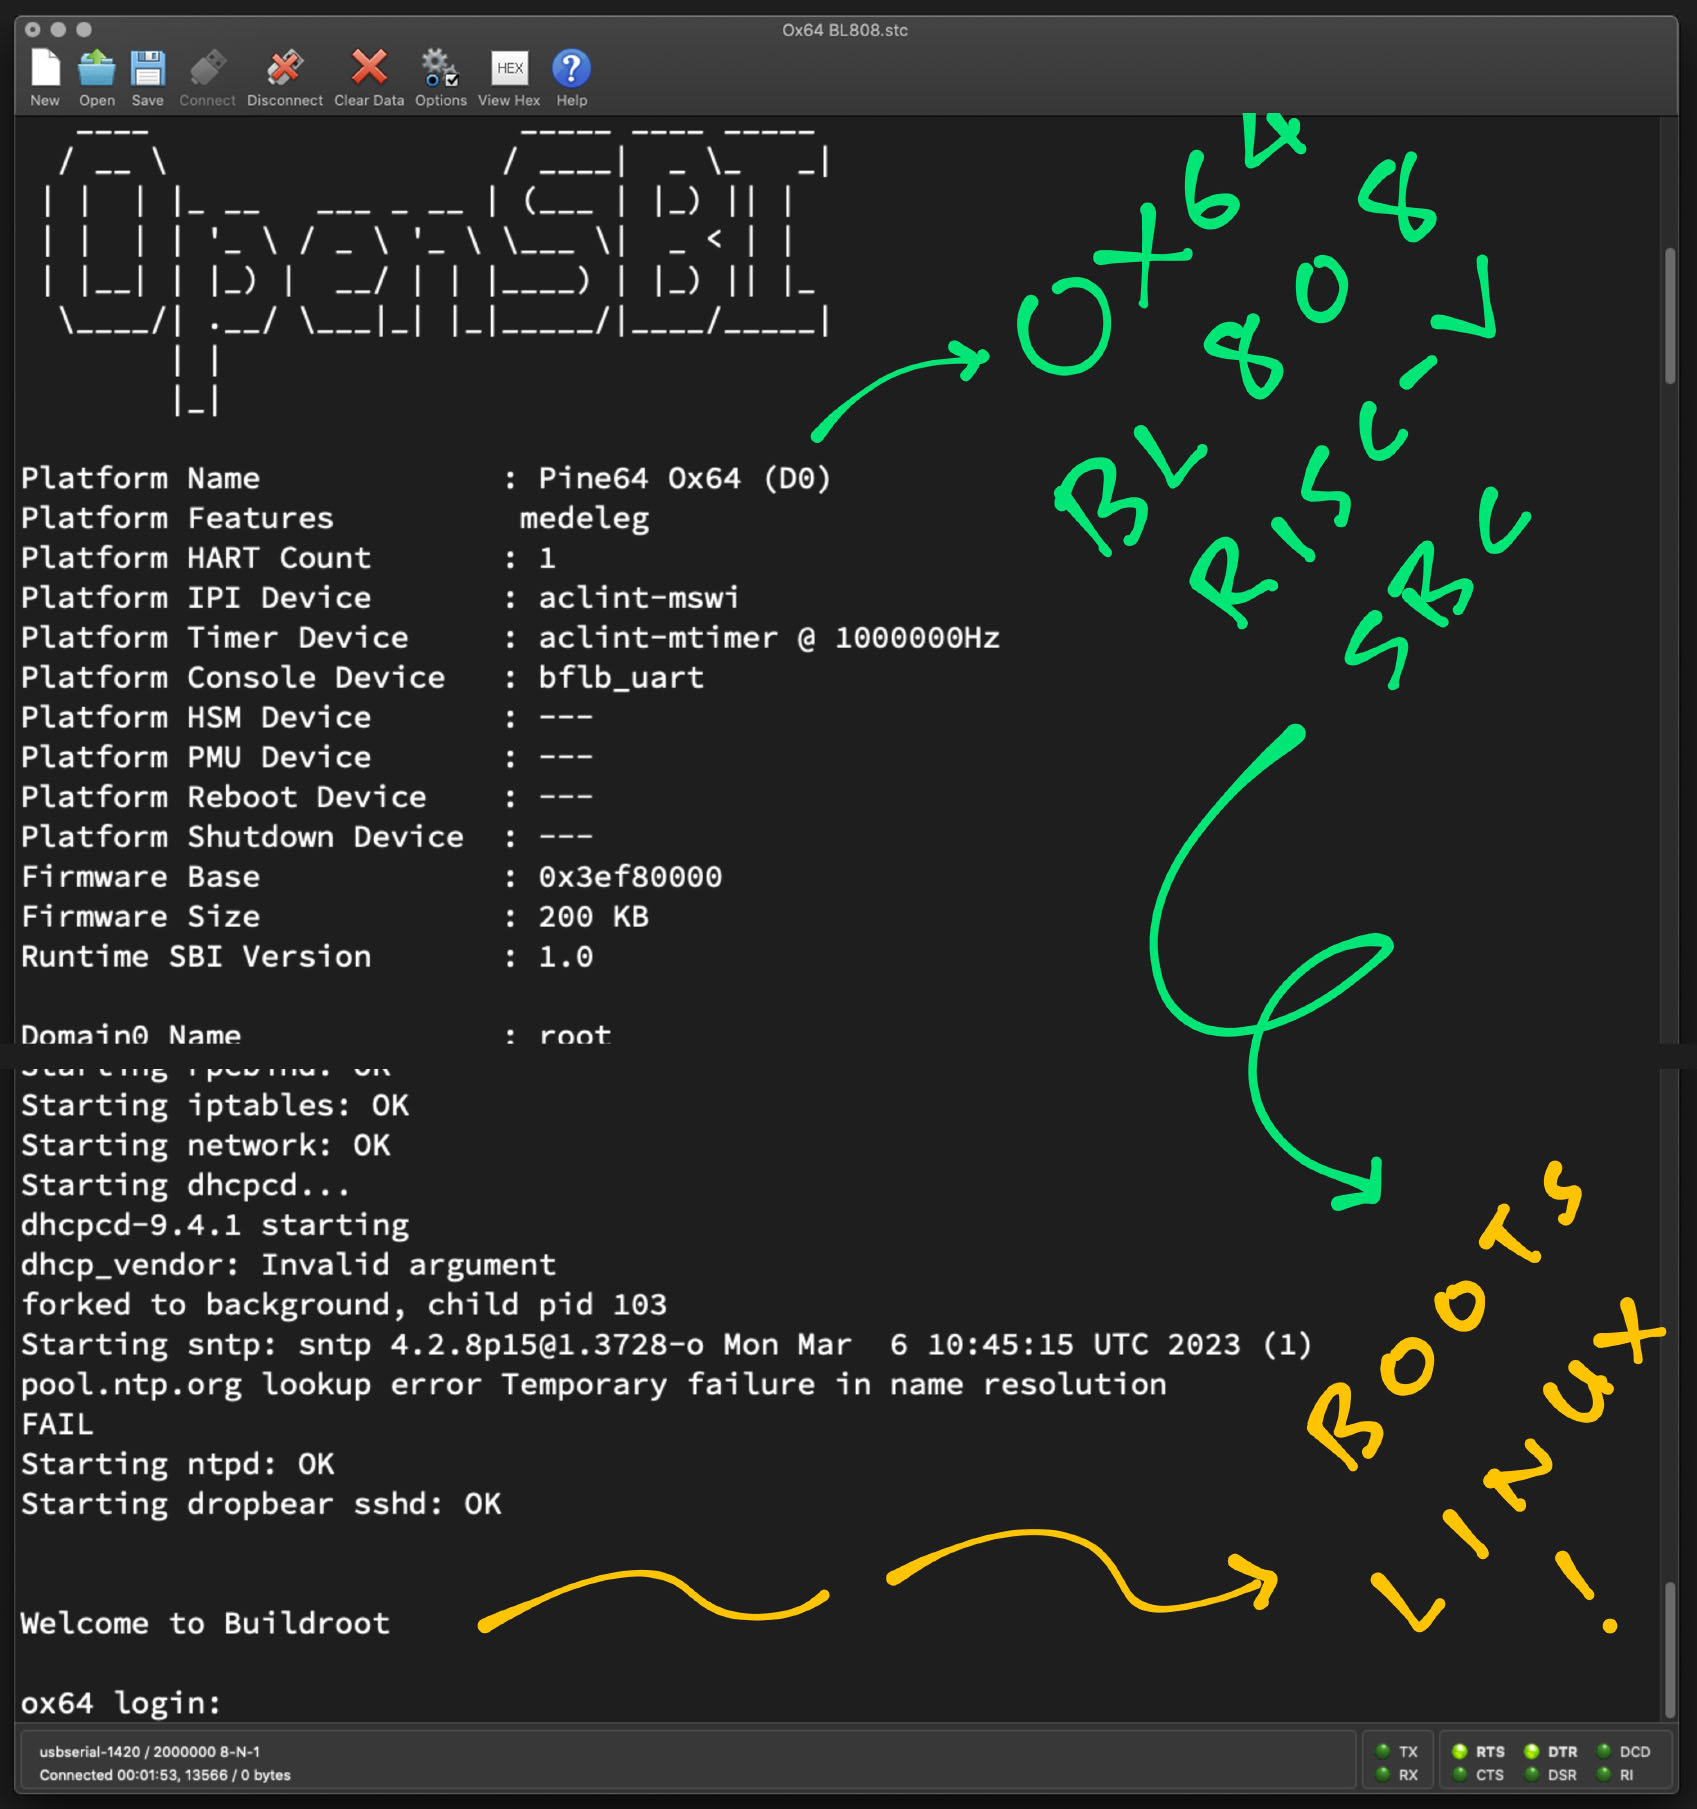
Booting OpenSBI at 0x000000003ef80000 with DTB at 0x51ff8000Which loads the OpenSBI Supervisor Binary Interface…
OpenSBI v1.2
Platform Name             : Pine64 Ox64 (D0)
Platform Features          medeleg
Platform HART Count       : 1
Platform IPI Device       : aclint-mswi
Platform Timer Device     : aclint-mtimer @ 1000000Hz
Platform Console Device   : bflb_uart
Firmware Base             : 0x3ef80000
Firmware Size             : 200 KB
Runtime SBI Version       : 1.0
Which starts the U-Boot Bootloader…
U-Boot 2023.04-rc2 (Mar 06 2023 - 11:48:40 +0000)
DRAM: 64 MiB
Core: 36 devices, 17 uclasses, devicetree: board
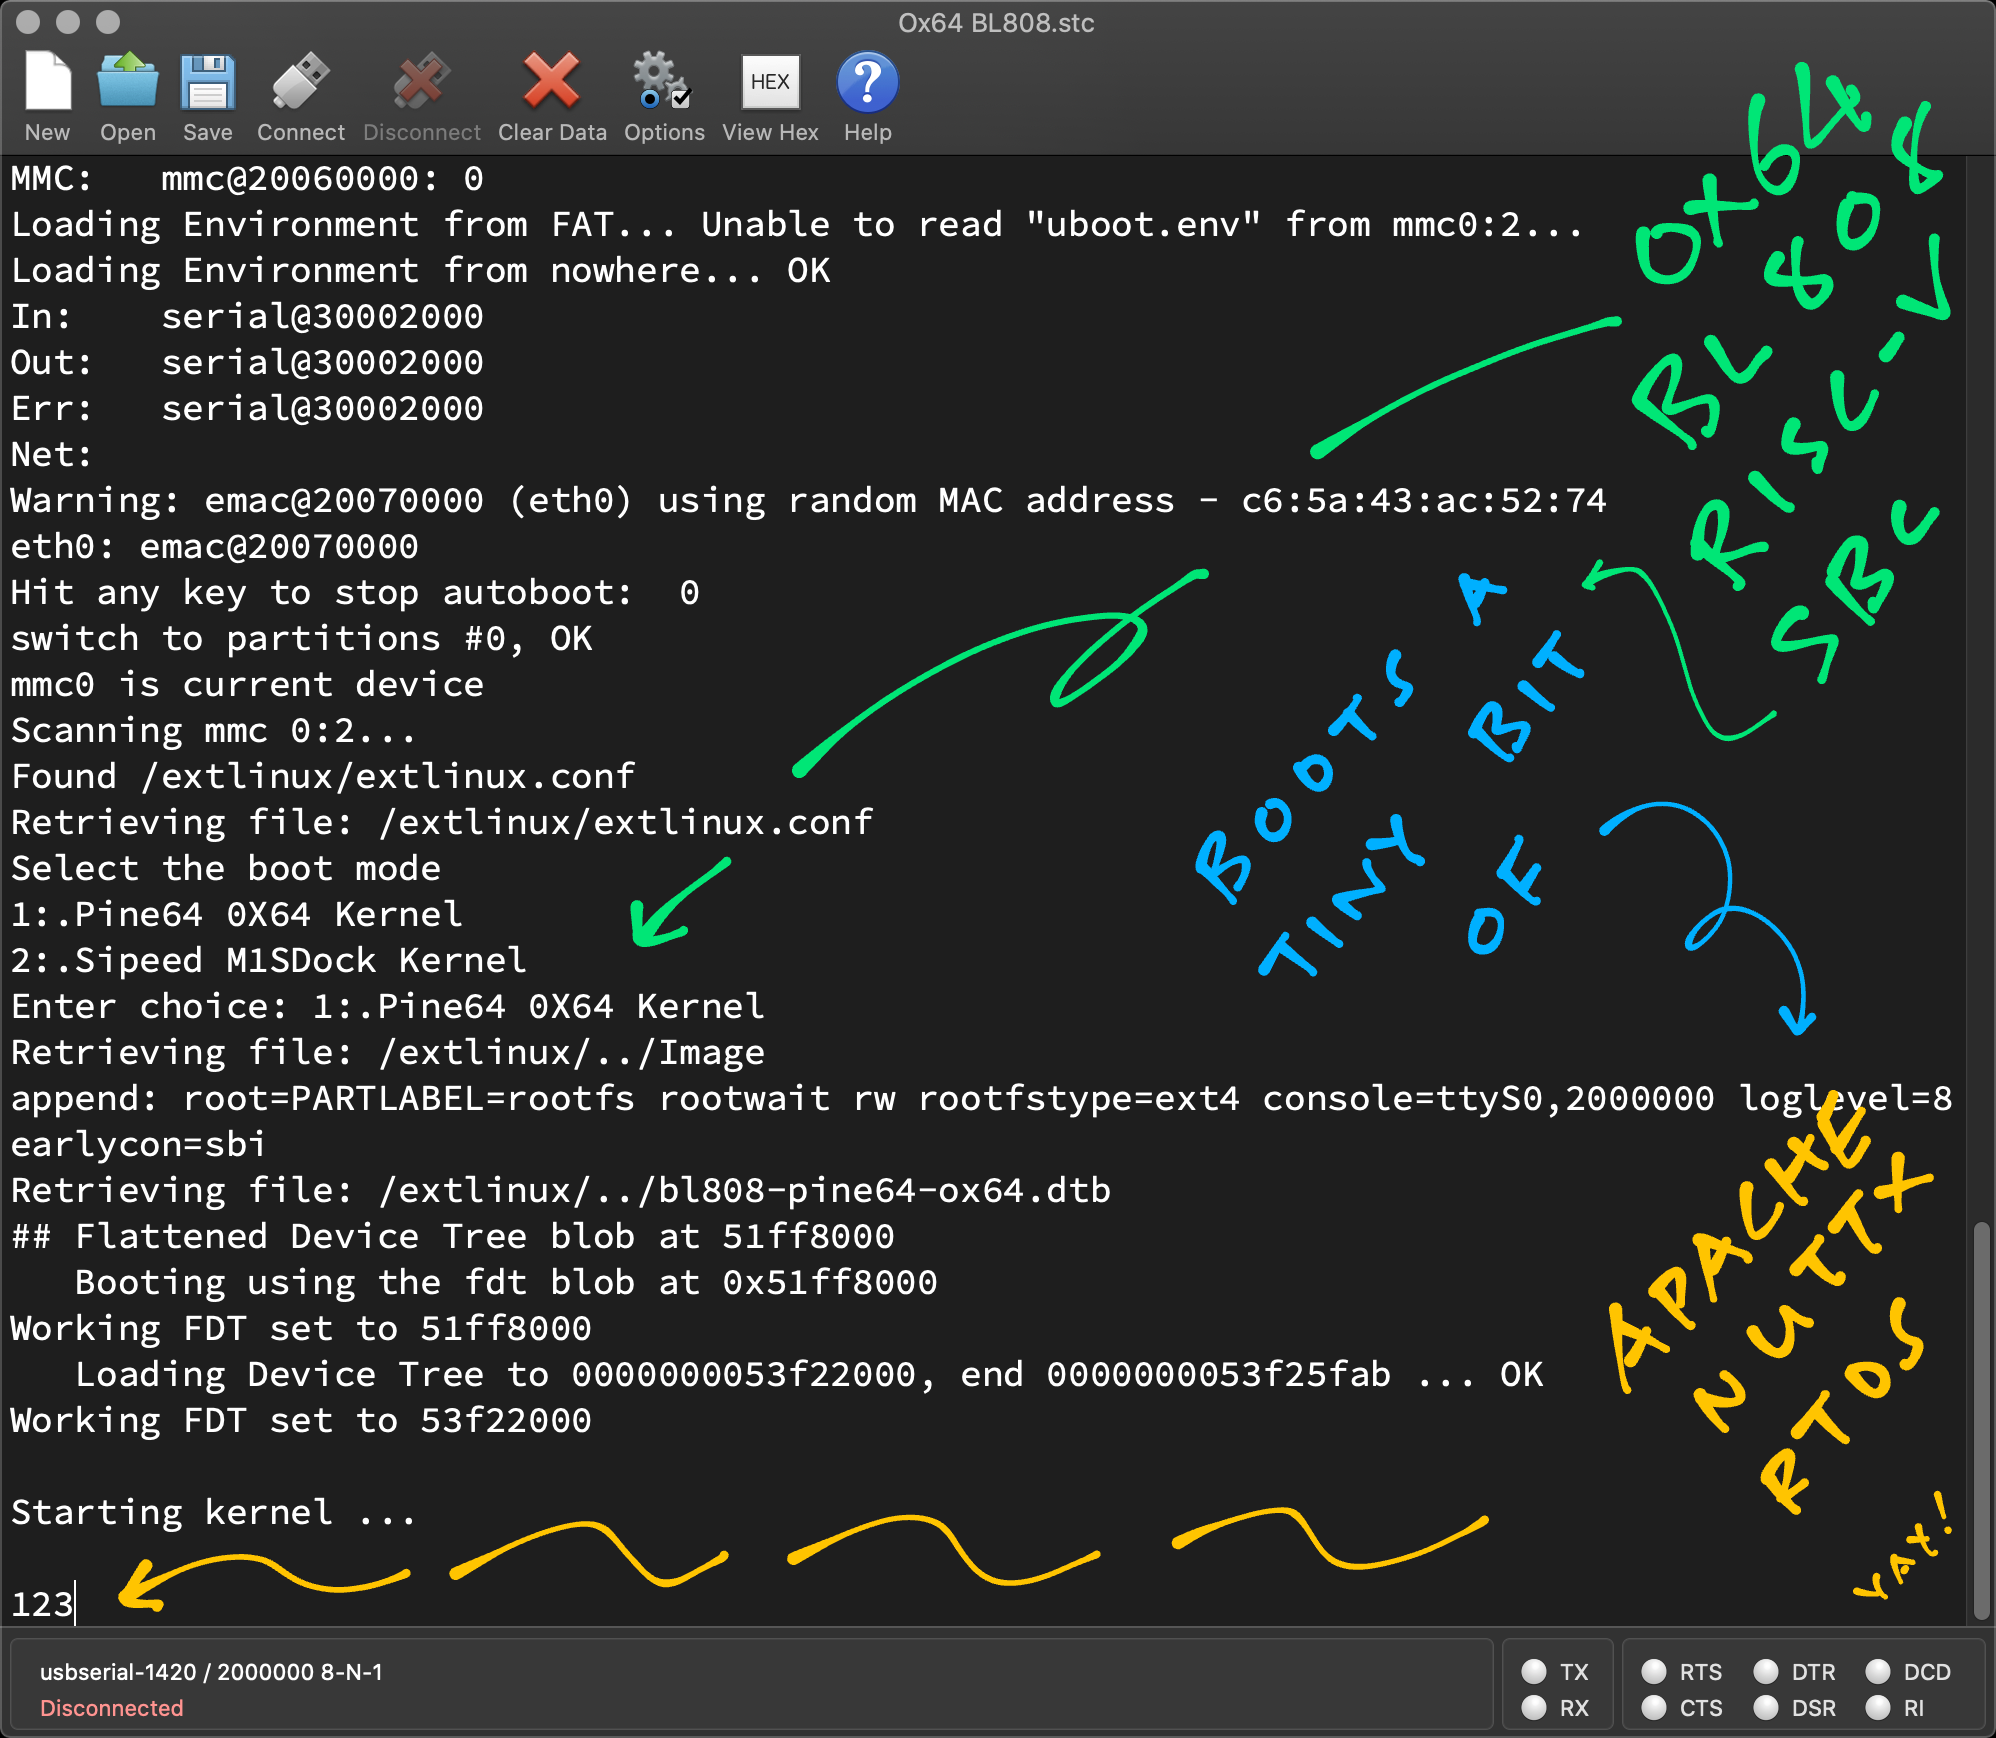
MMC: mmc@20060000: 0
Loading Environment from FAT...
Unable to read "uboot.env" from mmc0:2... Which starts Buildroot Linux (finally!)…
Starting kernel ...
Linux version 6.2.0
  (runner@fv-az587-938)
  (riscv64-unknown-linux-gnu-gcc
  (Xuantie-900 linux-5.10.4 glibc gcc Toolchain V2.6.1 B-20220906) 10.2.0, GNU ld (GNU Binutils) 2.35) #1 Mon Mar  6 11:17:27 UTC 2023
...
Welcome to Buildroot
ox64 login:
Yep Linux is running on Ox64 yay! (Pic below)
If nothing appears: Check that we are using BL DevCube 1.8.3
In BL DevCube, UART Rate (for MCU and IoT) should be 230400. (230.4 kbps)
Don’t set to 2,000,000 (2 Mbps), it will fail on macOS!
If U-Boot fails to boot Linux…
U-Boot 2023.04-rc2 (Mar 06 2023 - 11:48:40 +0000)
Card did not respond to voltage select! : -110
BOOTP broadcast
Retry time exceeded; starting againCheck that our microSD Card is inserted correctly. (Pic above)
Flashing BL808 sounds a little wonky?
Yeah. According to @gamelaster…
“This is not hardware specific, but flasher specific. With blisp, I was able to get faster flashing working, but this is Apple’s quirk. Or maybe not? Because FreeBSD need same quirks and exact buffer sizes as Apple.”
Hopefully we can use blisp for flashing BL808 more reliably!
Read the article…
Why Apache NuttX RTOS?
Ox64 (with 64 MB RAM) seems a little tiny for 64-bit Linux.
Perhaps Ox64 might run more efficiently with a tiny 64-bit RTOS (Real-Time Operating System)? Like Apache NuttX RTOS?
Let’s explore…
How to boot Apache NuttX RTOS on Ox64?
Ox64 boots Linux like a typical RISC-V SBC with…
So let’s pretend to be Linux and trick Ox64 into booting NuttX!
“Linux-To-NuttX Switcheroo” has worked remarkably well for booting NuttX on PinePhone, PinePhone Pro, NanoPi M4 SBC and Star64 RISC-V SBC…
We’ll do it again for Ox64! Starting with the NuttX Boot Code…
How will we print to the Serial Console?
We’ll borrow the NuttX UART Driver for BL602. (Which will probably work with BL808)
The Linux Device Tree has helpful hints…
Or we’ll call the OpenSBI Legacy Console…
(Ox64 implements SBI Spec v1.0 without Debug Console)
What about the other BL808 Drivers?
We’ll port the BL808 Drivers from Bouffalo Lab’s BouffaloSDK to NuttX.
(BouffaloSDK is Apache 2.0 Licensed)
Will we boot NuttX on both 32-bit and 64-bit RISC-V Cores? (Pic above)
Initially we’ll boot NuttX on the 64-bit D0 Multimedia Core.
NuttX will talk to the Existing OpenBouffalo Firmware on the 32-bit M0 Wireless Core over Mailbox.
(Linux Device Tree tells us how)
Later we might boot NuttX on the 32-bit M0 Wireless Core. And let the 64-bit and 32-bit Cores talk over OpenAMP. (Asymmetric Multi-Processing)
Will OpenSBI boot NuttX on the 32-bit RISC-V Core?
Sadly nope. The 32-bit M0 Wireless Core isn’t controlled by OpenSBI, according to the OpenSBI Log…
Platform HART Count: 1(That’s for the D0 Multimedia Core)
So booting 32-bit NuttX with OpenSBI HSM simply won’t work.
We’ll have to flash 32-bit NuttX to Ox64 with BL DevCube. (Ouch!)
Are you sorry that NuttX Fans had to put up with this entire article?
Yes I’m truly sorry! But that’s exactly how we’ll boot NuttX on Ox64…
Flash OpenSBI and U-Boot Bootloader to Ox64…
So that it will load our NuttX Kernel Image
(That pretends to be Linux)
Thankfully it’s a One-Time Thing. To upgrade the NuttX Kernel, we only need to update the microSD Card.
(No more flashing yay!)
(Ox64 on a Breadboard might block the microSD Card. Can this microSD Extender help?)
Thanks to the excellent work by the OpenBouffalo Community, we have Linux booting smoothly (and swiftly) on Ox64 BL808 RISC-V SBC.
And by studying their work, we have booted a tiny bit of Apache NuttX RTOS on Ox64 BL808! (Pic above)
We’ll talk more about NuttX on Ox64 in the next article!
Many Thanks to my GitHub Sponsors (and the awesome NuttX Community) for supporting my work! This article wouldn’t have been possible without your support.
Got a question, comment or suggestion? Create an Issue or submit a Pull Request here…
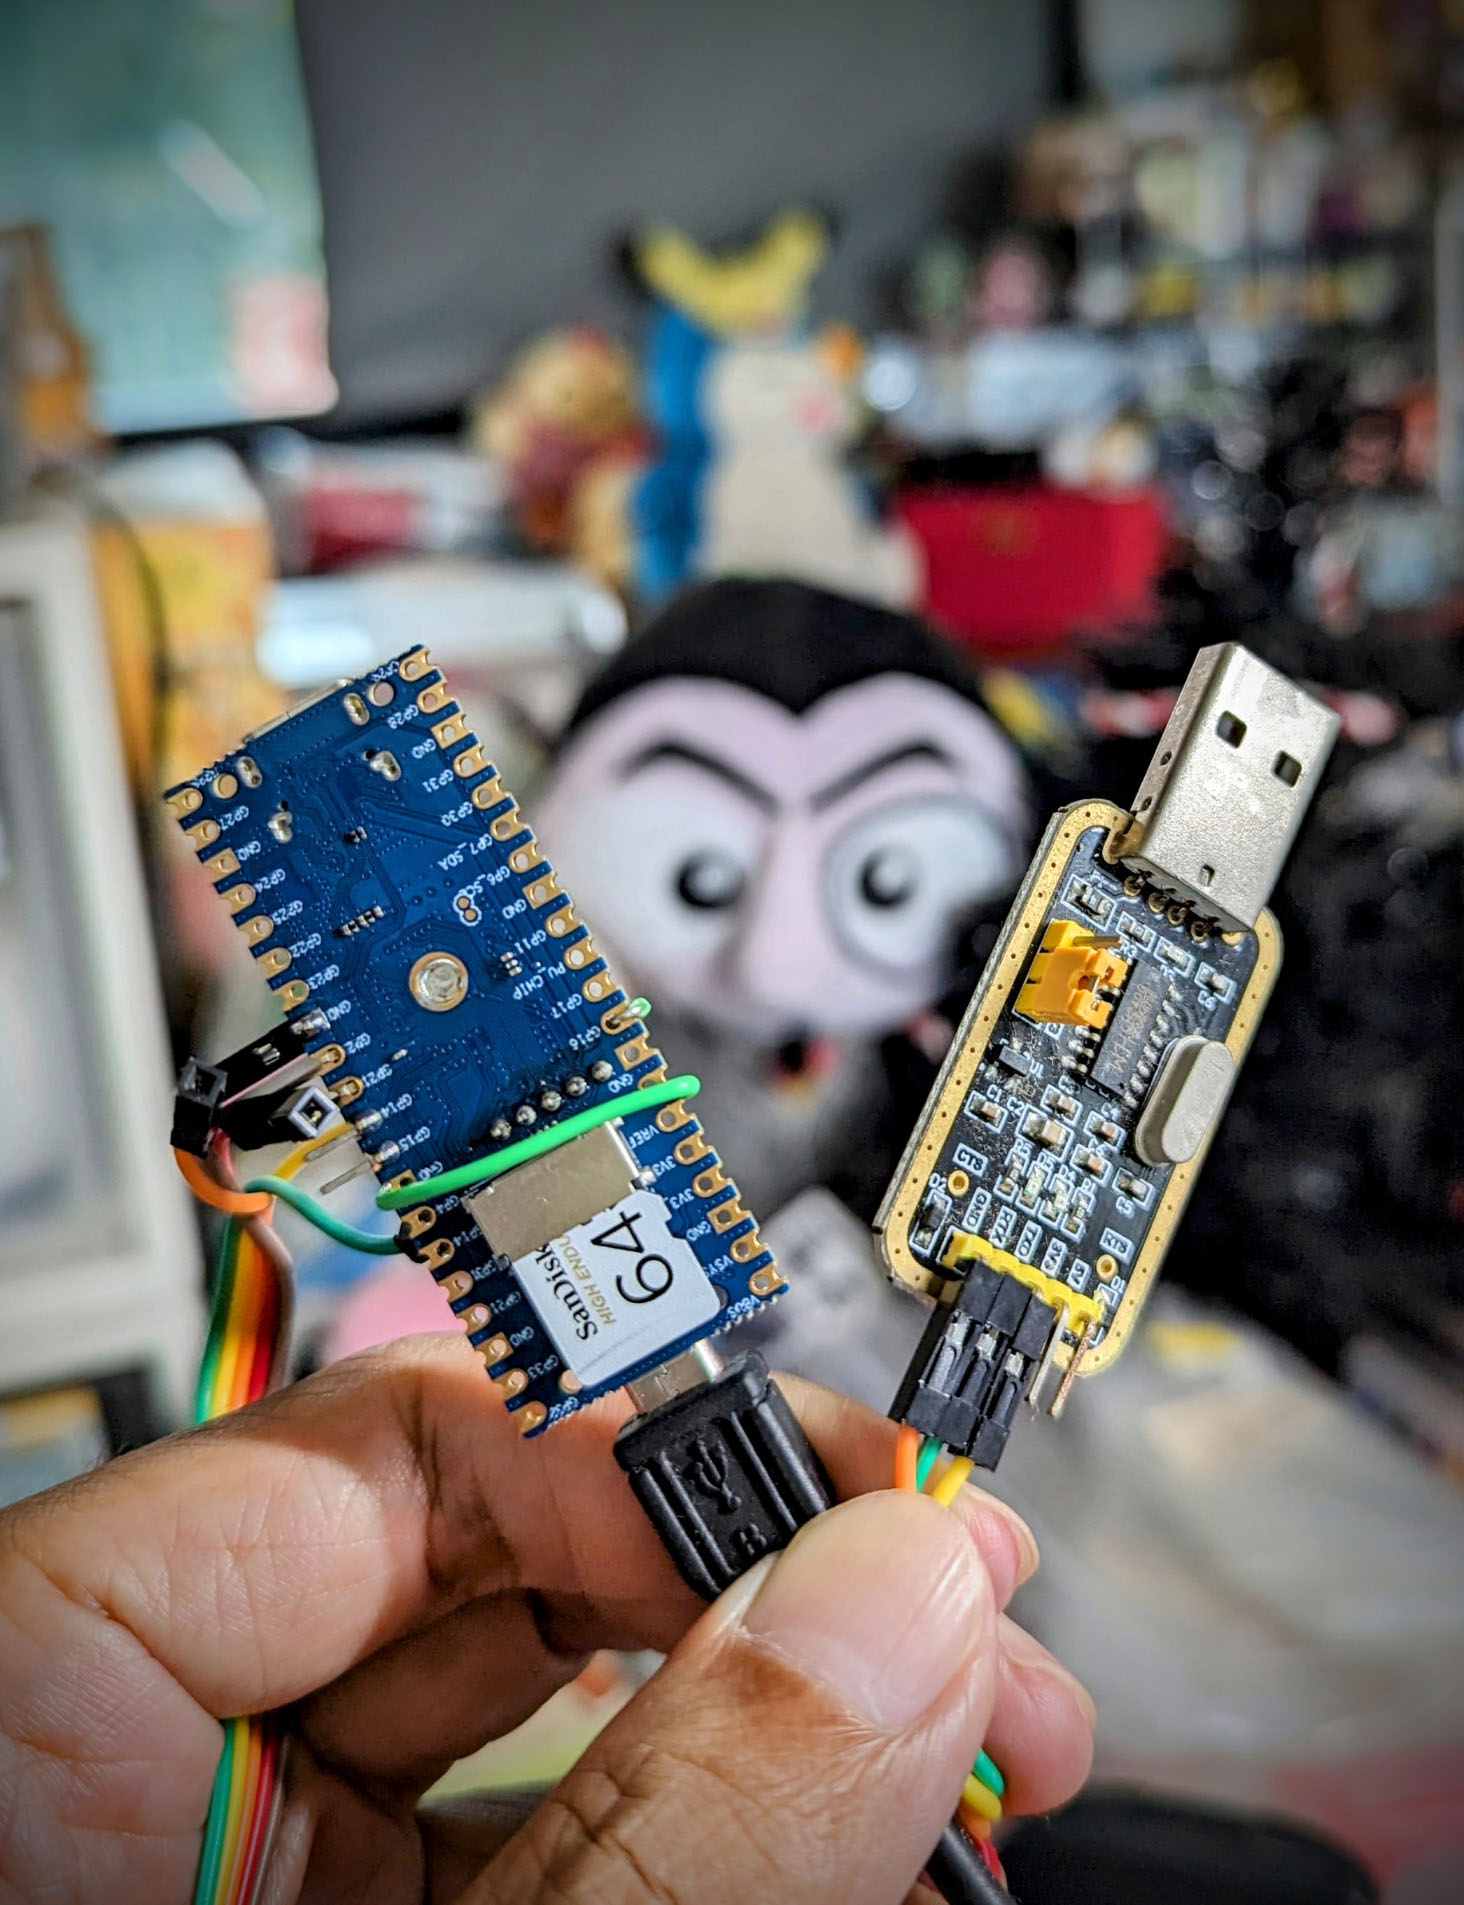
My horrigible soldering of Ox64 BL808 😬
Will Apache NuttX RTOS boot on Ox64 BL808?
Let’s examine the Linux Kernel Image for Ox64, and we replicate the same format for NuttX. (Which is how we ported NuttX to 64-bit RISC-V Star64 JH7110 SBC)
We download the Ox64 Binaries…
From the latest Ox64 Linux Release…
Unzip it and mount the SD Card Image…
$ ls -l sdcard-pine64_ox64_full_defconfig
-  13,154,816  Image
-       4,012  bl808-pine64-ox64.dtb
-       4,106  bl808-sipeed-m1s.dtb
-         350  boot-m1s.scr
-         352  boot-pine64.scr
-         352  boot.scr
d          96  extlinux
Dump the Image as hex…
$ hexdump sdcard-pine64_ox64_full_defconfig/Image
0000000 4d 5a 6f 10 20 08 01 00 00 00 20 00 00 00 00 00
0000010 00 80 cd 00 00 00 00 00 00 00 00 00 00 00 00 00
0000020 02 00 00 00 00 00 00 00 00 00 00 00 00 00 00 00
0000030 52 49 53 43 56 00 00 00 52 53 43 05 40 00 00 00
The Linux Kernel Image begins with this RISC-V Linux Image Header…
Here are the decoded bytes…
code0: Executable code
(4 bytes, offset 0x00)
4d 5a 6f 10 code1: Executable code
(4 bytes, offset 0x04)
20 08 01 00 text_offset: Image load offset, little endian
(8 bytes, offset 0x08)
00 00 20 00 00 00 00 00image_size: Effective Image size, little endian
(8 bytes, offset 0x10)
00 80 cd 00 00 00 00 00flags: Kernel flags, little endian
(8 bytes, offset 0x18)
00 00 00 00 00 00 00 00version: Version of this header (MinL MinM . MajL MajM)
(4 bytes, offset 0x20)
02 00 00 00res1: Reserved
(4 bytes, offset 0x24)
00 00 00 00res2: Reserved
(8 bytes, offset 0x28)
00 00 00 00 00 00 00 00magic: Magic number, little endian, “RISCV\x00\x00\x00”
(8 bytes, offset 0x30)
52 49 53 43 56 00 00 00magic2: Magic number 2, little endian, “RSC\x05”
(4 bytes, offset 0x38)
52 53 43 05res3: Reserved for PE COFF offset
(4 bytes, offset 0x3C)
40 00 00 00Our NuttX Kernel shall recreate this RISC-V Linux Image Header. (Total 0x40 bytes)
(Or U-Boot Bootloader might refuse to boot NuttX)
The above Header Values are exactly the same as Star64. (Except the Image Size and Executable Code, since the Jump Address is different)
Thus we simply reuse the code from NuttX Star64…
What’s inside the Linux Device Tree for Ox64?
Anything that might help NuttX for Ox64?
Let’s dump the Linux Device Tree for Ox64, based on the files that we have downloaded earlier…
dtc \
  -o bl808-pine64-ox64.dts \
  -O dts \
  -I dtb \
  bl808-pine64-ox64.dtb
Which produces the Decompiled Device Tree: bl808-pine64-ox64.dts
What’s inside the Decompiled Device Tree?
This says the Ox64 Linux will transmit to UART3 at Base Address 0x3000 2000…
serial@30002000 {
  compatible = "bflb,bl808-uart";
  reg = <0x30002000 0x1000>;
  interrupts = <0x14 0x04>;
  clocks = <0x04>;
  status = "okay";
  phandle = <0x0a>;
};We’ll do the same for NuttX and reuse the NuttX UART Driver for BL602…
And this specifies the Mailbox that will forward the Peripheral Interrupts from M0 Wireless Core to D0 Multimedia Core…
mailbox@30005000 {
  compatible = "bflb,bl808-ipc";
  reg = <
    0x30005000 0x20
    0x30005020 0x20
    0x2000a800 0x20
    0x2000a820 0x20
  >;
  interrupts = <0x36 0x04>;
  interrupt-controller;
  #interrupt-cells = <0x03>;
  #mbox-cells = <0x02>;
  status = "okay";
  phandle = <0x03>;
};NuttX will receive the Forwarded Peripheral Interrupts the same way, via the Mailbox.
Let’s talk about the Forwarding of Peripheral Interrupts…
What’s this forwarding of Peripheral Interrupts? (Pic above)
From the M0 Wireless Core, we see this log by the OpenBouffalo Firmware m0_lowload…
Starting Mailbox Handlers
Forwarding Interupt SDH (33) to D0 (0x58008bbc)
Forwarding Interupt GPIO (60) to D0 (0x58008d0e)
Running...
Mailbox IRQ Stats:
.Peripheral SDH (33): 0
.Peripheral GPIO (60): 0
Unhandled Interupts: 0 Unhandled Signals 0The log above says that…
M0 Wireless Core (OpenBouffalo Firmware) will forward the Peripheral Interrupts to D0 Multimedia Core (Linux)
The Forwarded Peripheral Interrupts are for SD Card Host Controller (SDH) and GPIO
Which makes sense because the U-Boot Bootloader (on D0 Multimedia Core) needs to access the SD Card (for booting Linux)
What are the BL808 Interrupt Numbers?
GPIO Interrupt is IRQ 60
Because GPIO_INT0 = IRQ_NUM_BASE + 44
(BL808 Reference Manual, Page 44)
And IRQ_NUM_BASE is 16
SD Card Interrupt is IRQ 33
How does the OpenBouffalo Firmware forward the Peripheral Interrupts?
Check out…
How we Setup SD Card Interrupt
How we Forward GPIO Interrupt
Refer to OpenBouffalo Firmware for m0_lowload
What about other Peripheral Interrupts?
OpenBouffalo Firmware for m0_lowload seems to support other Peripheral Interrupts (but disabled for now)…
Are there other ways to boot Linux on Ox64?
According to @madushan1000…
“You can also use u-boot. openbouffalo/u-boot/bl808-2023-02-19. You can also get rid of mailbox, but you will have to build the kernel yourself openbouffalo/linux/bl808”