📝 22 Jun 2021
How a Human teaches a Machine to light up an LED…
Human: Hello Machine, please light up the LED in a fun and interesting way.
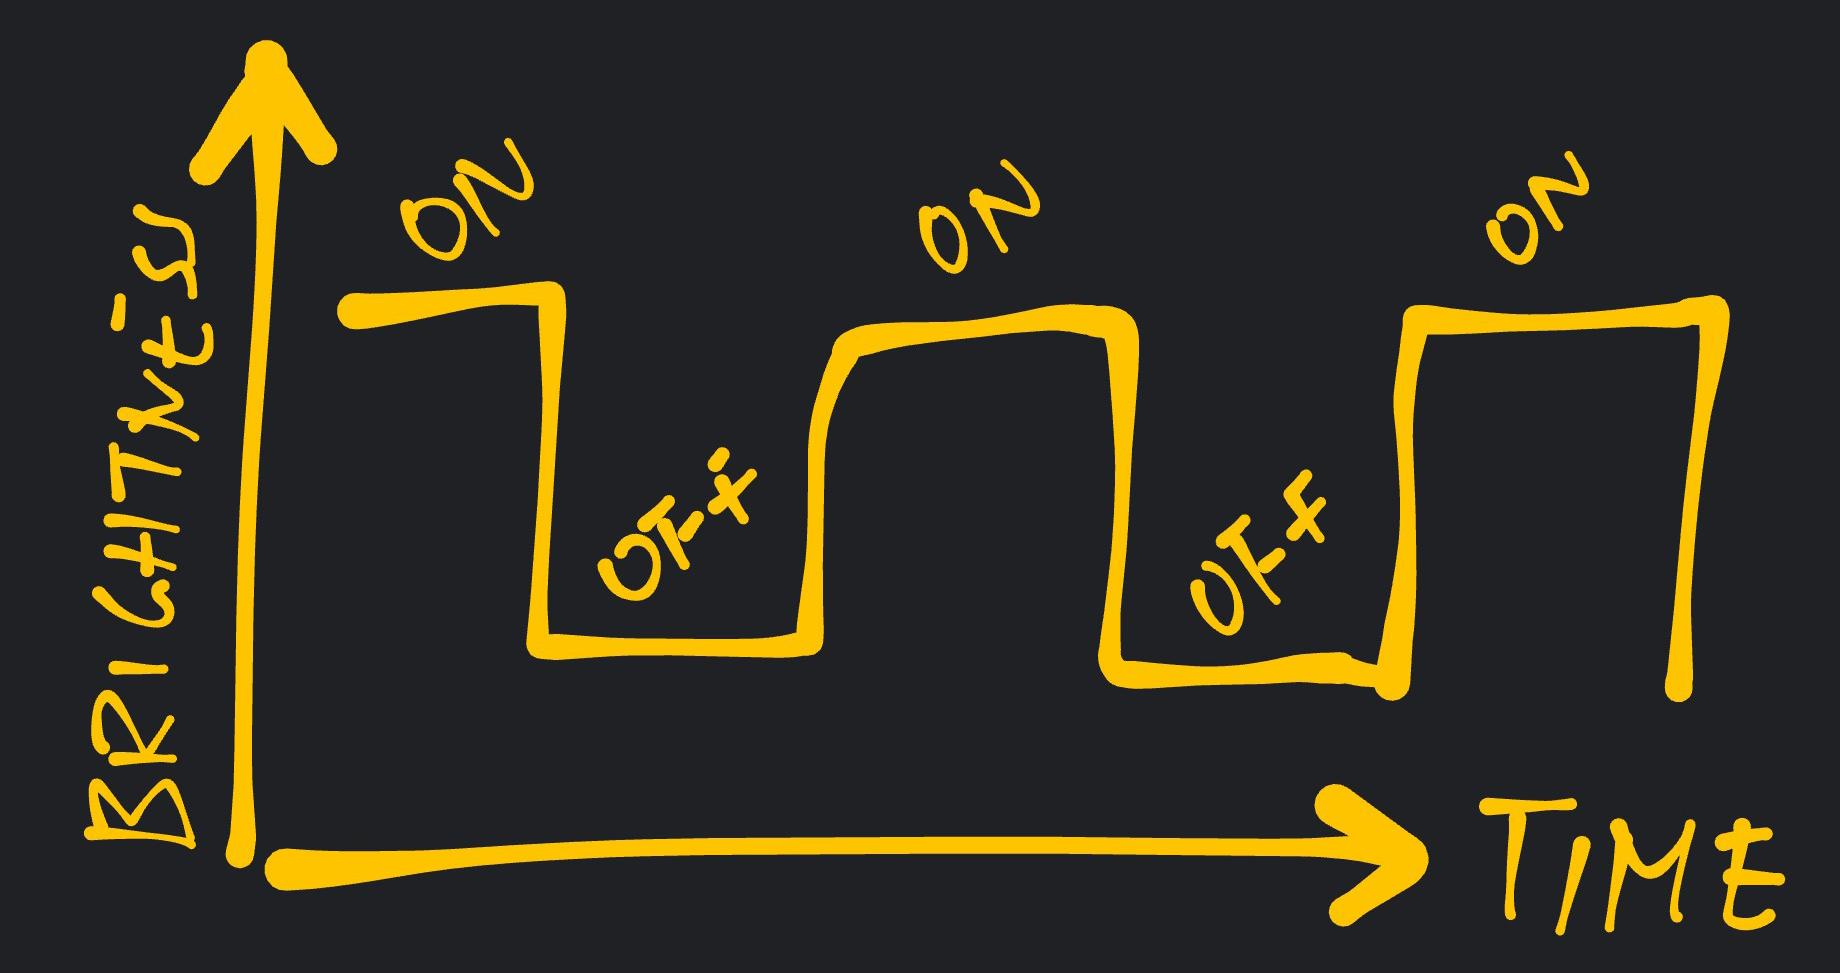
Machine: OK I shall light up the LED: on - off - on -off - on - off…

Human: That’s not very fun and interesting.
Machine: OK Hooman… Define fun and interesting.
Human: Make the LED glow gently brighter and dimmer, brighter and dimmer, and so on.
Machine: Like a wavy curve? Please teach me to draw a wavy curve.
Human: Like this…
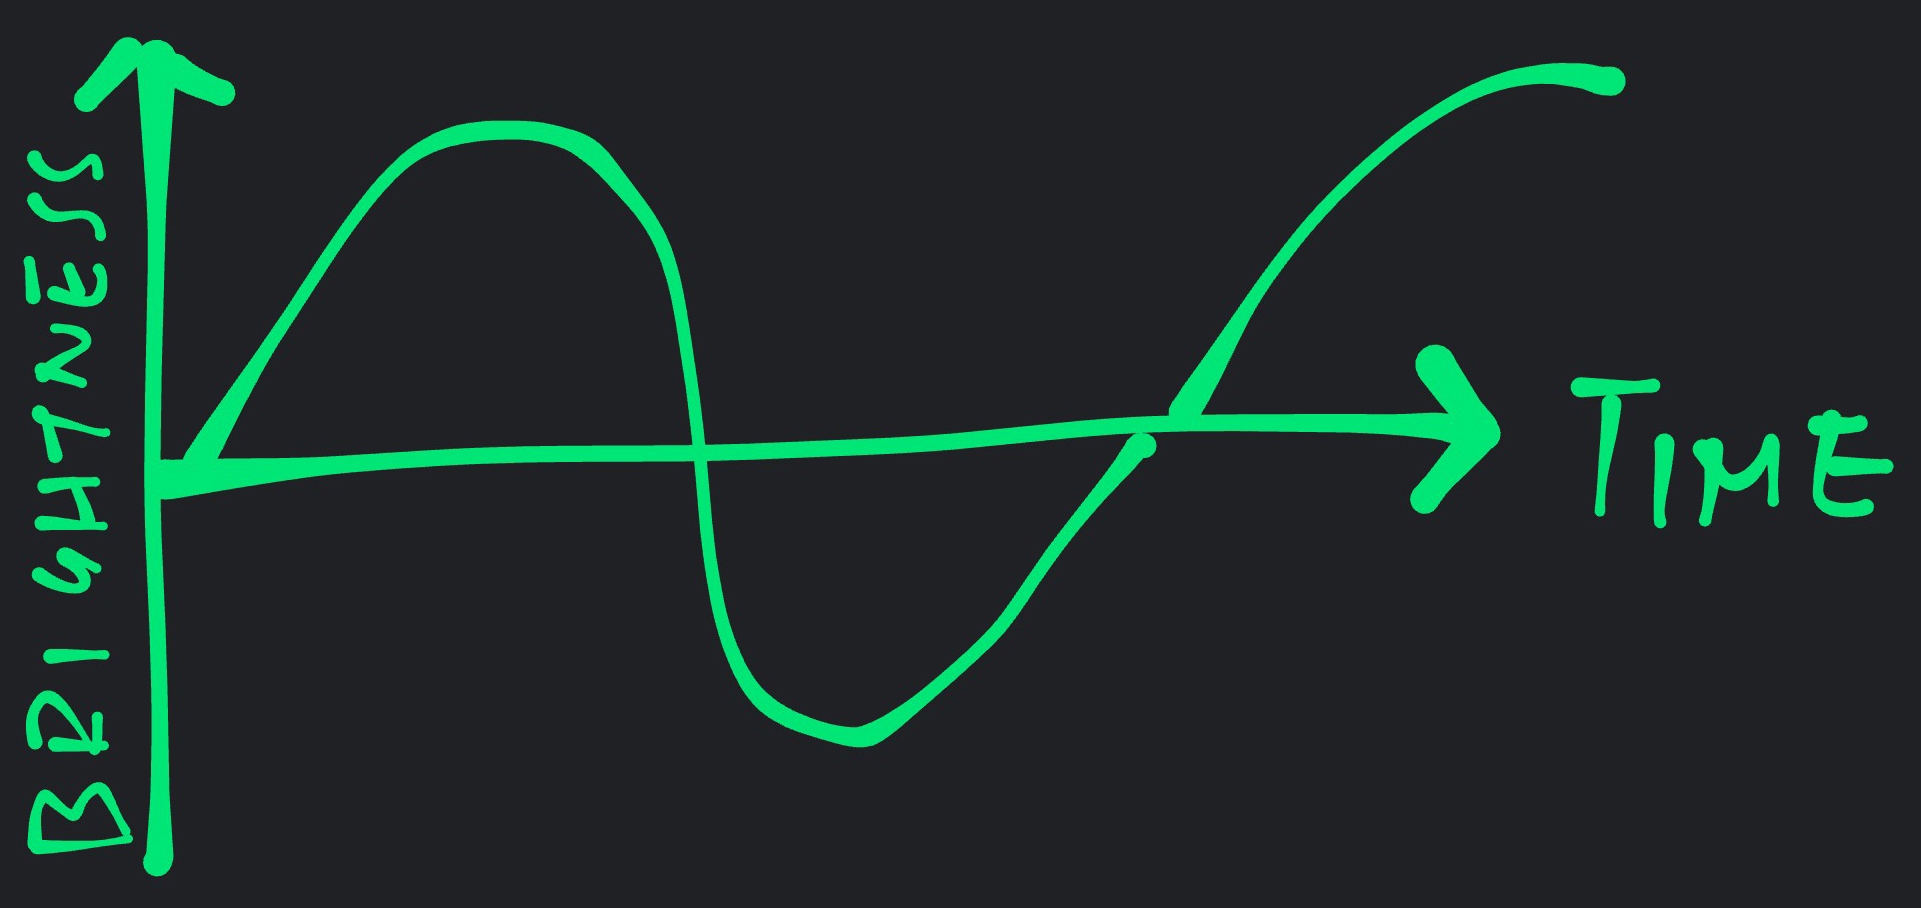
Machine: OK I have been trained. I shall now use my trained model to infer the values of the wavy curve. And light up the LED in a fun and interesting way.
This sounds like Science Fiction… But this is possible today!
(Except for the polite banter)
Read on to learn how Machine Learning (TensorFlow Lite) makes this possible on the BL602 RISC-V + WiFi SoC.
Remember in our story…
Our Machine learns to draw a wavy curve
Our Machine reproduces the wavy curve (to light up the LED)
To accomplish (1) and (2) on BL602, we shall use an open-source Machine Learning library: TensorFlow Lite for Microcontrollers
What’s a Tensor?
Remember these from our Math Textbook? Scalar, Vector and Matrix
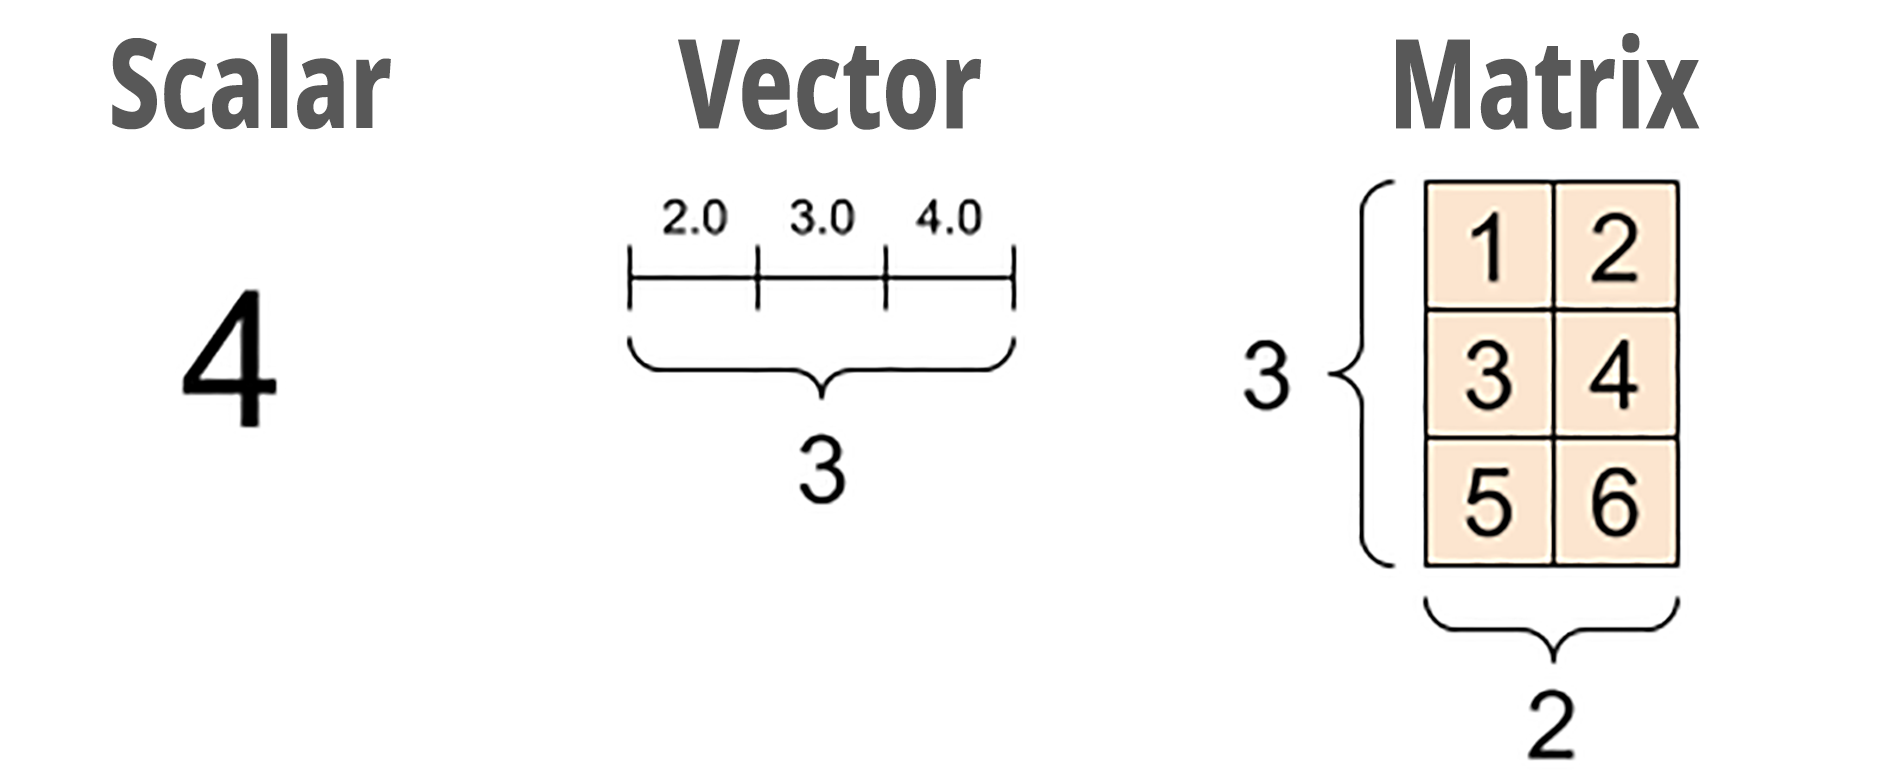
When we extend a Matrix from 2D to 3D, we get a Tensor With 3 Axes…
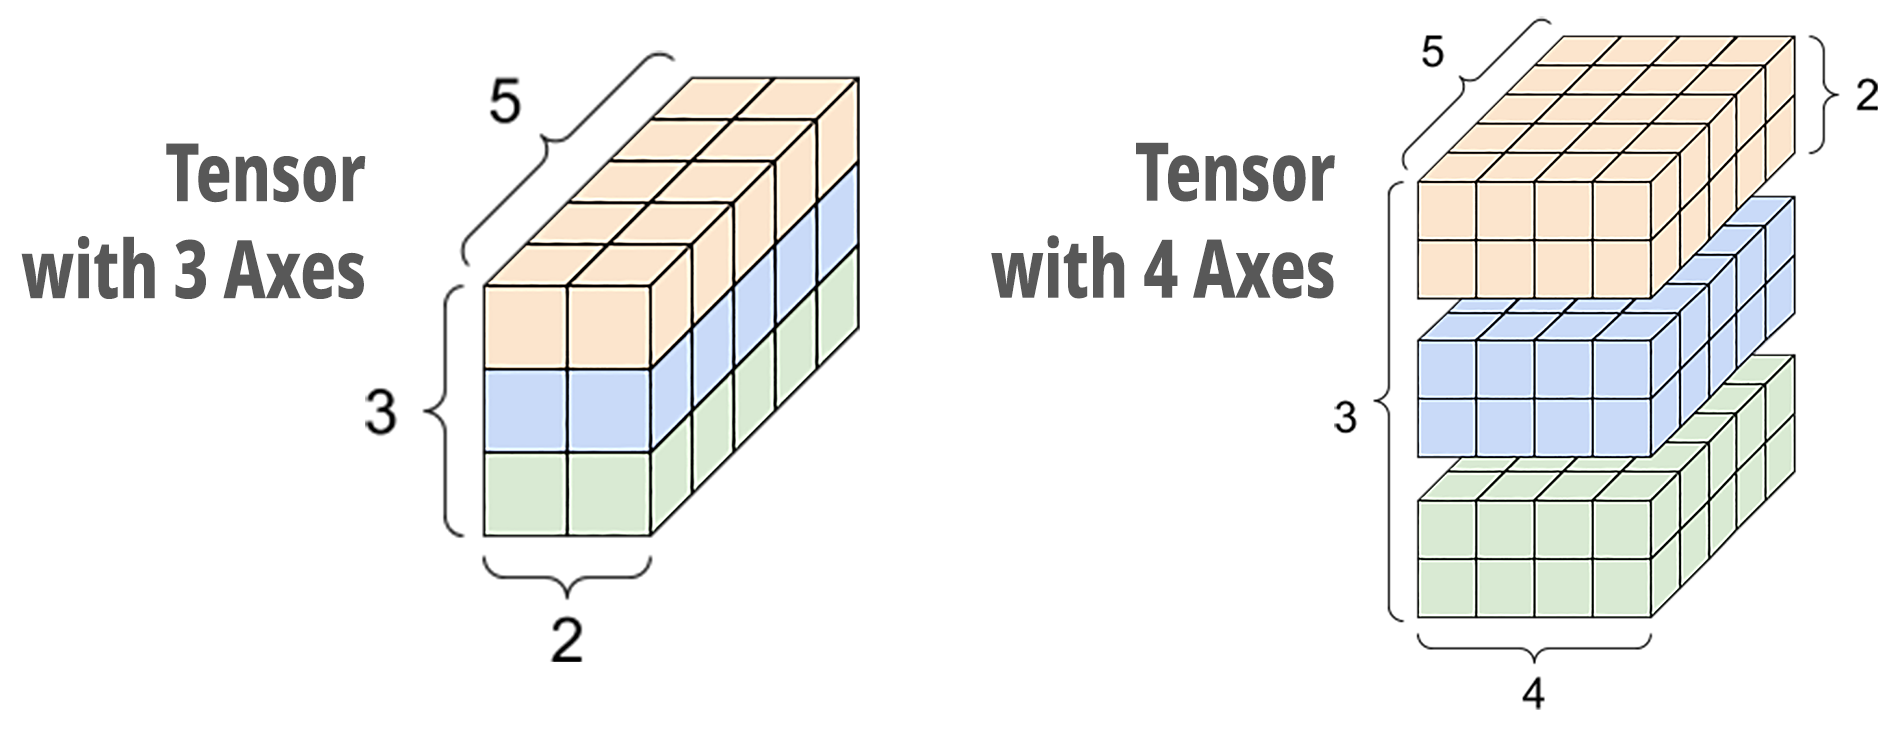
And yes we can have a Tensor With 4 or More Axes!
Tensors With Multiple Dimensions are really useful for crunching the numbers needed for Machine Learning.
That’s how the TensorFlow library works: Computing lots of Tensors.
(Fortunately we won’t need to compute any Tensors ourselves… The library does everything for us)
Why is the library named TensorFlow?
Because it doesn’t drip, it flows 😂
But seriously… In Machine Learning we push lots of numbers (Tensors) through various math functions over specific paths (Dataflow Graphs).
That’s why it’s named “TensorFlow”
(Yes it sounds like the Neural Network in our brain)
What’s the “Lite” version of TensorFlow?
TensorFlow normally runs on powerful servers to perform Machine Learning tasks. (Like Speech Recognition and Image Recognition)
We’re using TensorFlow Lite, which is optimised for microcontrollers…
Works on microcontrollers with limited RAM
(Including Arduino, Arm and ESP32)
Uses Static Memory instead of Dynamic Memory (Heap)
But it only supports Basic Models of Machine Learning
Today we shall study the TensorFlow Lite library that has been ported to BL602…
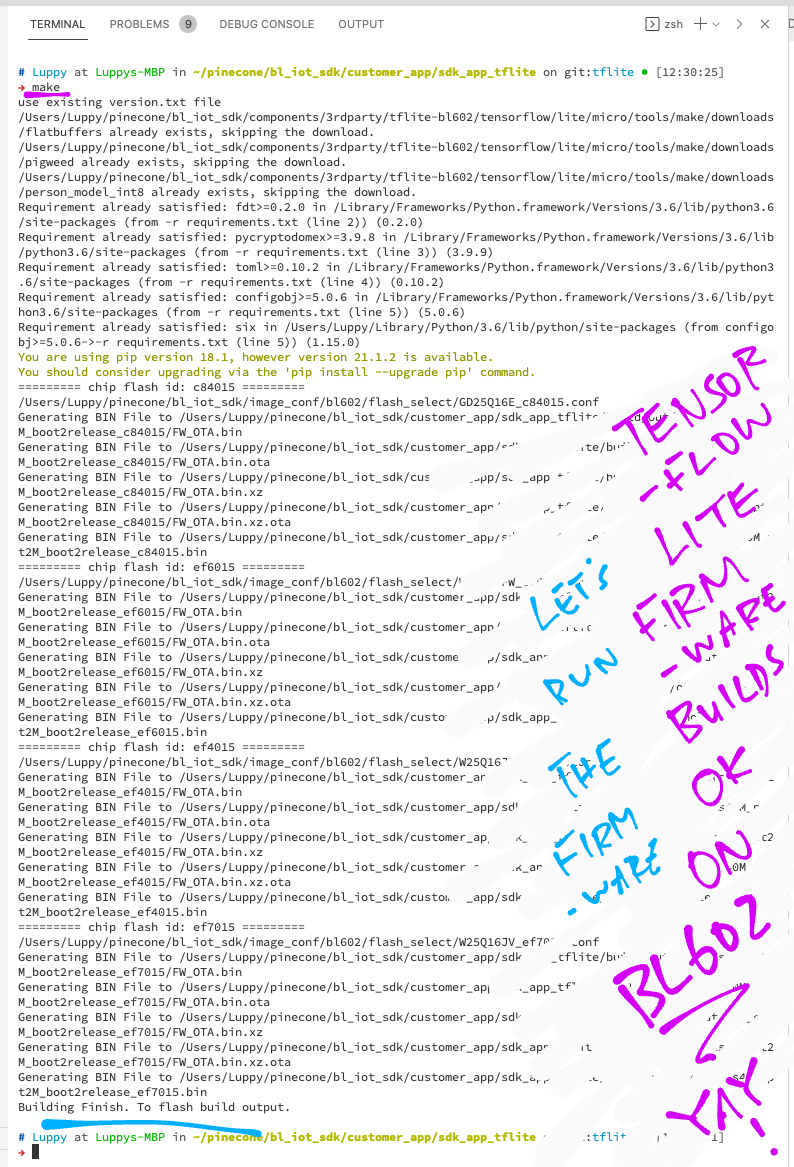
Let’s build, flash and run the TensorFlow Lite Firmware for BL602… And watch Machine Learning in action!
Download the Firmware Binary File sdk_app_tflite.bin from…
Alternatively, we may build the Firmware Binary File sdk_app_tflite.bin from the source code…
## Download the master branch of lupyuen's bl_iot_sdk
git clone --recursive --branch master https://github.com/lupyuen/bl_iot_sdk

## TODO: Change this to the full path of bl_iot_sdk
export BL60X_SDK_PATH=$PWD/bl_iot_sdk
export CONFIG_CHIP_NAME=BL602

## Build the firmware
cd bl_iot_sdk/customer_app/sdk_app_tflite
make

## For WSL: Copy the firmware to /mnt/c/blflash, which refers to c:\blflash in Windows
mkdir /mnt/c/blflash
cp build_out/sdk_app_tflite.bin /mnt/c/blflash
More details on building bl_iot_sdk
Follow these steps to install blflash…
We assume that our Firmware Binary File sdk_app_tflite.bin has been copied to the blflash folder.
Set BL602 to Flashing Mode and restart the board…
For PineCone:
Set the PineCone Jumper (IO 8) to the H Position (Like this)
Press the Reset Button
For BL10:
Connect BL10 to the USB port
Press and hold the D8 Button (GPIO 8)
Press and release the EN Button (Reset)
Release the D8 Button
For Ai-Thinker Ai-WB2, Pinenut and MagicHome BL602:
Disconnect the board from the USB Port
Connect GPIO 8 to 3.3V
Reconnect the board to the USB port
Enter these commands to flash sdk_app_tflite.bin to BL602 over UART…
## For Linux:
blflash flash build_out/sdk_app_tflite.bin \
    --port /dev/ttyUSB0

## For macOS:
blflash flash build_out/sdk_app_tflite.bin \
    --port /dev/tty.usbserial-1420 \
    --initial-baud-rate 230400 \
    --baud-rate 230400

## For Windows: Change COM5 to the BL602 Serial Port
blflash flash c:\blflash\sdk_app_tflite.bin --port COM5
(For WSL: Do this under plain old Windows CMD, not WSL, because blflash needs to access the COM port)
More details on flashing firmware
Set BL602 to Normal Mode (Non-Flashing) and restart the board…
For PineCone:
Set the PineCone Jumper (IO 8) to the L Position (Like this)
Press the Reset Button
For BL10:
For Ai-Thinker Ai-WB2, Pinenut and MagicHome BL602:
Disconnect the board from the USB Port
Connect GPIO 8 to GND
Reconnect the board to the USB port
After restarting, connect to BL602’s UART Port at 2 Mbps like so…
For Linux:
screen /dev/ttyUSB0 2000000For macOS: Use CoolTerm (See this)
For Windows: Use putty (See this)
Alternatively: Use the Web Serial Terminal (See this)
We’re ready to enter the Machine Learning Commands into the BL602 Firmware!
More details on connecting to BL602
Remember this wavy curve?

We wanted to apply Machine Learning on BL602 to…
Learn the wavy curve
Reproduce values from the wavy curve
Watch what happens when we enter the Machine Learning Commands into the BL602 Firmware.
We enter this command to load BL602’s “brain” with knowledge about the wavy curve…
init(Wow wouldn’t it be great if we could do this for our School Tests?)
Technically we call this “Loading The TensorFlow Lite Model”.
The TensorFlow Lite Model works like a “brain dump” or “knowledge snapshot” that tells BL602 everything about the wavy curve.
(How did we create the model? We’ll learn in a while)
Now that BL602 has loaded the TensorFlow Lite Model (and knows everything about the wavy curve), let’s test it!
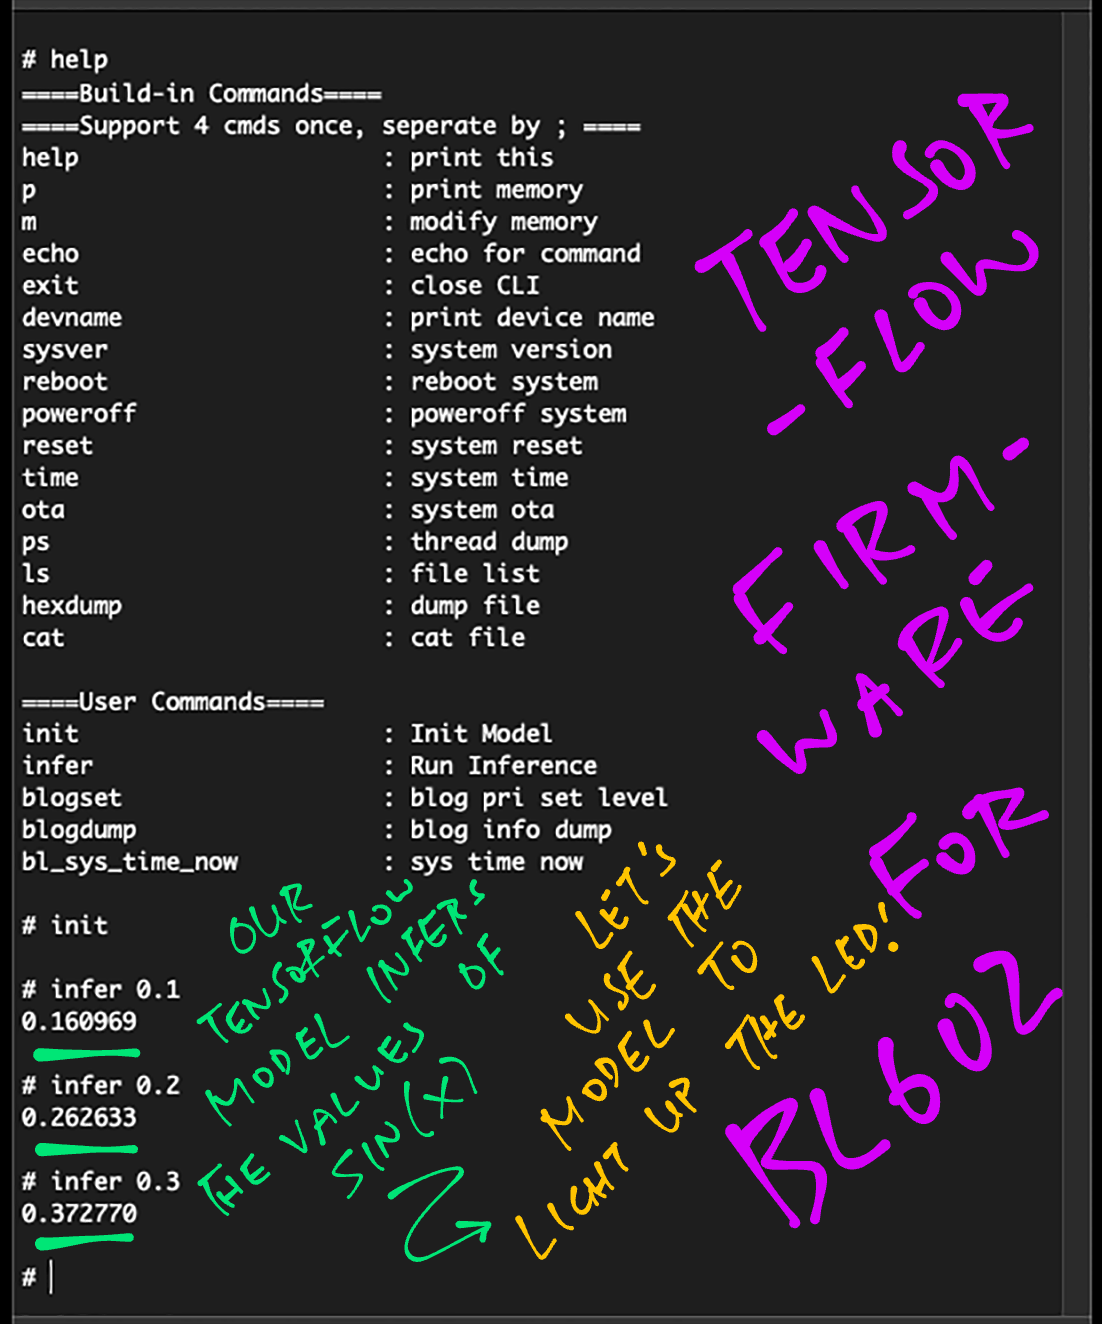
This command asks BL602 to infer the output value of the wavy curve, given the input value 0.1…
infer 0.1BL602 responds with the inferred output value…
0.160969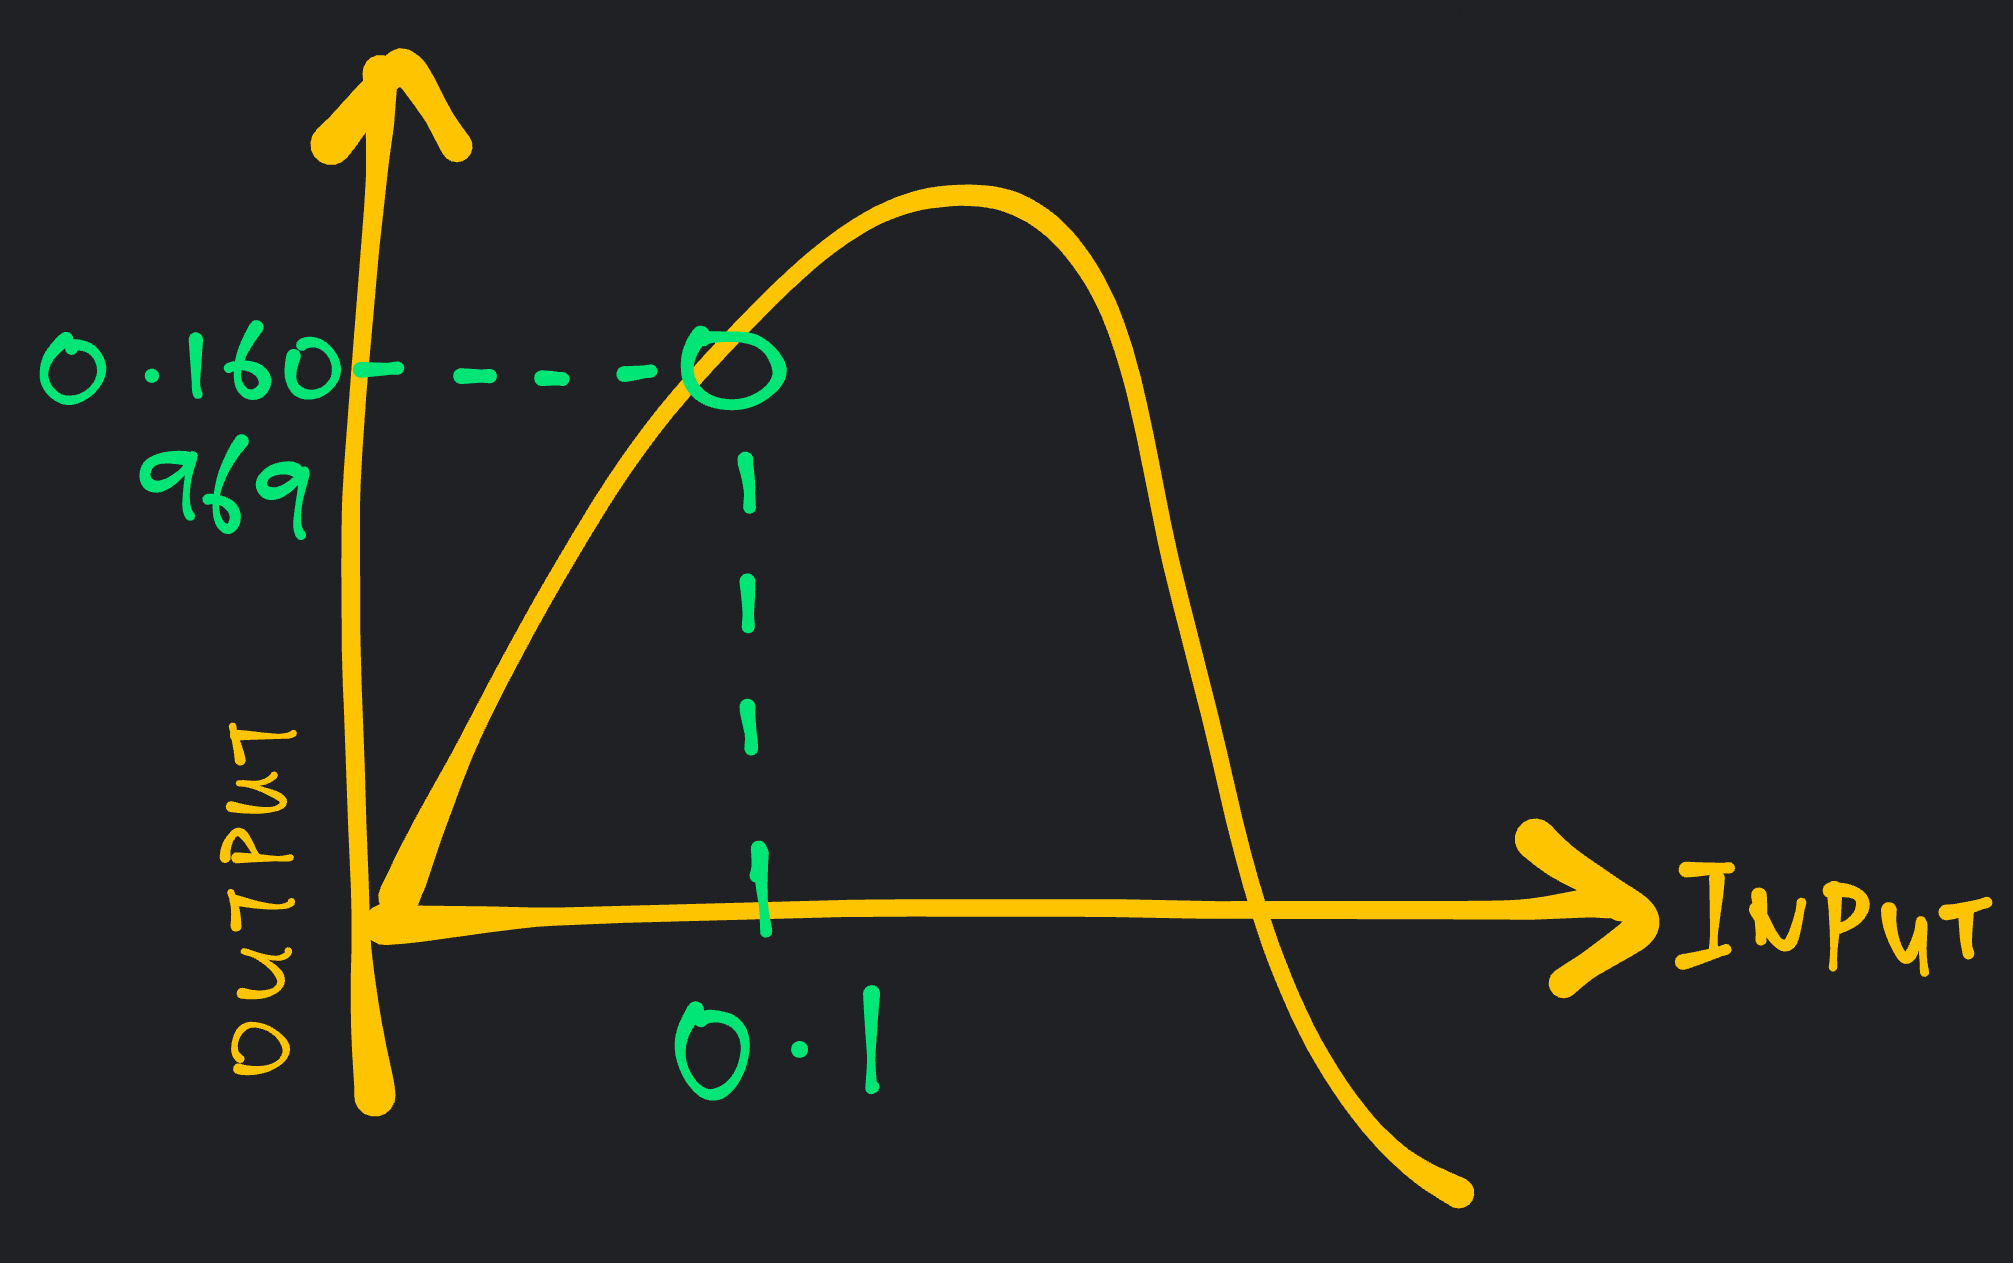
Let’s test it with two more input values: 0.2 and 0.3…
## infer 0.2
0.262633

## infer 0.3
0.372770
BL602 responds with the inferred output values: 0.262633 and 0.372770
That’s how we load a TensorFlow Lite Model on BL602… And run an inference with the TensorFlow Lite Model!
The wavy curve looks familiar…?

Yes it was the Sine Function all along!
y = sin( x )
(Input value x is in radians, not degrees)
So we were using a TensorFlow Lite Model for the Sine Function?
Right! The “init” command from the previous chapter loads a TensorFlow Lite Model that’s trained with the Sine Function.
How accurate are the values inferred by the model?
Sadly Machine Learning Models are rarely 100% accurate.
Here’s a comparison of the values inferred by the model (left) and the actual values (right)…
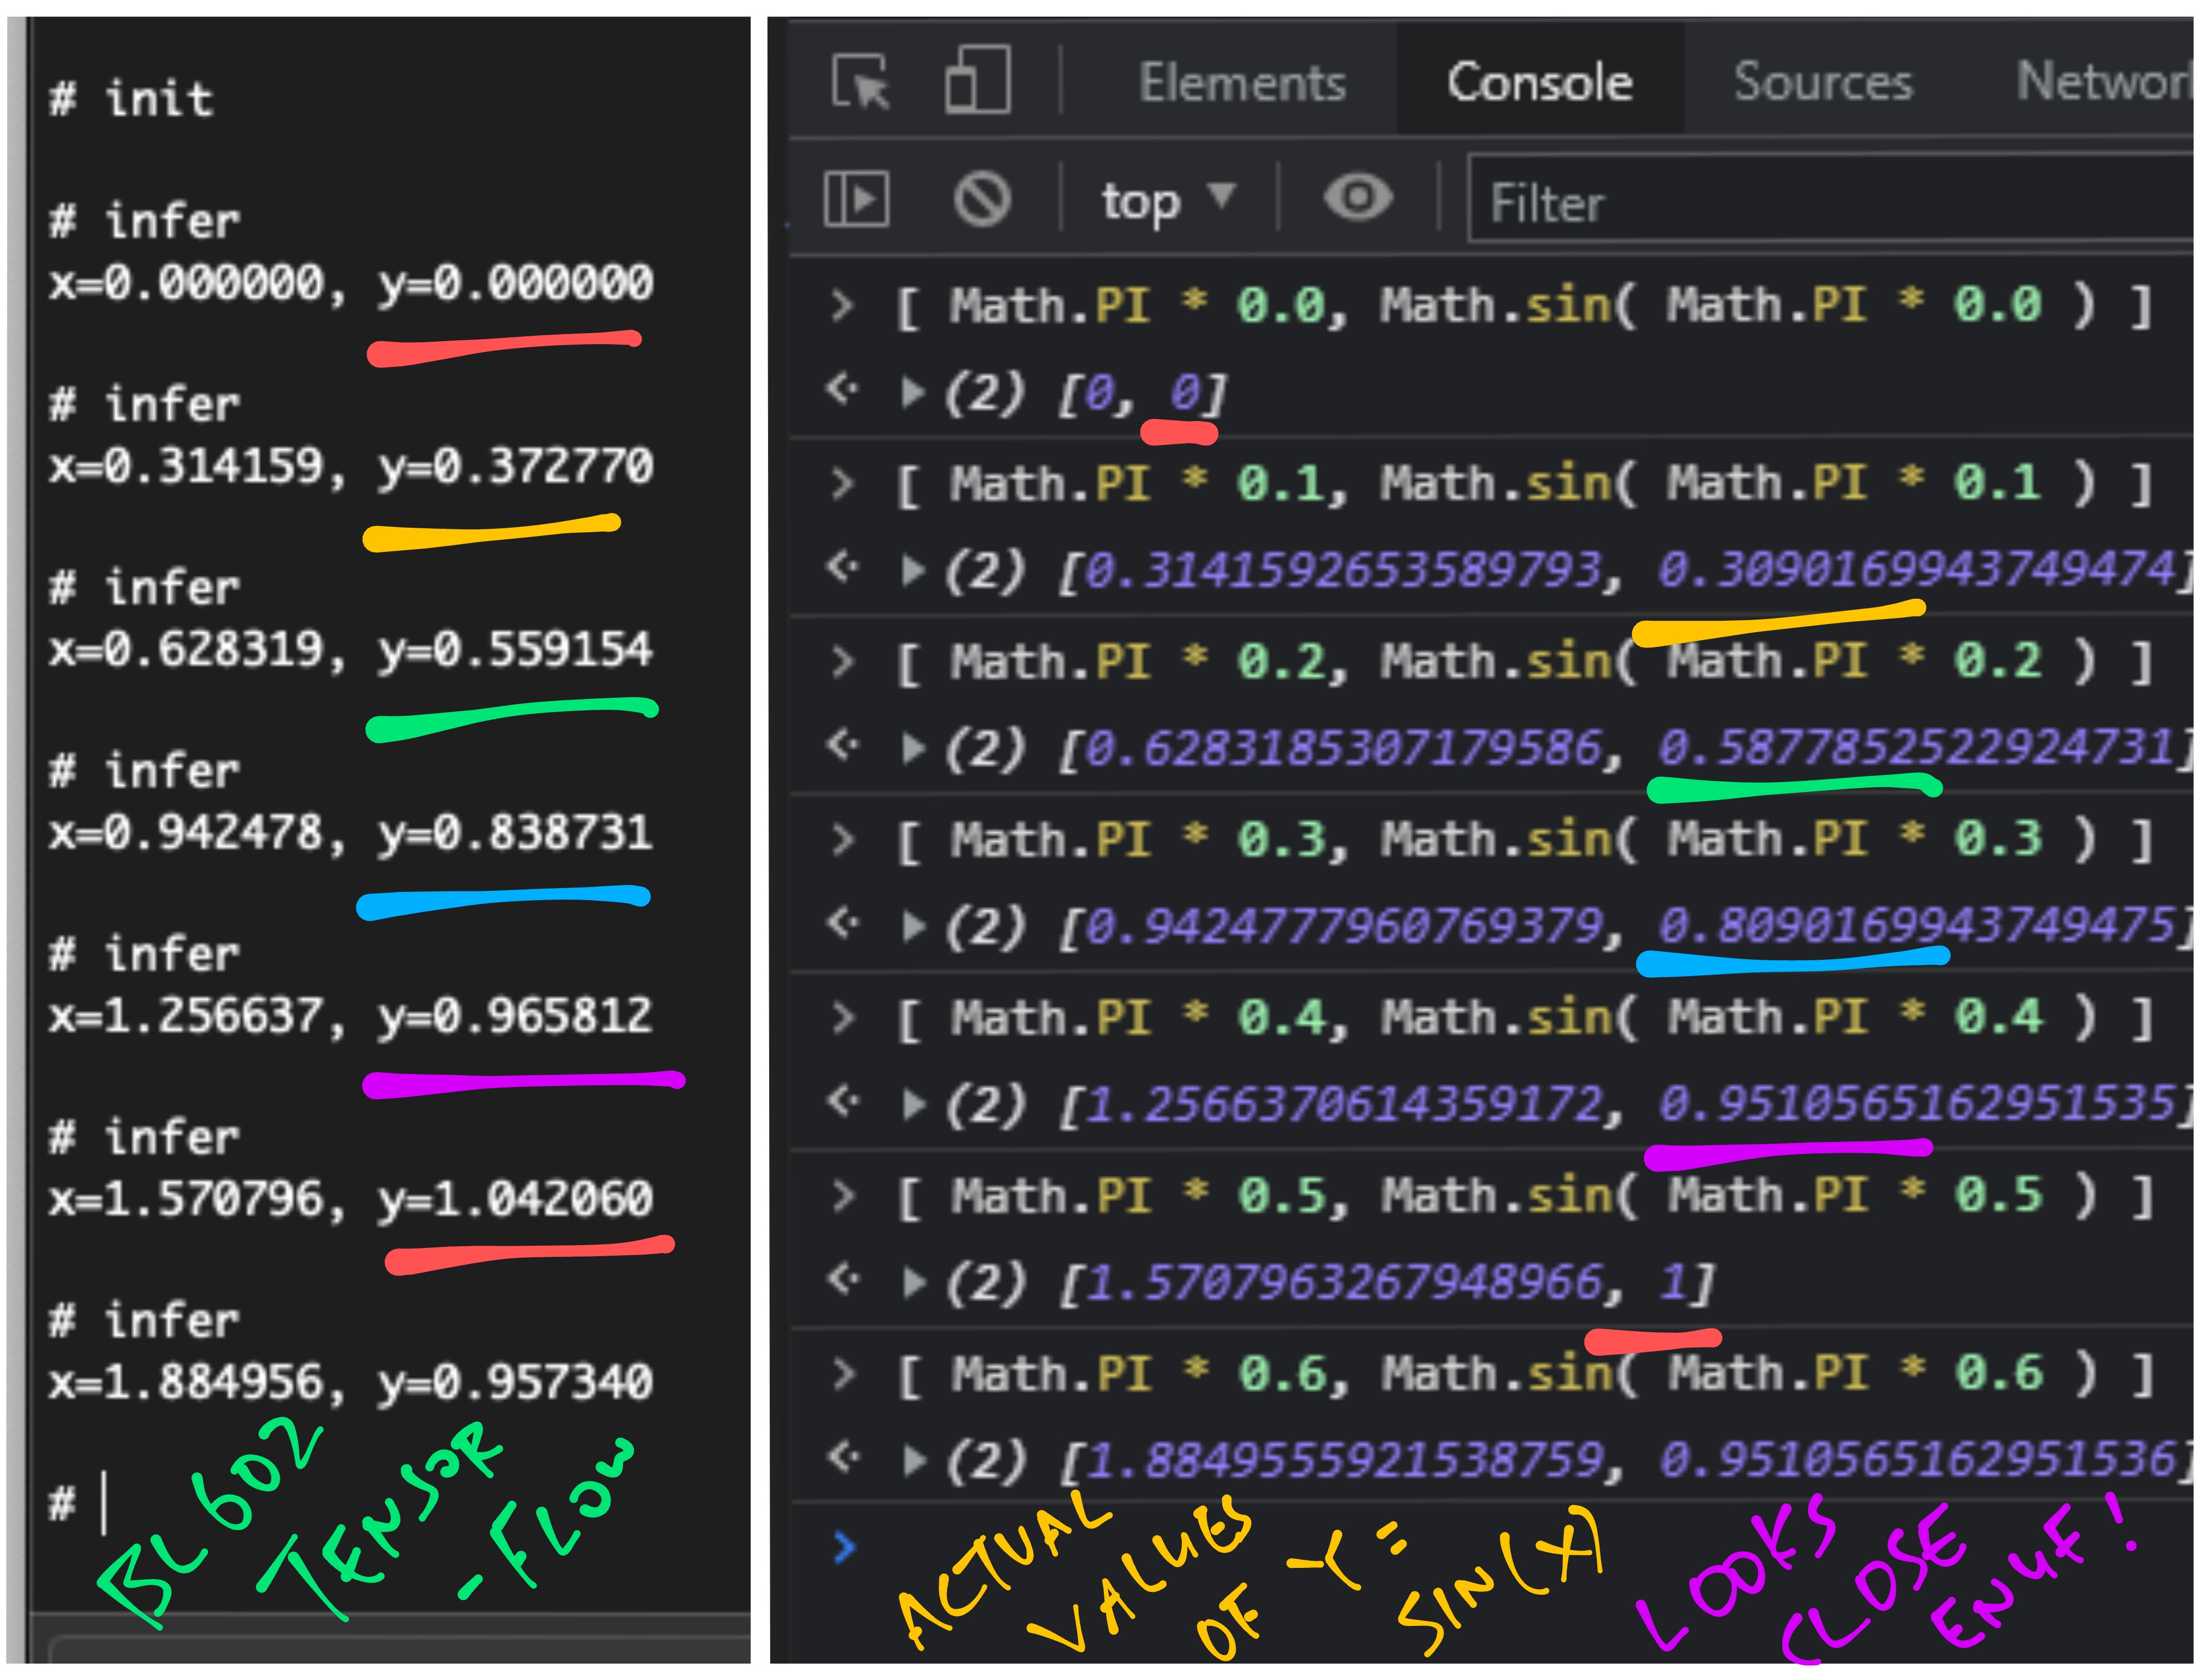
But we can train the model to be more accurate right?
Training the Machine Learning Model on too much data may cause Overfitting…
When we vary the input value slightly, the output value may fluctuate wildly.
(We definitely don’t want our LED to glow erratically!)
Is the model accurate enough?
Depends how we’ll be using the model.
For glowing an LED it’s probably OK to use a Machine Learning Model that’s accurate to 1 Significant Digit.
We’ll watch the glowing LED in a while!
(The TensorFlow Lite Model came from this sample code)
Let’s study the code inside the TensorFlow Lite Firmware for BL602… To understand how it loads the TensorFlow Lite Model and runs inferences.
Here are the C++ Global Variables needed for TensorFlow Lite: main_functions.cc
// Globals for TensorFlow Lite
namespace {
  tflite::ErrorReporter* error_reporter = nullptr;
  const tflite::Model* model = nullptr;
  tflite::MicroInterpreter* interpreter = nullptr;
  TfLiteTensor* input = nullptr;
  TfLiteTensor* output = nullptr;

  constexpr int kTensorArenaSize = 2000;
  uint8_t tensor_arena[kTensorArenaSize];
}
error_reporter will be used for printing error messages to the console
model is the TensorFlow Lite Model that we shall load into memory
interpreter provides the interface for running inferences with the TensorFlow Lite Model
input is the Tensor that we shall set to specify the input values for running an inference
output is the Tensor that will contain the output values after running an inference
tensor_arena is the working memory that will be used by TensorFlow Lite to compute inferences
Now we study the code that populates the above Global Variables.
Here’s the “init” command for our BL602 Firmware: demo.c
/// Command to load the TensorFlow Lite Model (Sine Wave)
static void init(char *buf, int len, int argc, char **argv) {
  load_model();
}
The command calls load_model to load the TensorFlow Lite Model: main_functions.cc
// Load the TensorFlow Lite Model into Static Memory
void load_model() {
tflite::InitializeTarget();
// Set up logging. Google style is to avoid globals or statics because of
// lifetime uncertainty, but since this has a trivial destructor it's okay.
static tflite::MicroErrorReporter micro_error_reporter;
error_reporter = µ_error_reporter;Here we initialise the TensorFlow Lite Library.
Next we load the TensorFlow Lite Model…
  // Map the model into a usable data structure. This doesn't involve any
  // copying or parsing, it's a very lightweight operation.
  model = tflite::GetModel(g_model);
  if (model->version() != TFLITE_SCHEMA_VERSION) {
    TF_LITE_REPORT_ERROR(error_reporter,
      "Model provided is schema version %d not equal "
      "to supported version %d.",
      model->version(), TFLITE_SCHEMA_VERSION);
    return;
  }
g_model contains the TensorFlow Lite Model Data, as defined in model.cc
We create the TensorFlow Lite Interpreter that will be called to run inferences…
  // This pulls in all the operation implementations we need.
  static tflite::AllOpsResolver resolver;

  // Build an interpreter to run the model with.
  static tflite::MicroInterpreter static_interpreter(
      model, resolver, tensor_arena, kTensorArenaSize, error_reporter);
  interpreter = &static_interpreter;
Then we allocate the working memory that will be used by the TensorFlow Lite Library to compute inferences…
  // Allocate memory from the tensor_arena for the model's tensors.
  TfLiteStatus allocate_status = interpreter->AllocateTensors();
  if (allocate_status != kTfLiteOk) {
    TF_LITE_REPORT_ERROR(error_reporter, "AllocateTensors() failed");
    return;
  }
Finally we remember the Input and Output Tensors…
  // Obtain pointers to the model's input and output tensors.
  input = interpreter->input(0);
  output = interpreter->output(0);
}
Which will be used in the next chapter to run inferences.
Earlier we entered this command to run an inference with the TensorFlow Lite Model…
## infer 0.1
0.160969
Here’s the “infer” command in our BL602 Firmware: demo.c
/// Command to infer values with TensorFlow Lite Model (Sine Wave)
static void infer(char *buf, int len, int argc, char **argv) {
  //  Convert the argument to float
  if (argc != 2) { printf("Usage: infer <float>\r\n"); return; }
  float input = atof(argv[1]);
To run an inference, the “infer” command accepts one input value: a floating-point number.
We pass the floating-point number to the run_inference function…
  //  Run the inference
  float result = run_inference(input);

  //  Show the result
  printf("%f\r\n", result);
}
And we print the result of the inference. (Another floating-point number)
run_inference is defined in main_functions.cc …
// Run an inference with the loaded TensorFlow Lite Model.
// Return the output value inferred by the model.
float run_inference(
  float x) {  //  Value to be fed into the model

  // Quantize the input from floating-point to integer
  int8_t x_quantized = x / input->params.scale
    + input->params.zero_point;
Interesting Fact: Our TensorFlow Lite Model (for Sine Function) actually accepts an integer input and produces an integer output! (8-bit integers)
(Integer models run more efficiently on microcontrollers)
The code above converts the floating-point input to an 8-bit integer.
We pass the 8-bit integer input to the TensorFlow Lite Model through the Input Tensor…
  // Place the quantized input in the model's input tensor
  input->data.int8[0] = x_quantized;
Then we call the interpreter to run the inference on the TensorFlow Lite Model…
  // Run inference, and report any error
  TfLiteStatus invoke_status = interpreter->Invoke();
  if (invoke_status != kTfLiteOk) {
    TF_LITE_REPORT_ERROR(error_reporter, "Invoke failed on x: %f\n",
      static_cast<double>(x));
    return 0;
  }
The 8-bit integer result is returned through the Output Tensor…
  // Obtain the quantized output from model's output tensor
  int8_t y_quantized = output->data.int8[0];
We convert the 8-bit integer result to floating-point…
  // Dequantize the output from integer to floating-point
  float y = (y_quantized - output->params.zero_point)
    * output->params.scale;

  // Output the results
  return y;
}
Finally we return the floating-point result.
The code we’ve seen is derived from the TensorFlow Lite Hello World Sample, which is covered here…
As promised, now we light up the BL602 LED with TensorFlow Lite!
Here’s the “glow” command in our BL602 Firmware: demo.c
/// PineCone Blue LED is connected on BL602 GPIO 11
/// TODO: Change the LED GPIO Pin Number for your BL602 board
#define LED_GPIO 11

/// Use PWM Channel 1 to control the LED GPIO.
/// TODO: Select the PWM Channel that matches the LED GPIO
#define PWM_CHANNEL 1

/// Command to glow the LED with values generated by the TensorFlow Lite Model (Sine Wave).
/// We vary the LED brightness with Pulse Widge Modulation:
/// blinking the LED very rapidly with various Duty Cycle settings.
/// See https://lupyuen.codeberg.page/articles/led#from-gpio-to-pulse-width-modulation-pwm
static void glow(char *buf, int len, int argc, char **argv) {
  //  Configure the LED GPIO for PWM
  int rc = bl_pwm_init(
    PWM_CHANNEL,  //  PWM Channel (1)
    LED_GPIO,     //  GPIO Pin Number (11)
    2000          //  PWM Frequency (2,000 Hz)
  );
  assert(rc == 0);
The “glow” command takes the Output Values from the TensorFlow Lite Model (Sine Function) and sets the brightness of the BL602 LED…

The code above configures the LED GPIO Pin for PWM Output at 2,000 cycles per second, by calling the BL602 PWM Hardware Abstraction Layer (HAL).
(PWM or Pulse Width Modulation means that we’ll be pulsing the LED very rapidly at 2,000 times a second, to vary the perceived brightness. See this)
To set the (perceived) LED Brightness, we set the PWM Duty Cycle by calling the BL602 PWM HAL…
  //  Dim the LED by setting the Duty Cycle to 100%
  rc = bl_pwm_set_duty(
    PWM_CHANNEL,  //  PWM Channel (1)
    100           //  Duty Cycle (100%)
  );
  assert(rc == 0);
Here we set the Duty Cycle to 100%, which means that the LED GPIO will be set to High for 100% of every PWM Cycle.
Our LED switches off when the LED GPIO is set to High. Thus the above code effectively sets the LED Brightness to 0%.
But PWM won’t actually start until we do this…
  //  Start the PWM, which will blink the LED very rapidly (2,000 times a second)
  rc = bl_pwm_start(PWM_CHANNEL);
  assert(rc == 0);
Now that PWM is started for our LED GPIO, let’s vary the LED Brightness…
We do this 4 times
(Giving the glowing LED more time to mesmerise us)
We step through the Input Values from 0 to 6.283 (or Pi * 2) at intervals of 0.05
(Because the TensorFlow Lite Model has been trained on Input Values 0 to Pi * 2… One cycle of the Sine Wave)
  //  Repeat 4 times...
  for (int i = 0; i < 4; i++) {

    //  With input values from 0 to 2 * Pi (stepping by 0.05)...
    for (float input = 0; input < kXrange; input += 0.05) {  //  kXrange is 2 * Pi: 6.283
Inside the loops, we run the TensorFlow Lite inference with the Input Value (0 to 6.283)…
      //  Infer the output value with the TensorFlow Model (Sine Wave)
      float output = run_inference(input);
(We’ve seen run_inference in the previous chapter)
The TensorFlow Lite Model (Sine Function) produces an Output Value that ranges from -1 to 1.
Negative values are not meaningful for setting the LED Brightness, hence we multiply the Output Value by itself…
      //  Output value has range -1 to 1.
      //  We square the output value to produce range 0 to 1.
      float output_squared = output * output;
(Why compute Output Squared instead of Output Absolute? Because Sine Squared produces a smooth curve, whereas Sine Absolute creates a sharp beak)
Next we set the Duty Cycle to the Output Value Squared, scaled to 100%…
      //  Set the brightness (Duty Cycle) of the PWM LED to the
      //  output value squared, scaled to 100%
      rc = bl_pwm_set_duty(
        PWM_CHANNEL,                //  PWM Channel (1)
        (1 - output_squared) * 100  //  Duty Cycle (0% to 100%)
      );
      assert(rc == 0);
We flip the LED Brightness (1 - Output Squared) because…
Duty Cycle = 0% means 100% brightness
Duty Cycle = 100% means 0% brightness
After setting the LED Brightness, we sleep for 100 milliseconds…
      //  Sleep 100 milliseconds
      time_delay(                //  Sleep by number of ticks (from NimBLE Porting Layer)
        time_ms_to_ticks32(100)  //  Convert 100 milliseconds to ticks (from NimBLE Porting Layer)
      );
    }
  }
(More about NimBLE Porting Layer)
And we repeat both loops.
At the end of the command, we turn off the PWM for LED GPIO…
  //  Stop the PWM, which will stop blinking the LED
  rc = bl_pwm_stop(PWM_CHANNEL);
  assert(rc == 0);
}
Let’s run this!
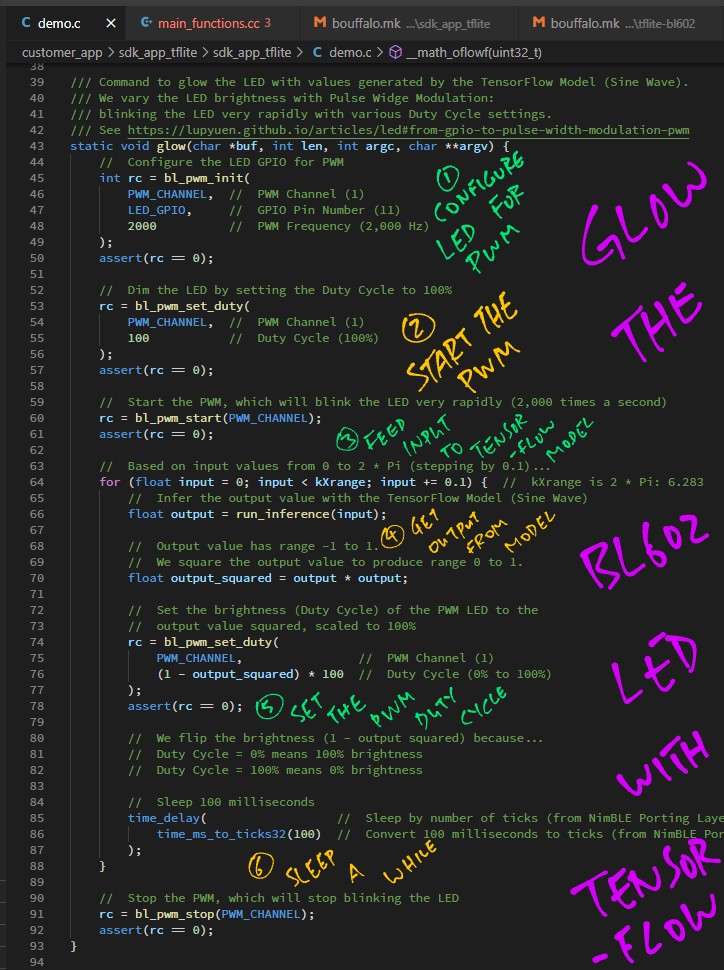
Start the BL602 Firmware for TensorFlow Lite sdk_app_tflite
(As described earlier)
Enter this command to load the TensorFlow Lite Model…
init(We’ve seen the “init” command earlier)
Then enter this command to glow the LED with the TensorFlow Lite Model…
glow(Yep the “glow” command from the previous chapter)
And the BL602 LED glows gently! Brighter and dimmer, brighter and dimmer, …
(Though the LED flips on abruptly at the end, because we turned off the PWM)

(Tip: The Sine Function is a terrific way to do things smoothly and continuously! Because the derivative of sin(x) is cos(x), another smooth curve! And the derivative of cos(x) is -sin(x)… Wow!)

Sorry Padme, it won’t be easy to create and train a TensorFlow Lite Model.
But let’s quickly run through the steps…
Where is the TensorFlow Lite Model defined?
g_model contains the TensorFlow Lite Model Data, as defined in model.cc …
// Automatically created from a TensorFlow Lite flatbuffer using the command:
//   xxd -i model.tflite > model.cc
// This is a standard TensorFlow Lite model file that has been converted into a
// C data array, so it can be easily compiled into a binary for devices that
// don't have a file system.
alignas(8) const unsigned char g_model[] = {
  0x1c, 0x00, 0x00, 0x00, 0x54, 0x46, 0x4c, 0x33, 0x14, 0x00, 0x20, 0x00,
  0x1c, 0x00, 0x18, 0x00, 0x14, 0x00, 0x10, 0x00, 0x0c, 0x00, 0x00, 0x00,
  ...
  0x00, 0x00, 0x00, 0x09};
const int g_model_len = 2488;
The TensorFlow Lite Model (2,488 bytes) is stored in BL602’s XIP Flash ROM.
This gives the TensorFlow Lite Library more RAM to run Tensor Computations for inferencing.
(Remember tensor_arena?)
Can we create and train this model on BL602?
Sorry Padme nope.
Training a TensorFlow Lite Model requires Python. Thus we need a Linux, macOS or Windows computer.
Here’s the Python Jupyter Notebook for training the TensorFlow Lite Model that we have used…
Check out the docs on training and converting TensorFlow Lite Models…
Even though we’ve used TensorFlow Lite for a trivial task (glowing an LED)… There are so many possible applications!
PineCone BL602 Board has a 3-in-1 LED: Red + Green + Blue.
We could control all 3 LEDs and glow them in a dazzling, multicolour way!
(The TensorFlow Lite Model would probably produce an Output Tensor that contains 3 Output Values)
Light up an LED when BL602 detects my face.
We could stream the 2D Image Data from a Camera Module to the TensorFlow Lite Model.
Recognise spoken words and phrases.
By streaming the Audio Data from a Microphone to the TensorFlow Lite Model.
Recognise motion gestures.
By streaming the Motion Data from an Accelerometer to the TensorFlow Lite Model.
This has been a super quick tour of TensorFlow Lite.
I hope to see many more fun and interesting Machine Learning apps on BL602 and other RISC-V micrcontrollers!
For the next article I shall head back to Rust on BL602… And explain how we create Rust Wrappers for the entire BL602 IoT SDK, including GPIO, UART, I2C, SPI, ADC, DAC, LVGL, LoRa, TensorFlow, …
Stay Tuned!
Got a question, comment or suggestion? Create an Issue or submit a Pull Request here…
lupyuen.github.io/src/tflite.md
In this chapter we discuss the changes we made when porting TensorFlow Lite to BL602.
TensorFlow Lite on BL602 is split across two repositories…
TensorFlow Lite Firmware: sdk_app_tflite
This tflite branch of BL602 IoT SDK…
github.com/lupyuen/bl_iot_sdk/tree/master
Contains the TensorFlow Lite Firmware at…
TensorFlow Lite Library: tflite-bl602
This TensorFlow Lite Library…
github.com/lupyuen/tflite-bl602
Should be checked out inside the above BL602 IoT SDK at this folder…
components/3rdparty/tflite-bl602
When we clone the BL602 IoT SDK recursively…
## Download the master branch of lupyuen's bl_iot_sdk
git clone --recursive --branch master https://github.com/lupyuen/bl_iot_sdk
The TensorFlow Lite Library tflite-bl602 will be automatically cloned to components/3rdparty
(Because tflite-bl602 is a Git Submodule of bl_iot_sdk)
TensorFlow Lite builds with its own Makefile.
However we’re using the Makefiles from BL602 IoT SDK, so we merged the TensorFlow Lite build steps into these BL602 Makefiles…
TensorFlow Lite Library Makefiles
TensorFlow Lite Firmware Makefiles
The changes are described in the following sections.
Here are the source folders that we compile for the TensorFlow Lite Firmware…
From tflite-bl602/bouffalo.mk and tflite-bl602/component.mk
## Include Folders
## TODO: Sync with bouffalo.mk and component.mk
COMPONENT_ADD_INCLUDEDIRS := \
  tensorflow/.. \
  tensorflow/lite/micro/tools/make/downloads/flatbuffers/include \
  tensorflow/lite/micro/tools/make/downloads/gemmlowp \
  tensorflow/lite/micro/tools/make/downloads/ruy

## Source Folders
## TODO: Sync with bouffalo.mk and component.mk
COMPONENT_SRCDIRS := \
  tensorflow/lite/c \
  tensorflow/lite/core/api \
  tensorflow/lite/kernels \
  tensorflow/lite/kernels/internal \
  tensorflow/lite/micro \
  tensorflow/lite/micro/kernels \
  tensorflow/lite/micro/memory_planner \
  tensorflow/lite/schema
The source folders are specified in both bouffalo.mk and component.mk. We should probably specify the source folders in a common Makefile instead…
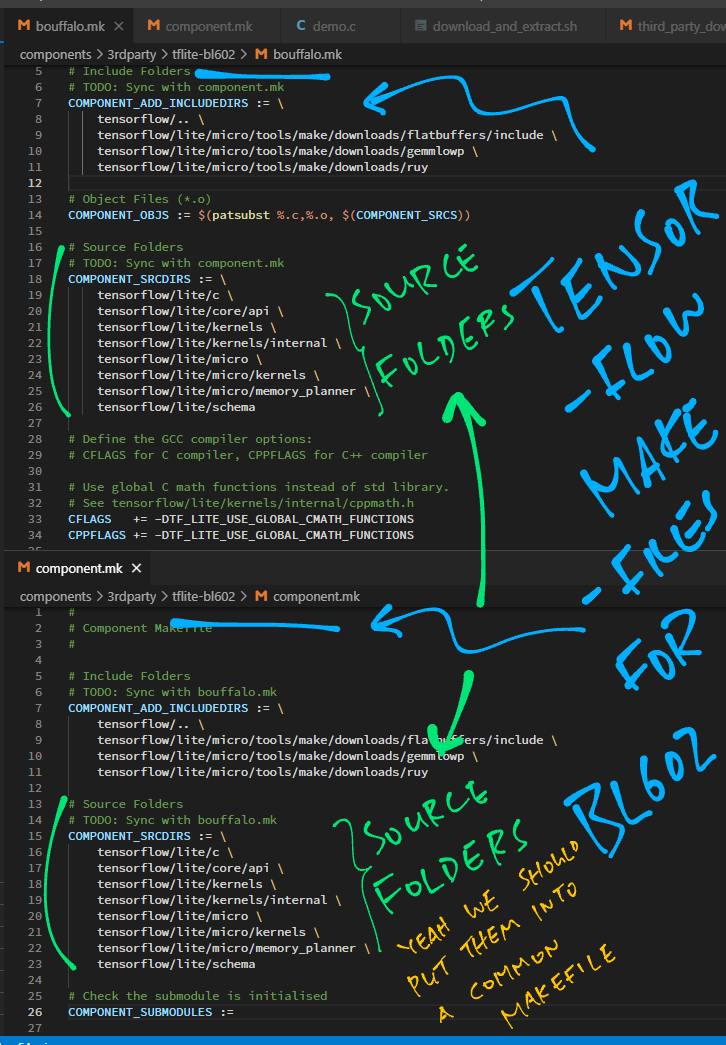
Here are the GCC Compiler Flags for TensorFlow Lite Library: tflite-bl602/bouffalo.mk
## Define the GCC compiler options:
## CFLAGS for C compiler, CPPFLAGS for C++ compiler

## Use global C math functions instead of std library.
## See tensorflow/lite/kernels/internal/cppmath.h
CFLAGS   += -DTF_LITE_USE_GLOBAL_CMATH_FUNCTIONS
CPPFLAGS += -DTF_LITE_USE_GLOBAL_CMATH_FUNCTIONS

## Use std::min instead of std::fmin
## See tensorflow/lite/kernels/internal/min.h
CFLAGS   += -DTF_LITE_USE_GLOBAL_MIN
CPPFLAGS += -DTF_LITE_USE_GLOBAL_MIN

## Use std::max instead of std::fmax
## See tensorflow/lite/kernels/internal/max.h
CFLAGS   += -DTF_LITE_USE_GLOBAL_MAX
CPPFLAGS += -DTF_LITE_USE_GLOBAL_MAX

## Use Static Memory instead of Heap Memory
## See tensorflow/lite/kernels/internal/types.h
CFLAGS   += -DTF_LITE_STATIC_MEMORY
CPPFLAGS += -DTF_LITE_STATIC_MEMORY
And here are the flags for TensorFlow Lite Firmware: sdk_app_tflite/bouffalo.mk
## Define the GCC compiler options:
## CFLAGS for C compiler, CPPFLAGS for C++ compiler
## See additional options at components/3rdparty/tflite-bl602/bouffalo.mk

## Use Static Memory instead of Heap Memory
## See components/3rdparty/tflite-bl602/tensorflow/lite/kernels/internal/types.h
CFLAGS   += -DTF_LITE_STATIC_MEMORY
CPPFLAGS += -DTF_LITE_STATIC_MEMORY

## Don't use Thread-Safe Initialisation for C++ Static Variables.
## This fixes the missing symbols __cxa_guard_acquire and __cxa_guard_release.
## Note: This assumes that we will not init C++ static variables in multiple tasks.
## See https://alex-robenko.gitbook.io/bare_metal_cpp/compiler_output/static
CPPFLAGS += -fno-threadsafe-statics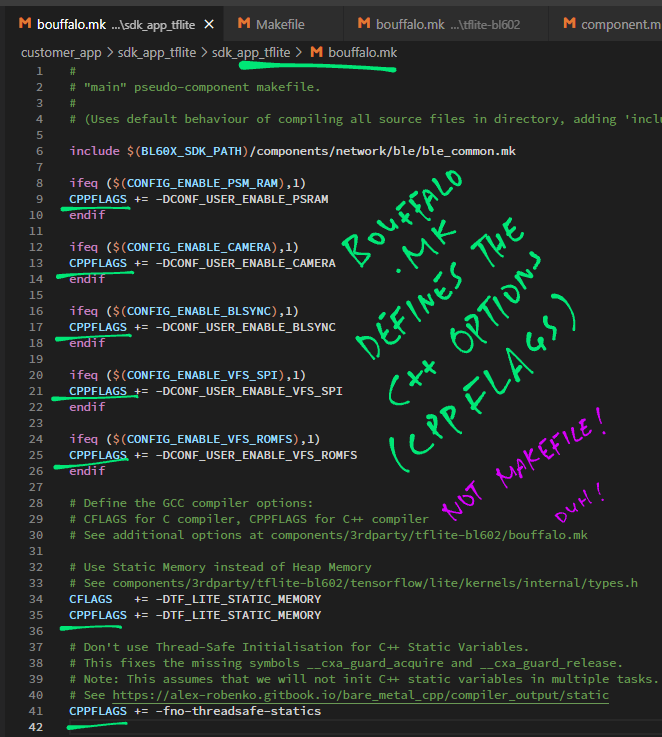
TF_LITE_USE_GLOBAL_CMATH_FUNCTIONS is needed because we use the global C Math Functions instead of the C++ std library…
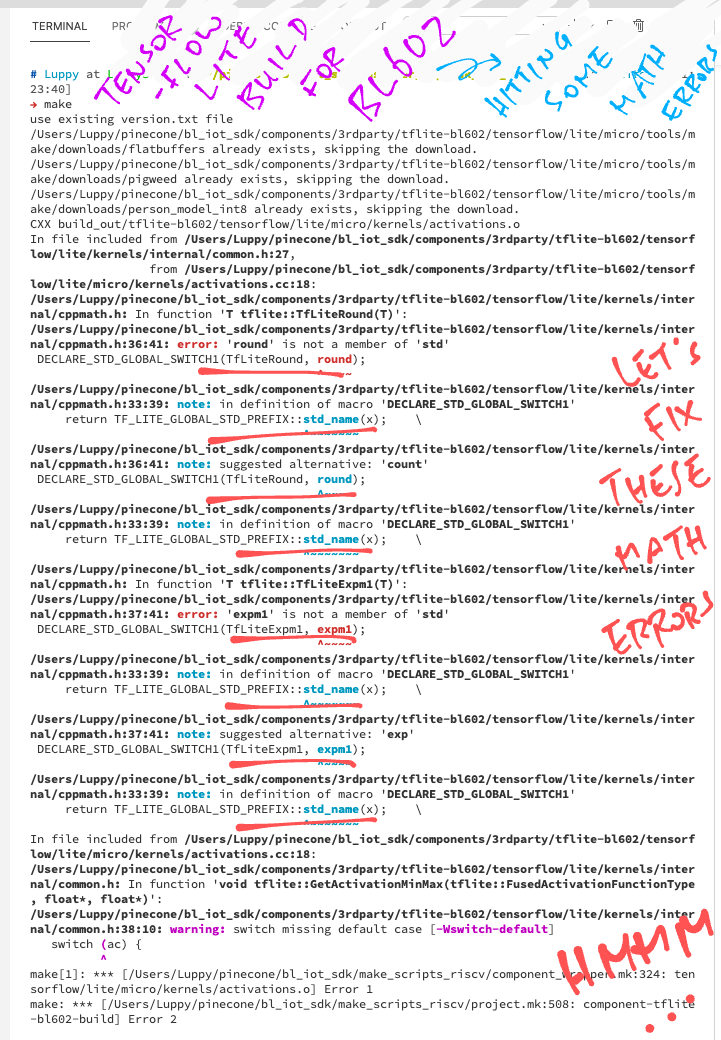
TF_LITE_STATIC_MEMORY is needed because we use Static Memory instead of Dynamic Memory (new and delete)…
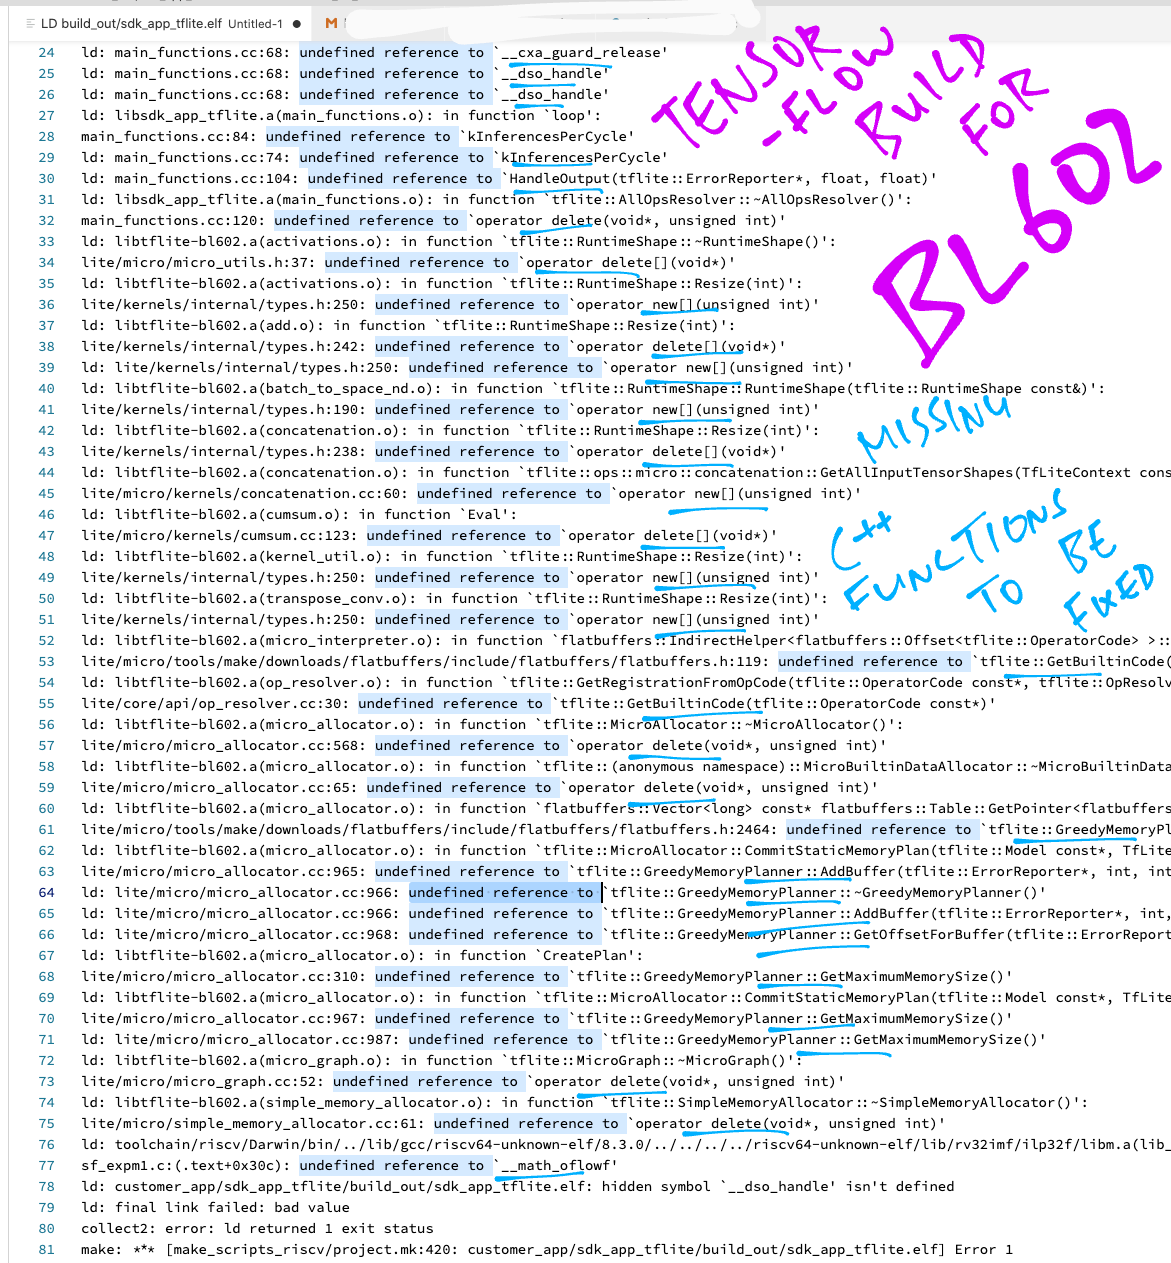
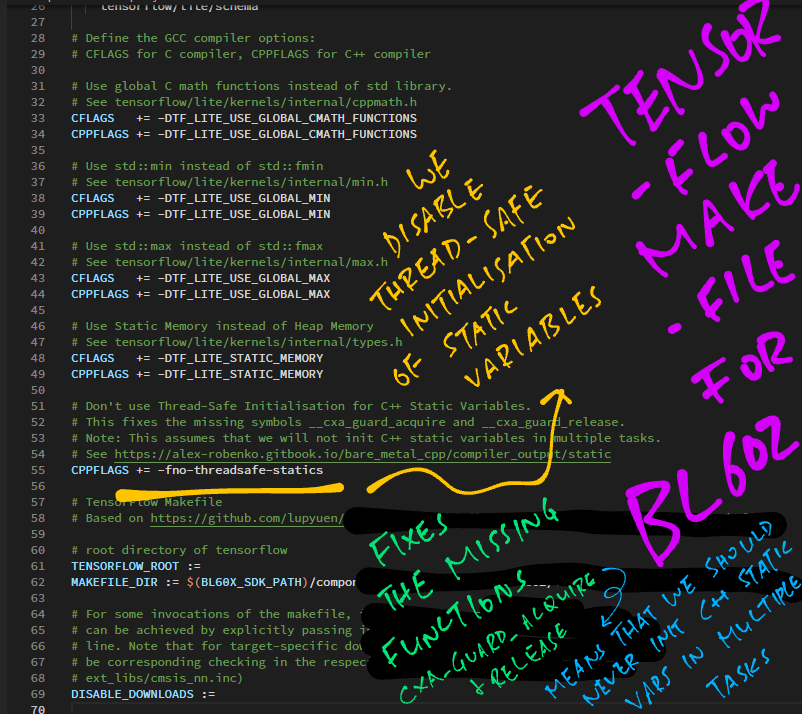
no-threadsafe-statics is needed to disable Thread-Safe Initialisation for C++ Static Variables. This fixes the missing symbols __cxa_guard_acquire and __cxa_guard_release.
Note: This assumes that we will not init C++ static variables in multiple tasks. (See this)
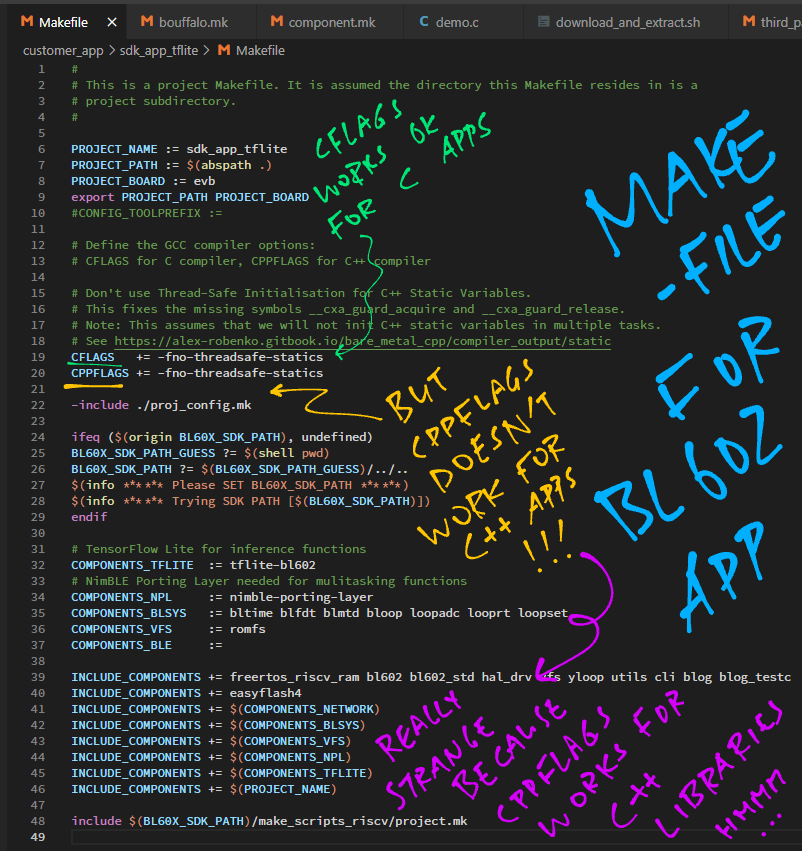
Note that CPPFLAGS (for C++ compiler) should be defined in sdk_app_tflite/bouffalo.mk instead of sdk_app_tflite/Makefile…
TensorFlow Lite needs 4 External Libraries for its build…
flatbuffers: Serialisation Library (similar to Protocol Buffers). TensorFlow Lite Models are encoded in the flatbuffers format.
pigweed: Embedded Libraries (See this)
gemmlowp: Small self-contained low-precision General Matrix Multiplication library. Input and output matrix entries are integers on at most 8 bits.
ruy: Matrix Multiplication Library for neural network inference engines. Supports floating-point and 8-bit integer-quantized matrices.
To download flatbuffers and pigweed, we copied these steps from TensorFlow Lite’s Makefile to tflite-bl602/bouffalo.mk …
## TensorFlow Makefile
## Based on https://github.com/tensorflow/tflite-micro/blob/main/tensorflow/lite/micro/tools/make/Makefile#L509-L542

## root directory of tensorflow
TENSORFLOW_ROOT :=
MAKEFILE_DIR := $(BL60X_SDK_PATH)/components/3rdparty/tflite-bl602/tensorflow/lite/micro/tools/make

## For some invocations of the makefile, it is useful to avoid downloads. This
## can be achieved by explicitly passing in DISABLE_DOWNLOADS=true on the command
## line. Note that for target-specific downloads (e.g. CMSIS) there will need to
## be corresponding checking in the respecitve included makefiles (e.g.
## ext_libs/cmsis_nn.inc)
DISABLE_DOWNLOADS :=

ifneq ($(DISABLE_DOWNLOADS), true)
  ## The download scripts require that the downloads directory already exist for
  ## improved error checking. To accomodate that, we first create a downloads
  ## directory.
  $(shell mkdir -p ${MAKEFILE_DIR}/downloads)

  ## Directly download the flatbuffers library.
  DOWNLOAD_RESULT := $(shell $(MAKEFILE_DIR)/flatbuffers_download.sh ${MAKEFILE_DIR}/downloads)
  ifneq ($(DOWNLOAD_RESULT), SUCCESS)
    $(error Something went wrong with the flatbuffers download: $(DOWNLOAD_RESULT))
  endif

  DOWNLOAD_RESULT := $(shell $(MAKEFILE_DIR)/pigweed_download.sh ${MAKEFILE_DIR}/downloads)
  ifneq ($(DOWNLOAD_RESULT), SUCCESS)
    $(error Something went wrong with the pigweed download: $(DOWNLOAD_RESULT))
  endif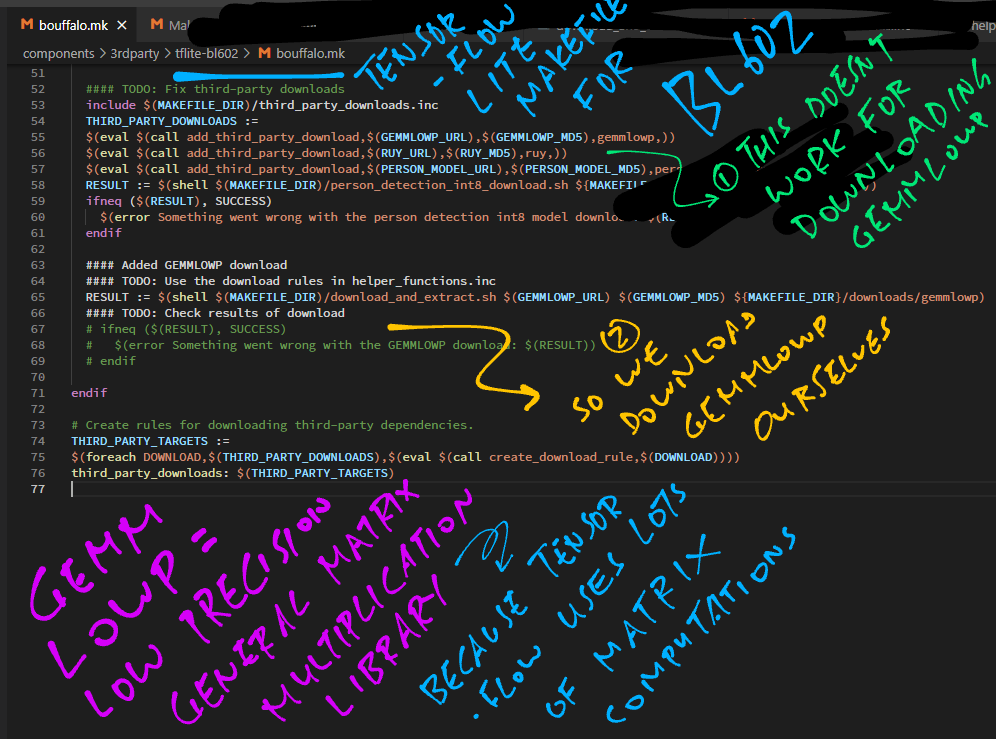
Unfortunately these steps dont’t work for downloading gemmlowp and ruy …
  ## TODO: Fix third-party downloads
  include $(MAKEFILE_DIR)/third_party_downloads.inc
  THIRD_PARTY_DOWNLOADS :=
  $(eval $(call add_third_party_download,$(GEMMLOWP_URL),$(GEMMLOWP_MD5),gemmlowp,))
  $(eval $(call add_third_party_download,$(RUY_URL),$(RUY_MD5),ruy,))
  $(eval $(call add_third_party_download,$(PERSON_MODEL_URL),$(PERSON_MODEL_MD5),person_model_grayscale,))
  RESULT := $(shell $(MAKEFILE_DIR)/person_detection_int8_download.sh ${MAKEFILE_DIR}/downloads $(CO_PROCESSOR))
  ifneq ($(RESULT), SUCCESS)
    $(error Something went wrong with the person detection int8 model download: $(RESULT))
  endif
  ...
endif

## TODO: Fix third-party downloads
## Create rules for downloading third-party dependencies.
THIRD_PARTY_TARGETS :=
$(foreach DOWNLOAD,$(THIRD_PARTY_DOWNLOADS),$(eval $(call create_download_rule,$(DOWNLOAD))))
third_party_downloads: $(THIRD_PARTY_TARGETS)
So we download gemmlowp and ruy ourselves: tflite-bl602/bouffalo.mk
  ## Added GEMMLOWP, RUY downloads
  ## TODO: Use the download rules in helper_functions.inc
  RESULT := $(shell $(MAKEFILE_DIR)/download_and_extract.sh $(GEMMLOWP_URL) $(GEMMLOWP_MD5) ${MAKEFILE_DIR}/downloads/gemmlowp)

  ## TODO: Check results of download
  ## ifneq ($(RESULT), SUCCESS)
  ##   $(error Something went wrong with the GEMMLOWP download: $(RESULT))
  ## endif

  RESULT := $(shell $(MAKEFILE_DIR)/download_and_extract.sh $(RUY_URL) $(RUY_MD5) ${MAKEFILE_DIR}/downloads/ruy)
  ## TODO: Check results of download
  ## ifneq ($(RESULT), SUCCESS)
  ##   $(error Something went wrong with the RUY download: $(RESULT))
  ## endif
endif
GEMMLOWP_URL and RUY_URL are defined in third_party_downloads …
GEMMLOWP_URL := "https://github.com/google/gemmlowp/archive/719139ce755a0f31cbf1c37f7f98adcc7fc9f425.zip"
GEMMLOWP_MD5 := "7e8191b24853d75de2af87622ad293ba"

RUY_URL="https://github.com/google/ruy/archive/d37128311b445e758136b8602d1bbd2a755e115d.zip"
RUY_MD5="abf7a91eb90d195f016ebe0be885bb6e"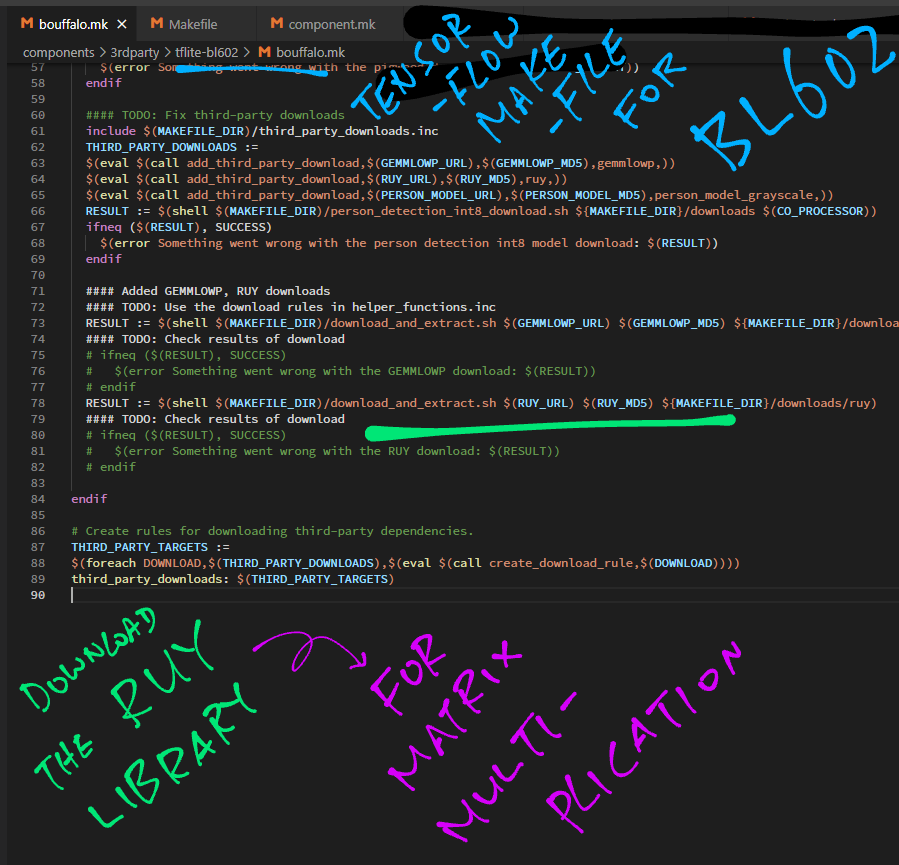
TensorFlow Lite builds OK on Linux and macOS. But on Windows MSYS it shows this error…
/d/a/bl_iot_sdk/bl_iot_sdk/components/3rdparty/tflite-bl602/tensorflow/lite/micro/tools/make/
flatbuffers_download.sh: line 102:
unzip: command not found
*** Something went wrong with the flatbuffers download: .
Stop.
...
D:/a/bl_iot_sdk/bl_iot_sdk/customer_app/sdk_app_tflite/sdk_app_tflite
main_functions.cc:19:10:
fatal error: tensorflow/lite/micro/all_ops_resolver.h:
No such file or directory
#include "tensorflow/lite/micro/all_ops_resolver.h"
^~~~~~~~~~~~~~~~~~~~~~~~~~~~~~~~~~~~~~~~~~
2021-06-22T13:40:25.9719870Z compilation terminated.
(From this GitHub Actions Workflow: build.yml)
The build for Windows MSYS probably needs unzip to be installed.
C++ Programs (like TensorFlow Lite) need a Global Destructor __dso_handle that points to the Static C++ Objects that will be destroyed when the program is terminated. (See this)
We won’t be destroying any Static C++ Objects. (Because our firmware doesn’t have a shutdown command) Hence we set the Global Destructor to null: sdk_app_tflite/demo.c
/// Global Destructor for C++, which we're not using.
/// See https://alex-robenko.gitbook.io/bare_metal_cpp/compiler_output/static#custom-destructors
void *__dso_handle = NULL;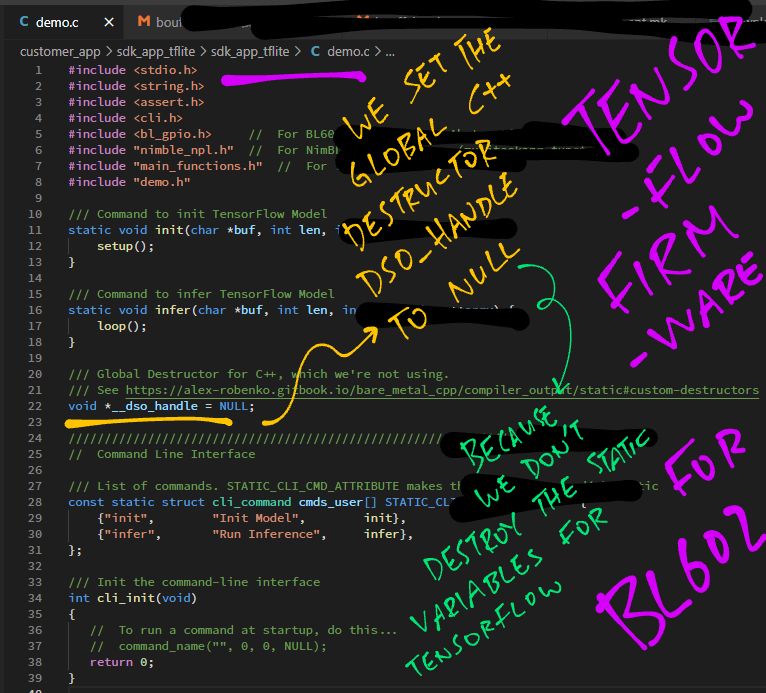
__math_oflowf is called by C++ Programs to handle Floating-Point Math Overflow.
For BL602 we halt with an Assertion Failure when Math Overflow occurs: sdk_app_tflite/demo.c
/// TODO: Handle math overflow.
float __math_oflowf (uint32_t sign) {
    assert(false);  //  For now, we halt when there is a math overflow
    //  Previously: return xflowf (sign, 0x1p97f);
    //  From https://code.woboq.org/userspace/glibc/sysdeps/ieee754/flt-32/math_errf.c.html#__math_oflowf
}These two files were excluded from the build because of compile errors…
TensorFlow Lite for BL602 was compiled for a RISC-V CPU without any special hardware optimisation.
For CPUs with Vector Processing or Digital Signal Processing Instructions, we may optimise TensorFlow Lite by executing these instructions.
Check out this doc on TensorFlow Lite optimisation…
This doc explains how TensorFlow Lite was optimised for VexRISCV…
