📝 14 Oct 2021
This may surprise most folks… The BL602 and BL604 RISC-V SoCs have an Internal Temperature Sensor!
The Internal Temperature Sensor is not documented in the BL602 / BL604 Datasheet. But it’s buried deep inside the BL602 / BL604 Reference Manual.
(Under “Analog-to-Digital Converter”)
Today we shall…
Read the Internal Temperature Sensor on BL602 and BL604
Transmit the temperature over LoRaWAN to The Things Network (with CBOR Encoding)
Chart the temperature with Grafana (the open-source visualisation tool)

The firmware has been tested on PineDio Stack BL604 (pic below). But it should work on any BL602 or BL604 Board: Ai-Thinker Ai-WB2, PineCone BL602, Pinenut, DT-BL10, MagicHome BL602, …
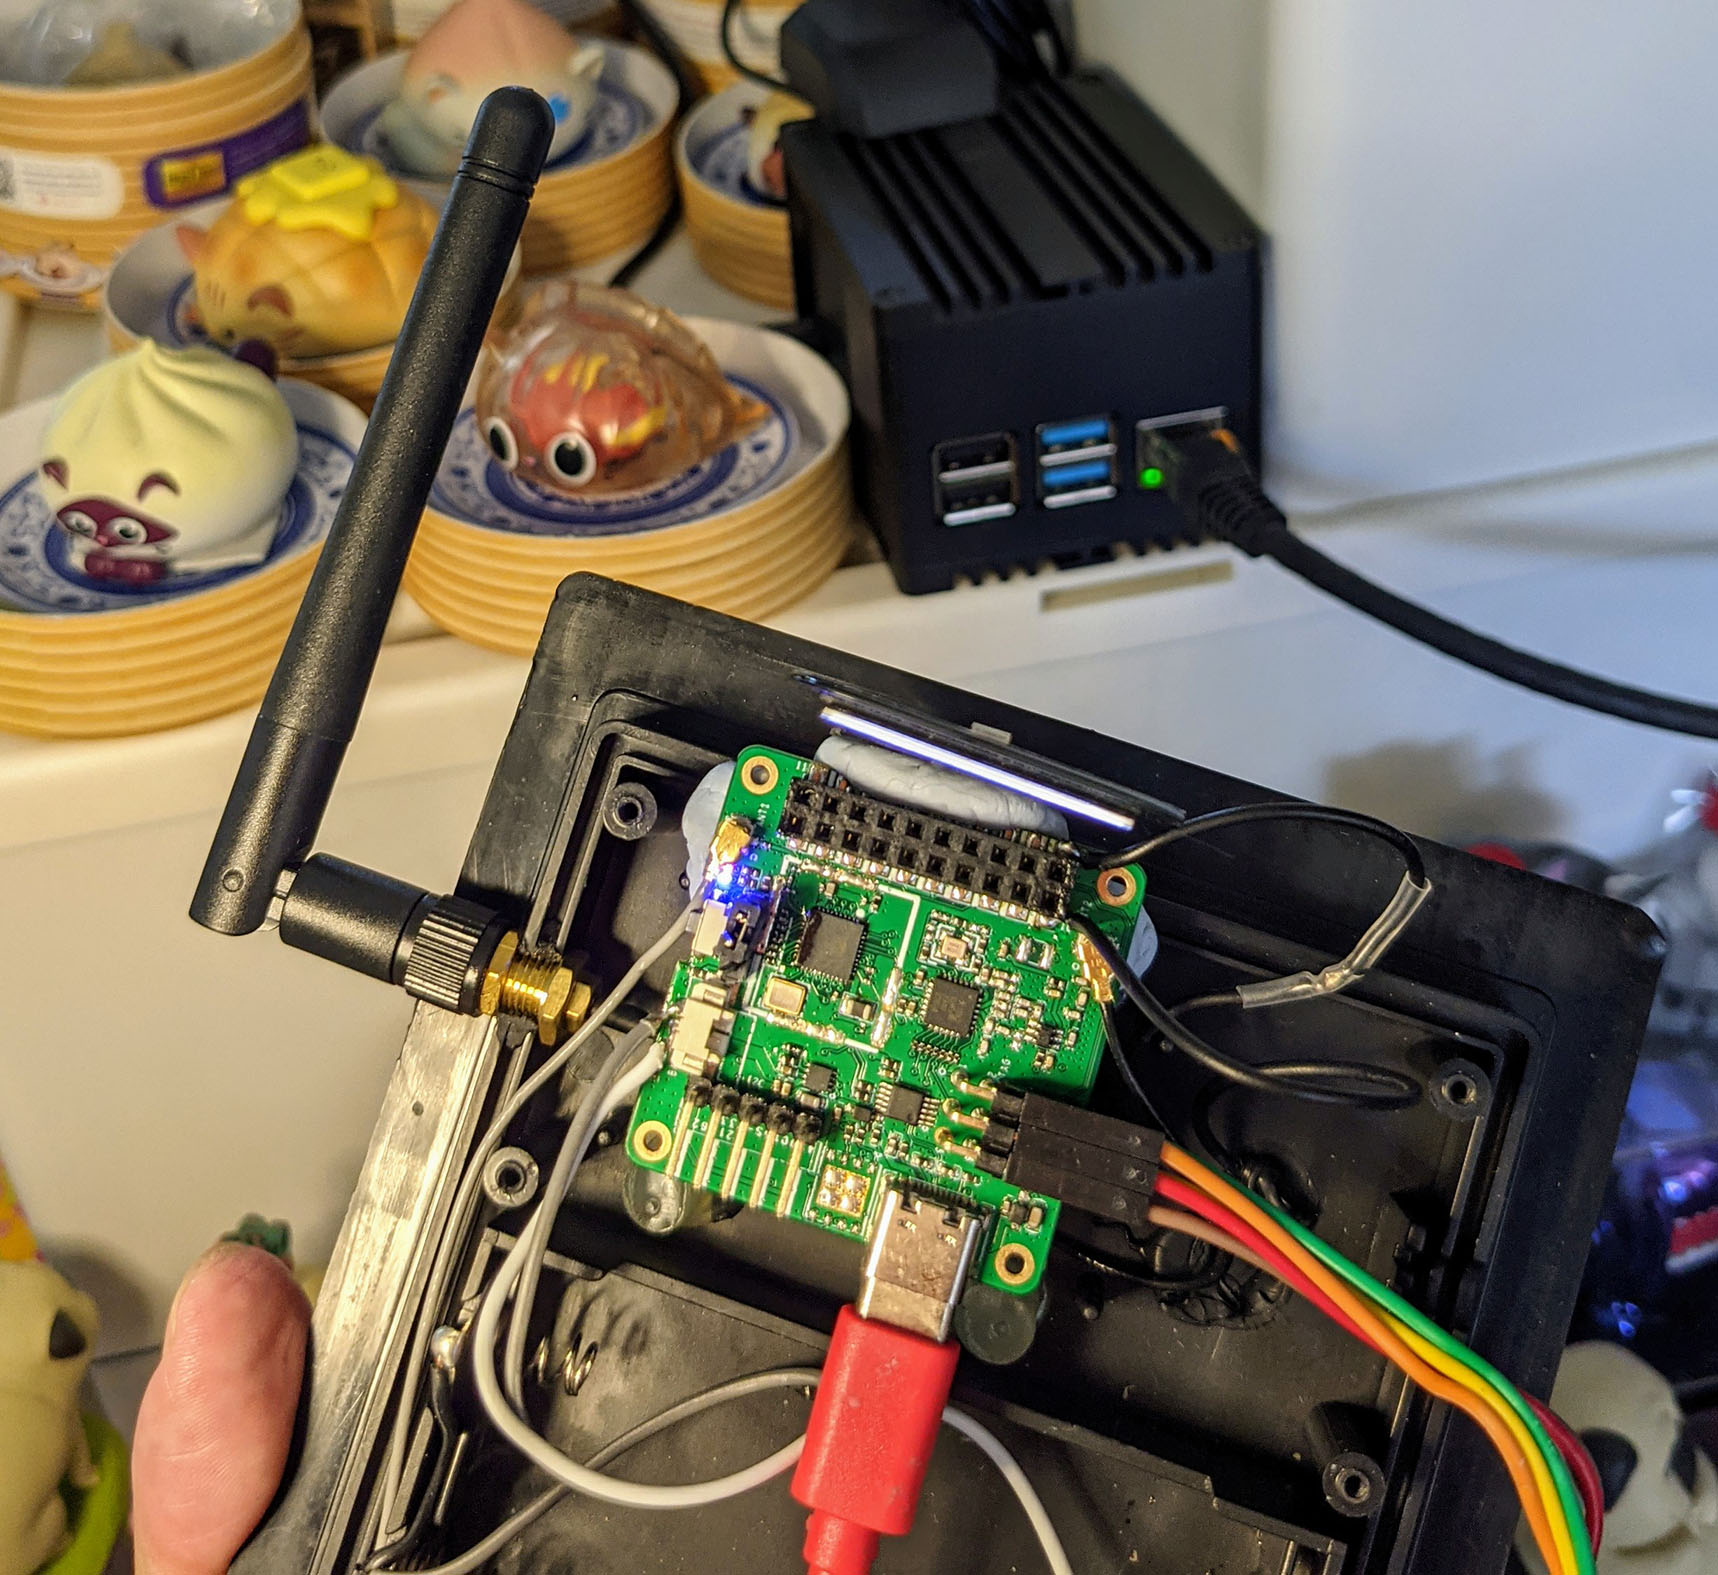
The Internal Temperature Sensor is inside the Analog-to-Digital Converter (ADC) on BL602 and BL604…
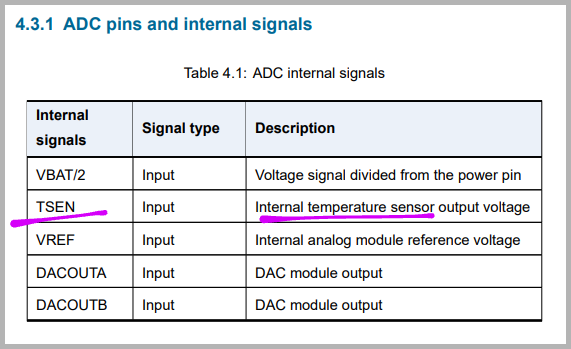
(From BL602 / BL604 Reference Manual)
The Internal Temperature Sensor behaves like an Analog Input. Which we call the ADC to measure.
The steps for reading the Internal Temperature Sensor seem complicated…
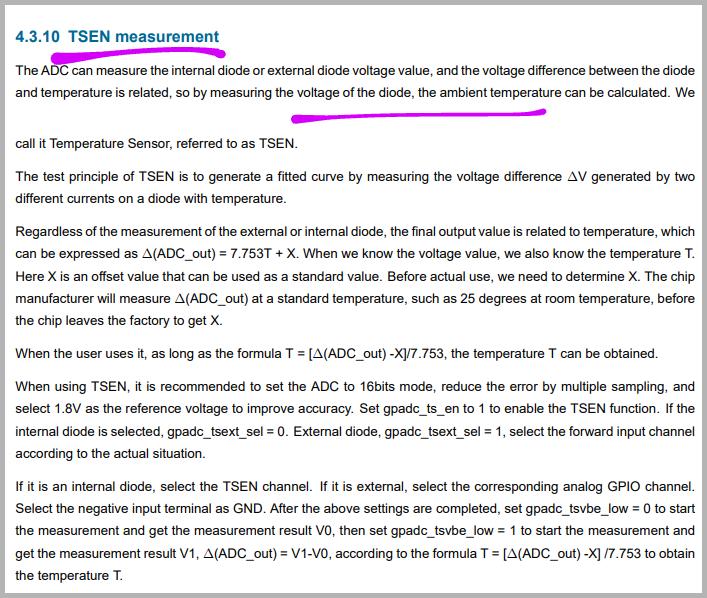
(From BL602 / BL604 Reference Manual)
But thankfully there’s an (undocumented) function in the BL602 IoT SDK that reads the Internal Temperature Sensor!
Let’s call the function now.
(Internal Temperature Sensors based on ADC are available on many microcontrollers, like STM32 Blue Pill)
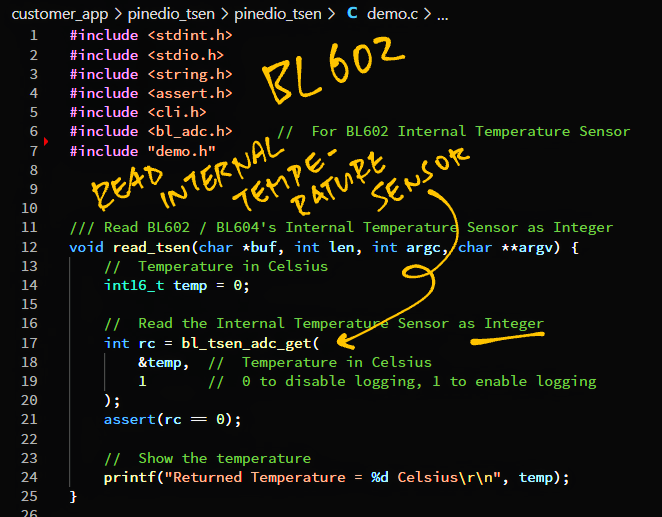
To read the Internal Temperature Sensor the Quick Way, we call bl_tsen_adc_get from the ADC Hardware Abstraction Layer (HAL): pinedio_tsen/demo.c
#include <bl_adc.h>  //  For BL602 Internal Temperature Sensor

/// Read BL602 / BL604's Internal Temperature Sensor as Integer
void read_tsen(char *buf, int len, int argc, char **argv) {
  //  Temperature in Celsius
  int16_t temp = 0;

  //  Read the Internal Temperature Sensor as Integer
  int rc = bl_tsen_adc_get(
    &temp,  //  Temperature in Celsius
    1       //  0 to disable logging, 1 to enable logging
  );
  assert(rc == 0);

  //  Show the temperature
  printf("Returned Temperature = %d Celsius\r\n", temp);
}
Let’s build, flash and run the pinedio_tsen demo firmware…
At the BL602 / BL604 Command Prompt, enter this command…
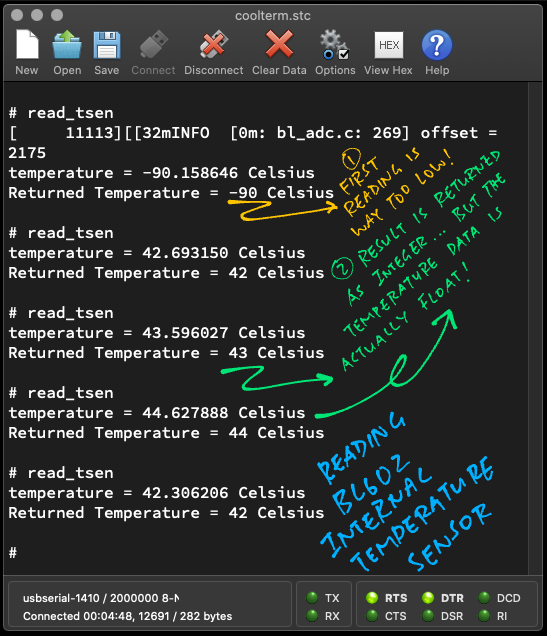
read_tsenThe first result will look odd…
temperature = -90.932541 Celsius
Returned Temperature = -90 Celsius
Running read_tsen again will produce the right result…
temperature = 43.467045 Celsius
Returned Temperature = 43 CelsiusWe discover two issues with the Quick Way of reading the Internal Temperature Sensor…
First Result is way too low…
temperature = -90.932541 Celsius
Returned Temperature = -90 Celsius
(Workaround: Discard the first result returned by bl_tsen_adc_get)
According to the internal log, the temperature is a Floating-Point Number…
temperature = 43.467045 Celsius
Returned Temperature = 43 Celsius
But the returned value is a Truncated Integer!
(Sorry, no workaround for this)
Yep our Quick Way is also the Inaccurate Way!
Let’s fix both issues.
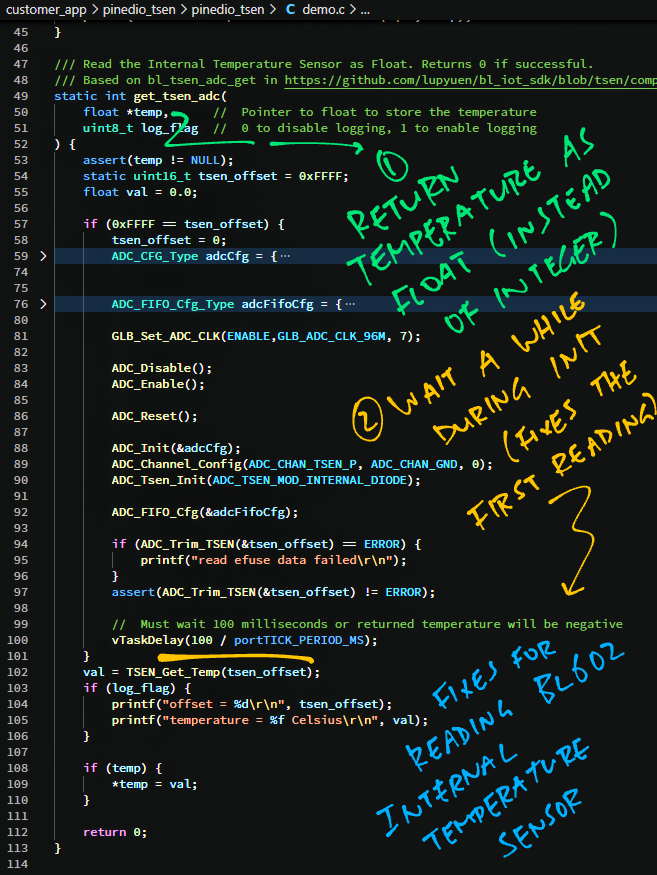
To read the Internal Temperature Sensor the Accurate Way, we copy the bl_tsen_adc_get function and change two things…
Wait a while as we initialise the ADC for the first time
(100 milliseconds)
Return the temperature as Float
(Instead of Integer)
Below is get_tsen_adc, our modded function (with all the fixings): pinedio_tsen/demo.c
#include <bl_adc.h>     //  For BL602 ADC HAL
#include <bl602_adc.h>  //  For BL602 ADC Standard Driver
#include <bl602_glb.h>  //  For BL602 Global Register Standard Driver
#include <FreeRTOS.h>   //  For FreeRTOS
#include <task.h>       //  For vTaskDelay

/// Read the Internal Temperature Sensor as Float. Returns 0 if successful.
/// Based on bl_tsen_adc_get in https://github.com/lupyuen/bl_iot_sdk/blob/master/components/hal_drv/bl602_hal/bl_adc.c#L224-L282
static int get_tsen_adc(
  float *temp,      //  Pointer to float to store the temperature
  uint8_t log_flag  //  0 to disable logging, 1 to enable logging
) {
  assert(temp != NULL);
  static uint16_t tsen_offset = 0xFFFF;
  float val = 0.0;

  //  If the offset has not been fetched...
  if (0xFFFF == tsen_offset) {
    //  Define the ADC configuration
    tsen_offset = 0;
    ADC_CFG_Type adcCfg = {
      .v18Sel=ADC_V18_SEL_1P82V,                /*!< ADC 1.8V select */
      .v11Sel=ADC_V11_SEL_1P1V,                 /*!< ADC 1.1V select */
      .clkDiv=ADC_CLK_DIV_32,                   /*!< Clock divider */
      .gain1=ADC_PGA_GAIN_1,                    /*!< PGA gain 1 */
      .gain2=ADC_PGA_GAIN_1,                    /*!< PGA gain 2 */
      .chopMode=ADC_CHOP_MOD_AZ_PGA_ON,         /*!< ADC chop mode select */
      .biasSel=ADC_BIAS_SEL_MAIN_BANDGAP,       /*!< ADC current form main bandgap or aon bandgap */
      .vcm=ADC_PGA_VCM_1V,                      /*!< ADC VCM value */
      .vref=ADC_VREF_2V,                        /*!< ADC voltage reference */
      .inputMode=ADC_INPUT_SINGLE_END,          /*!< ADC input signal type */
      .resWidth=ADC_DATA_WIDTH_16_WITH_256_AVERAGE,  /*!< ADC resolution and oversample rate */
      .offsetCalibEn=0,                         /*!< Offset calibration enable */
      .offsetCalibVal=0,                        /*!< Offset calibration value */
    };
    ADC_FIFO_Cfg_Type adcFifoCfg = {
      .fifoThreshold = ADC_FIFO_THRESHOLD_1,
      .dmaEn = DISABLE,
    };

    //  Enable and reset the ADC
    GLB_Set_ADC_CLK(ENABLE,GLB_ADC_CLK_96M, 7);
    ADC_Disable();
    ADC_Enable();
    ADC_Reset();

    //  Configure the ADC and Internal Temperature Sensor
    ADC_Init(&adcCfg);
    ADC_Channel_Config(ADC_CHAN_TSEN_P, ADC_CHAN_GND, 0);
    ADC_Tsen_Init(ADC_TSEN_MOD_INTERNAL_DIODE);
    ADC_FIFO_Cfg(&adcFifoCfg);

    //  Fetch the offset
    BL_Err_Type rc = ADC_Trim_TSEN(&tsen_offset);
    assert(rc != ERROR);  //  Read efuse data failed

    //  Must wait 100 milliseconds or returned temperature will be negative
    vTaskDelay(100 / portTICK_PERIOD_MS);
  }
  //  Read the temperature based on the offset
  val = TSEN_Get_Temp(tsen_offset);
  if (log_flag) {
    printf("offset = %d\r\n", tsen_offset);
    printf("temperature = %f Celsius\r\n", val);
  }
  //  Return the temperature
  *temp = val;
  return 0;
}
Note that get_tsen_adc now returns the temperature as Float (instead of Integer)…
static int get_tsen_adc(
  float *temp,      //  Pointer to float to store the temperature
  uint8_t log_flag  //  0 to disable logging, 1 to enable logging
);
And we added a 100-millisecond delay when initialising the ADC for the first time…
//  If the offset has not been fetched...
if (0xFFFF == tsen_offset) {
  ...
  //  Must wait 100 milliseconds or
  //  returned temperature will be negative
  vTaskDelay(100 / portTICK_PERIOD_MS);
Let’s call get_tsen_adc now.
We’re ready to read the Internal Temperature Sensor the Accurate Way!
The code below looks similar to the earlier code except…
We now call our modded function get_tsen_adc
(Instead of the BL602 ADC HAL)
Which returns a Float
(Instead of Integer)
From pinedio_tsen/demo.c…
/// Read BL602 / BL604's Internal Temperature Sensor as Float
void read_tsen2(char *buf, int len, int argc, char **argv) {
  //  Temperature in Celsius
  float temp = 0;

  //  Read the Internal Temperature Sensor as Float
  int rc = get_tsen_adc(
    &temp,  //  Temperature in Celsius
    1       //  0 to disable logging, 1 to enable logging
  );
  assert(rc == 0);

  //  Show the temperature
  printf("Returned Temperature = %f Celsius\r\n", temp);
}
Let’s build, flash and run the pinedio_tsen demo firmware…
At the BL602 / BL604 Command Prompt, enter this command a few times…
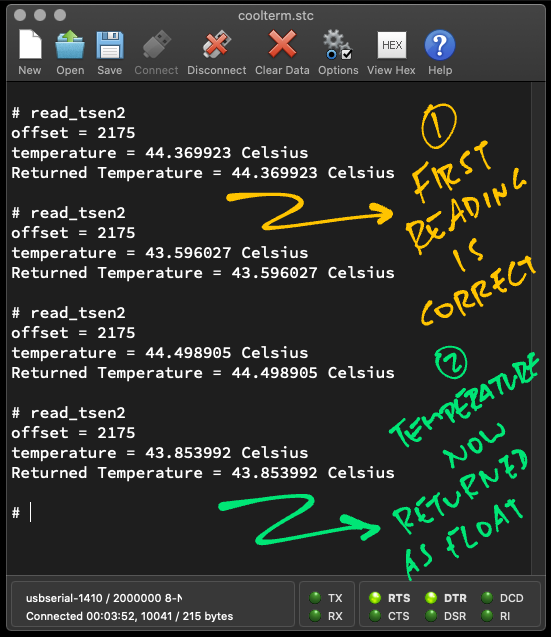
read_tsen2The results look consistent…
offset = 2175
temperature = 44.369923 Celsius
Returned Temperature = 44.369923 Celsius

offset = 2175
temperature = 43.596027 Celsius
Returned Temperature = 43.596027 Celsius

offset = 2175
temperature = 43.596027 Celsius
Returned Temperature = 43.596027 Celsius
(No more Sub-Zero Temperatures!)
And the temperature is returned as Float.
(No more Integers!)
Since we have an Onboard Temperature Sensor (though it runs a little hot), let’s turn BL602 and BL604 into an IoT Sensor Device for LoRaWAN and The Things Network!
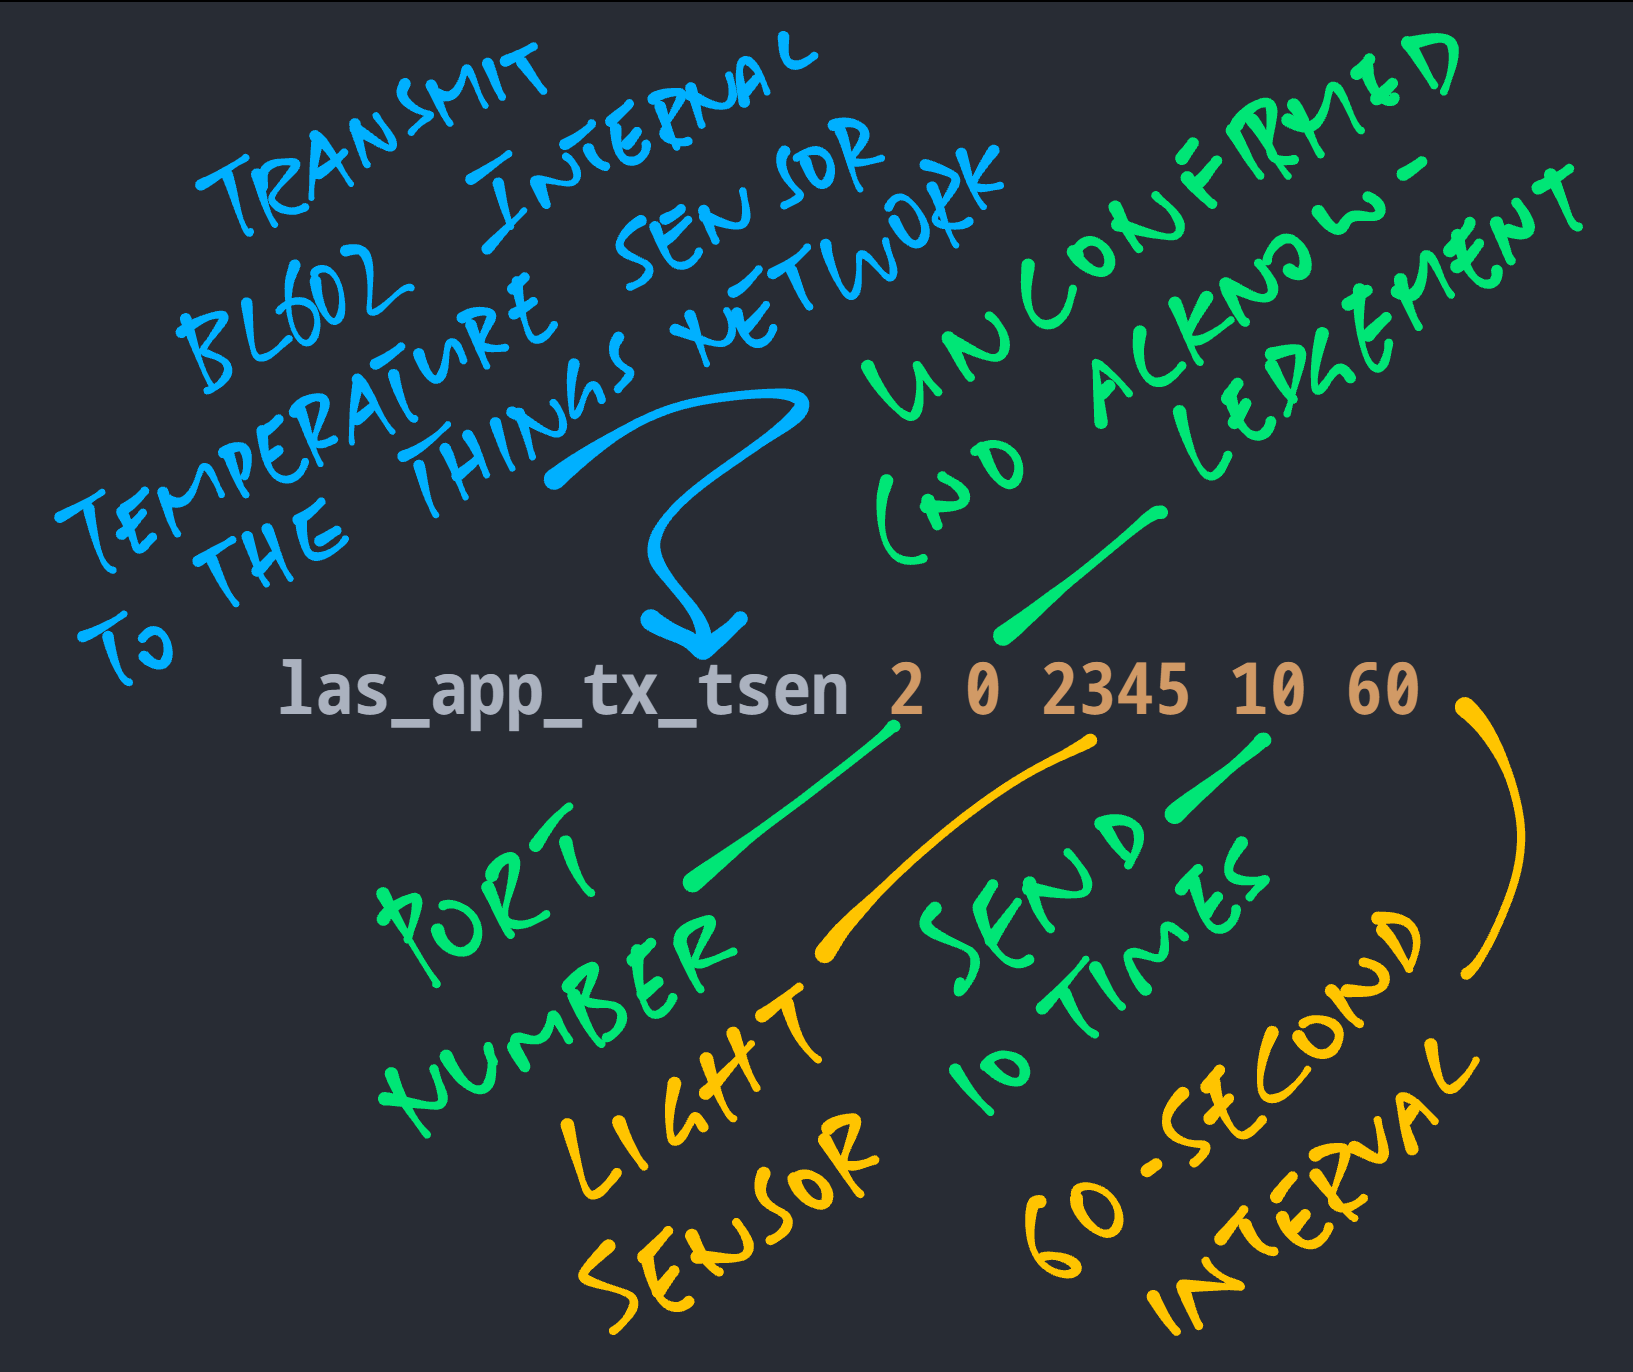
We’ll create this LoRaWAN Command for BL602 and BL604…
las_app_tx_tsen 2 0 4000 10 60Which means…
Transmit to LoRaWAN Port 2
With sensor values t (Internal Temperature) and l (Light Level: 4000)
(Encoded with CBOR)
Transmit 10 times
At intervals of 60 seconds
0 means that this is an Unconfirmed Message
(Because we’re not expecting an acknowledgement)
(More about The Things Network)
las_app_tx_tsen is defined like so: pinedio_lorawan/lorawan.c
/// Transmit Internal Temperature Sensor Data to LoRaWAN, encoded with CBOR. The command
///   las_app_tx_tsen 2 0 2345 10 60
/// Will transmit the CBOR payload
///   { "t": 1234, "l": 2345 }
/// To port 2, unconfirmed (0), for 10 times, with a 60 second interval.
/// Assuming that the Internal Temperature Sensor returns 12.34 degrees Celsius.
void las_cmd_app_tx_tsen(char *buf0, int len0, int argc, char **argv) {
  //  Get port number
  uint8_t port = parse_ull_bounds(argv[1], 1, 255, &rc);

  //  Get unconfirmed / confirmed packet type
  uint8_t pkt_type = parse_ull_bounds(argv[2], 0, 1, &rc);

  //  Get l value
  uint16_t l = parse_ull_bounds(argv[3], 0, 65535, &rc);

  //  Get count
  uint16_t count = parse_ull_bounds(argv[4], 0, 65535, &rc);

  //  Get interval
  uint16_t interval = parse_ull_bounds(argv[5], 0, 65535, &rc);
We begin by fetching the command-line arguments.
For each message that we shall transmit…
  //  Repeat count times
  for (int i = 0; i < count; i++) {

    //  Wait for interval seconds
    if (i > 0) { vTaskDelay(interval * 1000 / portTICK_PERIOD_MS); }

    //  Read Internal Temperature Sensor as a Float
    float temp = 0;
    int rc = get_tsen_adc(
      &temp,  //  Temperature in Celsius
      1       //  0 to disable logging, 1 to enable logging
    );
    assert(rc == 0);
We read the Internal Temperature Sensor as a Float.
Next we scale up the temperature 100 times and truncate as Integer…
    //  Scale the temperature up 100 times and truncate as integer:
    //  12.34 ºC becomes 1234
    int16_t t = temp * 100;
(Because encoding the temperature as 1234 requires fewer bytes than 12.34)
We encode the temperature (and light level) with CBOR and transmit as a LoRaWAN message…
    //  Omitted: Encode into CBOR for { "t": ????, "l": ???? }
    uint8_t output[50];
    ...

    //  Allocate a pbuf
    struct pbuf *om = lora_pkt_alloc(output_len);

    //  Copy the encoded CBOR into the pbuf
    rc = pbuf_copyinto(om, 0, output, output_len);

    //  Send the pbuf
    rc = lora_app_port_send(port, mcps_type, om);
Which goes all the way to The Things Network! Assuming that we have configured our LoRaWAN settings for The Things Network.
(CBOR Encoding is explained here)
(Sending a LoRaWAN Packet is explained here)
Let’s build, flash and run the updated LoRaWAN Firmware: pinedio_lorawan
At the BL602 / BL604 Command Prompt, enter this command…
las_app_tx_tsen 2 0 4000 10 60Which means…
Transmit to LoRaWAN Port 2
With sensor values t (Internal Temperature) and l (Light Level: 4000)
(Encoded with CBOR)
Transmit 10 times
At intervals of 60 seconds
0 means that this is an Unconfirmed Message
(Because we’re not expecting an acknowledgement)
We should see the Internal Temperature transmitted over LoRaWAN every 60 seconds…
temperature = 44.885849 Celsius
Encode CBOR: { t: 4488, l: 4000 }
CBOR Output: 11 bytes
  0xa2 0x61 0x74 0x19 0x11 0x88 0x61 0x6c 0x19 0x0f 0xa0
  ...
temperature = 47.207531 Celsius
Encode CBOR: { t: 4720, l: 4000 }
CBOR Output: 11 bytes
  0xa2 0x61 0x74 0x19 0x12 0x70 0x61 0x6c 0x19 0x0f 0xa0
...Let’s check the transmitted Sensor Data with Grafana and Roblox.
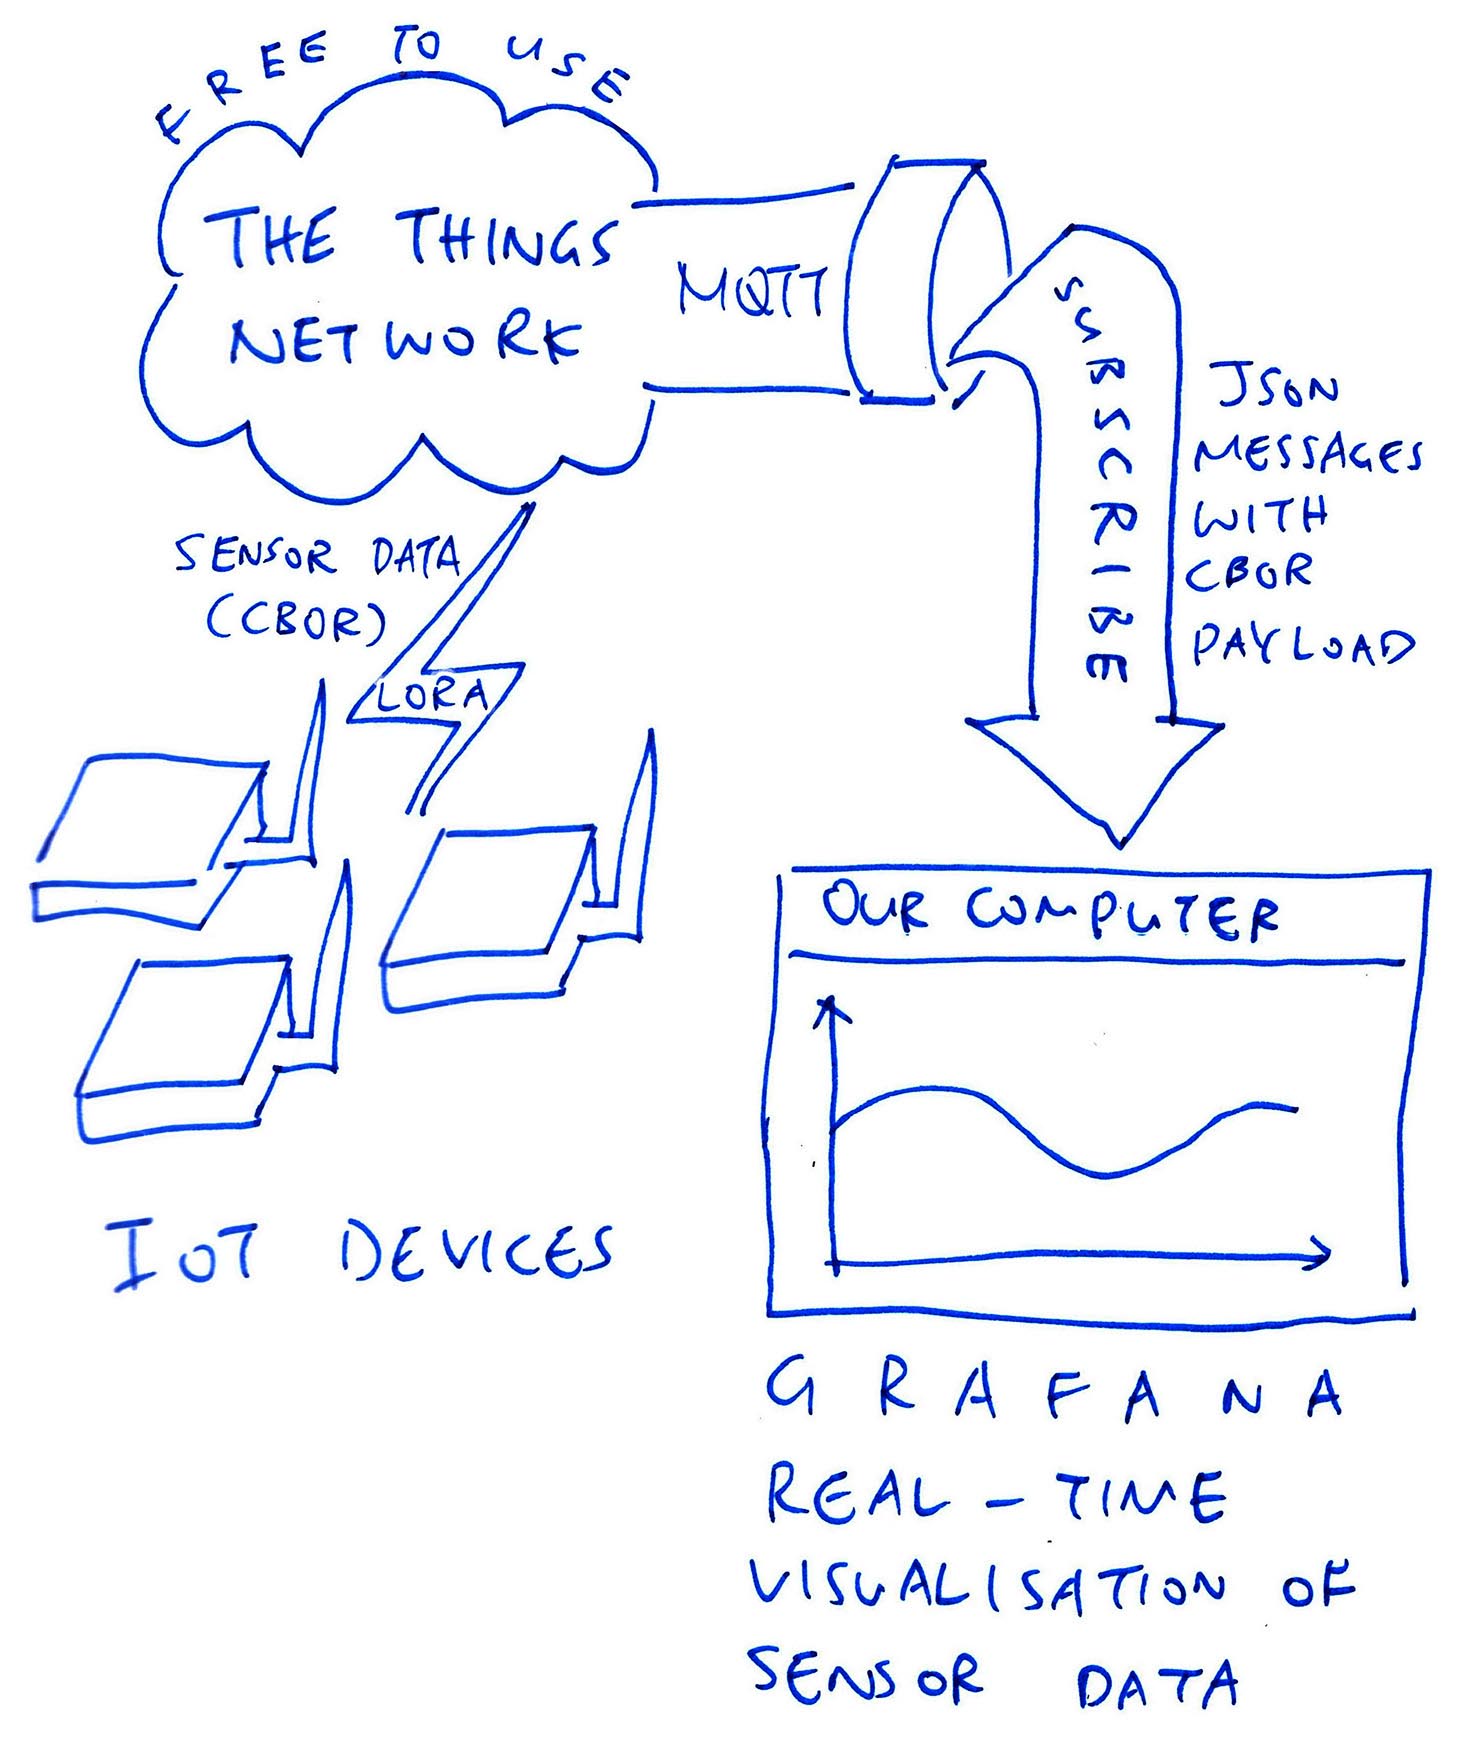
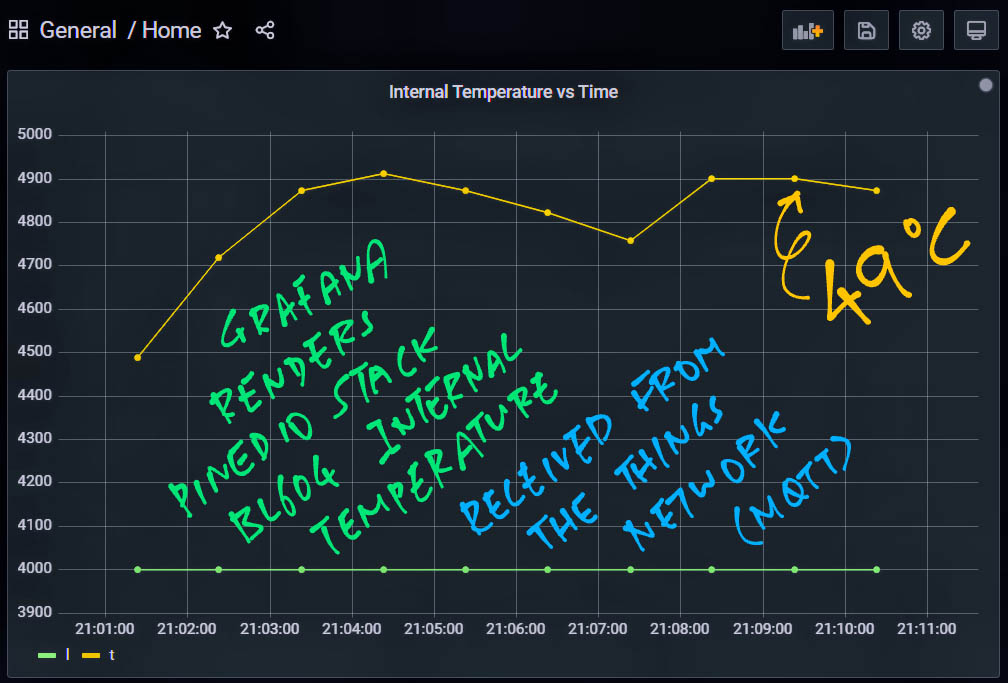
In an earlier article we have configured Grafana (the open source visualisation tool) to read Sensor Data from The Things Network. And chart the Sensor Data in real time…
Follow the instructions below to install and configure Grafana…
Start the Grafana service and run the las_app_tx_tsen command from the previous chapter.
We should see this chart in Grafana after 10 minutes…
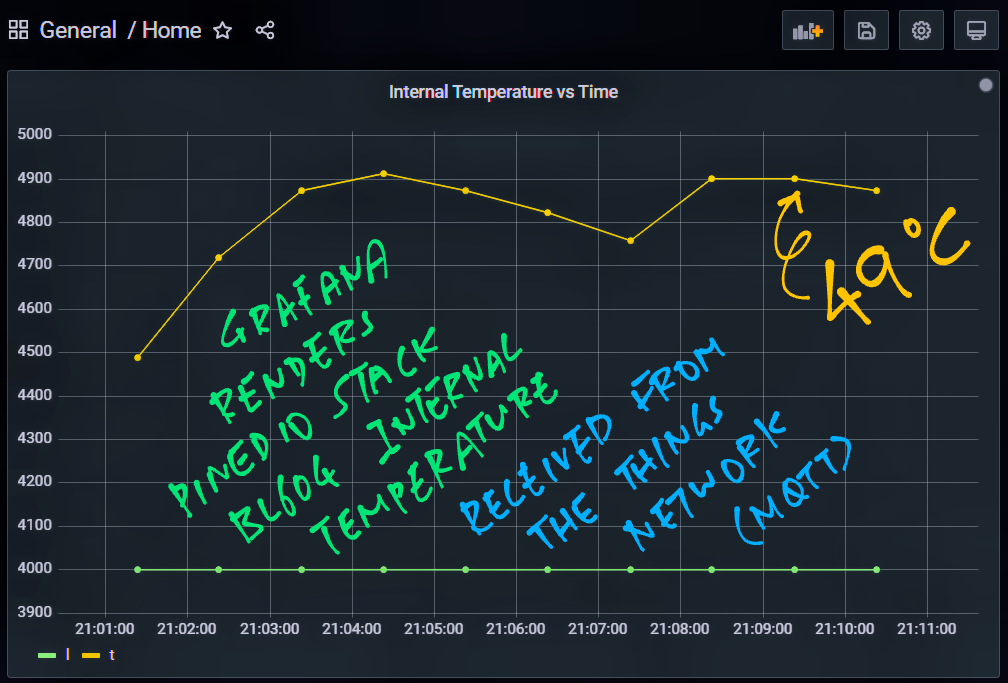
(Note that the temperatures have been scaled up 100 times)
There’s another way to see the Sensor Data (in a fun way): Roblox…
(Yep the multiplayer 3D world!)
Follow the instructions below to install and configure Roblox…
We should see the temperature rendered by Roblox as a glowing thing…
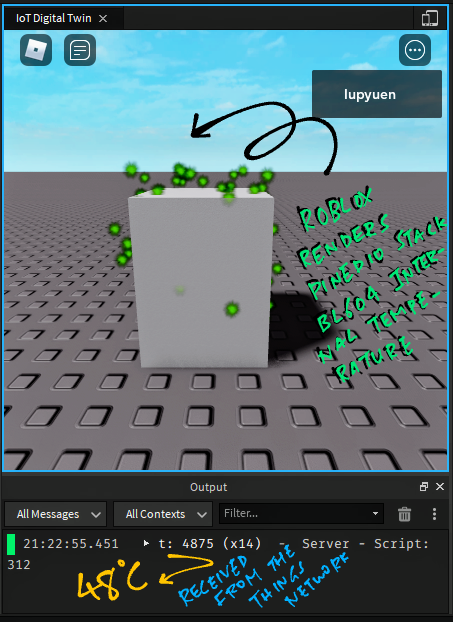
And the output log shows our temperature, scaled by 100 times.
(Like 4875 for 48.75 ºC)

Today we have turned BL602 and BL604 into a basic IoT Sensor Device that transmits its Internal Temperature to LoRaWAN and The Things Network.
In the next article we shall build a better IoT Monitoring System that stores the Sensor Data with Prometheus and visualises the data in a Grafana Dashboard…
Many Thanks to my GitHub Sponsors for supporting my work! This article wouldn’t have been possible without your support.
Got a question, comment or suggestion? Create an Issue or submit a Pull Request here…
Here are the steps to build, flash and run the Internal Temperature Sensor Firmware for BL602 and BL604…
Download the firmware…
## Download the master branch of lupyuen's bl_iot_sdk
git clone --recursive --branch master https://github.com/lupyuen/bl_iot_sdk
Build the Firmware Binary File pinedio_tsen.bin…
## TODO: Change this to the full path of bl_iot_sdk
export BL60X_SDK_PATH=$HOME/bl_iot_sdk
export CONFIG_CHIP_NAME=BL602

cd bl_iot_sdk/customer_app/pinedio_tsen
make

## For WSL: Copy the firmware to /mnt/c/blflash, which refers to c:\blflash in Windows
mkdir /mnt/c/blflash
cp build_out/pinedio_tsen.bin /mnt/c/blflash
More details on building bl_iot_sdk
Follow these steps to install blflash…
We assume that our Firmware Binary File pinedio_tsen.bin has been copied to the blflash folder.
Set BL602 / BL604 to Flashing Mode and restart the board…
For PineDio Stack BL604:
Set the GPIO 8 Jumper to High (Like this)
Disconnect the USB cable and reconnect
Or use the Improvised Reset Button (Here’s how)
For PineCone BL602:
Set the PineCone Jumper (IO 8) to the H Position (Like this)
Press the Reset Button
For BL10:
Connect BL10 to the USB port
Press and hold the D8 Button (GPIO 8)
Press and release the EN Button (Reset)
Release the D8 Button
For Ai-Thinker Ai-WB2, Pinenut and MagicHome BL602:
Disconnect the board from the USB Port
Connect GPIO 8 to 3.3V
Reconnect the board to the USB port
Enter these commands to flash pinedio_tsen.bin to BL602 / BL604 over UART…
## For Linux:
blflash flash build_out/pinedio_tsen.bin \
    --port /dev/ttyUSB0

## For macOS:
blflash flash build_out/pinedio_tsen.bin \
    --port /dev/tty.usbserial-1420 \
    --initial-baud-rate 230400 \
    --baud-rate 230400

## For Windows: Change COM5 to the BL602 / BL604 Serial Port
blflash flash c:\blflash\pinedio_tsen.bin --port COM5
(For WSL: Do this under plain old Windows CMD, not WSL, because blflash needs to access the COM port)
More details on flashing firmware
Set BL602 / BL604 to Normal Mode (Non-Flashing) and restart the board…
For PineDio Stack BL604:
Set the GPIO 8 Jumper to Low (Like this)
Disconnect the USB cable and reconnect
Or use the Improvised Reset Button (Here’s how)
For PineCone BL602:
Set the PineCone Jumper (IO 8) to the L Position (Like this)
Press the Reset Button
For BL10:
For Ai-Thinker Ai-WB2, Pinenut and MagicHome BL602:
Disconnect the board from the USB Port
Connect GPIO 8 to GND
Reconnect the board to the USB port
After restarting, connect to BL602 / BL604’s UART Port at 2 Mbps like so…
For Linux:
screen /dev/ttyUSB0 2000000For macOS: Use CoolTerm (See this)
For Windows: Use putty (See this)
Alternatively: Use the Web Serial Terminal (See this)
More details on connecting to BL602 / BL604
Here are the steps to build, flash and run the LoRaWAN Firmware for PineDio Stack BL604…
Download the LoRaWAN firmware and driver source code…
## Download the master branch of lupyuen's bl_iot_sdk
git clone --recursive --branch master https://github.com/lupyuen/bl_iot_sdk
In the customer_app/pinedio_lorawan folder, edit Makefile and find this setting…
CFLAGS += -DCONFIG_LORA_NODE_REGION=1Change “1” to your LoRa Region…
| Value | Region |
|---|---|
| 0 | No region |
| 1 | AS band on 923MHz |
| 2 | Australian band on 915MHz |
| 3 | Chinese band on 470MHz |
| 4 | Chinese band on 779MHz |
| 5 | European band on 433MHz |
| 6 | European band on 868MHz |
| 7 | South Korean band on 920MHz |
| 8 | India band on 865MHz |
| 9 | North American band on 915MHz |
| 10 | North American band on 915MHz with a maximum of 16 channels |
The GPIO Pin Numbers for LoRa SX1262 are defined in…
components/3rdparty/lora-sx1262/include/sx126x-board.hThey have been configured for PineDio Stack. (So no changes needed)
Build the Firmware Binary File pinedio_lorawan.bin…
## TODO: Change this to the full path of bl_iot_sdk
export BL60X_SDK_PATH=$HOME/bl_iot_sdk
export CONFIG_CHIP_NAME=BL602

cd bl_iot_sdk/customer_app/pinedio_lorawan
make

## For WSL: Copy the firmware to /mnt/c/blflash, which refers to c:\blflash in Windows
mkdir /mnt/c/blflash
cp build_out/pinedio_lorawan.bin /mnt/c/blflash
More details on building bl_iot_sdk
Follow these steps to install blflash…
We assume that our Firmware Binary File pinedio_lorawan.bin has been copied to the blflash folder.
Set BL602 / BL604 to Flashing Mode and restart the board…
For PineDio Stack BL604:
Set the GPIO 8 Jumper to High (Like this)
Disconnect the USB cable and reconnect
Or use the Improvised Reset Button (Here’s how)
For PineCone BL602:
Set the PineCone Jumper (IO 8) to the H Position (Like this)
Press the Reset Button
For BL10:
Connect BL10 to the USB port
Press and hold the D8 Button (GPIO 8)
Press and release the EN Button (Reset)
Release the D8 Button
For Ai-Thinker Ai-WB2, Pinenut and MagicHome BL602:
Disconnect the board from the USB Port
Connect GPIO 8 to 3.3V
Reconnect the board to the USB port
Enter these commands to flash pinedio_lorawan.bin to BL602 / BL604 over UART…
## For Linux:
blflash flash build_out/pinedio_lorawan.bin \
    --port /dev/ttyUSB0

## For macOS:
blflash flash build_out/pinedio_lorawan.bin \
    --port /dev/tty.usbserial-1420 \
    --initial-baud-rate 230400 \
    --baud-rate 230400

## For Windows: Change COM5 to the BL602 / BL604 Serial Port
blflash flash c:\blflash\pinedio_lorawan.bin --port COM5
(For WSL: Do this under plain old Windows CMD, not WSL, because blflash needs to access the COM port)
More details on flashing firmware
Set BL602 / BL604 to Normal Mode (Non-Flashing) and restart the board…
For PineDio Stack BL604:
Set the GPIO 8 Jumper to Low (Like this)
Disconnect the USB cable and reconnect
Or use the Improvised Reset Button (Here’s how)
For PineCone BL602:
Set the PineCone Jumper (IO 8) to the L Position (Like this)
Press the Reset Button
For BL10:
For Ai-Thinker Ai-WB2, Pinenut and MagicHome BL602:
Disconnect the board from the USB Port
Connect GPIO 8 to GND
Reconnect the board to the USB port
After restarting, connect to BL602 / BL604’s UART Port at 2 Mbps like so…
For Linux:
screen /dev/ttyUSB0 2000000For macOS: Use CoolTerm (See this)
For Windows: Use putty (See this)
Alternatively: Use the Web Serial Terminal (See this)
More details on connecting to BL602 / BL604
Let’s enter the LoRaWAN Commands to join The Things Network and transmit a Data Packet!
Log on to The Things Network. Browse to our Device and copy these values…
JoinEUI (Join Extended Unique Identifier)
DevEUI (Device Extended Unique Identifier)
AppKey (Application Key)
In the BL602 / BL604 terminal, press Enter to reveal the command prompt.
First we start the Background Task that will handle LoRa packets…
Enter this command…
create_taskNext we initialise the LoRa SX1262 and LoRaWAN Drivers…
init_lorawanSet the DevEUI…
las_wr_dev_eui 0xAB:0xBA:0xDA:0xBA:0xAB:0xBA:0xDA:0xBAChange “0xAB:0xBA:...” to your DevEUI
(Remember to change the “,” delimiter to “:”)
Set the JoinEUI…
las_wr_app_eui 0x00:0x00:0x00:0x00:0x00:0x00:0x00:0x00Change “0x00:0x00:...” to your JoinEUI
(Yep change the “,” delimiter to “:”)
Set the AppKey…
las_wr_app_key 0xAB:0xBA:0xDA:0xBA:0xAB:0xBA:0xDA:0xBA0xAB:0xBA:0xDA:0xBA:0xAB:0xBA:0xDA:0xBAChange “0xAB:0xBA:...” to your AppKey
(Again change “,” to “:”)
We send a request to join The Things Network…
las_join 1“1” means try only once.
Finally we open an Application Port that will connect to The Things Network…
las_app_port open 2“2” is the Application Port Number