📝 27 May 2021
Drag-and-drop uLisp programs for microcontrollers… And run them WITHOUT a microcontroller!
What if we…
Compile the uLisp Interpreter (from the previous article) to WebAssembly…
Use the WebAssembly version of uLisp to simulate BL602 in a Web Browser…
(Including GPIO, I2C, SPI, Display Controller, Touch Controller, LVGL, LoRa… Similar to this)
Integrate the BL602 Simulator with Blockly…
So that Embedded Developers may preview their Blockly uLisp Apps in the Web Browser?
Today we shall build a simple simulator for the BL602 RISC-V + WiFi SoC that will run Blockly uLisp Apps in a Web Browser.
(No BL602 hardware needed!)

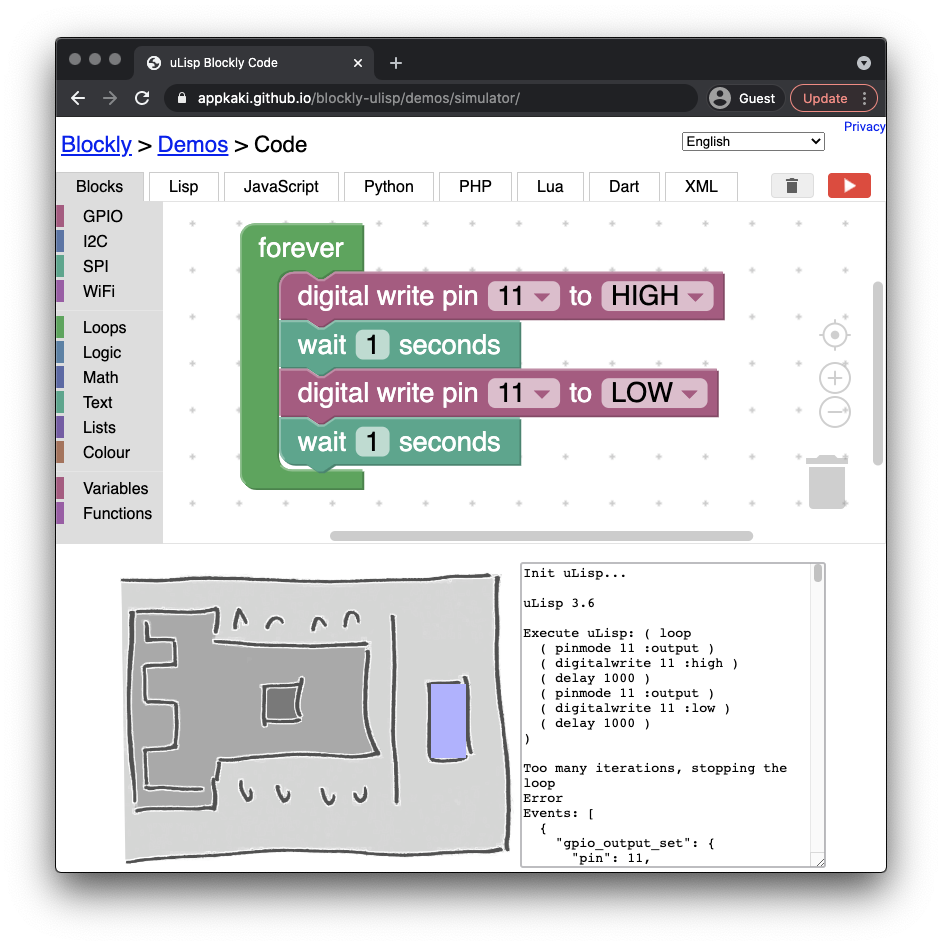
BL602 Simulator with Blockly and uLisp in WebAssembly
What is Emscripten?
Emscripten compiles C programs into WebAssembly so that we can run them in a Web Browser.
(Think of WebAssembly as a kind of Machine Code that runs natively in any Web Browser)
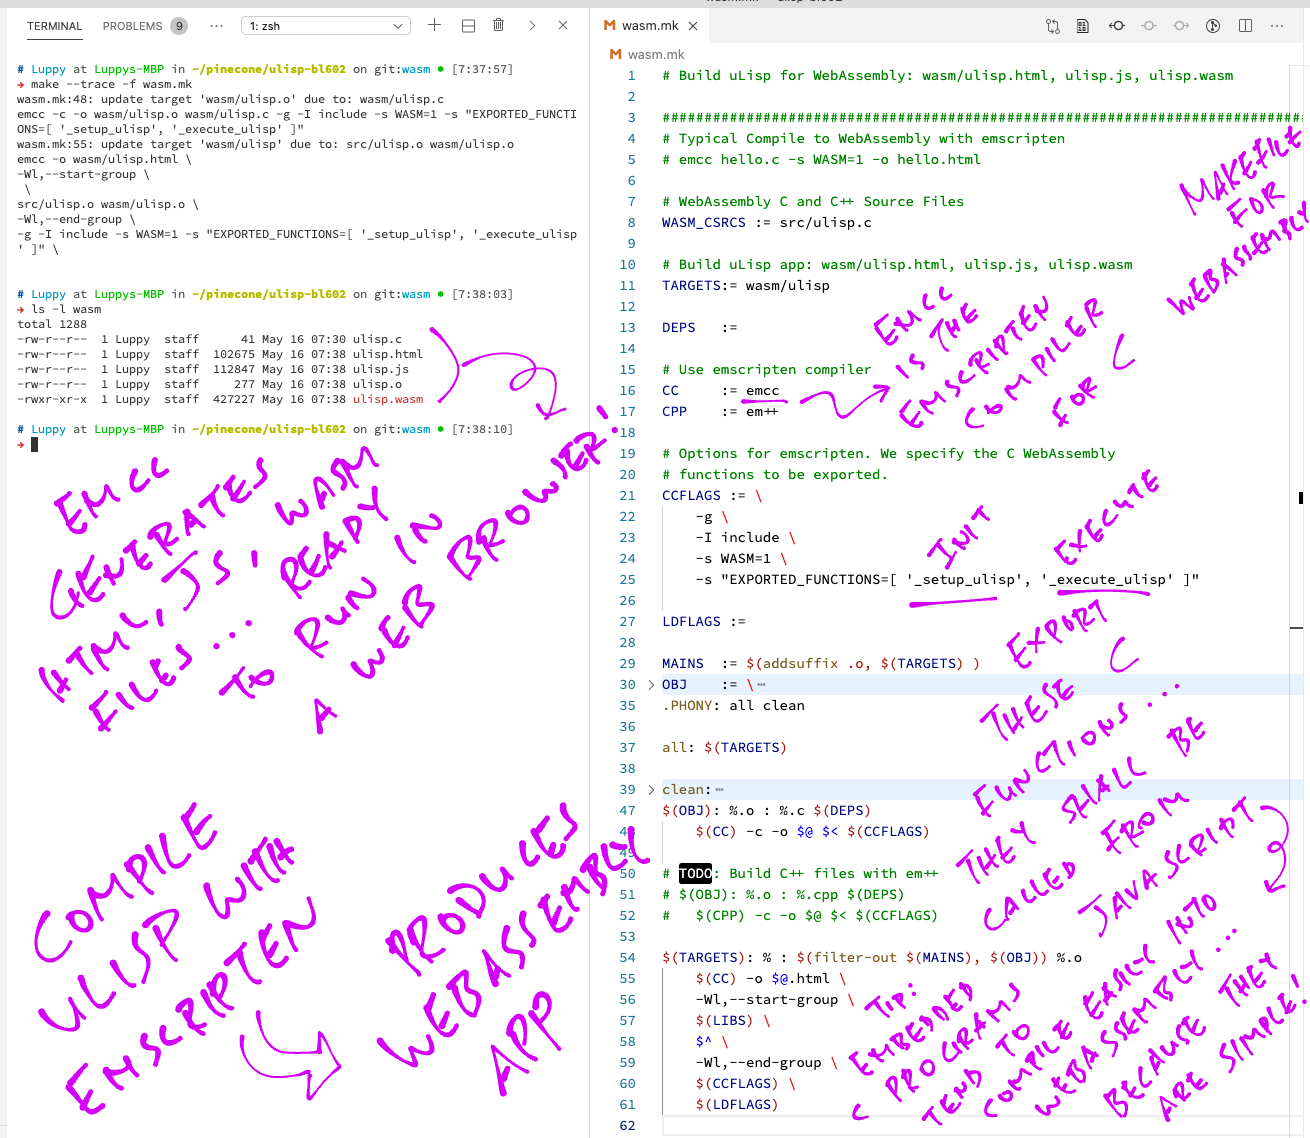
Here’s how we compile our uLisp Interpreter ulisp.c (from the last article) with the Emscripten Compiler emcc…
emcc -g -s WASM=1 \
    src/ulisp.c wasm/wasm.c \
    -o ulisp.html \
    -I include \
    -s "EXPORTED_FUNCTIONS=[ '_setup_ulisp', '_execute_ulisp', '_clear_simulation_events', '_get_simulation_events' ]" \
    -s "EXTRA_EXPORTED_RUNTIME_METHODS=[ 'cwrap', 'allocate', 'intArrayFromString', 'UTF8ToString' ]"
(See the Makefile wasm.mk. More about wasm.c in a while)
C programs that call the Standard C Libraries should build OK with Emscripten: printf, <stdio.h>, <stdlib.h>, <string.h>, …
The Emscripten Compiler generates 3 output files…
ulisp.wasm: Contains the WebAssembly Code generated for our C program.
ulisp.js: JavaScript module that loads the WebAssembly Code into a Web Browser and runs it
ulisp.html: HTML file that we may open in a Web Browser to load the JavaScript module and run the WebAssembly Code
(Instructions for installing Emscripten)
What are the EXPORTED_FUNCTIONS?
-s "EXPORTED_FUNCTIONS=[ '_setup_ulisp', '_execute_ulisp', '_clear_simulation_events', '_get_simulation_events' ]"These are the C functions from our uLisp Interpreter ulisp.c that will be exported to JavaScript.
Our uLisp Interpreter won’t do anything meaningful in a Web Browser unless these 2 functions are called…
_setup_ulisp: Initialise the uLisp Interpreter
_execute_ulisp: Execute a uLisp script
(We’ll see the other 2 functions later)
How do we call the EXPORTED_FUNCTIONS from JavaScript?
Here’s how we call the WebAssembly functions _setup_ulisp and _execute_ulisp from JavaScript: ulisp.html
/// Wait for emscripten to be initialised
Module.onRuntimeInitialized = function() {
  //  Init uLisp interpreter
  Module._setup_ulisp();

  //  Set the uLisp script
  var scr = "( list 1 2 3 )";

  //  Allocate WebAssembly memory for the script
  var ptr = Module.allocate(intArrayFromString(scr), ALLOC_NORMAL);

  //  Execute the uLisp script in WebAssembly
  Module._execute_ulisp(ptr);

  //  Free the WebAssembly memory allocated for the script
  Module._free(ptr);
};
(More about allocate and free)
To run this in a Web Browser, we browse to ulisp.html in a Local Web Server. (Sorry, WebAssembly won’t run from a Local Filesystem)
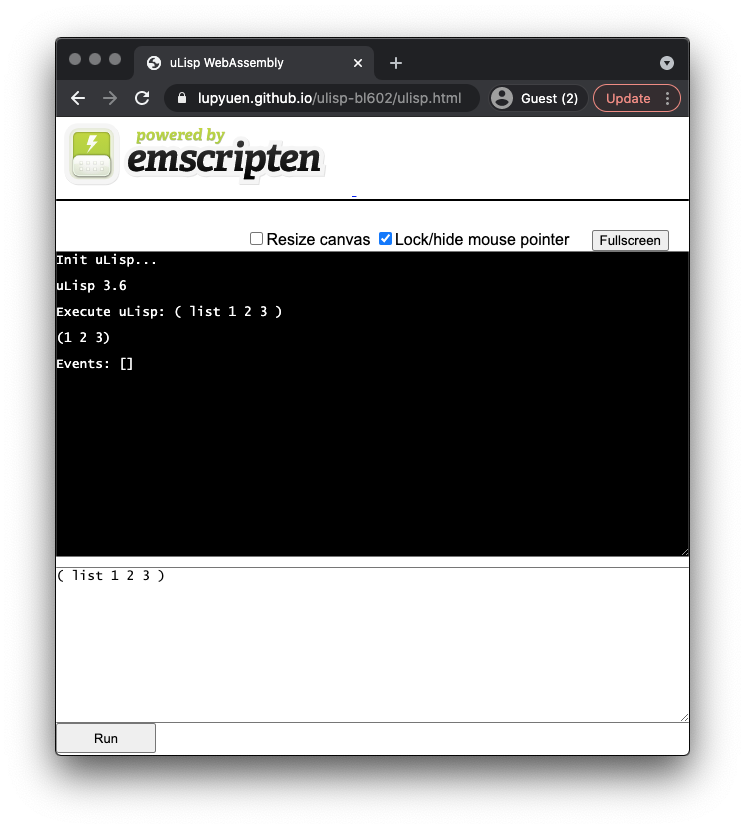
Our uLisp Interpreter in WebAssembly shows the result…
(1 2 3)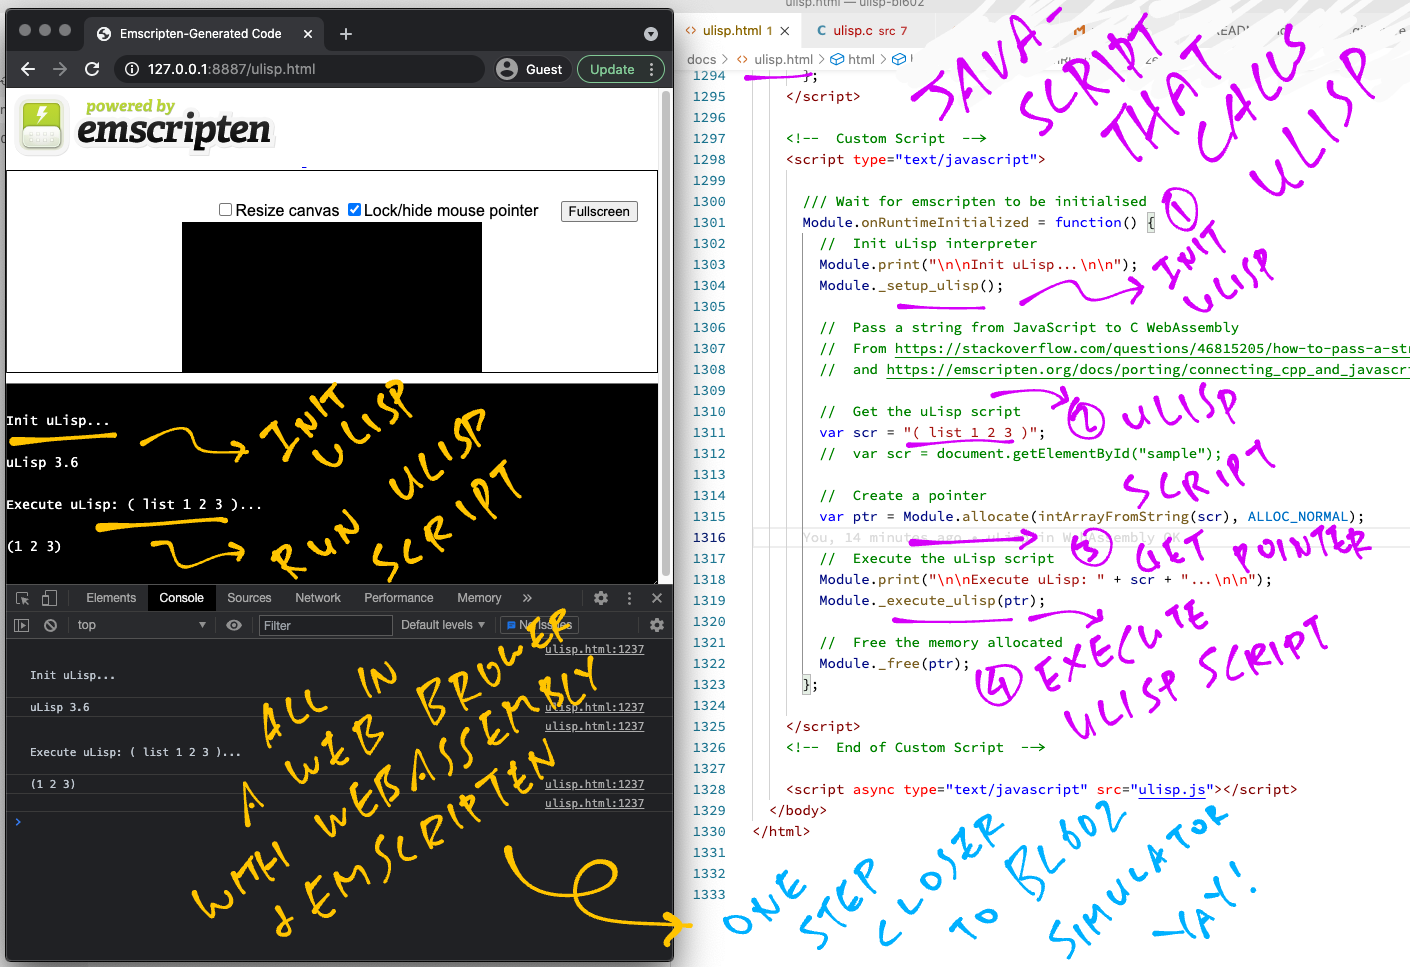
But ulisp.c contains references to the BL602 IoT SDK, so it won’t compile for WebAssembly?
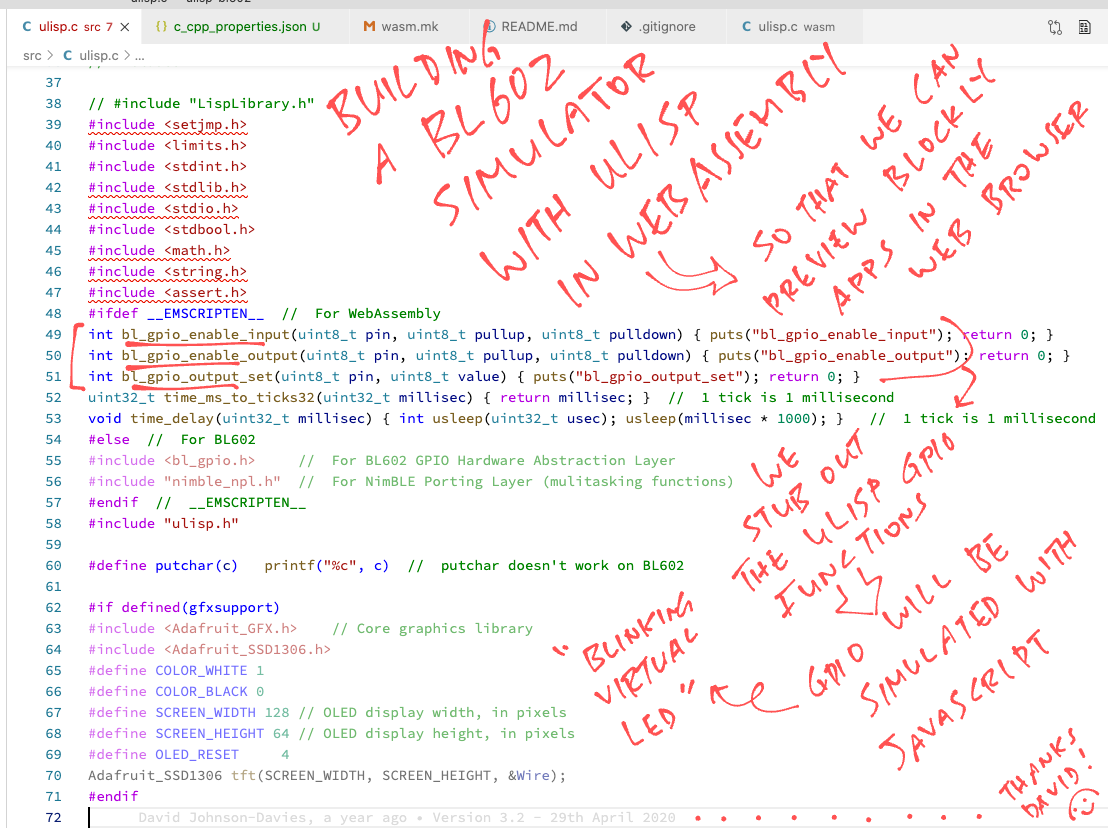
For now, we replace the hardware-specific functions for BL602 by Stub Functions (which will be fixed in a while)…
#ifdef __EMSCRIPTEN__  //  If building for WebAssembly...
//  Use stubs for BL602 functions, will fix later.
int bl_gpio_enable_input(uint8_t pin, uint8_t pullup, uint8_t pulldown)
    { return 0; }
int bl_gpio_enable_output(uint8_t pin, uint8_t pullup, uint8_t pulldown)
    { return 0; }
int bl_gpio_output_set(uint8_t pin, uint8_t value)
    { return 0; }
uint32_t time_ms_to_ticks32(uint32_t millisec)
    { return millisec; }
void time_delay(uint32_t millisec)
    {}

#else                    //  If building for BL602...
#include <bl_gpio.h>     //  For BL602 GPIO Hardware Abstraction Layer
#include "nimble_npl.h"  //  For NimBLE Porting Layer (mulitasking functions)
#endif  //  __EMSCRIPTEN__
The symbol __EMSCRIPTEN__ is defined when we use the Emscripten compiler.
(Yep it’s possible to reuse the same ulisp.c for BL602 and WebAssembly!)
uLisp in WebAssembly looks underwhelming. Where’s the REPL (Read-Evaluate-Print Loop)?
As we’ve seen, printf works perfectly fine in WebAssembly… The output appears automagically in the HTML Text Box provided by Emscripten.
Console Input is a little more tricky. Let’s…
Add a HTML Text Box for input
Execute the input text with uLisp
Here’s how we add the HTML Text Box: ulisp.html
<!-- HTML Text Box for input -->
<textarea id="input"></textarea>

<!-- HTML Button that runs the uLisp script -->
<input id="run" type="button" value="Run" onclick="runScript()"></input>
Also we add a “Run” Button that will execute the uLisp Script entered into the Text Box.
Let’s refactor our JavaScript to separate the uLisp Initialisation and Execution.
Here’s how we initialise the uLisp Interpreter: ulisp.html
/// Wait for emscripten to be initialised
Module.onRuntimeInitialized = function() {
  //  Init uLisp interpreter
  Module._setup_ulisp();
};
In the runScript function (called by the “Run” Button), we grab the uLisp Script from the text box and run it…
/// Run the script in the input box
function runScript() {
  //  Get the uLisp script from the input text box
  var scr = document.getElementById("input").value;

  //  Allocate WebAssembly memory for the script
  var ptr = Module.allocate(intArrayFromString(scr), ALLOC_NORMAL);

  //  Execute the uLisp script
  Module._execute_ulisp(ptr);

  //  Free the WebAssembly memory allocated for the script
  Module._free(ptr);
}
And our uLisp REPL in WebAssembly is done!
How shall we render the Simulated BL602 Board?
Remember how we built the uLisp REPL with HTML and JavaScript?
Let’s do the same for the BL602 Simulator…
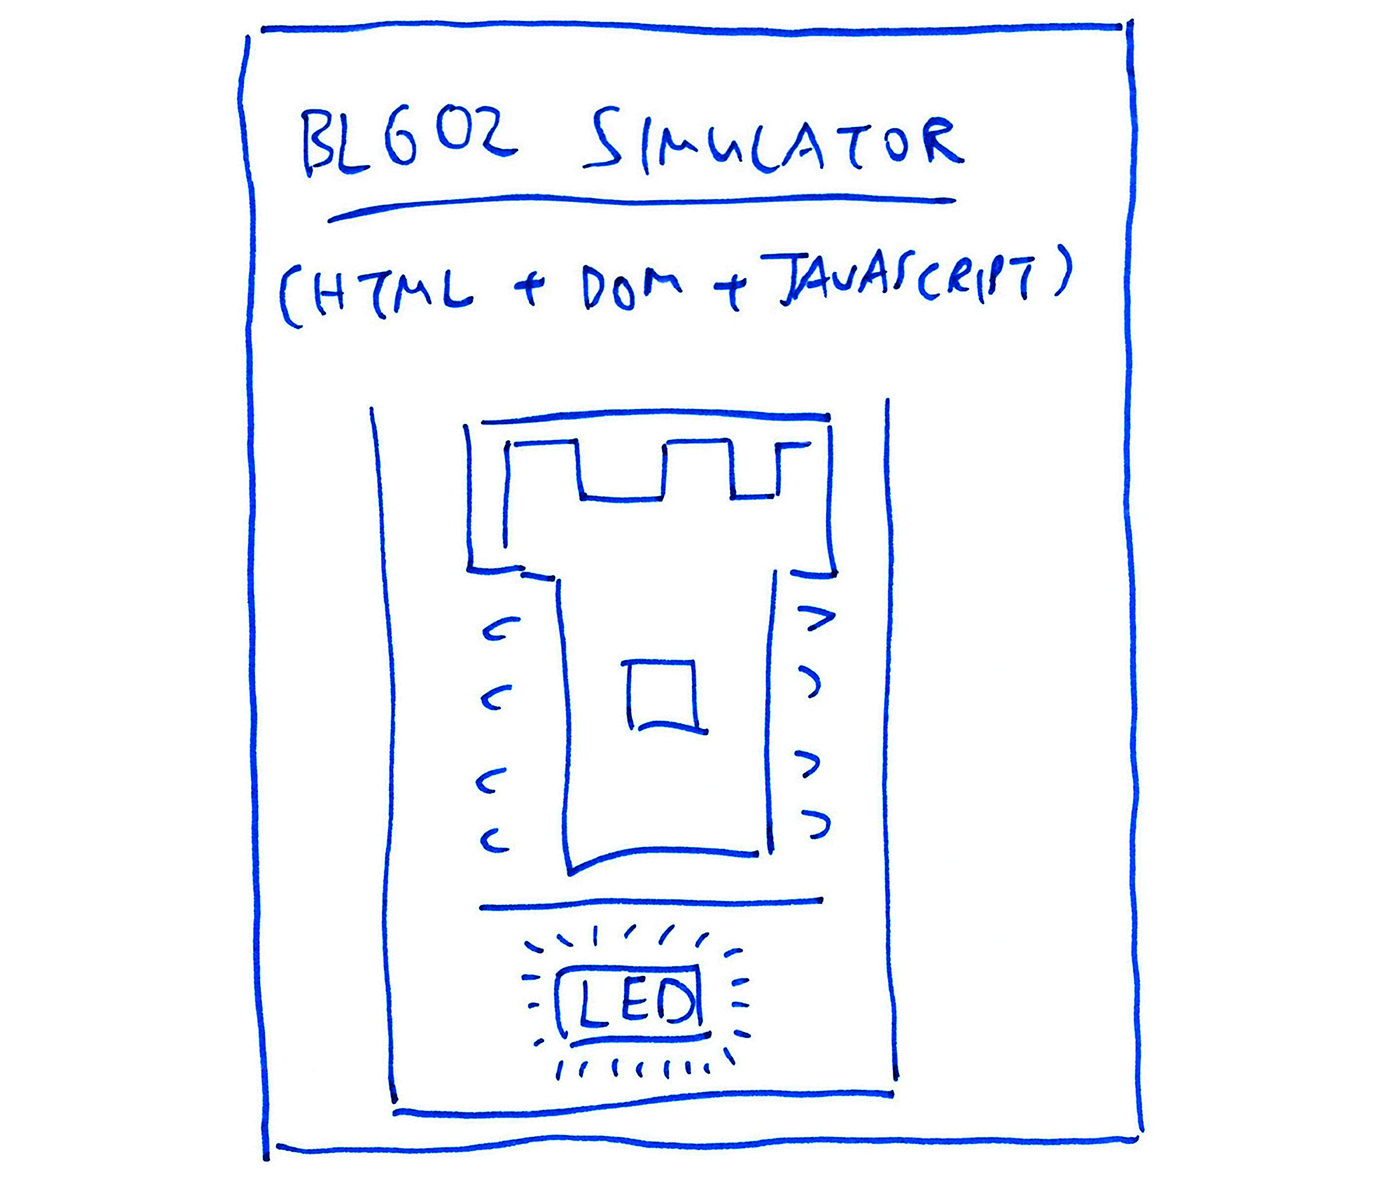
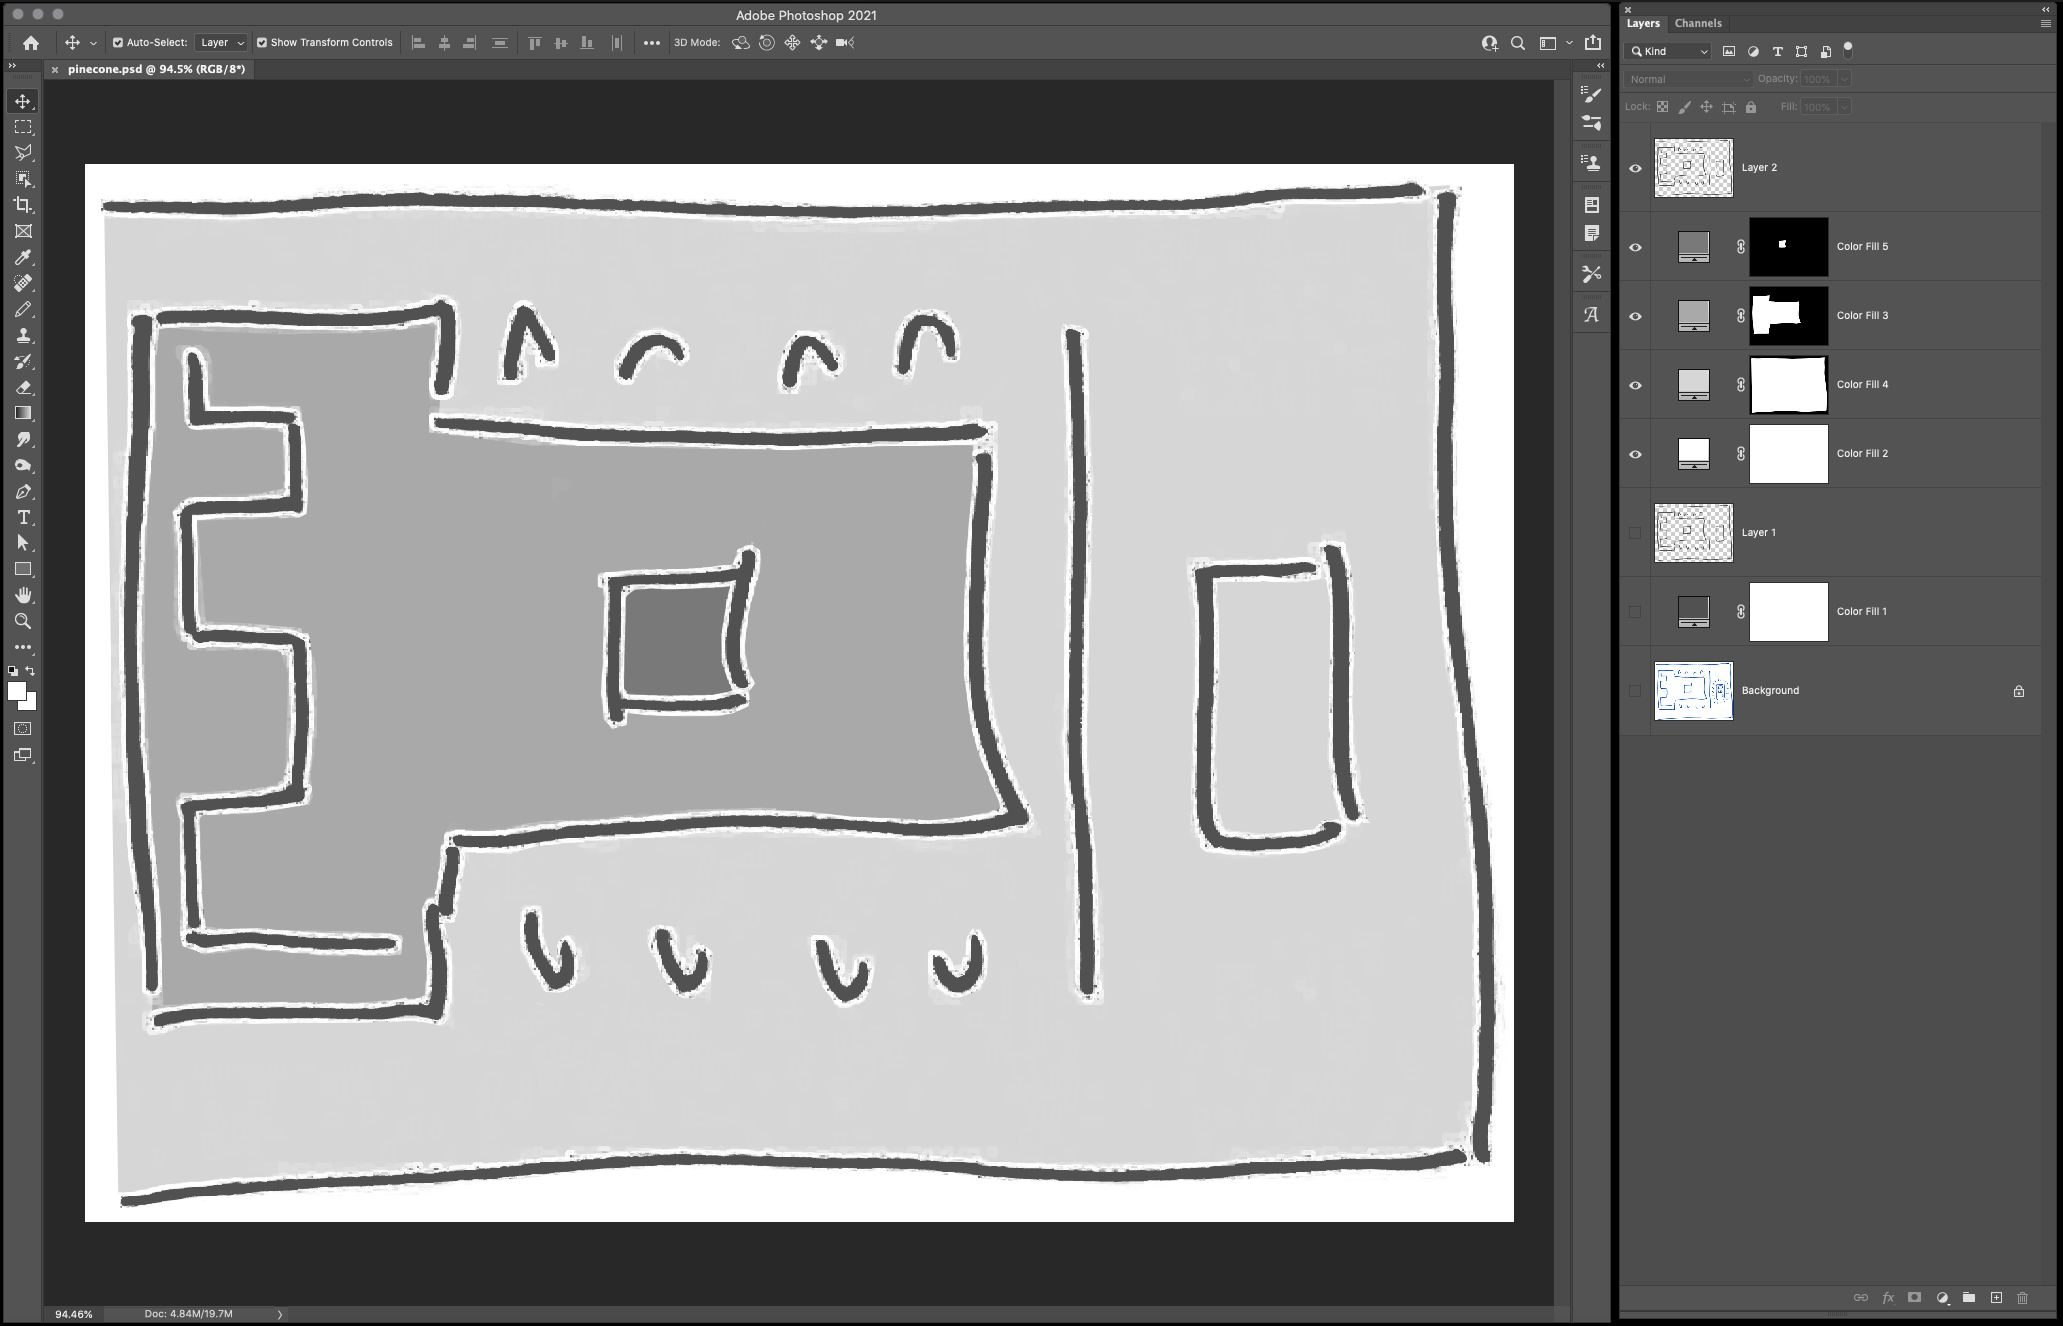
First we save this sketchy image of a PineCone BL602 Board as a PNG file: pinecone.png
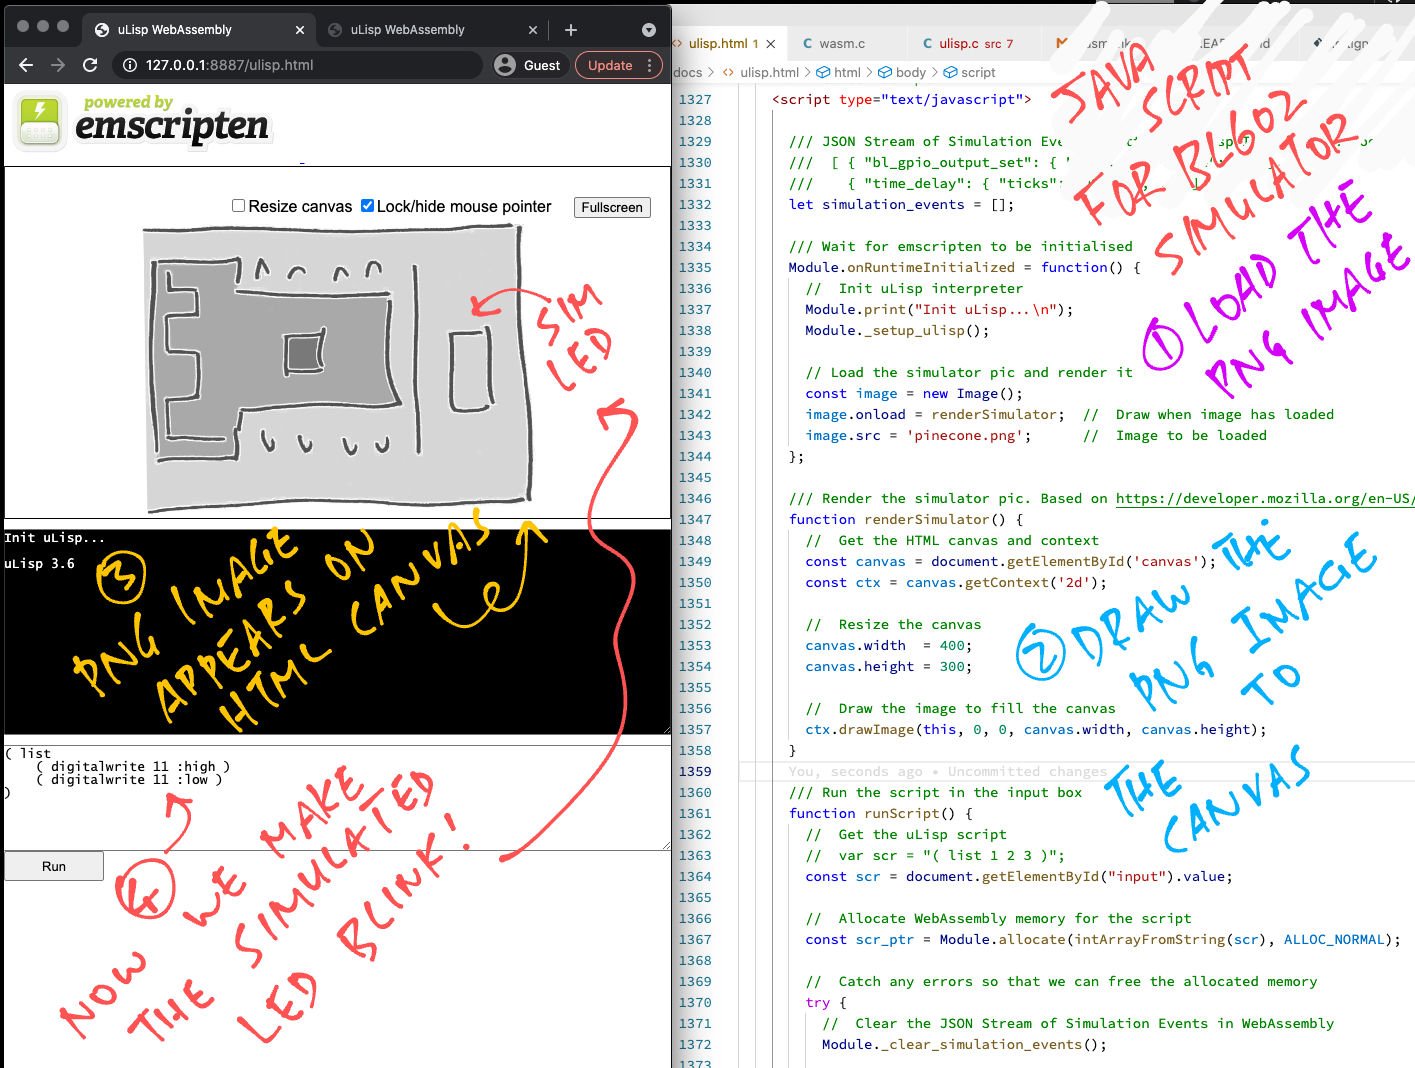
We load the PNG file in our web page: ulisp.html
/// Wait for emscripten to be initialised
Module.onRuntimeInitialized = function() {
  //  Omitted: Init uLisp interpreter
  ...
  // Load the simulator pic and render it
  const image = new Image();
  image.onload = renderSimulator;  //  Draw when image has loaded
  image.src = 'pinecone.png';      //  Image to be loaded
};
This code calls the renderSimulator function when our BL602 image has been loaded into memory.
Emscripten has helpfully generated a HTML Canvas in ulisp.html …
<canvas id="canvas" class="emscripten" oncontextmenu="event.preventDefault()" tabindex=-1></canvas>In the renderSimulator function, let’s render our BL602 image onto the HTML Canvas: ulisp.html
/// Render the simulator pic. Based on https://developer.mozilla.org/en-US/docs/Web/API/CanvasRenderingContext2D/drawImage
function renderSimulator() {
  //  Get the HTML canvas and context
  const canvas = document.getElementById('canvas');
  const ctx = canvas.getContext('2d');

  //  Resize the canvas
  canvas.width  = 400;
  canvas.height = 300;

  //  Draw the image to fill the canvas
  ctx.drawImage(this, 0, 0, canvas.width, canvas.height);
}
Our rendered BL602 Simulator looks like this…
What about the LED?
To simulate the LED switching on, let’s draw a blue rectangle onto the HTML Canvas: ulisp.html
//  Get the HTML Canvas Context
const ctx = document.getElementById('canvas').getContext('2d');

//  LED On: Set the fill colour to Blue
ctx.fillStyle = '#B0B0FF';  //  Blue

//  Draw the LED colour
ctx.fillRect(315, 116, 35, 74);
Our rendered BL602 LED looks good…
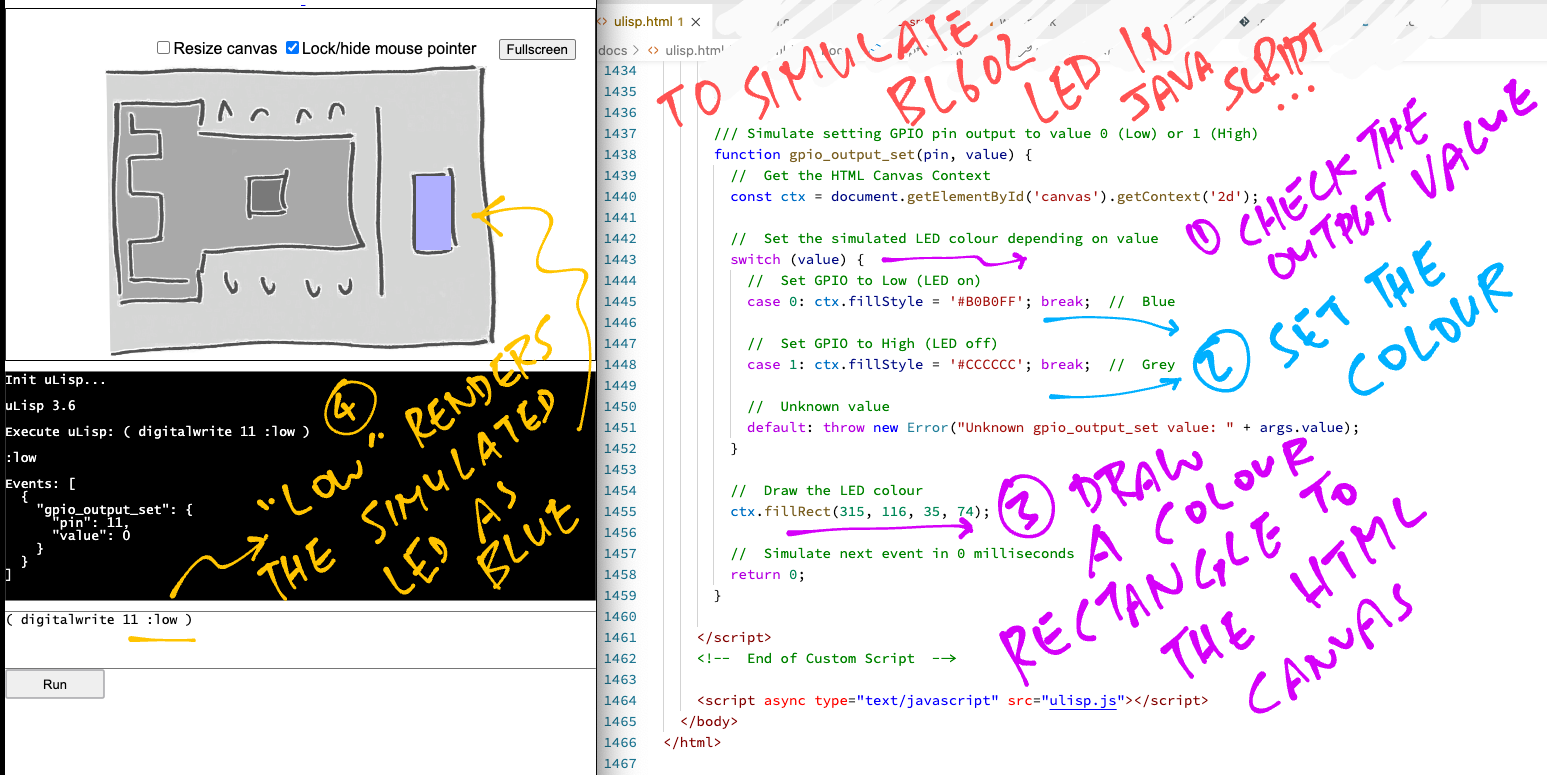
And to simulate the LED switching off, we draw a grey rectangle: ulisp.html
//  LED Off: Set the fill colour to Grey
ctx.fillStyle = '#CCCCCC';  //  Grey

//  Draw the LED colour
ctx.fillRect(315, 116, 35, 74);
Now we wire up the Simulated BL602 LED to uLisp!
Our story so far…
Our uLisp Interpreter lives in WebAssembly (compiled from C with Emscripten)
Our BL602 Simulator lives in JavaScript (rendered onto a HTML Canvas)
How shall we connect uLisp to the BL602 Simulator… And blink the Simulated LED?
Oh yes we have ways of making uLisp talk to BL602 Simulator… From WebAssembly to JavaScript!
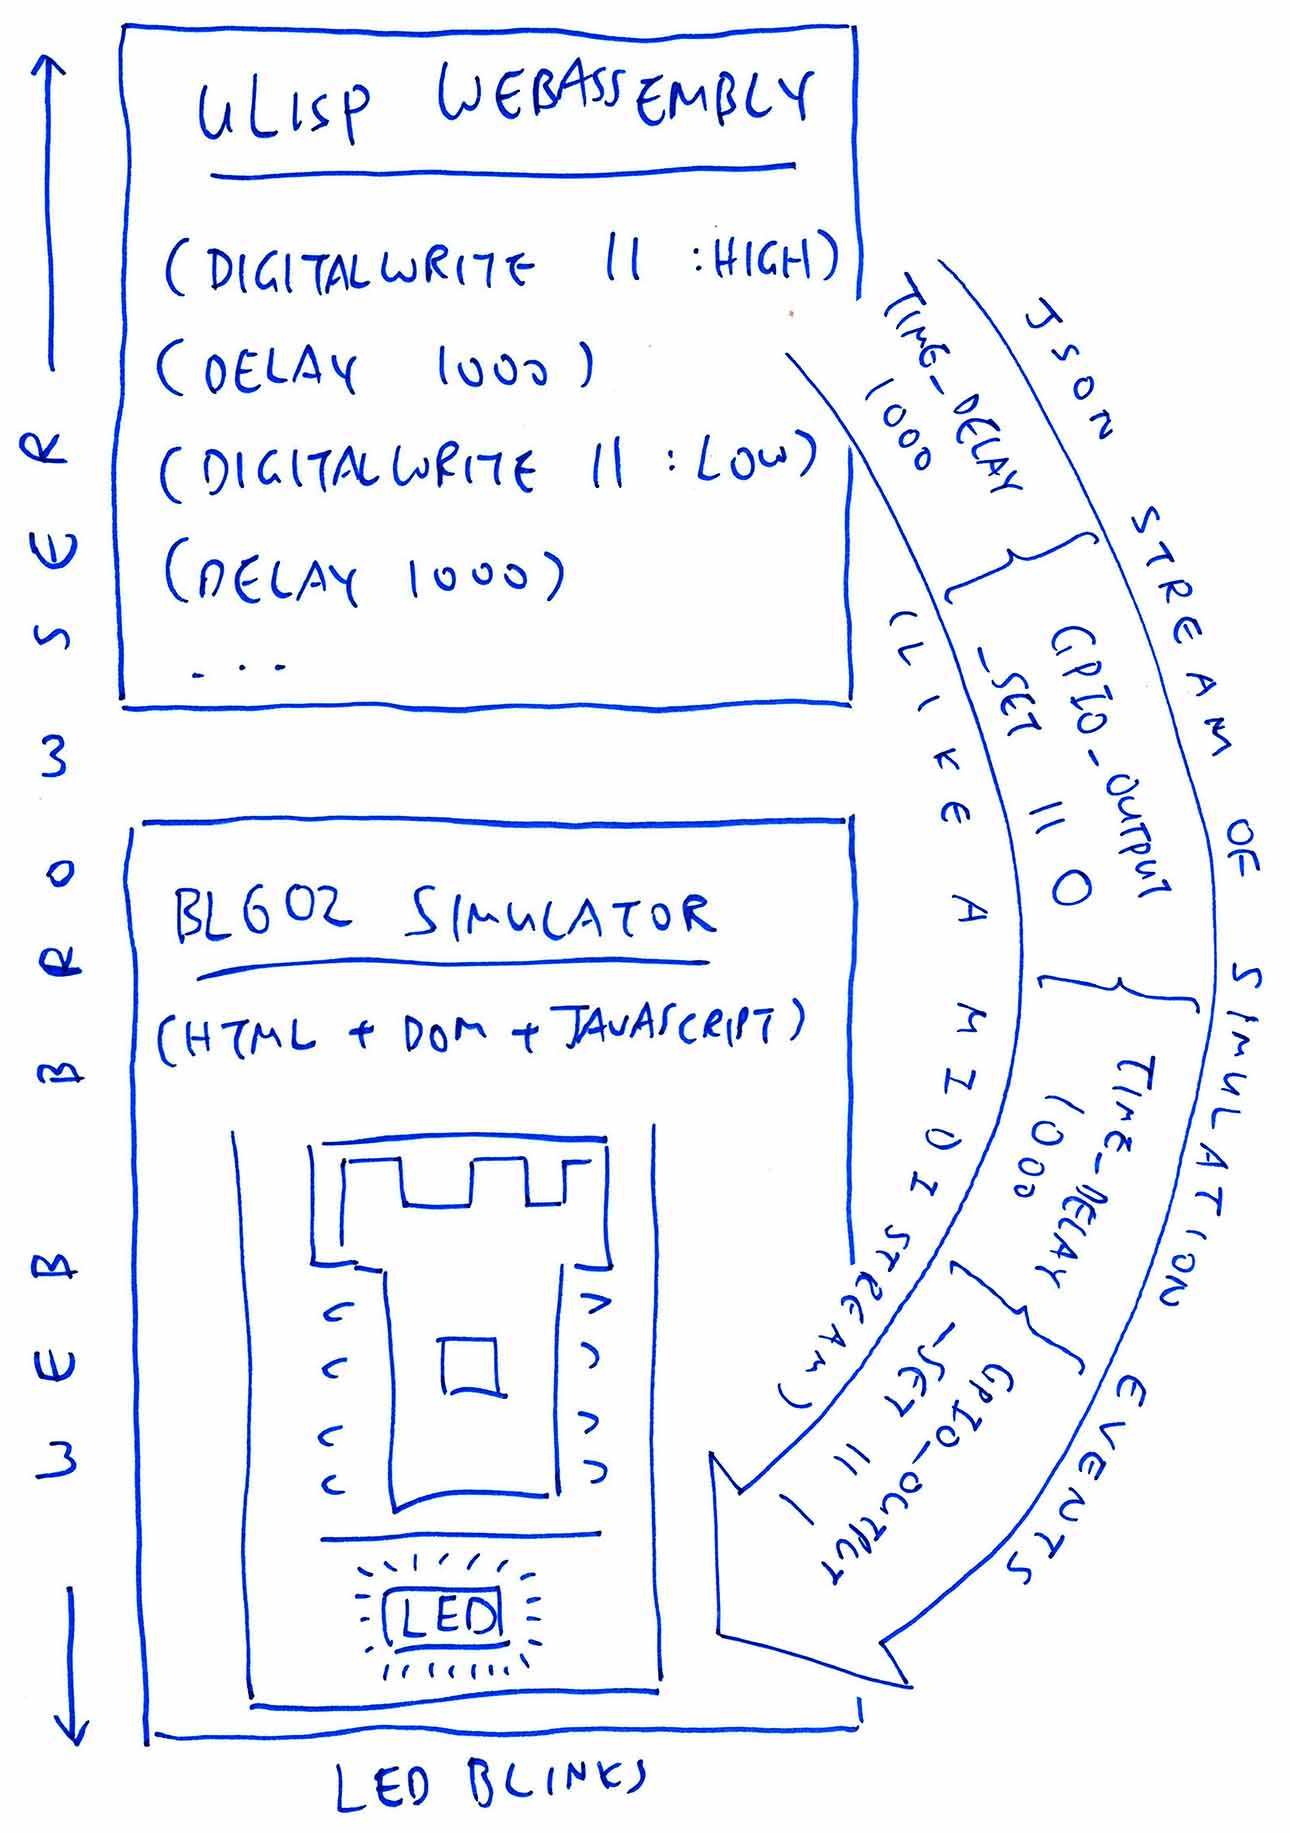
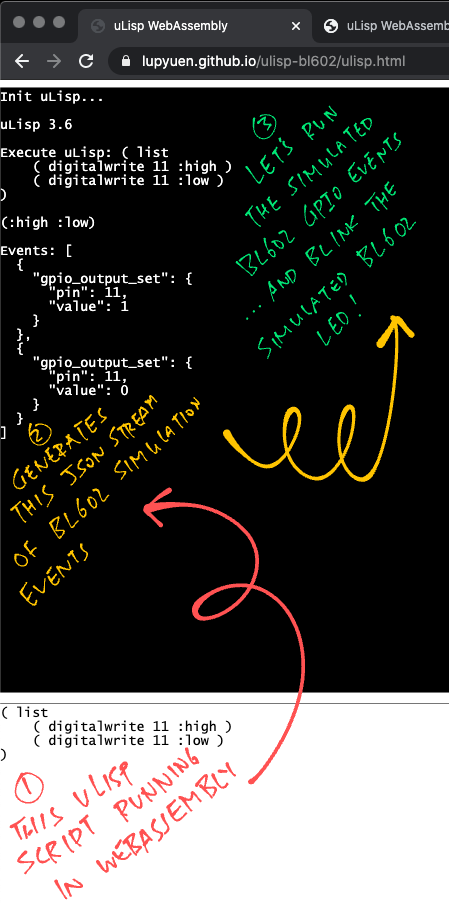
Here’s one way: A JSON Stream of BL602 Simulation Events…
What’s a BL602 Simulation Event?
When uLisp needs to set the GPIO Output to High or Low (to flip an LED On/Off)…
( digitalwrite 11 :high )It sends a Simulation Event to the BL602 Simulator (in JSON format)…
{ "gpio_output_set": {
  "pin": 11,
  "value": 1
} }
Which is handled by the BL602 Simulator to flip the Simulated LED on or off.
(Yes the blue LED we’ve seen earlier)
Is uLisp directly controlling the BL602 Simulator?
Not quite. uLisp is indirectly controlling the BL602 Simulator by sending Simulation Events.
(There are good reasons for doing this Inversion of Control, as well shall learn in a while)
What about time delays like ( delay 1000 )?
uLisp generates Simulation Events for time delays. To handle such events, our BL602 Simulator pauses for the specified duration.
(It’s like playing a MIDI Stream)
Hence this uLisp script…
( delay 1000 )Will generate this Simulation Event…
{ "time_delay": { "ticks": 1000 } }What’s a JSON Stream of Simulation Events?
To simulate a uLisp program on the BL602 Simulator, we shall pass an array of Simulation Events (in JSON format) from uLisp to the BL602 Simulator.
This (partial) uLisp program that sets the GPIO Output and waits 1 second…
( list
  ( digitalwrite 11 :high )
  ( delay 1000 )
  ...
)
Will generate this JSON Stream of Simulation Events…
[ { "gpio_output_set": { "pin": 11, "value": 1 } },
  { "time_delay": { "ticks": 1000 } },
  ...
]
That will simulate a blinking BL602 LED (eventually).
Let’s watch how uLisp adds an event to the JSON Stream of Simulation Events.
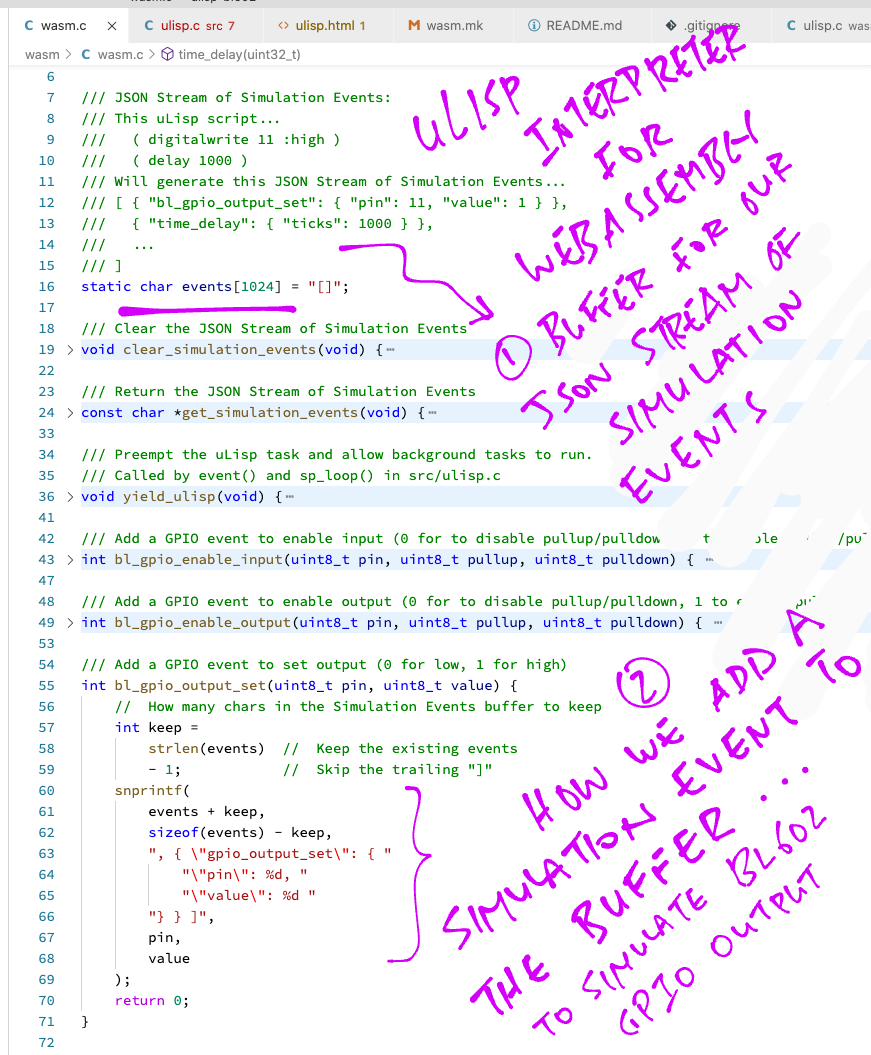
We define a string buffer for the JSON array of events: wasm.c
/// Buffer for JSON Stream of Simulation Events
static char events[1024] = "[]";
To append a GPIO Output Event to the buffer, uLisp calls the function bl_gpio_output_set from wasm.c
/// Add a GPIO event to set output (0 for low, 1 for high)
int bl_gpio_output_set(uint8_t pin, uint8_t value) {
    //  How many chars in the Simulation Events buffer to keep
    int keep =
        strlen(events)  //  Keep the existing events
        - 1;            //  Skip the trailing "]"

    //  Append the GPIO Output Event to the buffer
    snprintf(
        events + keep,
        sizeof(events) - keep,
        ", { \"gpio_output_set\": { "
            "\"pin\": %d, "
            "\"value\": %d "
        "} } ]",
        pin,
        value
    );
    return 0;
}
This code appends a JSON event to the string buffer, which will look like this…
[, { "gpio_output_set": { "pin": 11, "value": 1 } } ]We’ll fix the leading comma “,” in a while.
How is bl_gpio_output_set called by uLisp?
When we enter this uLisp script to set the GPIO Output…
( digitalwrite 11 :high )The uLisp Interpreter calls fn_digitalwrite defined in ulisp.c …
/// Set the GPIO Output to High or Low
object *fn_digitalwrite (object *args, object *env) {
    //  Omitted: Parse the GPIO pin number and High / Low
    ...
    //  Set the GPIO output (from BL602 GPIO HAL)
    int rc = bl_gpio_output_set(
        pin,  //  GPIO pin number
        mode  //  0 for low, 1 for high
    );
Which calls our function bl_gpio_output_set to add the GPIO Output Event.
Will this work when running on real BL602 hardware?
Yep it does! bl_gpio_output_set is a real function defined in the BL602 IoT SDK for setting the GPIO Output.
Thus fn_digitalwrite (and the rest of uLisp) works fine on Real BL602 (hardware) and Simulated BL602 (WebAssembly).
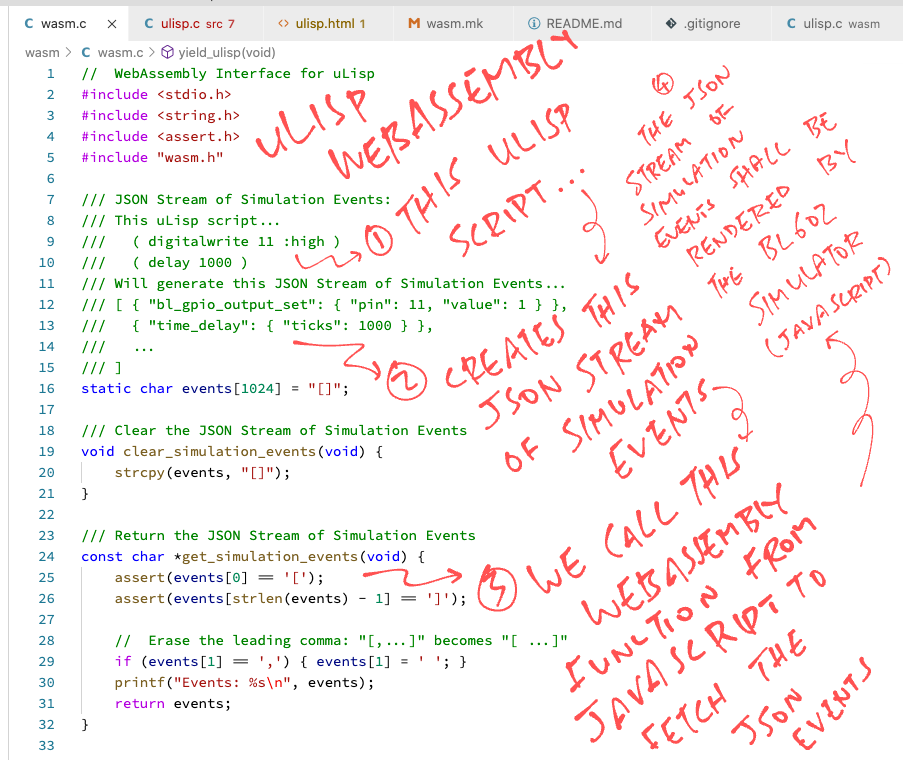
uLisp (in WebAssembly) has generated the JSON Stream of BL602 Simulation Events. How will our BL602 Simulator (in JavaScript) fetch the Simulation Events?
To fetch the Simulation Events, we expose a getter function in WebAssembly like so: wasm.c
/// Return the JSON Stream of Simulation Events
const char *get_simulation_events(void) {
  assert(events[0] == '[');
  assert(events[strlen(events) - 1] == ']');

  //  Erase the leading comma: "[,...]" becomes "[ ...]"
  if (events[1] == ',') { events[1] = ' '; }
  return events;
}
get_simulation_events returns the WebAssembly string buffer that contains the Simulation Events (in JSON format).
Switching over from uLisp WebAssembly to our BL602 Simulator in JavaScript…
Remember the runScript function we wrote for our uLisp REPL?
Let’s rewrite runScript to fetch the Simulation Events by calling get_simulation_events. From ulisp.html …
/// JSON Stream of Simulation Events emitted by uLisp Interpreter. Looks like...
///  [ { "gpio_output_set": { "pin": 11, "value": 1 } },
///    { "time_delay": { "ticks": 1000 } }, ... ]
let simulation_events = [];

/// Run the script in the input box
function runScript() {
  //  Get the uLisp script
  //  var scr = "( list 1 2 3 )";
  const scr = document.getElementById("input").value;

  //  Allocate WebAssembly memory for the script
  const scr_ptr = Module.allocate(intArrayFromString(scr), ALLOC_NORMAL);

  //  Catch any errors so that we can free the allocated memory
  try {
    //  Clear the JSON Stream of Simulation Events in WebAssembly
    Module._clear_simulation_events();

    //  Execute the uLisp script in WebAssembly
    Module.print("\nExecute uLisp: " + scr + "\n");
    Module._execute_ulisp(scr_ptr);
This is similar to the earlier version of runScript except…
We now have a static variable simulation_events that will store the Simulation Events
We use a try...catch...finally block to deallocate the WebAssembly memory.
(In case we hit errors in the JSON parsing)
We call _clear_simulation_events to erase the buffer of Simulation Events (in WebAssembly).
(More about this later)
After calling _execute_ulisp to execute the uLisp Script, we fetch the generated Simulation Events by calling _get_simulation_events (which we’ve seen earlier)…
    //  Get the JSON string of Simulation Events from WebAssembly. Looks like...
    //  [ { "gpio_output_set": { "pin": 11, "value": 1 } },
    //    { "time_delay": { "ticks": 1000 } }, ... ]
    const json_ptr = Module._get_simulation_events();

    //  Convert the JSON string from WebAssembly to JavaScript
    const json = Module.UTF8ToString(json_ptr);
_get_simulation_events returns a pointer to a WebAssembly String.
Here we call UTF8ToString (from Emscripten) to convert the pointer to a JavaScript String.
We parse the returned string as a JSON array of Simulation Events…
    //  Parse the JSON Stream of Simulation Events
    simulation_events = JSON.parse(json);
    Module.print("Events: " + JSON.stringify(simulation_events, null, 2) + "\n");
And we store the parsed array of events into the static variable simulation_events
In case the JSON Parsing fails, we have a try...catch...finally block to ensure that the WebAssembly memory is properly deallocated…
  } catch(err) {
    //  Catch and show any errors
    console.error(err);
  } finally {
    //  Free the WebAssembly memory allocated for the script
    Module._free(scr_ptr);
  }
Now we’re ready to run the Simulated BL602 Events and blink the Simulated BL602 LED!
  //  Start a timer to simulate the returned events
  if (simulation_events.length > 0) {
    window.setTimeout("simulateEvents()", 1);
  }
}
We call a JavaScript Timer to trigger the function simulateEvents.
This simulates the events in simulation_events (like flipping the Simulated LED), one event at a time.
What’s inside the WebAssembly function clear_simulation_events?
Before running a uLisp Script, our BL602 Simulator calls clear_simulation_events to erase the buffer of Simulation Events: wasm.c
/// Clear the JSON Stream of Simulation Events
void clear_simulation_events(void) {
  strcpy(events, "[]");
}simulateEvents is the Event Loop for our BL602 Simulator. It calls itself repeatedly to simulate each event generated by uLisp.
Here’s how it works: ulisp.html
/// Simulate the BL602 Simulation Events recorded in simulate_events, which contains...
///  [ { "gpio_output_set": { "pin": 11, "value": 1 } },
///    { "time_delay": { "ticks": 1000 } }, ... ]
function simulateEvents() {
  //  Take the first event and update the queue
  if (simulation_events.length == 0) { return; }
  const event = simulation_events.shift();
  //  event looks like:
  //  { "gpio_output_set": { "pin": 11, "value": 1 } }

  //  Get the event type (gpio_output_set)
  //  and parameters ({ "pin": 11, "value": 1 })
  const event_type = Object.keys(event)[0];
  const args = event[event_type];
simulateEvents starts by fetching the next event to be simulated (from simulation_events).
It decodes the event into…
Event Type: Like…
gpio_output_set
Event Parameters: Like…
{ "pin": 11, "value": 1 }
Next it handles each Event Type…
  //  Timeout in milliseconds to the next event
  let timeout = 1;

  //  Handle each event type
  switch (event_type) {

    //  Set GPIO output
    //  { "gpio_output_set": { "pin": 11, "value": 1 } }
    case "gpio_output_set":
      timeout += gpio_output_set(args.pin, args.value);
      break;
If we’re simulating a GPIO Output Event, we call the function gpio_output_set and pass the Event Parameters (pin and value).
(We’ll talk about gpio_output_set and the timeout in a while)
    //  Delay
    //  { "time_delay": { "ticks": 1000 } }
    case "time_delay":
      timeout += time_delay(args.ticks);
      break;

    //  Unknown event type
    default:
      throw new Error("Unknown event type: " + event_type);
  }
This code simulates time delays, which we’ll see later.
  //  Simulate the next event
  if (simulation_events.length > 0) {
    window.setTimeout("simulateEvents()", timeout);
  }
}
Finally we simulate the next event (from simulation_events), by triggering simulateEvents with a JavaScript Timer.
And that’s how we simulate every event generated by uLisp!
What’s inside the function gpio_output_set?
gpio_output_set is called by simulateEvents to simulate a GPIO Output Event: ulisp.html
/// Simulate setting GPIO pin output to value 0 (Low) or 1 (High):
/// { "gpio_output_set": { "pin": 11, "value": 1 } }
function gpio_output_set(pin, value) {
  //  Get the HTML Canvas Context
  const ctx = document.getElementById('canvas').getContext('2d');
First we fetch the HTML Canvas and its Context.
Then we set the Fill Colour to Blue or Grey, depending on GPIO Output Value…
  //  Set the simulated LED colour depending on value
  switch (value) {
    //  Set GPIO to Low (LED on)
    case 0: ctx.fillStyle = '#B0B0FF'; break;  //  Blue

    //  Set GPIO to High (LED off)
    case 1: ctx.fillStyle = '#CCCCCC'; break;  //  Grey

    //  Unknown value
    default: throw new Error("Unknown gpio_output_set value: " + args.value);
  }
(Yes we’ve seen this code earlier)
Finally we draw the Simulated LED with the Fill Colour (Blue or Grey)…
  //  Draw the LED colour
  ctx.fillRect(315, 116, 35, 74);

  //  Simulate next event in 0 milliseconds
  return 0;
}
Here’s what we see in the BL602 Simulator when we set the GPIO Output to Low (LED on)…
( digitalwrite 11 :low )
Now our BL602 Simulator flips the Simulated LED on and off. We’re ready to blink the Simulated LED right?
Not quite. We need to simulate Time Delays too!
Can’t we implement Time Delays by sleeping inside uLisp?
Not really. From what we’ve seen, uLisp doesn’t run our script in real time.
uLisp merely generates a bunch of Simulation Events. The events need to be simulated in the correct time sequence by our BL602 Simulator.
Hence we also need to simulate Time Delays with a Simulation Event.
How does uLisp generate a Simulation Event for Time Delay?
When we run this uLisp Script…
( delay 1000 )Our uLisp Intepreter in WebAssembly generates a Time Delay Event like so: wasm.c
/// Add a delay event. 1 tick is 1 millisecond
void time_delay(uint32_t ticks) {
  //  How many chars in the Simulation Events buffer to keep
  int keep =
    strlen(events)  //  Keep the existing events
    - 1;            //  Skip the trailing "]"

  //  Append the Time Delay Event to the buffer
  snprintf(
    events + keep,
    sizeof(events) - keep,
    ", { \"time_delay\": { "
      "\"ticks\": %d "
    "} } ]",
    ticks
  );
}
This code adds a Time Delay Event that looks like…
{ "time_delay": { "ticks": 1000 } }(We define 1 tick as 1 millisecond, so this event sleeps for 1 second)
How does our BL602 Simulator handle a Time Delay Event in JavaScript?
Earlier we’ve seen simulateEvents, the Event Loop for our BL602 Simulator: ulisp.html
function simulateEvents() {
  //  Take the first event
  const event = simulation_events.shift();
  ...
  //  Get the event type and parameters
  const event_type = Object.keys(event)[0];
  const args = event[event_type];
  ...
  //  Handle each event type
  switch (event_type) {
    ...
    //  Delay
    //  { "time_delay": { "ticks": 1000 } }
    case "time_delay":
      timeout += time_delay(args.ticks);
      break;
simulateEvents handles the Time Delay Event by calling time_delay with the number of ticks (milliseconds) to delay: ulisp.html
/// Simulate a delay for the specified number of ticks (1 tick = 1 millisecond)
/// { "time_delay": { "ticks": 1000 } }
function time_delay(ticks) {
  //  Simulate the next event in "ticks" milliseconds
  return ticks;
}
time_delay doesn’t do much… It returns the number of ticks (milliseconds) to delay.
The magic actually happens in the calling function simulateEvents. From ulisp.html …
function simulateEvents() {
  ...
  //  Get the delay in ticks / milliseconds
  timeout += time_delay(args.ticks);
  ...
  //  Simulate the next event
  if (simulation_events.length > 0) {
    //  Timer expires in timeout milliseconds
    window.setTimeout("simulateEvents()", timeout);
  }
}
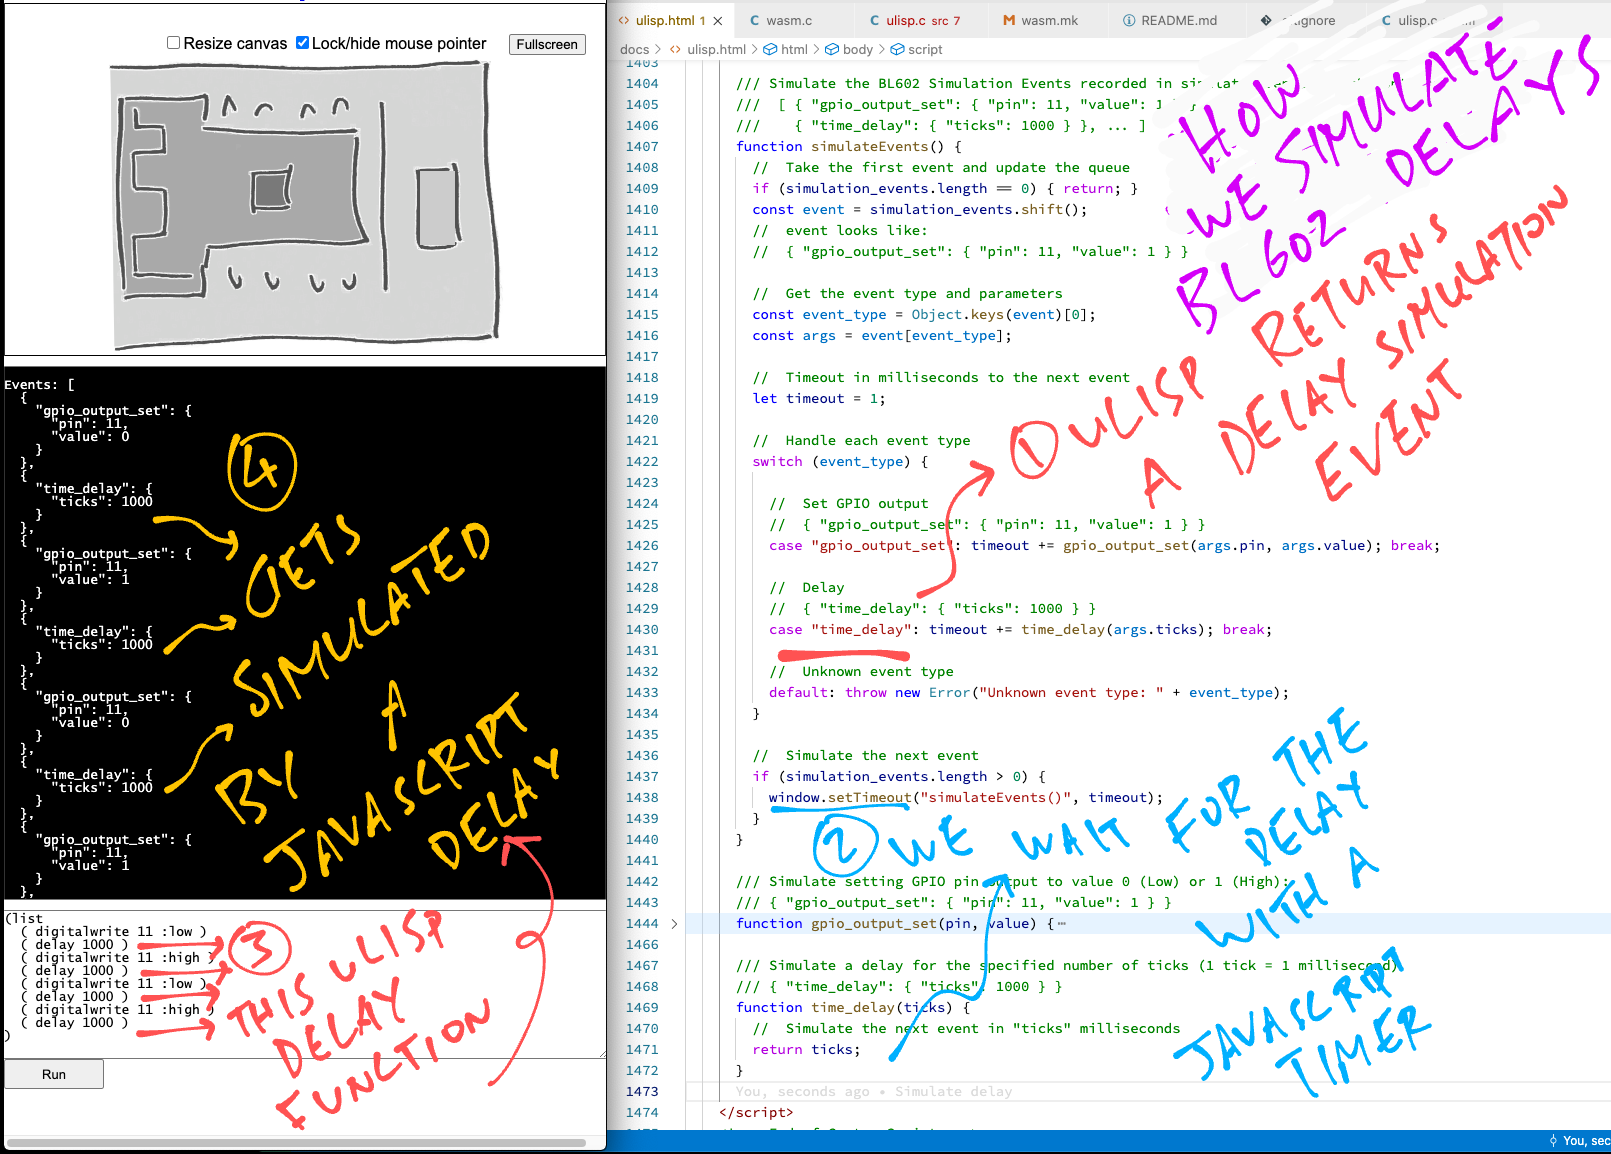
simulateEvents takes the returned value (number of ticks to wait) and sets the timeout of the JavaScript Timer.
(When the timer expires, it calls simulateEvents to handle the next Simulation Event)
Let’s watch Time Delay Events in action! Guess what happens when we run this uLisp Script with our BL602 Simulator…
( list
  ( digitalwrite 11 :low )
  ( delay 1000 )
  ( digitalwrite 11 :high )
  ( delay 1000 )
)
Let’s ponder this uLisp Script that blinks the LED in a loop…
( loop
  ( digitalwrite 11 :low )
  ( delay 1000 )
  ( digitalwrite 11 :high )
  ( delay 1000 )
)
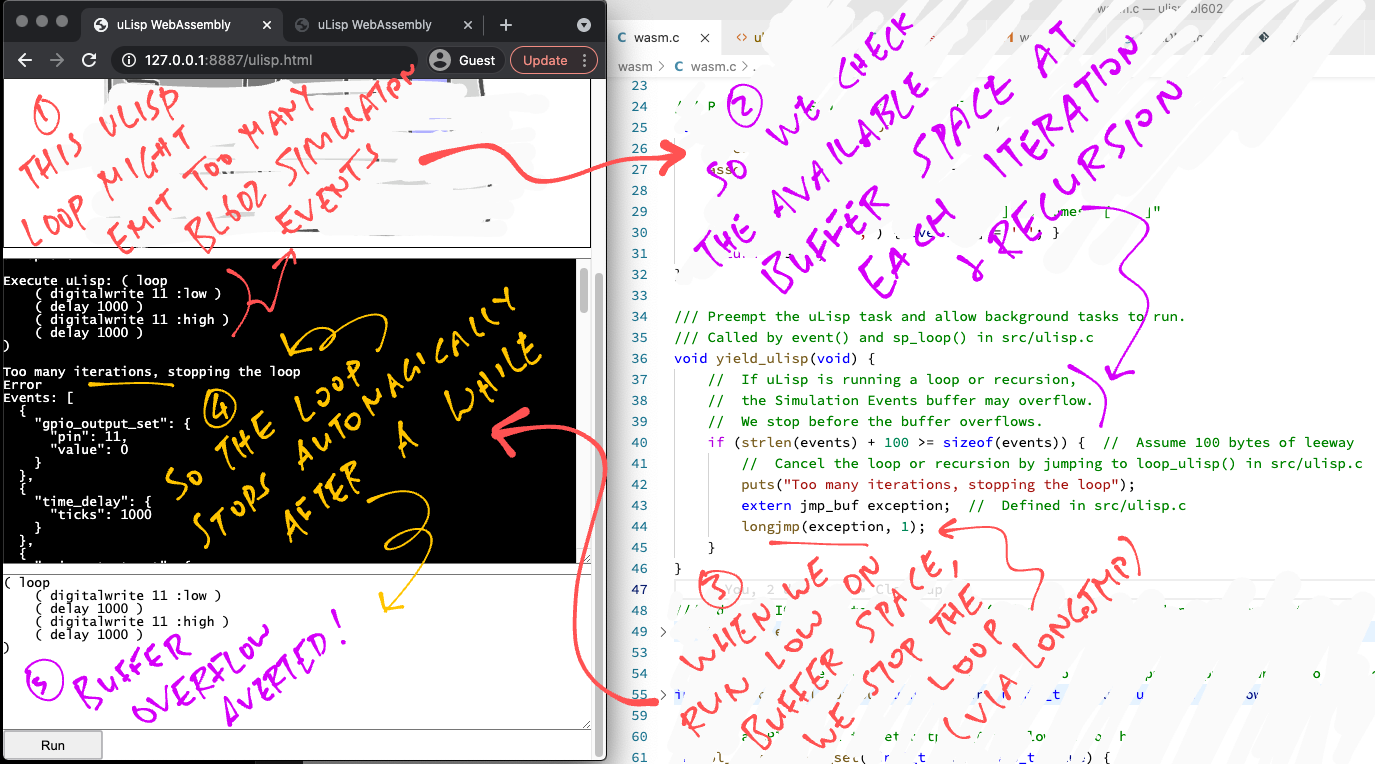
Wait a minute… Won’t this uLisp Script generate an Infinite Stream of Simulation Events? And overflow our 1024-byte event buffer?
Righto! We can’t allow uLisp Loops and Recursion to run forever in our simulator. We must stop them! (Eventually)
We stop runaway Loops and Recursion here: wasm.c
/// Preempt the uLisp task and allow background tasks to run.
/// Called by eval() and sp_loop() in src/ulisp.c
void yield_ulisp(void) {
  //  If uLisp is running a loop or recursion,
  //  the Simulation Events buffer may overflow.
  //  We stop before the buffer overflows.
  if (strlen(events) + 100 >= sizeof(events)) {  //  Assume 100 bytes of leeway

    //  Cancel the loop or recursion by jumping to loop_ulisp() in src/ulisp.c
    puts("Too many iterations, stopping the loop");
    extern jmp_buf exception;  //  Defined in src/ulisp.c
    longjmp(exception, 1);
  }
}
uLisp calls yield_ulisp when it iterates through a loop or evaluates a recursive expression.
If yield_ulisp detects that the buffer for Simulation Events is about to overflow, it stops the uLisp Loop / Recursion by jumping out (longjmp) and reporting an exception.
(Which will return a truncated stream of Simulation Events to the BL602 Simulator)
Looks kinda simplistic?
Yes this solution might not work for some kinds of uLisp Loops and Recursion. But it’s sufficient to simulate a blinking LED (for a short while).
How does uLisp call yield_ulisp?
uLisp calls yield_ulisp when iterating through a loop in ulisp.c …
///  Execute uLisp Loop
object *sp_loop (object *args, object *env) {
  ...
  for (;;) {
    //  Preempt the uLisp task and allow background tasks to run
    yield_ulisp();
And when it evaluates a (potentially) recursive expression: ulisp.c
///  Main uLisp Evaluator
object *eval (object *form, object *env) {
  ...
  // Preempt the uLisp task and allow background tasks to run
  yield_ulisp();
So now we’re all set to run this uLisp loop?
( loop
  ( digitalwrite 11 :low )
  ( delay 1000 )
  ( digitalwrite 11 :high )
  ( delay 1000 )
)
Yes! Here’s our BL602 Simulator running the LED Blinky Loop. Watch how the Simulated LED stops blinking after a while…
Today we’ve created two things that run in a Web Browser…
uLisp REPL (based on WebAssembly)
BL602 Simulator (based on JavaScript)
In the previous article we’ve created a Blockly Web Editor that lets us drag-and-drop uLisp Programs in a Web Browser (much like Scratch). (See this)
Can we drag-and-drop Blockly Programs in a Web Browser… And run them with uLisp REPL and BL602 Simulator?
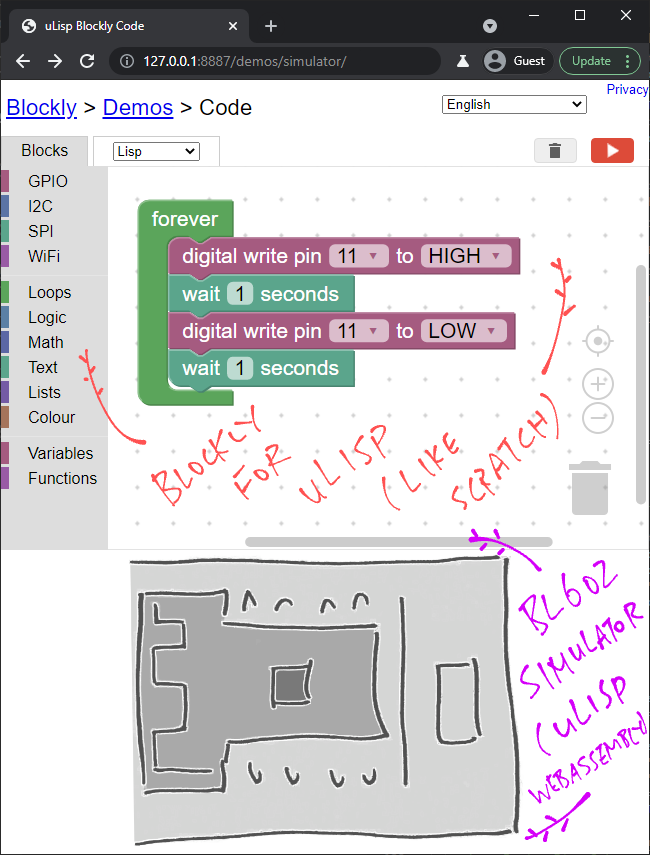
Yes we can! Just do this…
Click this link to run the Blockly Web Editor for uLisp WebAssembly and BL602 Simulator…
(This website contains HTML, JavaScript and WebAssembly, no server-side code. We’ll explain blockly-ulisp in a while)
Drag-and-drop this Blockly Program…
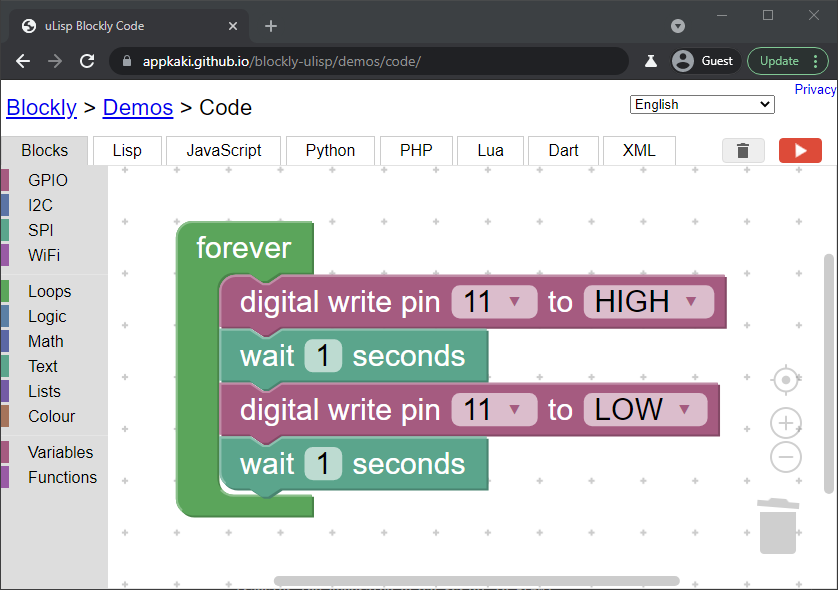
By snapping these blocks together…
forever from Loops (in the left bar)
digital write from GPIO (in the left bar)
wait from Loops (in the left bar)
Make sure they fit snugly. (Not floaty)
Set the parameters for the blocks as shown above…
digital write: Set the output to HIGH for the first block, LOW for the second block
wait: Wait 1 second for both blocks
Click the Lisp tab at the top.
We should see this uLisp code generated by Blockly…
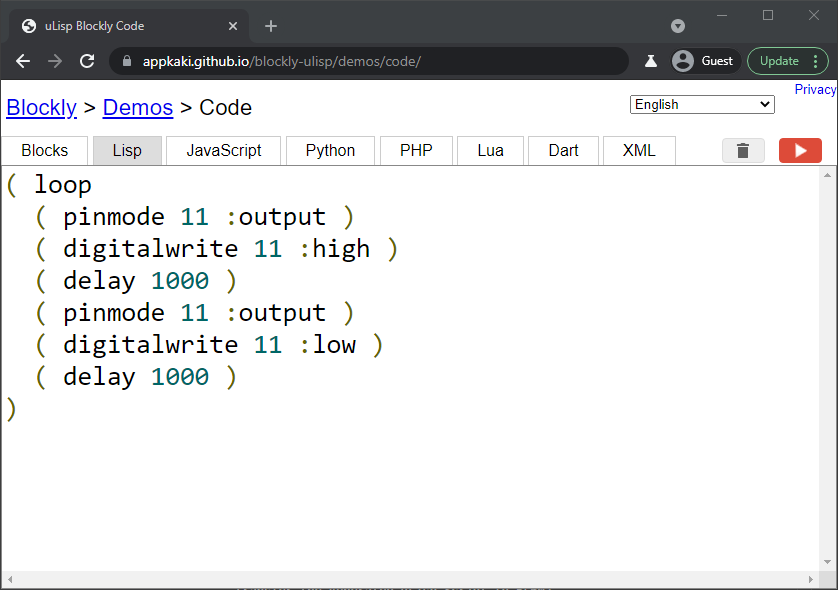
Click the Run Button [ ▶ ] at top right.
The Simulated LED blinks every second!
(And stops after a while, because we don’t simulate infinite loops)
Yes indeed we can drag-and-drop Blockly Programs… And run them with the uLisp REPL and BL602 Simulator!
Read on to find out how we connected Blockly to uLisp REPL (in WebAssembly) and BL602 Simulator (in JavaScript).

Adding the BL602 Simulator to Blockly (from the previous article) was surprisingly painless.
Here’s what we did…
We create a Blockly folder for our new web page (based on the Blockly folder from the previous article)…
Copy the folder demos/code to demos/simulator
We copy the WebAssembly files to the Blockly folder…
Copy ulisp.js and ulisp.wasm from ulisp-bl602/docs to demos/simulator
Insert the HTML Canvas and the Output Box (for the uLisp log): index.html
<!-- Canvas for Simulator -->
<tr>
  <td colspan=2 align="center">
    <canvas id="canvas" width="400" height="300"></canvas>
    <textarea id="output" style="width: 300px; height: 300px;"></textarea>
    <div class="spinner" id='spinner'></div>
    <div class="emscripten" id="status"></div>
    <progress value="0" max="100" id="progress" hidden=1></progress>
  </td>
</tr>
<!-- End -->(spinner, status and progress are needed by the Emscripten JavaScript)
Copy the Emscripten JavaScript from ulisp.html to index.html
<!--  Emscripten Script: From ulisp.html  -->
<script type='text/javascript'>
  var statusElement   = ...
  var progressElement = ...
  var spinnerElement  = ...

  var Module = {
    preRun:  [],
    postRun: [],
    print:     ... ,
    printErr:  ... ,
    canvas:    ... ,
    setStatus: ... ,
    monitorRunDependencies: ...
  };
  Module.setStatus( ... );
  window.onerror = ...
</script>
<!--  End of Emscripten Script  -->
Copy the BL602 Simulator JavaScript from ulisp.html to index.html
<!--  Custom Script: TODO Sync with ulisp.html  -->
<script type="text/javascript">

  /// JSON Stream of Simulation Events emitted by uLisp Interpreter
  let simulation_events = [];

  /// Wait for emscripten to be initialised
  Module.onRuntimeInitialized = ...

  /// Render the simulator pic
  function renderSimulator() { ... }

  /// Run the provided script
  function runScript(scr) { /* See changes below */ }

  /// Simulate the BL602 Simulation Events recorded in simulate_events
  function simulateEvents() { ... }

  /// Simulate setting GPIO pin output to value 0 (Low) or 1 (High)
  function gpio_output_set(pin, value) { ... }

  /// Simulate a delay for the specified number of ticks
  function time_delay(ticks) { ... }

</script>
<!--  End of Custom Script  -->
Modify the runScript function above…
/// Run the uLisp script from Input Box
function runScript() {
  //  Get the uLisp script from Input Box
  const scr = document.getElementById("input").value;

  //  Allocate WebAssembly memory for the script
  const scr_ptr = Module.allocate(intArrayFromString(scr), ALLOC_NORMAL);
So that it runs the script from the provided parameter (instead of the REPL Input Box): index.html
/// Run the provided uLisp script
function runScript(scr) {
  //  Allocate WebAssembly memory for the script
  const scr_ptr = Module.allocate(intArrayFromString(scr), ALLOC_NORMAL);
Load our Emscripten WebAssembly into Blockly: index.html
<!--  Load Emscripten WebAssembly: From ulisp.html  -->
<script async type="text/javascript" src="ulisp.js"></script>
<!--  End of Emscripten WebAssembly  -->
Previously we ran the uLisp code on a real BL602 with the Web Serial API.
Now we run the uLisp code on BL602 Simulator: code.js
///  Run the uLisp code on BL602 Simulator
Code.runJS = function() {
  //  Generate the uLisp code by calling the Blockly Code Generator for uLisp
  var code = Blockly.Lisp.workspaceToCode(Code.workspace);

  //  Run the uLisp code on BL602 Simulator
  runScript(code);   //  Defined in index.html
}
And that’s how we added uLisp WebAssembly and BL602 Simulator to Blockly…
Dragging-and-dropping uLisp programs for microcontrollers… And running them WITHOUT a microcontroller!
Our BL602 Simulator works OK for simulating a uLisp Program. Will it work for simulating BL602 Firmware coded in C?
Our BL602 Simulator might work for BL602 Firmware coded in C!
Let’s look at this BL602 Blinky Firmware in C: sdk_app_blinky/demo.c
/// Blink the BL602 LED
void blinky(char *buf, int len, int argc, char **argv) {
  //  Configure the LED GPIO for output (instead of input)
  int rc = bl_gpio_enable_output(
    LED_GPIO,  //  GPIO pin number (11)
    0,         //  No GPIO pullup
    0          //  No GPIO pulldown
  );
  assert(rc == 0);  //  Halt on error

  //  Blink the LED 5 times
  for (int i = 0; i < 10; i++) {

    //  Toggle the LED GPIO between 0 (on) and 1 (off)
    rc = bl_gpio_output_set(  //  Set the GPIO output (from BL602 GPIO HAL)
      LED_GPIO,               //  GPIO pin number (11)
      i % 2                   //  0 for low, 1 for high
    );
    assert(rc == 0);  //  Halt on error

    //  Sleep 1 second
    time_delay(                 //  Sleep by number of ticks (from NimBLE Porting Layer)
      time_ms_to_ticks32(1000)  //  Convert 1,000 milliseconds to ticks (from NimBLE Porting Layer)
    );
  }
}
To get this C code running on our BL602 Simulator, we need to compile the code to WebAssembly.
Will this C code compile to WebAssembly?
Remember earlier we created these C Functions for our WebAssembly Interface…
/// Add a GPIO event to set output (0 for low, 1 for high)
int bl_gpio_output_set(uint8_t pin, uint8_t value) { ... }

/// Configure the GPIO pin for output
int bl_gpio_enable_output(uint8_t pin, uint8_t pullup, uint8_t pulldown) { return 0; }

/// Add a delay event. 1 tick is 1 millisecond
void time_delay(uint32_t ticks) { ... }

/// Convert milliseconds to ticks
uint32_t time_ms_to_ticks32(uint32_t millisec) { return millisec; }
These C Function Signatures are 100% identical to the BL602 Functions from the BL602 IoT SDK: bl_gpio_output_set, bl_gpio_enable_output, …
So yep, the above BL602 Firmware Code will compile to WebAssembly!
Similar to a uLisp Program, the BL602 Firmware Code (running in WebAssebly) will generate a JSON Stream of Simulation Events.
(Which we’ll feed to our BL602 Simulator in JavaScript)
But can we simulate ALL functions from the BL602 IoT SDK: GPIO, I2C, SPI, ADC, DAC, LVGL, LoRa, …?
This needs work of course.
To simulate any uLisp Program or BL602 Firmware we need to code the necessary Simulation Functions in JavaScript (like gpio_output_set and time_delay) for GPIO, I2C, SPI, ADC, DAC, LVGL, LoRa, …
(Sounds like an interesting challenge!)
Why did we choose to simulate a JSON Stream of Simulation Events? Is there a simpler way?
Let’s look at this uLisp Program…
( loop
  ( digitalwrite 11 :low )
  ( delay 1000 )
  ( digitalwrite 11 :high )
)
The obvious way to simulate this uLisp Program (with WebAssembly) would be to let uLisp control the simulator directly…
uLisp evaluates the first expression…
( digitalwrite 11 :low )uLisp renders the Simulated LED flipped on.
(Probably with SDL, which is supported by Emscripten)
uLisp evaluates the next expression…
( delay 1000 )uLisp pauses for 1 second
uLisp evaluates the next expression…
( digitalwrite 11 :high )uLisp renders the Simulated LED flipped off
uLisp repeats the above steps forever
This Synchronous Simulation of uLisp Programs is Tightly Coupled.
It’s heavily dependent on the implementation of the uLisp Interpreter. And the way we render the simulator (like SDL).
Which makes this design harder to reuse for other kinds of BL602 Firmware (like our BL602 Blinky Firmware in C) and other ways of rendering the simulator (like JavaScript).
To fix this, we apply Inversion of Control and flip the design, so that uLisp no longer controls the simulator directly…

And we get the chosen design of our BL602 Simulator.
Some Higher Entity (the Simulator JavaScript) takes the Simulation Events emitted by uLisp, and feeds them to the BL602 Simulator.
With this simulator design we get…
Loose Coupling: We can reuse this design for other kinds of BL602 Firmware, like our BL602 Blinky Firmware in C. (As explained in the previous chapter)
Unit Testing: We might someday feed the JSON Stream of Simulation Events to a Unit Testing Engine, for running Automated Unit Tests on our uLisp Programs and BL602 Firmware. (Without actual BL602 hardware!)
Time Compression: Time Delay Events are encoded inside the stream of Simulation Events. Which means that the simulation runs in Deferred Time, not in Real Time.
This gets interesting because we no longer need to wait say, 1 hour of real time to simulate a BL602 program… We could speed up the simulator 10 times and see the outcome in 6 minutes!
Time Reversal: With a stream of Simulation Events, we could reverse time too! Rewinding to a specific point in the stream could be really helpful for troubleshooting BL602 Firmware.
UPDATE: We’ve created a BL602 Simulator in Rust. Read about it here
Creating a BL602 Simulator for uLisp and Blockly has been a fun experience.
But more work needs to be done… Please lemme know if you’re keen to help!
Could this be the better way to learn Embedded Programming on modern microcontrollers?
Let’s build it and find out! 🙏 👍 😀
Got a question, comment or suggestion? Create an Issue or submit a Pull Request here…