📝 25 Aug 2022
Ghidra with Apache NuttX RTOS for Arm Cortex-A53
UPDATE: PinePhone is now officially supported by Apache NuttX RTOS (See this)
Apache NuttX RTOS (Real-Time Operating System) runs on 64-bit Arm Cortex-A53 with Multiple Cores…
Pine64 PinePhone is based on the Allwinner A64 SoC with 4 Cores of Arm Cortex-A53…
Will NuttX run on PinePhone? Let’s find out!
Why NuttX?
NuttX is a tiny operating system. It might be a fun way to teach more people about the internals of Phone Operating Systems. (Without digging deep into the Linux Stack)
Someday we might have a cheap, fast, responsive and tweakable phone running on NuttX!
But why an RTOS for PinePhone? What about drivers and apps?
Yep we have interesting challenges running NuttX on PinePhone, we’ll talk more below.
First we experiment with NuttX on Arm Cortex-A53, emulated with QEMU. Then we discuss how it might work on PinePhone…
Many thanks to qinwei2004 and the NuttX Team for implementing Cortex-A53 support!
NuttX Mainline has the latest support for Arm Cortex-A53. We download the Source Code for our experiment…
## Create NuttX Directory
mkdir nuttx
cd nuttx

## Download NuttX OS
git clone \
    --recursive \
    https://github.com/apache/nuttx \
    nuttx

## Download NuttX Apps
git clone \
    --recursive \
    https://github.com/apache/nuttx-apps \
    apps

## We'll build NuttX inside nuttx/nuttx
cd nuttx
(Having problems? Try my arm64 branch)
We’ll build NuttX in a while. Install the Build Prerequisites below, but skip the RISC-V Toolchain…
Let’s download the Arm64 Toolchain instead…
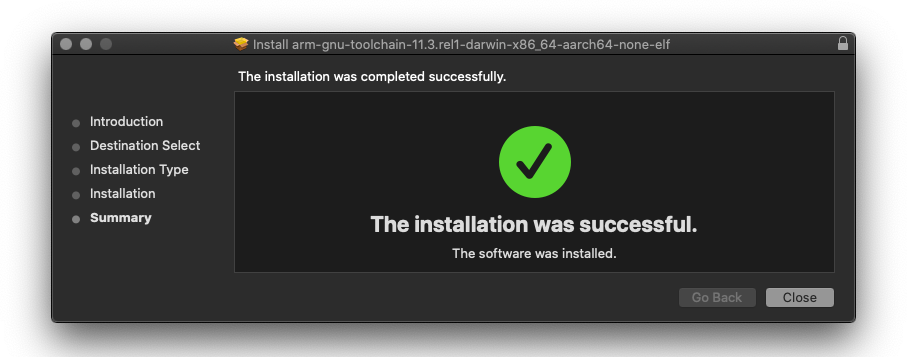
We’ll cross-compile Arm64 NuttX on our computer. Download the Arm Toolchain for AArch64 ELF Bare-Metal Target aarch64-none-elf…
For Linux x64 and WSL:
For macOS:
(I don’t recommend building NuttX on Plain Old Windows CMD, please use WSL instead)
Add the downloaded Arm Toolchain to the PATH…
## For Linux x64 and WSL:
export PATH="$PATH:$HOME/gcc-arm-11.2-2022.02-x86_64-aarch64-none-elf/bin"

## For macOS:
export PATH="$PATH:/Applications/ArmGNUToolchain/11.3.rel1/aarch64-none-elf/bin"
Check the Arm Toolchain…
$ aarch64-none-elf-gcc -v
gcc version 11.3.1 20220712 (Arm GNU Toolchain 11.3.Rel1)
(Based on the instructions here)
Our experiment today will run on any Linux / macOS / Windows computer, no PinePhone needed.
That’s because we’re emulating Arm Cortex-A53 with the awesome QEMU Machine Emulator.
Download and install QEMU…
For macOS we may use brew…
brew install qemuQEMU runs surprisingly well for emulating 64-bit Arm Cortex-A53, especially for a light operating system like NuttX.
We’ll run two experiments with QEMU…
NuttX on a Single Core of Arm Cortex-A53
NuttX on 4 Cores of Arm Cortex-A53
Which works like 4 Arm64 Processors running in parallel, similar to PinePhone.
First we build NuttX for a Single Core of Arm Cortex-A53…
## Configure NuttX for Single Core
./tools/configure.sh -l qemu-armv8a:nsh
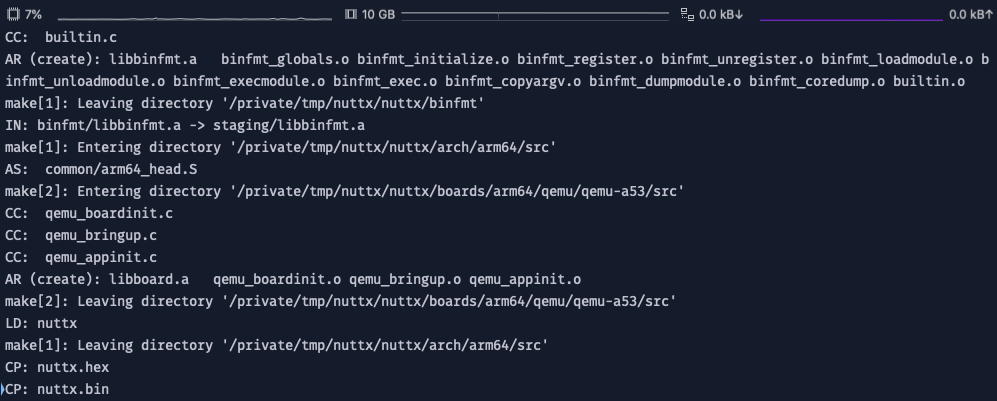
## Build NuttX
make
## Dump the disassembly to nuttx.S
aarch64-none-elf-objdump \
-t -S --demangle --line-numbers --wide \
nuttx \
>nuttx.S \
2>&1(On an old MacBook Pro 2012, NuttX builds in 2 minutes)
The NuttX Output Files may be found here…
The output file nuttx is the Arm64 ELF Executable that we’ll run in the next step.
We’re ready to run NuttX! This is how we test NuttX on QEMU with a Single Core of Arm Cortex-A53…
## Start QEMU (Single Core) with NuttX
qemu-system-aarch64 \
  -cpu cortex-a53 \
  -nographic \
  -machine virt,virtualization=on,gic-version=3 \
  -net none \
  -chardev stdio,id=con,mux=on \
  -serial chardev:con \
  -mon chardev=con,mode=readline \
  -kernel ./nuttx
(More about QEMU “virt” Machine)
QEMU shows this…
- Ready to Boot CPU
- Boot from EL2
- Boot from EL1
- Boot to C runtime for OS Initialize

nx_start: Entry
up_allocate_heap: heap_start=0x0x402c4000, heap_size=0x7d3c000
gic_validate_dist_version: GICv3 version detect
gic_validate_dist_version: GICD_TYPER = 0x37a0007
gic_validate_dist_version: 224 SPIs implemented
gic_validate_dist_version: 0 Extended SPIs implemented
gic_validate_dist_version: Distributor has no Range Selector support
gic_validate_redist_version: GICD_TYPER = 0x1000011
gic_validate_redist_version: 16 PPIs implemented
gic_validate_redist_version: no VLPI support, no direct LPI support
up_timer_initialize: up_timer_initialize: cp15 timer(s) running at 62.50MHz, cycle 62500
uart_register: Registering /dev/console
uart_register: Registering /dev/ttyS0
work_start_highpri: Starting high-priority kernel worker thread(s)
nx_start_application: Starting init thread
lib_cxx_initialize: _sinit: 0x402a7000 _einit: 0x402a7000 _stext: 0x40280000 _etext: 0x402a8000
nsh: sysinit: fopen failed: 2
nsh: mkfatfs: command not found

NuttShell (NSH) NuttX-10.4.0
nsh> nx_start: CPU0: Beginning Idle Loop
Welcome to NuttX Land!
Enter “help” or “?” to see the NuttX Commands…
nsh> help
help usage:  help [-v] [<cmd>]

  .         cd        dmesg     help      mount     rmdir     true      xd
  [         cp        echo      hexdump   mv        set       truncate
  ?         cmp       exec      kill      printf    sleep     uname
  basename  dirname   exit      ls        ps        source    umount
  break     dd        false     mkdir     pwd       test      unset
  cat       df        free      mkrd      rm        time      usleep

Builtin Apps:
  getprime  hello     nsh       ostest    sh
To be really sure that we’re emulating Arm64…
nsh> uname -a
NuttX 10.3.0-RC2 1e8f2a8 Aug 23 2022 07:04:54 arm64 qemu-armv8a
“Hello World” works as expected…
nsh> hello
task_spawn: name=hello entry=0x4029b594 file_actions=0x402c9580 attr=0x402c9588 argv=0x402c96d0
spawn_execattrs: Setting policy=2 priority=100 for pid=3
Hello, World!!
NuttX is POSIX Compliant, so the Developer Experience feels very much like Linux (but much smaller)…
nsh> ls /
/:
 dev/
 etc/
 proc/
We started the Bare Minimum of NuttX Devices…
nsh> ls /dev
/dev:
 console
 null
 ram0
 ram2
 ttyS0
 zero
With a few Background Processes…
nsh> ls /proc
/proc:
 0/
 1/
 2/
 meminfo
 memdump
 fs/
 self/
 uptime
 version
And NuttX runs everything in RAM, no File System needed (for today)…
nsh> ls /etc
/etc:
 init.d/

nsh> ls /etc/init.d
/etc/init.d:
 rcS

nsh> cat /etc/init.d/rcS
## Create a RAMDISK and mount it at /tmp
mkrd -m 2 -s 512 1024
mkfatfs /dev/ram2
mount -t vfat /dev/ram2 /tmp
Press Ctrl-C to quit QEMU.
From Single Core to Multi Core! Now we build NuttX for 4 Cores of Arm Cortex-A53…
## Erase the NuttX Configuration
make distclean

## Configure NuttX for 4 Cores
./tools/configure.sh -l qemu-armv8a:nsh_smp

## Build NuttX
make

## Dump the disassembly to nuttx.S
aarch64-none-elf-objdump \
  -t -S --demangle --line-numbers --wide \
  nuttx \
  >nuttx.S \
  2>&1
The NuttX Output Files may be found here…
And this is how we test NuttX on QEMU with 4 Cores of Arm Cortex-A53…
## Start QEMU (4 Cores) with NuttX
qemu-system-aarch64 \
  -smp 4 \
  -cpu cortex-a53 \
  -nographic \
  -machine virt,virtualization=on,gic-version=3 \
  -net none \
  -chardev stdio,id=con,mux=on \
  -serial chardev:con \
  -mon chardev=con,mode=readline \
  -kernel ./nuttx
Note that smp is set to 4. (Symmetric Multi-Processing)
QEMU shows this…
- Ready to Boot CPU
- Boot from EL2
- Boot from EL1
- Boot to C runtime for OS Initialize
NuttX boots on the First Core of our emulated Arm Cortex-A53…
[CPU0] psci_detect: Detected PSCI v1.1
[CPU0] nx_start: Entry
[CPU0] up_allocate_heap: heap_start=0x0x402db000, heap_size=0x7d25000
[CPU0] gic_validate_dist_version: GICv3 version detect
[CPU0] gic_validate_dist_version: GICD_TYPER = 0x37a0007
[CPU0] gic_validate_dist_version: 224 SPIs implemented
[CPU0] gic_validate_dist_version: 0 Extended SPIs implemented
[CPU0] gic_validate_dist_version: Distributor has no Range Selector support
[CPU0] gic_validate_redist_version: GICD_TYPER = 0x1000001
[CPU0] gic_validate_redist_version: 16 PPIs implemented
[CPU0] gic_validate_redist_version: no VLPI support, no direct LPI support
[CPU0] up_timer_initialize: up_timer_initialize: cp15 timer(s) running at 62.50MHz, cycle 62500
[CPU0] uart_register: Registering /dev/console
[CPU0] uart_register: Registering /dev/ttyS0
Here comes excitement: NuttX boots on the Second Core of our Arm Cortex-A53!
- Ready to Boot CPU
- Boot from EL2
- Boot from EL1
- Boot to C runtime for OS Initialize

[CPU1] gic_validate_redist_version: GICD_TYPER = 0x101000101
[CPU1] gic_validate_redist_version: 16 PPIs implemented
[CPU1] gic_validate_redist_version: no VLPI support, no direct LPI support
[CPU1] nx_idle_trampoline: CPU1: Beginning Idle Loop
[CPU0] arm64_start_cpu: Secondary CPU core 1 (MPID:0x1) is up
Followed by the Third Core…
- Ready to Boot CPU
- Boot from EL2
- Boot from EL1
- Boot to C runtime for OS Initialize

[CPU2] gic_validate_redist_version: GICD_TYPER = 0x201000201
[CPU2] gic_validate_redist_version: 16 PPIs implemented
[CPU2] gic_validate_redist_version: no VLPI support, no direct LPI support
[CPU2] nx_idle_trampoline: CPU2: Beginning Idle Loop
[CPU0] arm64_start_cpu: Secondary CPU core 2 (MPID:0x2) is up
Finally all 4 Cores are up!
- Ready to Boot CPU
- Boot from EL2
- Boot from EL1
- Boot to C runtime for OS Initialize

[CPU3] gic_validate_redist_version: GICD_TYPER = 0x301000311
[CPU3] gic_validate_redist_version: 16 PPIs implemented
[CPU3] gic_validate_redist_version: no VLPI support, no direct LPI support
[CPU0] arm64_start_cpu: Secondary CPU core 3 (MPID:0x3) is up
[CPU0] work_start_highpri: Starting high-priority kernel worker thread(s)
[CPU0] nx_start_application: Starting init thread
[CPU3] nx_idle_trampoline: CPU3: Beginning Idle Loop
[CPU0] nx_start: CPU0: Beginning Idle Loop
NuttX Shell appears…
nsh: sysinit: fopen failed: 2
nsh: mkfatfs: command not found
NuttShell (NSH) NuttX-10.4.0
nsh>
Even though we have 4 Cores, everything works as expected…
nsh> uname -a
NuttX 10.3.0-RC2 1e8f2a8 Aug 21 2022 15:57:35 arm64 qemu-armv8a

nsh> hello
[CPU0] task_spawn: name=hello entry=0x4029cee4 file_actions=0x402e52b0 attr=0x402e52b8 argv=0x402e5400
[CPU0] spawn_execattrs: Setting policy=2 priority=100 for pid=6
Hello, World!
Symmetric Multi-Processing never looked so cool!
(Can we use QEMU to emulate parts of PinePhone? That would be extremely helpful for testing!)
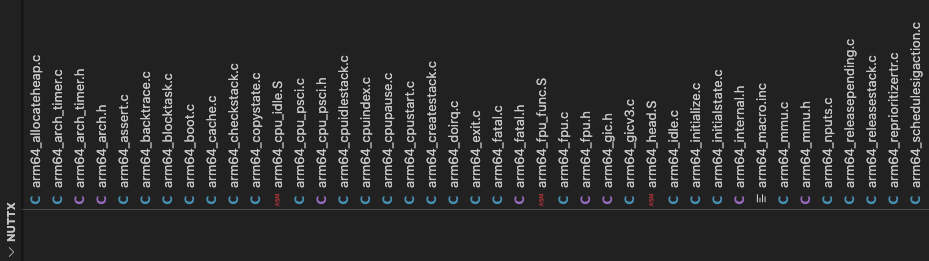
Arm64 Architecture-Specific Source Files
What’s inside the NuttX code for Arm Cortex-A53?
Let’s browse the Source Files for the implementation of Cortex-A53 on NuttX.
NuttX treats QEMU as a Target Board (as though it was a dev board). Here are the Source Files and Build Configuration for the QEMU Board…
(We’ll clone this to create a Target Board for PinePhone)
The Board-Specific Drivers for QEMU are started in qemu_bringup.c
(We’ll start the PinePhone Drivers here)
The QEMU Board calls the QEMU Architecture-Specific Drivers at…
The UART Driver is located at qemu_serial.c and qemu_lowputc.S
(For PinePhone we’ll create a UART Driver for Allwinner A64 SoC. I2C, SPI and other Low-Level A64 Drivers will be located here too)
The QEMU Functions (Board and Architecture) call the Arm64 Architecture Functions (pic above)…
Which implement all kinds of Arm64 Features: FPU, Interrupts, MMU, Tasks, Timers…
(We’ll reuse them for PinePhone)
NuttX can’t possibly boot on PinePhone right?
It might! Let’s compare our NuttX Image with a PinePhone Linux Image. And find out what needs to be patched.
Follow these steps to load our NuttX ELF Image nuttx into Ghidra, the popular open-source tool for Reverse Engineering…
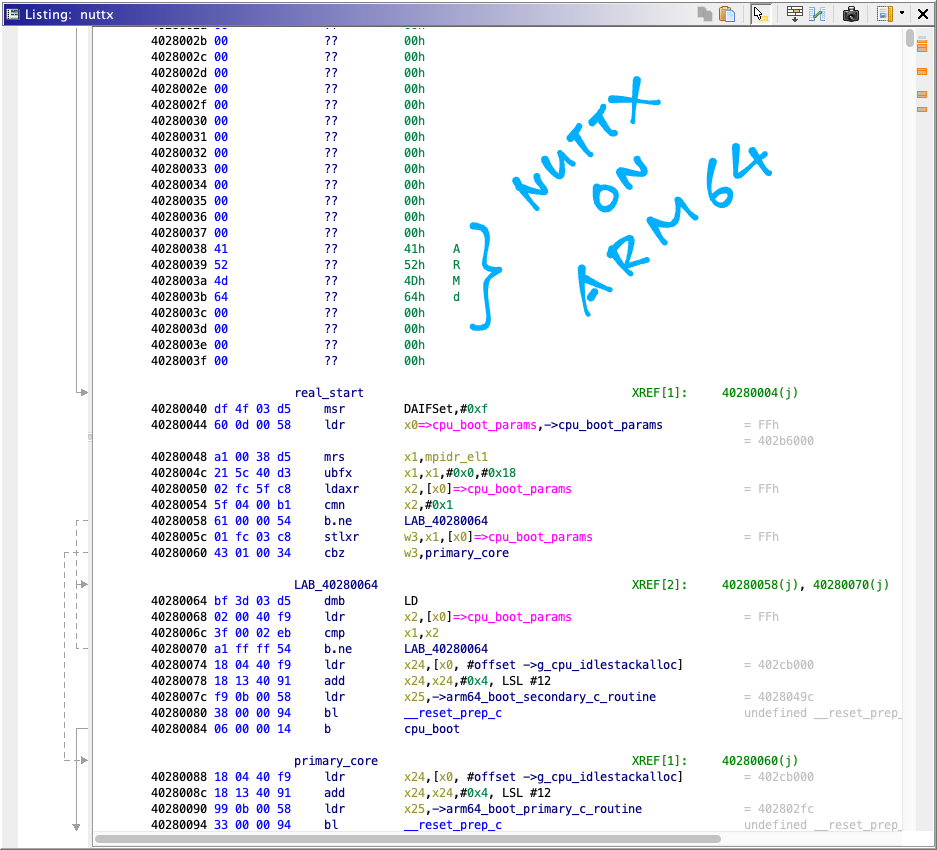
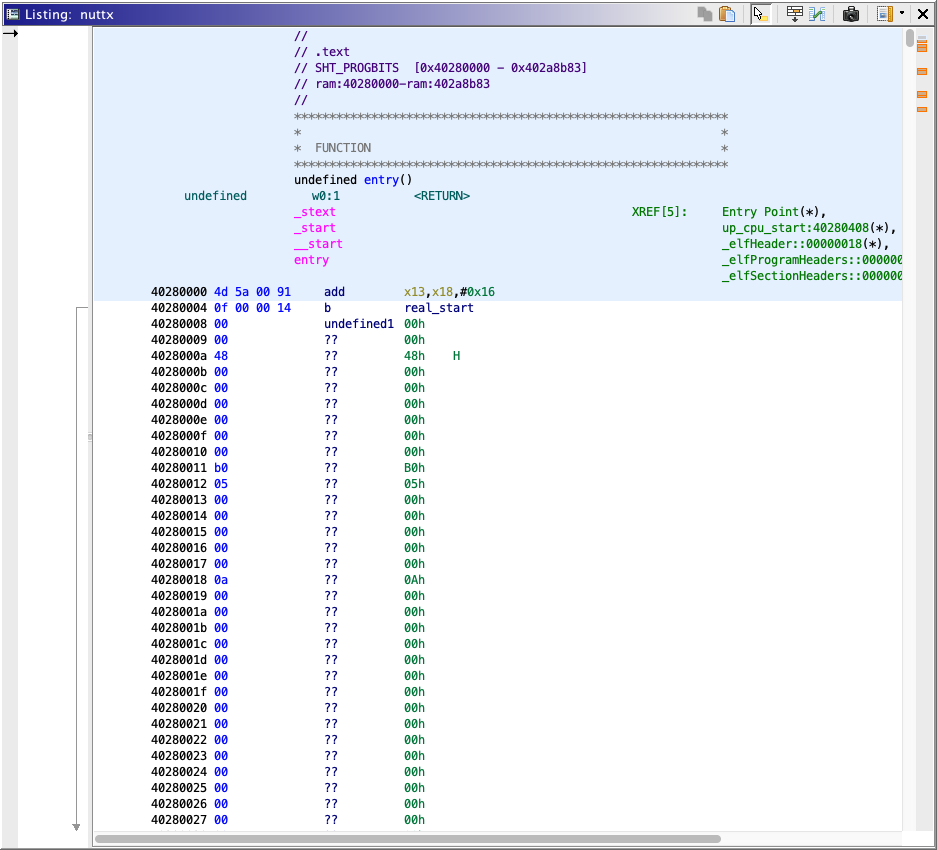
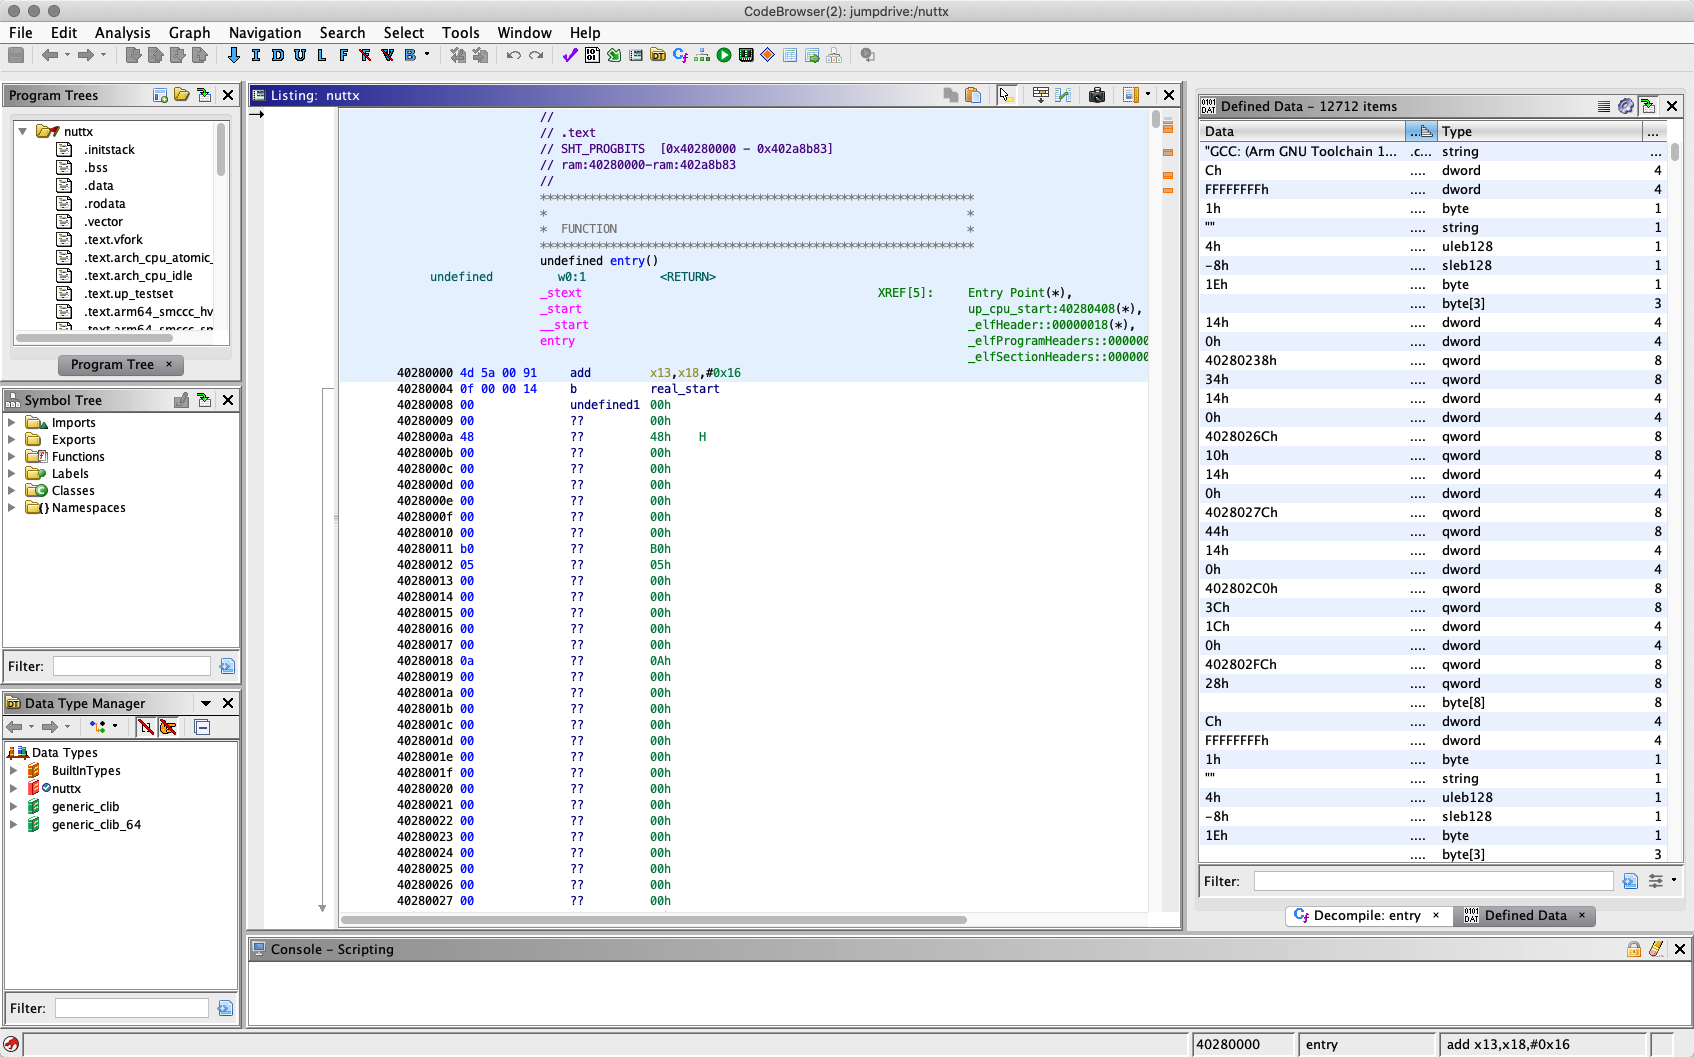
Ghidra says that our NuttX Image will be loaded at address 0x4028 0000. (Pic above)
The Arm64 Instructions at the top of our NuttX Image will jump to real_start (to skip the header)…
40280000 4d 5a 00 91     add        x13,x18,#0x16
40280004 0f 00 00 14     b          real_start
After the header, real_start is defined at 0x4028 0040 with the Startup Code…
We see something interesting: The Magic Number ARM\x64 appears at address 0x4028 0038. (Offset 0x38)
Searching the net for this Magic Number reveals that it’s actually an Arm64 Linux Kernel Header!
When we refer to the NuttX Disassembly nuttx.S, we find happiness: arch/arm64/src/common/arm64_head.S
  /* Kernel startup entry point.
   * ---------------------------
   *
   * The requirements are:
   *   MMU = off, D-cache = off, I-cache = on or off,
   *   x0 = physical address to the FDT blob.
   *       it will be used when NuttX support device tree in the future
   *
   * This must be the very first address in the loaded image.
   * It should be loaded at any 4K-aligned address.
   */
  .globl __start;
__start:

  /* DO NOT MODIFY. Image header expected by Linux boot-loaders.
   *
   * This add instruction has no meaningful effect except that
   * its opcode forms the magic "MZ" signature of a PE/COFF file
   * that is required for UEFI applications.
   *
   * Some bootloader (such imx8 uboot) checking the magic "MZ" to see
   * if the image is a valid Linux image. but modifying the bootLoader is
   * unnecessary unless we need to do a customize secure boot.
   * so just put the ''MZ" in the header to make bootloader happiness
   */

  add     x13, x18, #0x16      /* the magic "MZ" signature */
  b       real_start           /* branch to kernel start */
(“MZ” refers to Mark Zbikowski)
Yep that’s the jump to real_start that we saw earlier.
Followed by this header…
  .quad   0x480000              /* Image load offset from start of RAM */
  .quad   _e_initstack - __start         /* Effective size of kernel image, little-endian */
  .quad   __HEAD_FLAGS         /* Informative flags, little-endian */
  .quad   0                    /* reserved */
  .quad   0                    /* reserved */
  .quad   0                    /* reserved */
  .ascii  "ARM\x64"            /* Magic number, "ARM\x64" */
  .long   0                    /* reserved */

real_start: ...
Our NuttX Image actually follows the Arm64 Linux Kernel Image Format! As defined here…
The doc says that a Linux Kernel Image (for Arm64) begins with this 64-byte header…
u32 code0;                    /* Executable code */
u32 code1;                    /* Executable code */
u64 text_offset;              /* Image load offset, little endian */
u64 image_size;               /* Effective Image size, little endian */
u64 flags;                    /* kernel flags, little endian */
u64 res2      = 0;            /* reserved */
u64 res3      = 0;            /* reserved */
u64 res4      = 0;            /* reserved */
u32 magic     = 0x644d5241;   /* Magic number, little endian, "ARM\x64" */
u32 res5; /* reserved (used for PE COFF offset) */Is there a proper Linux Header in our NuttX Image?
Let’s do a quick check on our NuttX Header.
The Image Load Offset in our NuttX Header is 0x48 0000 as we’ve seen earlier…
.quad 0x480000 /* Image load offset from start of RAM */Our RAM starts at 0x4000 0000. (We’ll see later)
This means that our NuttX Image will be loaded at 0x4048 0000.
But Ghidra (and the Arm Disassembly) says that our NuttX Image is actually loaded at 0x4028 0000! (Instead of 0x4048 0000)
Maybe the Image Load Offset should have been 0x28 0000? (Instead of 0x48 0000)
Everything else in the NuttX Header looks like a proper Linux Kernel Header.
Yep our NuttX Image might actually boot on PinePhone with some patching!
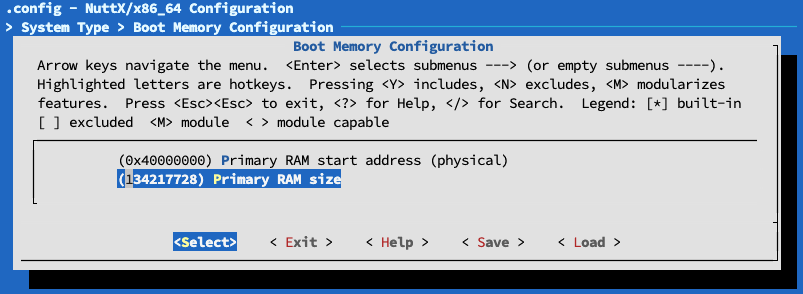
How do we know that RAM starts at 0x4000 0000?
RAM Size and RAM Start are defined in the NuttX Configuration for Arm64 (pic above): nsh/defconfig and nsh_smp/defconfig
CONFIG_RAM_SIZE=134217728
CONFIG_RAM_START=0x40000000
That’s 128 MB RAM. Which should fit inside PinePhone’s 2 GB RAM.
Why is our NuttX Image loaded at 0x4028 0000?
Our NuttX Image was built with this Linker Command, as observed with “make --trace”…
aarch64-none-elf-ld \
  --entry=__start \
  -nostdlib \
  --cref \
  -Map=nuttx/nuttx/nuttx.map \
  -Tnuttx/nuttx/boards/arm64/qemu/qemu-armv8a/scripts/dramboot.ld  \
  -L nuttx/nuttx/staging \
  -L nuttx/nuttx/arch/arm64/src/board  \
  -o nuttx/nuttx/nuttx arm64_head.o  \
  --start-group \
  -lsched \
  -ldrivers \
  -lboards \
  -lc \
  -lmm \
  -larch \
  -lapps \
  -lfs \
  -lbinfmt \
  -lboard /Applications/ArmGNUToolchain/11.3.rel1/aarch64-none-elf/bin/../lib/gcc/aarch64-none-elf/11.3.1/libgcc.a /Applications/ArmGNUToolchain/11.3.rel1/aarch64-none-elf/bin/../lib/gcc/aarch64-none-elf/11.3.1/../../../../aarch64-none-elf/lib/libm.a \
  --end-group
In the Linker Command above, we see the NuttX Linker Script…
Which defines _start as 0x4028 0000…
SECTIONS
{
  . = 0x40280000;  /* uboot load address */
  _start = .;
That’s why our NuttX Image is loaded at 0x4028 0000!
Will this work with PinePhone?
We’ll change _start to 0x4000 0000 for PinePhone.
In a while we’ll see that Start of RAM is 0x4000 0000 and Image Load Offset is 0 for a PinePhone Linux Image.
(UPDATE: Start of RAM should be 0x4008 0000 instead)
(UPDATE: We don’t need to change the Image Load Offset)
(What’s the significance of 0x4028 0000? Something specific to NXP i.MX8?)
We’ve seen our NuttX Image (which actually looks like a Linux Kernel Image). Now we compare with a PinePhone Linux Kernel Image and find out what needs to be patched in NuttX.
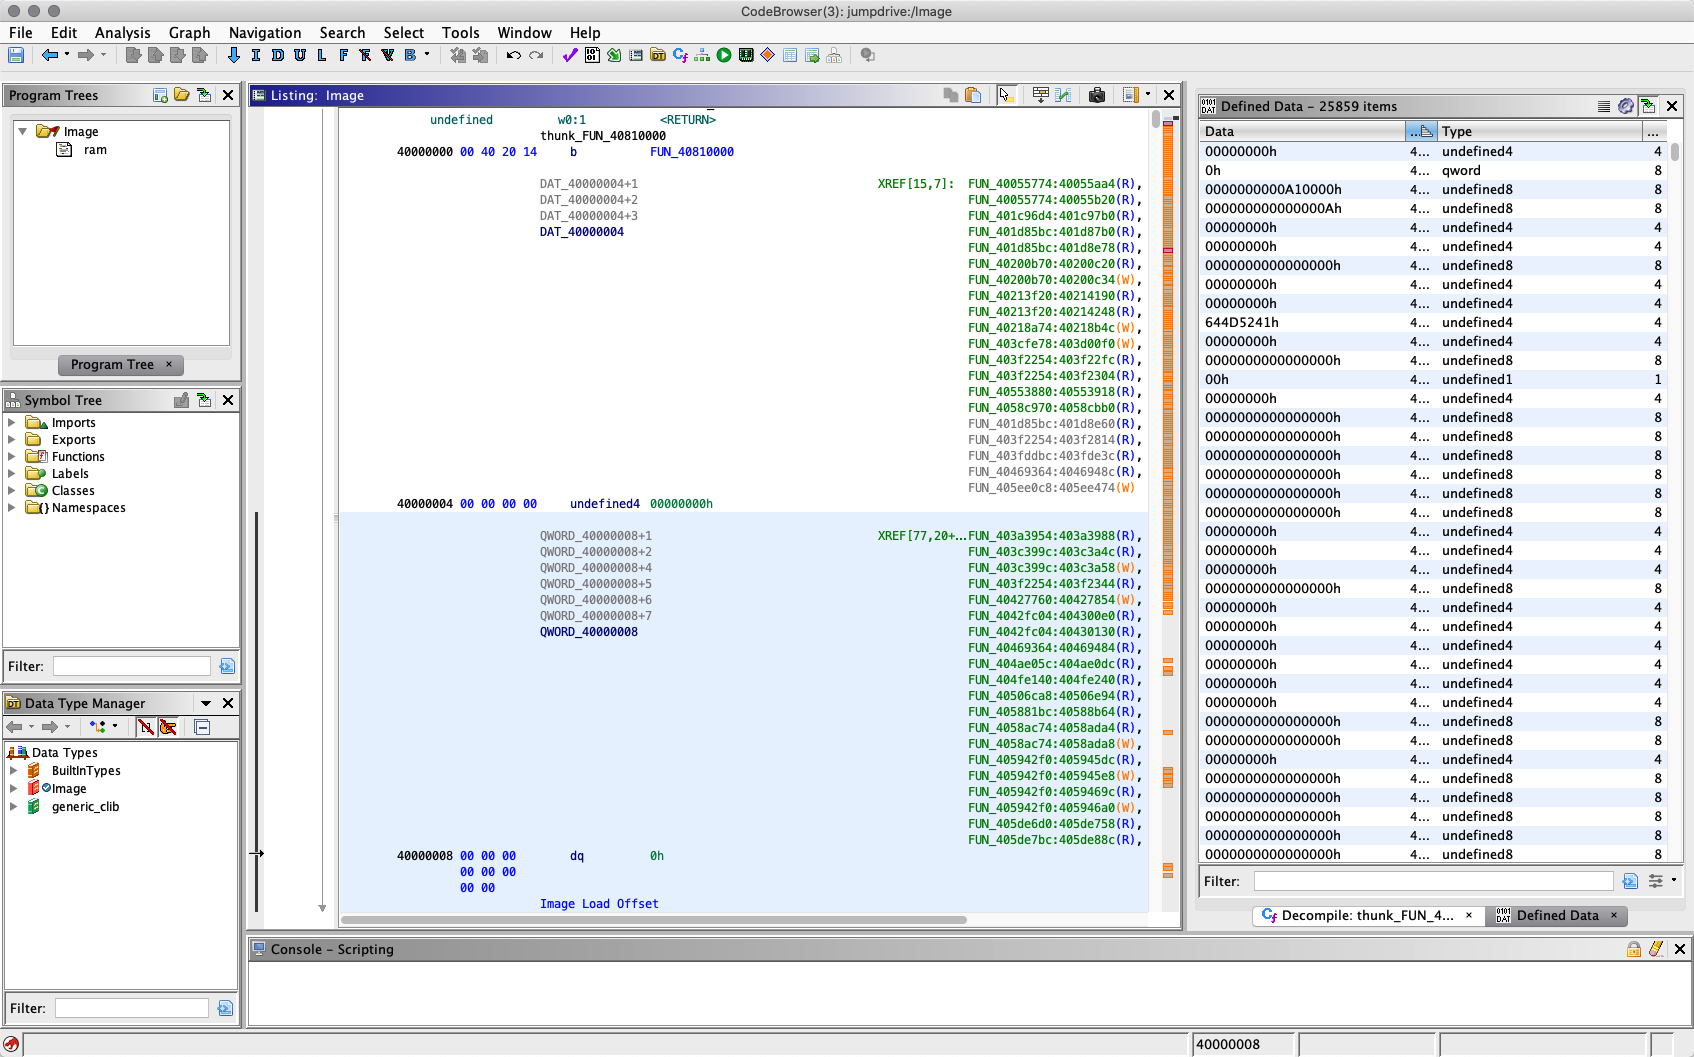
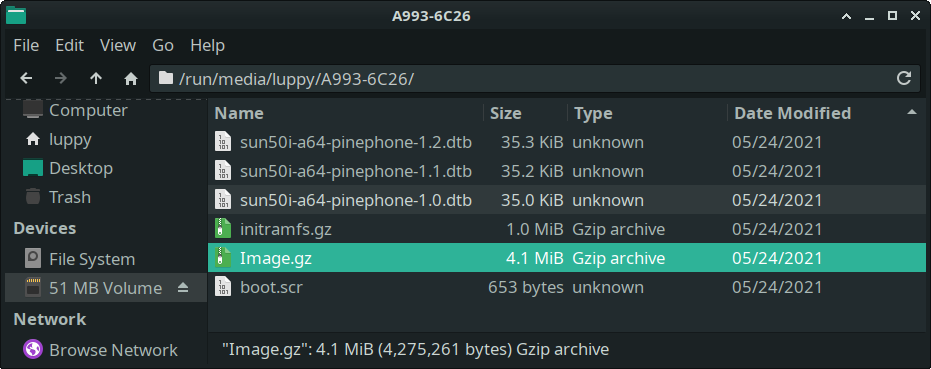
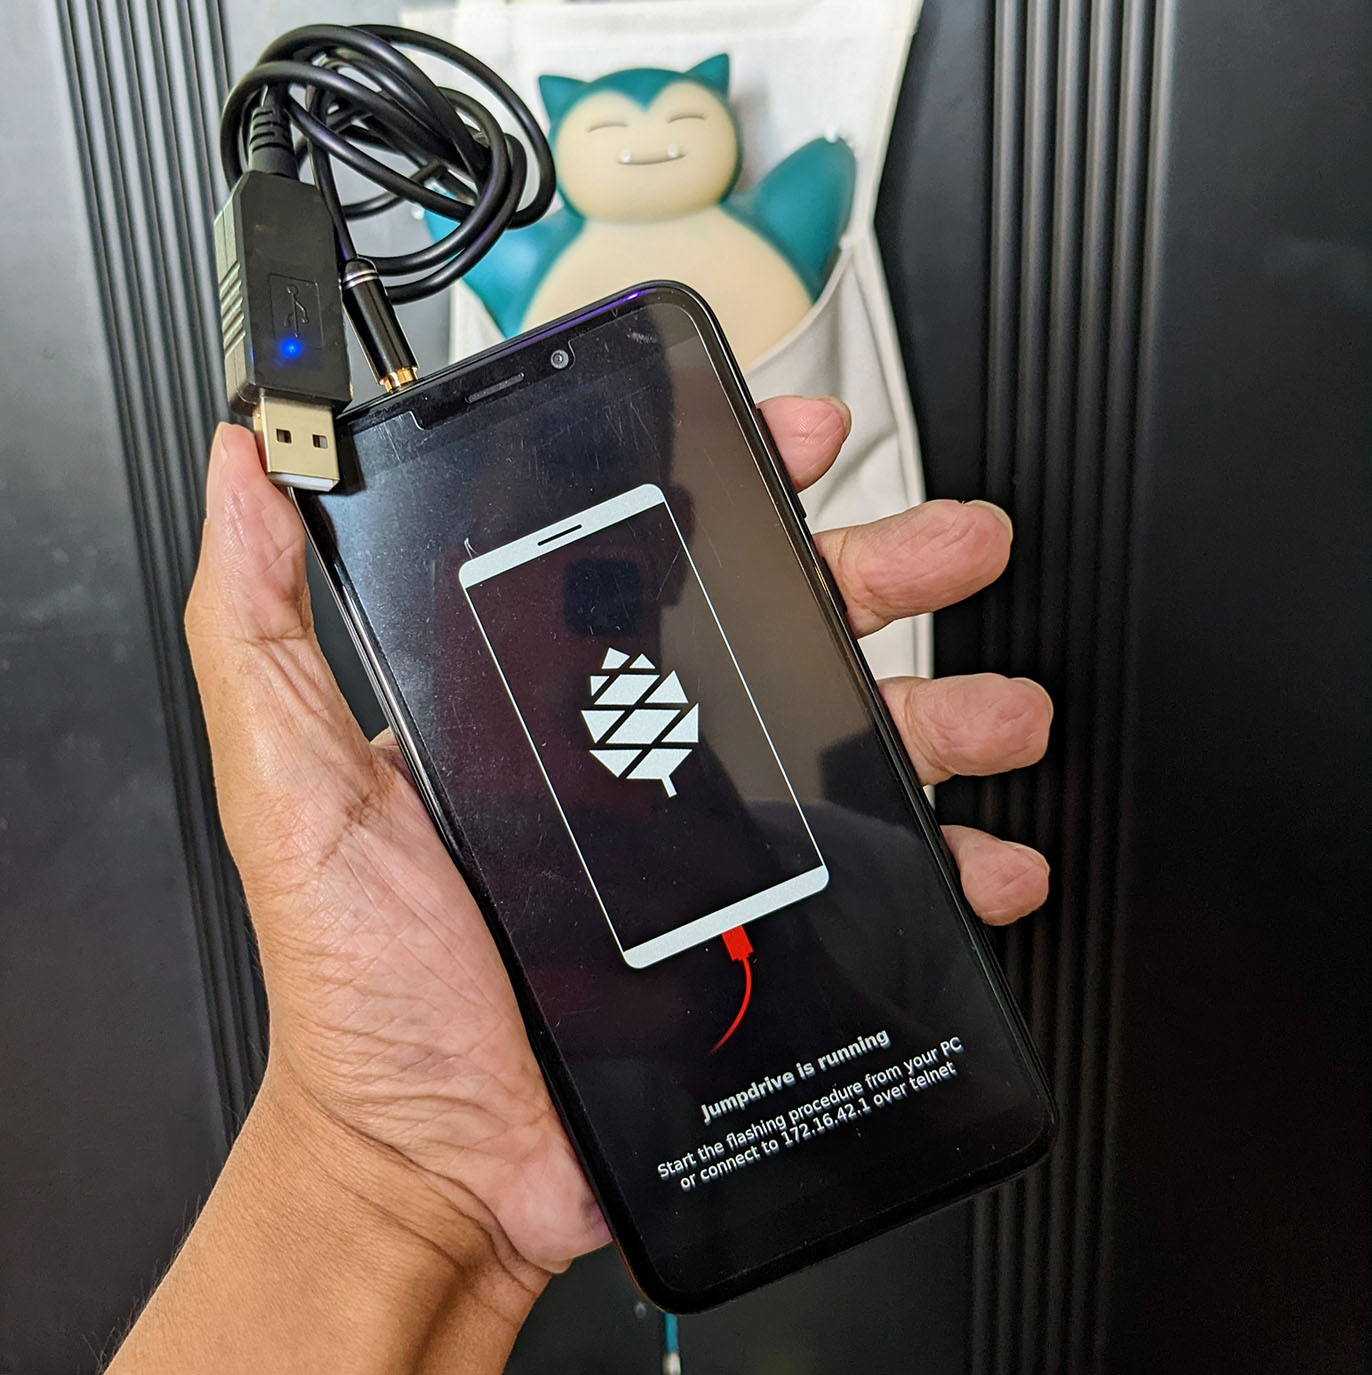
We’ll analyse the Linux Kernel in the PinePhone Jumpdrive Image, since it’s small…
Here are the steps…
Download pine64-pinephone.img.xz
Extract the files from the microSD Image with Balena Etcher
Expand the extracted files…
gunzip Image.gz
gunzip initramfs.gz
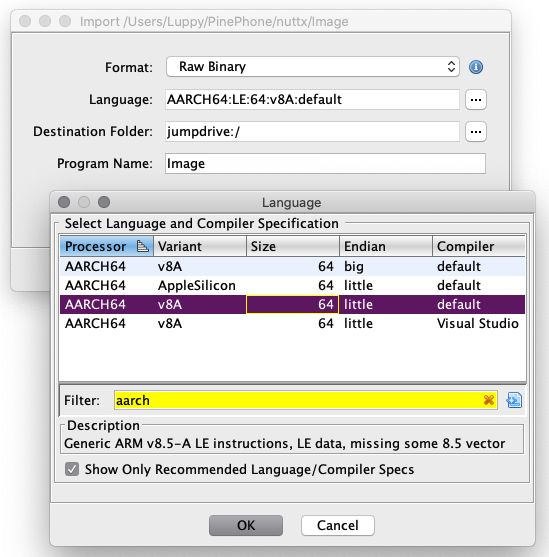
tar xvf initramfsFollow these steps to import the uncompressed Image (Linux Kernel) into Ghidra
Check that we’ve set the “Language” as “AARCH64:LE:v8A:default”. (Pic above)
Here’s the Jumpdrive Image (Linux Kernel) in Ghidra…
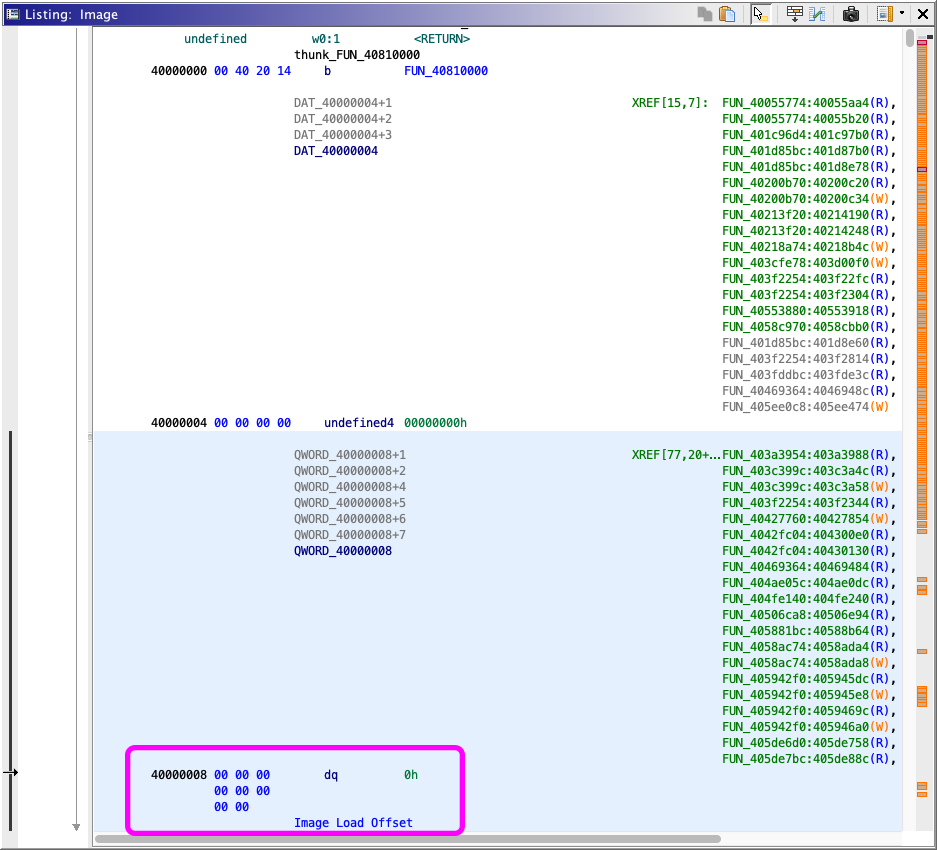
That’s the Linux Kernel Header?
Right! The Linux Kernel Header shows…
Magic Number is ARM\x64
(At offset 0x38)
Image Load Offset is 0
(At offset 0x08, pic above)
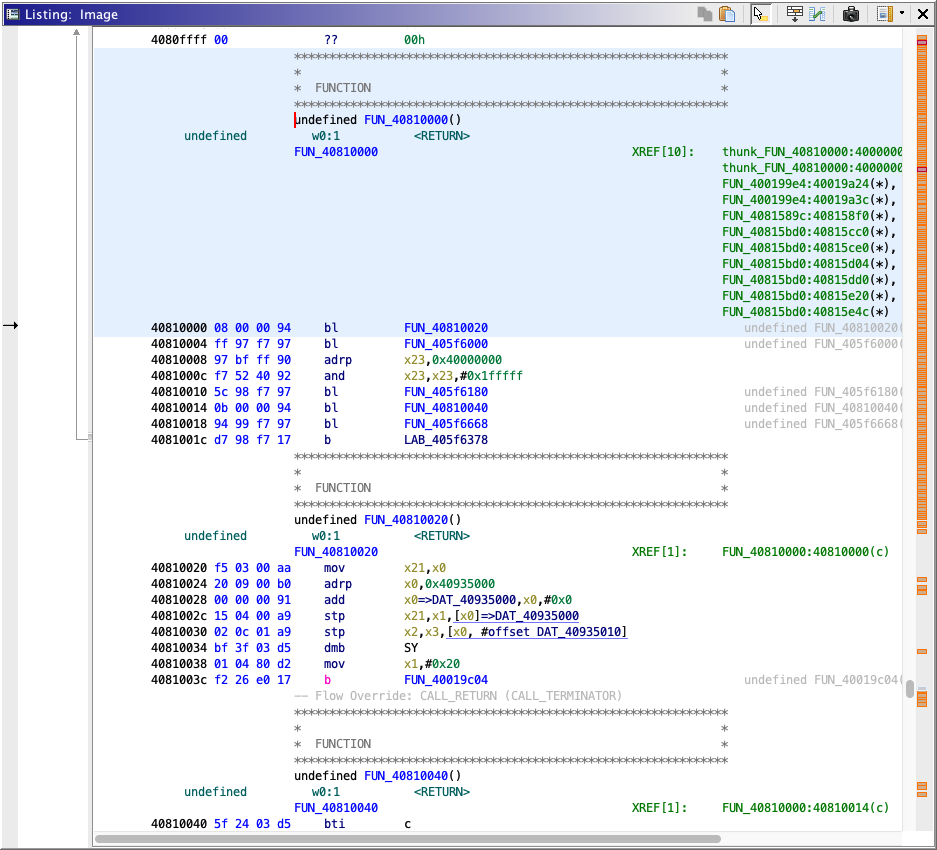
The First Instruction at 0x4000 0000 jumps to 0x4081 0000 (to skip the Linux Kernel Header)…
40000000 00 40 20 14 b FUN_40810000(Sorry Mr Zbikowski, PinePhone doesn’t need your Magic Signature)
The Linux Kernel Code actually begins at 0x4081 0000…
After comparing our NuttX Image with a PinePhone Linux Image, we conclude that they look quite similar!
So will NuttX boot on PinePhone?
It’s highly plausible! We discovered (with happiness) that NuttX already generates an Arm64 Linux Kernel Header.
Thus NuttX could be a drop-in replacement for the PinePhone Linux Kernel! We just need to…
Write PinePhone Jumpdrive to a microSD Card (pic above)
Overwrite Image.gz by the (gzipped) NuttX Binary Image nuttx.bin
Insert microSD Card into PinePhone
Power on PinePhone
And NuttX will (theoretically) boot on PinePhone!
But NuttX needs some changes for PinePhone?
Yep 3 things we’ll modify in NuttX, as mentioned earlier…
Change _start to 0x4000 0000 (from 0x4028 0000) in the NuttX Linker Script: dramboot.ld
SECTIONS
{
/* TODO: Change to 0x40000000 for PinePhone */
. = 0x40280000;  /* uboot load address */
_start = .;
(UPDATE: _start / Start of RAM should be 0x4008 0000 instead)
Change Image Load Offset in our NuttX Header to 0x0 (from 0x48 0000): arm64_head.S
/* TODO: Change to 0x0 for PinePhone */
.quad   0x480000  /* Image load offset from start of RAM */
Increase the RAM Size to 2 GB (from 128 MB): nsh/defconfig and nsh_smp/defconfig
/* TODO: Increase to 2 GB for PinePhone */
CONFIG_RAM_SIZE=134217728
CONFIG_RAM_START=0x40000000
(We’ll increase the RAM Size later, since we don’t need much RAM now)
Will we see anything when NuttX boots on PinePhone?
Not yet. We need to implement the UART Driver for NuttX…
UPDATE: NuttX boots on PinePhone yay!
We won’t see any output from NuttX until we implement the UART Driver for NuttX.
For QEMU: These are the Source Files for the UART Driver (PL011)…
We’ll redo the code above for the PinePhone UART Driver (based on Allwinner A64 SoC)…
UPDATE: We now have a partial implementation of the PinePhone UART Driver
Where’s the UART Port on PinePhone?
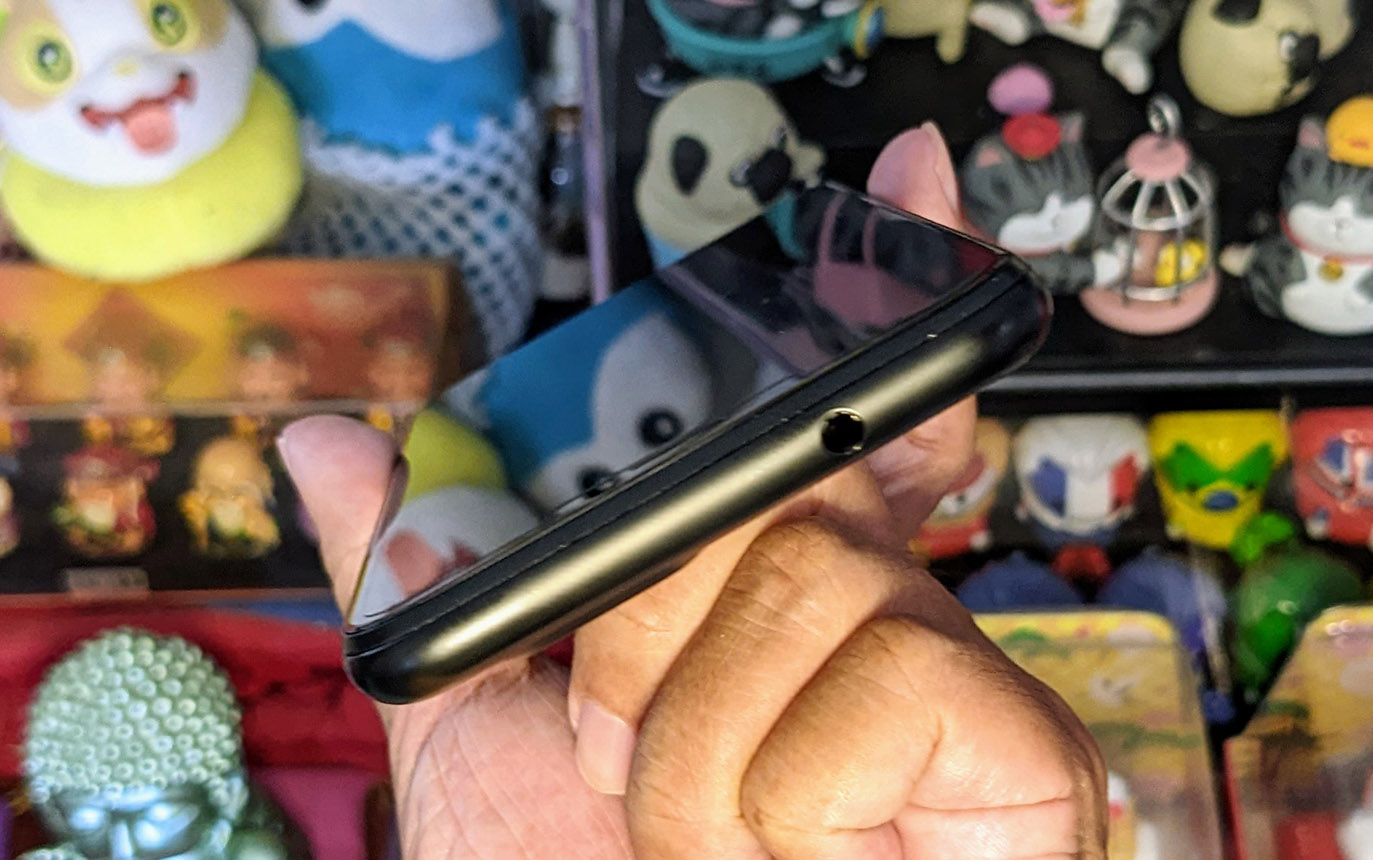
To access the UART Port on PinePhone, we’ll use this USB Serial Debug Cable…
Which connects to PinePhone’s Headphone Port. Genius!
(Remember to flip the Headphone Switch to OFF)
PinePhone’s UART Log will look like this…
PinePhone UART Port in disguise
Will an RTOS work well on Phones?
BlackBerry 10 phones ran on QNX, which is a Real-Time Operating System. (10 years ago!)
What’s an RTOS anyway?
On a Real-Time Operating System (RTOS), the Task Scheduling Behaviour is predictable. Like: Task X will be scheduled to run within Y microseconds.
An RTOS is not designed for High Processing Throughput. But it will guarantee (somewhat) that a Task will respond within a fixed period of time.
What does it mean for PinePhone on RTOS?
With an RTOS, I’m guessing the PinePhone User Interface will feel more responsive? And Incoming Calls and Text Messages will hopefully pop up quicker.
That assumes we’ll assign the correct Priority for each Task. It sounds like we’re micro-managing the resources on PinePhone, but I’m curious to see the actual outcome.
(And it will be super educational!)
But NuttX might be too tiny for PinePhone?
A tiny operating system (like NuttX), might be good for teaching the internals of a Phone Operating System.
We might not get all PinePhone features to work. But at least we’ll understand every single feature that we built!
Tiny OSes are also easier to tweak. Think of the super-tweakable PineTime Smartwatch, which also runs on an RTOS. (FreeRTOS)
(Maybe someday PineTime, PinePhone and Pinebook Pro will run NuttX for Educational Purposes!)
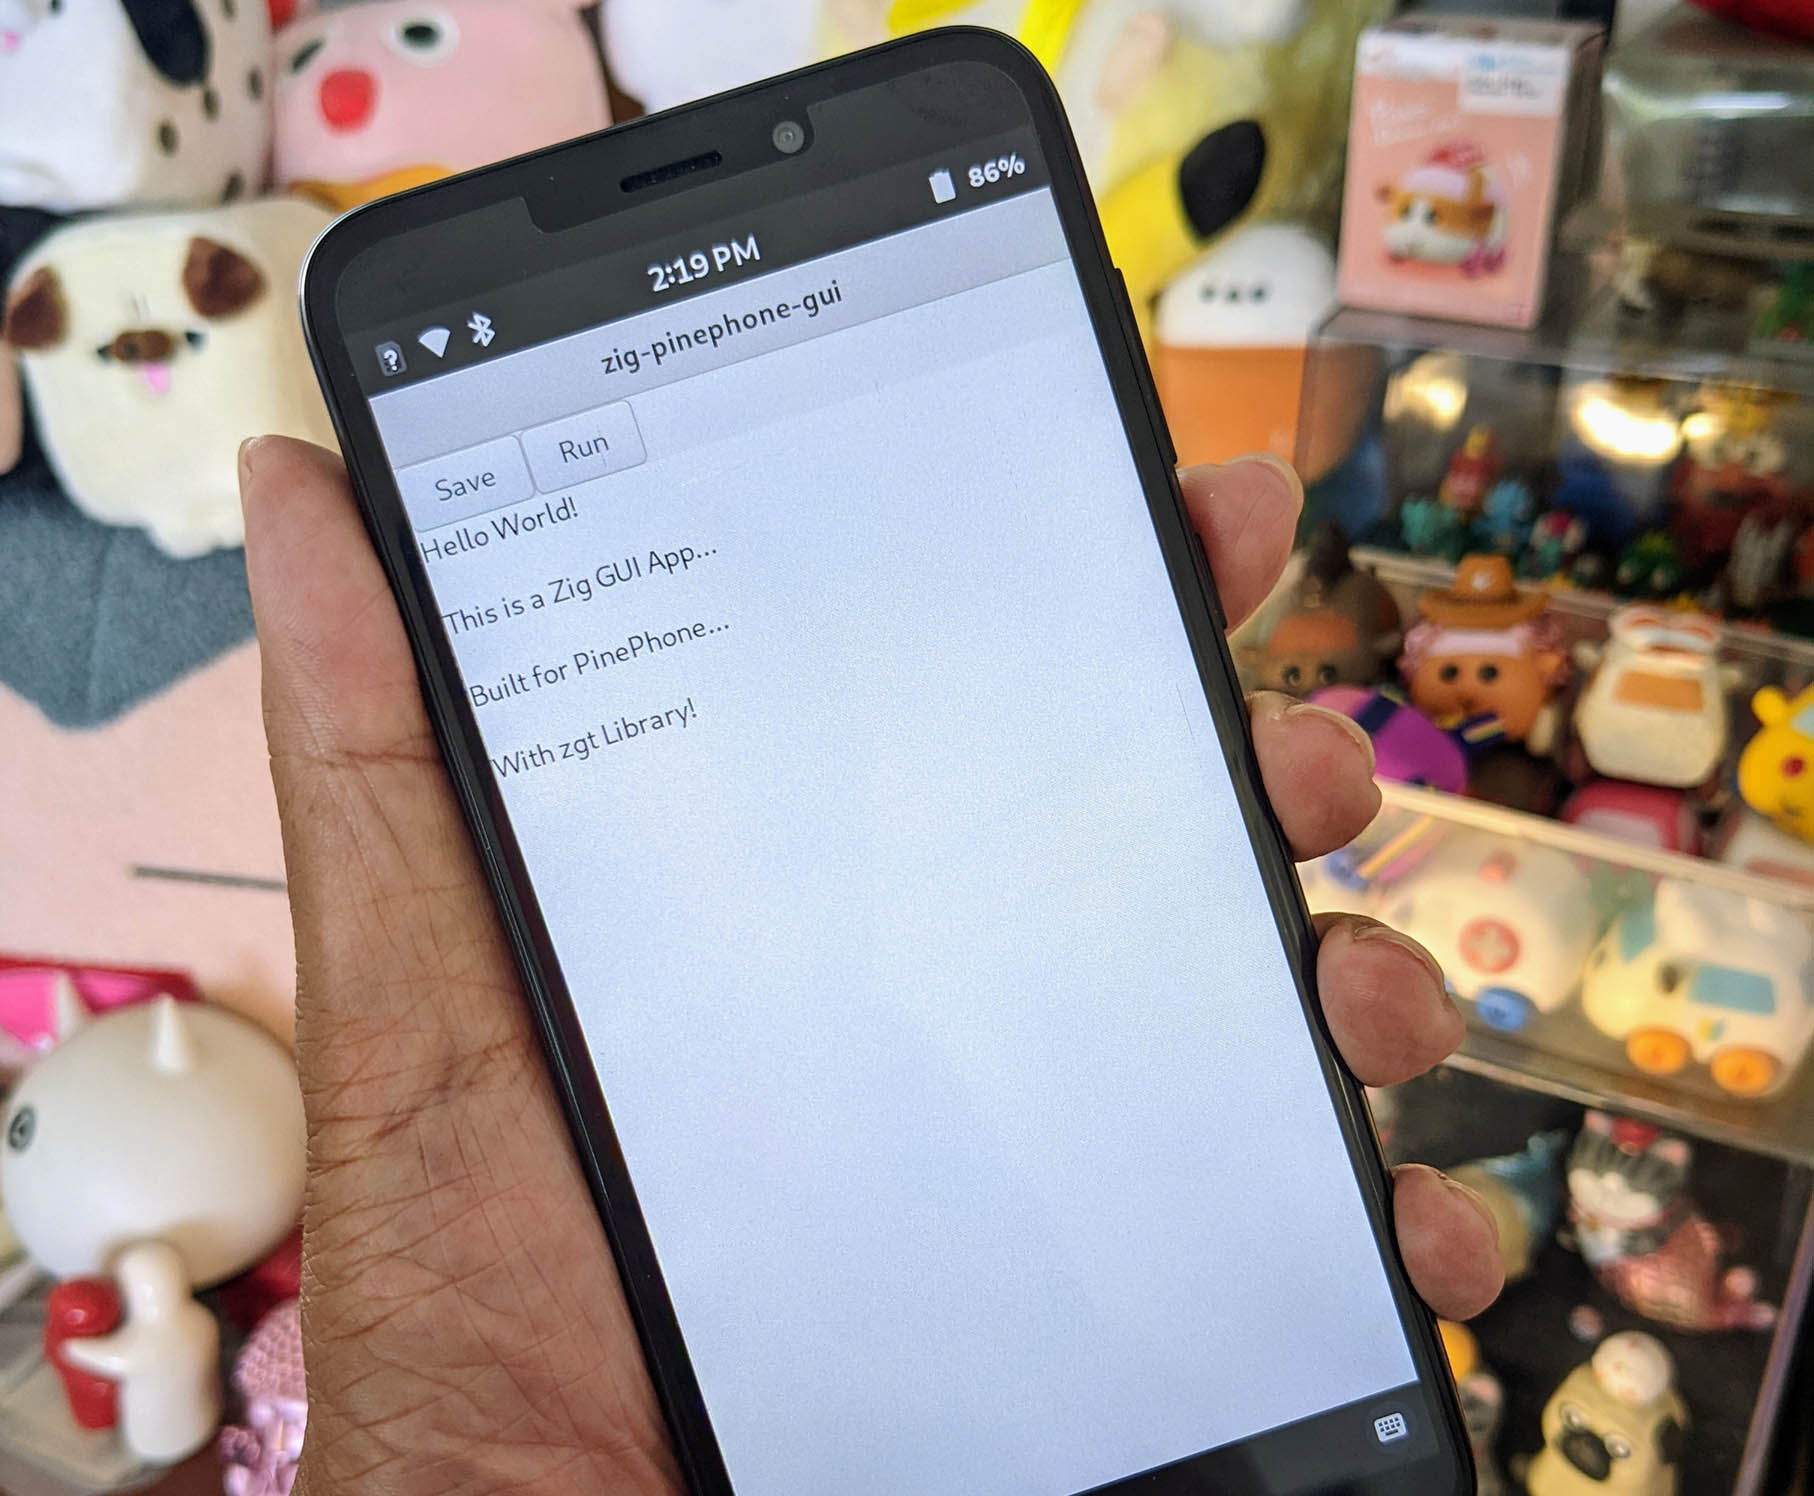
PinePhone on Linux with a Zig GTK App
Are there NuttX Drivers for PinePhone?
Here comes the hard part: We have to code the Nuttx Driver for each PinePhone component…
PinePhone’s Device Tree tells us what drivers we need…
Some drivers might already exist in NuttX…
We’ve previously created NuttX Drivers for another Touchscreen Device: Pine64 PineDio Stack BL604. (Pic below)
Do we really need all these PinePhone Drivers?
For Educational Purposes, we might not need all PinePhone Drivers.
Just pick the PinePhone Drivers that we need, compile them into NuttX, copy to microSD and boot up PinePhone.
Might be a quick way to experiment with the internals of NuttX on PinePhone!
What about NuttX Apps for PinePhone?
NuttX is bundled with some Demos and Utilities…
But we’ll probably create our own GUI Apps for PinePhone, like with Zig and LVGL…
(Can we build PinePhone Drivers the safer way with Zig? Might be interesting to explore!)
What about X11 Apps?
According to Alan Carvalho de Assis…
Tab Window Manager (Tom’s Window Manager) has been ported from X11 to NuttX
(Coming Soon) Nano-X Window System might make it easier to port X11 Apps to NuttX
Stay tuned for updates!
(Need a Wayland Compositor? This Zig one looks portable)
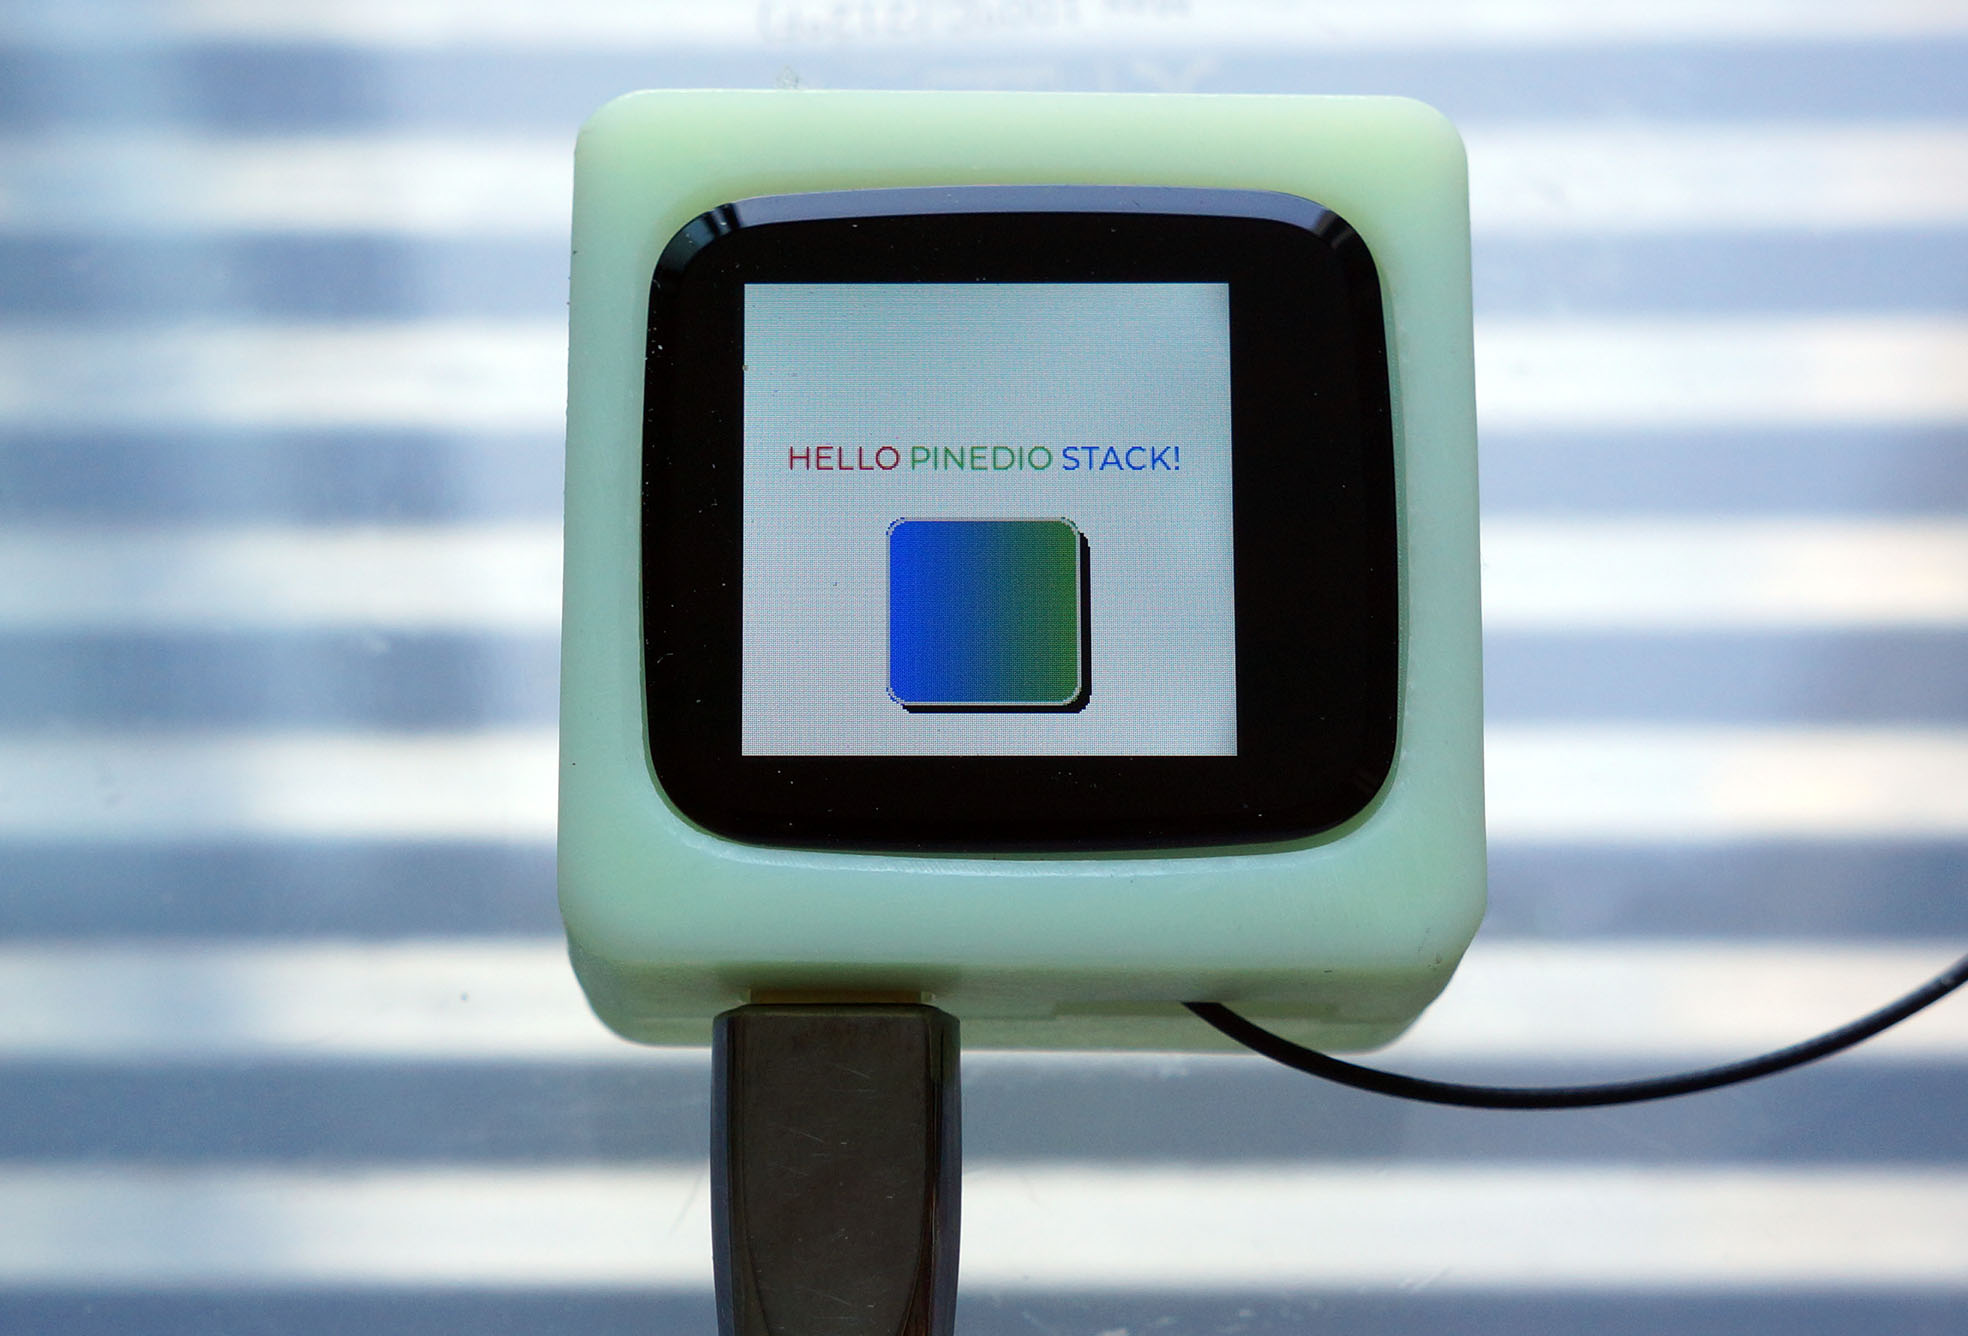
NuttX on a Touchscreen Device: Pine64 PineDio Stack BL604
Please check out the other articles on NuttX for PinePhone…
NuttX on PinePhone might take a while to become a Daily Driver…
But today NuttX is ready to turn PinePhone into a valuable Learning Resource!
There’s plenty to be done for NuttX on PinePhone, please lemme know if you would like to join me 🙏
Many Thanks to my GitHub Sponsors for supporting my work! This article wouldn’t have been possible without your support.
Got a question, comment or suggestion? Create an Issue or submit a Pull Request here…
This article is the expanded version of this Twitter Thread
What happens when we power on PinePhone? How does it start the Kernel Image in the microSD Card?
Check out these docs for Allwinner A64…
PinePhone connected to USB Serial Debug Cable
Earlier we talked about connecting a USB Serial Debug Cable to PinePhone…
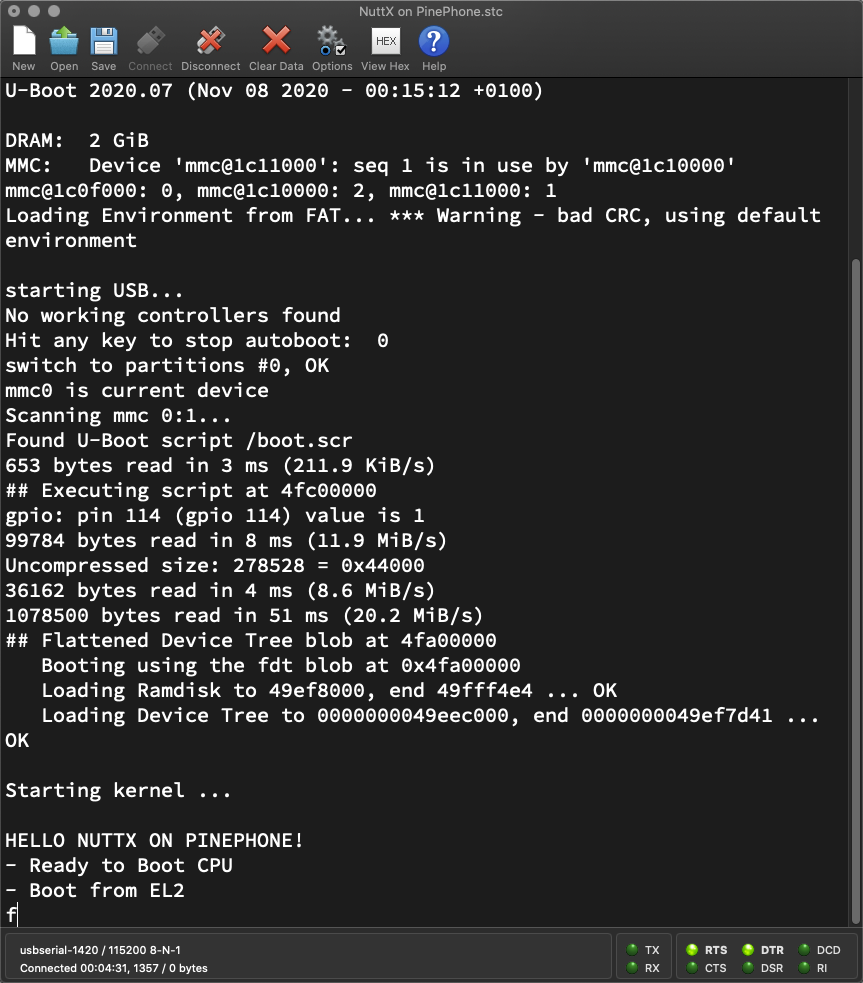
With the USB Serial Debug Cable we captured the UART Log below from PinePhone running Jumpdrive…
$ screen /dev/ttyUSB0 115200

DRAM: 2048 MiB
Trying to boot from MMC1
NOTICE:  BL31: v2.2(release):v2.2-904-gf9ea3a629
NOTICE:  BL31: Built : 15:32:12, Apr  9 2020
NOTICE:  BL31: Detected Allwinner A64/H64/R18 SoC (1689)
NOTICE:  BL31: Found U-Boot DTB at 0x4064410, model: PinePhone
NOTICE:  PSCI: System suspend is unavailable

U-Boot 2020.07 (Nov 08 2020 - 00:15:12 +0100)

DRAM:  2 GiB
MMC:   Device 'mmc@1c11000': seq 1 is in use by 'mmc@1c10000'
mmc@1c0f000: 0, mmc@1c10000: 2, mmc@1c11000: 1
Loading Environment from FAT... *** Warning - bad CRC, using default environment

starting USB...
No working controllers found
Hit any key to stop autoboot:  0
switch to partitions #0, OK
mmc0 is current device
Scanning mmc 0:1...
Found U-Boot script /boot.scr
653 bytes read in 3 ms (211.9 KiB/s)
## Executing script at 4fc00000
gpio: pin 114 (gpio 114) value is 1
4275261 bytes read in 192 ms (21.2 MiB/s)
Uncompressed size: 10170376 = 0x9B3008
36162 bytes read in 4 ms (8.6 MiB/s)
1078500 bytes read in 50 ms (20.6 MiB/s)
## Flattened Device Tree blob at 4fa00000
   Booting using the fdt blob at 0x4fa00000
   Loading Ramdisk to 49ef8000, end 49fff4e4 ... OK
   Loading Device Tree to 0000000049eec000, end 0000000049ef7d41 ... OK

Starting kernel ...

/ # uname -a
Linux (none) 5.9.1jumpdrive #3 SMP Sun Nov 8 00:41:50 CET 2020 aarch64 GNU/Linux

/ # ls
bin                info.sh            root               telnet_connect.sh
config             init               sbin               usr
dev                init_functions.sh  splash.ppm
error.ppm.gz       linuxrc            splash.ppm.gz
etc                proc               sys
We hope to see a similar UART Log when NuttX boots successfully on PinePhone.
What’s boot.scr?
Found U-Boot script /boot.scrAccording to the log above, the U-Boot Bootloader runs the U-Boot Script boot.scr to…
Light up the PinePhone LED (I think?)
Load Image.gz into RAM
(At 0x4408 0000)
Unzip Image.gz in RAM
(At 0x4008 0000)
Load the Linux Device Tree…
sun50i-a64-pinephone-1.2.dtb
(At 0x4FA0 0000)
Load the RAM File System initramfs.gz
(At 0x4FE0 0000)
Boot the Unzipped Linux Kernel in Image
(At 0x4008 0000)
Here’s the Source File: Jumpdrive/src/pine64-pinephone.txt
setenv kernel_addr_z 0x44080000

setenv bootargs loglevel=0 silent console=tty0 vt.global_cursor_default=0

gpio set 114

if load ${devtype} ${devnum}:${distro_bootpart} ${kernel_addr_z} /Image.gz; then
  unzip ${kernel_addr_z} ${kernel_addr_r}
  if load ${devtype} ${devnum}:${distro_bootpart} ${fdt_addr_r} /sun50i-a64-pinephone-1.2.dtb; then
    if load ${devtype} ${devnum}:${distro_bootpart} ${ramdisk_addr_r} /initramfs.gz; then
      booti ${kernel_addr_r} ${ramdisk_addr_r}:${filesize} ${fdt_addr_r};
    else
      booti ${kernel_addr_r} - ${fdt_addr_r};
    fi;
  fi;
fi
The above U-Boot Script pine64-pinephone.txt is compiled to boot.scr by this Makefile: Jumpdrive/Makefile
%.scr: src/%.txt
	@echo "MKIMG $@"
@mkimage -A arm -O linux -T script -C none -n "U-Boot boot script" -d $< $@What are fdt_addr_r, kernel_addr_r and ramdisk_addr_r?
They are Environment Variables defined in U-Boot…
=> printenv
fdt_addr_r=0x4FA00000
kernel_addr_r=0x40080000
ramdisk_addr_r=0x4FE00000U-Boot says that the Start of RAM kernel_addr_r is 0x4008 0000.
For NuttX: We might need to modify the above U-Boot Script because…
NuttX doesn’t need the Linux Device Tree
NuttX doesn’t need the RAM File System either
Which frees up more RAM for NuttX
(More about U-Boot Bootloader)
This is how we analyse our NuttX ELF Image nuttx with Ghidra…
(Works for any ELF file actually)
Install Java Dev Kit (JDK) 11 (64-bit)
Download a Ghidra Release File.
Extract the Ghidra Release File.
Launch Ghidra…
## For Linux and macOS
./ghidraRun

## For Windows
ghidraRun.bat
The Ghidra Help Window appears, with plenty of useful info that’s not available elsewhere.
Minimise the Ghidra Help Window for now.
(But remember to browse it when we have the time!)
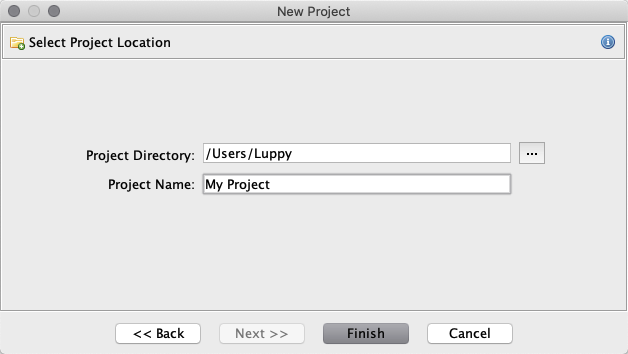
In the Ghidra Main Window, click File → New Project
For Project Type: Select Non-Shared Project
For Project Name: Enter “My Project”
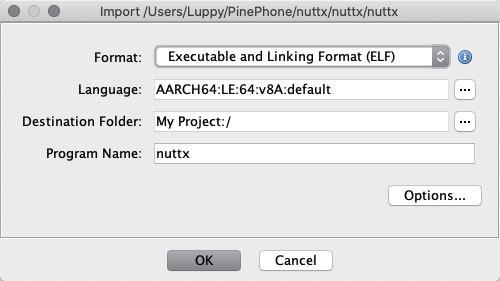
Click File → Import File
Select our NuttX ELF Image nuttx
Ghidra detects that our Executable is “AARCH64:LE:v8A:default”.
Click OK and OK again.
Double-click our ELF File nuttx
The CodeBrowser Window appears.
(With a dragon-like spectre)
When prompted to analyze, click Yes and Analyze.
Ignore the warnings.
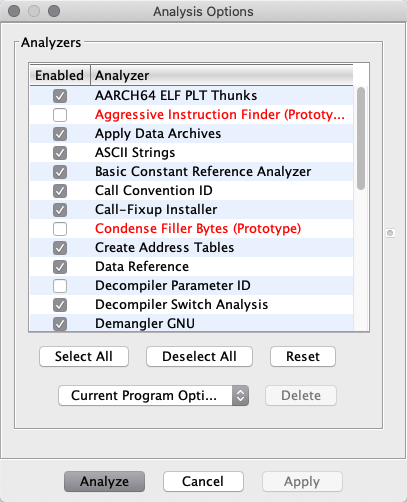
And we’re done with the analysis! We should see this…
In case of problems, check these docs…
Also check the Ghidra Help Window that we have minimised.
This is how we analyse the PinePhone Linux Kernel Image with Ghidra…
Assume that we’ve extracted and uncompressed the PinePhone Kernel Image…
Assume that we’ve created a Ghidra Project
(From the previous section)
Go back to the Ghidra Project Window: “My Project”
Click File → Import File
Select our PinePhone Kernel Image
At the right of Language, click the “...” Button
Enter aarch into the Filter Box. Select…
AARCH64v8A64littledefaultClick OK.
Language should now show “AARCH64:LE:v8A:default”
Click OK and OK again.
Double-click our Image File
The CodeBrowser Window appears.
(With a dragon-like spectre)
When prompted to analyze, click Yes and Analyze.
Ignore the warnings.
Start of RAM is 0x4000 0000 according to the PinePhone Memory Map…
Image Load Offset is 0 according to the Linux Kernel Header (offset 0x08)
So we shift our PinePhone Image to start at 0x4000 0000…
Click Window → Memory Map
Click ram
Click the icon at top right with the Four Arrows (pic below)
(The icon says “Move a block to another address”)
Set New Start Address to 40000000
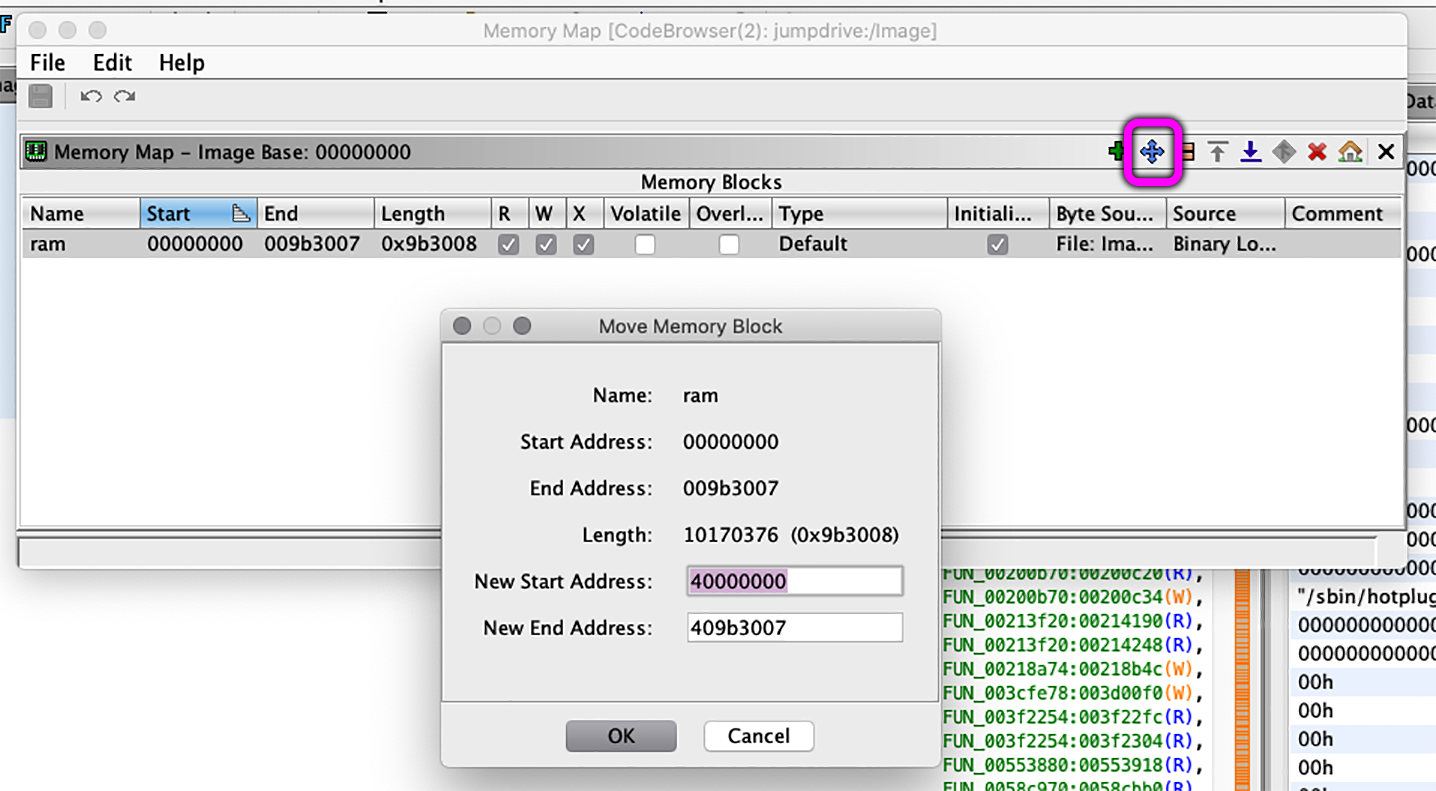
And we’re done with the analysis! We should see this…