📝 25 Jun 2023
Apache NuttX is a Real-Time Operating System (RTOS) that runs on many kinds of devices, from 8-bit to 64-bit.
(Think Linux, but a lot smaller and simpler)
In this article we’ll…
Boot NuttX RTOS on a 64-bit RISC-V device
Explore the Boot Code that starts NuttX on RISC-V
And learn a little RISC-V Assembly!
But we need RISC-V Hardware?
No worries! We’ll run NuttX on the QEMU Emulator for 64-bit RISC-V.
(Which will work on Linux, macOS and Windows machines)
Building Apache NuttX RTOS in 4 minutes
We begin by booting NuttX RTOS on RISC-V QEMU Emulator (64-bit)…
Download and install QEMU Emulator.
## For macOS:
brew install qemu

## For Debian and Ubuntu:
sudo apt install qemu-system-riscv64
Download nuttx from the NuttX Release…
nuttx: NuttX Image for 64-bit RISC-V QEMU
If we prefer to build NuttX ourselves: Follow these steps
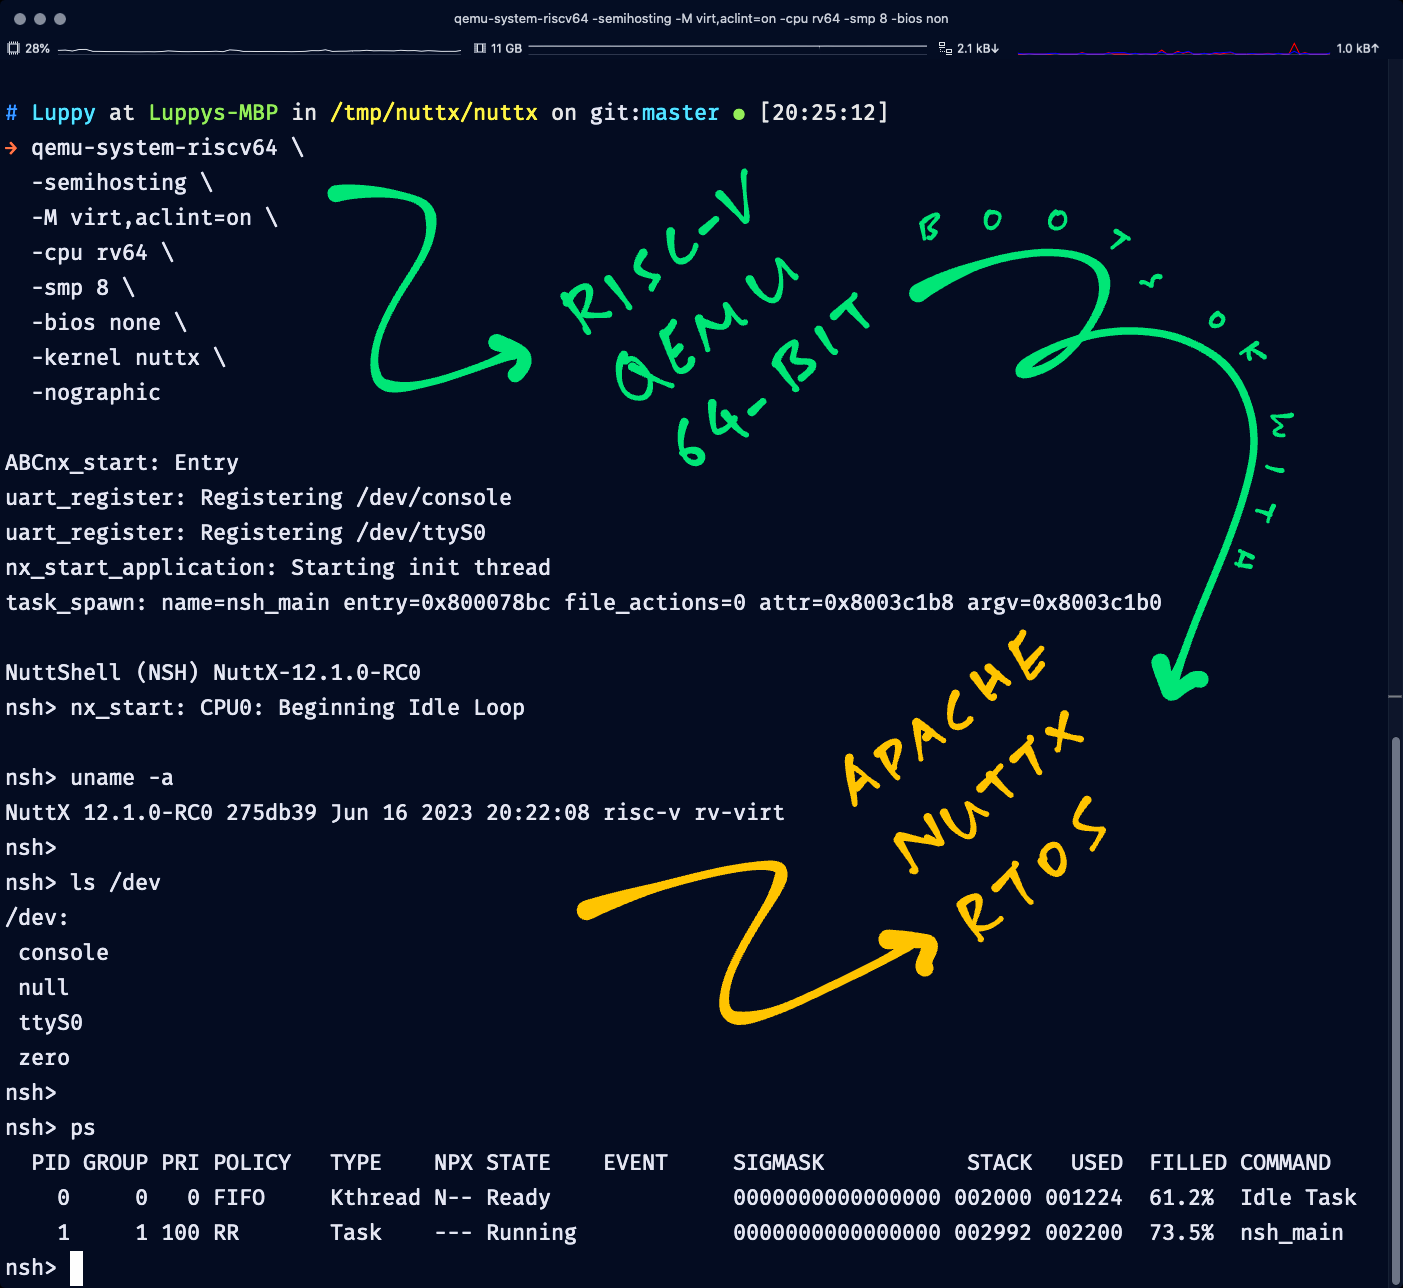
Start the QEMU RISC-V Emulator (64-bit) with NuttX RTOS…
qemu-system-riscv64 \
  -semihosting \
  -M virt,aclint=on \
  -cpu rv64 \
  -bios none \
  -kernel nuttx \
  -nographic
NuttX is now running in the QEMU Emulator! (Pic below)
uart_register: Registering /dev/console
uart_register: Registering /dev/ttyS0
nx_start_application: Starting init thread

NuttShell (NSH) NuttX-12.1.0-RC0
nsh> nx_start: CPU0: Beginning Idle Loop
nsh>Enter “help” to see the available commands…
nsh> help
help usage:  help [-v] [<cmd>]

    .         break     dd        exit      ls        ps        source    umount
    [         cat       df        false     mkdir     pwd       test      unset
    ?         cd        dmesg     free      mkrd      rm        time      uptime
    alias     cp        echo      help      mount     rmdir     true      usleep
    unalias   cmp       env       hexdump   mv        set       truncate  xd
    basename  dirname   exec      kill      printf    sleep     uname

Builtin Apps:
    nsh     ostest  sh
NuttX works like a tiny version of Linux, so the commands will look familiar…
nsh> uname -a
NuttX 12.1.0-RC0 275db39 Jun 16 2023 20:22:08 risc-v rv-virt

nsh> ls /dev
/dev:
console
null
ttyS0
zero

nsh> ps
  PID GROUP PRI POLICY   TYPE    NPX STATE    EVENT     SIGMASK           STACK   USED  FILLED COMMAND
    0     0   0 FIFO     Kthread N-- Ready              0000000000000000 002000 001224  61.2%  Idle Task
1 1 100 RR Task --- Running 0000000000000000 002992 002024 67.6% nsh_mainTo Exit QEMU: Press Ctrl-A then x
Let’s talk about QEMU…
(NuttX Kernel Mode works OK with QEMU)
Apache NuttX RTOS on RISC-V QEMU
Earlier we ran this command. What does it mean?
qemu-system-riscv64 \
  -kernel nuttx \
  -cpu rv64 \
  -M virt,aclint=on \
  -semihosting \
  -bios none \
  -nographic
The above command starts the QEMU Emulator for RISC-V (64-bit) with…
Kernel Image: nuttx
CPU: 64-bit RISC-V
Machine: Generic Virtual Platform (virt)
Handle Interrupts with Advanced Core Local Interruptor (ACLINT)
Enable Semihosting Debugging without BIOS
Run Emulator in Console Mode (instead of Graphical Mode)
Which RISC-V Instructions are supported by QEMU?
QEMU’s RISC-V Generic Virtual Platform (virt) supports RV64GC, which is equivalent to RV64IMAFDCZicsr_Zifencei (phew)…
| RV64I | 64-bit Base Integer Instruction Set |
| M | Integer Multiplication and Division |
| A | Atomic Instructions |
| F | Single-Precision Floating-Point |
| D | Double-Precision Floating-Point |
| C | Compressed Instructions |
| Zicsr | Control and Status Register (CSR) Instructions |
| Zifencei | Instruction-Fetch Fence |
We’ll meet these instructions shortly.
What happens when NuttX RTOS boots on QEMU?
Let’s find out by tracing the RISC-V Boot Code in NuttX!
Earlier we ran this command to generate the RISC-V Disassembly for the NuttX Kernel…
riscv64-unknown-elf-objdump \
  -t -S --demangle --line-numbers --wide \
  nuttx \
  >nuttx.S \
  2>&1
This produces nuttx.S, the disassembled NuttX Kernel for RISC-V.
nuttx.S begins with this RISC-V code…
0000000080000000 <__start>:
nuttx/arch/risc-v/src/chip/qemu_rv_head.S:46
__start:
  /* Load mhartid (cpuid) */
  csrr a0, mhartid
    80000000:	f1402573  csrr  a0, mhartid
This says…
NuttX Boot Code is at qemu_rv_head.S
NuttX Kernel begins execution at address 0x8000 0000
(What if NuttX is started by the U-Boot Bootloader? See this)
Now we head into the NuttX Boot Code…
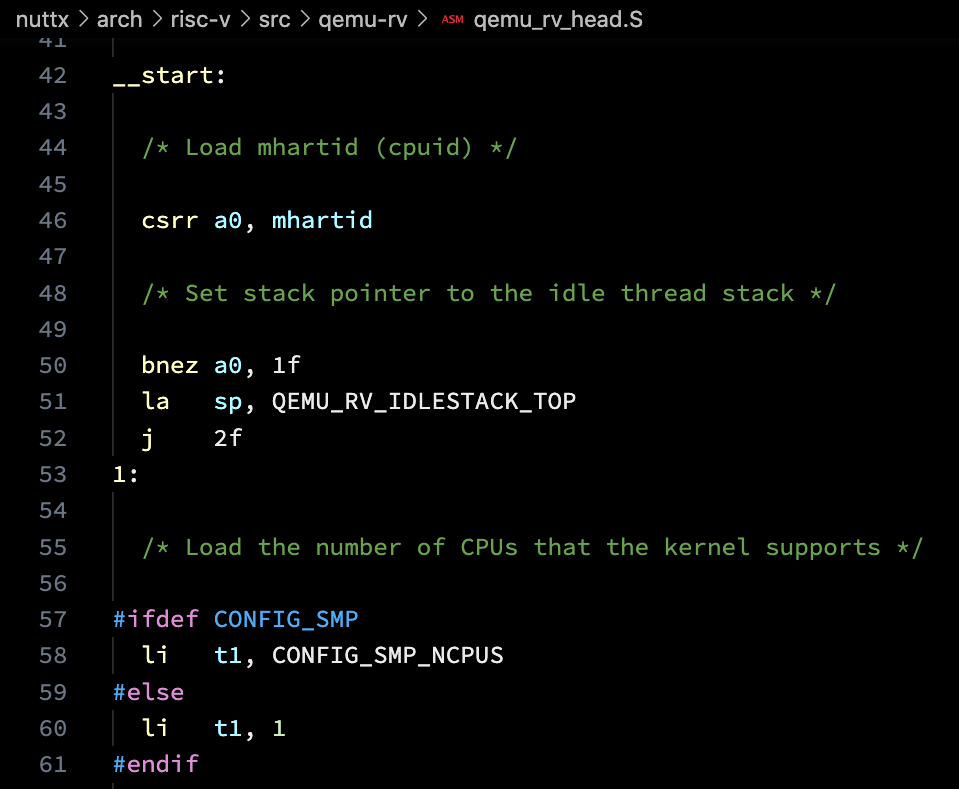
RISC-V Boot Code for Apache NuttX RTOS
What’s inside the NuttX Boot Code?
The RISC-V Assembly code in qemu_rv_head.S will…
Get the CPU ID
Check the Number of CPUs
Set the Stack Pointer
Disable Interrupts
Load the Interrupt Vector
Jump to qemu_rv_start
Let’s decipher the RISC-V Instructions in our Boot Code…
This is how we fetch the CPU ID in RISC-V Assembly: qemu_rv_head.S
/* Load mhartid (cpuid) */
csrr  a0, mhartid
Let’s break it down…
csrr is the RISC-V Instruction that reads the Control and Status Register
(Which contains the CPU ID)
a0 is the RISC-V Register that will be loaded with the CPU ID.
According to the RISC-V EABI (Embedded Application Binary Interface), a0 is actually an alias for the Official RISC-V Register x10.
(“a” refers to “Function Call Argument”)
mhartid says that we’ll read from the Hart ID Register, containing the ID of the Hardware Thread (“Hart”) that’s running our code.
(Equivalent to CPU ID)
So the above code will load the CPU ID into Register x10.
(We’ll call it a0 for convenience)
To disable interrupts in RISC-V, we do this: qemu_rv_head.S
/* Disable all interrupts (i.e. timer, external) in mie */
csrw  mie, zero
Which means…
csrw will write to the Control and Status Register
(Which controls interrupts and other CPU settings)
mie says that we’ll write to the Machine Interrupt Enable Register
(0 to Disable Interrupts, 1 to Enable)
zero says that we’ll read from Register x0…
Which always reads as 0!
Thus the above instruction will set the Machine Interrupt Enable Register to 0, which will disable interrupts.
(Yeah RISC-V has a funny concept of “0”)
Now check out this curious combination of instructions: qemu_rv_head.S
/* Wait forever */
csrw  mie, zero
wfi
From the previous section, we know that “csrw mie, zero” will disable interrupts.
But wfi will Wait for Interrupt…
Which will never happen because we disabled interrupts!
Thus the above code will get stuck there, waiting forever. (Intentionally)
(wfi is probably the only instruction common to RISC-V and Arm CPUs)
RISC-V handles interrupts by looking up the Interrupt Vector Table.
This is how we load the Address of the Vector Table into the CPU Settings: qemu_rv_head.S
/* Load address of Interrupt Vector Table */
la    t0, __trap_vec
csrw  mtvec, t0
la loads the Address of the Vector Table into Register t0
csrw writes t0 into the Control and Status Register at…
mtvec, the Machine Trap-Vector Base-Address Register
Which will load the Address of our Interrupt Vector Table into the CPU Settings.
(la is actually a Pseudo-Instruction that expands to auipc and addi)
(auipc loads an Address Offset from the Program Counter)
(addi adds an Immediate Value to a Register)
Adapting 32-bit code for 64-bit sounds hard… But it’s easy peasy for RISC-V!
Our Boot Code uses an Assembler Macro to figure out if we’re running 32-bit or 64-bit RISC-V: qemu_rv_head.S
#ifdef CONFIG_ARCH_RV32
  /* Do this for 32-bit RISC-V */
  slli t1, a0, 2

#else
  /* Do this for 64-bit RISC-V */
  slli t1, a0, 3
#endif
Which means that the exact same Boot Code will run on 32-bit AND 64-bit RISC-V!
(slli sounds “silly”, but it’s Logical Shift Left)
(CONFIG_ARCH_RV32 is derived from our NuttX Build Configuration)
What about the other RISC-V Instructions in our Boot Code?
Let’s skim through the rest…
bnez branches to Label 1f if Register a0 is Non-Zero
bnez a0, 1fj jumps to Label 2f
(We’ll explain Labels in a while)
j 2fli loads the Value 1 into Register t1
(li is a Pseudo-Instruction that expands to addi)
(addi adds an Immediate Value to a Register)
li t1, 1blt branches to Label 3f if Register a0 is less than Register t1
(And grabs a sandwich)
blt a0, t1, 3fadd sets Register t0 to the value of Register t0 + Register t1
(t1 is aliased to Register x15)
add t0, t0, t1REGLOAD is an Assembly Macro that expands to ld
ld loads Register t0 into the Stack Pointer Register
(Which is aliased to Register x2)
REGLOAD sp, 0(t0)jal (Jump And Link) will jump to the address qemu_rv_start and store the Return Address in Register x1
(Works like a Function Call)
jal x1, qemu_rv_startret returns from a Function Call.
(ret is a Pseudo-Instruction that expands to jalr)
(jalr “Jump And Link Register” will jump to the Return Address stored in Register x1)
retHere’s the complete list of RISC-V Instructions…
(See the Detailed Analysis of the NuttX Boot Code)
Why are the RISC-V Labels named “1f”, “2f”, “3f”?
“1f” refers to the Local Label “1” with a Forward Reference.
(Instead of a Backward Reference)
Can we write our own RISC-V Assembly Code? As a learning exercise?
Yep! Here’s how we inserted our own RISC-V Assembly Code into the NuttX Boot Code…
Let’s jump to qemu_rv_start…
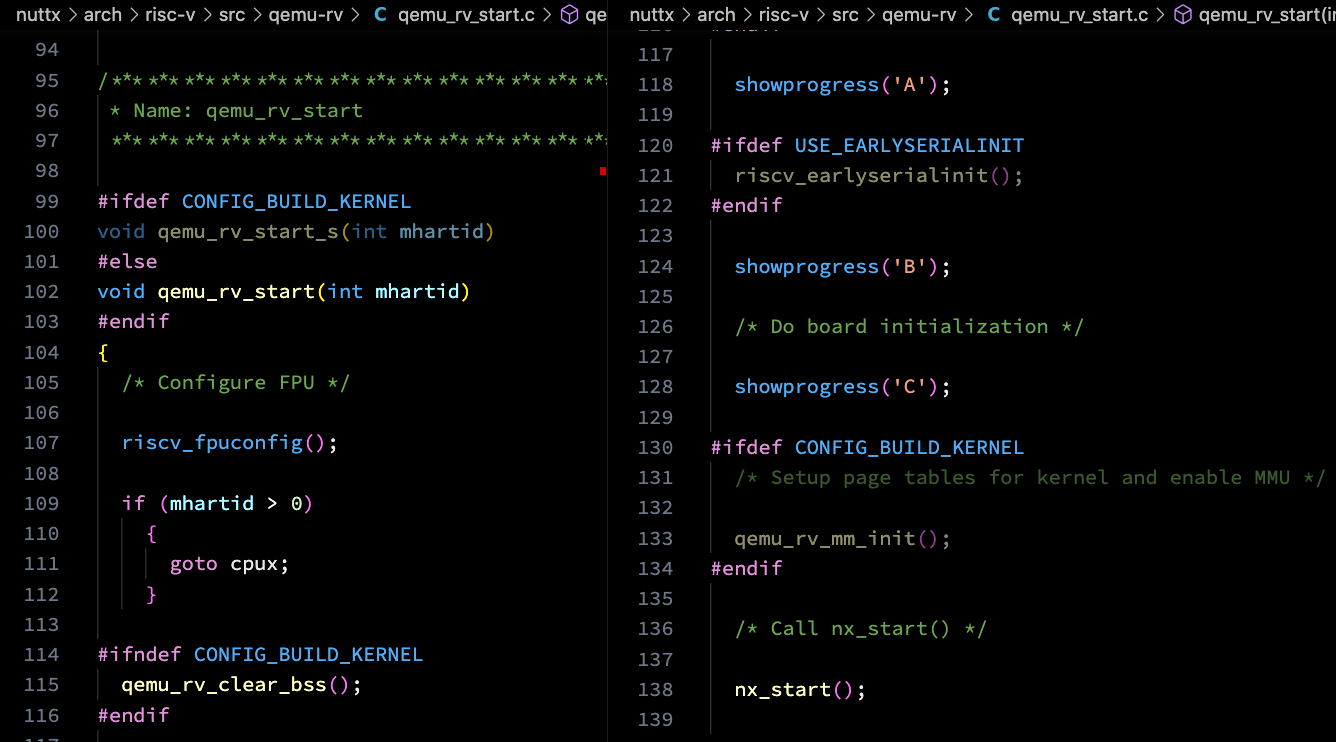
RISC-V Start Code for NuttX RTOS
Our Boot Code jumps to qemu_rv_start…
What happens next?
qemu_rv_start is the very first C Function that NuttX runs when it boots on QEMU.
(And jh7110_start for Star64 JH7110)
The function will…
Configure the Floating-Point Unit
Clear the BSS Memory
Initialise the Serial Port
Initialise the Memory Management Unit
(For Kernel Mode only)
Call nx_start
What happens in nx_start?
nx_start will initialise a whole bunch of NuttX things…
Which will start the NuttX Shell that we’ve seen earlier.
And that’s how NuttX RTOS boots on QEMU Emulator for RISC-V!
Why are we doing all this?
We’re about to port NuttX to the StarFive JH7110 RISC-V SoC and Pine64 Star64 Single-Board Computer.
The analysis we’ve done today will be super helpful as we write the Boot Code for these RISC-V devices.
Stay tuned for updates in the next article!
I hope this article has been an educational exploration of Apache NuttX RTOS on 64-bit RISC-V…
We booted NuttX RTOS on an emulated 64-bit RISC-V device
We peeked at the Boot Code that starts NuttX on RISC-V
And hopefully we learnt a little RISC-V Assembly!
As we’ve seen, NuttX is a tiny operating system that’s perfect for experimenting with RISC-V gadgets. We’ll do this and much more in the upcoming articles!
(We welcome your contribution to Apache NuttX RTOS)
Many Thanks to my GitHub Sponsors for supporting my work! This article wouldn’t have been possible without your support.
Got a question, comment or suggestion? Create an Issue or submit a Pull Request here…
lupyuen.github.io/src/riscv.md
Learning about RISC-V Architecture? This book has a concise overview, it might be available from your Local Library through the Libby App…
“Modern Computer Architecture and Organization” by Jim Ledin
Hart IDs are not guaranteed to be contiguous. One is guaranteed to be 0, the rest will all be different, but not necessarily 0, 1, 2, 3, 4, 5, …
To Enable Logging for RISC-V QEMU: Use the QEMU Option -trace "*"
Here’s the Device Tree for RISC-V QEMU
RISC-V Boot Code for Apache NuttX RTOS
Earlier we talked about the NuttX Boot Code for RISC-V QEMU…
Below is our Detailed Analysis of the Boot Code in…
For All Hart IDs:
Load the Hart ID (CPU ID) from the system…
__start:
  /* Load mhartid (cpuid) */
csrr a0, mhartid(RISC-V Instructions explained)
If Hart ID is 0 (First CPU):
Set Stack Pointer to the Idle Thread Stack…
  /* Set stack pointer to the idle thread stack */
  bnez a0, 1f
  la   sp, QEMU_RV_IDLESTACK_TOP
j 2fIf Hart ID is 1, 2, 3, …
g_cpu_basestack and Hart ID1:
/* Load the number of CPUs that the kernel supports */
#ifdef CONFIG_SMP
li t1, CONFIG_SMP_NCPUS
#else
li t1, 1
#endif
/* If a0 (mhartid) >= t1 (the number of CPUs), stop here */
blt a0, t1, 3f
csrw mie, zero
wfi
3:
/* To get g_cpu_basestack[mhartid], must get g_cpu_basestack first */
la t0, g_cpu_basestack
/* Offset = pointer width * hart id */
#ifdef CONFIG_ARCH_RV32
slli t1, a0, 2
#else
slli t1, a0, 3
#endif
add t0, t0, t1
/* Load idle stack base to sp */
REGLOAD sp, 0(t0)
/*
* sp (stack top) = sp + idle stack size - XCPTCONTEXT_SIZE
*
* Note: Reserve some space used by up_initial_state since we are already
* running and using the per CPU idle stack.
*/
li t0, STACK_ALIGN_UP(CONFIG_IDLETHREAD_STACKSIZE - XCPTCONTEXT_SIZE)
add sp, sp, t0For All Hart IDs:
2:
  /* Disable all interrupts (i.e. timer, external) in mie */
  csrw mie, zero

  /* Load the Trap Vector Table */
  la   t0, __trap_vec
  csrw mtvec, t0

  /* Jump to qemu_rv_start */
  jal  x1, qemu_rv_start

  /* We shouldn't return from _start */
The easiest way to run Apache NuttX RTOS on 64-bit RISC-V is to download the NuttX Image and boot it on QEMU Emulator…
But if we’re keen to build NuttX ourselves, here are the steps…
Install the Build Prerequisites, skip the RISC-V Toolchain…
Download the RISC-V Toolchain for riscv64-unknown-elf…
Download and configure NuttX…
mkdir nuttx
cd nuttx
git clone https://github.com/apache/nuttx nuttx
git clone https://github.com/apache/nuttx-apps apps

cd nuttx
tools/configure.sh rv-virt:nsh64
make menuconfig
In menuconfig, browse to “Device Drivers > System Logging”
Disable this option…
Prepend Timestamp to Syslog MessageBrowse to “Build Setup > Debug Options”
Select the following options…
Enable Debug Features
Enable Error Output
Enable Warnings Output
Enable Informational Debug Output
Enable Debug Assertions
Scheduler Debug Features
Scheduler Error Output
Scheduler Warnings Output
Scheduler Informational Output
Save and exit menuconfig.
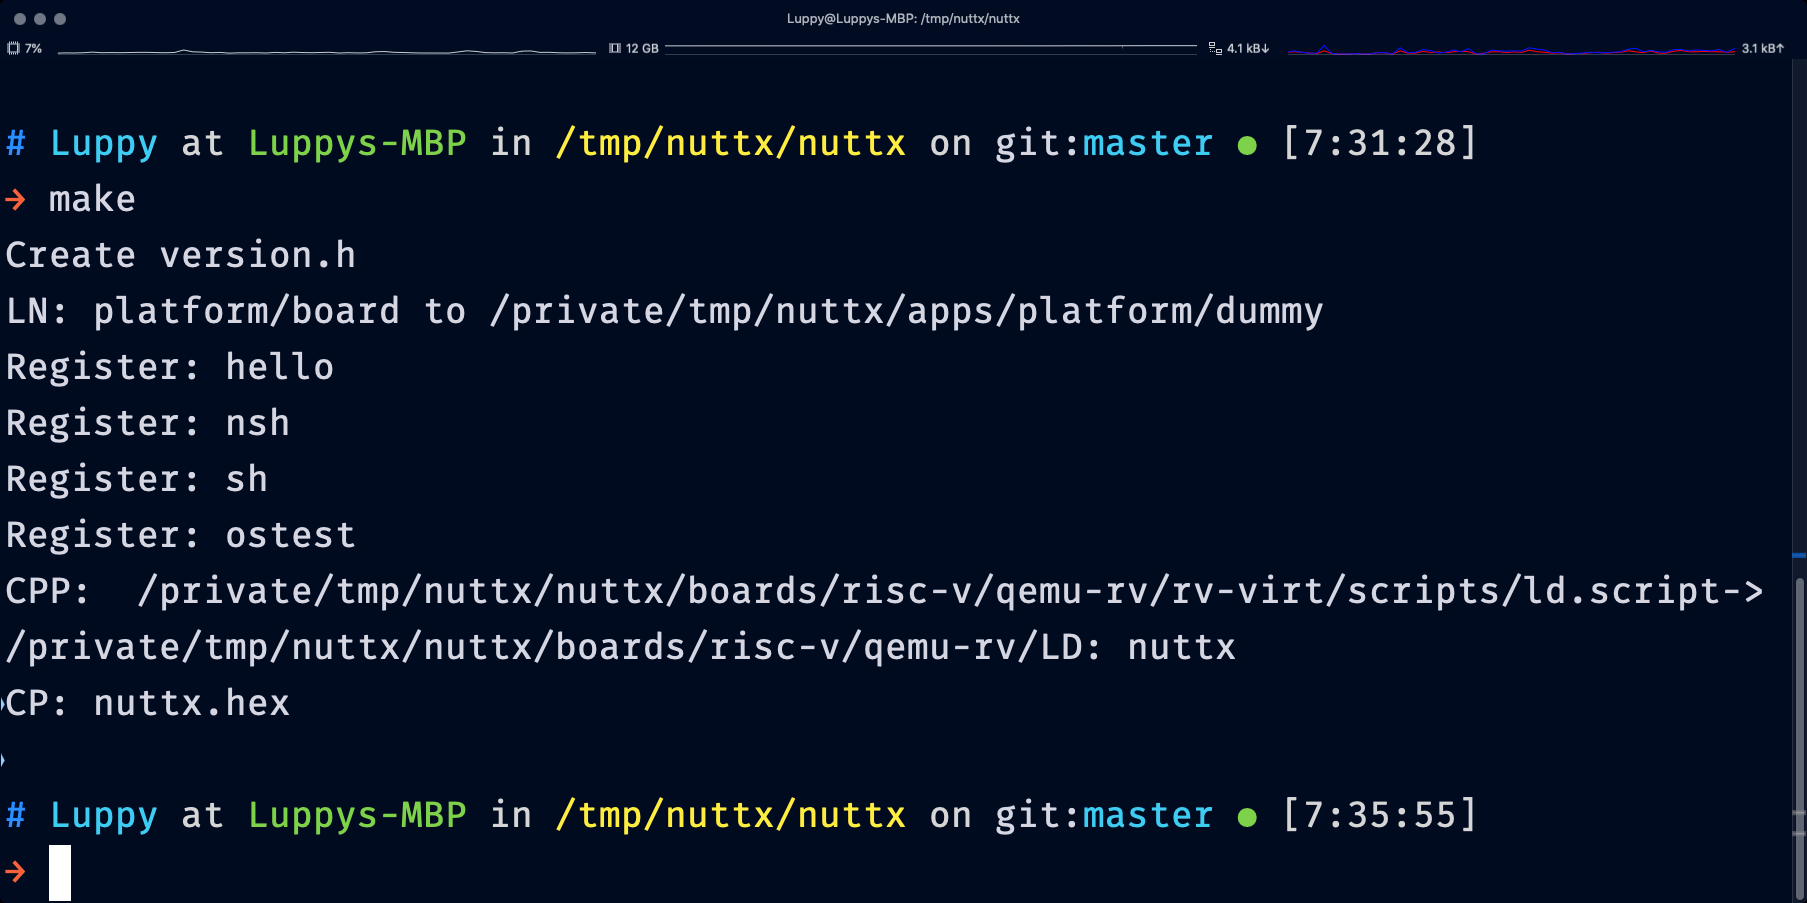
Build the NuttX Project and dump the RISC-V Disassembly…
make V=1 -j7

riscv64-unknown-elf-objdump \
  -t -S --demangle --line-numbers --wide \
  nuttx \
  >nuttx.S \
2>&1If the build fails with…
sed: 1: "/CONFIG_BASE_DEFCONFIG/ ...": bad flag in substitute command: '}'Please run “make menuconfig > Build Setup > Debug Options” and uncheck “Enable Debug Features”. Save, exit menuconfig and rebuild NuttX with make.
This produces the NuttX ELF Image nuttx that we may boot on QEMU RISC-V Emulator…
Let’s look at the GCC Command that compiles NuttX for 64-bit RISC-V QEMU…
From the previous section, we see that the NuttX Build compiles the source files with these GCC Options…
riscv64-unknown-elf-gcc \
  -c \
  -fno-common \
  -Wall \
  -Wstrict-prototypes \
  -Wshadow \
  -Wundef \
  -Os \
  -fno-strict-aliasing \
  -fomit-frame-pointer \
  -ffunction-sections \
  -fdata-sections \
  -g \
  -march=rv64imac \
  -mabi=lp64 \
  -mcmodel=medany \
  -isystem nuttx/include \
  -D__NuttX__ \
  -DNDEBUG \
  -D__KERNEL__  \
  -pipe \
  -I nuttx/arch/risc-v/src/chip \
  -I nuttx/arch/risc-v/src/common \
  -I nuttx/sched \
  chip/qemu_rv_start.c \
-o qemu_rv_start.oThe RISC-V Options are…
march=rv64imac: This generates Integer-Only 64-bit RISC-V code, no Floating-Point.
Which is surprising because RISC-V QEMU actually supports Floating-Point.
We’ll fix this as we port NuttX to the StarFive JH7110 RISC-V SoC and Pine64 Star64 SBC.
mabi=lp64: This Application Binary Interface says that Long Pointers are 64-bit. No Floating-Point Arguments will be passed in Registers.
We might fix this for JH7110 SoC and Star64 SBC.
mcmodel=medany: Sounds like a burger (or fast-food AI model) but it actually generates code for the Medium-Any Code Model. (Instead of Medium-Low)
UPDATE: We don’t recommend SiFive Freedom Tools for building Apache NuttX RTOS on Linux, macOS or Windows. (Since it’s outdated)
Please download the xPack Toolchain from the next section…
To build NuttX on Linux, macOS or Windows, we download the toolchain for xPack GNU RISC-V Embedded GCC. Here are the steps…
## Install Toolchain for RISC-V Target: xPack GNU RISC-V Embedded GCC
## Based on https://xpack.github.io/dev-tools/riscv-none-elf-gcc/install/

$ sudo apt -y remove \
  gcc-riscv64-unknown-elf \
  binutils-riscv64-unknown-elf \
  picolibc-riscv64-unknown-elf

$ ls /usr/bin/riscv*
ls: cannot access '/usr/bin/riscv*': No such file or directory

## Install xPack GCC Toolchain for RISC-V (Linux x64)
## https://github.com/xpack-dev-tools/riscv-none-elf-gcc-xpack/releases
$ wget https://github.com/xpack-dev-tools/riscv-none-elf-gcc-xpack/releases/download/v13.2.0-2/xpack-riscv-none-elf-gcc-13.2.0-2-linux-x64.tar.gz
$ tar xf xpack-riscv-none-elf-gcc-13.2.0-2-linux-x64.tar.gz
$ export PATH=$PWD/xpack-riscv-none-elf-gcc-13.2.0-2/bin:$PATH
$ riscv-none-elf-gcc -v
gcc version 13.2.0 (xPack GNU RISC-V Embedded GCC x86_64)

## For macOS Arm64: Change the above to...
## wget https://github.com/xpack-dev-tools/riscv-none-elf-gcc-xpack/releases/download/v14.2.0-1/xpack-riscv-none-elf-gcc-14.2.0-1-darwin-arm64.tar.gz
## tar xf xpack-riscv-none-elf-gcc-14.2.0-1-darwin-arm64.tar.gz

## Build NuttX, based on...
## https://lupyuen.codeberg.page/articles/release#build-nuttx-for-star64
## https://github.com/lupyuen/nuttx-star64/blob/main/.github/workflows/star64.yml

$ mkdir nuttx
$ cd nuttx
$ git clone https://github.com/apache/nuttx.git nuttx
$ git clone https://github.com/apache/nuttx-apps apps
$ cd nuttx

## Build NuttX for Star64 JH7110 SBC (or VisionFive2 SBC)
## To build NuttX for QEMU: Change "star64:nsh" to "rv-virt:nsh64"
## To build NuttX for Ox64: Change "star64:nsh" to "ox64:nsh"

$ make distclean
$ tools/configure.sh star64:nsh
$ make
LD: nuttx
CP: nuttx.hexRemember to add the xPack Toolchain to the PATH Environment Variable…
xpack-riscv-none-elf-gcc-12.3.0-1/binxPack names the binaries differently differently from other toolchains. Everywhere we see riscv64-unknown-elf, please change to riscv-none-elf.
xPack Toolchain works OK with Math Functions on JH7110: Source Code / Output Log / ELF Symbols
What about Alpine Linux and Debian Linux Containers?
Yep xPack Toolchain also works with Alpine and Debian Linux Containers (like for VSCode)…
Build NuttX with Debian Linux Container
(Debian builds more easily than Alpine)
Build NuttX with Alpine Linux Container
(Beware of glibc-to-musl conversion!)
Does the xPack Toolchain support -mcmodel=medany?
Yes the xPack Libraries are compiled with -mcmodel=medany.
xPack Toolchain requires applications to be compiled with -mcmodel=medany, otherwise the link might fail.
What about the standard toolchain: gcc-riscv64-unknown-elf?
According to this post, we might use gcc-riscv64-unknown-elf and picolibc-riscv64-unknown-elf.
But when we build NuttX with gcc-riscv64-unknown-elf, it fails with missing “math.h”…
$ sudo apt install \
  gcc-riscv64-unknown-elf \
  picolibc-riscv64-unknown-elf

$ make
./stdio/lib_dtoa_engine.c:40:10:
  fatal error: math.h: No such file or directory
  #include <math.h>
How do we point the NuttX Include and Lib Paths to picolibc for the NuttX Build?
(So that the NuttX Build will use the RISC-V “math.h” that’s bundled with picolibc)
TODO: Point the NuttX Include and Lib Paths to picolibc, like this