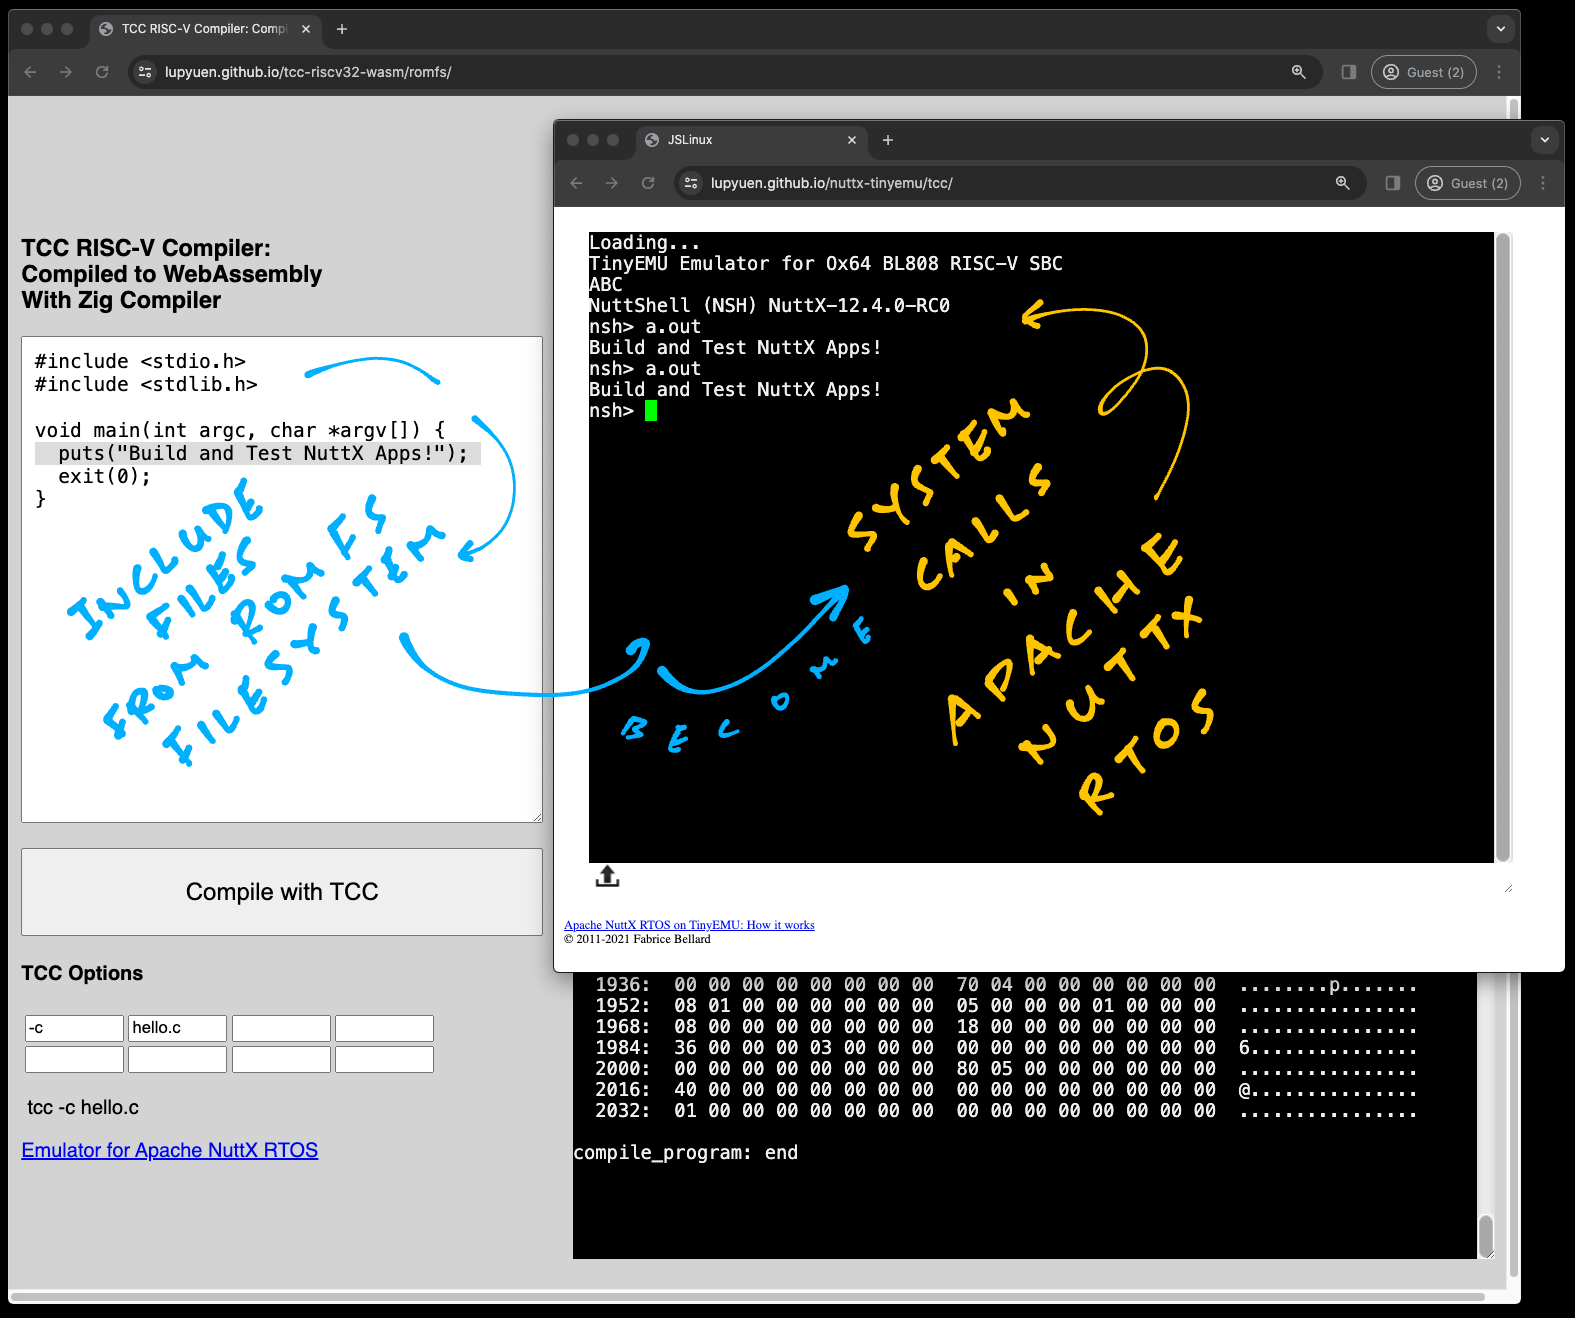
📝 11 Feb 2024

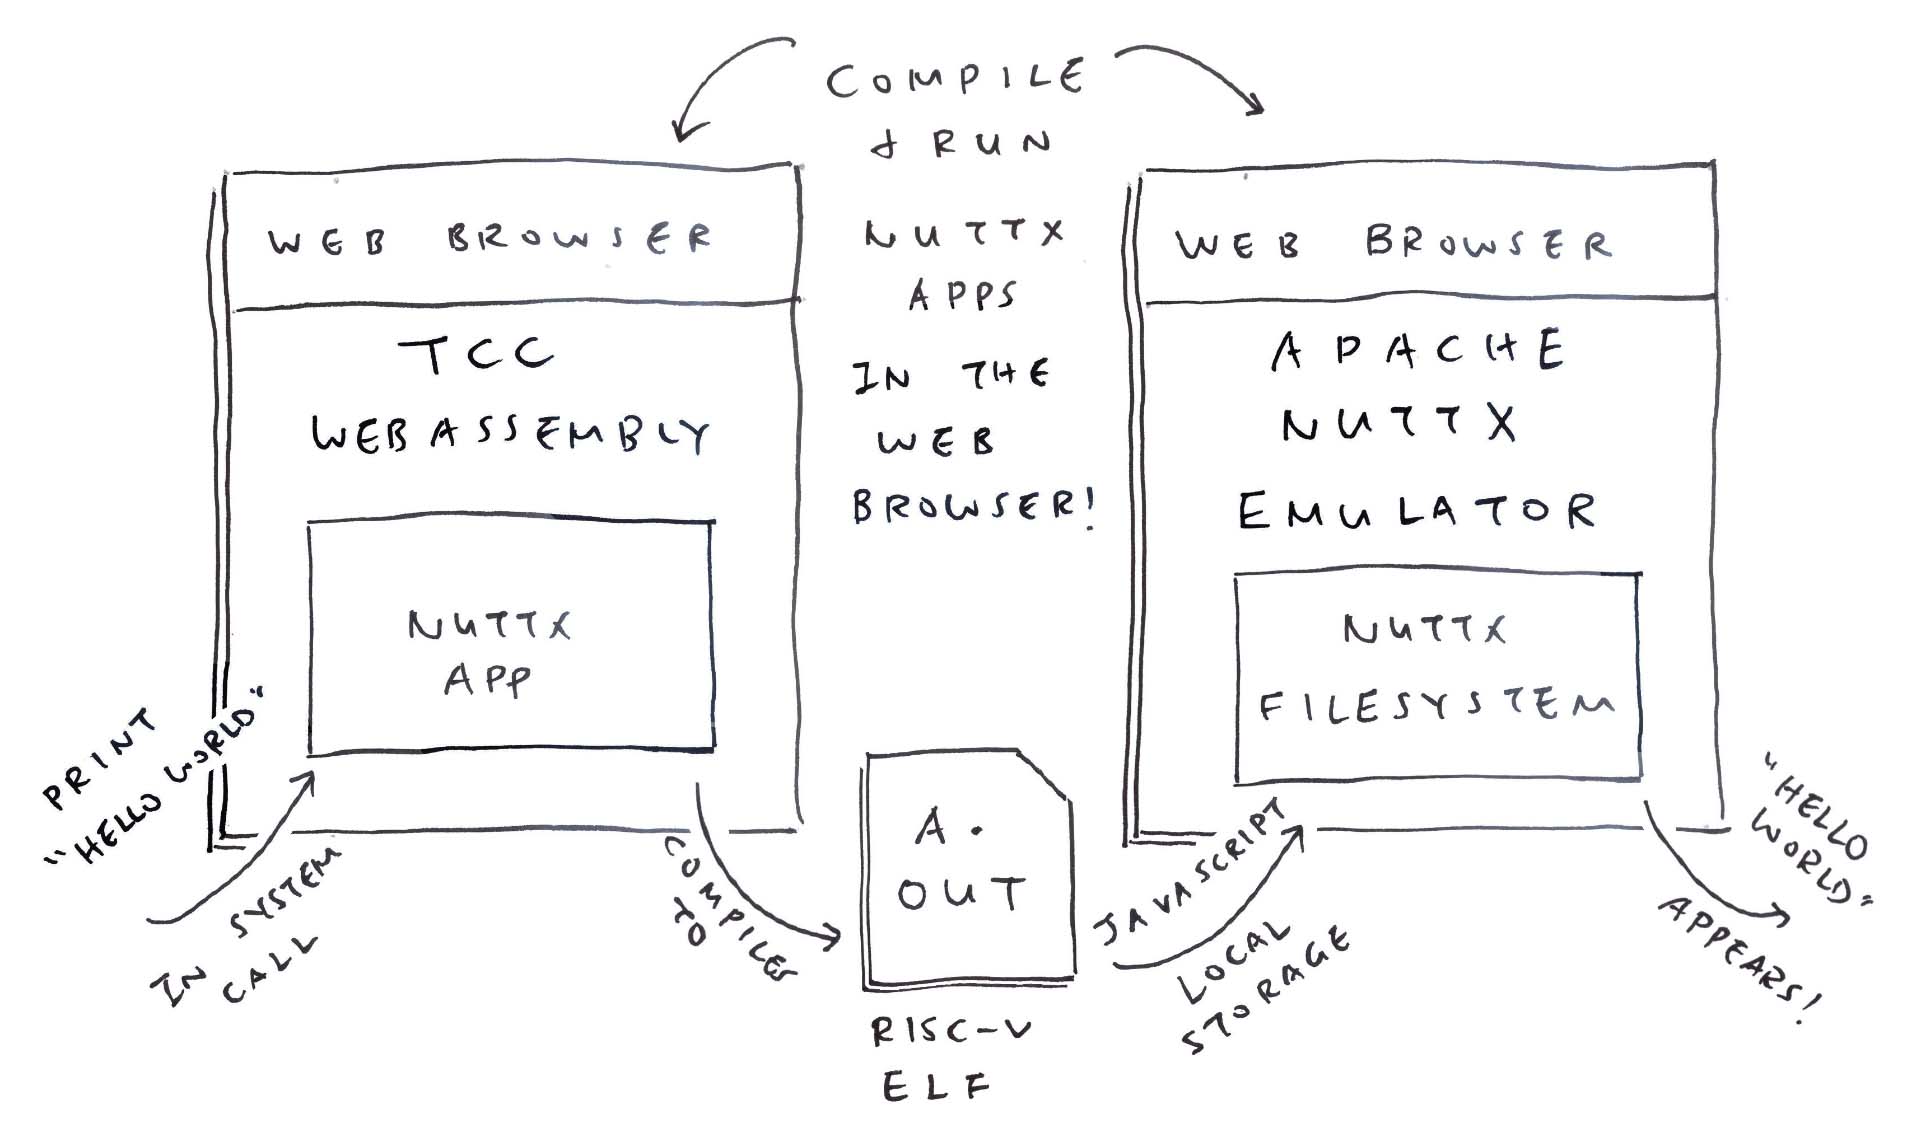
We’re building a C Compiler for RISC-V that runs in the Web Browser. (With Zig Compiler and WebAssembly)
But our C Compiler is kinda boring if it doesn’t support C Header Files and Library Files.
In this article we add a Read-Only Filesystem to our Zig WebAssembly…
We host the C Header Files in a ROM FS Filesystem
Zig reads them with the ROM FS Driver from Apache NuttX RTOS
And emulates POSIX File Access for TCC Compiler
We test the Compiled Output with NuttX Emulator
By making System Calls to NuttX Kernel
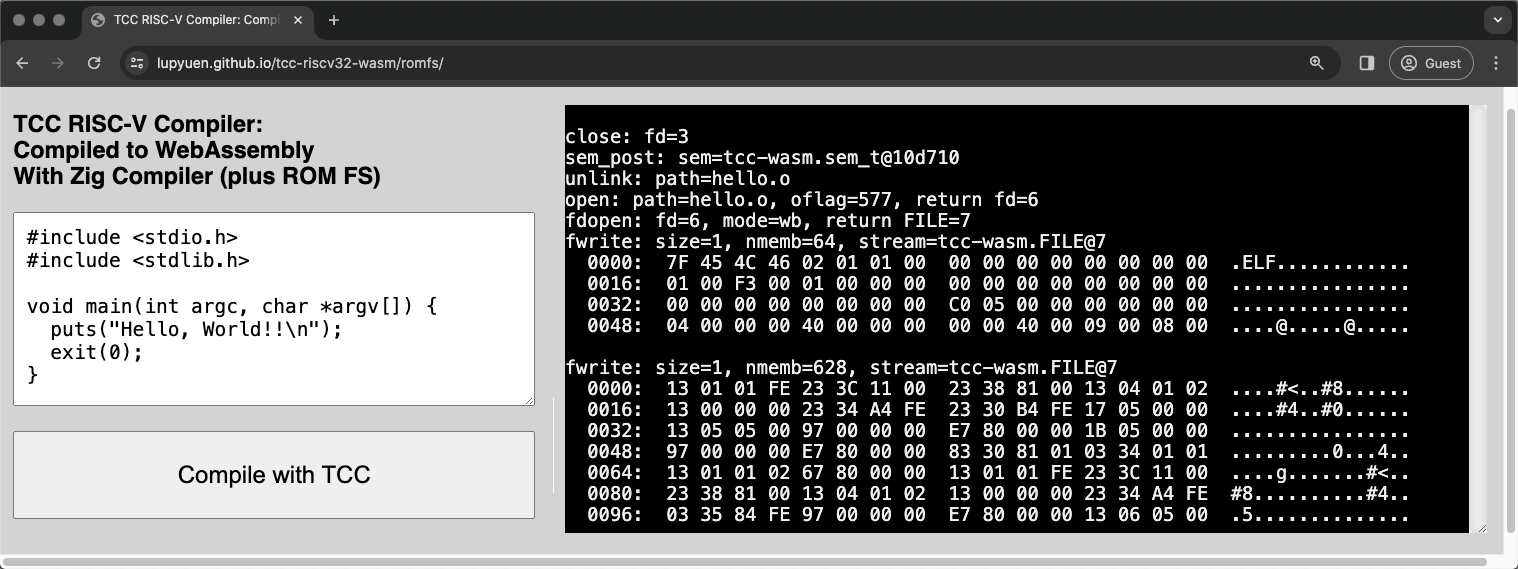
TCC Compiler in WebAssembly with ROM FS
Head over here to open TCC Compiler in our Web Browser (pic above)
This C Program appears…
// Demo Program for TCC Compiler
// with ROM FS
#include <stdio.h>
#include <stdlib.h>

void main(int argc, char *argv[]) {
  puts("Hello, World!!\n");
  exit(0);
}
Click the “Compile” button. Our Web Browser calls TCC to compile the above program…
## Compile to RISC-V ELF
tcc -c hello.c
And it downloads the compiled RISC-V ELF a.out.
To test the Compiled Output, we browse to the Emulator for Apache NuttX RTOS…
We run a.out in the NuttX Emulator…
TinyEMU Emulator for Ox64 BL808 RISC-V SBC
NuttShell (NSH) NuttX-12.4.0-RC0
nsh> a.out
Hello, World!!
And it works: Our Web Browser generates a RISC-V Executable, that runs in a RISC-V Emulator!
Surely it’s a staged demo? Something server-side?
Everything runs entirely in our Web Browser. Try this…
Browse to TCC RISC-V Compiler
Change the “Hello World” message
Click “Compile”
Reload the browser for NuttX Emulator
Run a.out
And the message changes! We discuss the internals…
Something oddly liberating about our demo…
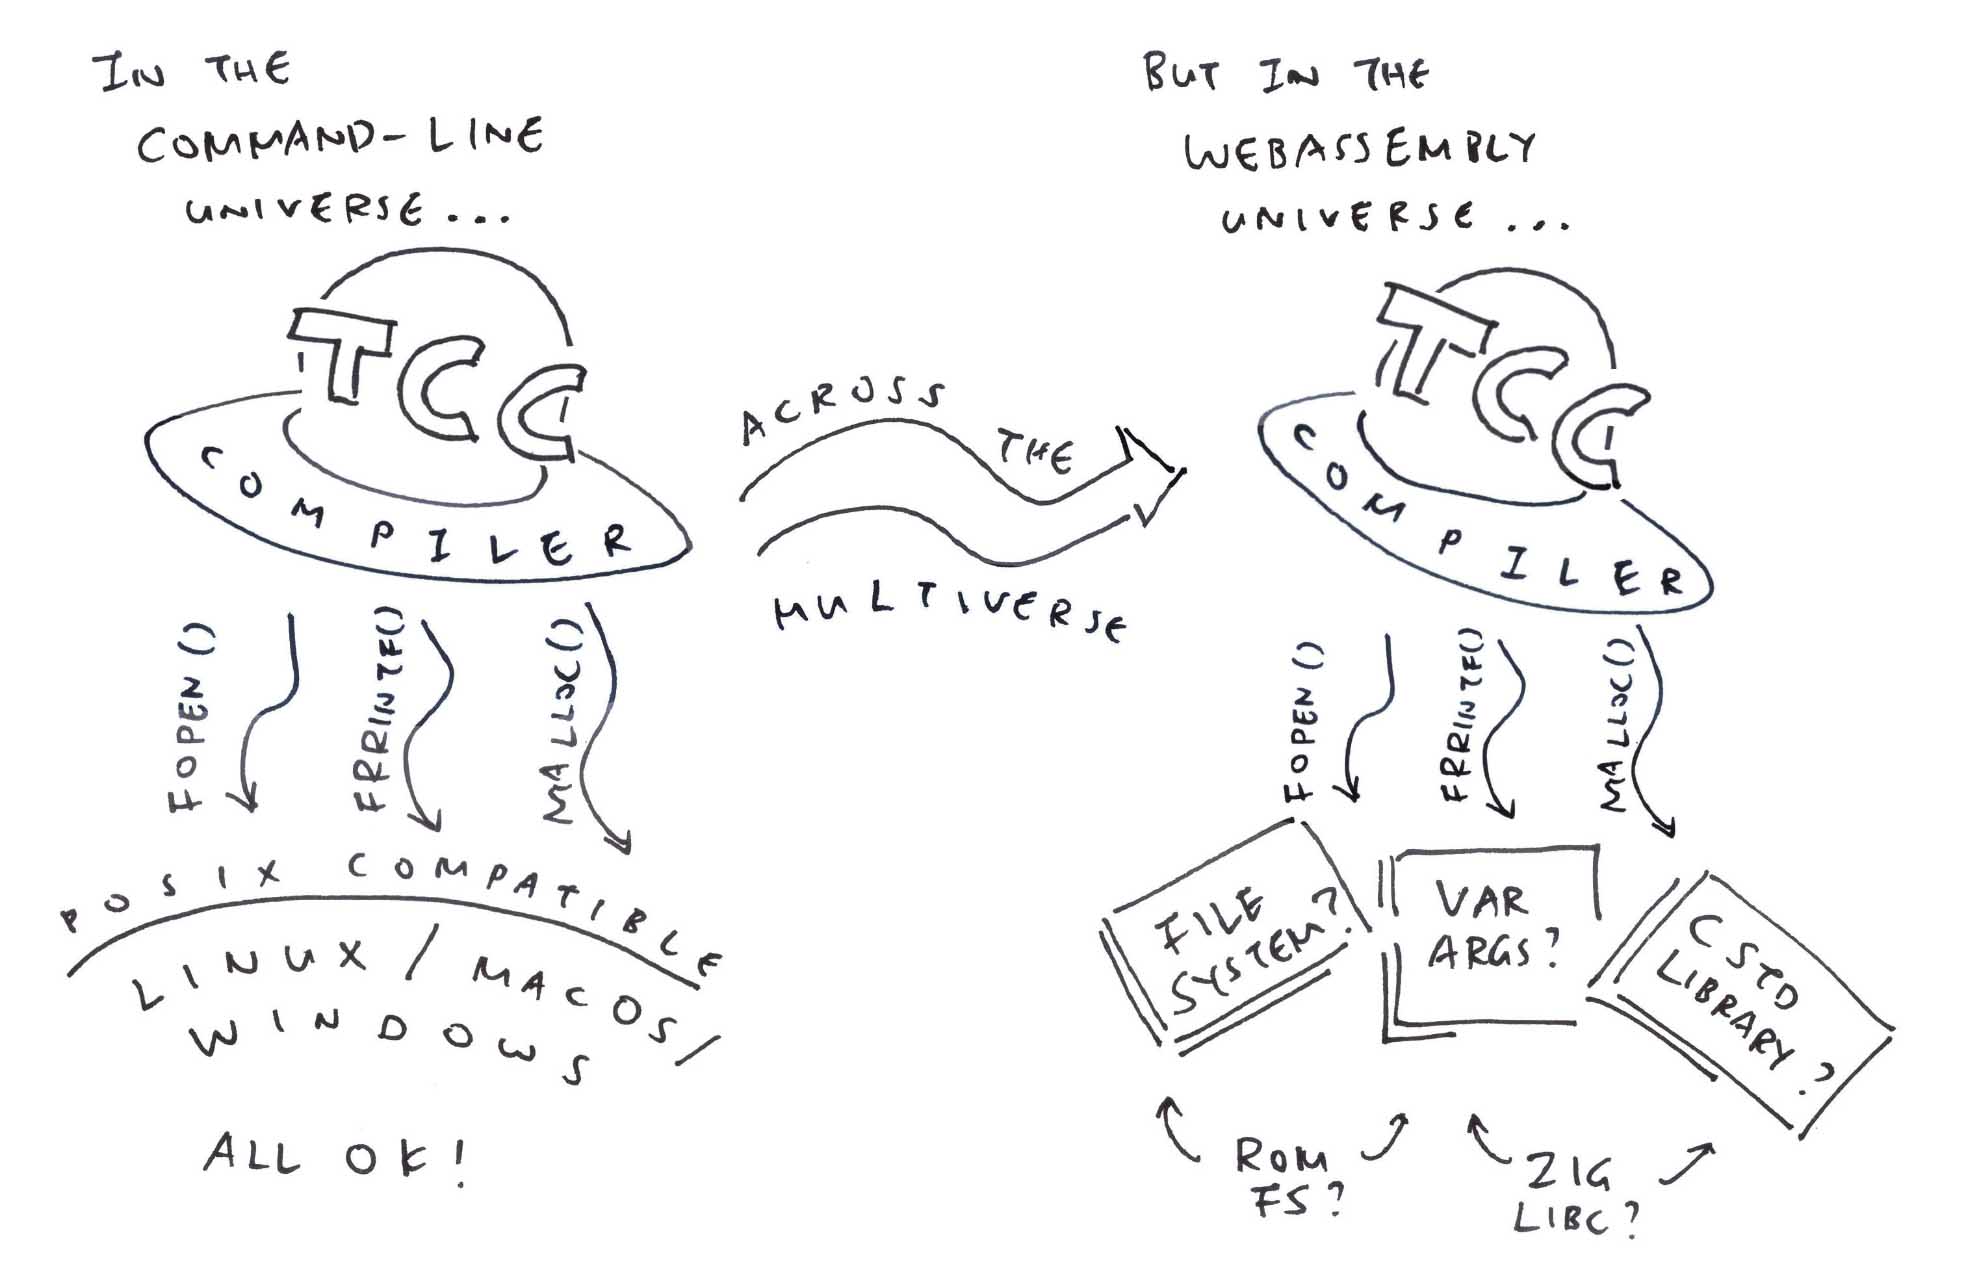
TCC Compiler was created as a Command-Line App that calls the usual POSIX Functions for File Access: open, read, write, …
But WebAssembly runs in a Secure Sandbox. No File Access allowed, sorry! (Like for C Header Files)
Huh! How did we get <stdio.h> and <stdlib.h>?
// Demo Program for TCC Compiler
// with ROM FS
#include <stdio.h>
#include <stdlib.h>

void main(int argc, char *argv[]) {
  puts("Hello, World!!\n");
  exit(0);
}
<stdio.h> and <stdlib.h> come from the ROM FS Filesystem that’s bundled inside our TCC WebAssembly.
ROM FS works like a regular Filesystem (think FAT and EXT4). Just that it’s tiny, runs in memory. And bundles easily with WebAssembly.
(Coming up in the next section)
Hmmm sounds like a major makeover for TCC Compiler…
Previously TCC Compiler could access Header Files directly from the Local Filesystem…
Now TCC WebAssembly needs to hoop through our Zig Wrapper to read the ROM FS Filesystem…
This is how we made it work…
What’s this ROM FS?
ROM FS is a Read-Only Filesystem that runs entirely in memory.
ROM FS is a lot simpler than Read-Write Filesystems (like FAT and EXT4). That’s why we run it inside TCC WebAssembly to host our C Header Files.
How to bundle our files into ROM FS?
genromfs will helpfully pack our C Header Files into a ROM FS Filesystem: build.sh
## For Ubuntu: Install `genromfs`
sudo apt install genromfs

## For macOS: Install `genromfs`
brew install px4/px4/genromfs

## Bundle the `romfs` folder into
## ROM FS Filesystem `romfs.bin`
## and label with this Volume Name
genromfs \
  -f romfs.bin \
  -d romfs \
-V "ROMFS"(<stdio.h> and <stdlib.h> are in the ROM FS Folder)
(Bundled into this ROM FS Filesystem)
We embed the ROM FS Filesystem romfs.bin into our Zig Wrapper, so it will be accessible by TCC WebAssembly: tcc-wasm.zig
// Embed the ROM FS Filesystem
// into our Zig Wrapper
const ROMFS_DATA = @embedFile(
  "romfs.bin"
);

// Later: Mount the ROM FS Filesystem
// from `ROMFS_DATA`For Easier Updates: We should download romfs.bin from our Web Server. (Pic below)
Is there a ROM FS Driver in Zig?
We looked around Apache NuttX RTOS (Real-Time Operating System) and we found a ROM FS Driver (in C). It works well with Zig!
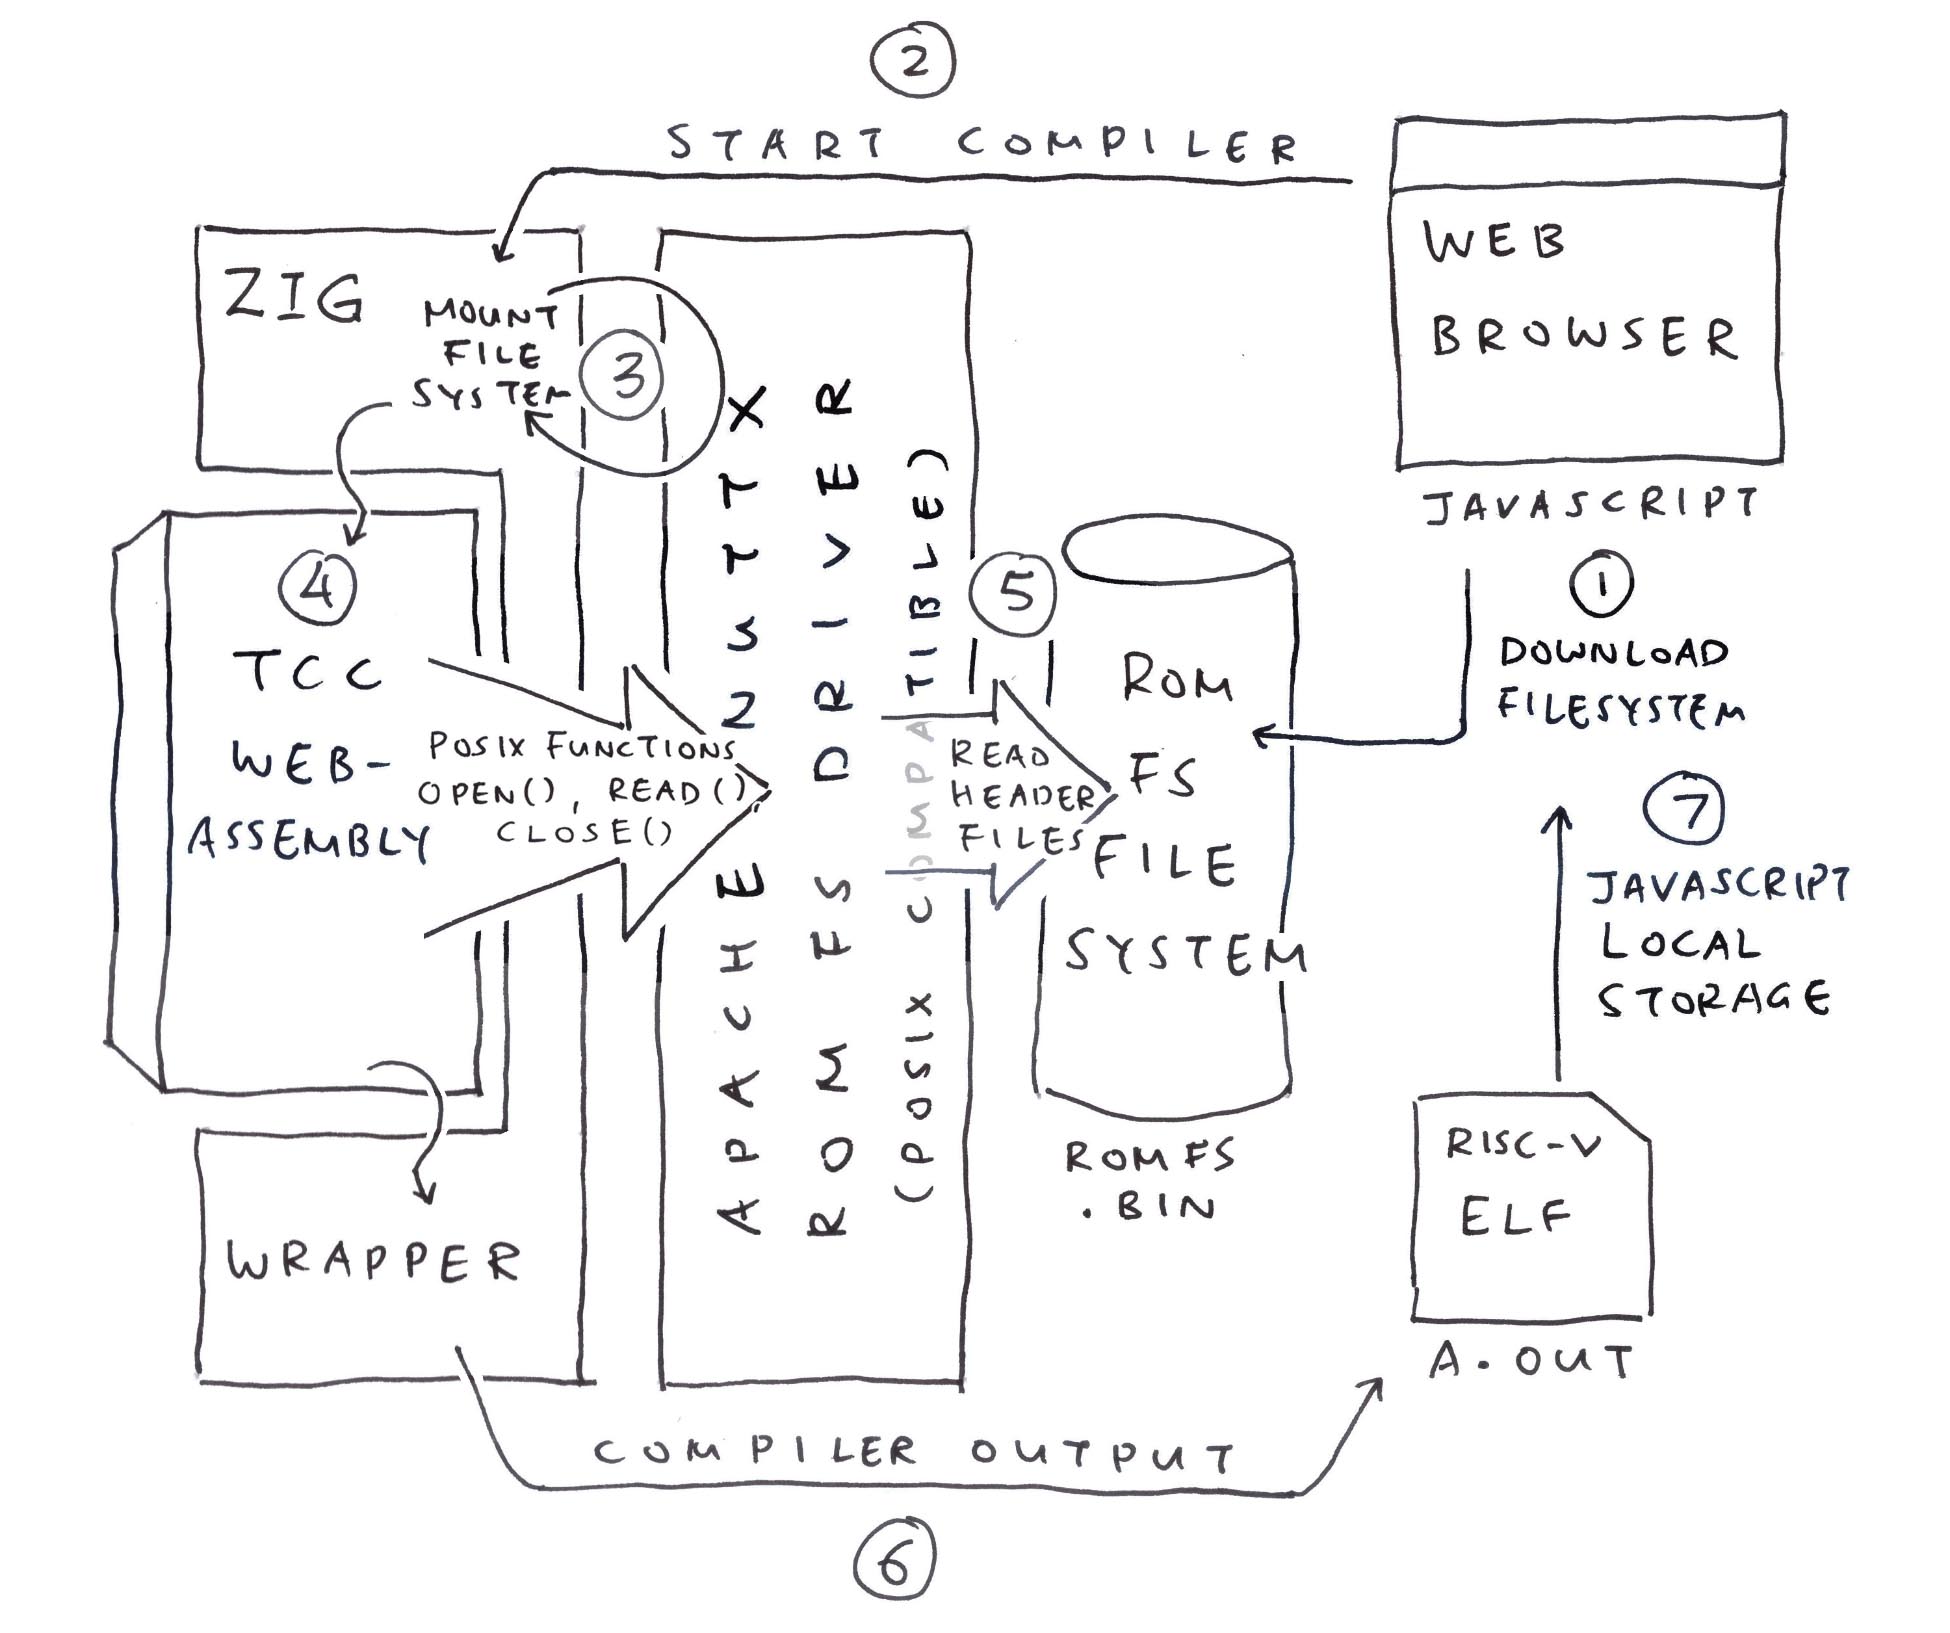
Let’s walk through the steps to call the NuttX ROM FS Driver from Zig (pic above)…
Mounting the ROM FS Filesystem
Opening a ROM FS File
Reading the ROM FS File
And Closing it
This is how we Mount our ROM FS Filesystem: tcc-wasm.zig
/// Import the NuttX ROM FS Driver
const c = @cImport({
  @cInclude("zig_romfs.h");
});

/// Main Function of our Zig Wrapper
pub export fn compile_program(...) [*]const u8 {

  // Create the Memory Allocator for malloc
  memory_allocator = std.heap.FixedBufferAllocator
    .init(&memory_buffer);

  // Mount the ROM FS Filesystem
  const ret = c.romfs_bind(
    c.romfs_blkdriver, // Block Driver for ROM FS
    null,              // No Data needed
    &c.romfs_mountpt   // Returns the Mount Point
  );
  assert(ret >= 0);

  // Prepare the Mount Inode.
  // We'll use it for opening files.
  romfs_inode = c.create_mount_inode(
    c.romfs_mountpt  // Mount Point
  );

// Omitted: Call the TCC Compiler(romfs_inode is our Mount Inode)
What if the ROM FS Filesystem contains garbage?
Our ROM FS Driver will Fail the Mount Operation.
That’s because it searches for a Magic Number at the top of the filesystem.
(Not to be confused with i-mode)
Next we Open a ROM FS File: tcc-wasm.zig
// Create the File Struct.
// Link to the Mount Inode.
var file = std.mem.zeroes(c.struct_file);
file.f_inode = romfs_inode;

// Open the ROM FS File
const ret2 = c.romfs_open(
  &file,       // File Struct
  "stdio.h",   // Pathname ("/" paths are OK)
  c.O_RDONLY,  // Read-Only
  0            // Mode (Unused for Read-Only Files)
);
assert(ret2 >= 0);(romfs_inode is our Mount Inode)
In the code above, we allocate the File Struct from the Stack. In a while we’ll allocate the File Struct from the Heap.
Finally we Read and Close the ROM FS File: tcc-wasm.zig
// Read the ROM FS File, first 4 bytes
var buf = std.mem.zeroes([4]u8);
const ret3 = c.romfs_read(
  &file,   // File Struct
  &buf,    // Buffer to be populated
  buf.len  // Buffer Size
);
assert(ret3 >= 0);

// Dump the 4 bytes
hexdump.hexdump(@ptrCast(&buf), @intCast(ret3));

// Close the ROM FS File
const ret4 = c.romfs_close(&file);
assert(ret4 >= 0);We’ll see this…
romfs_read: Read 4 bytes from offset 0
romfs_read: Read sector 17969028
romfs_filecacheread: sector: 2 cached: 0 ncached: 1 sectorsize: 64 XIP base: anyopaque@1122f74 buffer: anyopaque@1122f74
romfs_filecacheread: XIP buffer: anyopaque@1122ff4
romfs_read: Return 4 bytes from sector offset 0
  0000:  2F 2F 20 43  // C
romfs_close: Closing
Which looks right: <stdio.h> begins with “// C”
What’s going on inside the filesystem? We snoop around…
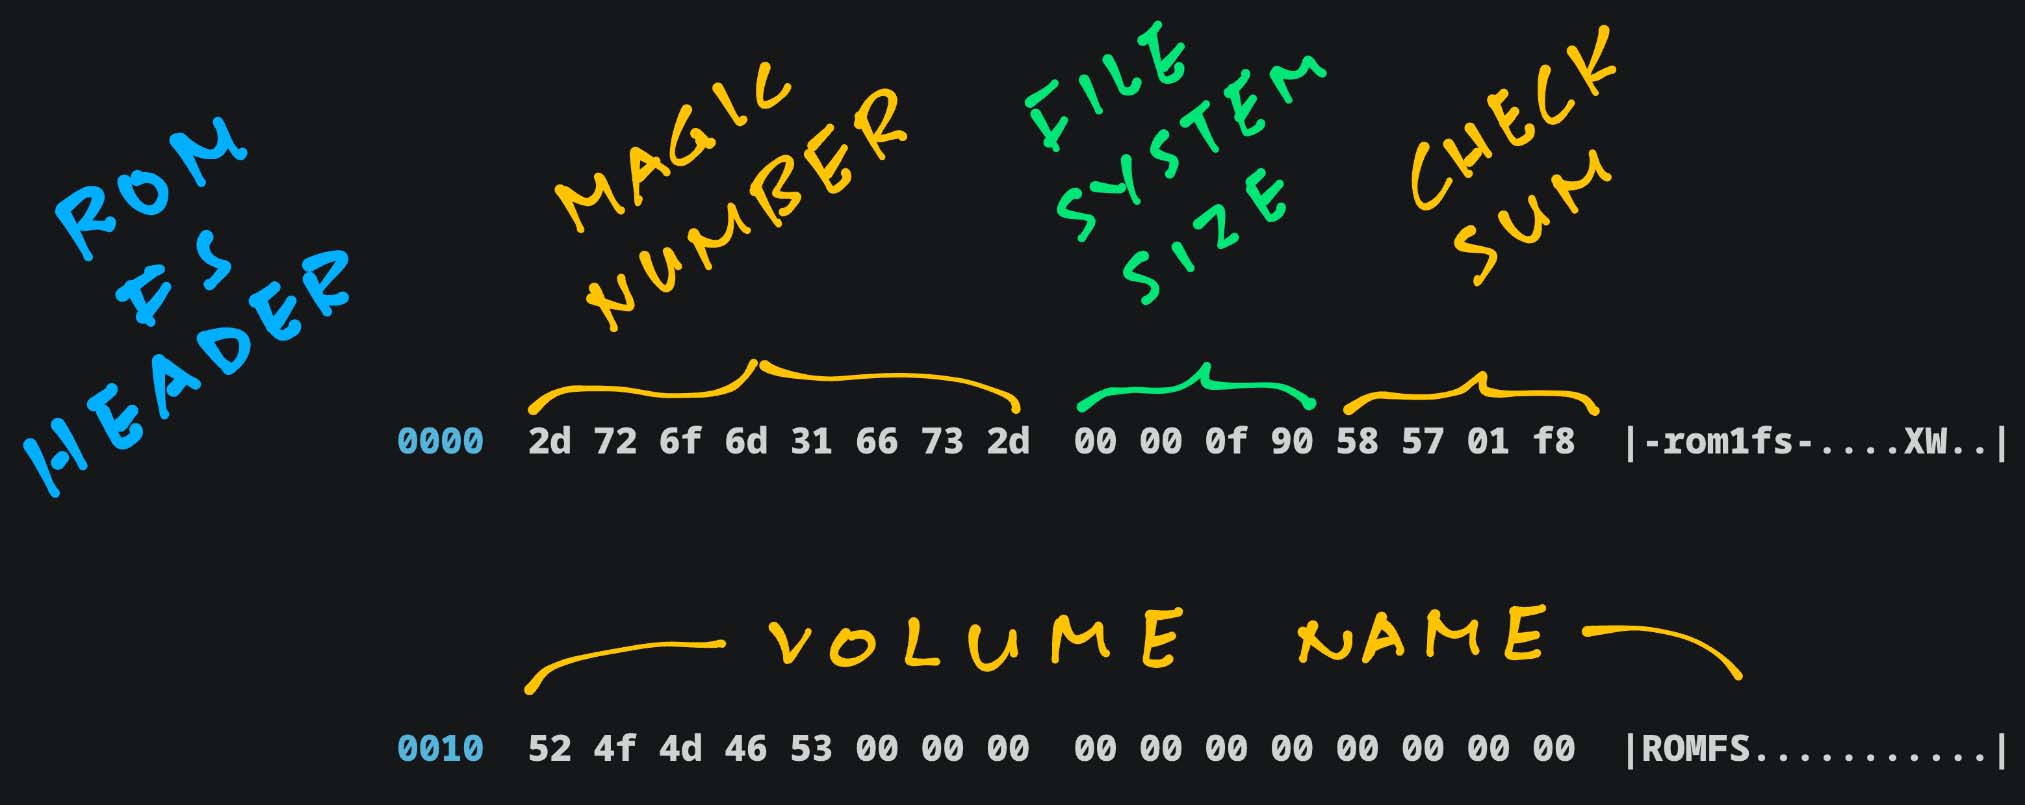
Is a ROM FS Filesystem really so simple and embeddable?
Seconds ago we bundled our C Header Files into a ROM FS Filesystem: build.sh
## For Ubuntu: Install `genromfs`
sudo apt install genromfs

## For macOS: Install `genromfs`
brew install px4/px4/genromfs

## Bundle the `romfs` folder into
## ROM FS Filesystem `romfs.bin`
## and label with this Volume Name
genromfs \
  -f romfs.bin \
  -d romfs \
-V "ROMFS"(<stdio.h> and <stdlib.h> are in the ROM FS Folder)
(Bundled into this ROM FS Filesystem)
Guided by the ROM FS Spec, we snoop around our ROM FS Filesystem romfs.bin…
## Dump our ROM FS Filesystem
hexdump -C romfs.bin This ROM FS Header appears at the top of the filesystem (pic above)…
Magic Number: Always “-rom1fs-”
Filesystem Size: Big Endian (0xF90)
Checksum: For first 512 bytes
Volume Name: We made it “ROMFS”
Next comes File Header and Data…
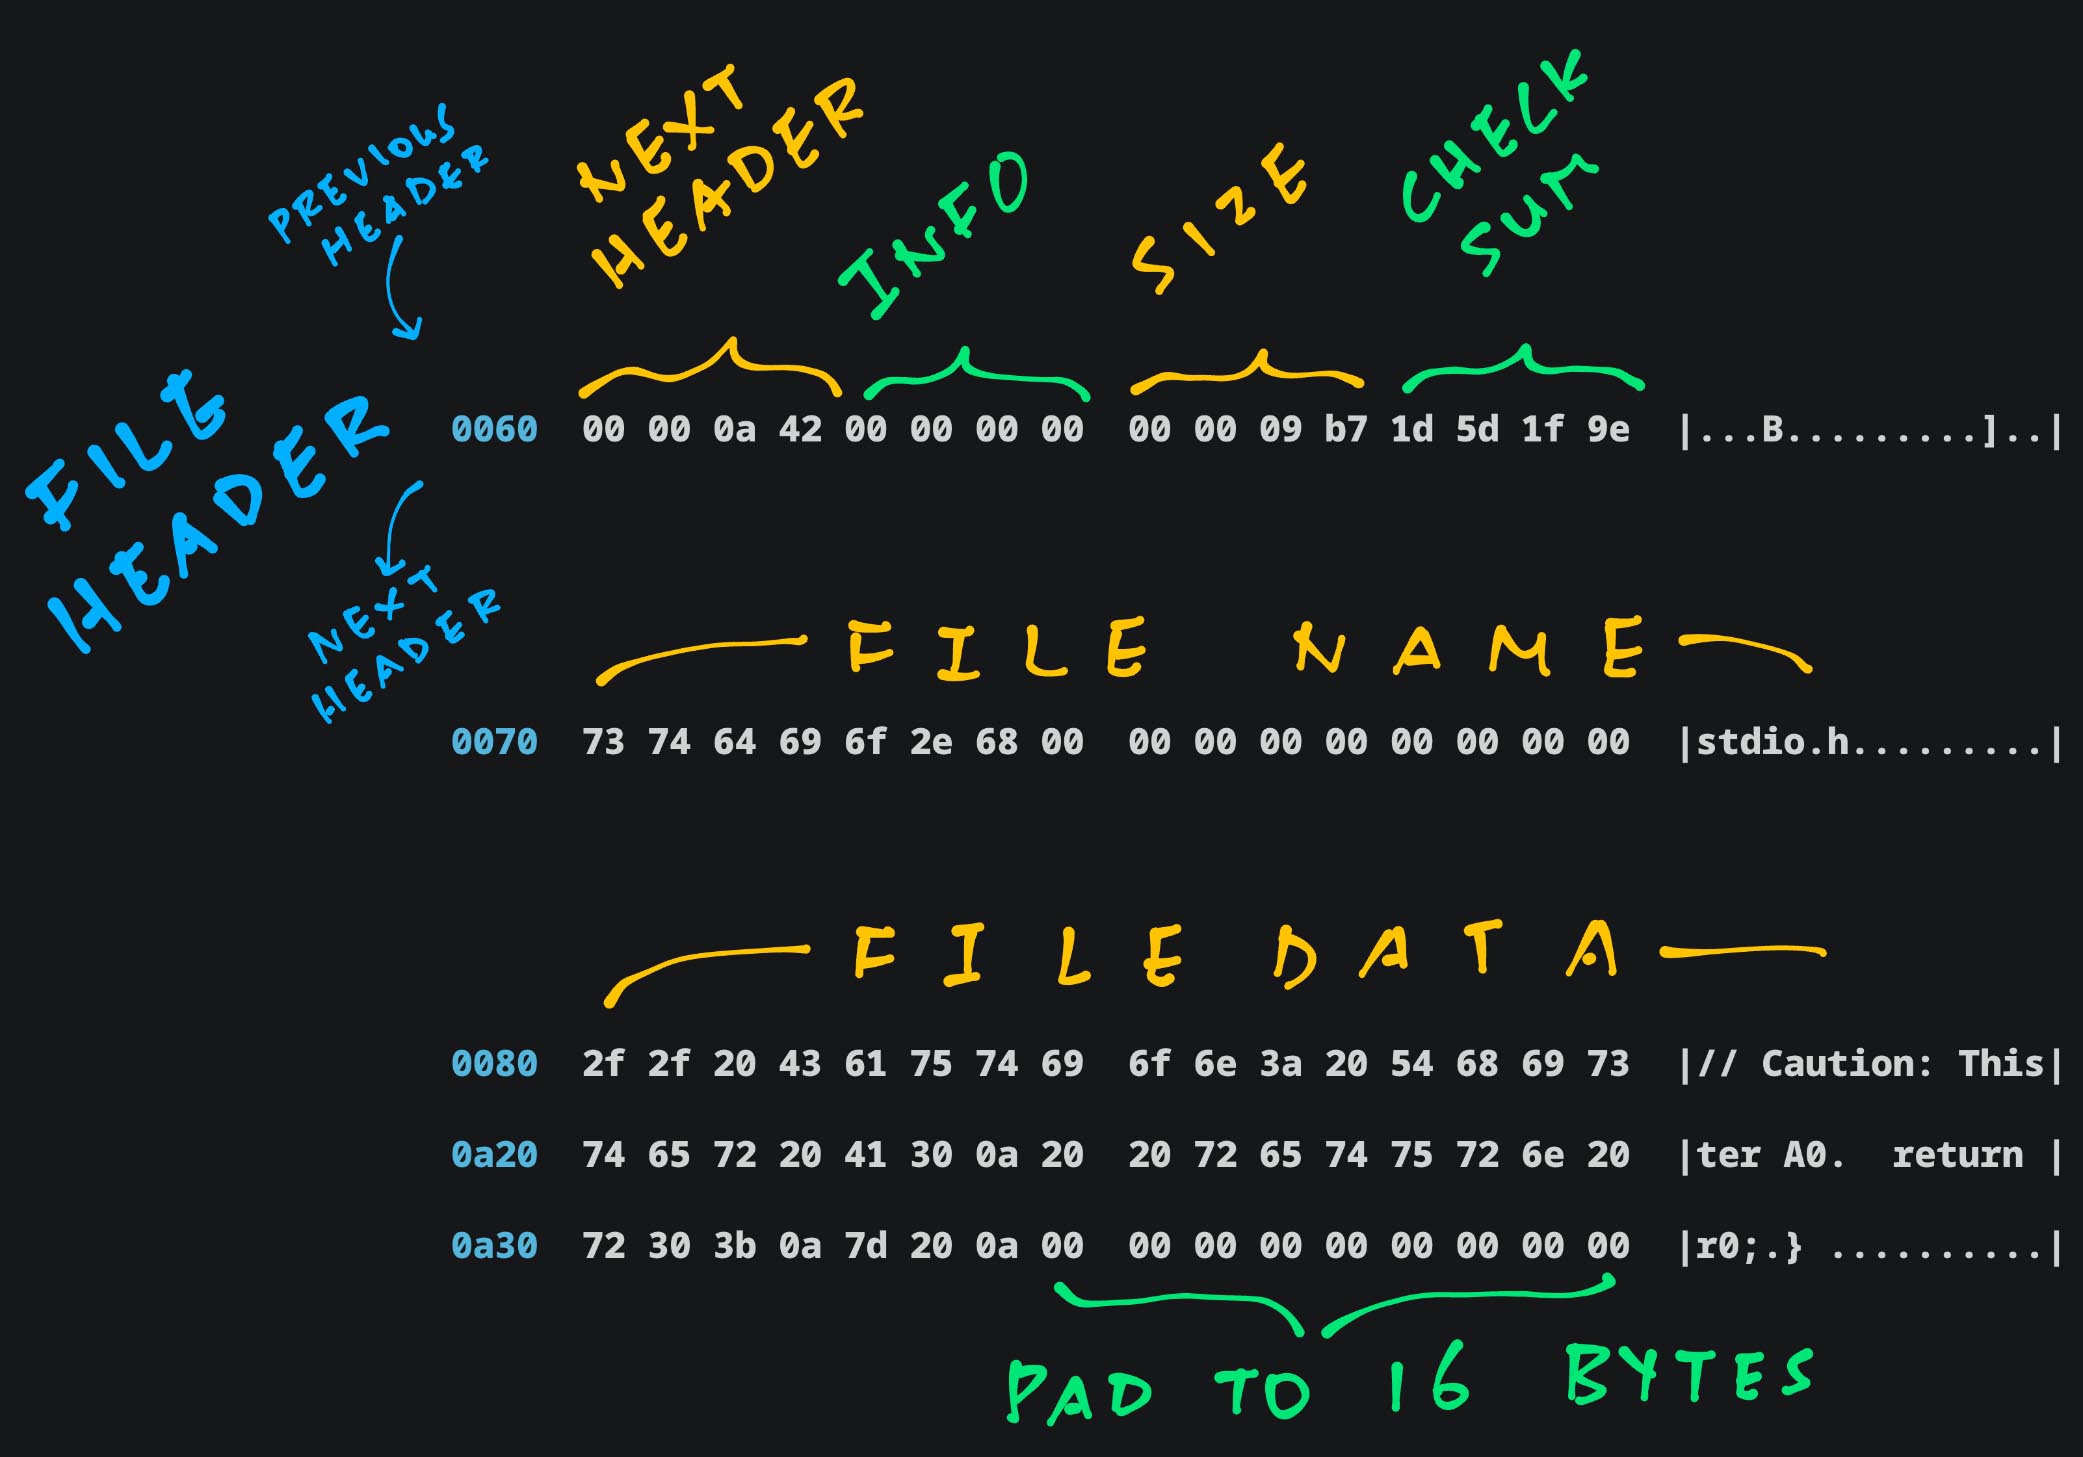
Next Header: Offset of Next File Header
File Info: For Special Files
File Size: Big Endian (0x9B7)
Checksum: For Metadata, File Name and Padding
File Name, File Data: Padded to 16 bytes
The Entire Dump of our ROM FS Filesystem is dissected in the Appendix.
ROM FS is indeed tiny, no frills and easy to embed in our apps!
Why is Next Header pointing to 0xA42? Shouldn’t it be padded?
Bits 0 to 3 of “Next Header” tell us the File Type.
0xA42 says that this is a Regular File. (Type 2)
We zoom out to TCC Compiler…

TCC Compiler expects POSIX Functions like open(), read(), close()…
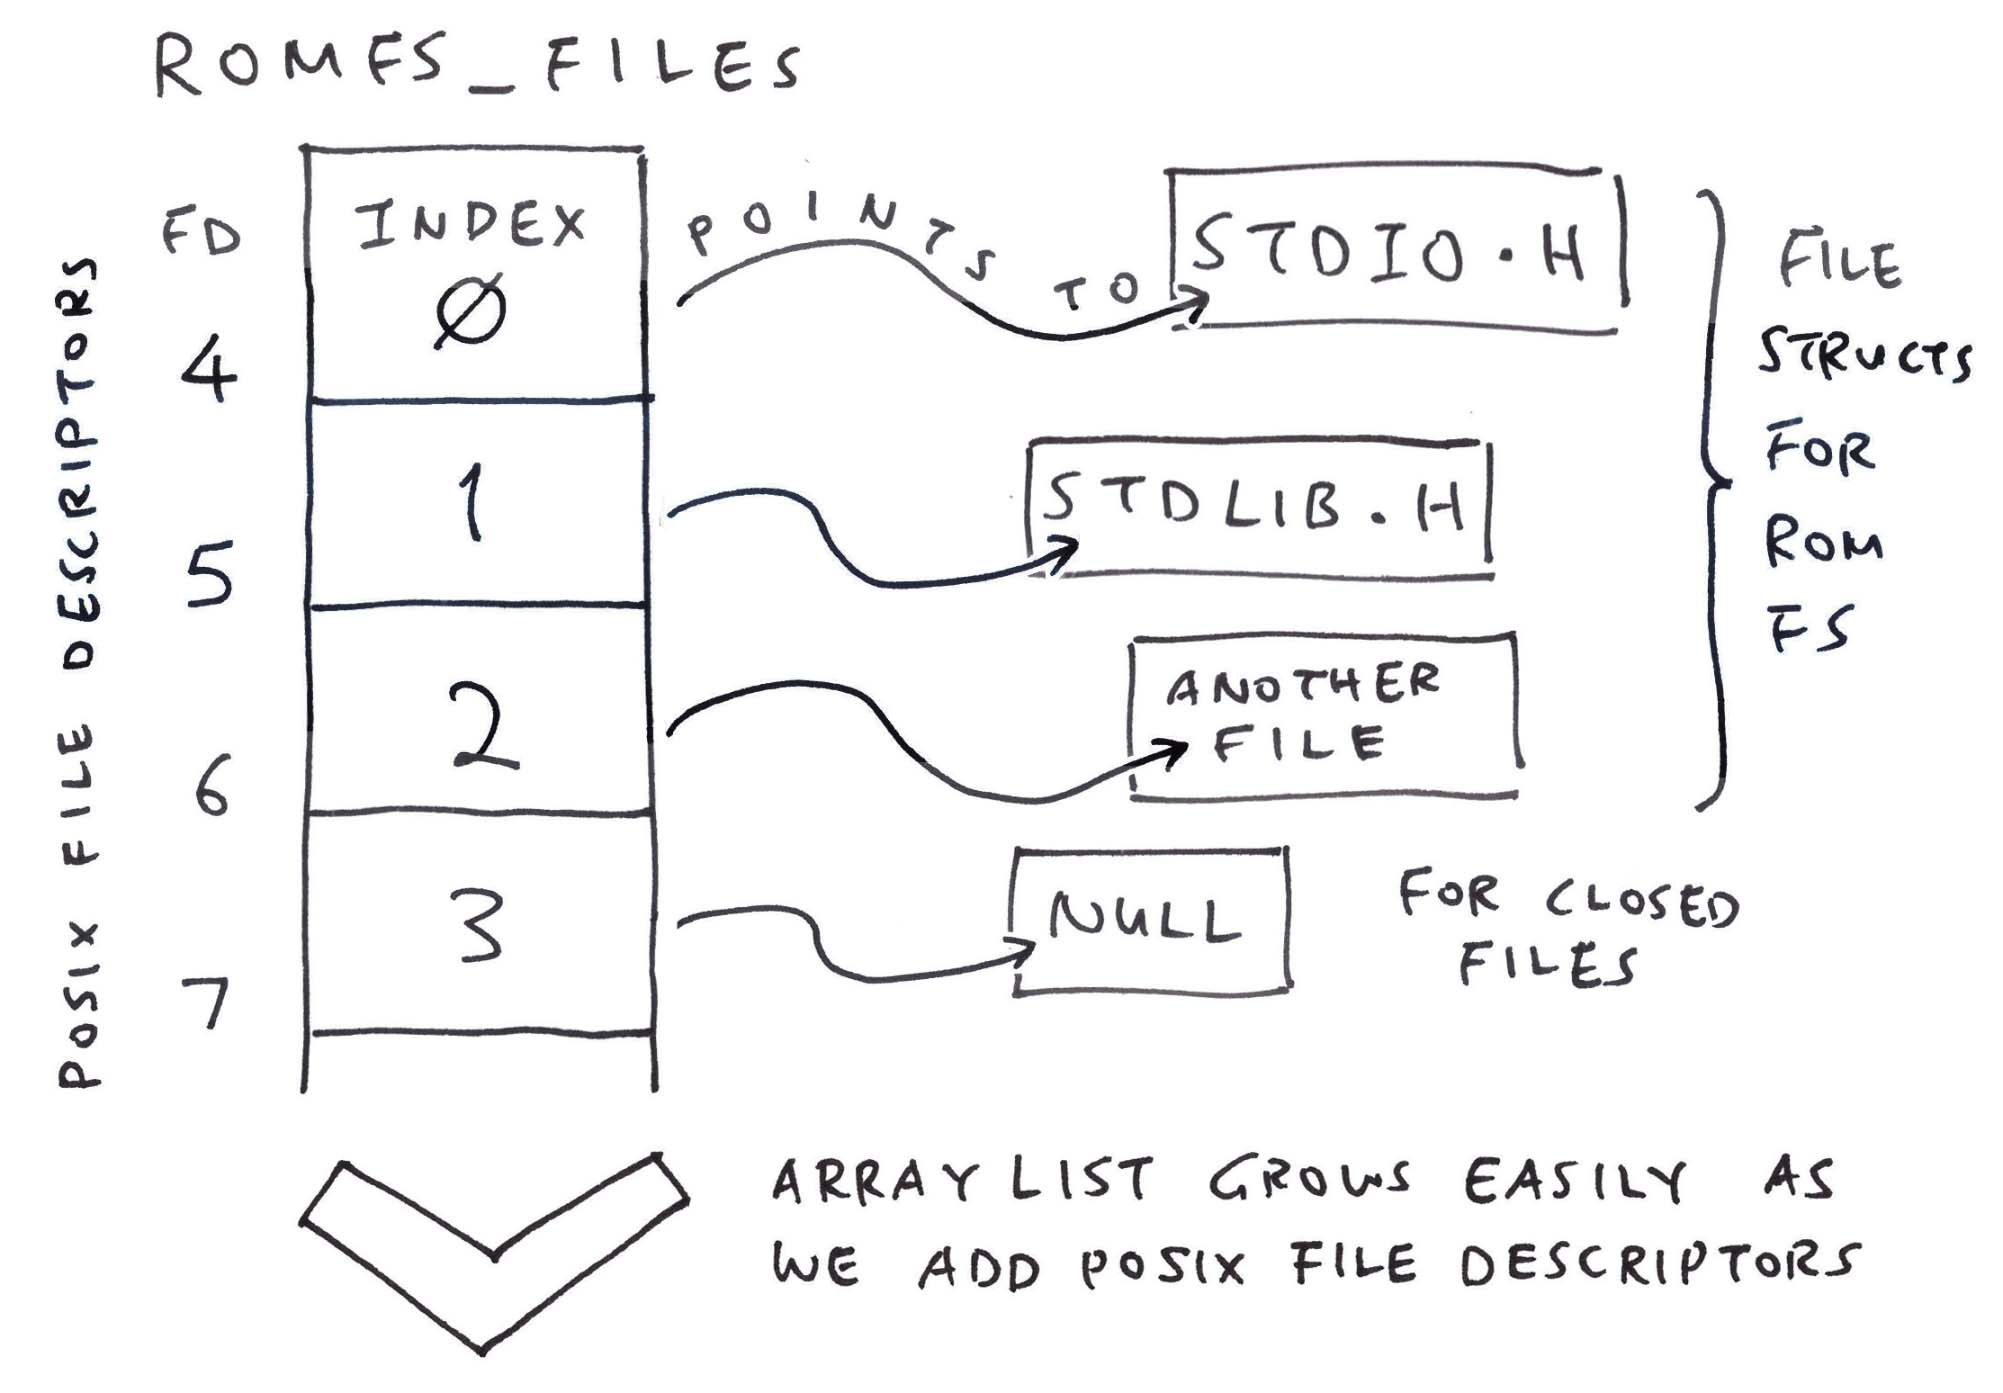
How will we connect them to ROM FS? (Pic above)
This is how we implement POSIX open() to open a C Header File (from ROM FS): tcc-wasm.zig
/// Open the ROM FS File and return the POSIX File Descriptor.
/// Emulates POSIX `open()`
export fn open(path: [*:0]const u8, oflag: c_uint, ...) c_int {

  // Omitted: Open the C Program File `hello.c`
  // Or create the RISC-V ELF `hello.o`
  ...
  // Allocate the File Struct
  const file = std.heap.page_allocator.create(
    c.struct_file
  ) catch { @panic("Failed to allocate file"); };
  file.* = std.mem.zeroes(c.struct_file);
  file.*.f_inode = romfs_inode;

  // Strip the System Include prefix
  const sys = "/usr/local/lib/tcc/include/";
  const strip_path =
    if (std.mem.startsWith(u8, std.mem.span(path), sys)) (path + sys.len)
    else path;

  // Open the ROM FS File
  const ret = c.romfs_open(
    file,       // File Struct
    strip_path, // Pathname
    c.O_RDONLY, // Read-Only
    0           // Mode (Unused for Read-Only Files)
  );
  if (ret < 0) { return ret; }

  // Remember the File Struct
  // for the POSIX File Descriptor
  const fd = next_fd;
  next_fd += 1;
  const f = fd - FIRST_FD - 1;
  assert(romfs_files.items.len == f);
  romfs_files.append(file)
    catch { @panic("Failed to add file"); };
  return fd;
}(Caution: We might have holes)
romfs_files remembers our POSIX File Descriptors: tcc-wasm.zig
// POSIX File Descriptors for TCC.
// This maps a File Descriptor to the File Struct.
// Index of romfs_files = File Descriptor Number - FIRST_FD - 1
var romfs_files: std.ArrayList(  // Array List of...
  ?*c.struct_file                // Pointers to File Structs (Nullable)
) = undefined;

// At Startup: Allocate the POSIX
// File Descriptors for TCC
romfs_files = std.ArrayList(?*c.struct_file)
  .init(std.heap.page_allocator);
Why ArrayList? It grows easily as we add File Descriptors…
When TCC WebAssembly calls POSIX read() to read the C Header File, we call ROM FS: tcc-wasm.zig
/// Read the POSIX File Descriptor `fd`.
/// Emulates POSIX `read()`
export fn read(fd: c_int, buf: [*:0]u8, nbyte: size_t) isize {

  // Omitted: Read the C Program File `hello.c`
  ...
  // Fetch the File Struct by
  // POSIX File Descriptor
  const f = fd - FIRST_FD - 1;
  const file = romfs_files.items[
    @intCast(f)
  ];

  // Read from the ROM FS File
  const ret = c.romfs_read(
    file, // File Struct
    buf,  // Buffer to be populated
    nbyte // Buffer Size
  );
  assert(ret >= 0);
  return @intCast(ret);
}Finally TCC WebAssembly calls POSIX close() to close the C Header File. We do the same for ROM FS: tcc-wasm.zig
/// Close the POSIX File Descriptor
/// Emulates POSIX `close()`
export fn close(fd: c_int) c_int {

  // Omitted: Close the C Program File `hello.c`
  // Or close the RISC-V ELF `hello.o`
  ...
  // Fetch the File Struct by
  // POSIX File Descriptor
  const f: usize = @intCast(fd - FIRST_FD - 1);

  // Close the ROM FS File if non-null
  if (romfs_files.items[f]) |file| {
    const ret = c.romfs_close(file);
    assert(ret >= 0);

    // Deallocate the File Struct
    std.heap.page_allocator.destroy(file);
    romfs_files.items[f] = null;
  }
  return 0;
}
That’s all we need to support C Header Files in TCC WebAssembly!
(Build and Test TCC WebAssembly)
What if we need a Writeable Filesystem?
Try the Tmp FS Driver from NuttX.
It’s simpler than FAT and easier to embed in WebAssembly. Probably wiser to split the Immutable Filesystem (ROM FS) and Writeable Filesystem (Tmp FS).
Seeking closure, we circle back to our very first demo…

TCC compiles our C Program and sends it to NuttX Emulator… How does it work?
Recall our Teleporting Magic Trick…
Browse to TCC RISC-V Compiler
Change the “Hello World” message
Click “Compile”
Reload the browser for NuttX Emulator
Enter a.out and the new message appears
What just happened? In Chrome Web Browser, click to Menu > Developer Tools > Application Tab > Local Storage > lupyuen.github.io
We’ll see that the RISC-V ELF a.out is stored locally as elf_data in the JavaScript Local Storage. (Pic below)
That’s why NuttX Emulator can pick up a.out from our Web Browser!
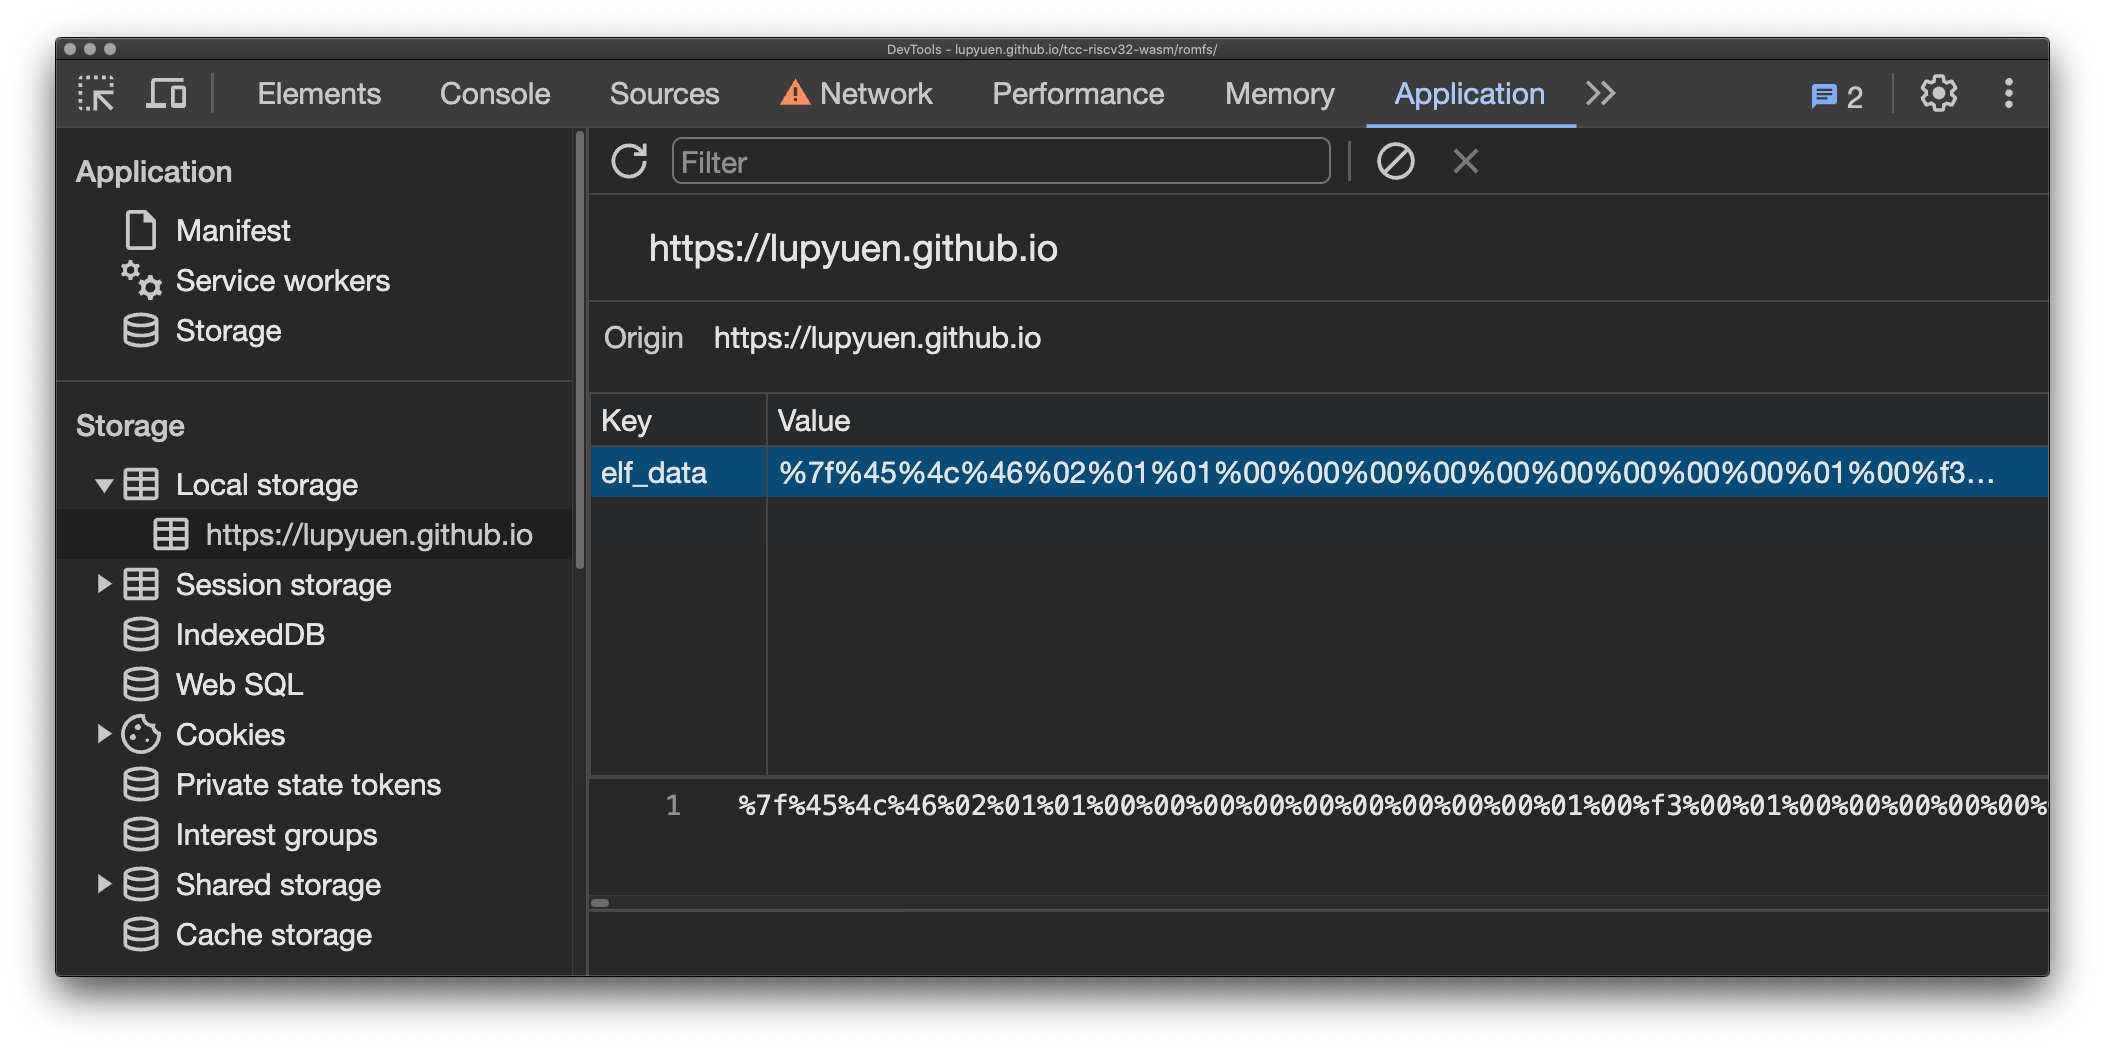
How did it get there?
In our WebAssembly JavaScript: TCC Compiler saves a.out to our JavaScript Local Storage (pic below): tcc.js
// Call TCC to compile a program
const ptr = wasm.instance.exports
  .compile_program(options_ptr, code_ptr);
...
// Encode the `a.out` data in text.
// Looks like: %7f%45%4c%46...
const data = new Uint8Array(memory.buffer, ptr + 4, len);
let encoded_data = "";
for (const i in data) {
  const hex = Number(data[i]).toString(16).padStart(2, "0");
  encoded_data += `%${hex}`;
}

// Save the ELF Data to JavaScript Local Storage.
// Will be loaded by NuttX Emulator
localStorage.setItem(
  "elf_data",   // Name for Local Storage
  encoded_data  // Encoded ELF Data
);
But NuttX Emulator boots from a Fixed NuttX Image, loaded from our Static Web Server…
How did a.out magically appear inside the NuttX Image?
We conjured a Nifty Illusion… a.out was in the NuttX Image all along!
## Create a Fake `a.out` that
## contains a Distinct Pattern:
##   22 05 69 00
##   22 05 69 01
## For 1024 times
rm -f /tmp/pattern.txt
start=$((0x22056900))
for i in {0..1023}
do
  printf 0x%x\\n $(($start + $i)) >> /tmp/pattern.txt
done

## Copy the Fake `a.out`
## to our NuttX Apps Folder
cat /tmp/pattern.txt \
  | xxd -revert -plain \
  >apps/bin/a.out
hexdump -C apps/bin/a.out

## Fake `a.out` looks like...
## 0000  22 05 69 00 22 05 69 01  22 05 69 02 22 05 69 03  |".i.".i.".i.".i.|
## 0010  22 05 69 04 22 05 69 05  22 05 69 06 22 05 69 07  |".i.".i.".i.".i.|
## 0020  22 05 69 08 22 05 69 09  22 05 69 0a 22 05 69 0b  |".i.".i.".i.".i.|
In our NuttX Build: Fake a.out gets bundled into the Initial RAM Disk initrd…
Which gets appended to the NuttX Image.
So we patched Fake a.out in the NuttX Image with the Real a.out?
Exactly!
In the JavaScript for NuttX Emulator: We read elf_data from JavaScript Local Storage and pass it to TinyEMU WebAssembly
Inside the TinyEMU WebAssembly: We receive the elf_data and copy it locally
Then we search for our Magic Pattern 22 05 69 00 in our Fake a.out
And we overwrite the Fake a.out with the Real a.out from elf_data
Everything is explained here…
That’s how we compile a NuttX App in the Web Browser, and run it with NuttX Emulator in the Web Browser! 🎉
Is there something special inside <stdio.h> and <stdlib.h>?
// Demo Program for TCC Compiler
// with ROM FS
#include <stdio.h>
#include <stdlib.h>

void main(int argc, char *argv[]) {
  puts("Hello, World!!\n");
  exit(0);
}
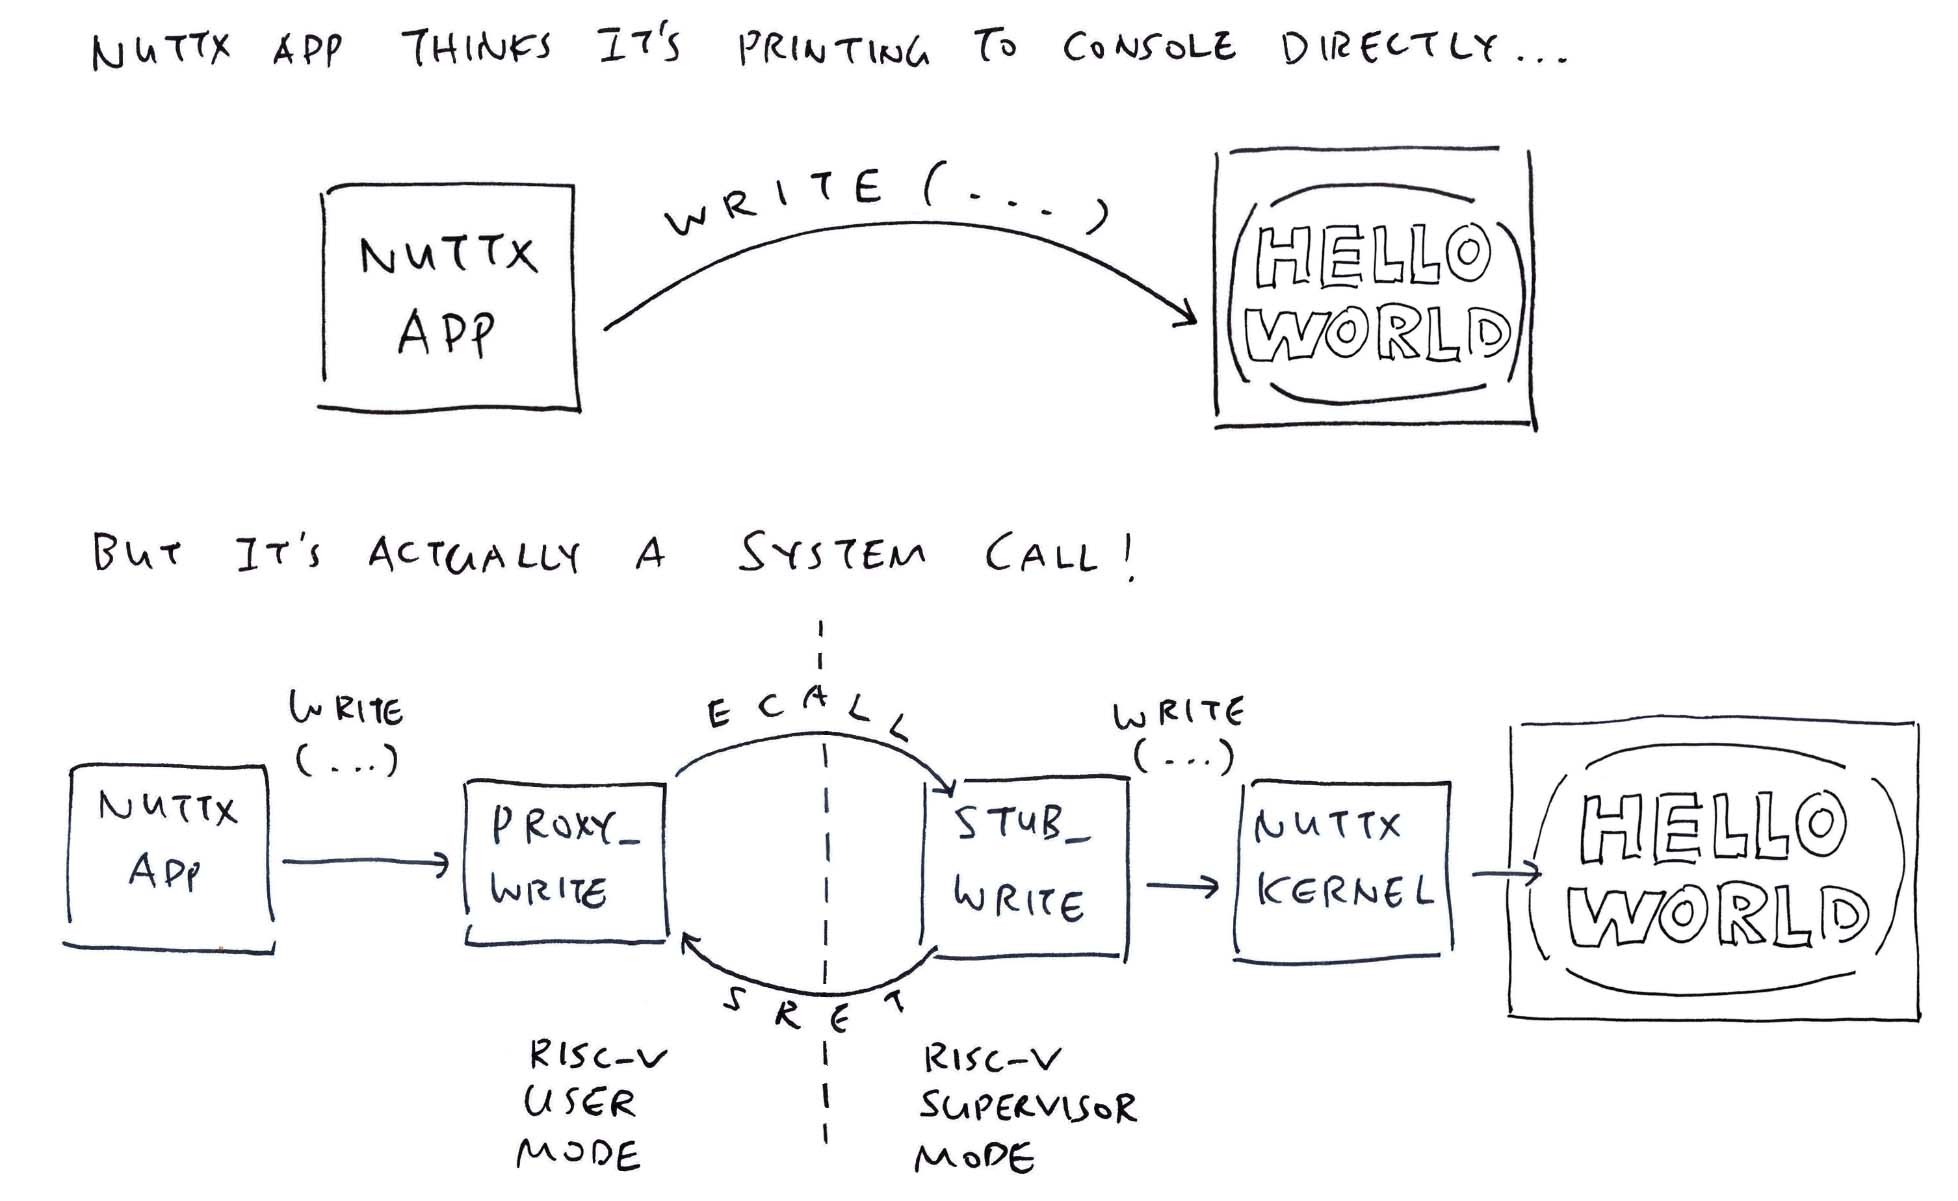
They’ll make System Calls to NuttX Kernel, for printing and quitting…
Today we solved a hefty headache in our port of TCC Compiler to WebAssembly: Missing C Header Files
We host the C Header Files in a ROM FS Filesystem
We found a ROM FS Driver from Apache NuttX RTOS that works well with WebAssembly
Our Zig Wrapper emulates POSIX File Access for ROM FS
TCC Compiler compiles C Programs with Header Files yay!
We tested the Compiler Output with NuttX Emulator in the Web Browser
Now we can build NuttX Apps in the Web Browser, and test them in the Web Browser too!
(NuttX becomes a Triple Treat: In the C Compiler, in the Apps and in the Emulator!)
Many Thanks to my GitHub Sponsors (and the awesome NuttX and Zig Communities) for supporting my work! This article wouldn’t have been possible without your support.
Got a question, comment or suggestion? Create an Issue or submit a Pull Request here…
lupyuen.github.io/src/romfs.md

TCC Compiler in WebAssembly with ROM FS
Follow these steps to Build and Test TCC WebAssembly (with ROM FS)…
## Download the ROMFS Branch of TCC Source Code.
## Configure the build for 64-bit RISC-V.
git clone \
  --branch romfs \
  https://github.com/lupyuen/tcc-riscv32-wasm
cd tcc-riscv32-wasm
./configure
make cross-riscv64

## Call Zig Compiler to compile TCC Compiler
## from C to WebAssembly. And link with Zig Wrapper.
## Produces `tcc-wasm.wasm` and `zig/romfs.bin`
pushd zig
./build.sh
popd

## Start the Web Server to test
## `tcc-wasm.wasm` and `zig/romfs.bin`
cargo install simple-http-server
simple-http-server ./docs &

## Or test with Node.js
node zig/test.js
node zig/test-nuttx.jsBrowse to this URL and our TCC WebAssembly will appear (pic above)…
## Test ROM FS with TCC WebAssembly
http://localhost:8000/romfs/index.html
Check the JavaScript Console for Debug Messages.

What did we change in the NuttX ROM FS Driver? (Pic above)
Not much! We made minor tweaks to the NuttX ROM FS Driver and added a Build Script…
We wrote some Glue Code in C (because some things couldn’t be expressed in Zig)…
NuttX ROM FS Driver will call mtd_ioctl in Zig when it maps the ROM FS Data in memory: tcc-wasm.zig
/// Embed the ROM FS Filesystem
/// (Or download it, see next section)
const ROMFS_DATA = @embedFile(
  "romfs.bin"
);

/// ROM FS Driver makes this IOCTL Request
export fn mtd_ioctl(_: *mtd_dev_s, cmd: c_int, rm_xipbase: ?*c_int) c_int {

  // Request for Memory Address of ROM FS
  if (cmd == c.BIOC_XIPBASE) {
    // If we're loading `romfs.bin` from Web Server:
    // Change `ROMFS_DATA` to `&ROMFS_DATA`
    rm_xipbase.?.* = @intCast(@intFromPtr(
      ROMFS_DATA
    ));

  // Request for Storage Device Geometry
  // Probably because NuttX Driver caches One Block of Data
  } else if (cmd == c.MTDIOC_GEOMETRY) {
    const blocksize = 64;
    const geo: *c.mtd_geometry_s = @ptrCast(rm_xipbase.?);
    geo.*.blocksize = blocksize;
    geo.*.erasesize = blocksize;
    geo.*.neraseblocks = ROMFS_DATA.len / blocksize;

  // Unknown Request
  } else { debug("mtd_ioctl: Unknown command {}", .{cmd}); }
  return 0;
}Anything else we changed in our Zig Wrapper?
Last week we hacked up a simple Format Pattern for handling fprintf and friends. (One Format Pattern per C Format String)
Now with Logging Enabled in NuttX ROM FS, we need to handle Complex Format Strings. Thus we extend our formatting to handle Multiple Format Patterns per Format String.
Instead of embedding our filesystem, let’s do better and download our filesystem…
In the previous section, our Zig Wrapper embeds romfs.bin inside WebAssembly: tcc-wasm.zig
/// Embed the ROM FS Filesystem.
/// But what if we need to update it?
const ROMFS_DATA = @embedFile(
  "romfs.bin"
);
For Easier Updates: We should download romfs.bin from our Web Server (pic above): tcc.js
// JavaScript to load the WebAssembly Module
// and start the Main Function.
// Called by the Compile Button.
async function bootstrap() {

  // Omitted: Download the WebAssembly
  ...
  // Download the ROM FS Filesystem
  const response = await fetch("romfs.bin");
  wasm.romfs = await response.arrayBuffer();

  // Start the Main Function
  window.requestAnimationFrame(main);
} (wasm is our WebAssembly Helper)
Our JavaScript Main Function passes the ROM FS Filesystem to our Zig Wrapper: tcc.js
// Main Function
function main() {
  // Omitted: Read the Compiler Options and Program Code
  ...
  // Copy `romfs.bin` into WebAssembly Memory
  const romfs_data = new Uint8Array(wasm.romfs);
  const romfs_size = romfs_data.length;
  const exports = wasm.instance.exports;
  const memory = exports.memory;
  const romfs_ptr = exports.get_romfs(romfs_size);
  const romfs_slice = new Uint8Array(
    memory.buffer,
    romfs_ptr,
    romfs_size
  );
  romfs_slice.set(romfs_data);

  // Call TCC to compile the program
  const ptr = wasm.instance.exports
.compile_program(options_ptr, code_ptr);(wasm is our WebAssembly Helper)
In our Zig Wrapper: get_romfs returns the WebAssembly Memory reserved for our ROM FS Filesystem: tcc-wasm.zig
/// Storage for ROM FS Filesystem, loaded from Web Server
/// Previously: We embedded the filesystem with `@embedFile`
var ROMFS_DATA = std.mem.zeroes([8192]u8);

/// Return the pointer to ROM FS Storage.
/// `size` is the expected filesystem size.
pub export fn get_romfs(size: u32) [*]const u8 {

  // Halt if we run out of memory
  if (size > ROMFS_DATA.len) {
    @panic("Increase ROMFS_DATA size");
  }
  return &ROMFS_DATA;
}
NuttX ROM FS Driver fetches ROMFS_DATA from our Zig Wrapper, via an IOCTL Request: tcc-wasm.zig
/// ROM FS Driver makes this IOCTL Request
export fn mtd_ioctl(_: *mtd_dev_s, cmd: c_int, rm_xipbase: ?*c_int) c_int {

  // Request for Memory Address of ROM FS
  if (cmd == c.BIOC_XIPBASE) {

    // Note: We changed `ROMFS_DATA` to `&ROMFS_DATA`
    // because we're loading from Web Server
    rm_xipbase.?.* = @intCast(@intFromPtr(
      &ROMFS_DATA
    ));
With a few tweaks to ROMFS_DATA, we’re now loading romfs.bin from our Web Server. Which is better for maintainability.
(Loading romfs.bin also works in Node.js)
What’s inside puts?
// Demo Program for TCC Compiler
// with ROM FS
#include <stdio.h>
#include <stdlib.h>

void main(int argc, char *argv[]) {
  puts("Hello, World!!\n");
  exit(0);
}
We implement puts by calling write: stdio.h
// Print the string to Standard Output
inline int puts(const char *s) {
  return
    write(1, s, strlen(s)) +
    write(1, "\n", 1);
}
Then we implement write the exact same way as NuttX, making a NuttX System Call (ECALL) to NuttX Kernel (pic above): stdio.h
// Caution: NuttX System Call Number may change
#define SYS_write 61

// Write to the File Descriptor
// https://lupyuen.codeberg.page/articles/app#nuttx-app-calls-nuttx-kernel
inline ssize_t write(int parm1, const void * parm2, size_t parm3) {
  return (ssize_t) sys_call3(
    (unsigned int) SYS_write,  // System Call Number
    (uintptr_t) parm1,         // File Descriptor (1 = Standard Output)
    (uintptr_t) parm2,         // Buffer to be written
    (uintptr_t) parm3          // Number of bytes to write
  );
}(System Call Numbers may change)
sys_call3 is our hacked implementation of NuttX System Call (ECALL): stdio.h
// Make a System Call with 3 parameters
// https://github.com/apache/nuttx/blob/master/arch/risc-v/include/syscall.h#L240-L268
inline uintptr_t sys_call3(
  unsigned int nbr,  // System Call Number
  uintptr_t parm1,   // First Parameter
  uintptr_t parm2,   // Second Parameter
  uintptr_t parm3    // Third Parameter
) {
  // Pass the Function Number and Parameters in
  // Registers A0 to A3

  // Rightfully:
  // Register A0 is the System Call Number
  // Register A1 is the First Parameter
  // Register A2 is the Second Paramter
  // Register A3 is the Third Parameter

  // But we're manually moving them around because of... issues
  // Register A0 (parm3) goes to A3
  register long r3 asm("a0") = (long)(parm3);  // Will move to A3
  asm volatile ("slli a3, a0, 32");  // Shift 32 bits Left then Right
  asm volatile ("srli a3, a3, 32");  // To clear the top 32 bits

  // Register A0 (parm2) goes to A2
  register long r2 asm("a0") = (long)(parm2);  // Will move to A2
  asm volatile ("slli a2, a0, 32");  // Shift 32 bits Left then Right
  asm volatile ("srli a2, a2, 32");  // To clear the top 32 bits

  // Register A0 (parm1) goes to A1
  register long r1 asm("a0") = (long)(parm1);  // Will move to A1
  asm volatile ("slli a1, a0, 32");  // Shift 32 bits Left then Right
  asm volatile ("srli a1, a1, 32");  // To clear the top 32 bits

  // Register A0 (nbr) stays the same
  register long r0 asm("a0") = (long)(nbr);  // Will stay in A0

  // `ecall` will jump from RISC-V User Mode
  // to RISC-V Supervisor Mode
  // to execute the System Call.
  asm volatile (

    // ECALL for System Call to NuttX Kernel
    "ecall \n"

    // NuttX needs NOP after ECALL
    ".word 0x0001 \n"

    // Input+Output Registers: None
    // Input-Only Registers: A0 to A3
    // Clobbers the Memory
    :
    : "r"(r0), "r"(r1), "r"(r2), "r"(r3)
    : "memory"
  );

  // Return the result from Register A0
  return r0;
}
Why so complicated?
That’s because TCC won’t load the RISC-V Registers correctly. Thus we load the registers ourselves.
Why not simply copy A0 to A2 minus the hokey pokey?
// Load SysCall Parameter to Register A0
register long r2 asm("a0") = (long)(parm2);

// Copy Register A0 to A2
asm volatile ("addi a2, a0, 0");
When we do that, Register A2 becomes negative…
nsh> a.out
riscv_swint: Entry: regs: 0x8020be10
cmd: 61
EPC: c0000160
A0: 3d
A1: 01
A2: ffffffffc0101000
A3: 0f
[...Page Fault because A2 is an Invalid Address...]
So we Shift Away the Negative Sign (silly + seriously)…
// Load SysCall Parameter to Register A0
register long r2 asm("a0") = (long)(parm2);

// Shift 32 bits Left and
// save to Register A2
asm volatile ("slli a2, a0, 32");

// Then shift 32 bits Right
// to clear the top 32 bits
asm volatile ("srli a2, a2, 32");
Then Register A2 becomes Positively OK…
riscv_swint: Entry: regs: 0x8020be10
cmd: 61
EPC: c0000164
A0: 3d
A1: 01
A2: c0101000
A3: 0f
Hello, World!!
BTW Andy won’t work…
// Load SysCall Parameter to Register A0
register long r2 asm("a0") = (long)(parm2);

// Logical AND with 0xFFFF_FFFF
// then save to Register A2
asm volatile ("andi a2, a0, 0xffffffff");
Because 0xFFFF_FFFF gets assembled to -1.
Chotto matte there’s more…
Tell me about exit…
// Demo Program for TCC Compiler
// with ROM FS
#include <stdio.h>
#include <stdlib.h>

void main(int argc, char *argv[]) {
  puts("Hello, World!!\n");
  exit(0);
}
We implement exit the same way as NuttX, by making a NuttX System Call (ECALL) to NuttX Kernel: stdlib.h
// Caution: NuttX System Call Number may change
#define SYS__exit 8

// Terminate the NuttX Process.
// From nuttx/syscall/proxies/PROXY__exit.c
inline void exit(int parm1) {

  // Make a System Call to NuttX Kernel
  sys_call1(
    (unsigned int)SYS__exit,  // System Call Number
    (uintptr_t)parm1          // Exit Status
  );

  // Loop Forever
  while(1);
}(System Call Numbers may change)
sys_call1 makes a NuttX System Call (ECALL), with our hand-crafted RISC-V Assembly (as a workaround): stdlib.h
// Make a System Call with 1 parameter
// https://github.com/apache/nuttx/blob/master/arch/risc-v/include/syscall.h#L188-L213
inline uintptr_t sys_call1(
  unsigned int nbr,  // System Call Number
  uintptr_t parm1    // First Parameter
) {
  // Pass the Function Number and Parameters
  // Registers A0 to A1

  // Rightfully:
  // Register A0 is the System Call Number
  // Register A1 is the First Parameter

  // But we're manually moving them around because of... issues
  // Register A0 (parm1) goes to A1
  register long r1 asm("a0") = (long)(parm1);  // Will move to A1
  asm volatile ("slli a1, a0, 32");  // Shift 32 bits Left then Right
  asm volatile ("srli a1, a1, 32");  // To clear the top 32 bits

  // Register A0 (nbr) stays the same
  register long r0 asm("a0") = (long)(nbr);  // Will stay in A0

  // `ecall` will jump from RISC-V User Mode
  // to RISC-V Supervisor Mode
  // to execute the System Call.
  asm volatile (

    // ECALL for System Call to NuttX Kernel
    "ecall \n"

    // NuttX needs NOP after ECALL
    ".word 0x0001 \n"

    // Input+Output Registers: None
    // Input-Only Registers: A0 and A1
    // Clobbers the Memory
    :
    : "r"(r0), "r"(r1)
    : "memory"
  );

  // Return the result from Register A0
  return r0;
}
This cumbersome workaround works OK with TCC Compiler and NuttX Apps!
Wow this looks horribly painful… Are we doing any more of this?
Nope sorry, we won’t do any more of this! Hand-crafting the NuttX System Calls in RISC-V Assembly was positively painful.
(We’ll revisit this when the RISC-V Registers are hunky dory in TCC)

Moments ago we saw RISC-V ELF a.out teleport magically from TCC WebAssembly to NuttX Emulator (pic above)…
And we discovered that TCC WebAssembly saves a.out to the JavaScript Local Storage, encoded as elf_data…

This is how we…
Take elf_data from JavaScript Local Storage
Patch the Fake a.out in the NuttX Image
With the Real a.out from TCC
In our NuttX Emulator JavaScript: We read elf_data from the JavaScript Local Storage and pass it to TinyEMU WebAssembly: jslinux.js
// Receive the Encoded ELF Data for `a.out`
// from JavaScript Local Storage and decode it
// Encoded data looks like: %7f%45%4c%46...
const elf_data_encoded = localStorage.getItem("elf_data");
if (elf_data_encoded) {
  elf_data = new Uint8Array(
    elf_data_encoded
      .split("%")
      .slice(1)
      .map(hex=>Number("0x" + hex))
  );
  elf_len = elf_data.length;
}
...
// Pass the ELF Data to TinyEMU Emulator
Module.ccall(
  "vm_start",  // Call `vm_start` in TinyEMU WebAssembly
  null,
  [ ... ],     // Omitted: Parameter Types
  [ // Parameters for `vm_start`
    url, mem_size, cmdline, pwd, width, height, (net_state != null) | 0, drive_url,
    // We added these for our ELF Data
    elf_data, elf_len
  ]
);
Inside our TinyEMU WebAssembly: We receive elf_data and copy it locally, because it will be clobbered (why?): jsemu.c
// Start the TinyEMU Emulator. Called by JavaScript.
void vm_start(...) {

  // Receive the ELF Data from JavaScript
  extern uint8_t elf_data[];  // From riscv_machine.c
  extern int elf_len;
  elf_len = elf_len0;

  // Copy ELF Data to Local Buffer because it will get clobbered
  if (elf_len > 4096) { puts("elf_len exceeds 4096, increase elf_data and a.out size"); }
  memcpy(elf_data, elf_data0, elf_len);
Then we search for our Magic Pattern 22 05 69 00 in our Fake a.out: riscv_machine.c
  // Patch the ELF Data to Fake `a.out` in Initial RAM Disk
  uint64_t elf_addr = 0;
  for (int i = 0; i < 0xD61680; i++) { // TODO: Fix the Image Size

    // Search for our Magic Pattern
    const uint8_t pattern[] = { 0x22, 0x05, 0x69, 0x00 };
    if (memcmp(&kernel_ptr[i], pattern, sizeof(pattern)) == 0) {

      // Overwrite our Magic Pattern with Real `a.out`. TODO: Catch overflow
      memcpy(&kernel_ptr[i], elf_data, elf_len);
      elf_addr = RAM_BASE_ADDR + i;
      break;
    }
  }
And we overwrite the Fake a.out with the Real a.out from elf_data.
This is perfectly OK because ROM FS Files are continuous and contiguous. (Though we ought to patch the File Size and Filesystem Header Checksum)
That’s how we compile a NuttX App in the Web Browser, and run it with NuttX Emulator in the Web Browser! 🎉

A while ago we saw genromfs faithfully packing our C Header Files into a ROM FS Filesystem: build.sh
## For Ubuntu: Install `genromfs`
sudo apt install genromfs

## For macOS: Install `genromfs`
brew install px4/px4/genromfs

## Bundle the `romfs` folder into
## ROM FS Filesystem `romfs.bin`
## and label with this Volume Name
genromfs \
  -f romfs.bin \
  -d romfs \
-V "ROMFS"(<stdio.h> and <stdlib.h> are in the ROM FS Folder)
(Bundled into this ROM FS Filesystem)
Based on the ROM FS Spec, we take a walk inside our ROM FS Filesystem romfs.bin…
## Dump our ROM FS Filesystem
hexdump -C romfs.bin Everything begins with the ROM FS Filesystem Header (pic above)…
      [ Magic Number        ]  [ FS Size ] [ Checksm ]
0000  2d 72 6f 6d 31 66 73 2d  00 00 0f 90 58 57 01 f8  |-rom1fs-....XW..|
      [ Volume Name: ROMFS                           ]
0010  52 4f 4d 46 53 00 00 00  00 00 00 00 00 00 00 00  |ROMFS...........|
Next comes the File Header for “.”…
----  File Header for `.`
      [ NextHdr ] [ Info    ]  [ Size    ] [ Checksm ]
0020  00 00 00 49 00 00 00 20  00 00 00 00 d1 ff ff 97  |...I... ........|
      [ File Name: `.`                               ]
0030  2e 00 00 00 00 00 00 00  00 00 00 00 00 00 00 00  |................|
      (NextHdr & 0xF = 9 means Executable Directory)
Followed by the File Header for “..”…
----  File Header for `..`
      [ NextHdr ] [ Info    ]  [ Size    ] [ Checksm ]
0040  00 00 00 60 00 00 00 20  00 00 00 00 d1 d1 ff 80  |...`... ........|
      [ File Name: `..`                              ]
0050  2e 2e 00 00 00 00 00 00  00 00 00 00 00 00 00 00  |................|
      (NextHdr & 0xF = 0 means Hard Link)
Then the File Header and Data for “stdio.h” (pic below)…
----  File Header for `stdio.h`
      [ NextHdr ] [ Info    ]  [ Size    ] [ Checksm ]
0060  00 00 0a 42 00 00 00 00  00 00 09 b7 1d 5d 1f 9e  |...B.........]..|
      [ File Name: `stdio.h`                         ]
0070  73 74 64 69 6f 2e 68 00  00 00 00 00 00 00 00 00  |stdio.h.........|
      (NextHdr & 0xF = 2 means Regular File)

----  File Data for `stdio.h`
0080  2f 2f 20 43 61 75 74 69  6f 6e 3a 20 54 68 69 73  |// Caution: This|
....
0a20  74 65 72 20 41 30 0a 20  20 72 65 74 75 72 6e 20  |ter A0.  return |
0a30  72 30 3b 0a 7d 20 0a 00  00 00 00 00 00 00 00 00  |r0;.} ..........|
Finally the File Header and Data for “stdlib.h”…
----  File Header for `stdlib.h`
      [ NextHdr ] [ Info    ]  [ Size    ] [ Checksm ]
0a40  00 00 00 02 00 00 00 00  00 00 05 2e 23 29 67 fc  |............#)g.|
      [ File Name: `stdlib.h`                        ]
0a50  73 74 64 6c 69 62 2e 68  00 00 00 00 00 00 00 00  |stdlib.h........|
      (NextHdr & 0xF = 2 means Regular File)

----  File Data for `stdio.h`
0a60  2f 2f 20 43 61 75 74 69  6f 6e 3a 20 54 68 69 73  |// Caution: This|
....
0f80  72 65 74 75 72 6e 20 72  30 3b 0a 7d 20 0a 00 00  |return r0;.} ...|
0f90  00 00 00 00 00 00 00 00  00 00 00 00 00 00 00 00  |................|
Zero fuss, ROM FS is remarkably easy to read!
