📝 26 Jan 2022

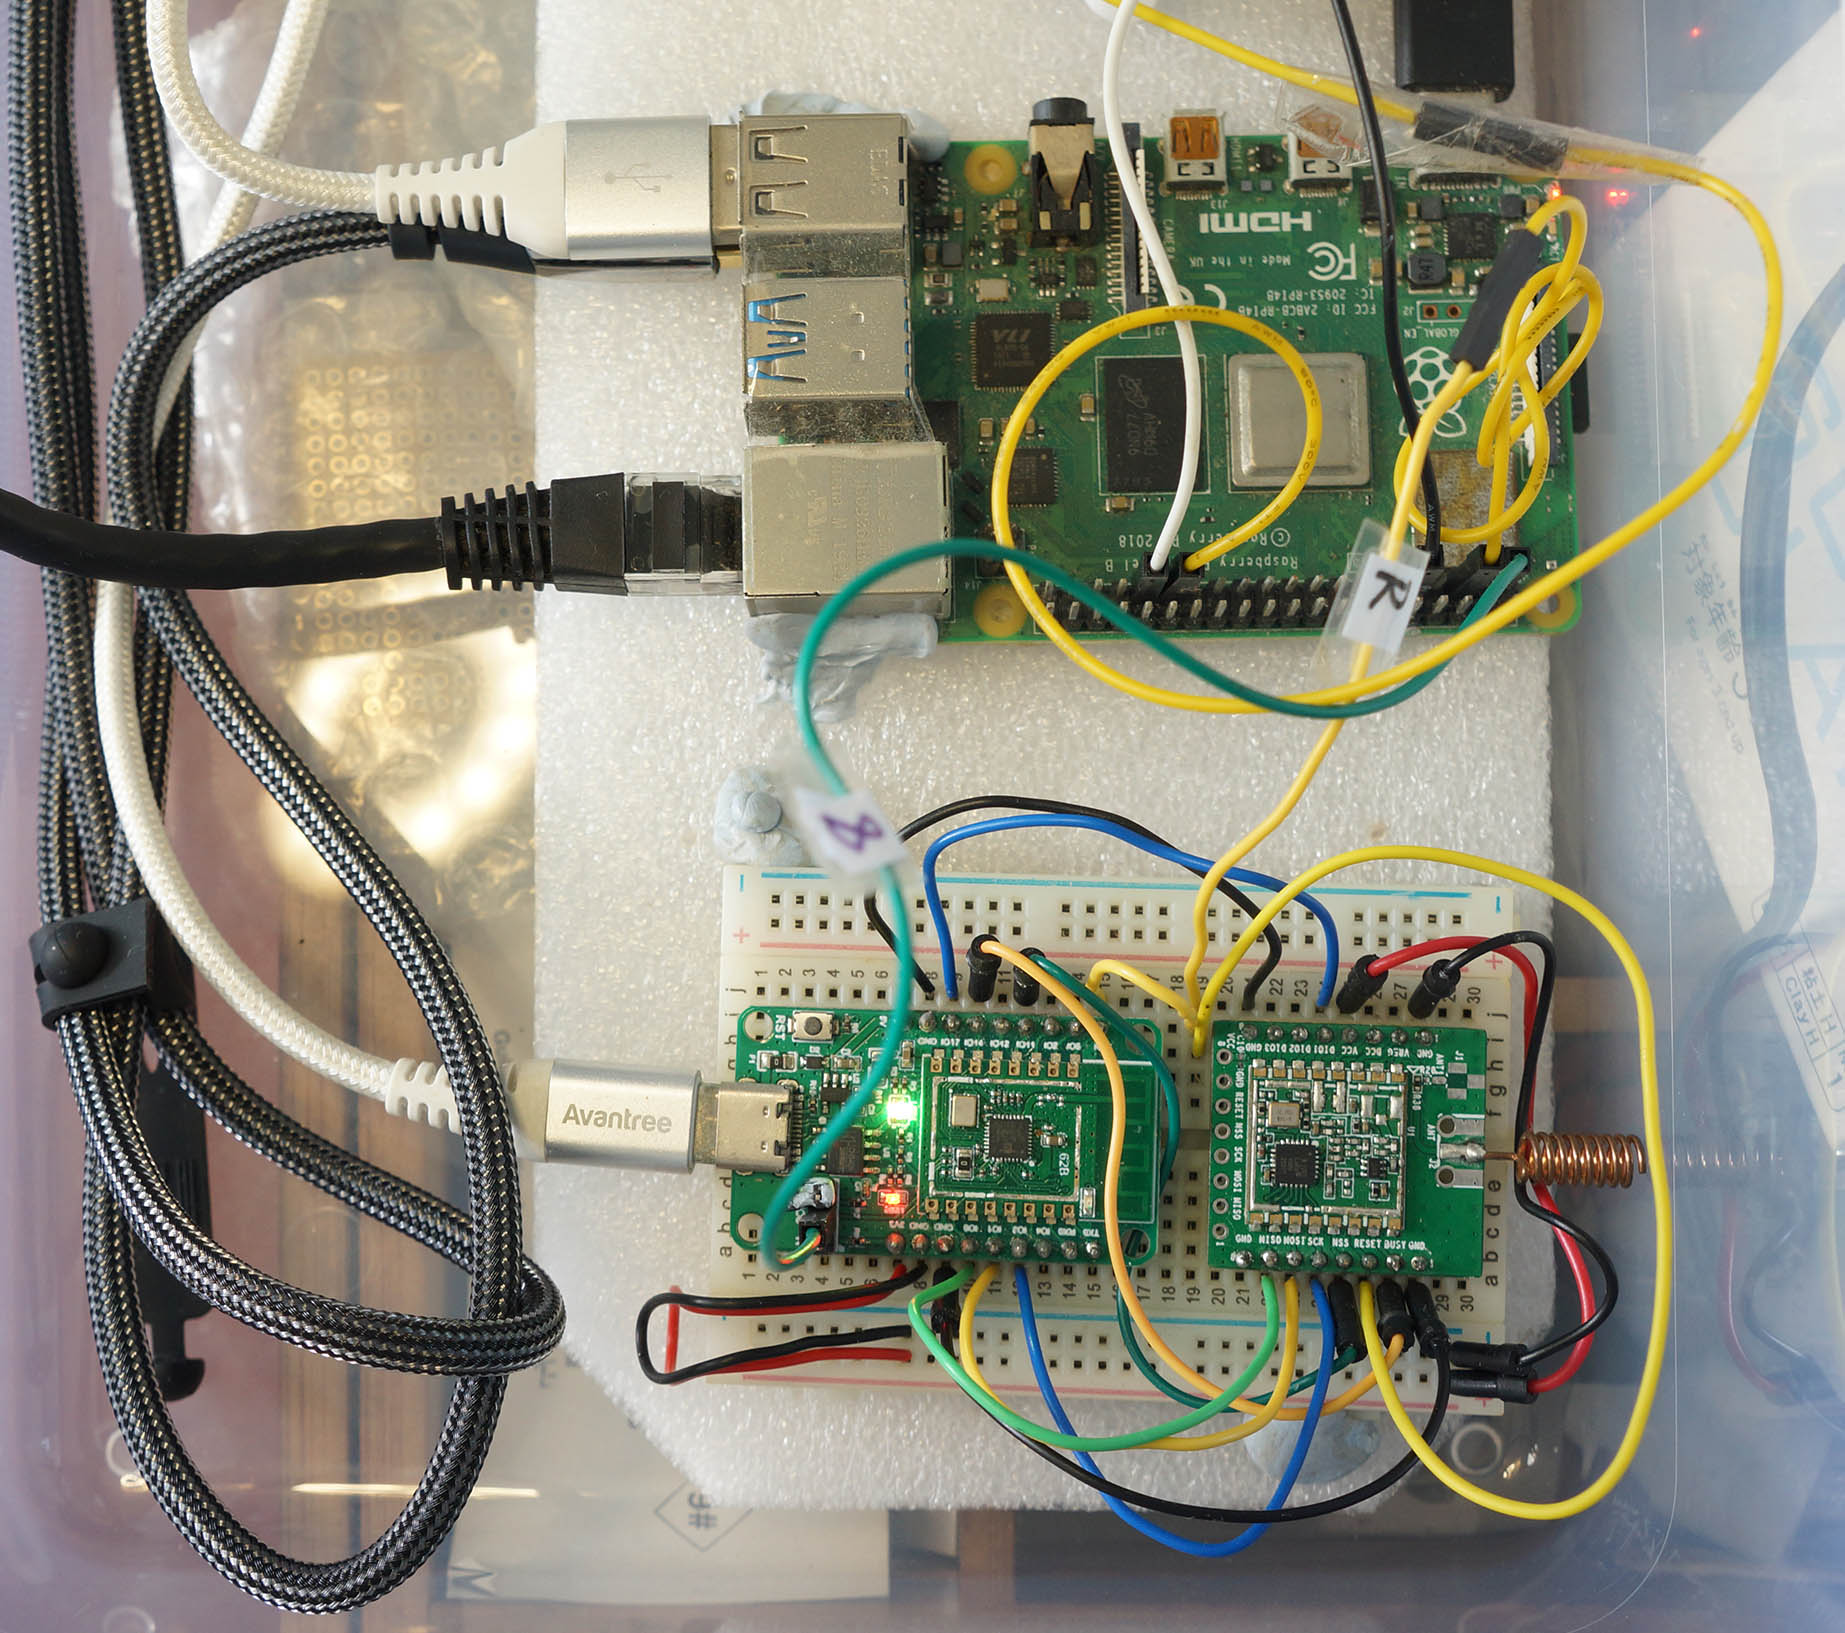
PineCone BL602 RISC-V Board (bottom) connected to Single-Board Computer (top) for Auto Flash and Test
UPDATE: Check out the new article on Automated Testing for PineDio Stack BL604
Suppose we’re testing embedded firmware on the BL602 RISC-V SoC. And the firmware changes every day (due to Daily Updates from upstream).
Instead of flipping a jumper, restarting the board, flashing over UART, restarting again, repeating every day…
Is there a way to Automatically Flash and Test the Daily Updates?
Yes we can, by connecting BL602 to a Linux Single-Board Computer!
Today we shall create a Linux Script that will…
Auto-Flash the Daily Build of Apache NuttX OS to BL602
Auto-Boot NuttX on BL602 after flashing
Auto-Test NuttX by sending a command that tests the GPIO Input / Output / Interrupts, SPI, ADC, Timers, Message Queues, PThreads, Strong Random Number Generator and Internal Temperature Sensor
(Spoilers: It’s LoRaWAN!)
If NuttX crashes, Auto-Decode the NuttX Stack Trace and show us the Source Code that caused the crash
Why are we doing this?
Might be useful for Release Testing of NuttX (and other operating systems) on real hardware
By auto-testing the LoRaWAN Stack on NuttX, we can be sure that GPIO Input / Output / Interrupts, SPI, ADC, … are all working OK with the latest Daily Build of NuttX
I write articles about NuttX OS. I need to pick the Latest Stable Build of NuttX for testing the NuttX code in my articles. (Like these)
BL602 Devs can easily download the latest tested build from GitHub Releases…
Will this work for other microcontrollers?
ESP32 has 2 buttons for flashing (BOOT and EN), very similar to BL602. Our Auto Flash and Test Script might work for ESP32 with some tweaking.
Arm Microcontrollers may be auto flashed and debugged with an OpenOCD Script. (Check out Remote PineTime)
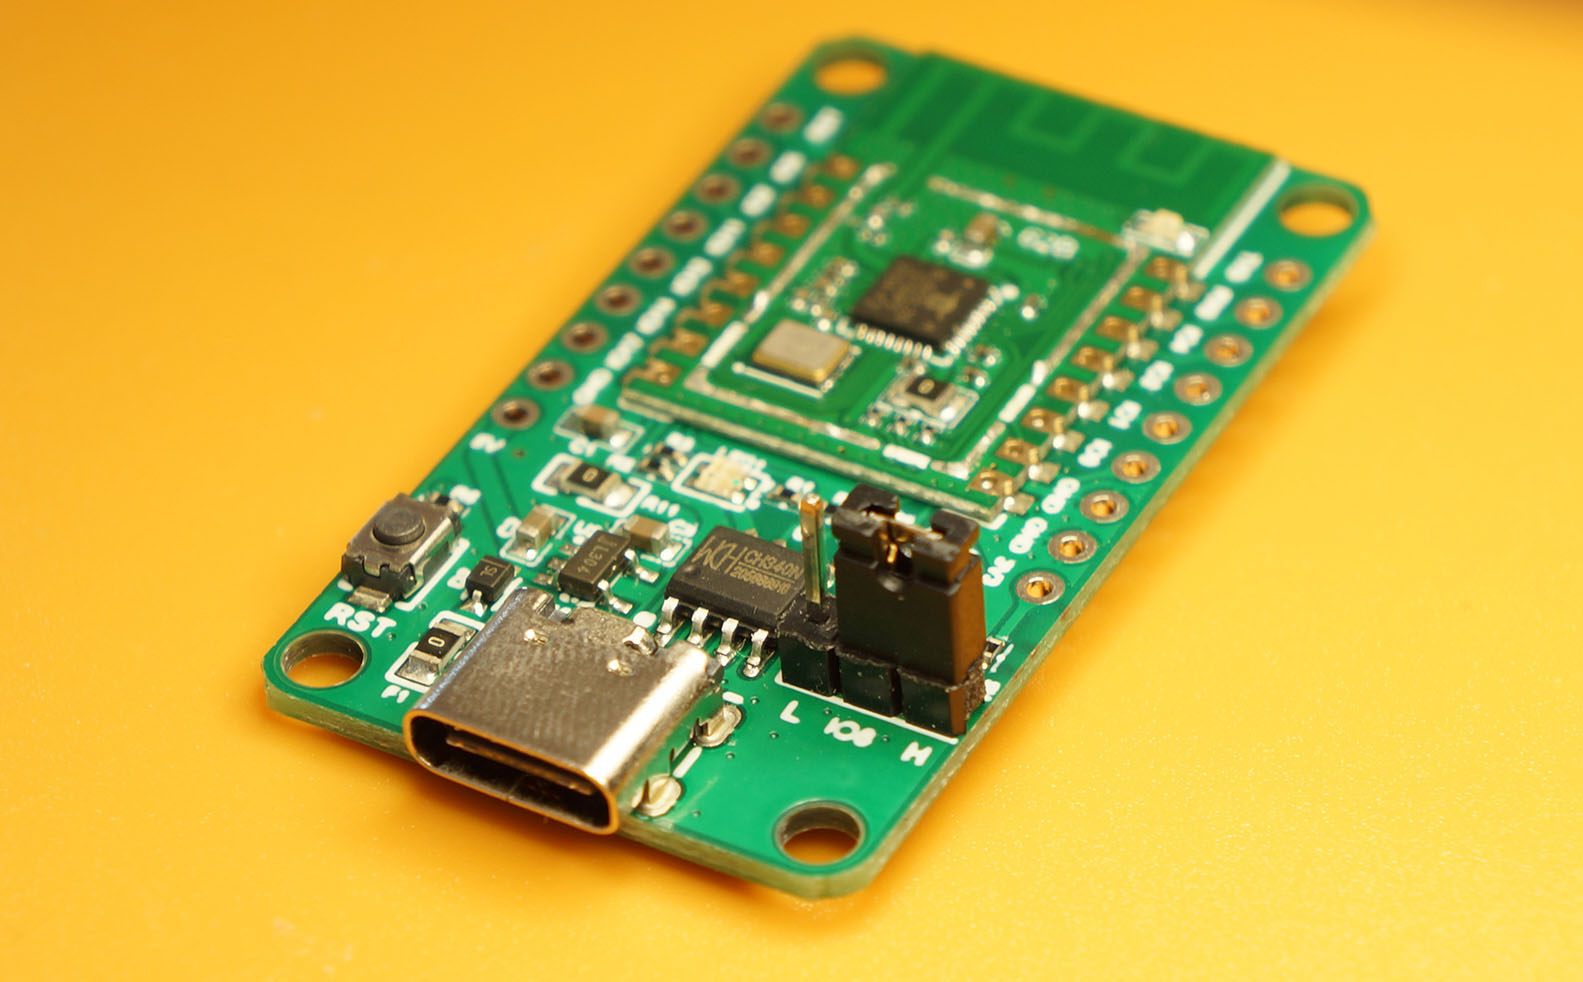
PineCone BL602 in Flashing Mode with GPIO 8 set to High. Sorry the jumper got mangled due to a soldering accident 🙏
This is how we work with BL602…
Connect BL602 to our computer’s USB port
Flip the GPIO 8 Jumper to High (pic above)
Press the Reset Button (RST).
BL602 is now in Flashing Mode.
Flash BL602 over USB UART with blflash…
$ blflash flash nuttx.bin --port /dev/ttyUSB0
Start connection...
Connection Succeed
Sending eflash_loader...
Program flash...
...
Success
Flip the GPIO 8 Jumper to Low (pic below)
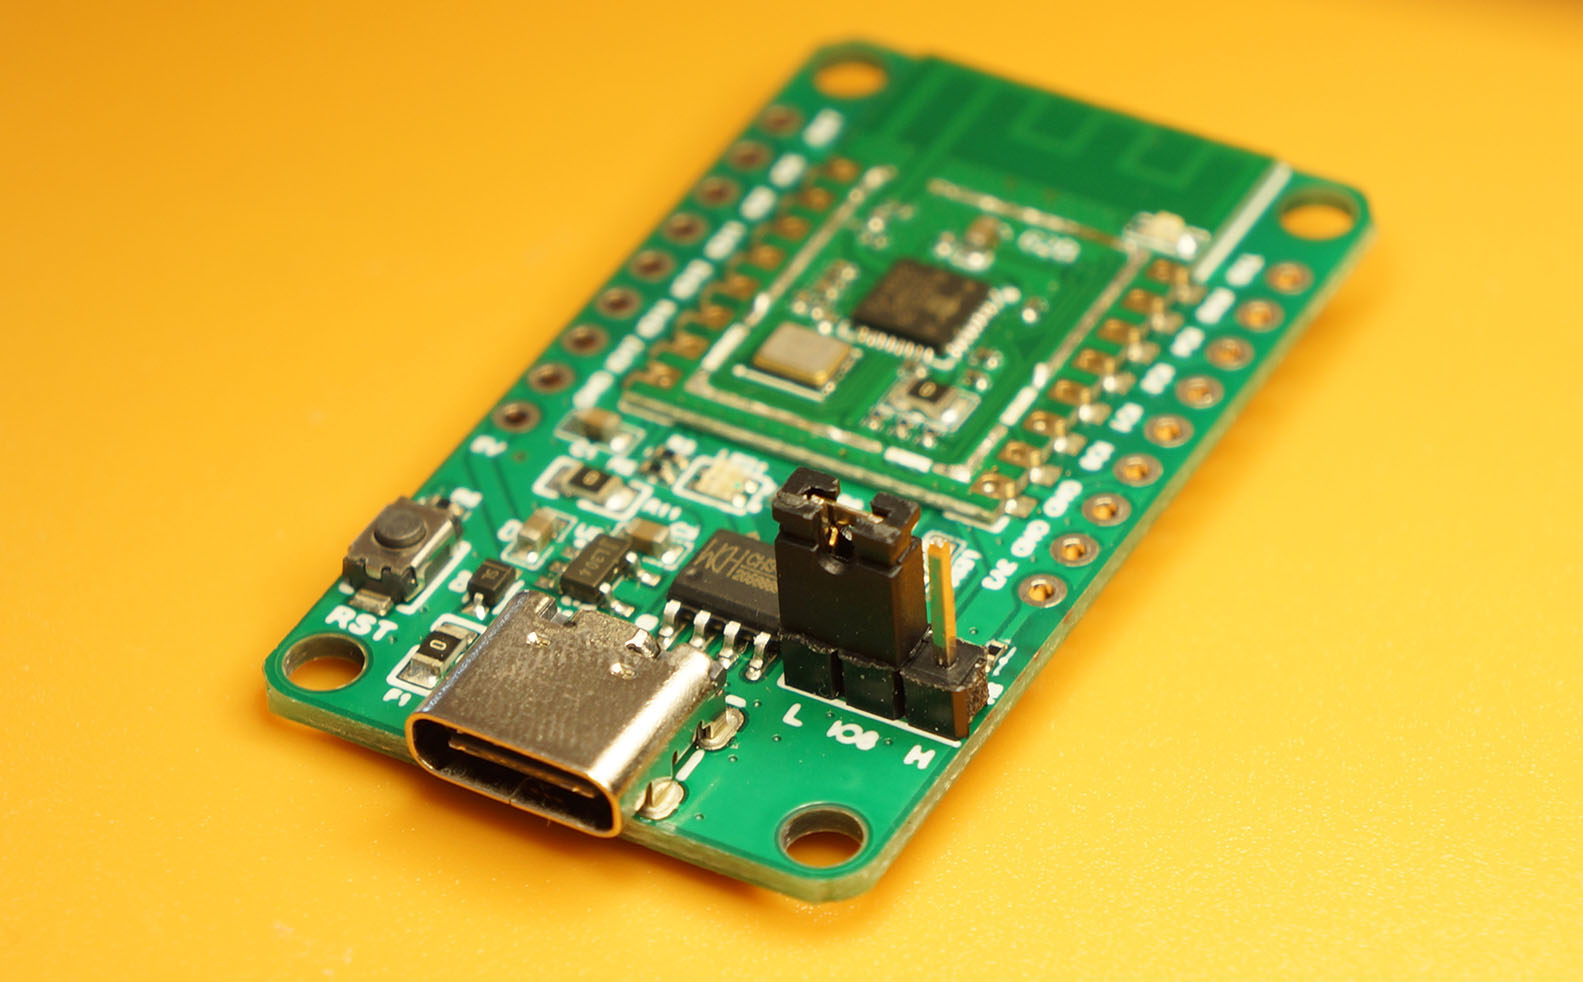
Press the Reset Button (RST).
BL602 is now in Normal Mode. (Non-Flashing)
Launch a Serial Terminal to test the BL602 Firmware
When we’re done, close the Serial Terminal and repeat the Flash-Test Cycle
Over the past 14 months I’ve been doing this over and over again. Until last week I wondered…
Can we automate this with a Single-Board Computer?
And indeed we can! (Duh!) Here’s how…

PineCone BL602 RISC-V Board (lower right) connected to Single-Board Computer (top) and Semtech SX1262 LoRa Transceiver (lower left)
Connect BL602 to a Single-Board Computer (SBC) as shown in the pic above…
| SBC | BL602 | Function |
|---|---|---|
| GPIO 2 | GPIO 8 | Flashing Mode (Long Green) |
| GPIO 3 | RST | Reset (Long Yellow) |
| GND | GND | Ground |
| USB | USB | USB UART |
(Ground is missing from the pic)
Check that BL602 is firmly seated on the Breadboard! The USB Connector tends to dislodge the BL602 Board from the Breadboard when the USB Cable wriggles too much.
For auto-testing LoRaWAN, we also connect BL602 to Semtech SX1262 LoRa Transceiver (pic above)…
Clearer pic of the GPIO 8 (Flashing Mode) and Reset Pins on PineCone BL602…
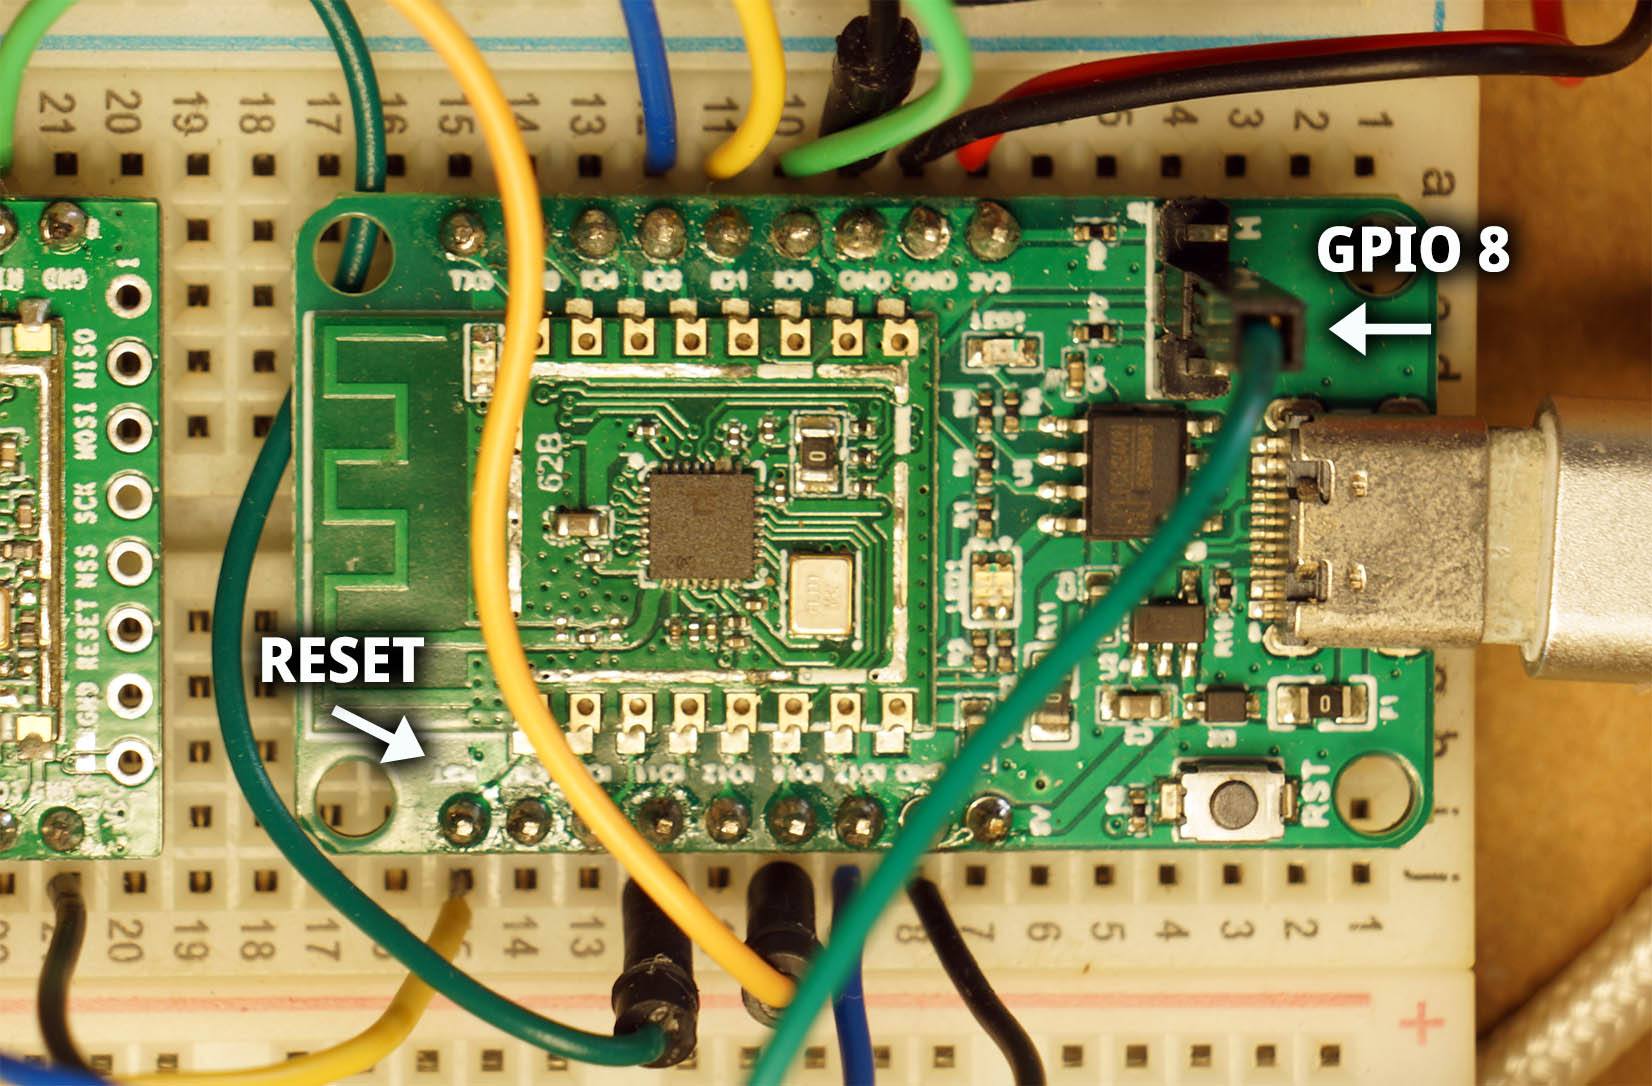
No more flipping the jumper and smashing the button! Let’s control GPIO 8 and Reset Pins with our Linux SBC.
Recall that GPIO 2 and 3 on our Linux SBC are connected to BL602 for the Flashing and Reset Functions…
| SBC | BL602 | Function |
|---|---|---|
| GPIO 2 | GPIO 8 | Flashing Mode |
| GPIO 3 | RST | Reset |
Let’s control GPIO 2 and 3 with a Bash Script…
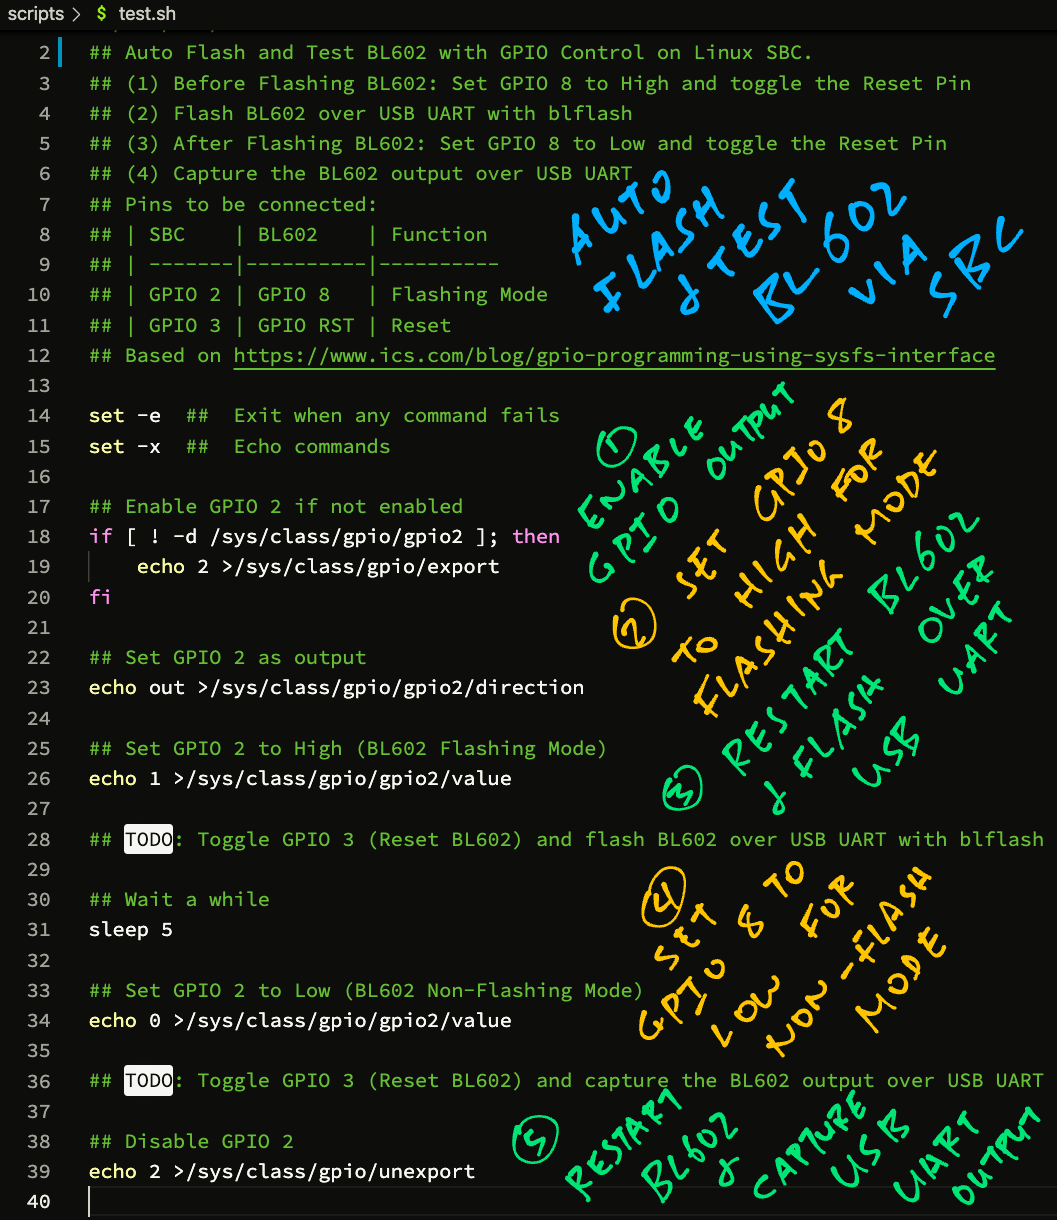
Our Bash Script begins by enabling GPIO 2 and 3: test.sh
##  Enable GPIO 2 and 3 (if not already enabled)
if [ ! -d /sys/class/gpio/gpio2 ]; then
  echo  2 >/sys/class/gpio/export
  sleep 1
fi
if [ ! -d /sys/class/gpio/gpio3 ]; then
  echo  3 >/sys/class/gpio/export
  sleep 1
fi(/sys/class/gpio comes from the Linux sysfs Interface)
After enabling GPIO 2 and 3, these GPIO Interfaces will appear in Linux…
/sys/class/gpio/gpio2
/sys/class/gpio/gpio3
Let’s configure them.
Our script configures GPIO 2 and 3 for GPIO Output (instead of GPIO Input): test.sh
##  Set GPIO 2 and 3 as output
echo out >/sys/class/gpio/gpio2/direction
echo out >/sys/class/gpio/gpio3/direction
Now we’re ready to toggle GPIO 2 and 3 to flash and reset BL602!
To enter Flashing Mode, our script sets GPIO 2 to High: test.sh
##  Set GPIO 2 to High (BL602 Flashing Mode)
echo  1 >/sys/class/gpio/gpio2/value
sleep 1
But to make it happen we need to restart BL602, coming up next…
To restart BL602 (and actually enter Flashing Mode), our script toggles GPIO 3 High-Low-High: test.sh
##  Toggle GPIO 3 High-Low-High (Reset BL602)
echo  1 >/sys/class/gpio/gpio3/value
sleep 1
echo  0 >/sys/class/gpio/gpio3/value
sleep 1
echo  1 >/sys/class/gpio/gpio3/value
sleep 1
BL602 is now in Flashing Mode!
Our script runs blflash to flash BL602 over USB UART: test.sh
##  BL602 is now in Flashing Mode.
##  Flash BL602 over USB UART with blflash.
blflash flash \
  /tmp/nuttx.bin \
  --port /dev/ttyUSB0
sleep 1(nuttx.bin is the Daily Upstream Build of NuttX OS, as explained in the Appendix)
Our firmware has been flashed automagically!
Now we return to Normal Mode (Non-Flashing) by setting GPIO 2 to Low: test.sh
##  Set GPIO 2 to Low (BL602 Normal Mode)
echo  0 >/sys/class/gpio/gpio2/value
sleep 1
We effect the change by restarting BL602…
##  Toggle GPIO 3 High-Low-High (Reset BL602)
echo  1 >/sys/class/gpio/gpio3/value
sleep 1
echo  0 >/sys/class/gpio/gpio3/value
sleep 1
echo  1 >/sys/class/gpio/gpio3/value
sleep 1
BL602 starts booting our firmware, but we need some prep…
We’re ready to show the output from our BL602 Firmware (NuttX). Our script sets the USB UART’s Baud Rate to 2 Mbps: test.sh
##  BL602 is now in Normal Mode.
##  Set USB UART to 2 Mbps.
stty \
  -F /dev/ttyUSB0 \
  raw 2000000
(Otherwise the output will be garbled)
Then our script streams the output from BL602 over USB UART…
#  Show the BL602 output and capture to /tmp/test.log.
#  Run this in the background so we can kill it later.
cat /dev/ttyUSB0 \
  | tee /tmp/test.log &
And captures the output to test.log for analysis. (Which we’ll explain shortly)
This runs as a Background Task (&) because we want the script to continue running (in the Foreground) as the BL602 output continues to stream (in the Background).
But nothing appears in the output?
Yep because BL602 has already booted our firmware. The Boot Messages have whooshed by before we captured them.
To see the Boot Messages, our script restarts BL602 yet again…
##  Toggle GPIO 3 High-Low-High (Reset BL602)
echo  1 >/sys/class/gpio/gpio3/value ; sleep 1
echo  0 >/sys/class/gpio/gpio3/value ; sleep 1
echo  1 >/sys/class/gpio/gpio3/value ; sleep 1

##  Wait a while for BL602 to finish booting
sleep 1

##  Omitted: Send test command and analyse the BL602 output
...
(We’ll talk later about the output analysis)
Remember that the BL602 output is still being streamed in a Background Task. Our script terminates the Background Task like so: test.sh
##  Kill the background task that captures the BL602 output
kill %1
And we’re done!
So this script totally replaces a human flipping the jumper and smashing the button on BL602?
Yep our Linux Script totally controls the Flashing and Reset Functions on BL602… No more human intervention!
Here’s a demo of our script flipping GPIO 2 and 3 and switching the flashing mode…
We’ve seen the Auto Flash and Test Script, let’s run it on our Linux SBC!
Enter this at the Linux command prompt…
##  Allow the user to access the GPIO and UART ports
sudo usermod -a -G gpio    $USER
sudo usermod -a -G dialout $USER

##  Logout and login to refresh the permissions
logout

##  Install Rust: https://rustup.rs/
curl --proto '=https' --tlsv1.2 -sSf https://sh.rustup.rs | sh

##  Add Rust to the PATH
source $HOME/.cargo/env

##  Install blflash
cargo install blflash

##  Download the script
git clone --recursive https://github.com/lupyuen/remote-bl602

##  Optional: Select the type of build (upstream / downstream / release)
##  export BUILD_PREFIX=upstream

##  Optional: Select the date of the build
##  export BUILD_DATE=2022-01-19

##  Run the script
remote-bl602/scripts/test.sh
(For Arch Linux and Manjaro: Change “dialout” to “uucp”)
Our script flashes and runs NuttX on BL602 like so…
Let’s study the script output: upstream-2022-01-21
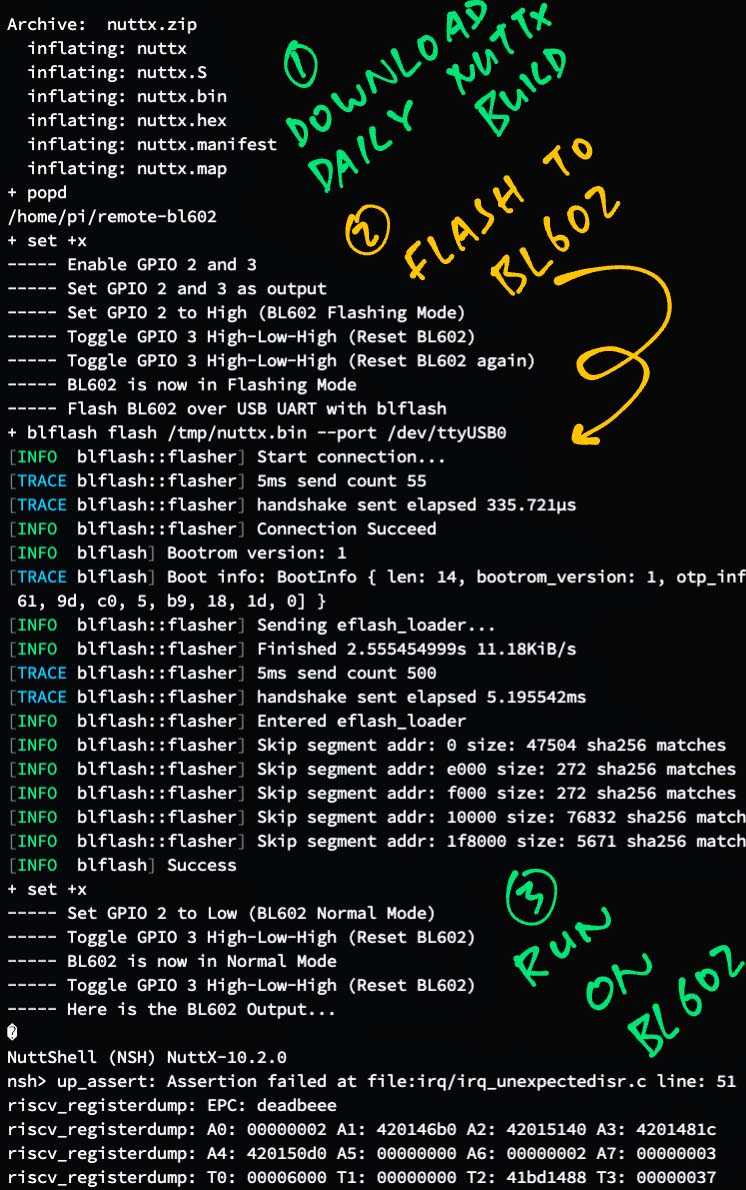
Our script begins by downloading Today’s Upstream Build of NuttX: upstream-2022-01-21
+ BUILD_PREFIX=upstream
+ BUILD_DATE=2022-01-21
----- Download the latest upstream NuttX build for 2022-01-21
+ wget -q \
  https://github.com/lupyuen/nuttx/releases/download/upstream-2022-01-21/nuttx.zip \
-O /tmp/nuttx.zip(nuttx.zip is built daily by GitHub Actions, as explained in the Appendix)
Our script unzips nuttx.zip, which includes the following files…
+ pushd /tmp
+ unzip -o nuttx.zip
Archive:  nuttx.zip
  inflating: nuttx
  inflating: nuttx.S
  inflating: nuttx.bin
  inflating: nuttx.config
  inflating: nuttx.hex
  inflating: nuttx.manifest
  inflating: nuttx.map
+ popdnuttx: Firmware in ELF Format
nuttx.bin: Firmware Binary to be flashed
nuttx.S: RISC-V Disassembly for the firmware
nuttx.map: Linker Map for the firmware
nuttx.config: Build Configuration (from .config)
Next we switch BL602 to Flashing Mode by flipping GPIO 2 and 3 (which we’ve seen earlier)…
Enable GPIO 2 and 3
Set GPIO 2 and 3 as output
Set GPIO 2 to High (BL602 Flashing Mode)
Toggle GPIO 3 High-Low-High (Reset BL602)
Toggle GPIO 3 High-Low-High (Reset BL602 again)
BL602 is now in Flashing Mode
We flash the downloaded NuttX Firmware nuttx.bin to BL602 with blflash…
----- Flash BL602 over USB UART with blflash
+ blflash flash /tmp/nuttx.bin --port /dev/ttyUSB0
Start connection...
Connection Succeed
Sending eflash_loader...
Entered eflash_loader
Program flash...
SuccessAfter flashing, we switch BL602 back to Normal Mode by flipping GPIO 2 and 3…
Set GPIO 2 to Low (BL602 Normal Mode)
Toggle GPIO 3 High-Low-High (Reset BL602)
BL602 is now in Normal Mode
Toggle GPIO 3 High-Low-High (Reset BL602)
BL602 boots the NuttX Firmware and starts the NuttX Shell…
----- Here is the BL602 Output...
gpio_pin_register: Registering /dev/gpio0
gpio_pin_register: Registering /dev/gpio1
gpint_enable: Disable the interrupt
gpio_pin_register: Registering /dev/gpio2
bl602_spi_setfrequency: frequency=400000, actual=0
bl602_spi_setbits: nbits=8
bl602_spi_setmode: mode=0

NuttShell (NSH) NuttX-10.2.0
nsh>Our script sends a Test Command to BL602 and the NuttX Shell…
----- Send command to BL602: lorawan_test
lorawan_test
nsh: lorawan_test: command not found
nsh>
lorawan_test is missing because the Upstream Build doesn’t include the LoRaWAN Stack.
But that’s OK, we’ll see LoRaWAN in action when we test the Release Build of NuttX.
===== Boot OKOur script analyses the output and determines that NuttX has booted successfully.
We’re done with the simplest scenario for Auto Flash and Test! Now we have a quick and nifty way to discover if Today’s Upstream Build of NuttX boots OK on BL602.
(I run the script every day to check the stability of the BL602 build)
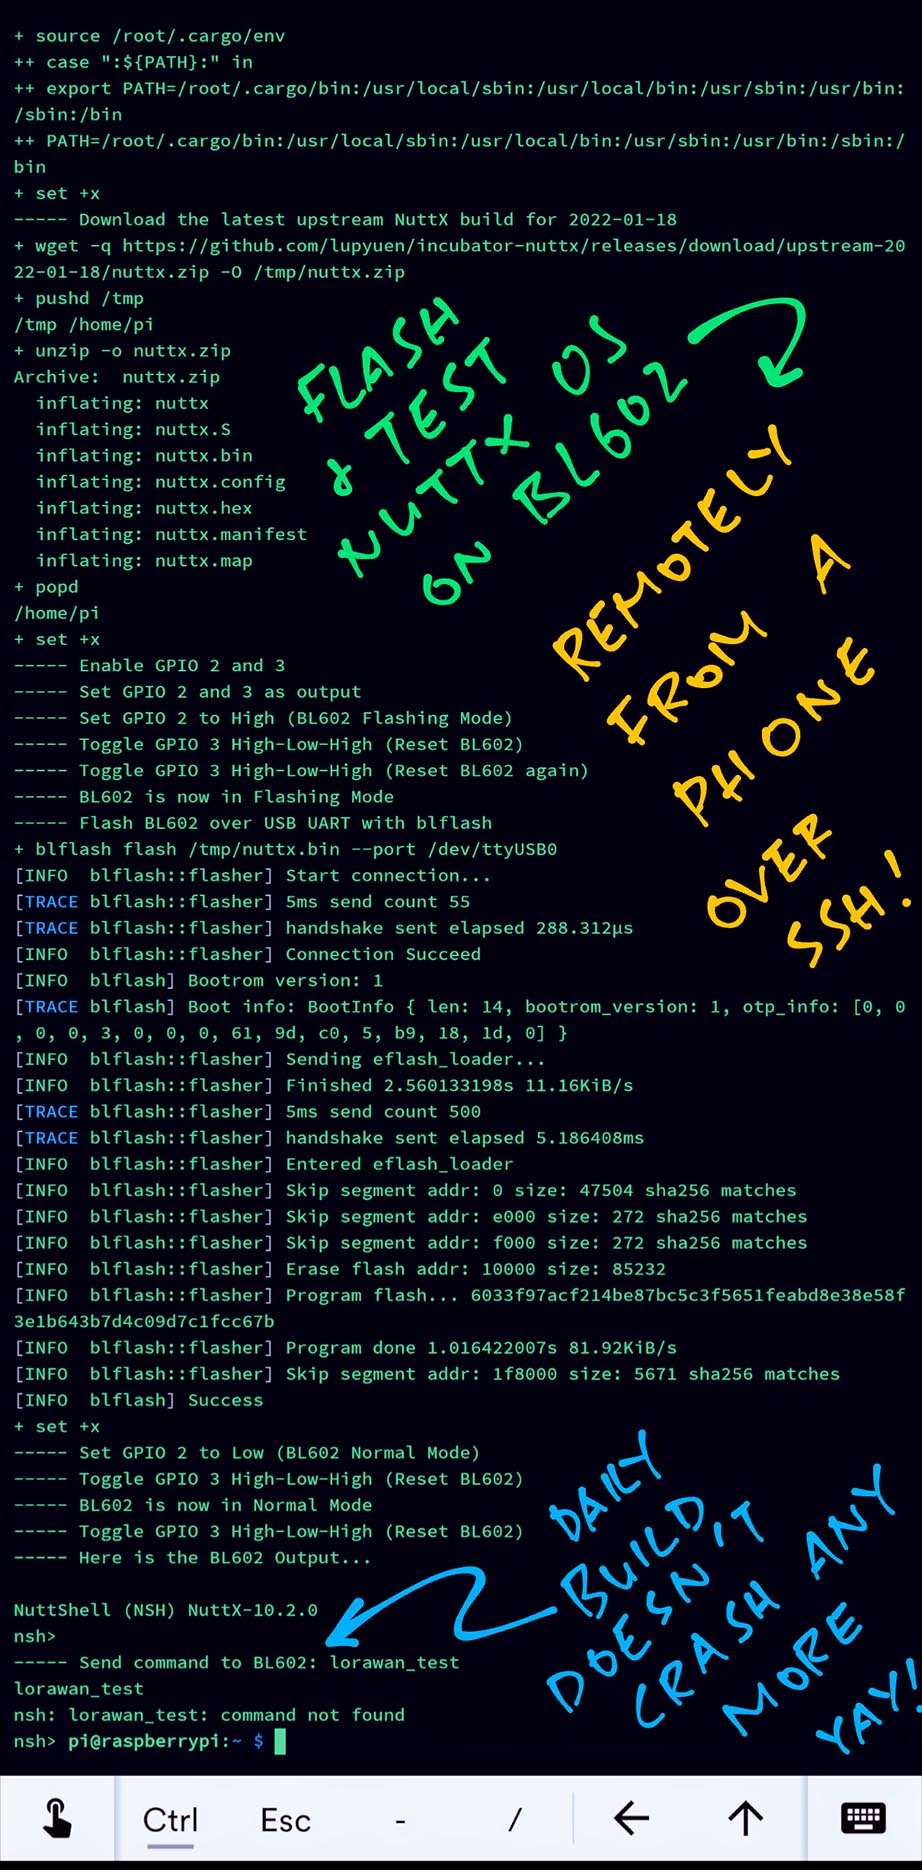
What happens when NuttX crashes during testing?
NuttX shows a Stack Trace like this…
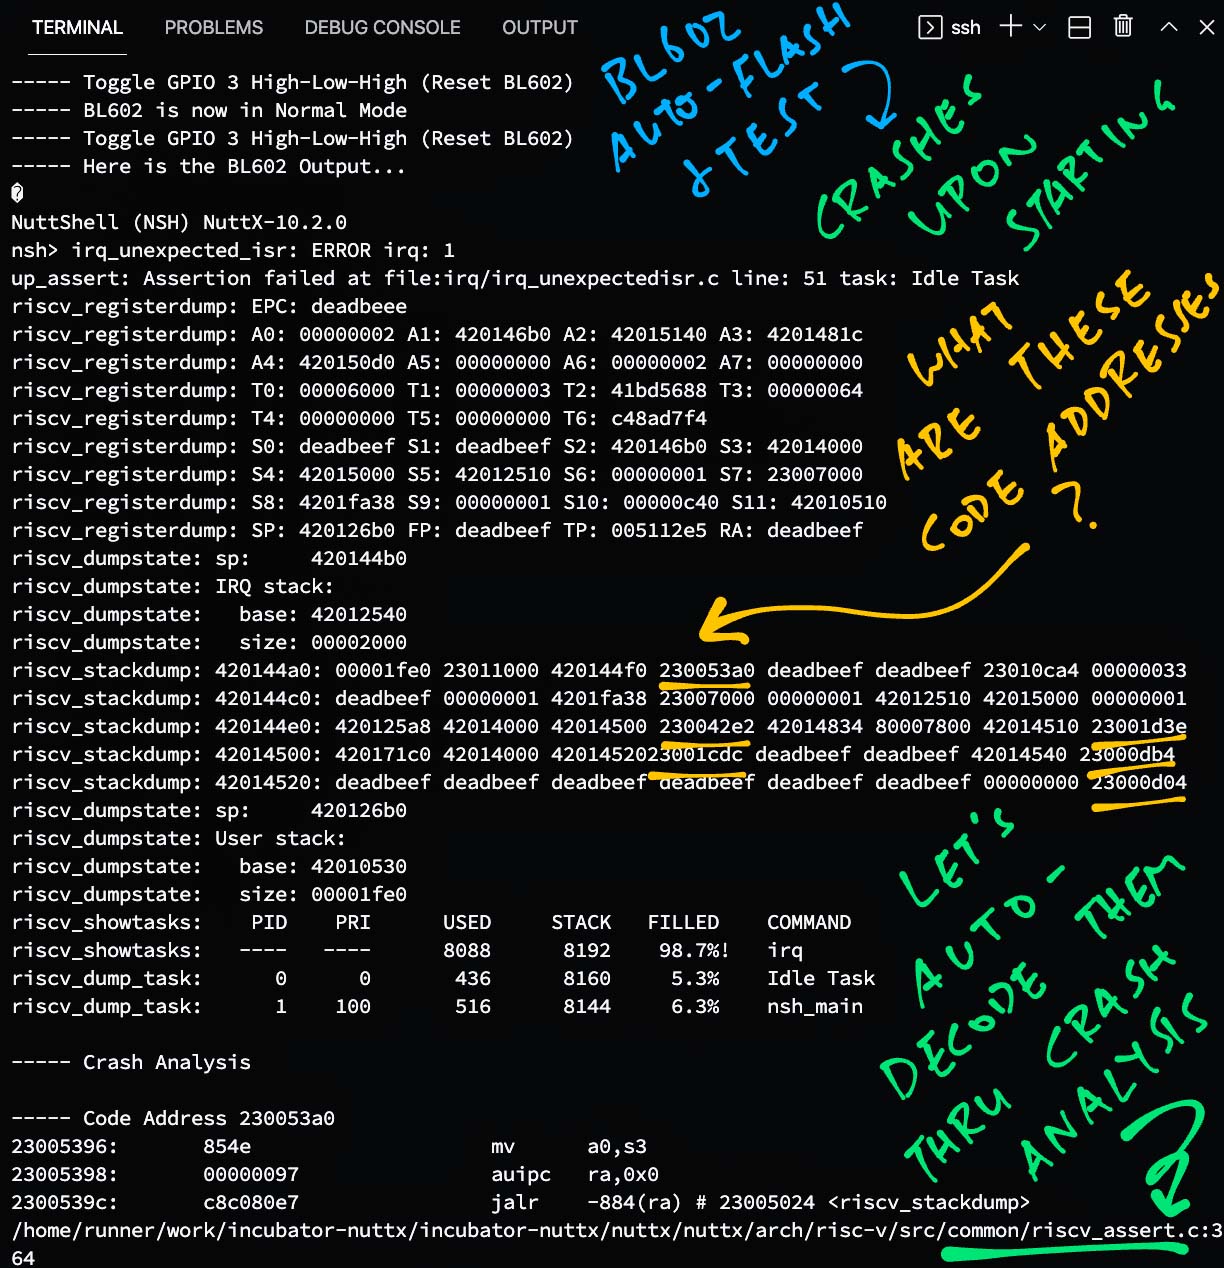
Let’s walk through the steps to decode the Stack Trace, then we’ll learn how our script decodes the Stack Trace for us.
At the top is the Assertion Failure message…
irq_unexpected_isr: ERROR irq: 1
up_assert: Assertion failed at file:irq/irq_unexpectedisr.c line: 51 task: Idle Task
Always enable Debug Assertions in our NuttX Build Configuration. They are super helpful for catching problems. (Here’s how)
Next we see the Register Dump…
riscv_registerdump: EPC: deadbeee
riscv_registerdump: A0: 00000002 A1: 420146b0 A2: 42015140 A3: 420141c
riscv_registerdump: A4: 420150d0 A5: 00000000 A6: 00000002 A7: 00000000
riscv_registerdump: T0: 00006000 T1: 00000003 T2: 41bd5588 T3: 00000064
riscv_registerdump: T4: 00000000 T5: 00000000 T6: c48ae7e4
riscv_registerdump: S0: deadbeef S1: deadbeef S2: 420146b0 S3: 42014000
riscv_registerdump: S4: 42015000 S5: 42012510 S6: 00000001 S7: 23007000
riscv_registerdump: S8: 4201fa38 S9: 00000001 S10: 00000c40 S11: 42010510
riscv_registerdump: SP: 420126b0 FP: deadbeef TP: 0c8a646d RA: deadbeef
Followed by the Interrupt Stack…
riscv_dumpstate: sp:     420144b0
riscv_dumpstate: IRQ stack:
riscv_dumpstate:   base: 42012540
riscv_dumpstate:   size: 00002000
The Stack Dump…
riscv_stackdump: 420144a0: 00001fe0 23011000 420144f0 230053a0 deadbeef deadbeef 23010ca4 00000033
riscv_stackdump: 420144c0: deadbeef 00000001 4201fa38 23007000 00000001 42012510 42015000 00000001
riscv_stackdump: 420144e0: 420125a8 42014000 42014500 230042e2 42014834 80007800 42014510 23001d3e
riscv_stackdump: 42014500: 420171c0 42014000 42014520 23001cdc deadbeef deadbeef 42014540 23000db4
riscv_stackdump: 42014520: deadbeef deadbeef deadbeef deadbeef deadbeef deadbeef 00000000 23000d04
The User Stack…
riscv_dumpstate: sp:     420126b0
riscv_dumpstate: User stack:
riscv_dumpstate:   base: 42010530
riscv_dumpstate:   size: 00001fe0
Finally the Task List…
riscv_showtasks:    PID    PRI      USED     STACK   FILLED    COMMAND
riscv_showtasks:   ----   ----      8088      8192    98.7%!   irq
riscv_dump_task:      0      0       436      8160     5.3%    Idle Task
riscv_dump_task:      1    100       516      8144     6.3%    nsh_main
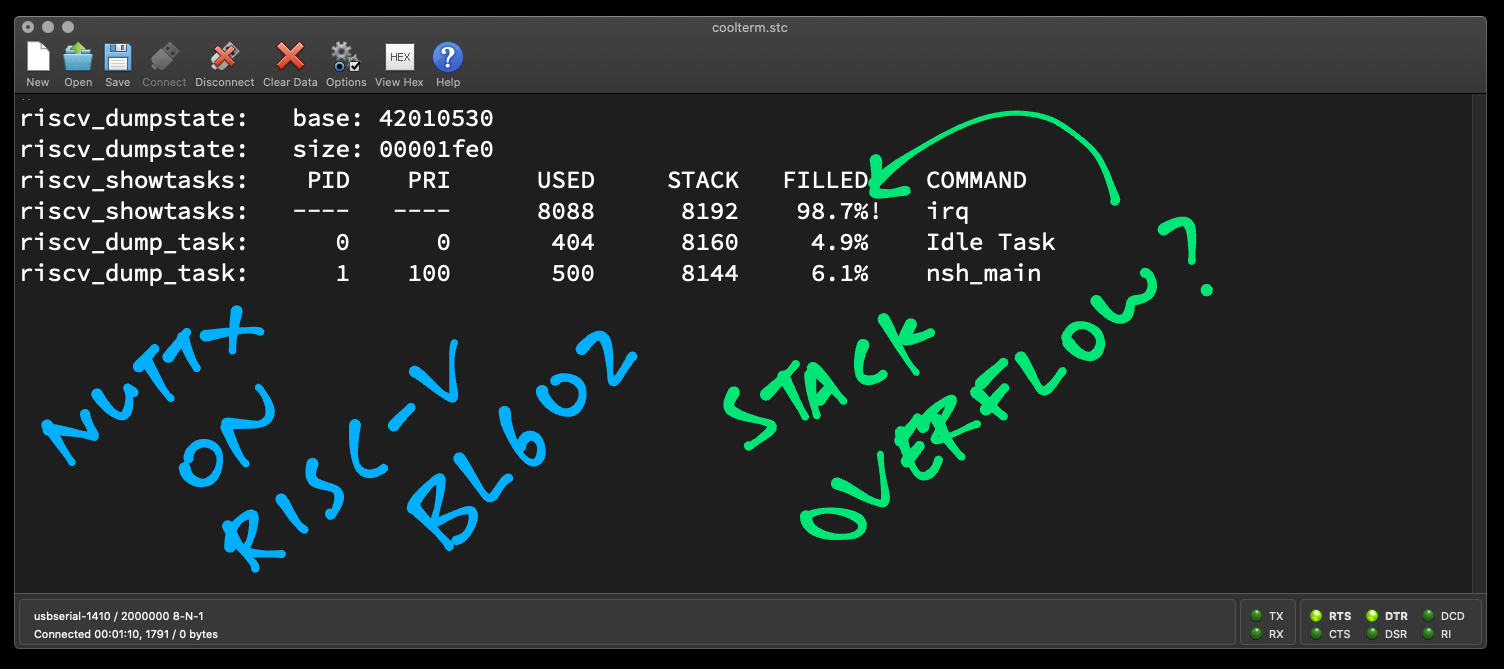
(The Interrupt Stack irq seems to be overflowing, it might have caused NuttX to crash)
In a while we’ll select the interesting addresses from above and decode them.
Before decoding the addresses, let’s prepare the RISC-V Disassembly of our BL602 Firmware…
## Dump the disassembly to nuttx.S
riscv64-unknown-elf-objdump \
  -t -S --demangle --line-numbers --wide \
  nuttx \
  >nuttx.S \
2>&1This generates the Disassembly File nuttx.S, which we’ll use in the next step.
From the Stack Trace above, we look for Code and Data Addresses and decode them…
BL602 Code Addresses have the form 23xxxxxx
BL602 Data Addresses have the form 42xxxxxx
Let’s pick a Code Address: 230053a0
We search for the address in the Disassembly File nuttx.S like so…
grep \
  --context=5 \
  --color=auto \
  "230053a0:" \
nuttx.SWhich shows…
nuttx/arch/risc-v/src/common/riscv_assert.c:364
  if (CURRENT_REGS)
    sp = CURRENT_REGS[REG_SP];
This is the Source Code for address 230053a0.
(Which is in the Assertion Handler, doesn’t look helpful)
Repeat this process for the other Code Addresses: 230042e2, 23001cdc, 23000db4, 23000d04, …
And we should have a fairly good idea how our firmware crashed.
What about the Data Addresses 42xxxxxx?
Let’s pick a Data Address: 42012510
We search for the address in the Disassembly File nuttx.S like this…
grep \
  --color=auto \
  "^42012510" \
  nuttx.S \
| grep -v "noinit"Which shows…
42012510 ... g_idleargvThis says that g_idleargv is the name of the variable at address 42012510.
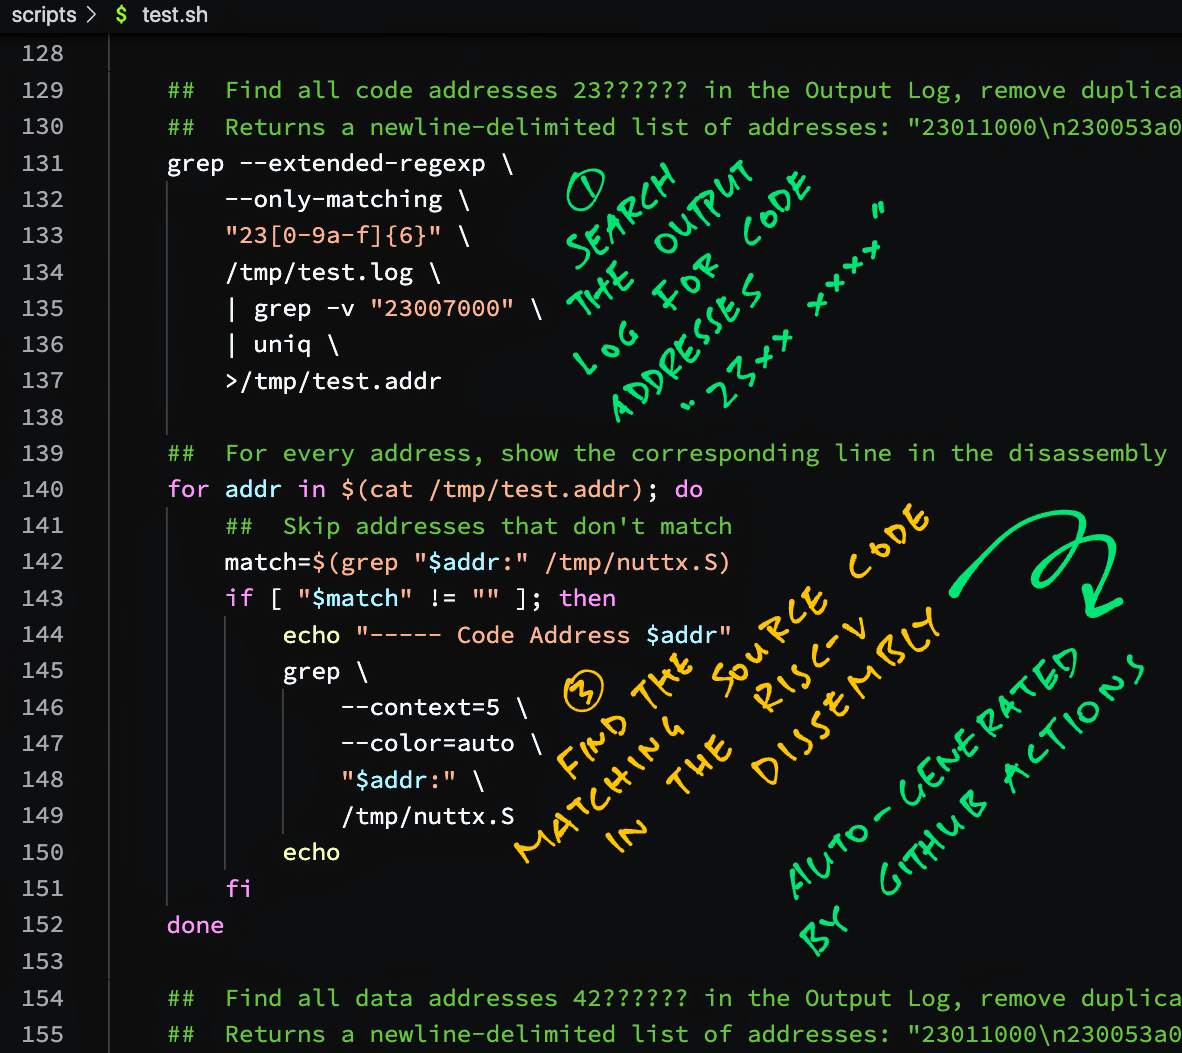
Decoding a NuttX Stack Trace looks mighty tedious!
Thankfully our Auto Flash and Test Script automates everything for us!
When our script detects that NuttX has crashed…
It searches for all BL602 Code Addresses in the NuttX Stack Trace
And shows the matching Source Code for the Code Addresses
It does the same to decode BL602 Data Addresses
RISC-V Disassembly for the NuttX Firmware is generated by GitHub Actions during the Daily Upstream Build
Here’s a demo of Auto Flash and Test with Auto Crash Analysis…
The Source Code decoded from a Stack Trace looks like this…
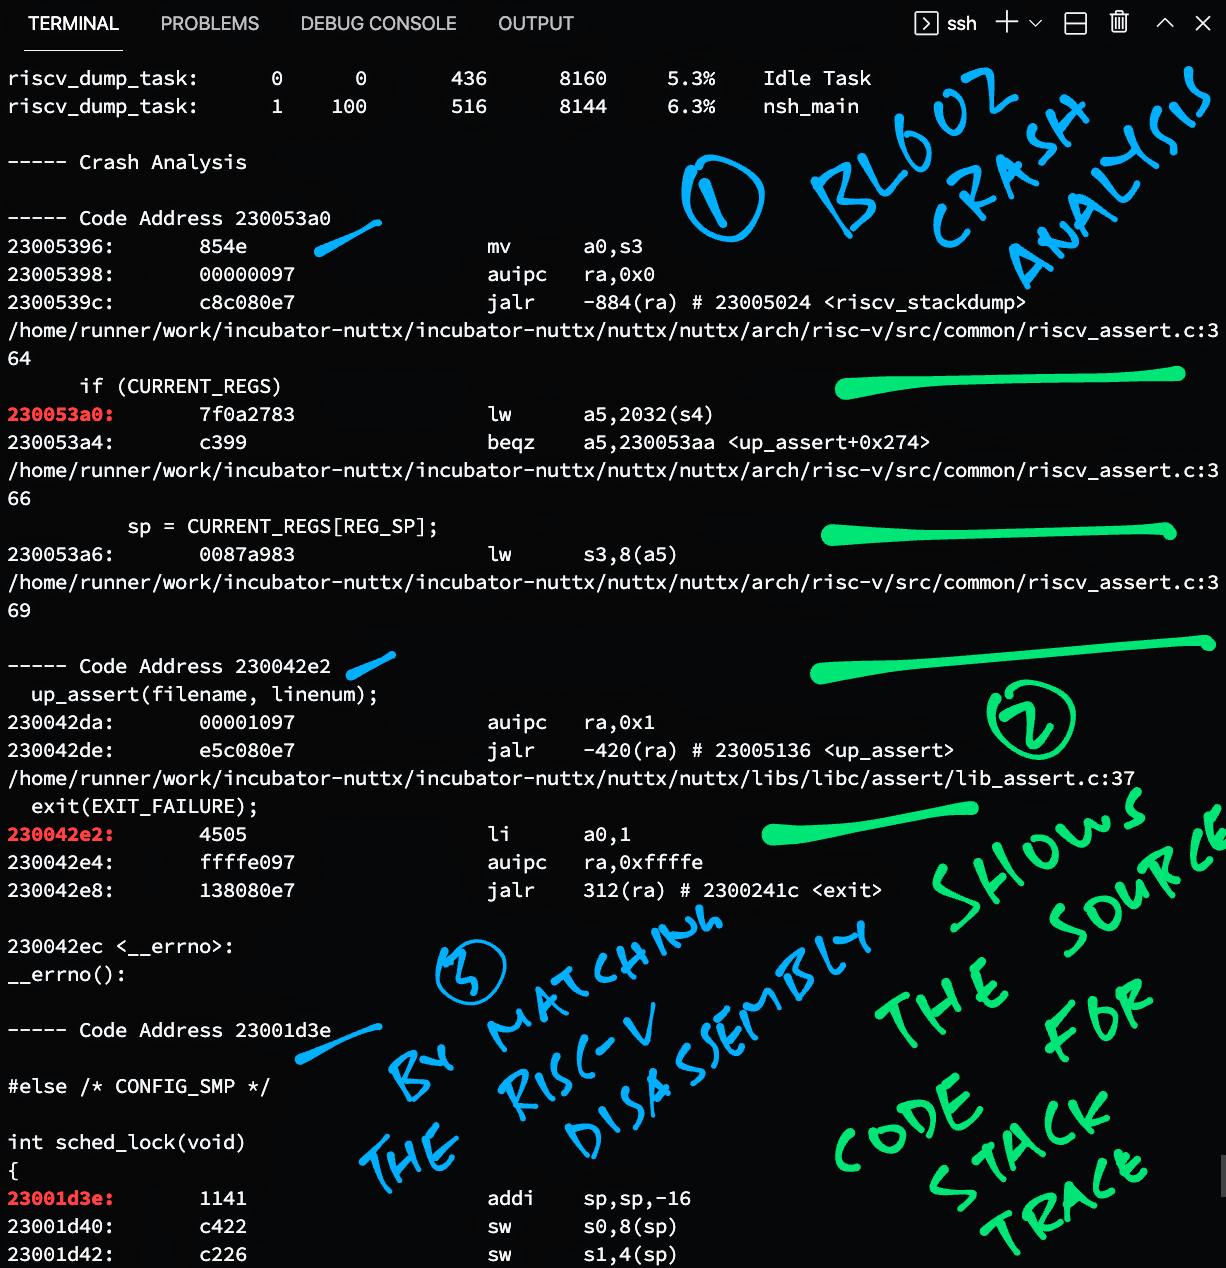
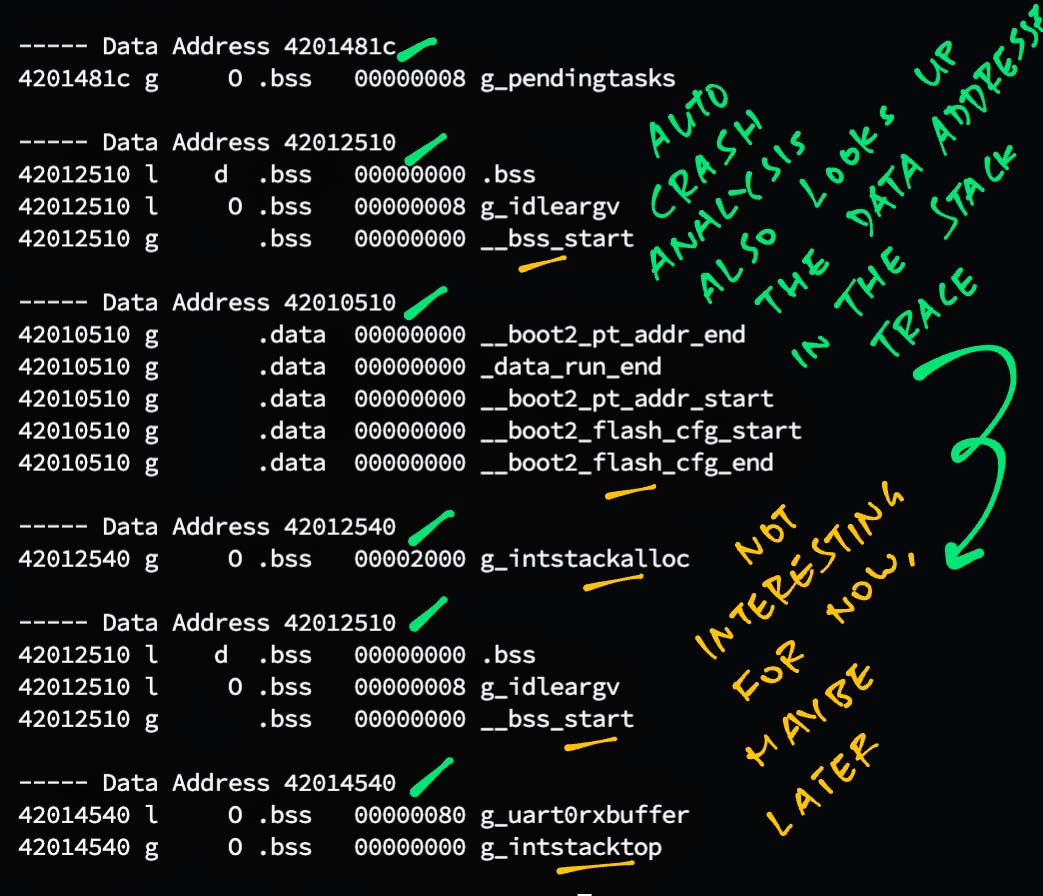
These are the Data Addresses decoded from the Stack Trace…
There’s a Design Flaw in our script that needs fixing… It doesn’t detect crashes while running the SPI, LoRaWAN and Touch Panel Tests. (See this)
(We should probably use a State Machine instead of a long chain of hacky “if-else” statements)
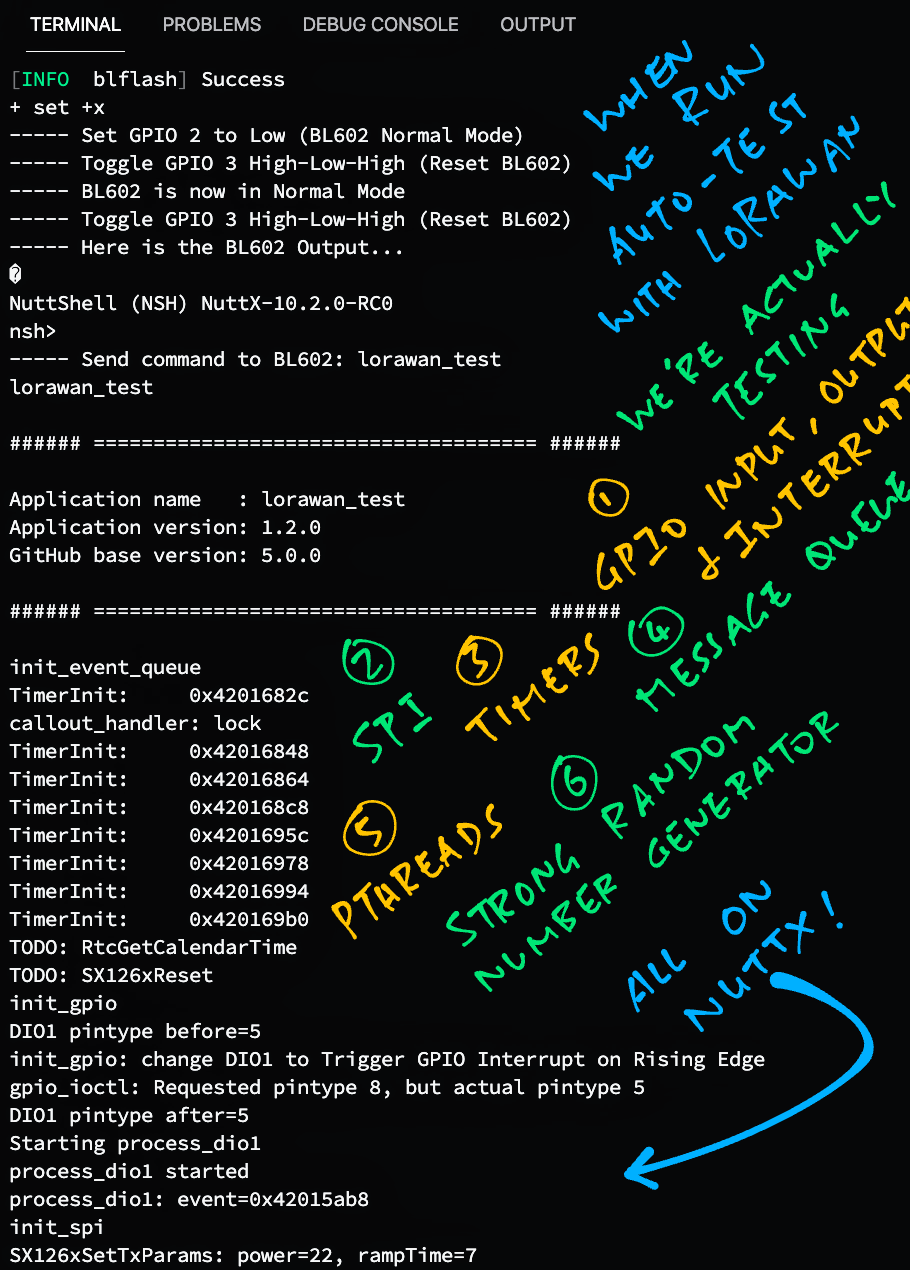
What’s the best way to auto-test all the NuttX functions: GPIO, SPI, ADC, Interrupts, Timers, Threads, Message Queues, Random Number Generator, …?
LoRaWAN is the perfect way to give NuttX a thorough workout!
GPIO Input: LoRaWAN reads a GPIO Input to poll the Busy State of the LoRa Transceiver
GPIO Output: Chip Select for the LoRa Transceiver
GPIO Interrupt: Triggered by LoRa Transceiver when a LoRa Packet is received
SPI: LoRa Transceiver talks on the SPI Bus
ADC: Used by the Internal Temperature Sensor (See below)
Timer: Triggers the periodic sending of Data Packets
Message Queue: Handles Transmit / Receive / Timeout Events
PThread: LoRaWAN handles events with a Background Thread
Strong Random Number Generator: Generates non-repeating LoRaWAN Nonces
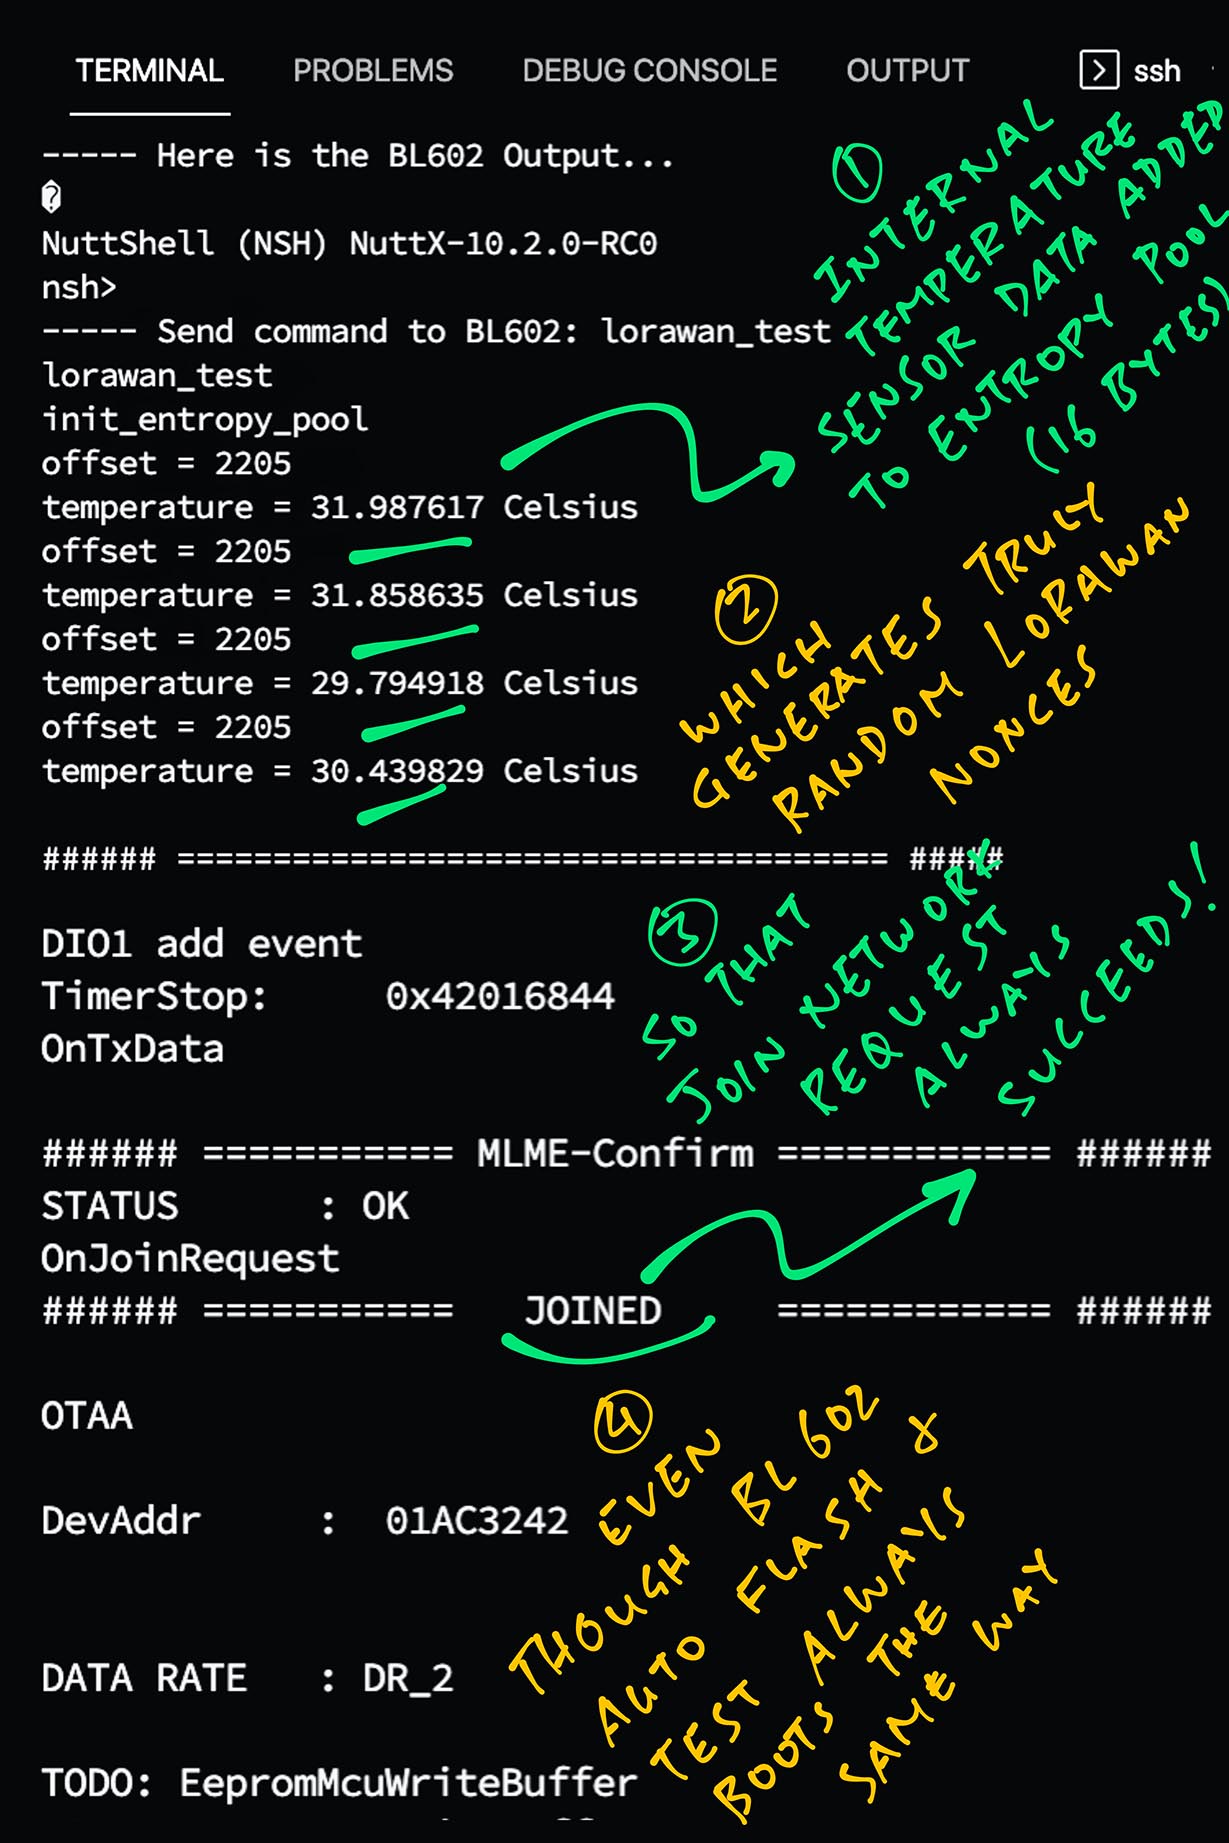
Internal Temperature Sensor: Seeds the Entropy Pool for the Random Number Generator (Here’s why)
We shall run this LoRaWAN Stack to connect to the LoRaWAN Network (ChirpStack) and transmit a Data Packet…
To run the LoRaWAN Auto-Test we switch to the Release Build (instead of the Upstream Build)…
##  Download the Release Build (instead of the Upstream Build)
export BUILD_PREFIX=release

##  Download this date of the build
export BUILD_DATE=2022-01-19

##  Run the script
remote-bl602/scripts/test.sh
(Release Build includes the LoRaWAN Stack)
After booting NuttX, our script sends the Test LoRaWAN command to the NuttX Shell: test.sh
##  If BL602 has not crashed, send the test command to BL602
echo "lorawan_test" >/dev/ttyUSB0

##  Wait a while for the test command to run
sleep 30

##  Check whether BL602 has joined the LoRaWAN Network
set +e  ##  Don't exit when any command fails
match=$(grep "JOINED" /tmp/test.log)
set -e  ##  Exit when any command fails
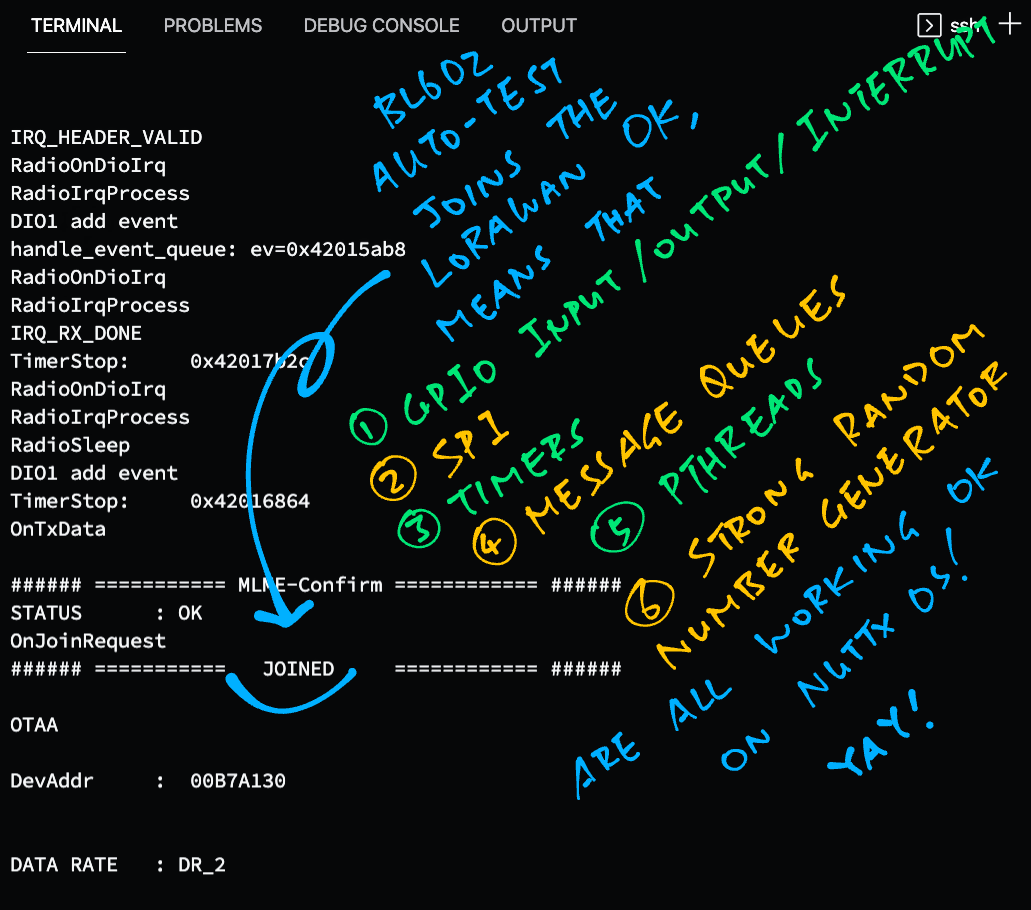
And it watches for this output message…
###### =========== MLME-Confirm ============ ######
STATUS: OK
###### =========== JOINED ============ ######Which means that BL602 has successfully joined the LoRaWAN Network…
===== All OK! BL602 has successfully joined the LoRaWAN NetworkAnd everything has tested OK on NuttX!
Here’s the demo of the LoRaWAN Auto-Test…
Back to our original question: Why are we doing all this?
My situation is kinda complicated, I need to worry about 3 branches of the NuttX Code…
Upstream Branch: Daily Upstream Updates from from the master branch of Apache’s NuttX Repo
(Without the LoRaWAN Stack)
Release Branch: This is the master branch of my repo that I reference in my NuttX Articles
(Includes the LoRaWAN Stack)
Downstream Branch: This is the downstream branch of my repo that merges the updates from the above 2 branches
(Includes the LoRaWAN Stack)
This is how we keep them in sync…
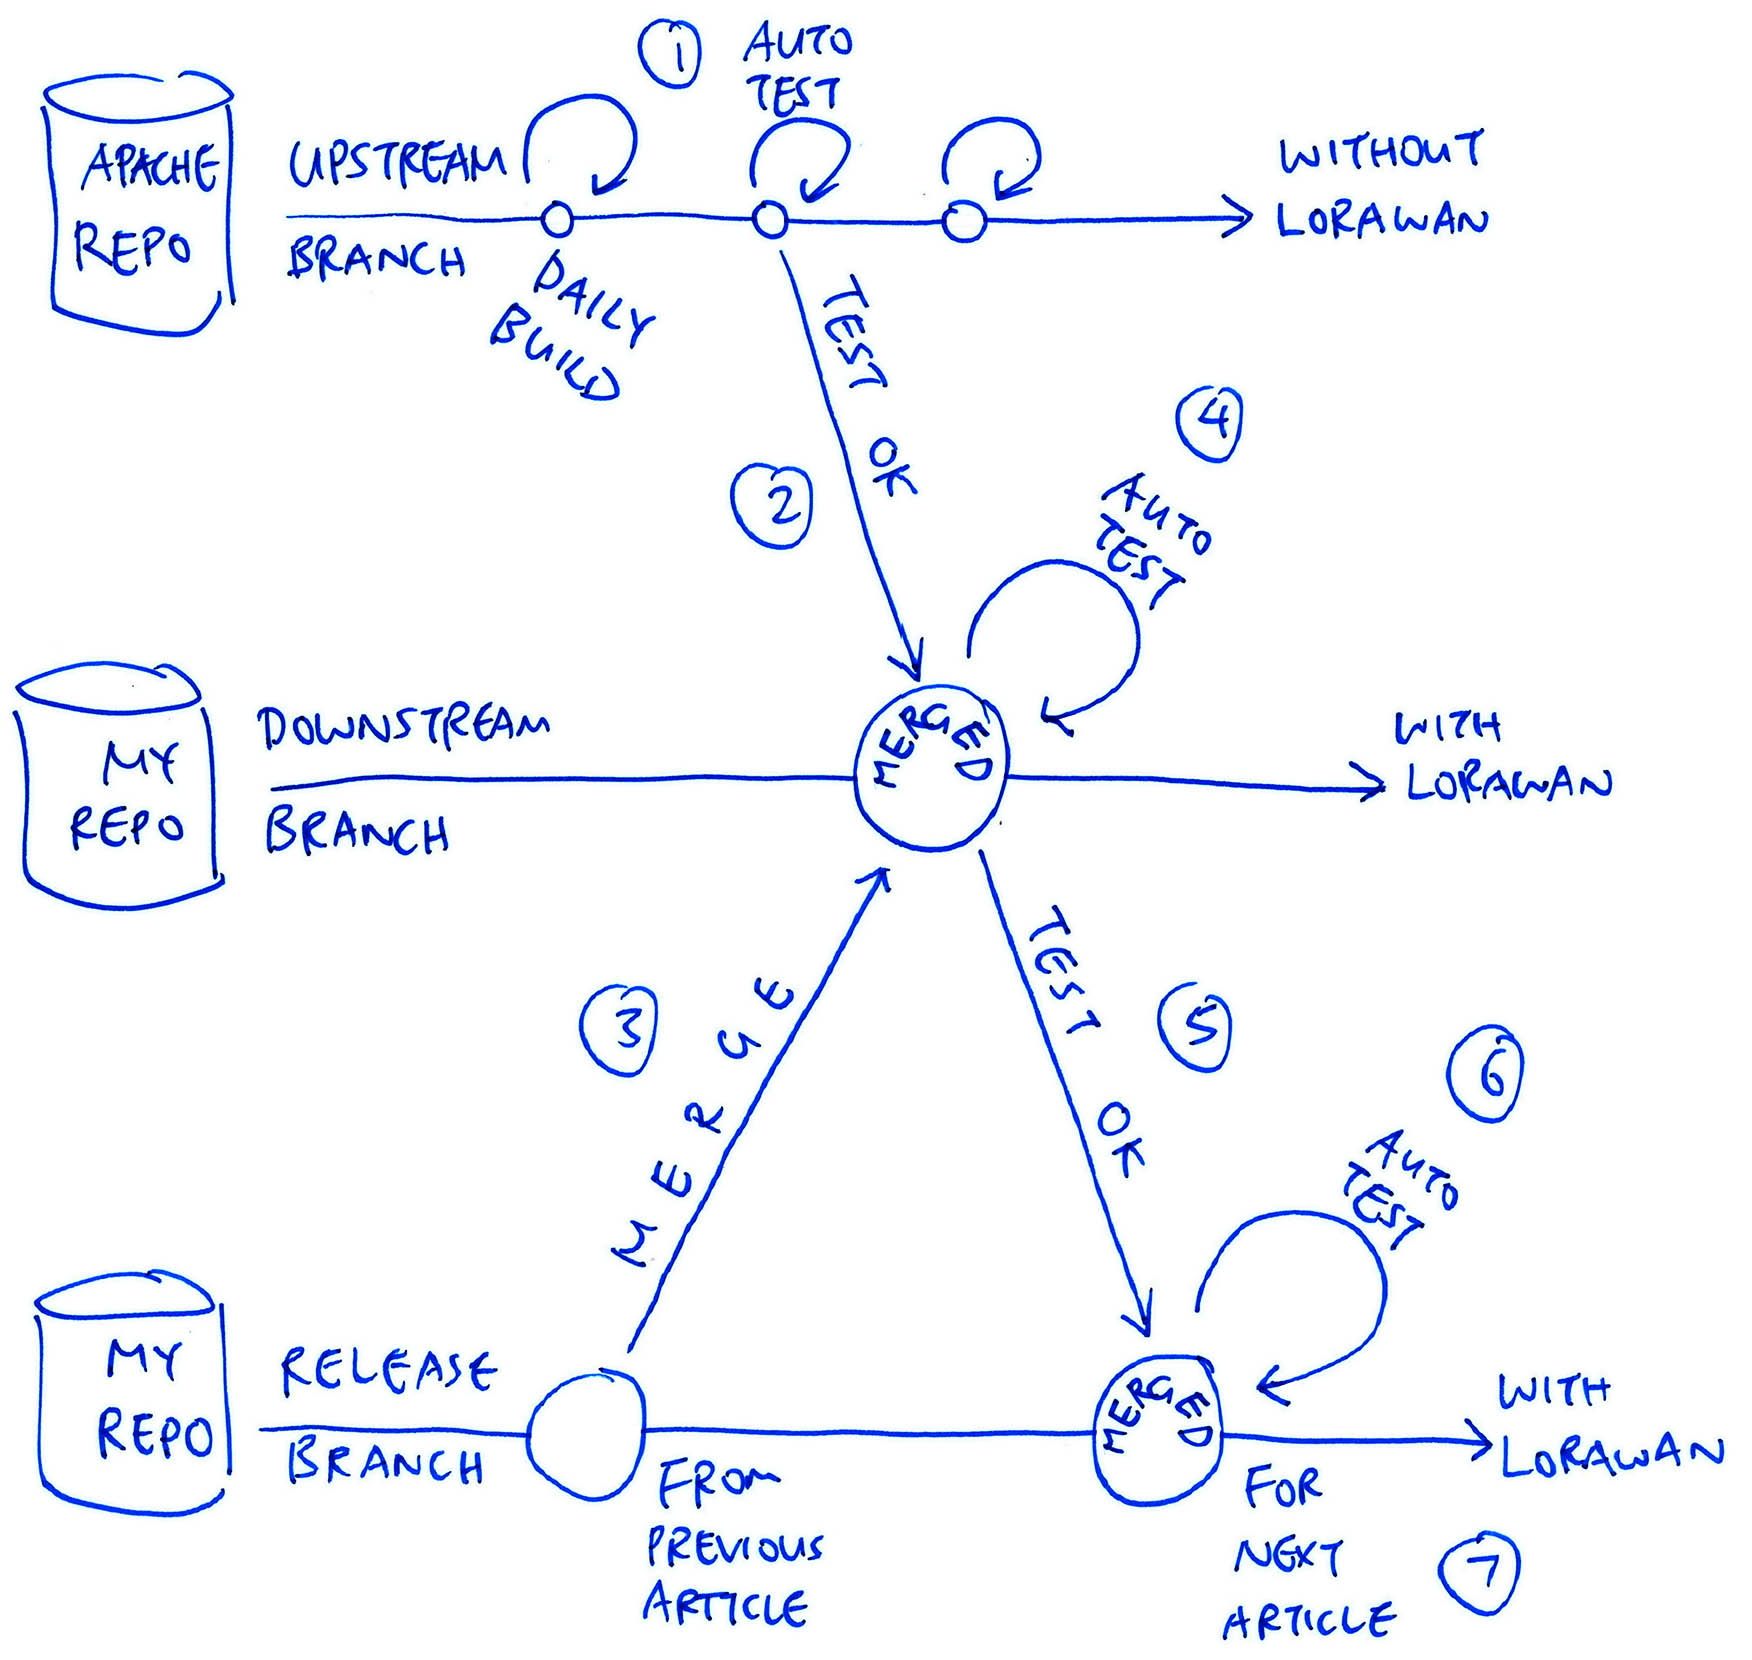
We build Upstream NuttX every day with GitHub Actions. (See this)
We run our Auto Flash and Test Script daily to check if the build boots OK on BL602.
(Upstream NuttX doesn’t include the LoRaWAN Stack)
If the Upstream Build is OK, we merge Upstream NuttX into our Downstream Branch.
We also merge the Release Branch (from our previous NuttX Article) to the Downstream Branch.
(Which includes the LoRaWAN Stack)
After merging the branches, we run Auto Flash and Test to verify that LoRaWAN runs OK on BL602.
If LoRaWAN runs OK, we merge the Downstream Branch to the Release Branch.
We run Auto Flash and Test one last time on the Release Branch to be really sure that LoRaWAN is still OK.
We feature the updated Release Branch in our next NuttX Article.
Looks complicated, but that’s how we keep our NuttX Articles in sync with the latest updates from Upstream NuttX.
(Which ensures that the code in our NuttX Articles won’t go obsolete too soon)
How do we run Auto Flash and Test on the Downstream Build?
Like this…
##  Download the Downstream Build (instead of the Upstream Build)
export BUILD_PREFIX=downstream

##  Download this date of the build
export BUILD_DATE=2022-01-19

##  Run the script
remote-bl602/scripts/test.shCan we solve this by merging the LoRaWAN Stack upstream?
The LoRaWAN Stack is not ready to be upstreamed because it uses different Coding Conventions. (See this)
Even if we could, we would need an automated, remote way to test if the LoRaWAN Stack is still working when there are changes to Upstream NuttX.
(Our Auto Flash and Test Script would be super helpful here)
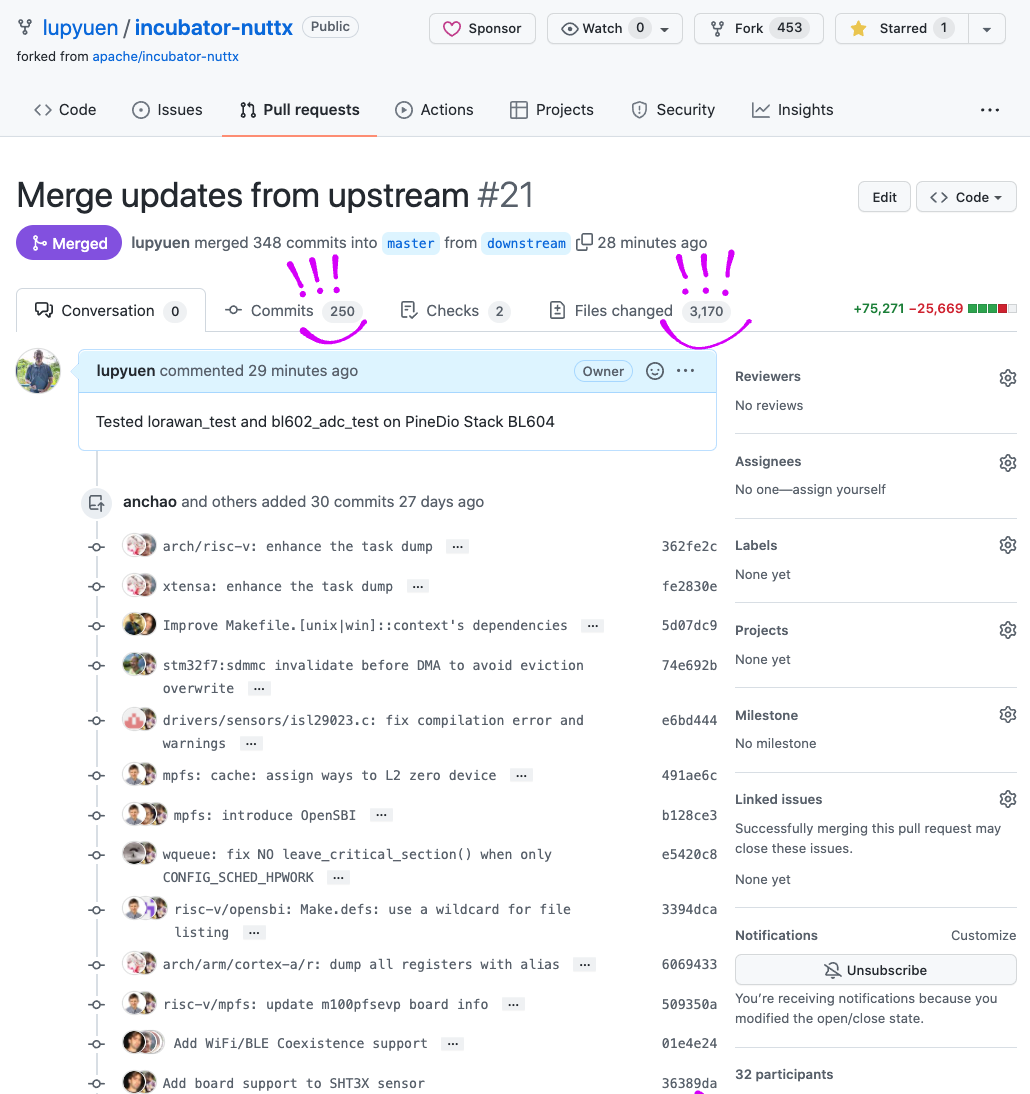
But for now… No more worries about merging hundreds of upstream commits (and thousands of changed files) into our NuttX Repo! 👍
UPDATE: Check out the new article on Automated Testing for PineDio Stack BL604
After 14 months of flipping the jumper and smashing the button on BL602, I’m so glad we have an automated way to Flash and Test BL602!
I hope the Flash and Test Script will make your NuttX Development more productive on BL602… Possibly on other microcontrollers too!
Many Thanks to my GitHub Sponsors for supporting my work! This article wouldn’t have been possible without your support.
Got a question, comment or suggestion? Create an Issue or submit a Pull Request here…
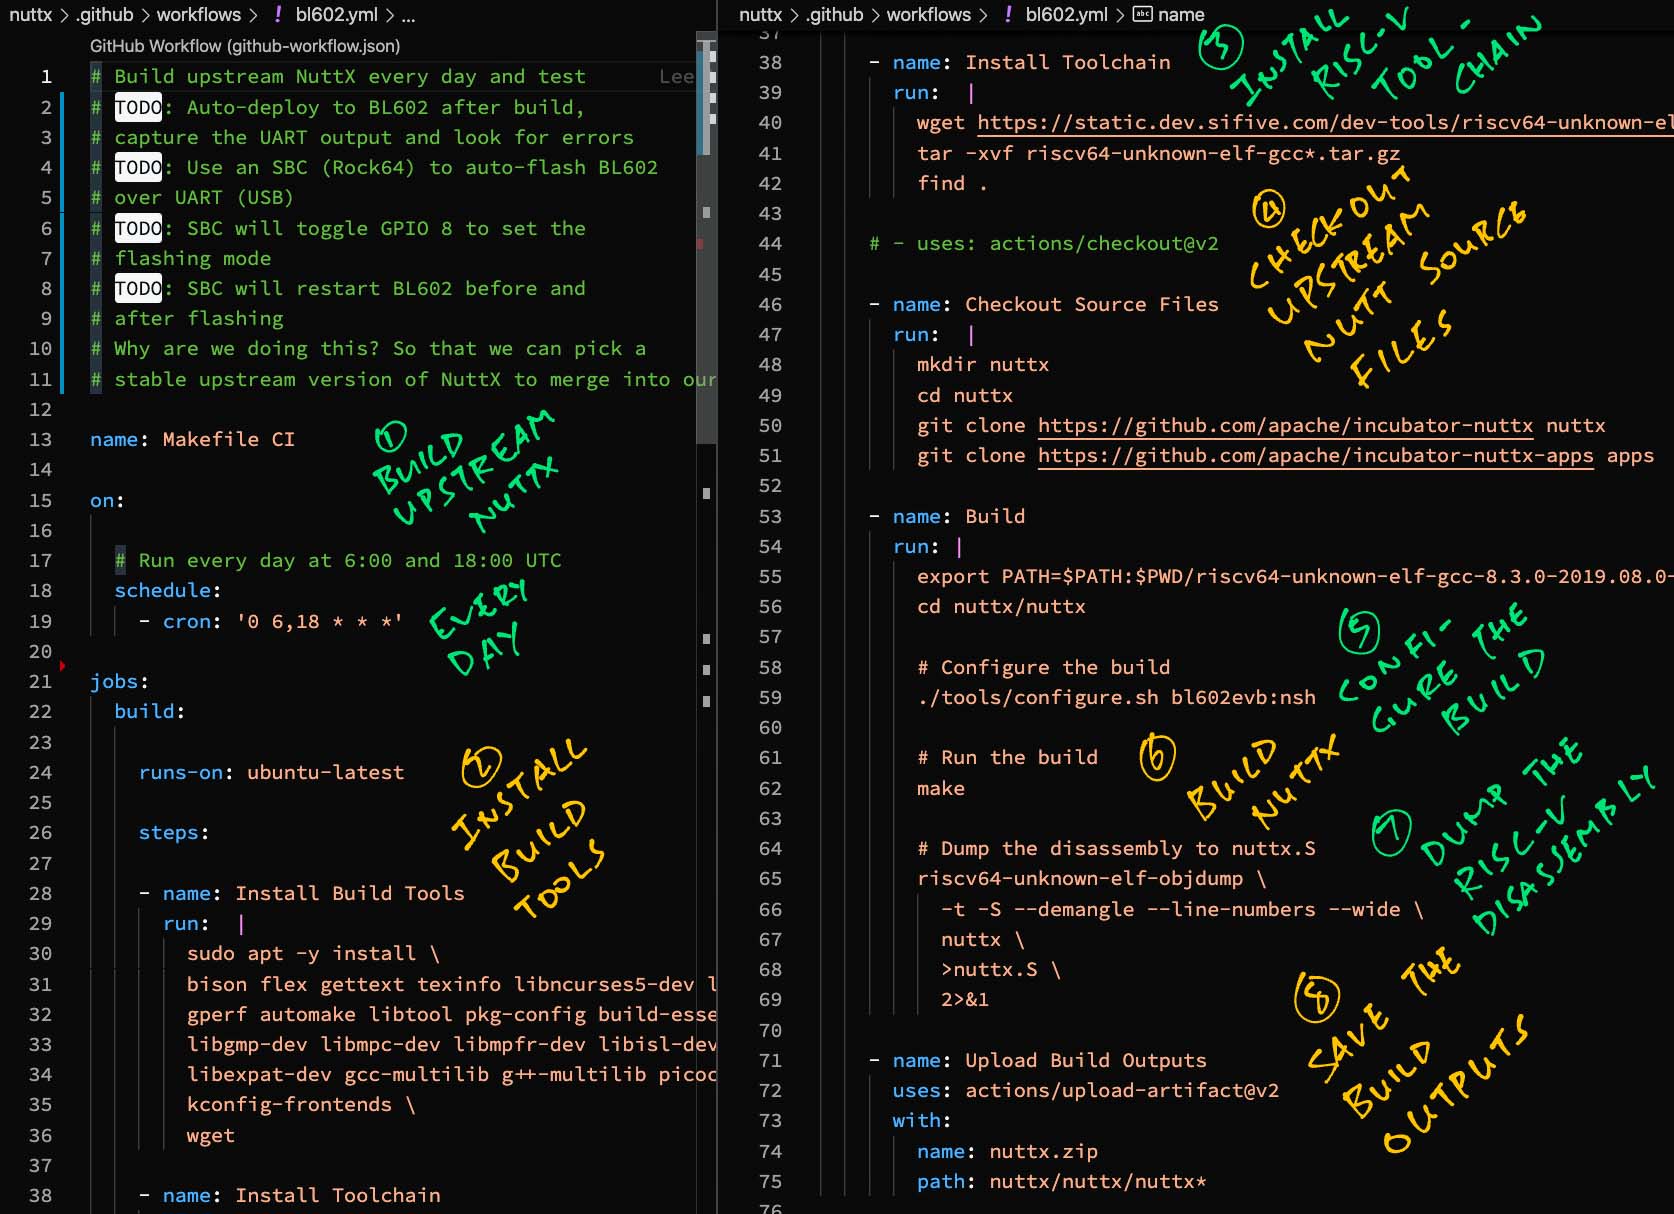
We auto-build the Upstream (Apache) version of NuttX every day with GitHub Actions, producing these files…
nuttx: Firmware in ELF Format
nuttx.bin: Firmware Binary to be flashed
nuttx.S: RISC-V Disassembly for the firmware
nuttx.map: Linker Map for the firmware
nuttx.config: Build Configuration (from .config)
Which are consumed by our Flash and Test Script.
In this section we study the workflow for the Upstream Build…
Similar workflows are used for the Release and Downstream Builds…
The Upstream Build is scheduled every day at 0:30 UTC: bl602.yml
name: BL602 Upstream
on:
  ## Run every day at 0:30 UTC, because 0:00 UTC seems too busy for the scheduler
  schedule:
    - cron: '30 0 * * *'
(The build will actually start at around 1:45 UTC, depending on the available server capacity at GitHub Actions)
Note that the scheduled run is not guaranteed, it may be cancelled if GitHub Actions is too busy. (See this)
First we install the Build Tools needed by NuttX…
jobs:
  build:
    runs-on: ubuntu-latest
    steps:
    - name: Install Build Tools
      run:  |
        sudo apt -y update
        sudo apt -y install \
          bison flex gettext texinfo libncurses5-dev libncursesw5-dev \
          gperf automake libtool pkg-config build-essential gperf genromfs \
          libgmp-dev libmpc-dev libmpfr-dev libisl-dev binutils-dev libelf-dev \
          libexpat-dev gcc-multilib g++-multilib u-boot-tools util-linux \
          kconfig-frontends \
wgetWe download the RISC-V GCC Toolchain (riscv64-unknown-elf-gcc) hosted at SiFive…
    - name: Install Toolchain
      run:  |
        wget https://static.dev.sifive.com/dev-tools/riscv64-unknown-elf-gcc-8.3.0-2019.08.0-x86_64-linux-ubuntu14.tar.gz
tar -xf riscv64-unknown-elf-gcc*.tar.gzWe checkout the NuttX Source Files from the Apache repo…
    - name: Checkout Source Files
      run:  |
        mkdir nuttx
        cd nuttx
        git clone https://github.com/apache/nuttx nuttx
        git clone https://github.com/apache/nuttx-apps apps
(For Release and Downstream Builds we checkout from the repo lupyuen/nuttx)
We’re almost ready to build NuttX, but first we configure the NuttX Build.
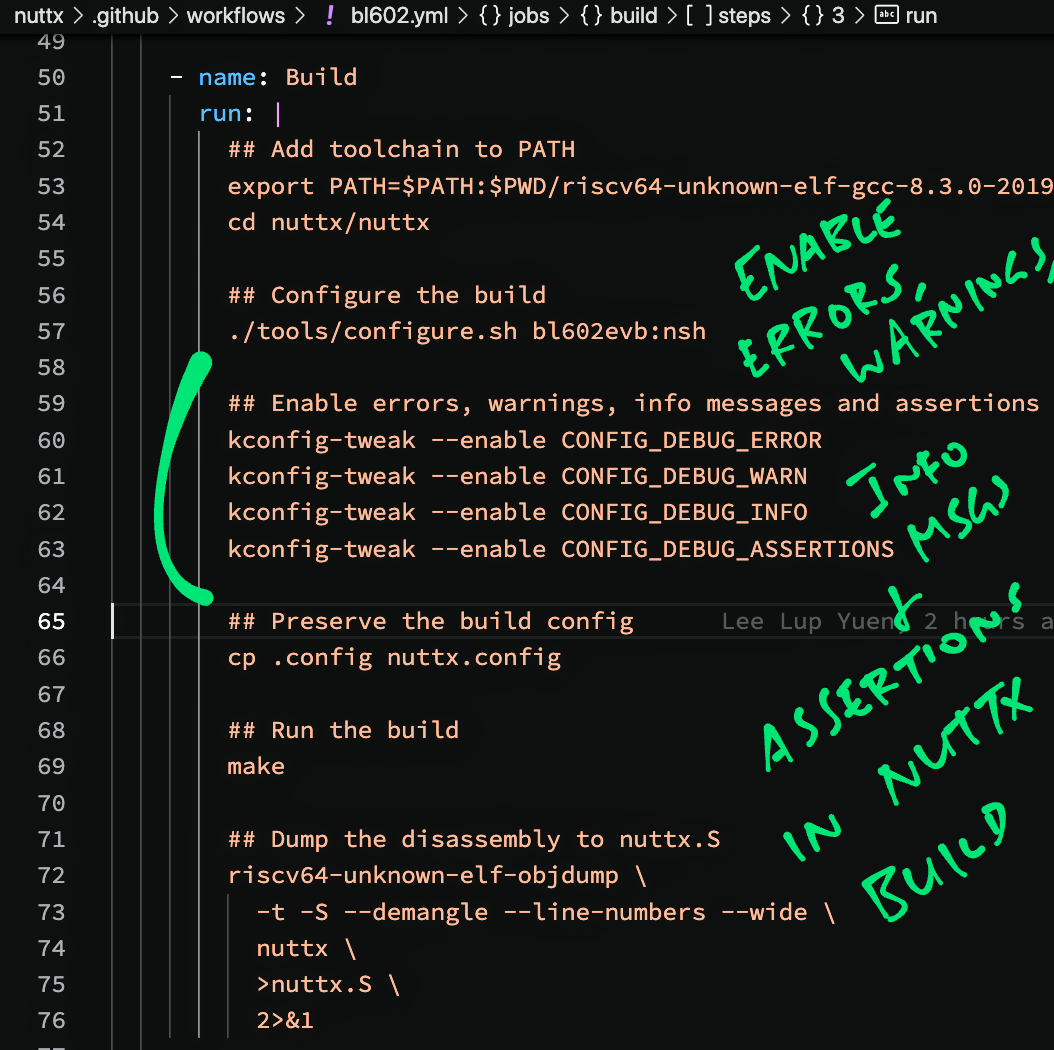
For the NuttX Build we configure BL602 as the target…
    - name: Build
      run: |
        ## Add toolchain to PATH
        export PATH=$PATH:$PWD/riscv64-unknown-elf-gcc-8.3.0-2019.08.0-x86_64-linux-ubuntu14/bin
        cd nuttx/nuttx

        ## Configure the build
        ./tools/configure.sh bl602evb:nsh
This creates the Build Config File .config.
Then we tweak the Build Config to show Errors, Warnings, Info Messages and Assertions…
        ## Enable errors, warnings, info messages and assertions
        kconfig-tweak --enable CONFIG_DEBUG_ERROR
        kconfig-tweak --enable CONFIG_DEBUG_WARN
        kconfig-tweak --enable CONFIG_DEBUG_INFO
        kconfig-tweak --enable CONFIG_DEBUG_ASSERTIONS

        ## Enable GPIO errors, warnings and info messages
        kconfig-tweak --enable CONFIG_DEBUG_GPIO
        kconfig-tweak --enable CONFIG_DEBUG_GPIO_ERROR
        kconfig-tweak --enable CONFIG_DEBUG_GPIO_WARN
        kconfig-tweak --enable CONFIG_DEBUG_GPIO_INFO

        ## Enable SPI errors, warnings and info messages
        kconfig-tweak --enable CONFIG_DEBUG_SPI
        kconfig-tweak --enable CONFIG_DEBUG_SPI_ERROR
        kconfig-tweak --enable CONFIG_DEBUG_SPI_WARN
kconfig-tweak --enable CONFIG_DEBUG_SPI_INFOWe enable Floating Point, Stack Canaries and 2 commands: “help” and “ls”…
        ## Enable Floating Point
        kconfig-tweak --enable CONFIG_LIBC_FLOATINGPOINT

        ## Enable Compiler Stack Canaries
        kconfig-tweak --enable CONFIG_STACK_CANARIES

        ## Enable NuttX Shell commands: help, ls
        kconfig-tweak --disable CONFIG_NSH_DISABLE_HELP
        kconfig-tweak --disable CONFIG_NSH_DISABLE_LS
We enable the GPIO Driver and Test App…
        ## Enable GPIO
        kconfig-tweak --enable CONFIG_DEV_GPIO
        kconfig-tweak --set-val CONFIG_DEV_GPIO_NSIGNALS 1

        ## Enable GPIO Test App
        kconfig-tweak --enable CONFIG_EXAMPLES_GPIO
        kconfig-tweak --set-str CONFIG_EXAMPLES_GPIO_PROGNAME "gpio"
        kconfig-tweak --set-val CONFIG_EXAMPLES_GPIO_PRIORITY 100
kconfig-tweak --set-val CONFIG_EXAMPLES_GPIO_STACKSIZE 2048We enable the BL602 SPI Driver…
        ## Enable SPI
        kconfig-tweak --enable CONFIG_BL602_SPI0
        kconfig-tweak --enable CONFIG_SPI
        kconfig-tweak --enable CONFIG_SPI_EXCHANGE
kconfig-tweak --enable CONFIG_SPI_DRIVERFinally we copy the Build Config to nuttx.config so that we may download and inspect later…
        ## Preserve the build config
        cp .config nuttx.config
We’re ready to build NuttX!
(For Release and Downstream Builds we also enable the LoRaWAN Stack)
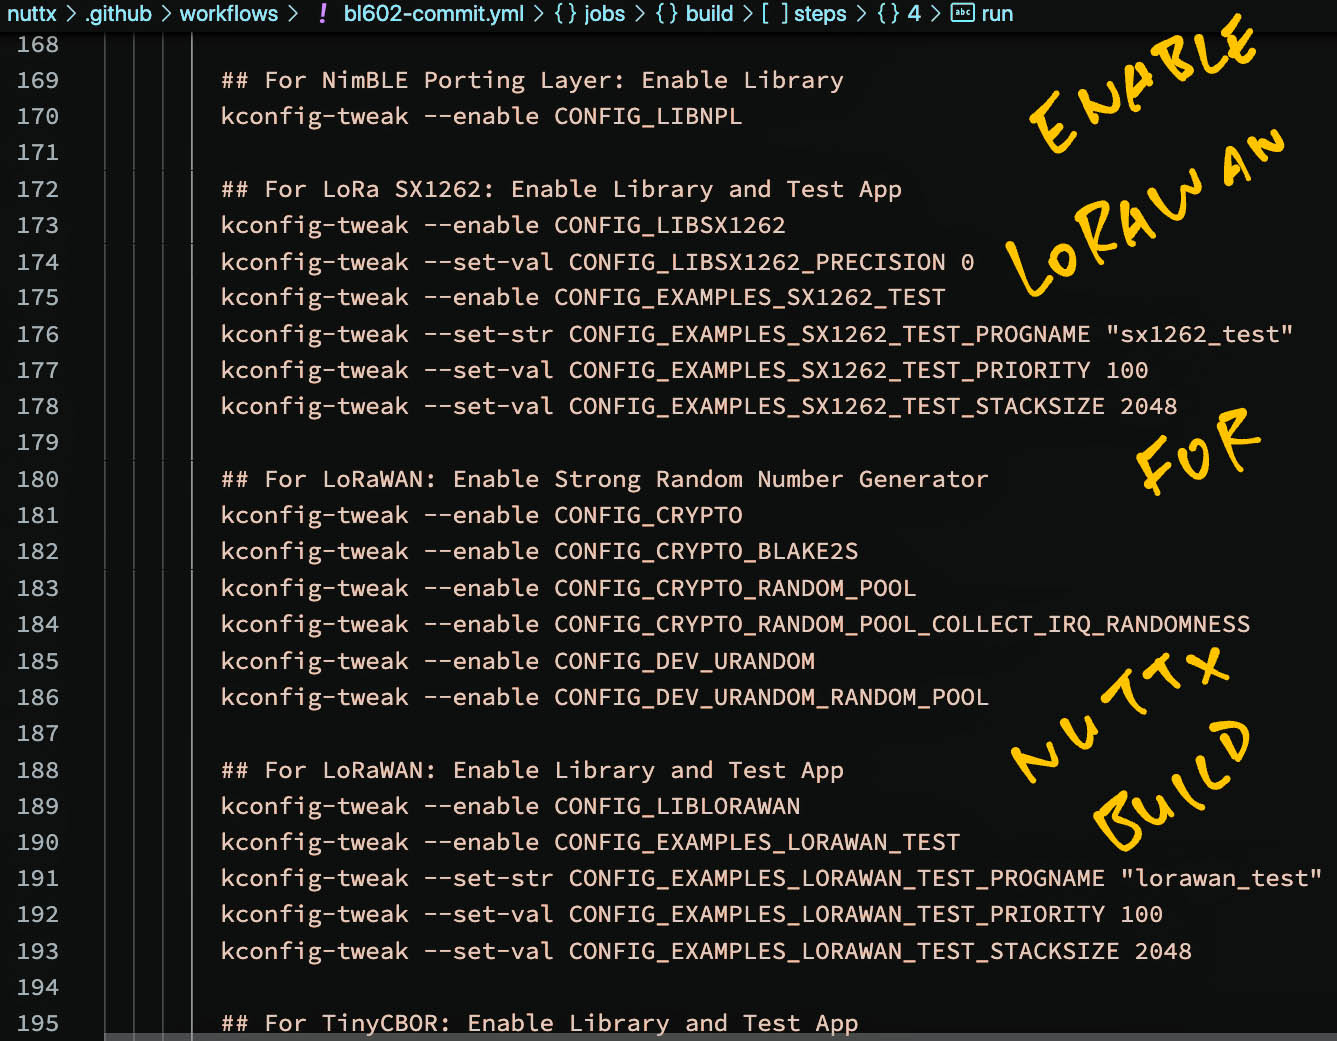
This builds the NuttX Firmware…
        ## Run the build
        make
Which creates the Firmware Binary nuttx.bin (for flashing) and the Firmware ELF nuttx.
(The build completes in under 3 minutes)
We dump the RISC-V Disassembly of the Firmware ELF to nuttx.S…
        ## Dump the disassembly to nuttx.S
        riscv64-unknown-elf-objdump \
          -t -S --demangle --line-numbers --wide \
          nuttx \
          >nuttx.S \
          2>&1
nuttx.S will be used by our Flash and Test Script to do Crash Analysis.
We upload all Build Outputs (including the Build Config nuttx.config) as Artifacts so that we may download later…
    - name: Upload Build Outputs
      uses: actions/upload-artifact@v2
      with:
        name: nuttx.zip
        path: nuttx/nuttx/nuttx*
The NuttX Build Outputs are now available for downloading as Artifacts, but they are protected by GitHub Login.
To allow our Flash and Test Script to access the files without GitHub Authentication, we publish the files as a GitHub Release…
The final task in our GitHub Actions workflow is to publish the NuttX Build Outputs as a GitHub Release.
(Which will be downloaded by our Flash and Test Script)
Let’s run through the steps to publish a GitHub Release that looks like this…
First we zip the NuttX Build Outputs into nuttx.zip…
    - name: Zip Build Outputs
      run: |
        cd nuttx/nuttx
        zip nuttx.zip nuttx*
Next we get the Current Date: 2022-01-19
    - name: Get Current Date
      id: date
      run: echo "::set-output name=date::$(date +'%Y-%m-%d')"
We create a Draft Release tagged as upstream-2022-01-19…
    - name: Create Draft Release
      id: create_release
      uses: actions/create-release@v1
      env:
        GITHUB_TOKEN: ${{ secrets.GITHUB_TOKEN }}
      with:
        tag_name: upstream-${{ steps.date.outputs.date }}
        release_name: upstream-${{ steps.date.outputs.date }}
        draft: true
        prerelease: false
We upload nuttx.zip to the Draft Release…
    - name: Upload Release
      uses: actions/upload-release-asset@v1.0.1
      env:
        GITHUB_TOKEN: ${{ secrets.GITHUB_TOKEN }}
      with:
        upload_url: ${{ steps.create_release.outputs.upload_url }}
        asset_path: nuttx/nuttx/nuttx.zip
        asset_name: nuttx.zip
        asset_content_type: application/zip
And publish the Release…
    - name: Publish Release
      uses: eregon/publish-release@v1
      env:
        GITHUB_TOKEN: ${{ secrets.GITHUB_TOKEN }}
      with:
        release_id: ${{ steps.create_release.outputs.id }}
The end! That’s how we build Upstream NuttX every day and publish the Build Outputs.
Check out the workflows for the Release and Downstream Builds…
How are they different from the Upstream Build?
The Release and Downstream Builds…
Are triggered by commits to the Release (master) and Downstream Branches (instead of scheduled time)
Checkout the Source Files from a different repo: lupyuen/nuttx
Enable the LoRaWAN Stack
Update the BL602 Pin Definitions to accommodate the Semtech SX1262 LoRa Transceiver
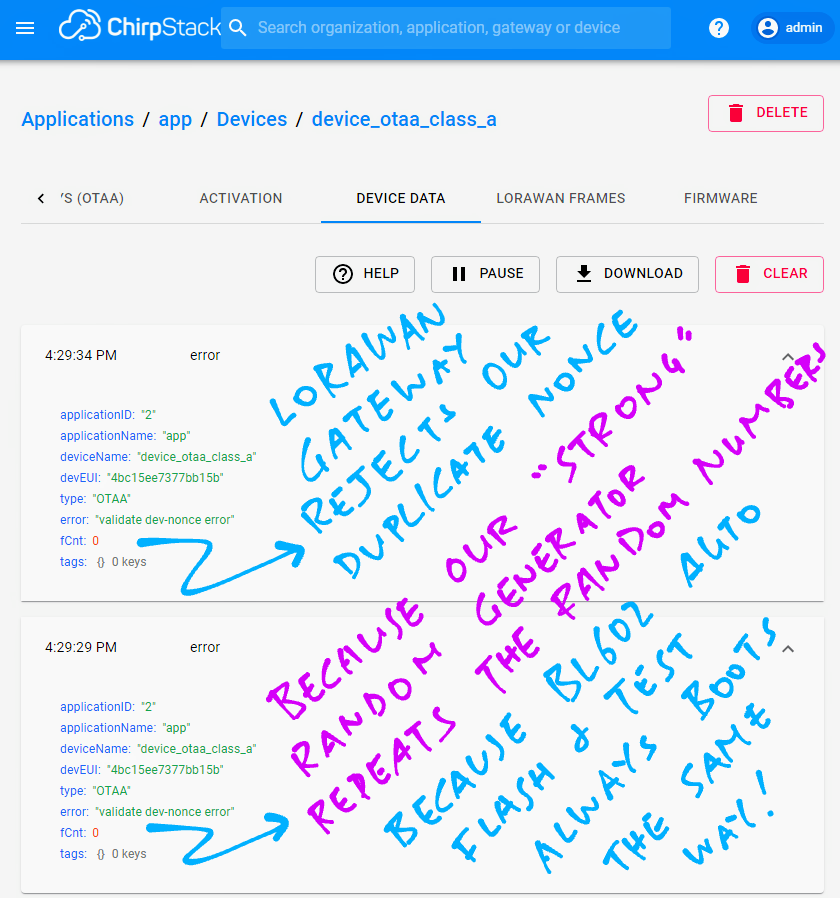
What’s a LoRaWAN Nonce?
Our LoRaWAN Stack transmits a random number called a Nonce when it joins a LoRaWAN Network.
To prevent Replay Attacks, the Nonce must be unique and should never be reused.
Is there a problem with LoRaWAN Nonces?
Our LoRaWAN Gateway (ChirpStack) says that it has detected Duplicate Nonces. (“validate dev-nonce error” in the pic above)
Because of Duplicate Nonces, our device can’t join the LoRaWAN Network. (Until after repeated retries)
But our LoRaWAN Nonces are totally random right?
We generate Nonces with NuttX’s Strong Random Number Generator with Entropy Pool.
Which generates totally random numbers in the real world.
But our Auto Flash and Test Script boots and runs NuttX so predictably that the same random numbers are re-generated at each boot.
(More about Strong Random Number Generator)
How shall we fix our LoRaWAN Nonces?
To fix this, we take data from an unpredictable source: Internal Temperature Sensor…
And feed the Temperature Sensor Data into NuttX’s Entropy Pool.
So that the Strong Random Number Generator will generate totally random numbers once again.
This is how we do it: lorawan_test/lorawan_test_main.c
//  If we are using Entropy Pool and the BL602 ADC is available,
//  add the Internal Temperature Sensor data to the Entropy Pool.
//  This prevents duplicate Join Nonce during BL602 Auto Flash and Test.
static void init_entropy_pool(void) {
  //  Repeat 4 times to get good entropy (16 bytes)
  for (int i = 0; i < 4; i++) {
    //  Read the Internal Temperature Sensor
    float temp = 0.0;
    get_tsen_adc(&temp, 1);

    //  Add Sensor Data (4 bytes) to Entropy Pool
    up_rngaddentropy(                  //  Add integers to Entropy Pool...
      RND_SRC_SENSOR,                  //  Source is Sensor Data
      (FAR const uint32_t *) &temp,    //  Integers to be added
      sizeof(temp) / sizeof(uint32_t)  //  How many integers (1)
    );
  }

  //  Force reseeding random number generator from entropy pool
  up_rngreseed();
}(get_tsen_adc is defined here)
This code adds 4 bytes of Temperature Sensor Data 4 times, adding a total of 16 bytes to the Entropy Pool.
(Which should be sufficiently unpredictable!)
The output shows that the Internal Temperature is indeed random: release-2022-01-19
NuttShell (NSH) NuttX-10.2.0-RC0
nsh> lorawan_test

init_entropy_pool
temperature = 30.181866 Celsius
temperature = 29.794918 Celsius
temperature = 30.439829 Celsius
temperature = 28.376112 Celsius
Our LoRaWAN Stack now generates different LoRaWAN Nonces for every Flash and Test. And the Join Network Request always succeeds! 🎉
