📝 3 Jan 2022

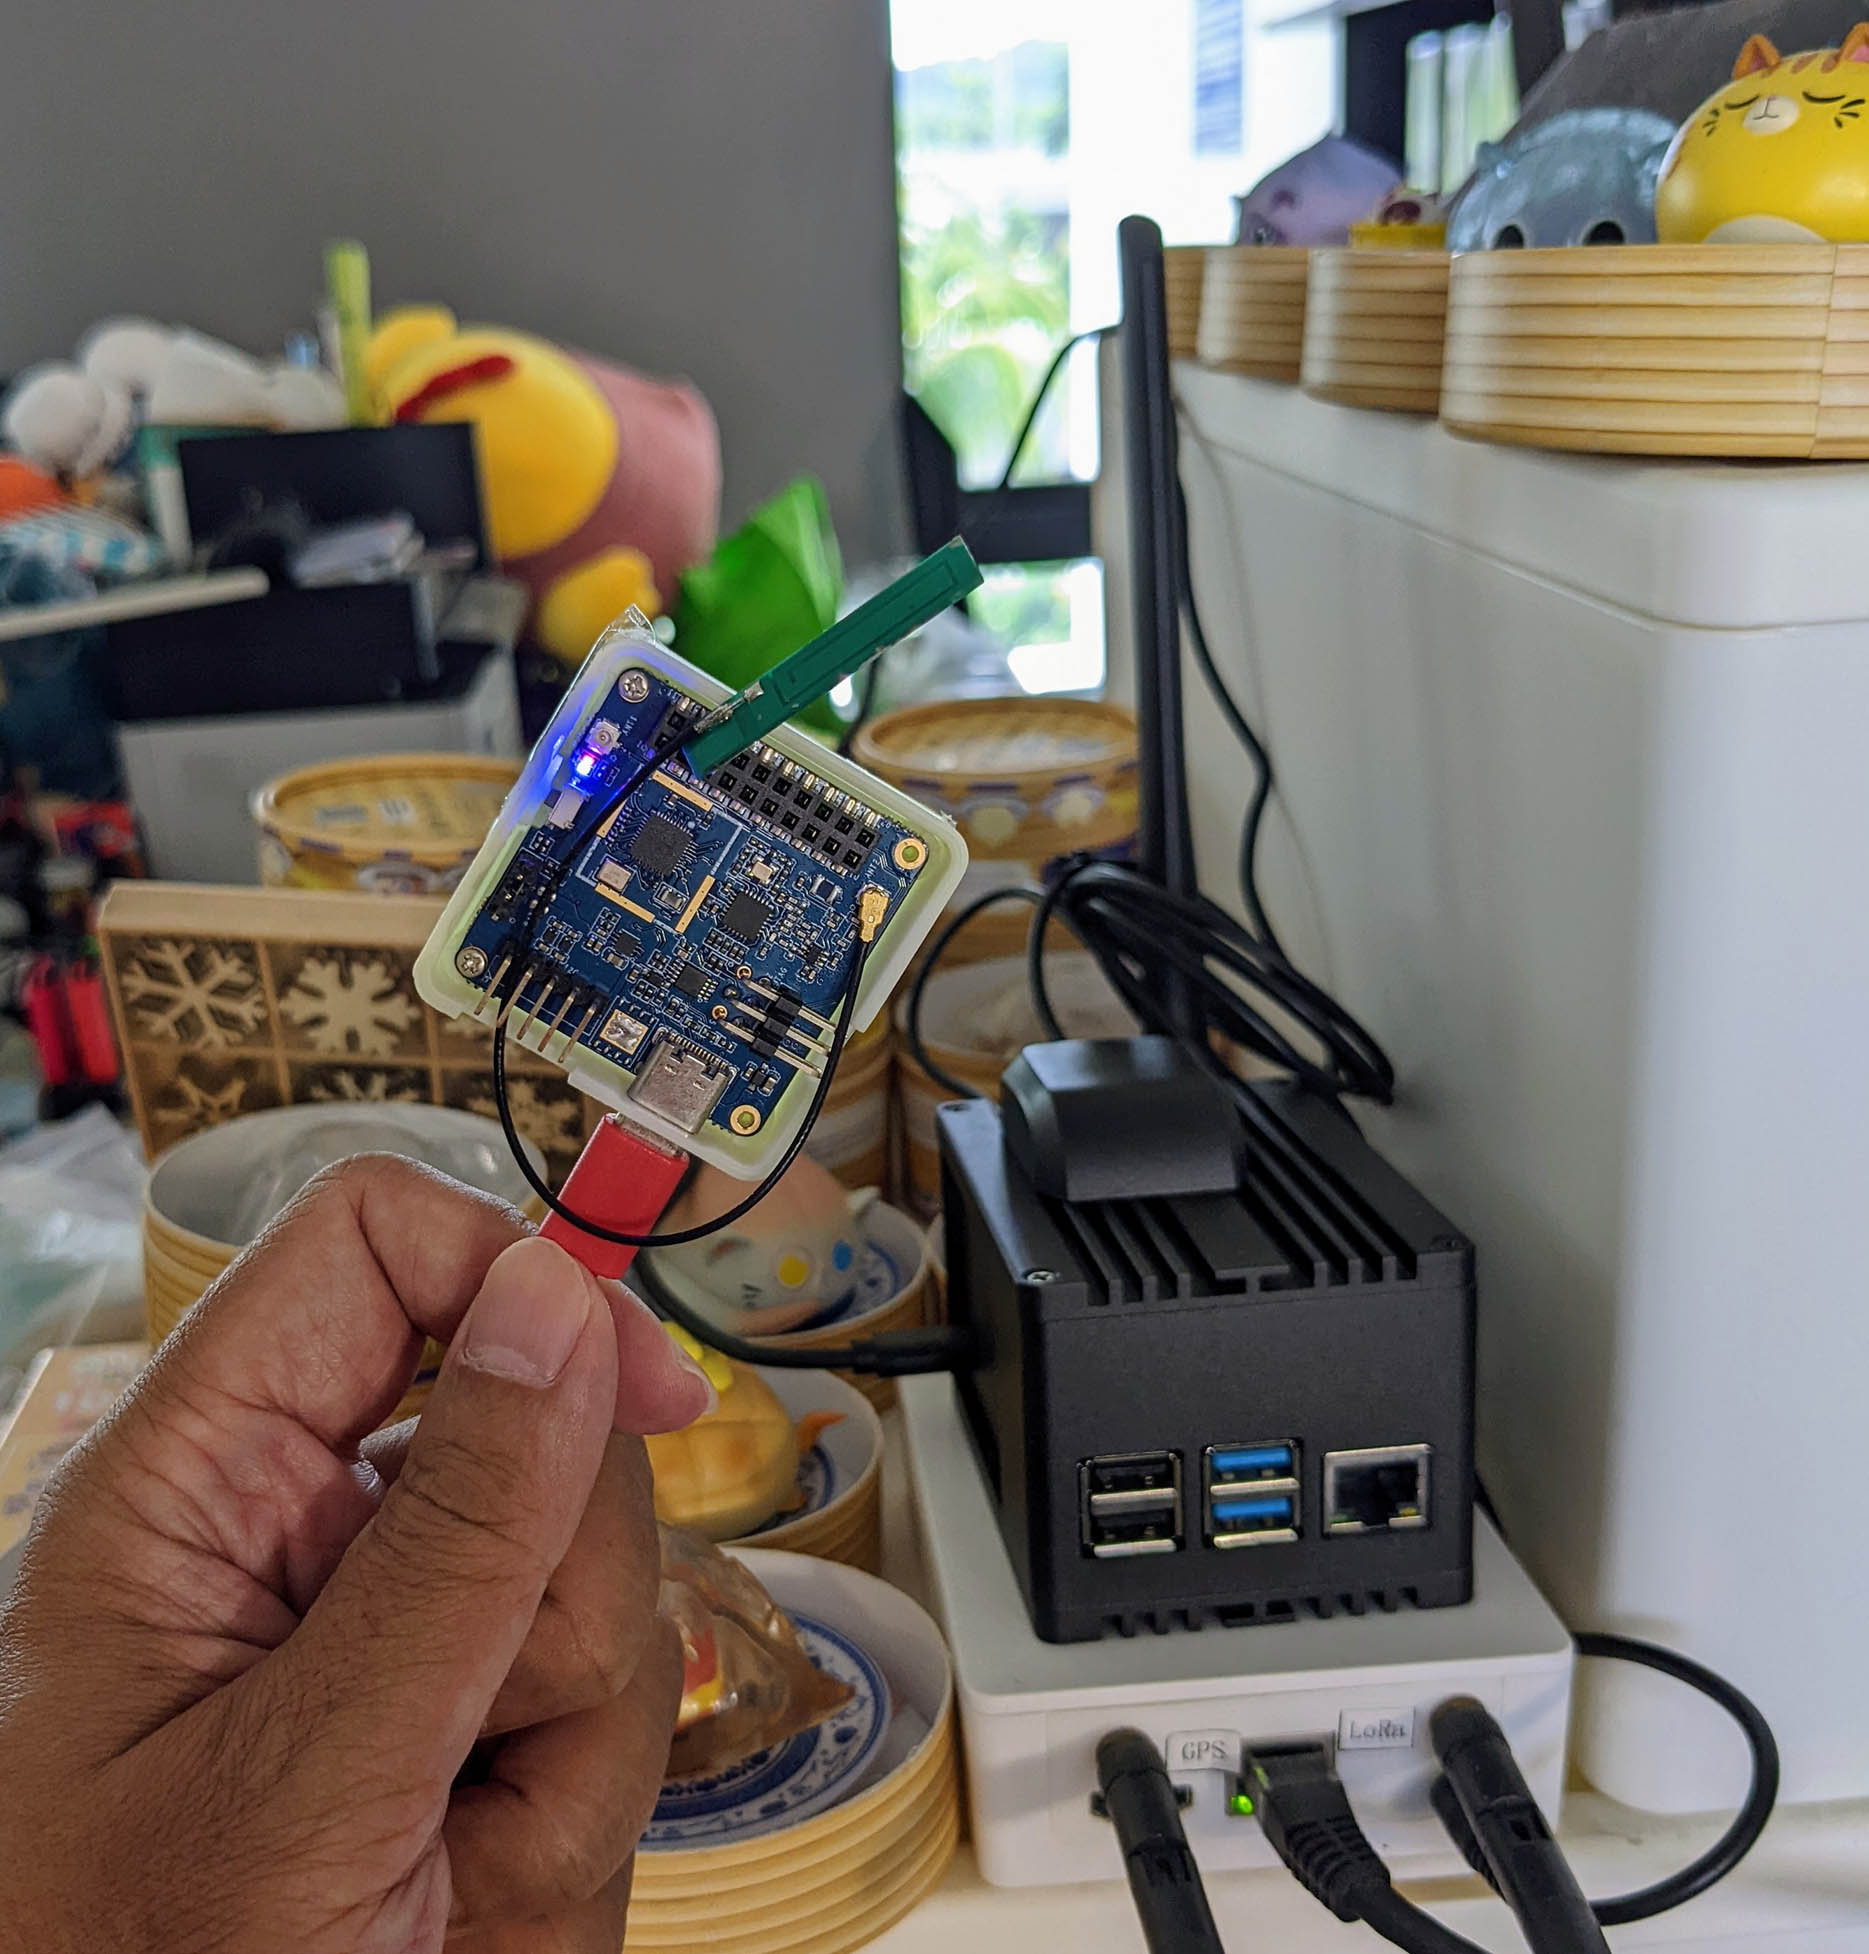
PineDio Stack BL604 RISC-V Board (left) talking LoRaWAN to RAKwireless WisGate LoRaWAN Gateway (right)
Last article we got LoRa (the long-range, low-bandwidth wireless network) running on Apache NuttX OS…
Today we shall run LoRaWAN on NuttX OS!
Why would we need LoRaWAN?
LoRa will work perfectly fine for unsecured Point-to-Point Wireless Communication between simple devices.
But if we’re building an IoT Sensor Device that will transmit data packets securely to a Local Area Network or to the internet, we need LoRaWAN.
We shall test LoRaWAN on NuttX with PineDio Stack BL604 RISC-V Board (pic above) and its onboard Semtech SX1262 Transceiver.
(LoRaWAN on NuttX works OK on ESP32, thanks @4ever_freedom!)
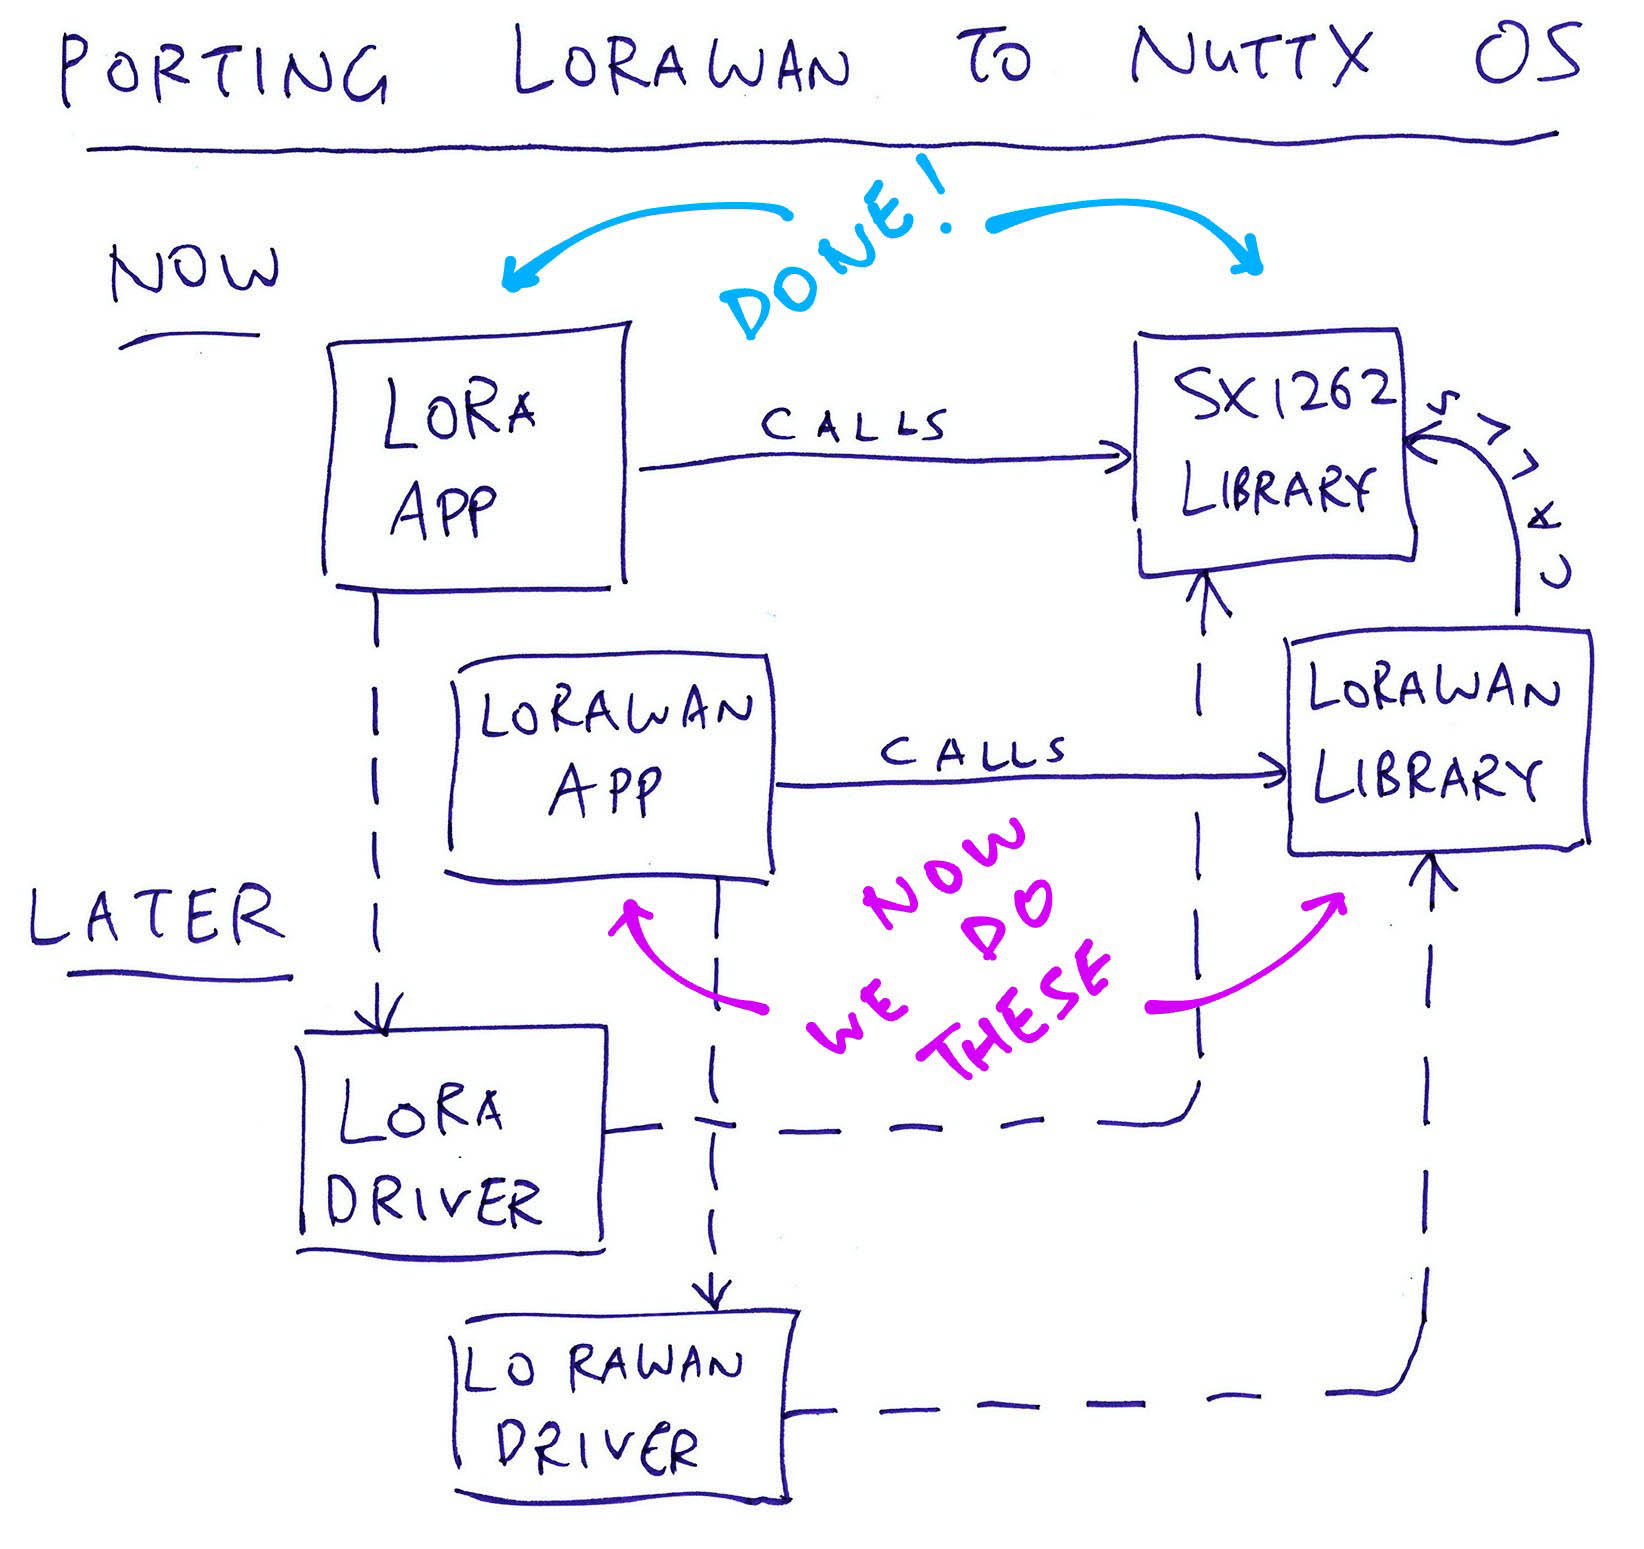
In the last article we created a LoRa Library for NuttX (top right) that works with Semtech SX1262 Transceiver…
Today we’ll create a LoRaWAN Library for NuttX (centre right)…
That’s a near-identical fork of Semtech’s LoRaWAN Stack (dated 14 Dec 2021)…
We’ll test with this LoRaWAN App on NuttX…
Why did we fork Semtech’s LoRaWAN Stack? Why not build it specifically for NuttX?
LoRaWAN works slightly differently across the world regions, to comply with Local Wireless Regulations: Radio Frequency, Maximum Airtime (Duty Cycle), Listen Before Talk, …
Thus we should port Semtech’s LoRaWAN Stack to NuttX with minimal changes, in case of future updates. (Like for new regions)
How does our LoRaWAN Library talk to the LoRa SX1262 Library?
Our LoRaWAN Library talks through Semtech’s Radio Interface that’s exposed by the LoRa SX1262 Library…
How did we create the LoRaWAN Library?
We followed the steps below to create “nuttx/libs/liblorawan” by cloning a NuttX Library…
Then we replaced the “liblorawan” folder by a Git Submodule that contains our LoRaWAN code…
cd nuttx/nuttx/libs
rm -r liblorawan
git rm -r liblorawan
git submodule add https://github.com/lupyuen/LoRaMac-node-nuttx liblorawan
(To add the LoRaWAN Library to your NuttX Project, see this)
Our LoRaWAN Library should work on any NuttX platform (like ESP32), assuming that the following dependencies are installed…
lupyuen/lora-sx1262 (lorawan branch)
LoRa Library for Semtech SX1262 Transceiver
NimBLE Porting Layer multithreading library
spi_test_driver (/dev/spitest0)
SPI Test Driver
Our LoRa SX1262 Library assumes that the following NuttX Devices are configured…
/dev/gpio0: GPIO Input for SX1262 Busy Pin
/dev/gpio1: GPIO Output for SX1262 Chip Select
/dev/gpio2: GPIO Interrupt for SX1262 DIO1 Pin
/dev/spi0: SPI Bus for SX1262
/dev/spitest0: SPI Test Driver (see above)
What shall we accomplish with LoRaWAN today?
We’ll do the basic LoRaWAN use case on NuttX…
Join NuttX to the LoRaWAN Network
Send a Data Packet from NuttX to LoRaWAN
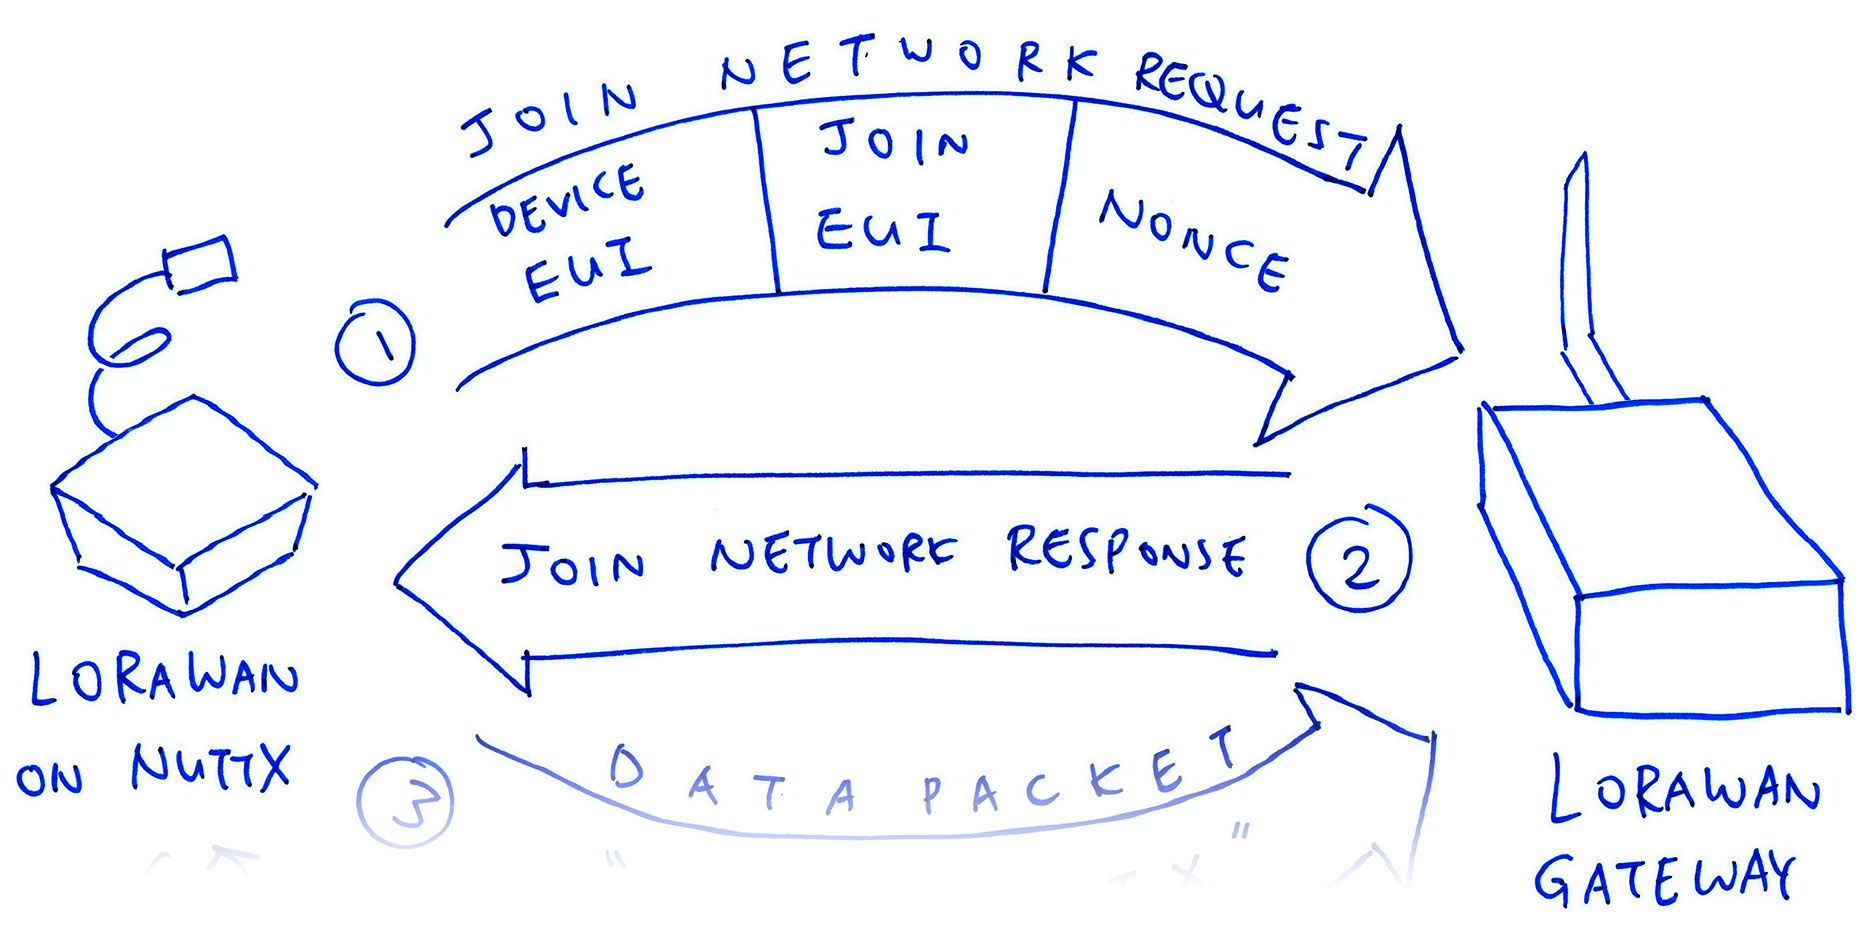
Which works like this…
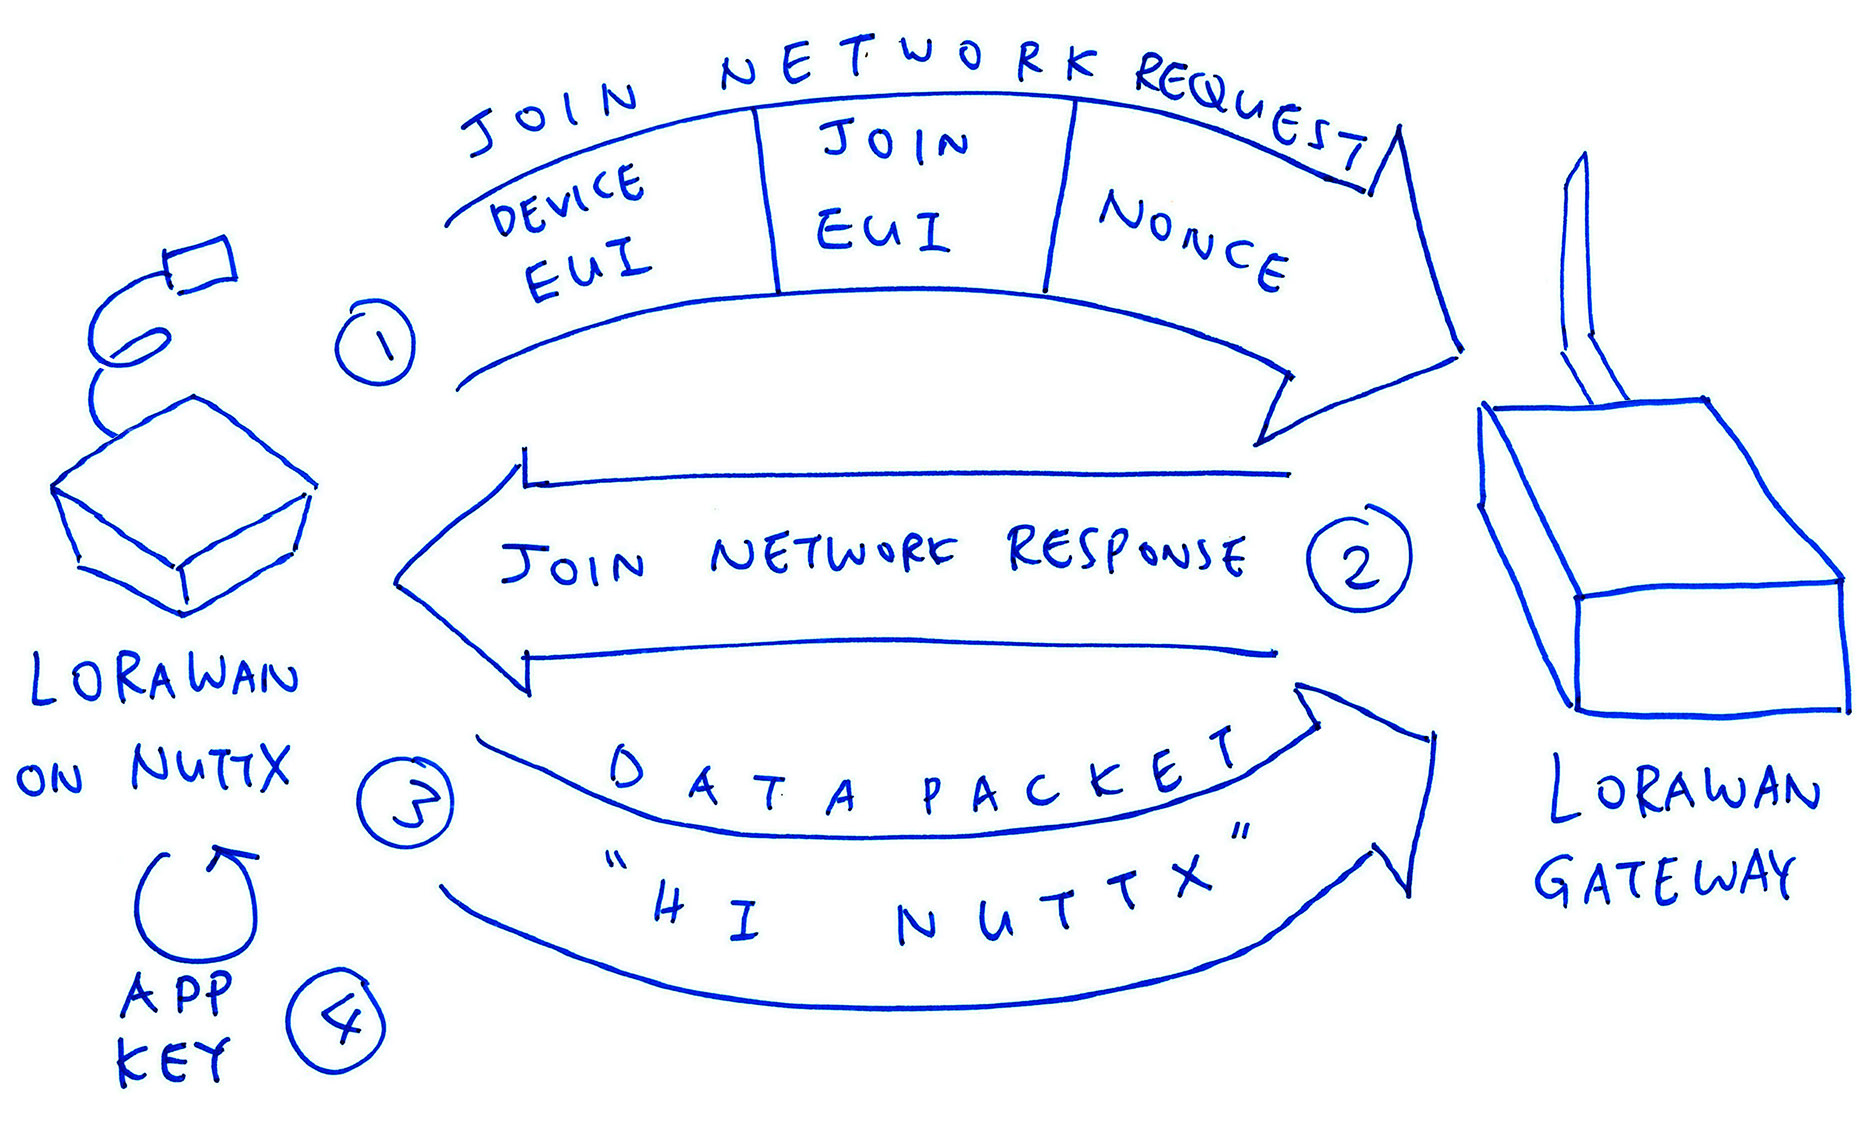
NuttX sends a Join Network Request to the LoRaWAN Gateway.
Inside the Join Network Request are…
Device EUI: Unique ID that’s assigned to our LoRaWAN Device
Join EUI: Identifies the LoRaWAN Network that we’re joining
Nonce: Non-repeating number, to prevent Replay Attacks
(EUI sounds like Durian on Century Egg… But it actually means Extended Unique Identifier)
LoRaWAN Gateway returns a Join Network Response
(Which contains the Device Address)
NuttX sends a Data Packet to the LoRaWAN Network
(Which has the Device Address and Payload “Hi NuttX”)
NuttX uses an App Key to sign the Join Network Request and the Data Packet
(App Key is stored inside NuttX, never exposed over the airwaves)
In a while we’ll set the Device EUI, Join EUI and App Key in our code.
To run LoRaWAN on NuttX, download the modified source code for NuttX OS and NuttX Apps…
mkdir nuttx
cd nuttx
git clone --recursive --branch lorawan https://github.com/lupyuen/nuttx nuttx
git clone --recursive --branch lorawan https://github.com/lupyuen/nuttx-apps apps
Or if we prefer to add the LoRaWAN Library to our NuttX Project, follow these instructions…
(For PineDio Stack BL604: The features below are already preinstalled)
Disable the Assertion Check for GPIO Pin Type…
Let’s configure our LoRaWAN code.
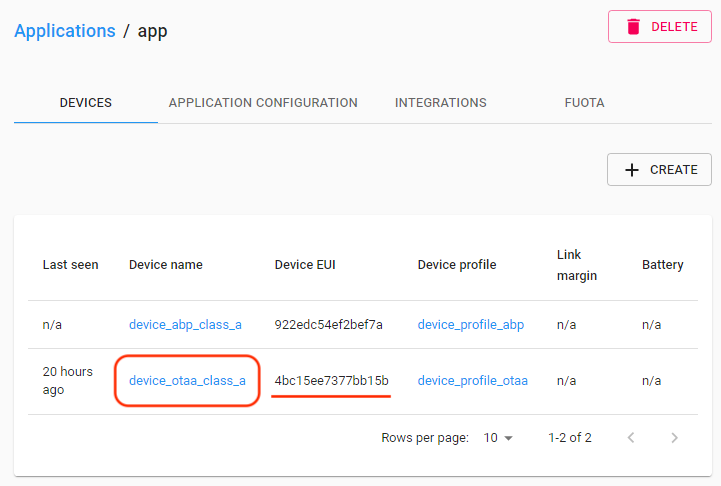
Where do we get the Device EUI, Join EUI and App Key?
We get the LoRaWAN Settings from our LoRaWAN Gateway, like ChirpStack (pic above)…
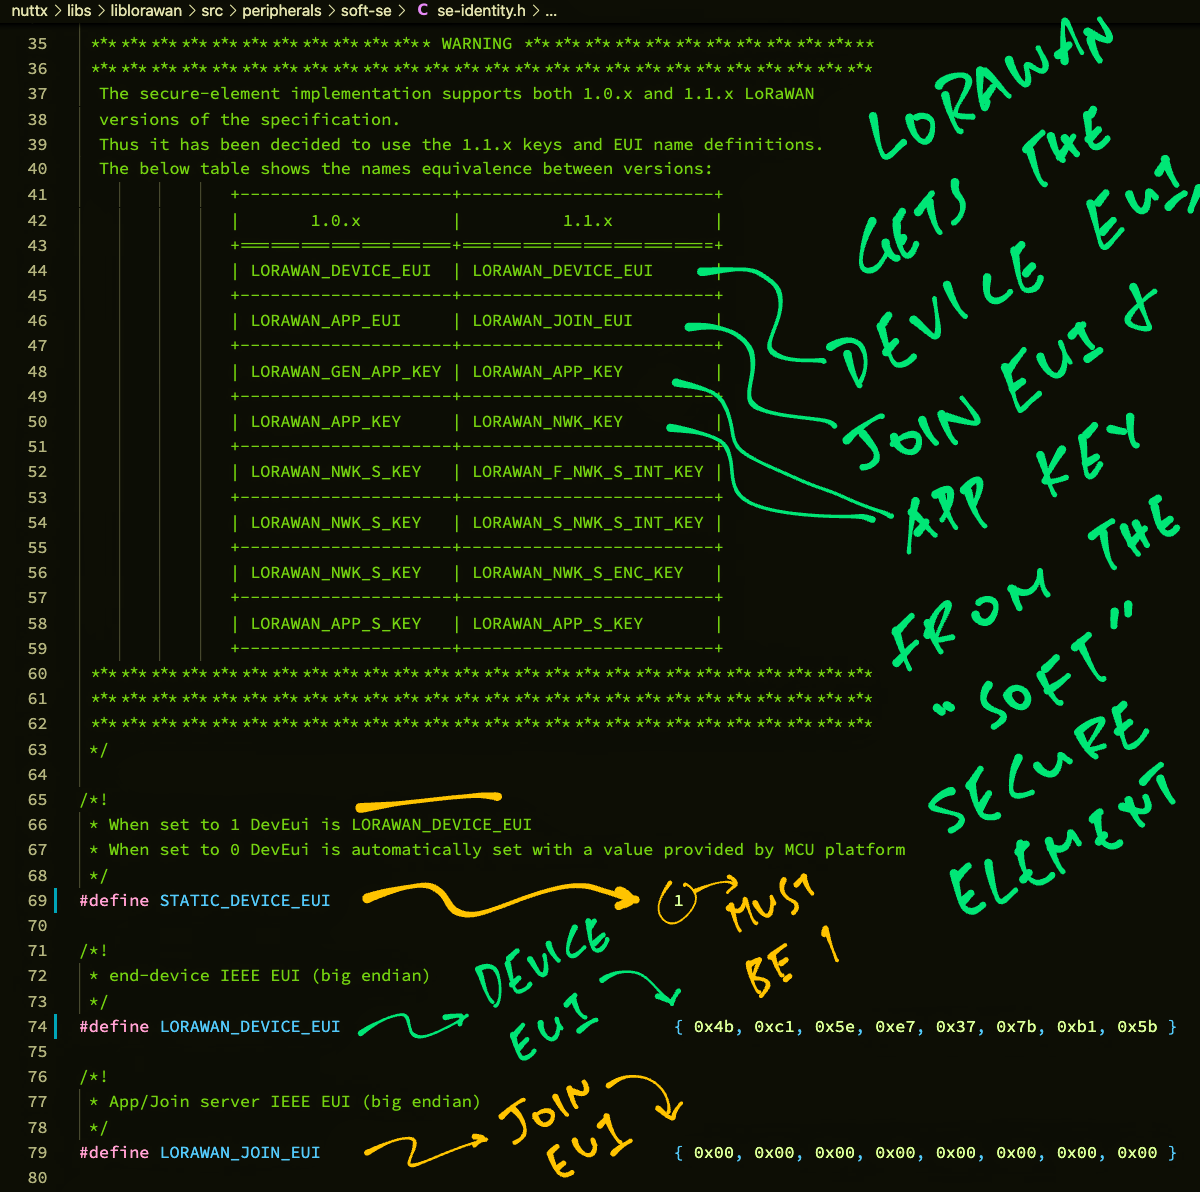
How do we set the Device EUI, Join EUI and App Key in our code?
Edit the file…
nuttx/libs/liblorawan/src/peripherals/soft-se/se-identity.hLook for these lines in se-identity.h
/*!
 * When set to 1 DevEui is LORAWAN_DEVICE_EUI
 * When set to 0 DevEui is automatically set with a value provided by MCU platform
 */
#define STATIC_DEVICE_EUI  1

/*!
 * end-device IEEE EUI (big endian)
 */
#define LORAWAN_DEVICE_EUI { 0x4b, 0xc1, 0x5e, 0xe7, 0x37, 0x7b, 0xb1, 0x5b }

/*!
 * App/Join server IEEE EUI (big endian)
 */
#define LORAWAN_JOIN_EUI { 0x00, 0x00, 0x00, 0x00, 0x00, 0x00, 0x00, 0x00 }
STATIC_DEVICE_EUI: Must be 1
LORAWAN_DEVICE_EUI: Change this to our LoRaWAN Device EUI (MSB First)
For ChirpStack: Copy from “Applications → app → Device EUI”
LORAWAN_JOIN_EUI: Change this to our LoRaWAN Join EUI (MSB First)
For ChirpStack: Join EUI is not needed, we leave it as zeroes
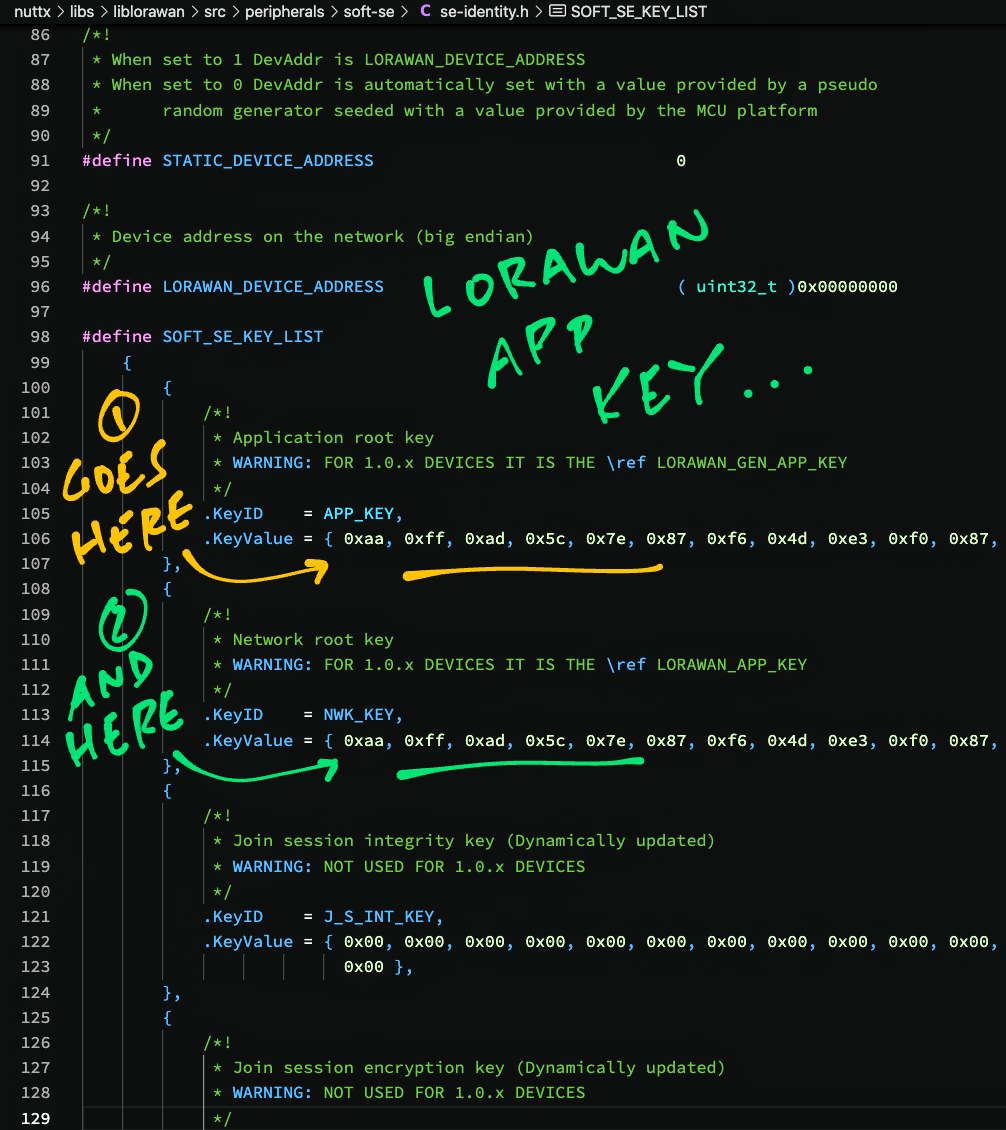
Next find this in the same file se-identity.h
#define SOFT_SE_KEY_LIST \
  { \
    { \
      /*! \
       * Application root key \
       * WARNING: FOR 1.0.x DEVICES IT IS THE \ref LORAWAN_GEN_APP_KEY \
       */ \
      .KeyID    = APP_KEY, \
      .KeyValue = { 0xaa, 0xff, 0xad, 0x5c, 0x7e, 0x87, 0xf6, 0x4d, 0xe3, 0xf0, 0x87, 0x32, 0xfc, 0x1d, 0xd2, 0x5d }, \
    }, \
    { \
      /*! \
       * Network root key \
       * WARNING: FOR 1.0.x DEVICES IT IS THE \ref LORAWAN_APP_KEY \
       */ \
      .KeyID    = NWK_KEY, \
      .KeyValue = { 0xaa, 0xff, 0xad, 0x5c, 0x7e, 0x87, 0xf6, 0x4d, 0xe3, 0xf0, 0x87, 0x32, 0xfc, 0x1d, 0xd2, 0x5d }, \
    }, \
APP_KEY: Change this to our LoRaWAN App Key (MSB First)
For ChirpStack: Copy from “Applications → app → Devices → device_otaa_class_a → Keys (OTAA) → Application Key”
NWK_KEY: Change this to our LoRaWAN App Key
(Same as APP_KEY)
What’s “soft-se”? Why are our LoRaWAN Settings there?
For LoRaWAN Devices that are designed to be super secure, they don’t expose the LoRaWAN App Key in the firmware code…
Instead they store the App Key in the Secure Element hardware.
Our LoRaWAN Library supports two kinds of Secure Elements: Microchip ATECC608A and Semtech LR1110
But our NuttX Device doesn’t have a Secure Element right?
That’s why we define the App Key in the “Software Secure Element (soft-se)” that simulates a Hardware Secure Element… Minus the actual hardware security.
Our App Key will be exposed if somebody dumps the firmware for our NuttX Device. But it’s probably OK during development.
Let’s set the LoRaWAN Frequency…
Find the LoRaWAN Frequency for our region…
Edit our LoRaWAN Test App…
apps/examples/lorawan_test/lorawan_test_main.cFind this in lorawan_test_main.c
#ifndef ACTIVE_REGION
#warning "No active region defined, LORAMAC_REGION_AS923 will be used as default."
#define ACTIVE_REGION LORAMAC_REGION_AS923
#endif
Change AS923 (both occurrences) to our LoRaWAN Frequency…
US915, CN779, EU433, AU915, AS923, CN470, KR920, IN865 or RU864
Do the same for the LoRaMAC Handler: LmHandler.c
nuttx/libs/liblorawan/src/apps/LoRaMac/common/LmHandler/LmHandler.c(We ought to define this parameter in Kconfig instead)
Let’s build the NuttX Firmware that contains our LoRaWAN Library…
Install the build prerequisites…
Assume that we have downloaded the NuttX Source Code and configured the LoRaWAN Settings…
Edit the Pin Definitions…
## For BL602 and BL604:
nuttx/boards/risc-v/bl602/bl602evb/include/board.h

## For ESP32: Change "esp32-devkitc" to our ESP32 board
nuttx/boards/xtensa/esp32/esp32-devkitc/src/esp32_gpio.c
Check that the Semtech SX1262 Pins are configured correctly in board.h or esp32_gpio.c…
Configure the build…
cd nuttx

## For BL602: Configure the build for BL602
./tools/configure.sh bl602evb:nsh

## For PineDio Stack BL604: Configure the build for BL604
./tools/configure.sh bl602evb:pinedio

## For ESP32: Configure the build for ESP32.
## TODO: Change "esp32-devkitc" to our ESP32 board.
./tools/configure.sh esp32-devkitc:nsh

## Edit the Build Config
make menuconfig
Enable the GPIO Driver in menuconfig…
Enable the SPI Peripheral, SPI Character Driver and SPI Test Driver…
Enable GPIO and SPI Logging for easier troubleshooting, but uncheck “Enable Info Debug Output”, “GPIO Info Output” and “SPI Info Output”…
Enable Stack Backtrace for easier troubleshooting…
Check the box for “RTOS Features” → “Stack Backtrace”
Enable POSIX Timers and Message Queues (for NimBLE Porting Layer)…
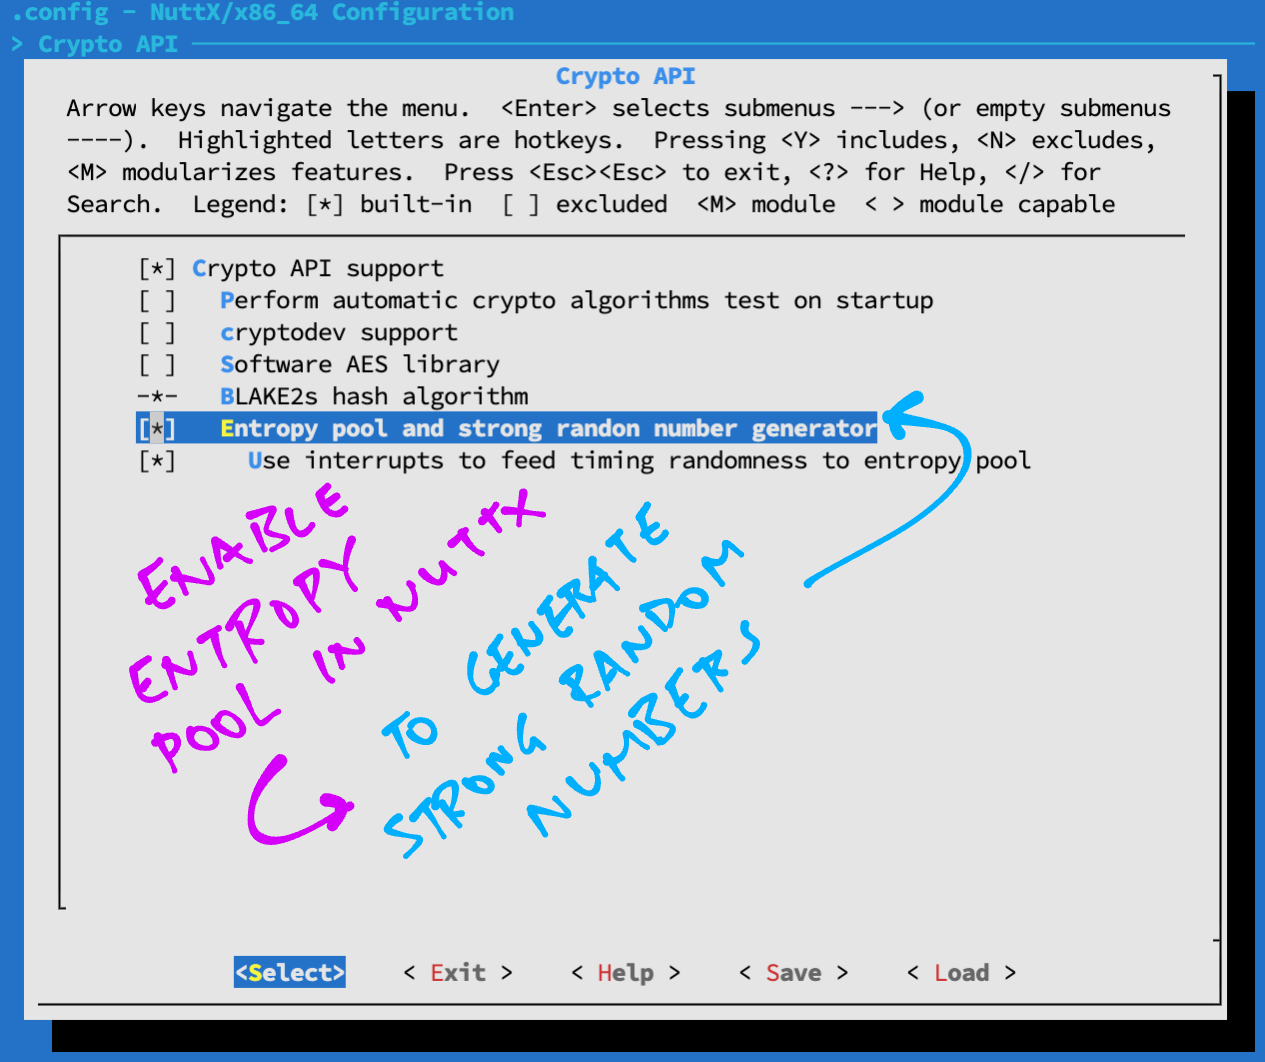
Enable Random Number Generator with Entropy Pool (for LoRaWAN Nonces)…
“Random Number Generator with Entropy Pool”
(We’ll talk about this in a while)
Click “Library Routines” and enable the following libraries…
“LoRaWAN Library”
“NimBLE Porting Layer”
“Semtech SX1262 Library”
Enable our LoRaWAN Test App…
Check the box for “Application Configuration” → “Examples” → “LoRaWAN Test App”
Save the configuration and exit menuconfig
For ESP32: Edit the function esp32_bringup in this file…
## Change "esp32-devkitc" to our ESP32 board
nuttx/boards/xtensa/esp32/esp32-devkitc/src/esp32_bringup.c
And call spi_test_driver_register to register our SPI Test Driver.
Build, flash and run the NuttX Firmware on BL602 or ESP32…
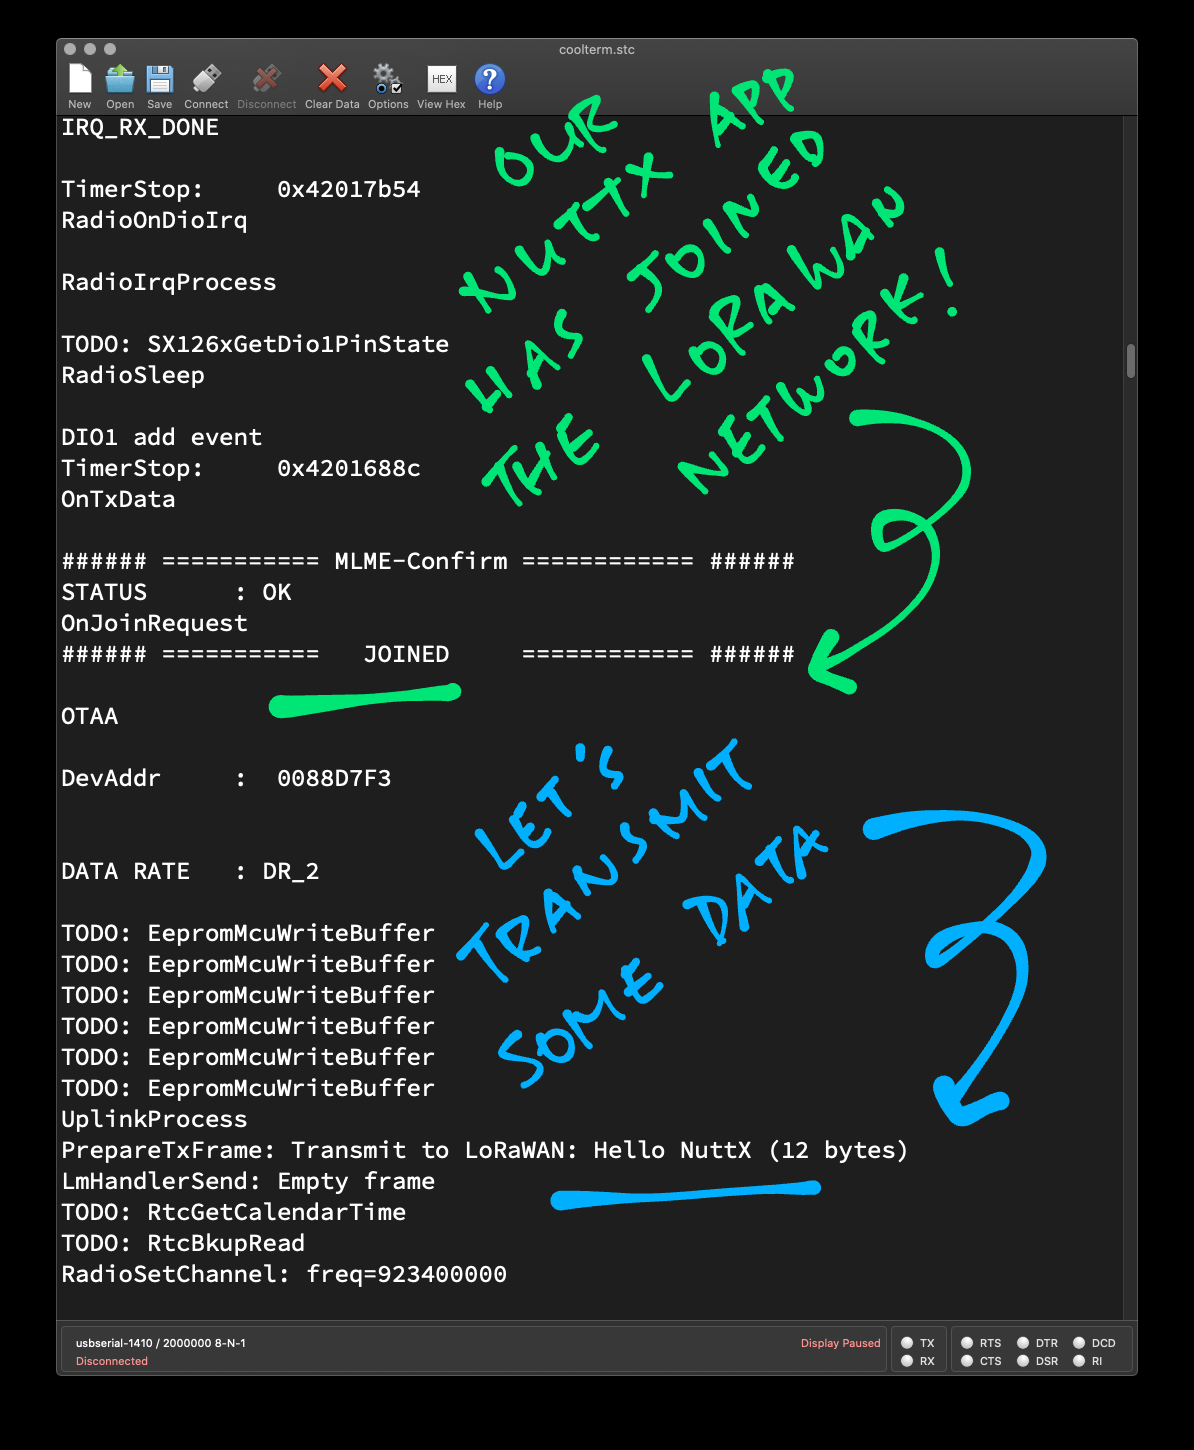
We’re ready to run the NuttX Firmware and test our LoRaWAN Library!
In the NuttX Shell, list the NuttX Devices…
ls /devWe should see…
/dev:
  gpio0
  gpio1
  gpio2
  spi0
  spitest0
  urandom
  ...
Our SPI Test Driver appears as “/dev/spitest0”
The SX1262 Pins for Busy, Chip Select and DIO1 should appear as “/dev/gpio0” (GPIO Input), “gpio1” (GPIO Output) and “gpio2” (GPIO Interrupt) respectively.
The Random Number Generator (with Entropy Pool) appears as “/dev/urandom”
In the NuttX Shell, run our LoRaWAN Test App…
lorawan_testOur app sends a Join Network Request to the LoRaWAN Gateway…
RadioSetPublicNetwork: public syncword=3444
DevEui      : 4B-C1-5E-E7-37-7B-B1-5B
JoinEui     : 00-00-00-00-00-00-00-00
Pin         : 00-00-00-00
### =========== MLME-Request ============ ##
###               MLME_JOIN               ##
### ===================================== ##
STATUS : OK
(Which contains the Device EUI and Join EUI that we have configured earlier)
A few seconds later we should see the Join Network Response from the LoRaWAN Gateway…
### =========== MLME-Confirm ============ ##
STATUS    : OK
### ===========   JOINED     ============ ##
OTAA
DevAddr   : 01DA9790
DATA RATE : DR_2Congratulations our NuttX Device has successfully joined the LoRaWAN Network!
If we see this instead…
### =========== MLME-Confirm ============ ##
STATUS : Rx 1 timeoutOur Join Network Request has failed.
Check the next section for troubleshooting tips.
Our LoRaWAN Test App continues to transmit Data Packets. But we’ll cover this later…
PrepareTxFrame: Transmit to LoRaWAN: Hi NuttX (9 bytes)
PrepareTxFrame: status=0, maxSize=11, currentSize=11
### =========== MCPS-Request ============ ##
###           MCPS_UNCONFIRMED            ##
### ===================================== ##
STATUS      : OK
PrepareTxFrame: Transmit OKLet’s find out how our LoRaWAN Test App joins the LoRaWAN Network.
How do we join the LoRaWAN Network in our NuttX App?
Let’s dive into the code for our LoRaWAN Test App: lorawan_test_main.c
int main(int argc, FAR char *argv[]) {

  //  Compute the interval between transmissions based on Duty Cycle
  TxPeriodicity = APP_TX_DUTYCYCLE + randr( -APP_TX_DUTYCYCLE_RND, APP_TX_DUTYCYCLE_RND );
Our app begins by computing the Time Interval Between Transmissions of our Data Packets.
(More about this later)
Next it calls LmHandlerInit to initialise the LoRaWAN Library…
  //  Init LoRaWAN
  if ( LmHandlerInit(
      &LmHandlerCallbacks,  //  Callback Functions
      &LmHandlerParams      //  LoRaWAN Parameters
      ) != LORAMAC_HANDLER_SUCCESS ) {
    printf( "LoRaMac wasn't properly initialized\n" );
    while ( 1 ) {} //  Fatal error, endless loop.
  }
(Functions named “Lm…” come from our LoRaWAN Library)
We set load the LoRa Alliance Compliance Protocol Packages…
  //  Set system maximum tolerated rx error in milliseconds
  LmHandlerSetSystemMaxRxError( 20 );

  //  LoRa-Alliance Compliance protocol package should always be initialized and activated.
  LmHandlerPackageRegister( PACKAGE_ID_COMPLIANCE, &LmhpComplianceParams );
  LmHandlerPackageRegister( PACKAGE_ID_CLOCK_SYNC, NULL );
  LmHandlerPackageRegister( PACKAGE_ID_REMOTE_MCAST_SETUP, NULL );
  LmHandlerPackageRegister( PACKAGE_ID_FRAGMENTATION, &FragmentationParams );
Below is the code that sends the Join Network Request to the LoRaWAN Gateway: LmHandlerJoin…
  //  Join the LoRaWAN Network
  LmHandlerJoin( );
We start the Transmit Timer that will schedule the transmission of Data Packets (right after we have joined the LoRaWAN Network)…
  //  Set the Transmit Timer
  StartTxProcess( LORAMAC_HANDLER_TX_ON_TIMER );
At this point we haven’t actually joined the LoRaWAN Network yet.
This happens in the LoRaWAN Event Loop that will handle the Join Network Response received from the LoRaWAN Gateway…
  //  Handle LoRaWAN Events
  handle_event_queue( NULL );  //  Never returns
  return 0;
}
(We’ll talk about the LoRaWAN Event Loop later)
Let’s check the logs on our LoRaWAN Gateway. (RAKwireless WisGate, the black box below)

To inspect the Join Network Request on our LoRaWAN Gateway (ChirpStack), click…
Applications → app → device_otaa_class_a → LoRaWAN Frames
Restart our NuttX Device and the LoRaWAN Test App…
The Join Network Request appears in ChirpStack…
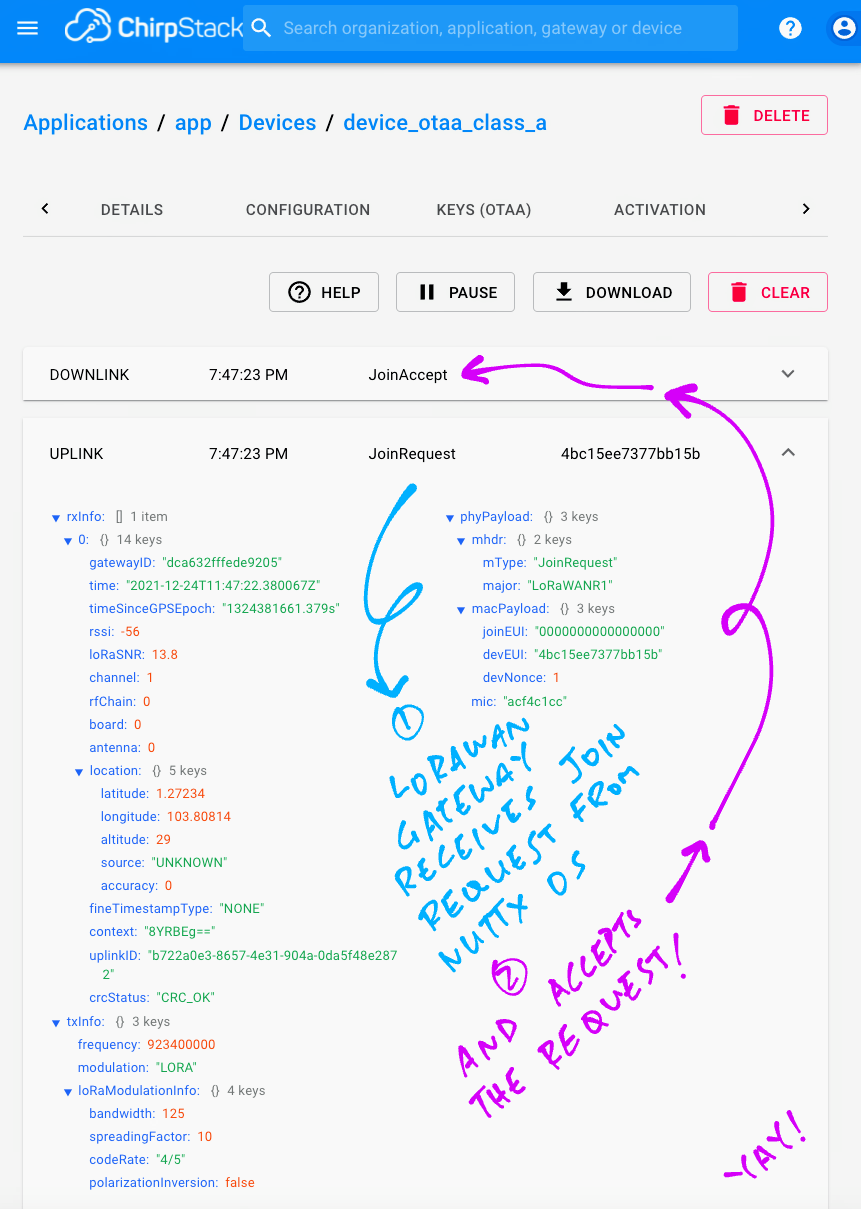
(Yep that’s the Device EUI and Join EUI that we have configured earlier)
Followed by the Join Accept Response…
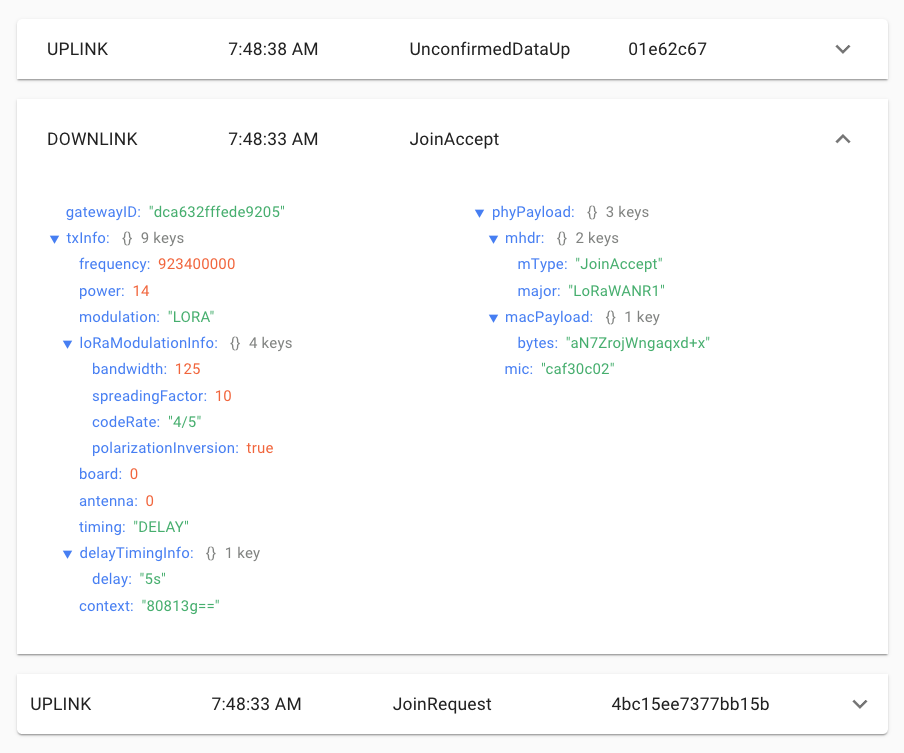
The Join Network Request / Response also appears in ChirpStack at…
Applications → app → device_otaa_class_a → Device Data
Like so (“Join”)…

What if we don’t see the Join Network Request or the Join Accept Response?
Check the “Troubleshoot LoRaWAN” section below for troubleshooting tips.
Now that we’ve joined the LoRaWAN Network, we’re ready to send Data Packets to LoRaWAN!
PrepareTxFrame is called by our LoRaWAN Event Loop to send a Data Packet when the Transmit Timer expires: lorawan_test_main.c
//  Prepare the payload of a Data Packet transmit it
static void PrepareTxFrame( void ) {

  //  If we haven't joined the LoRaWAN Network, try again later
  if (LmHandlerIsBusy()) { puts("PrepareTxFrame: Busy"); return; }
If we haven’t joined a LoRaWAN Network yet, this function will return. (And we’ll try again later)
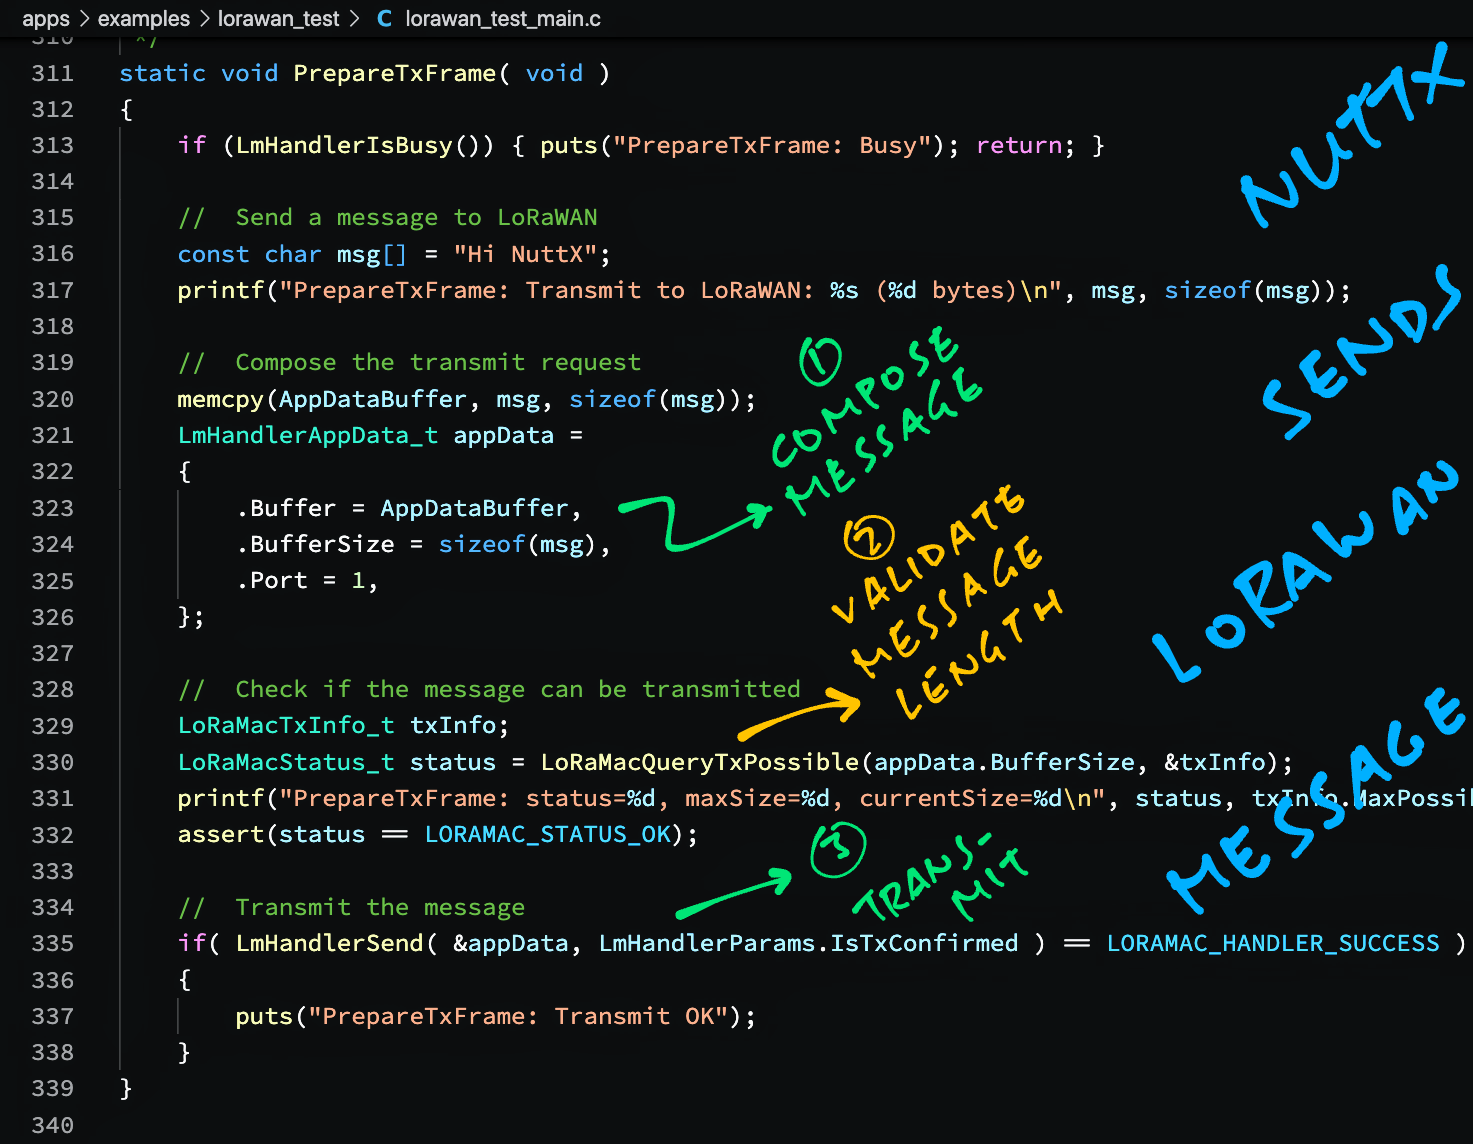
Assuming all is hunky dory, we proceed to transmit a 9-byte message (including terminating null)…
  //  Send a message to LoRaWAN
  const char msg[] = "Hi NuttX";
  printf("PrepareTxFrame: Transmit to LoRaWAN: %s (%d bytes)\n", msg, sizeof(msg));
We copy the message to the Transmit Buffer (max 242 bytes) and create a Transmit Request…
  //  Compose the transmit request
  assert(sizeof(msg) <= sizeof(AppDataBuffer));
  memcpy(AppDataBuffer, msg, sizeof(msg));
  LmHandlerAppData_t appData = {  //  Transmit Request contains...
    .Buffer = AppDataBuffer,      //  Transmit Buffer
    .BufferSize = sizeof(msg),    //  Size of Transmit Buffer
    .Port = 1,                    //  Port Number: 1 to 223
  };
Next we validate the Message Size…
  //  Validate the message size and check if it can be transmitted
  LoRaMacTxInfo_t txInfo;
  LoRaMacStatus_t status = LoRaMacQueryTxPossible(
    appData.BufferSize,  //  Message size
    &txInfo              //  Returns max message size
  );
  printf("PrepareTxFrame: status=%d, maxSize=%d, currentSize=%d\n", status, txInfo.MaxPossibleApplicationDataSize, txInfo.CurrentPossiblePayloadSize);
  assert(status == LORAMAC_STATUS_OK);
(What’s the Maximum Message Size? We’ll discuss in a while)
Finally we transmit the message…
  //  Transmit the message
  LmHandlerErrorStatus_t sendStatus = LmHandlerSend(
      &appData,   //  Transmit Request
      LmHandlerParams.IsTxConfirmed  //  0 for Unconfirmed
  );
  assert(sendStatus == LORAMAC_HANDLER_SUCCESS);
  puts("PrepareTxFrame: Transmit OK");
}
Why is our Data Packet marked Unconfirmed?
Our Data Packet is marked Unconfirmed because we don’t expect an acknowledgement from the LoRaWAN Gateway.
This is the typical mode for IoT Sensor Devices, which don’t handle acknowledgements to conserve battery power.
What’s the Maximum Message Size?
The Maximum Message (Payload) Size depends on…
LoRaWAN Data Rate (like Data Rate 2 or 3)
LoRaWAN Region (AS923 for Asia, AU915 for Australia / Brazil / New Zealand, EU868 for Europe, US915 for US, …)
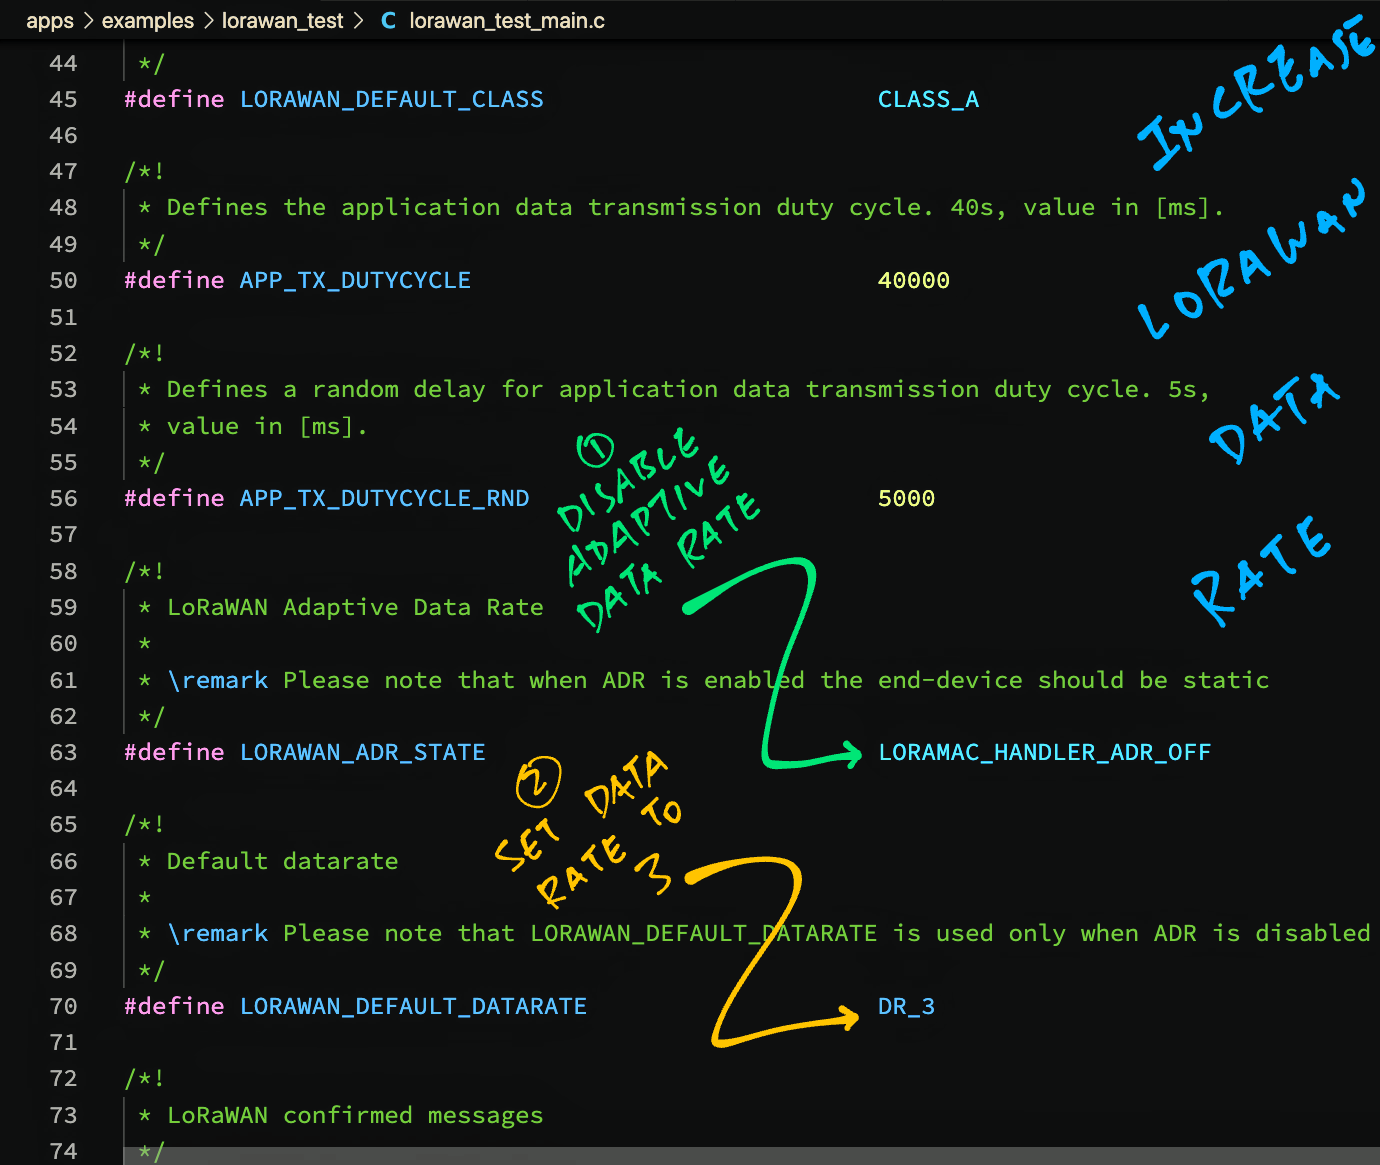
Our LoRaWAN Test App uses Data Rate 3: lorawan_test_main.c
//  LoRaWAN Adaptive Data Rate
//  Please note that when ADR is enabled the end-device should be static
#define LORAWAN_ADR_STATE LORAMAC_HANDLER_ADR_OFF

//  Default Data Rate
//  Please note that LORAWAN_DEFAULT_DATARATE is used only when ADR is disabled
#define LORAWAN_DEFAULT_DATARATE DR_3
But there’s a catch: The First Message Transmitted (after joining LoRaWAN) will have Data Rate 2 (instead of Data Rate 3)!
(We’ll see this in the upcoming demo)
For Data Rates 2 and 3, the Maximum Message (Payload) Sizes are…
| Region | Data Rate | Max Payload Size |
|---|---|---|
| AS923 | DR 2 DR 3 | 11 bytes 53 bytes |
| AU915 | DR 2 DR 3 | 11 bytes 53 bytes |
| EU868 | DR 2 DR 3 | 51 bytes 115 bytes |
| US915 | DR 2 DR 3 | 125 bytes 222 bytes |
(Based on LoRaWAN Regional Parameters)
Our LoRaWAN Test App sends a Message Payload of 9 bytes, so it should work fine for Data Rates 2 and 3 across all LoRaWAN Regions.
How often can we send data to the LoRaWAN Network?
We must comply with Local Wireless Regulations for Duty Cycle. Blasting messages non-stop is no-no!
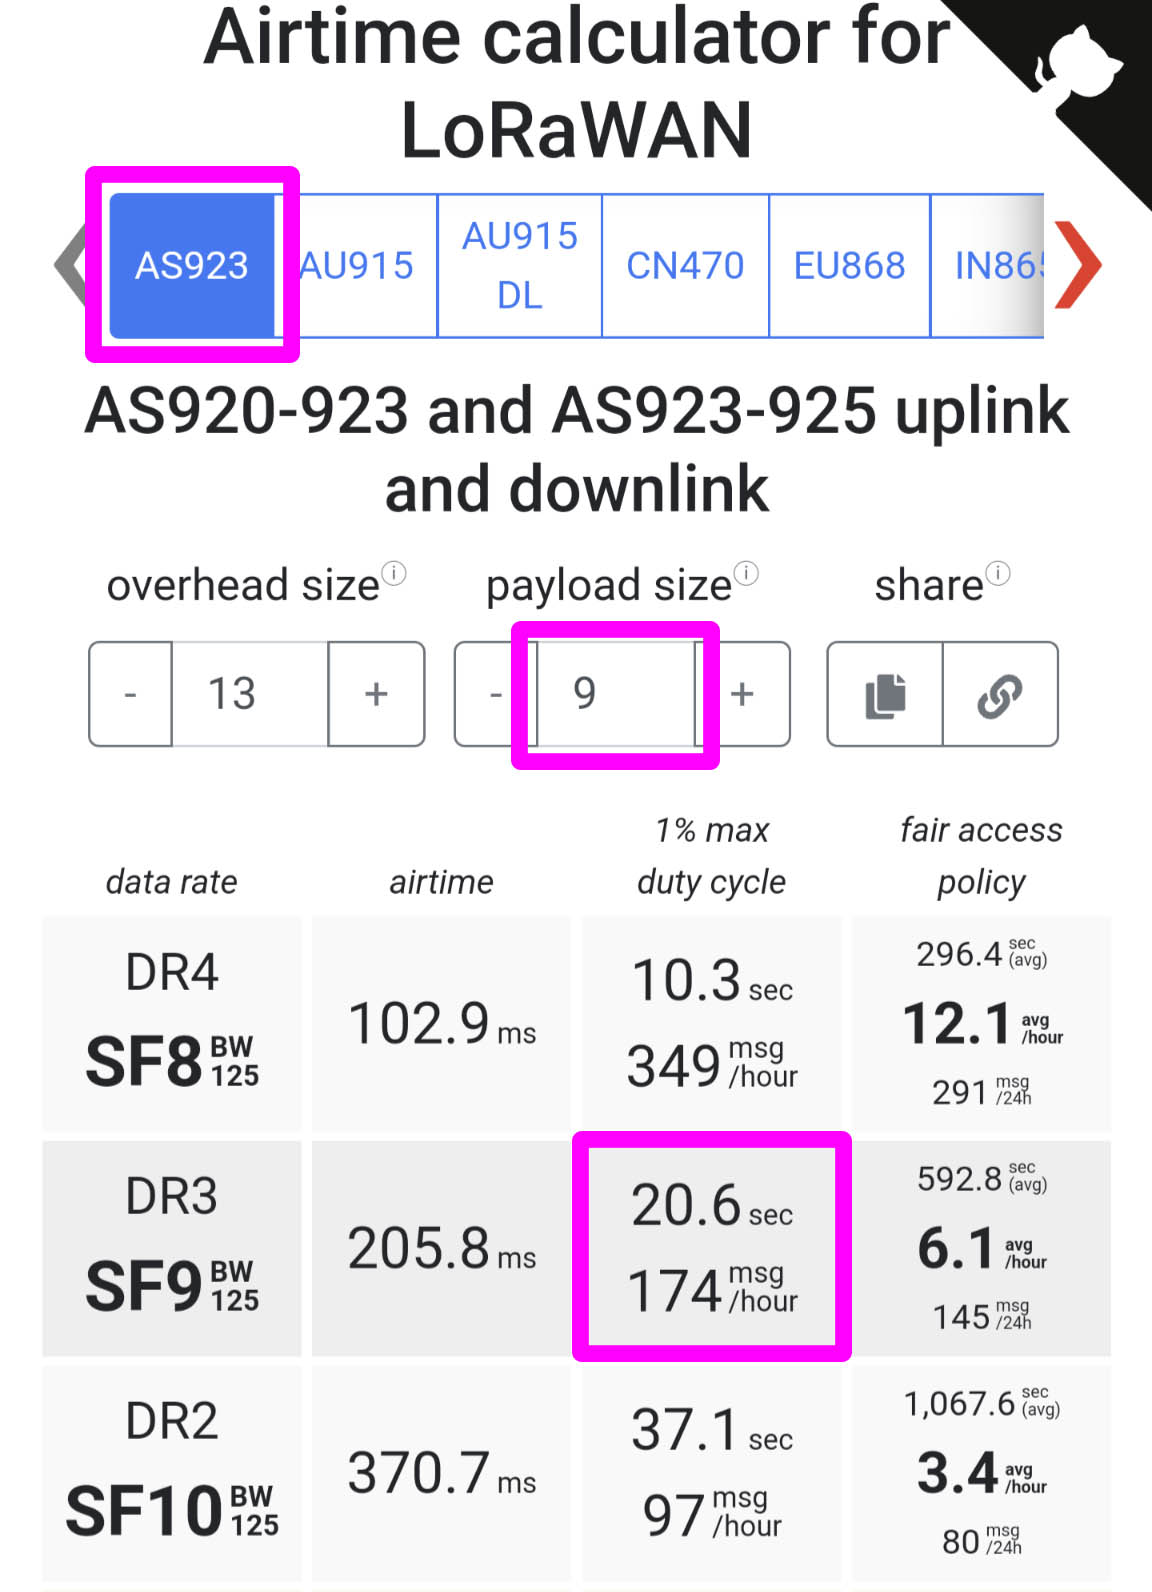
To figure out how often we can send data, check out the…
For AS923 (Asia) at Data Rate 3, the LoRaWAN Airtime Calculator says that we can send a message every 20.6 seconds (assuming Message Payload is 9 bytes)…
Let’s round up the Message Interval to 40 seconds for demo.
We configure this Message Interval as APP_TX_DUTYCYCLE in lorawan_test_main.c
//  Defines the application data transmission duty cycle.
//  40s, value in [ms].
#define APP_TX_DUTYCYCLE 40000

//  Defines a random delay for application data transmission duty cycle.
//  5s, value in [ms].
#define APP_TX_DUTYCYCLE_RND 5000
APP_TX_DUTYCYCLE is used to compute the Timeout Interval of our Transmit Timer: lorawan_test_main.c
//  Compute the interval between transmissions based on Duty Cycle
TxPeriodicity = APP_TX_DUTYCYCLE +
randr( -APP_TX_DUTYCYCLE_RND, APP_TX_DUTYCYCLE_RND );Thus our LoRaWAN Test App transmits a message every 40 seconds.
(±5 seconds of random delay)
Watch what happens when our LoRaWAN Test App transmits a Data Packet…
In the NuttX Shell, run our LoRaWAN Test App…
lorawan_testAs seen earlier, our app transmits a Join Network Request and receives a Join Accept Response from the LoRaWAN Gateway…
### =========== MLME-Confirm ============ ##
STATUS    : OK
### ===========   JOINED     ============ ##
OTAA
DevAddr   : 01DA9790
DATA RATE : DR_2Upon joining the LoRaWAN Network, our app transmits a Data Packet…
PrepareTxFrame: Transmit to LoRaWAN: Hi NuttX (9 bytes)
PrepareTxFrame: status=0, maxSize=11, currentSize=11
### =========== MCPS-Request ============ ##
###           MCPS_UNCONFIRMED            ##
### ===================================== ##
STATUS      : OK
PrepareTxFrame: Transmit OK
Note that the First Data Packet is assumed to have Data Rate 2, which allows Maximum Message Size 11 bytes (for AS923).
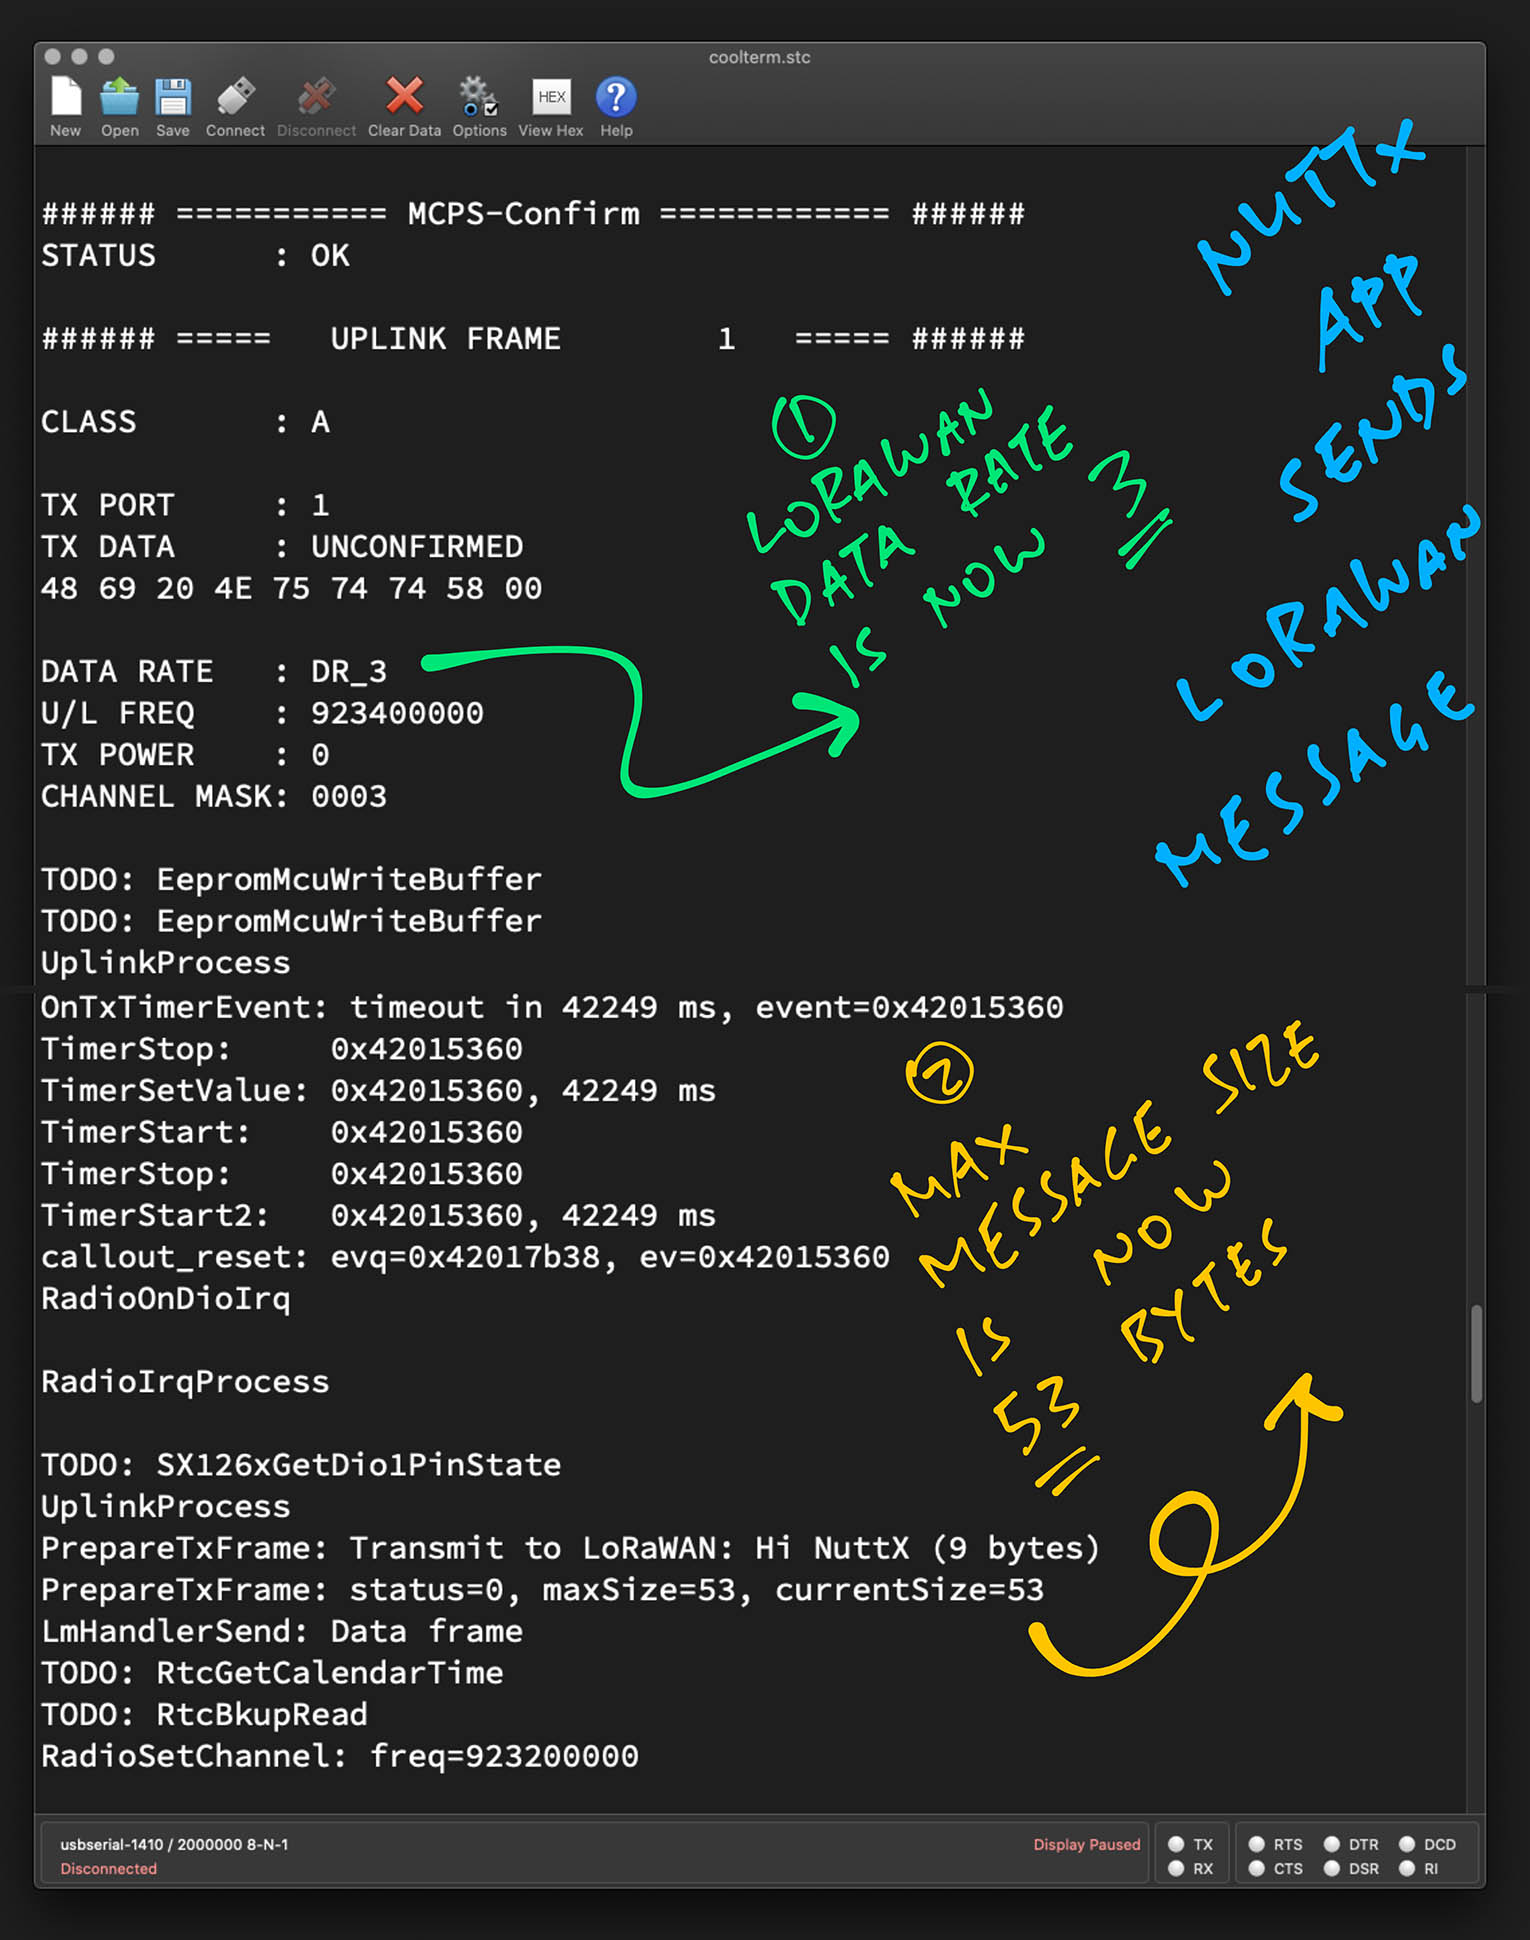
After transmitting the First Data Packet, our LoRaWAN Library automagically upgrades the Data Rate to 3…
### =========== MCPS-Confirm ============ ##
STATUS      : OK
### =====   UPLINK FRAME        1   ===== ##
CLASS       : A
TX PORT     : 1
TX DATA     : UNCONFIRMED
48 69 20 4E 75 74 74 58 00
DATA RATE   : DR_3
U/L FREQ    : 923400000
TX POWER    : 0
CHANNEL MASK: 0003
While transmitting the Second (and subsequent) Data Packet, the Maximum Message Size is extended to 53 bytes (because of the increased Data Rate)…
PrepareTxFrame: Transmit to LoRaWAN: Hi NuttX (9 bytes)
PrepareTxFrame: status=0, maxSize=53, currentSize=53
### =========== MCPS-Request ============ ##
###           MCPS_UNCONFIRMED            ##
### ===================================== ##
STATUS      : OK
PrepareTxFrame: Transmit OK
...

### =========== MCPS-Confirm ============ ##
STATUS      : OK
### =====   UPLINK FRAME        1   ===== ##
CLASS       : A
TX PORT     : 1
TX DATA     : UNCONFIRMED
48 69 20 4E 75 74 74 58 00
DATA RATE   : DR_3
U/L FREQ    : 923400000
TX POWER    : 0
CHANNEL MASK: 0003
This repeats roughly every 40 seconds.
Let’s check the logs in our LoRaWAN Gateway.
To inspect the Data Packet on our LoRaWAN Gateway (ChirpStack), click…
Applications → app → device_otaa_class_a → LoRaWAN Frames
And look for “Unconfirmed Data Up”…
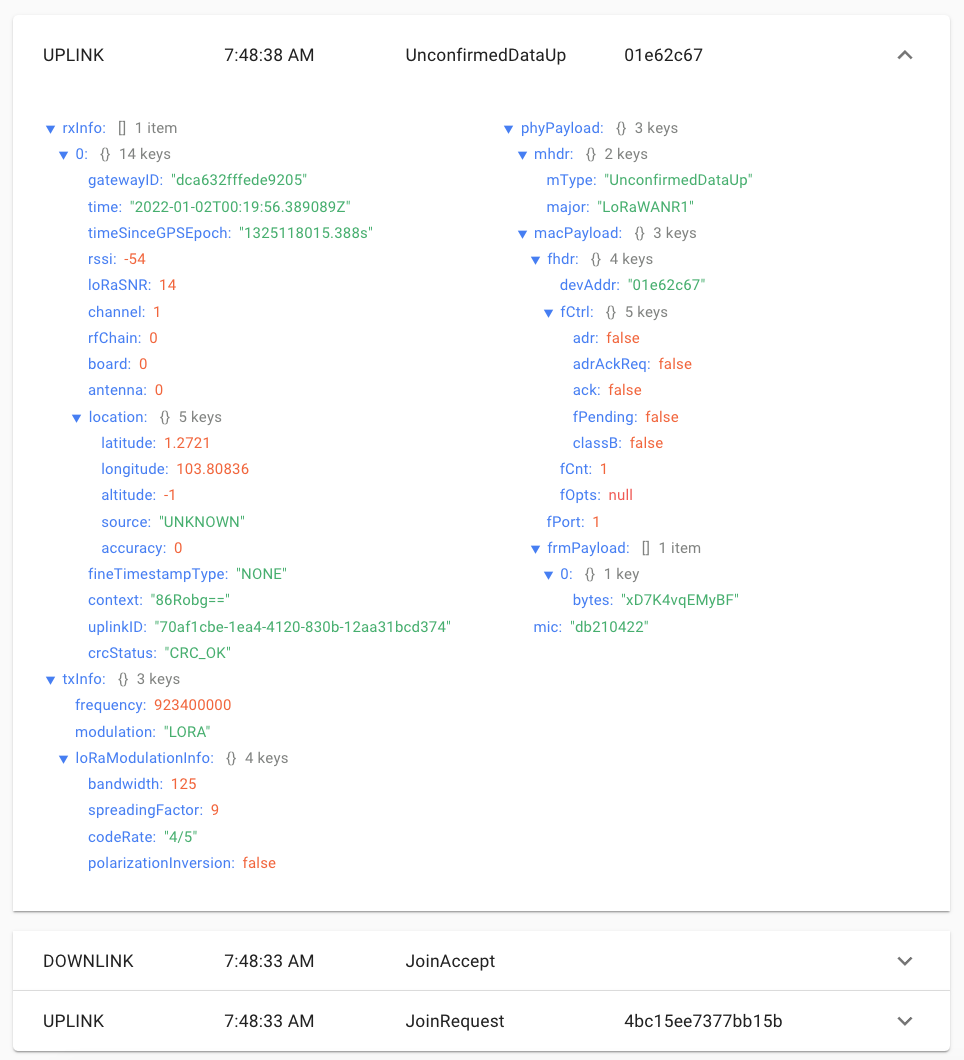
To see the Decoded Payload of our Data Packet, click…
Applications → app → device_otaa_class_a → Device Data
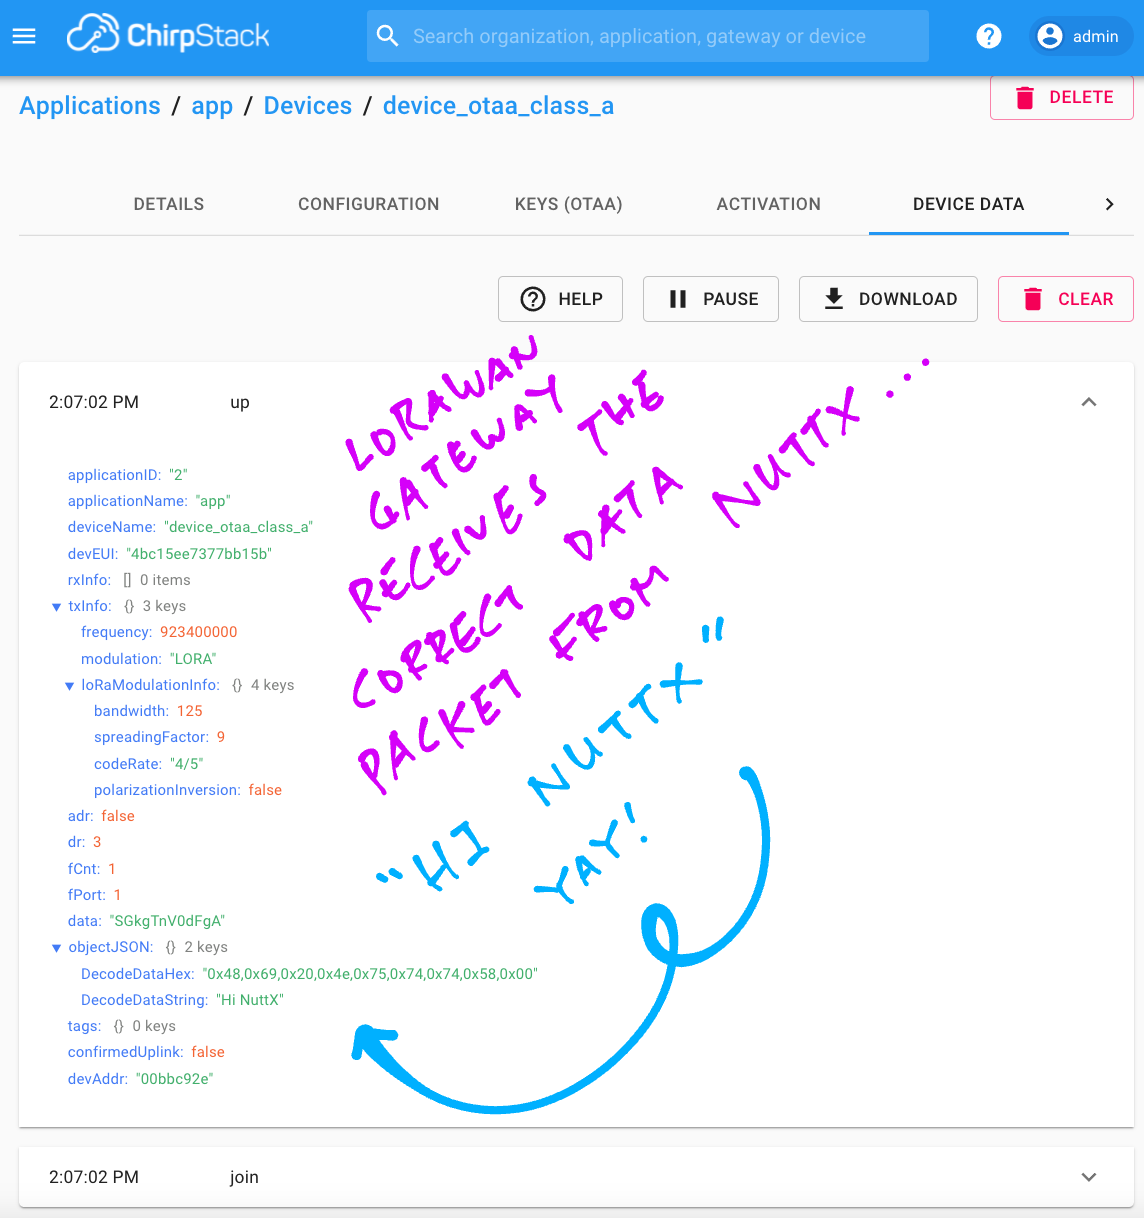
If we see “Hi NuttX”… Congratulations our LoRaWAN Test App has successfully transmitted a Data Packet to LoRaWAN!

Why did we configure NuttX to provide a Strong Random Number Generator with Entropy Pool?
The Strong Random Number Generator fixes a Nonce Quirk in our LoRaWAN Library that we observed during development…
Remember that our LoRaWAN Library sends a Nonce to the LoRaWAN Gateway every time it starts. (Pic above)
What’s a Nonce? It’s a Non-Repeating Number that prevents Replay Attacks
By default our LoRaWAN Library initialises the Nonce to 1 and increments by 1 for every Join Network Request: 1, 2, 3, 4, …
Now suppose the LoRaWAN Library crashes our device due to a bug. Watch what happens…
| Our Device | LoRaWAN Gateway |
|---|---|
| Here is Nonce 1 | |
| OK I accept Nonce 1 | |
| (Device crashes and restarts) | |
| Here is Nonce 1 | |
| (Silently rejects Nonce 1 because it’s repeated) | |
| (Timeout waiting for response) | |
| Here is Nonce 2 | |
| OK I accept Nonce 2 | |
| (Device crashes and restarts) |
If our device keeps crashing, the LoRaWAN Gateway will eventually reject a whole bunch of Nonces: 1, 2, 3, 4, …
(Which makes development super slow and frustrating)
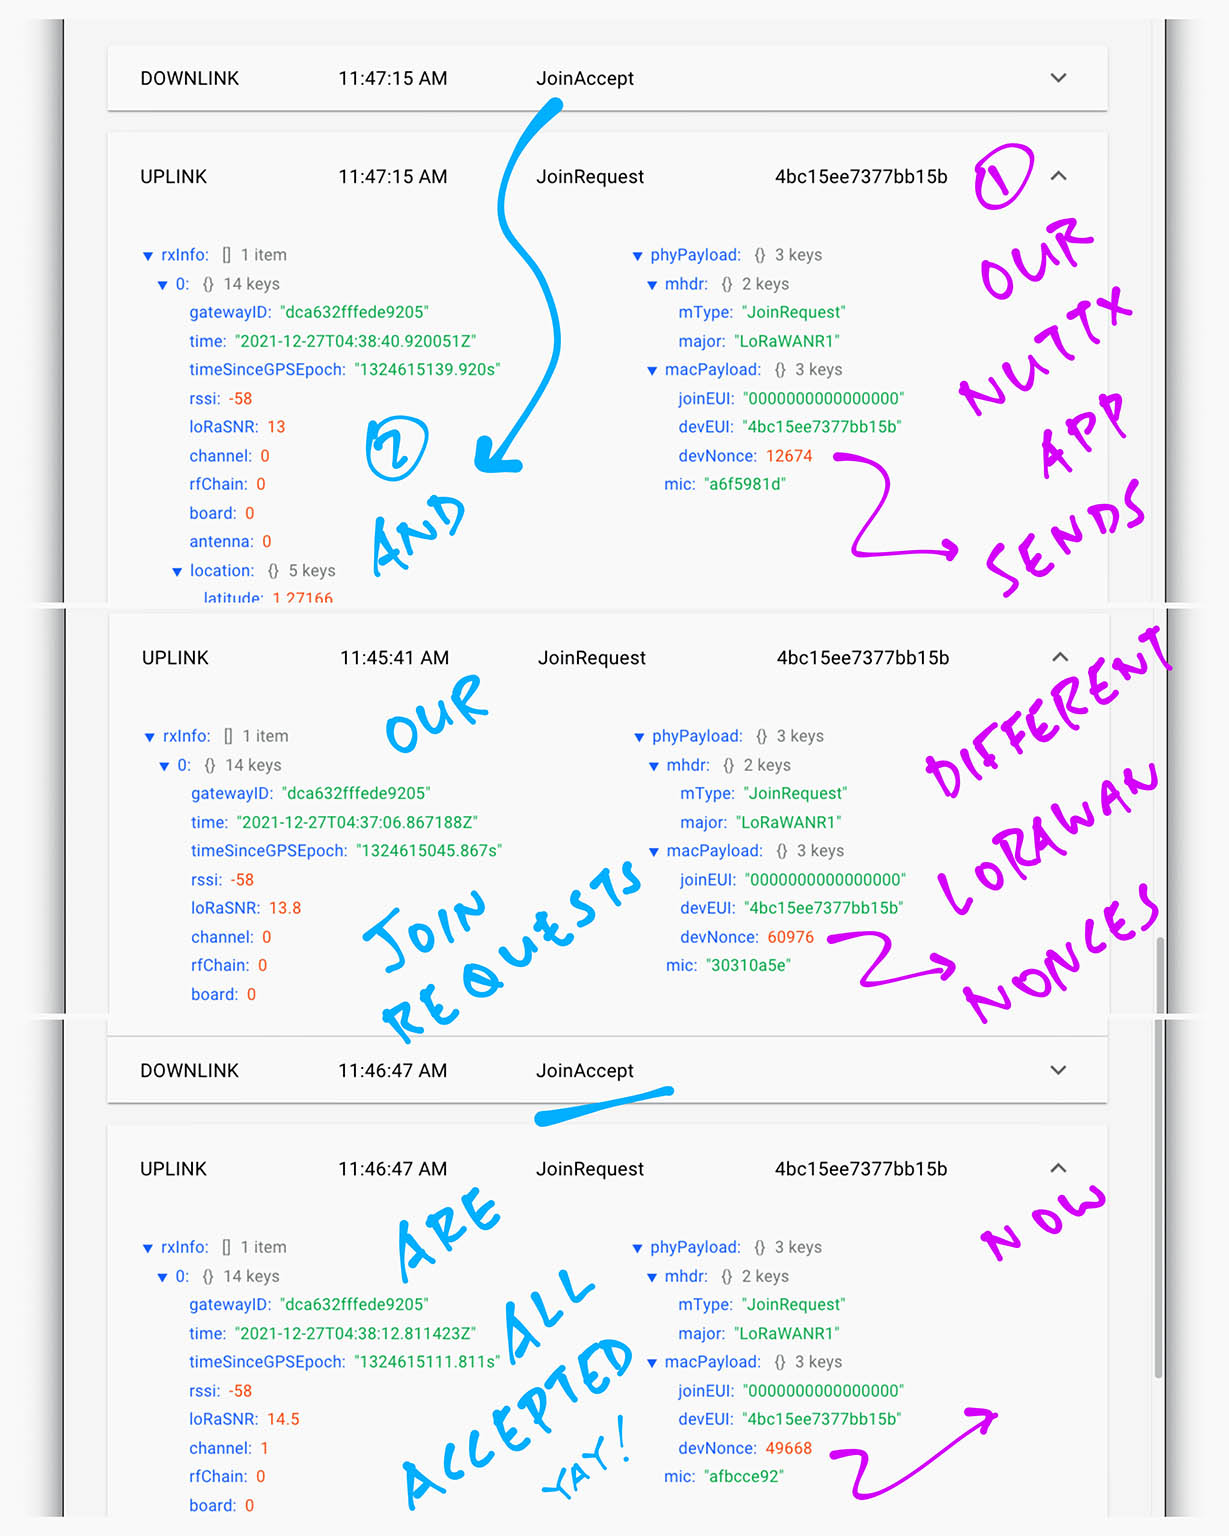
Thus we generate LoRaWAN Nonces with a Strong Random Number Generator instead.
(Random Numbers that won’t repeat upon restarting)
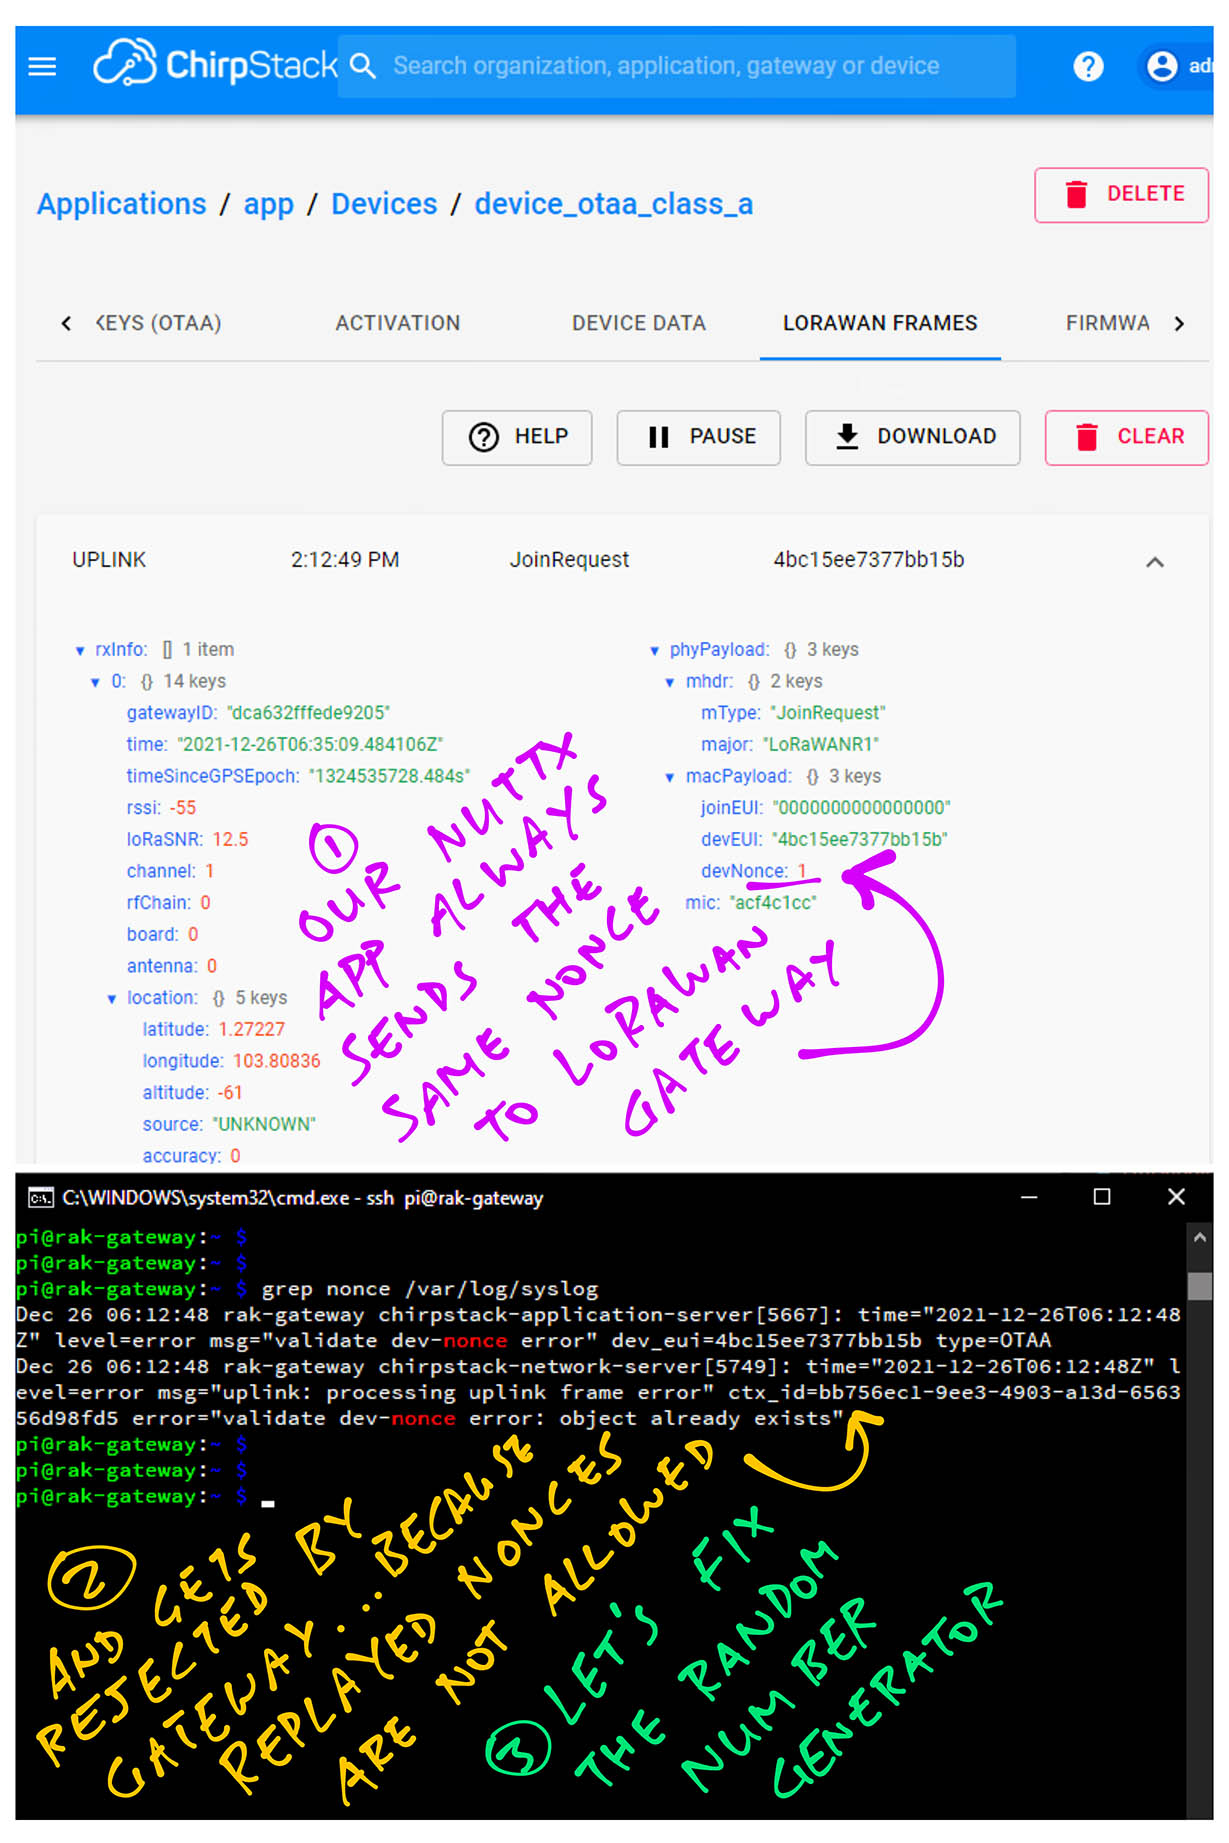
Our LoRaWAN Library supports Random Nonces… Assuming that we have a Secure Element.
Since we don’t have a Secure Element, let’s generate the Random Nonce in software: nuttx.c
/// Get random devnonce from the Random Number Generator
SecureElementStatus_t SecureElementRandomNumber( uint32_t* randomNum ) {
  //  Open the Random Number Generator /dev/urandom
  int fd = open("/dev/urandom", O_RDONLY);
  assert(fd > 0);

  //  Read the random number
  read(fd, randomNum, sizeof(uint32_t));
  close(fd);

  printf("SecureElementRandomNumber: 0x%08lx\n", *randomNum);
  return SECURE_ELEMENT_SUCCESS;
}
The above code is called by our LoRaWAN Library when preparing a Join Network Request: LoRaMacCrypto.c
//  Prepare a Join Network Request
LoRaMacCryptoStatus_t LoRaMacCryptoPrepareJoinRequest( LoRaMacMessageJoinRequest_t* macMsg ) {

#if ( USE_RANDOM_DEV_NONCE == 1 )
  //  Get Nonce from Random Number Generator
  uint32_t devNonce = 0;
  SecureElementRandomNumber( &devNonce );
  CryptoNvm->DevNonce = devNonce;
#else
  //  Init Nonce to 1
  CryptoNvm->DevNonce++;
#endif
To enable Random Nonces, we define USE_RANDOM_DEV_NONCE as 1 in LoRaMacCrypto.h
//  Indicates if a random devnonce must be used or not
#ifdef __NuttX__
//  For NuttX: Get random devnonce from the Random Number Generator
#define USE_RANDOM_DEV_NONCE 1
#else
#define USE_RANDOM_DEV_NONCE 0
#endif  //  __NuttX__
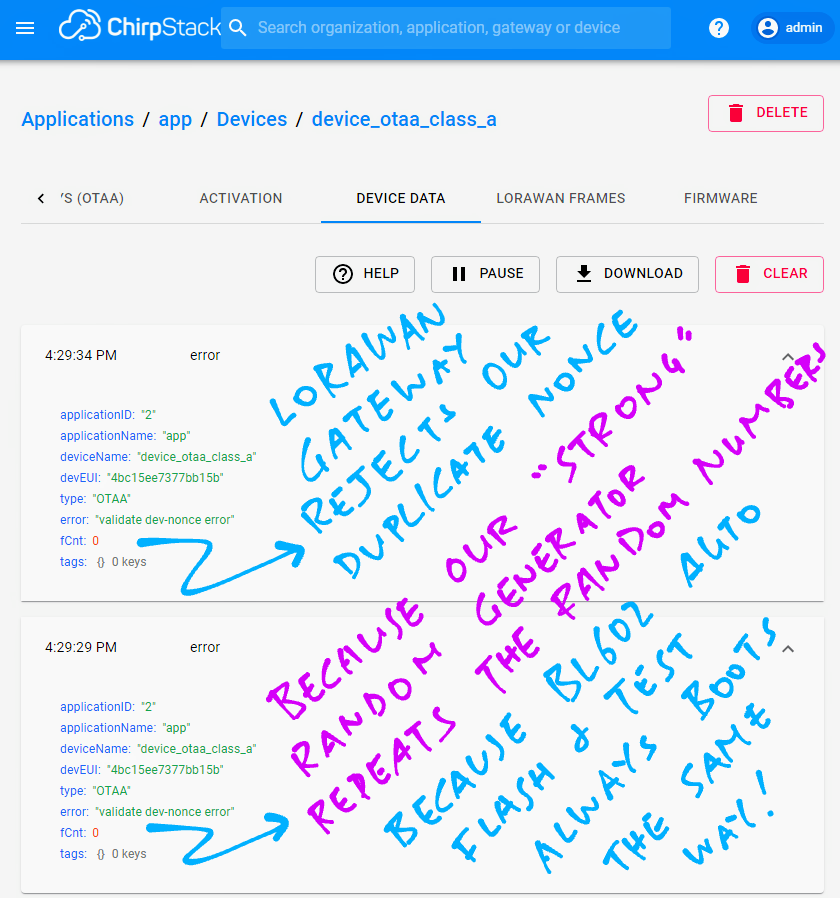
And that’s how we generate Random Nonces whenever we restart our device! (Pic below)
What happens if we don’t select Entropy Pool for our Random Number Generator?
Our Random Number Generator becomes “Weak”… It repeats the same Random Numbers upon restarting.
Thus we always select Entropy Pool for our Random Number Generator…
UPDATE: While running Auto Flash and Test with NuttX, we discovered that the Random Number Generator with Entropy Pool might generate the same Random Numbers. (Because the booting of NuttX becomes so predictable)
To fix this, we add Internal Temperature Sensor Data to the Entropy Pool, to generate truly random numbers…
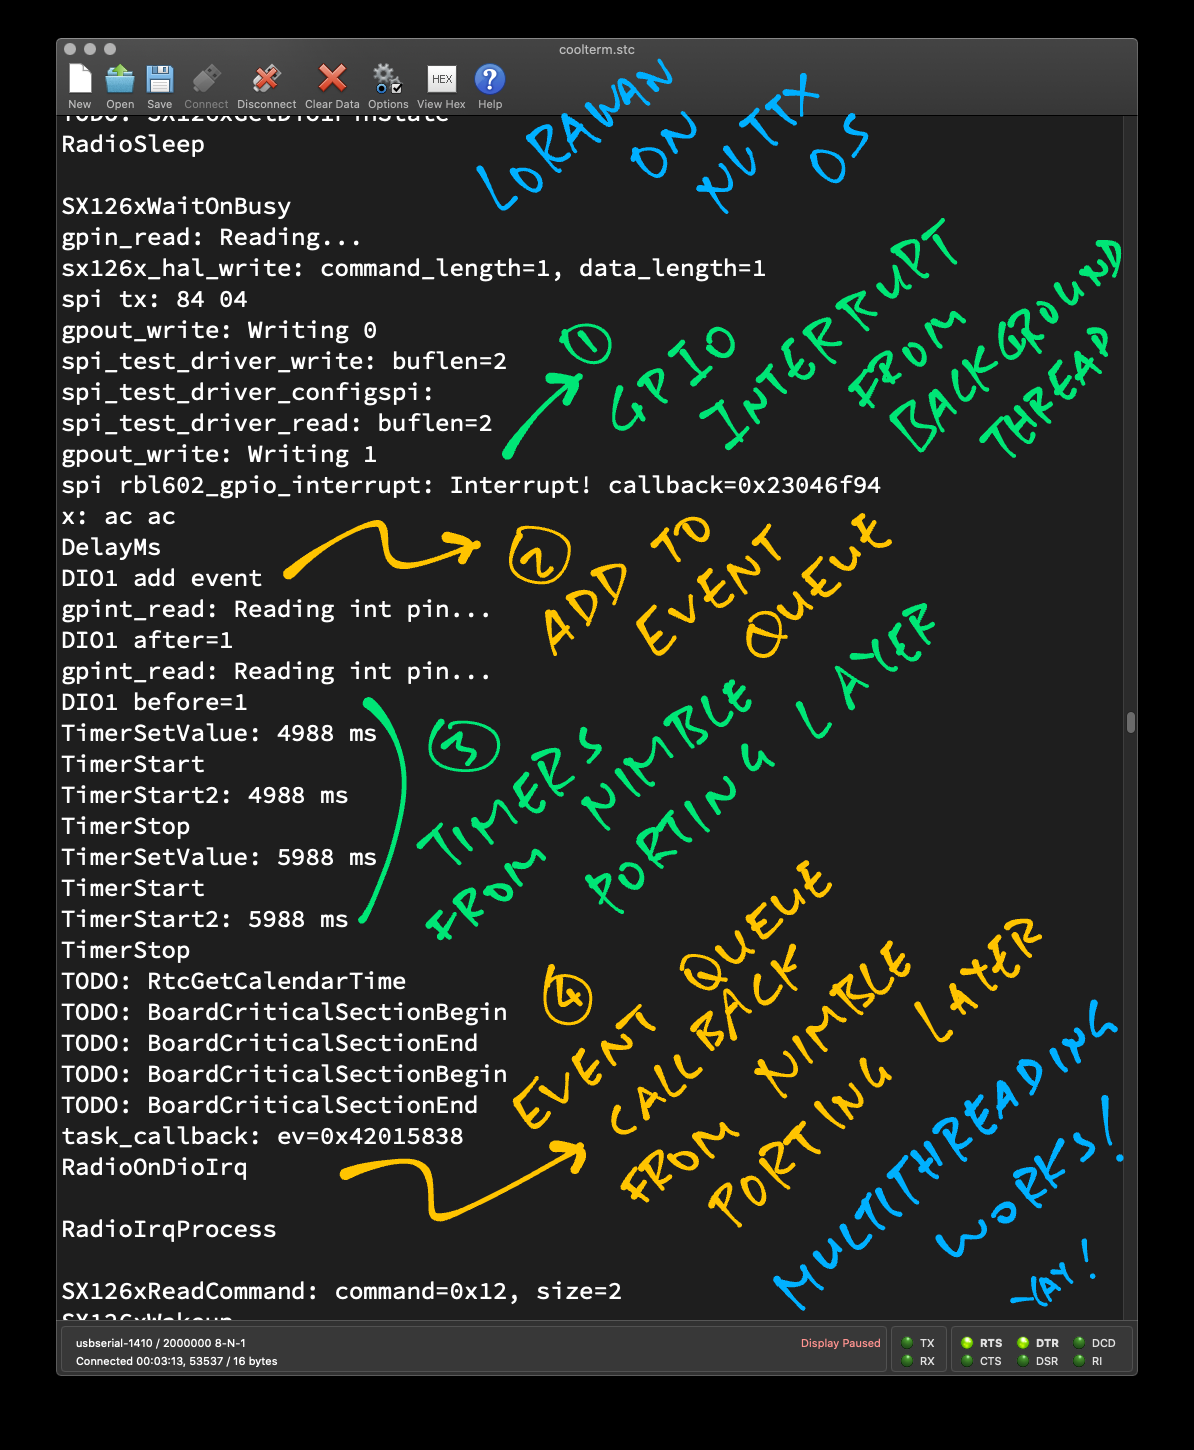
Let’s look inside our LoRaWAN Test App and learn how the Event Loop handles LoRa and LoRaWAN Events by calling NimBLE Porting Layer.
What is NimBLE Porting Layer?
NimBLE Porting Layer is a multithreading library that works on several operating systems…
It provides Timers and Event Queues that are used by the LoRa and LoRaWAN Libraries.
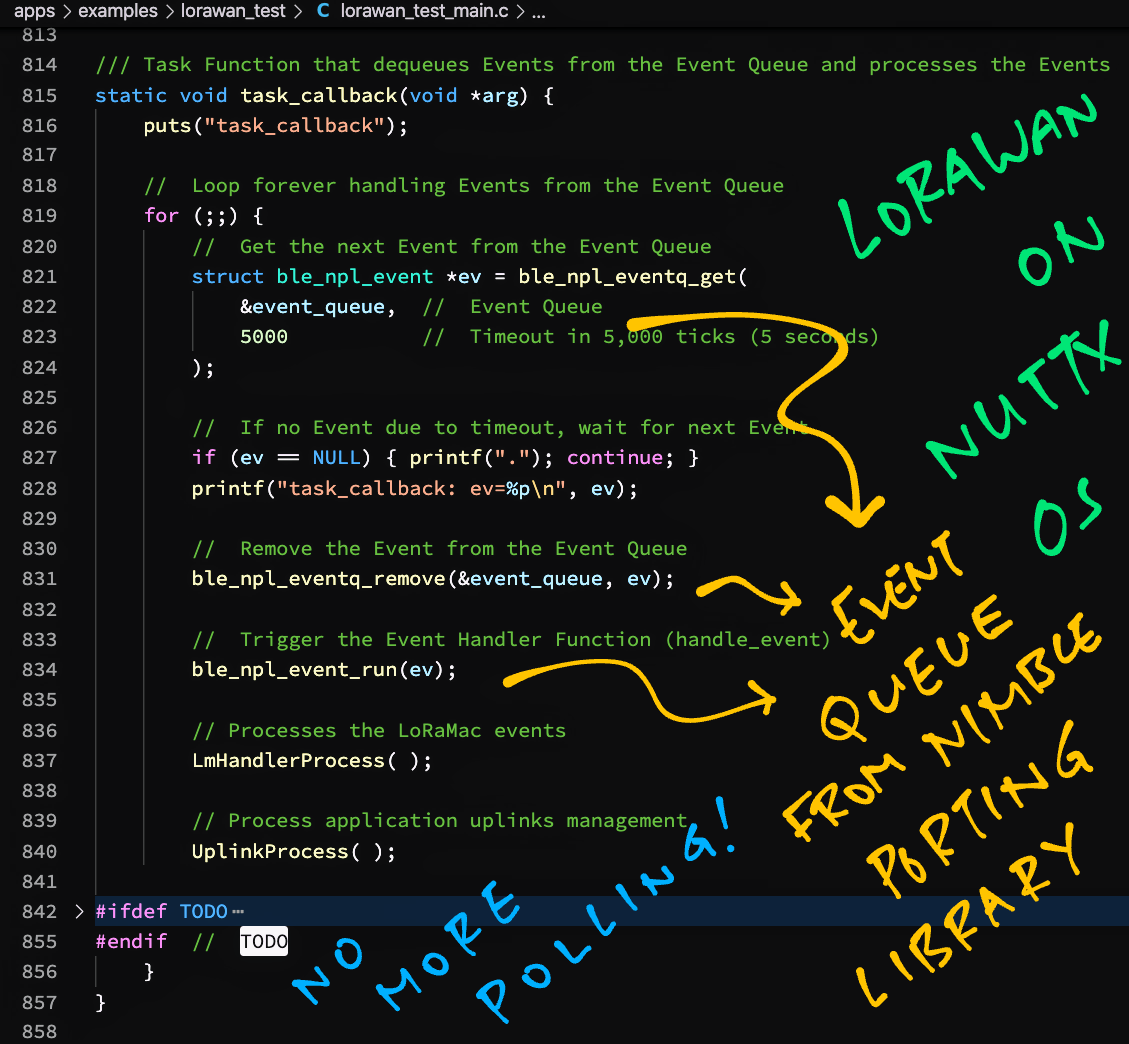
What’s inside our Event Loop?
Our Event Loop forever reads LoRa and LoRaWAN Events from an Event Queue and handles them.
The Event Queue is created in our LoRa SX1262 Library as explained here…
The Main Function of our LoRaWAN Test App calls this function to run the Event Loop: lorawan_test_main.c
/// Event Loop that dequeues Events from the Event Queue and processes the Events
static void handle_event_queue(void *arg) {

  //  Loop forever handling Events from the Event Queue
  for (;;) {

    //  Get the next Event from the Event Queue
    struct ble_npl_event *ev = ble_npl_eventq_get(
      &event_queue,         //  Event Queue
      BLE_NPL_TIME_FOREVER  //  No Timeout (Wait forever for event)
    );
This code runs in the Foreground Thread of our NuttX App.
Here we loop forever, waiting for Events from the Event Queue.
When we receive an Event, we remove the Event from the Event Queue…
    //  If no Event due to timeout, wait for next Event.
    //  Should never happen since we wait forever for an Event.
    if (ev == NULL) { printf("."); continue; }

    //  Remove the Event from the Event Queue
    ble_npl_eventq_remove(&event_queue, ev);
We call the Event Handler Function that was registered with the Event…
    //  Trigger the Event Handler Function
    ble_npl_event_run(ev);
For SX1262 Interrupts: We call RadioOnDioIrq to handle the packet transmitted / received notification
For Timer Events: We call the Timeout Function defined in the Timer
The rest of the Event Loop handles LoRaWAN Events…
    //  For LoRaWAN: Process the LoRaMAC events
    LmHandlerProcess( );
LmHandlerProcess handles Join Network Events in the LoRaMAC Layer of our LoRaWAN Library.
If we have joined the LoRaWAN Network, we transmit data to the network…
    //  For LoRaWAN: If we have joined the network, do the uplink
    if (!LmHandlerIsBusy( )) {
      UplinkProcess( );
}(UplinkProcess calls PrepareTxFrame, which we have seen earlier)
The last part of the Event Loop will handle Low Power Mode in future…
    //  For LoRaWAN: Handle Low Power Mode
    CRITICAL_SECTION_BEGIN( );
    if( IsMacProcessPending == 1 ) {
      //  Clear flag and prevent MCU to go into low power modes.
      IsMacProcessPending = 0;
    } else {
      //  The MCU wakes up through events
      //  TODO: BoardLowPowerHandler( );
    }
    CRITICAL_SECTION_END( );
  }
}
And we loop back perpetually, waiting for Events and handling them.
That’s how we handle LoRa and LoRaWAN Events with NimBLE Porting Layer!
The Join Network Request / Join Accept Response / Data Packet doesn’t appear in the LoRaWAN Gateway…
What can we check?
In the output of our LoRaWAN Test App, verify the Sync Word (must be 3444), Device EUI (MSB First), Join EUI (MSB First) and LoRa Frequency…
RadioSetPublicNetwork: public syncword=3444
DevEui      : 4B-C1-5E-E7-37-7B-B1-5B
JoinEui     : 00-00-00-00-00-00-00-00
RadioSetChannel: freq=923400000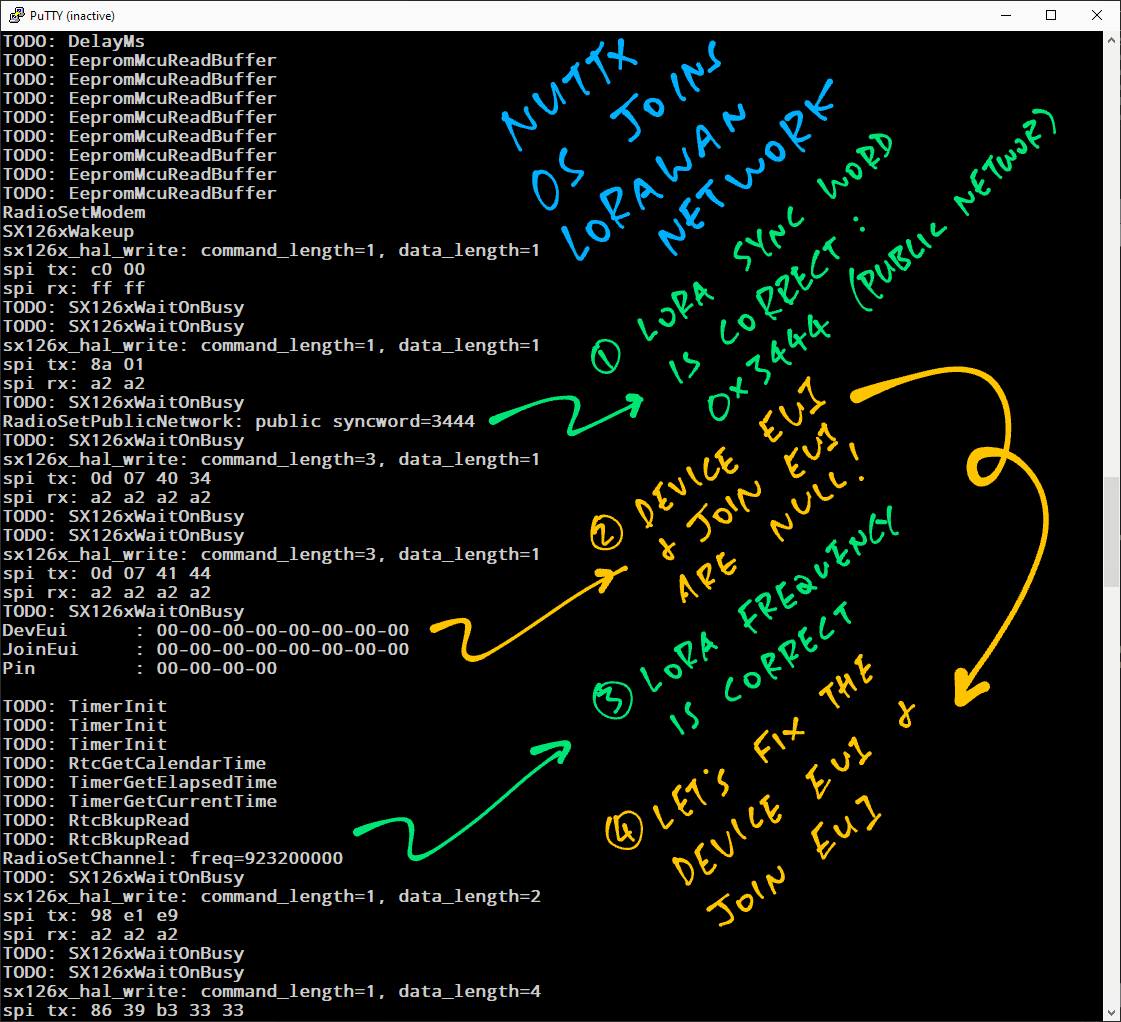
Verify the App Key (MSB First) in se-identity.h
On our LoRaWAN Gateway, scan the log for Message Integrity Code errors (“invalid MIC”)…
grep MIC /var/log/syslog

chirpstack-application-server[568]:
  level=error
  msg="invalid MIC"
  dev_eui=4bc15ee7377bb15b
  type=DATA_UP_MIC
This is usually caused by incorrect Device EUI, Join EUI or App Key.
On our LoRaWAN Gateway, scan the log for Nonce Errors (“validate dev-nonce error”)…
grep nonce /var/log/syslog

chirpstack-application-server[5667]:
  level=error
  msg="validate dev-nonce error"
  dev_eui=4bc15ee7377bb15b
  type=OTAA

chirpstack-network-server[5749]:
  time="2021-12-26T06:12:48Z"
  level=error
  msg="uplink: processing uplink frame error"
  ctx_id=bb756ec1-9ee3-4903-a13d-656356d98fd5
  error="validate dev-nonce error: object already exists"
This means that a Duplicate Nonce has been detected.
Check that we’re using a Strong Random Number Generator with Entropy Pool…
Another way to check for Duplicate Nonce: Click…
Applications → app → device_otaa_class_a → Device Data
Look for “validate dev-nonce error”…
Disable all Info Logging on NuttX
(See “LoRaWAN is Time Sensitive” below)
Verify the Message Size for the Data Rate
(See “Empty LoRaWAN Message” below)
If we fail to join the LoRaWAN Network, see these tips…
More troubleshooting tips…
Warning: LoRaWAN is Time Sensitive!
Our LoRaWAN Library needs to handle Events in a timely manner… Or the protocol fails.
This is the normal flow for the Join Network Request…
| Our Device | LoRaWAN Gateway |
|---|---|
| Join Network Request → | |
| Transmit OK Interrupt | |
| Switch to Receive Mode | |
| ← Join Accept Response | |
| Handle Join Response |
Watch what happens if our device gets too busy…
| Our Device | LoRaWAN Gateway |
|---|---|
| Join Network Request → | |
| Transmit OK Interrupt | |
| (Busy Busy) | ← Join Accept Response |
| Switch to Receive Mode | |
| Join Response missing! |
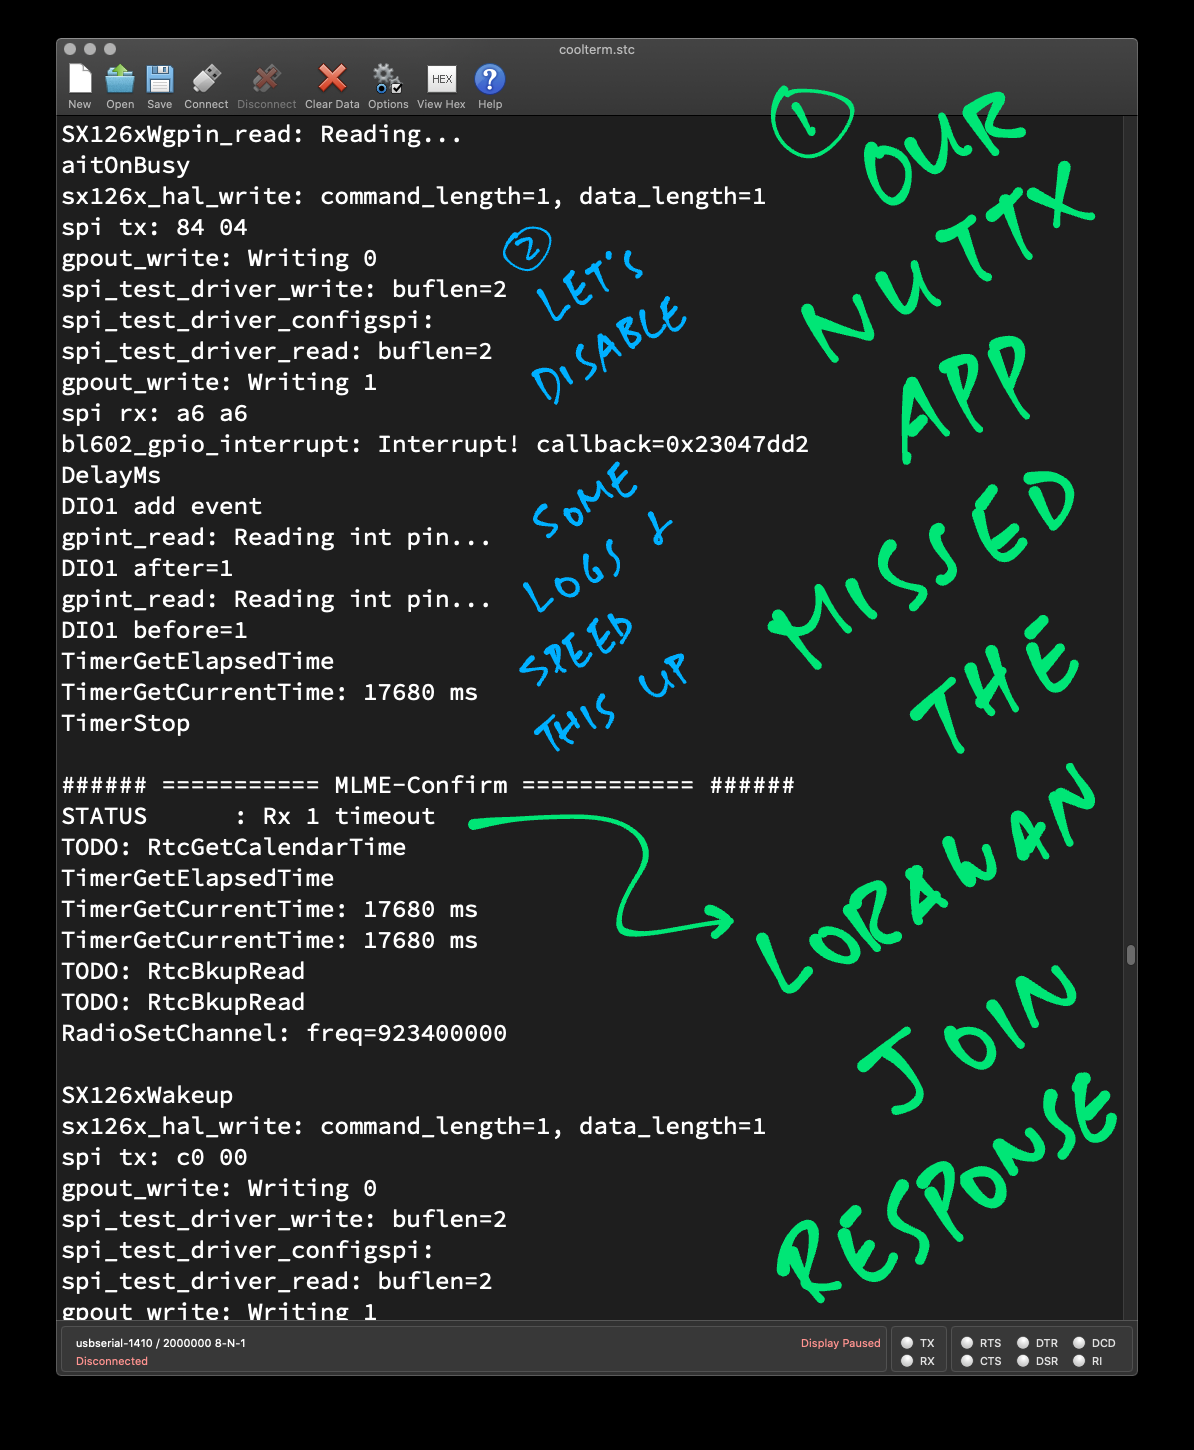
This might happen if our device is busy writing debug logs to the console.
(LoRaWAN Gateway returns the Join Accept Response in a One-Second Window)
Thus we should disable Info Logging on NuttX…
In menuconfig, select “Build Setup” → “Debug Options”
Uncheck the following…
(It’s OK to enable Debug Assertions, Error Output and Warning Output)
Since LoRaWAN is Time Sensitive, we ought to optimise SPI Data Transfers with DMA.
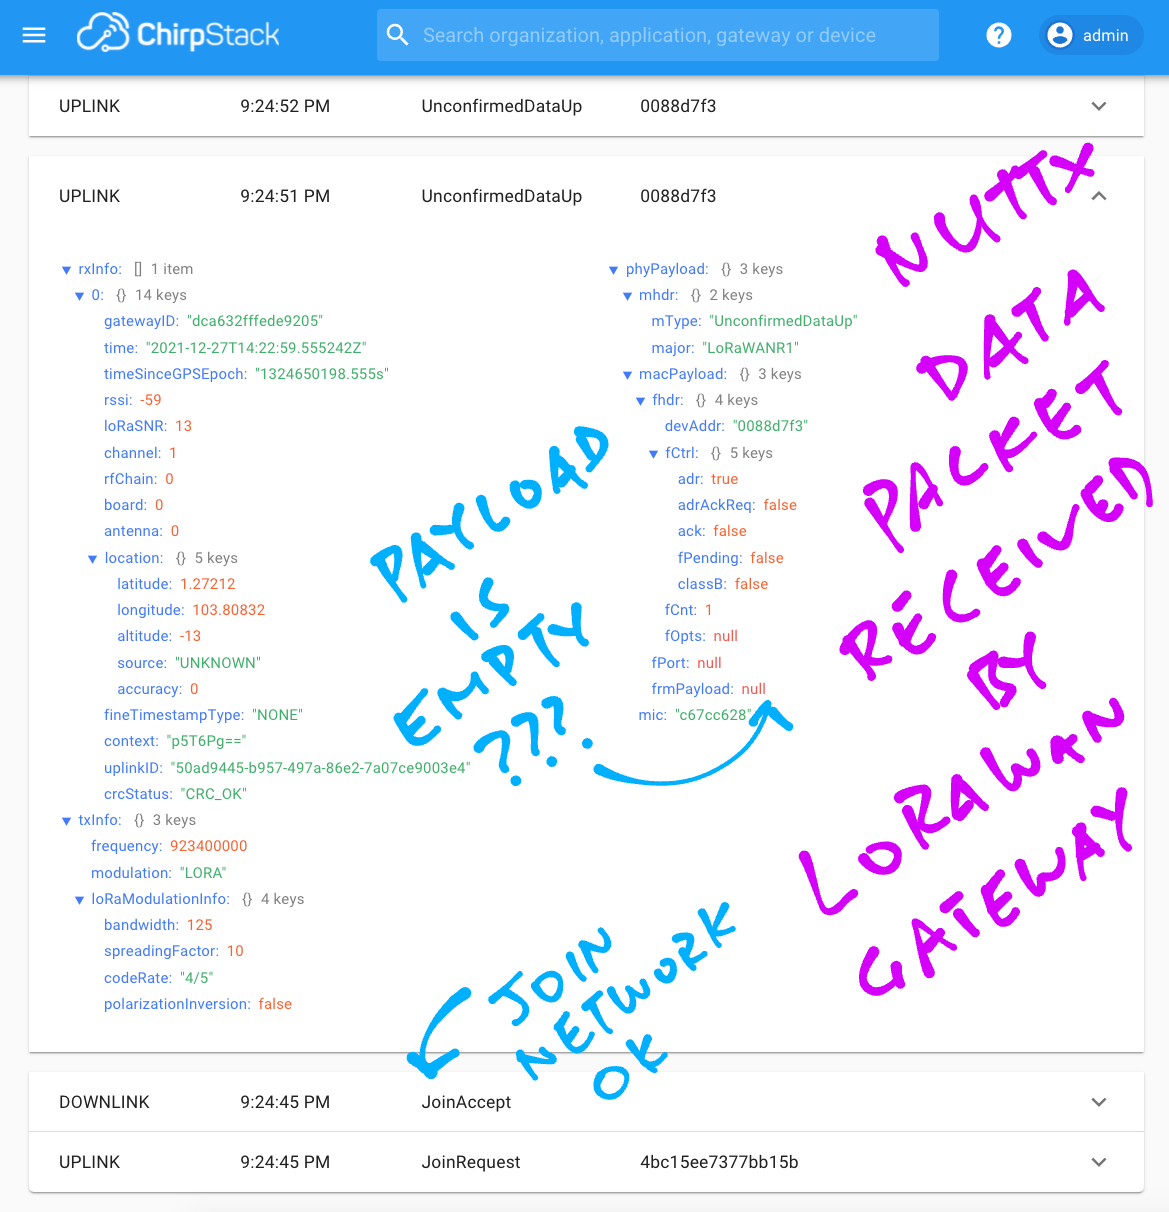
What happens when we send a message that’s too large?
Our LoRaWAN Library will transmit an Empty Message Payload!
We’ll see this in the LoRaWAN Gateway…
In the output for our LoRaWAN Test App, look for “maxSize” to verify the Maximum Message Size for our Data Rate and LoRaWAN Region…
PrepareTxFrame: Transmit to LoRaWAN: Hi NuttX (9 bytes)
PrepareTxFrame: status=0, maxSize=11, currentSize=11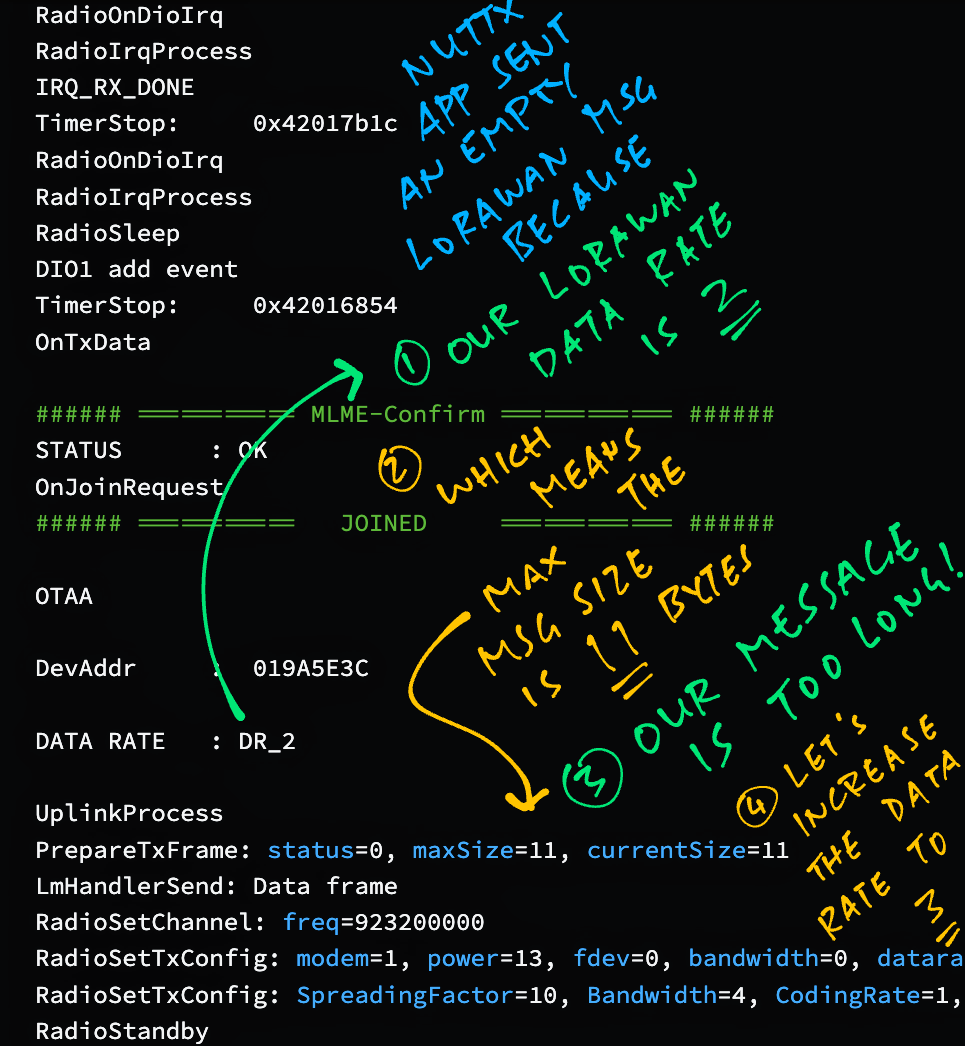
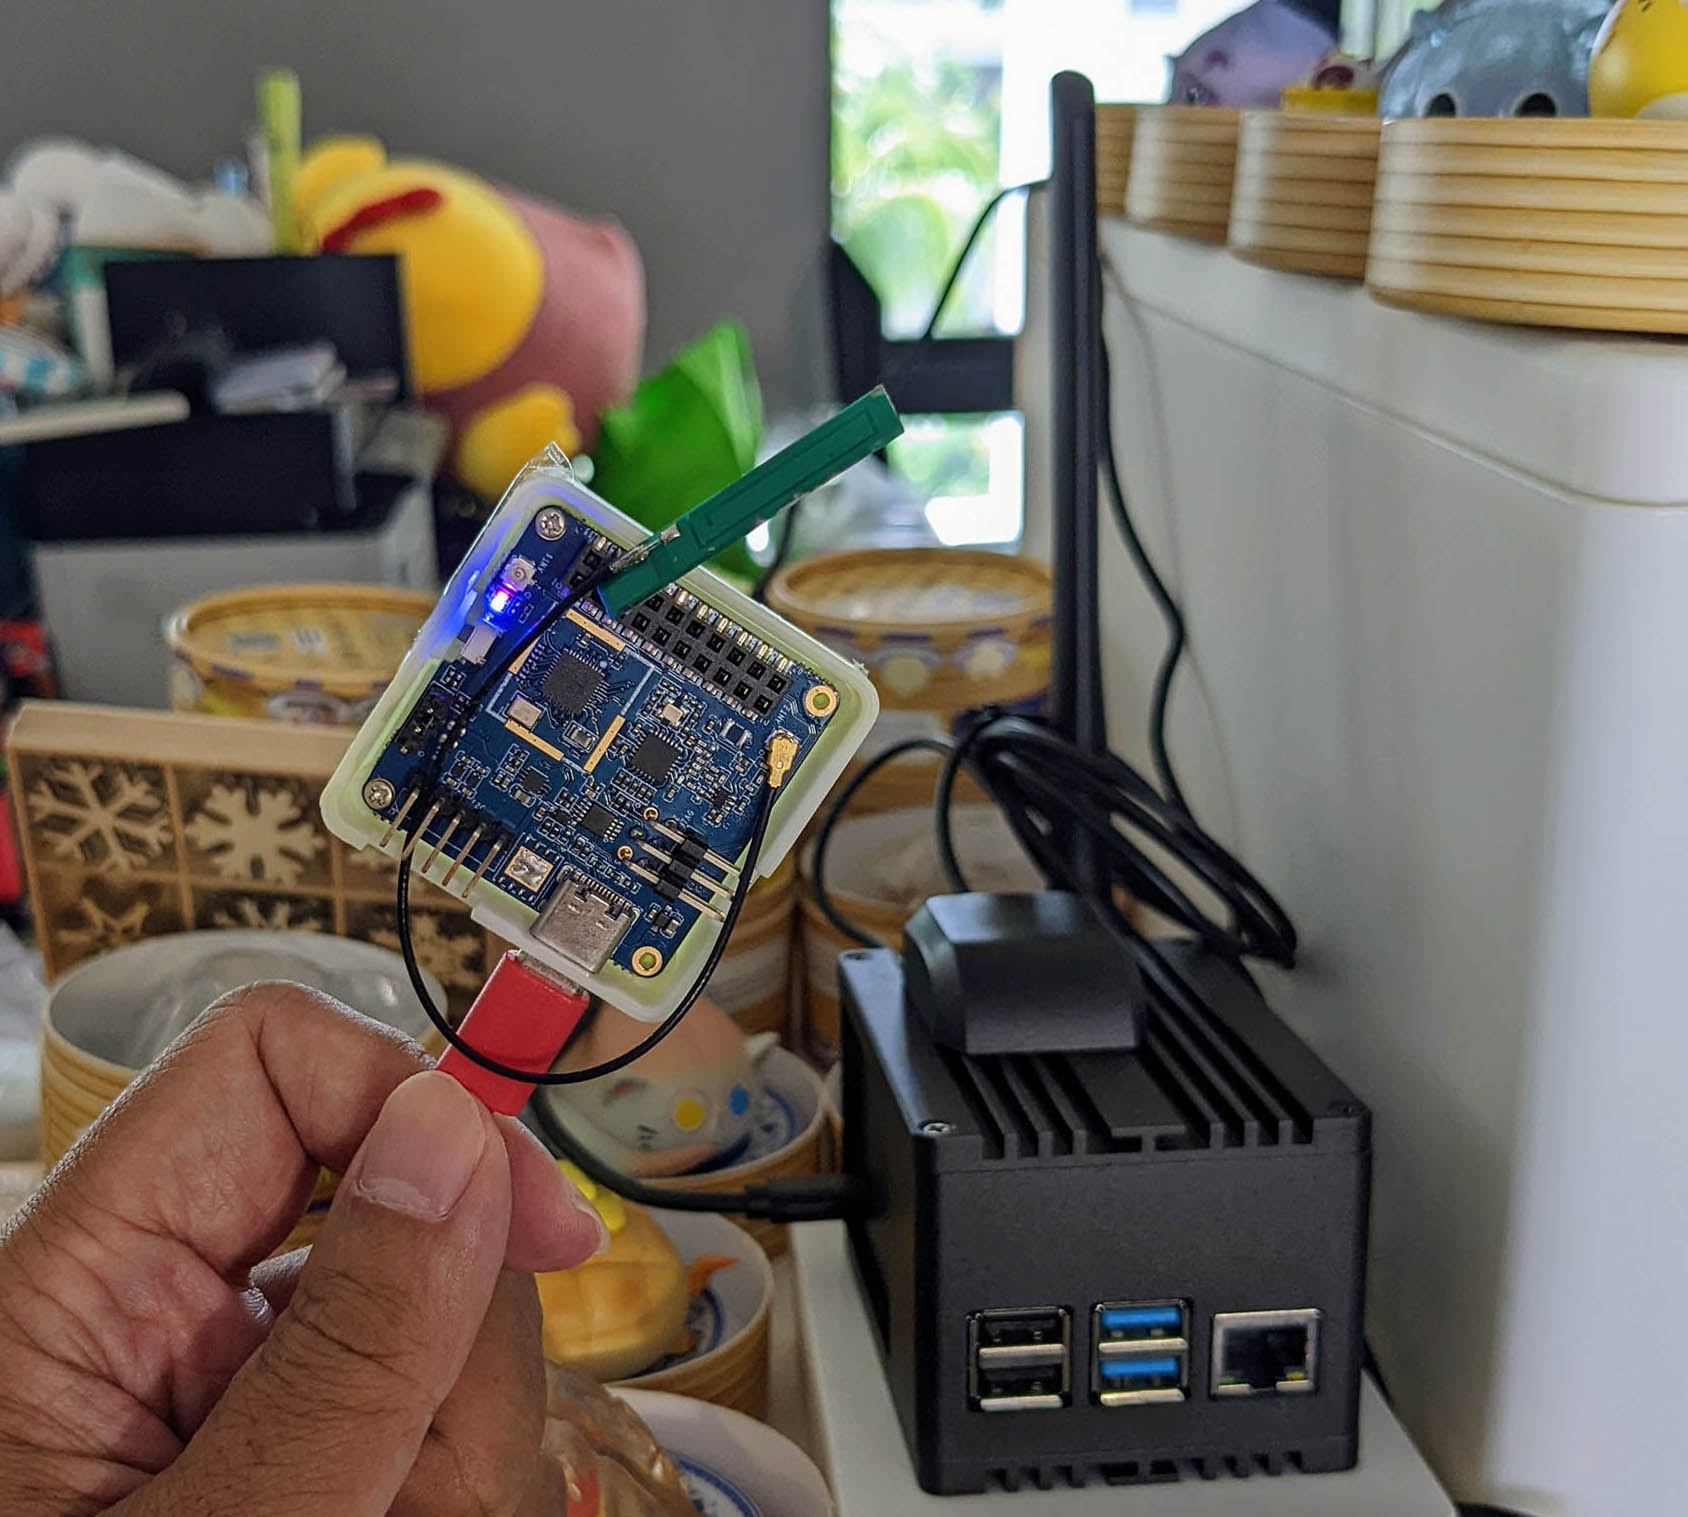
Today we have successfully tested the LoRaWAN Library on PineDio Stack BL604 RISC-V Board (pic below) and its onboard Semtech SX1262 Transceiver.
The NuttX implementation of SPI on BL602 and BL604 might need some enhancements…
NuttX on BL602 / BL604 executes SPI Data Transfer with Polling (not DMA)
LoRaWAN is Time Sensitive, as explained earlier. SPI with Polling might cause incoming packets to be dropped.
(SPI with DMA is probably better for LoRaWAN)
We’re testing NuttX and LoRaWAN on PineDio Stack BL604, which comes with an onboard ST7789 SPI Display.
ST7789 works better with DMA when blasting pixels to the display.
We might have contention between ST7789 and SX1262 if we do SPI with Polling
(How would we multitask LoRaWAN with Display Updates?)
Hence we might need to implement SPI with DMA real soon on BL602 and BL604.
We could port the implementation of SPI DMA from BL602 IoT SDK to NuttX…
UPDATE: SPI DMA is now supported on BL602 NuttX…
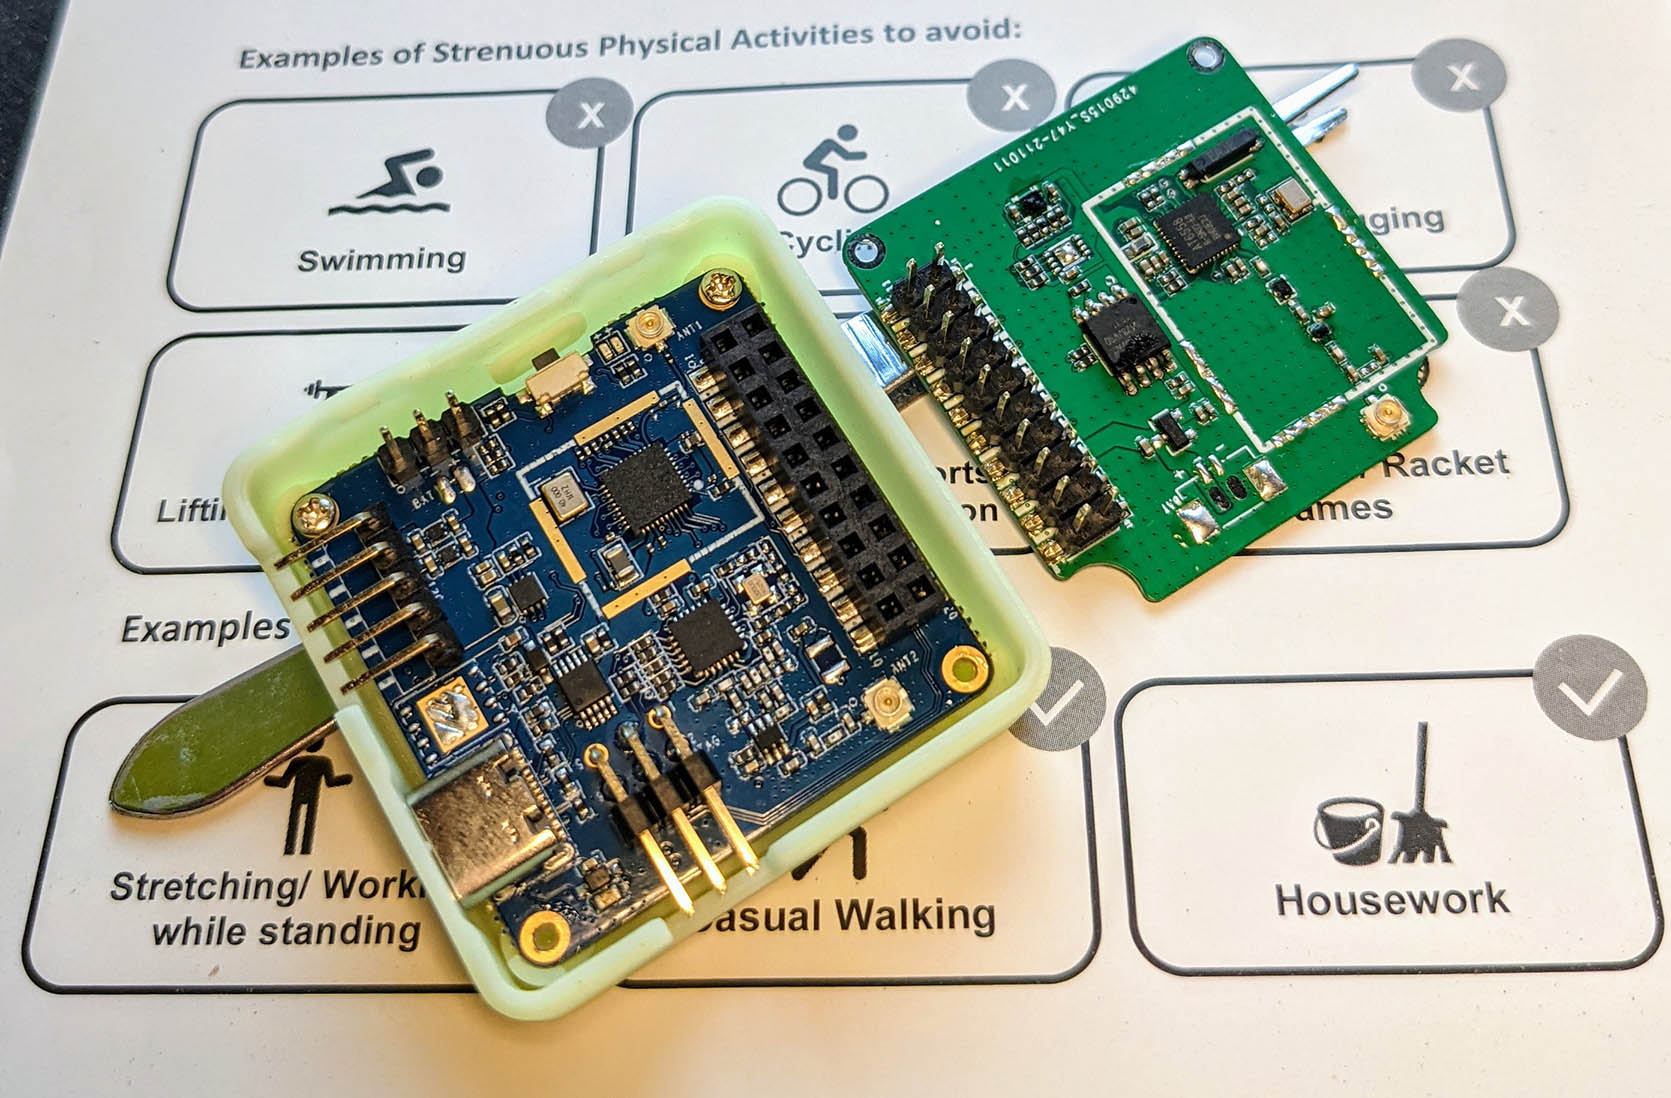
We’re ready to build a complete IoT Sensor Device with NuttX!
Now that LoRaWAN is up, we’ll carry on in the next few articles…
Implement CBOR on NuttX for compressing Sensor Data…
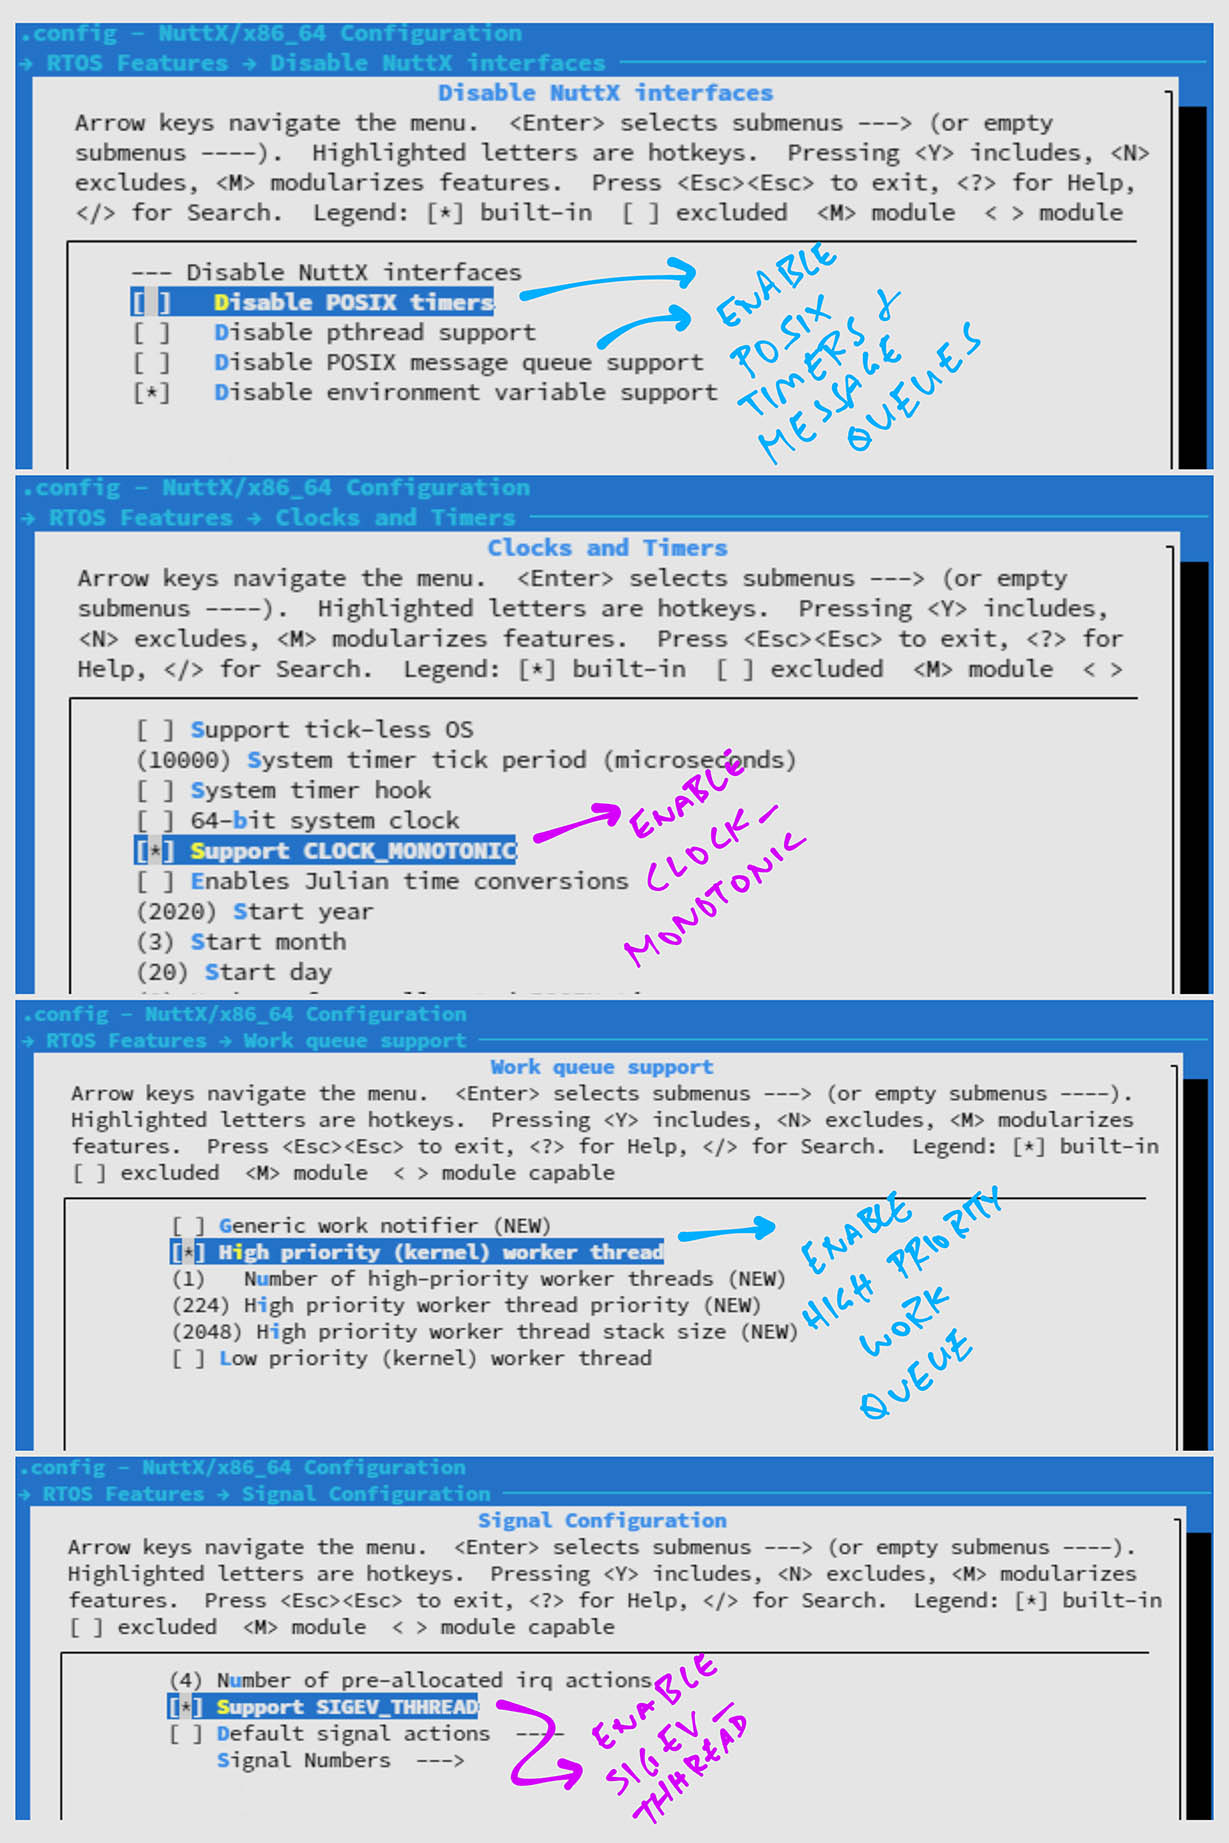
Transmit the compressed Sensor Data to The Things Network over LoRaWAN
(Pic below)
We’ll read BL602’s Internal Temperature Sensor to get real Sensor Data…
We’re porting plenty of code to NuttX: LoRa, LoRaWAN and NimBLE Porting Layer. Do we expect any problems?
Yep we might have issues keeping our LoRaWAN Stack in sync with Semtech’s version. (But we shall minimise the changes)
We have ported the Rust Embedded HAL to NuttX. Here’s what we’ve done…
Many Thanks to my GitHub Sponsors for supporting my work! This article wouldn’t have been possible without your support.
Got a question, comment or suggestion? Create an Issue or submit a Pull Request here…
lupyuen.github.io/src/lorawan3.md
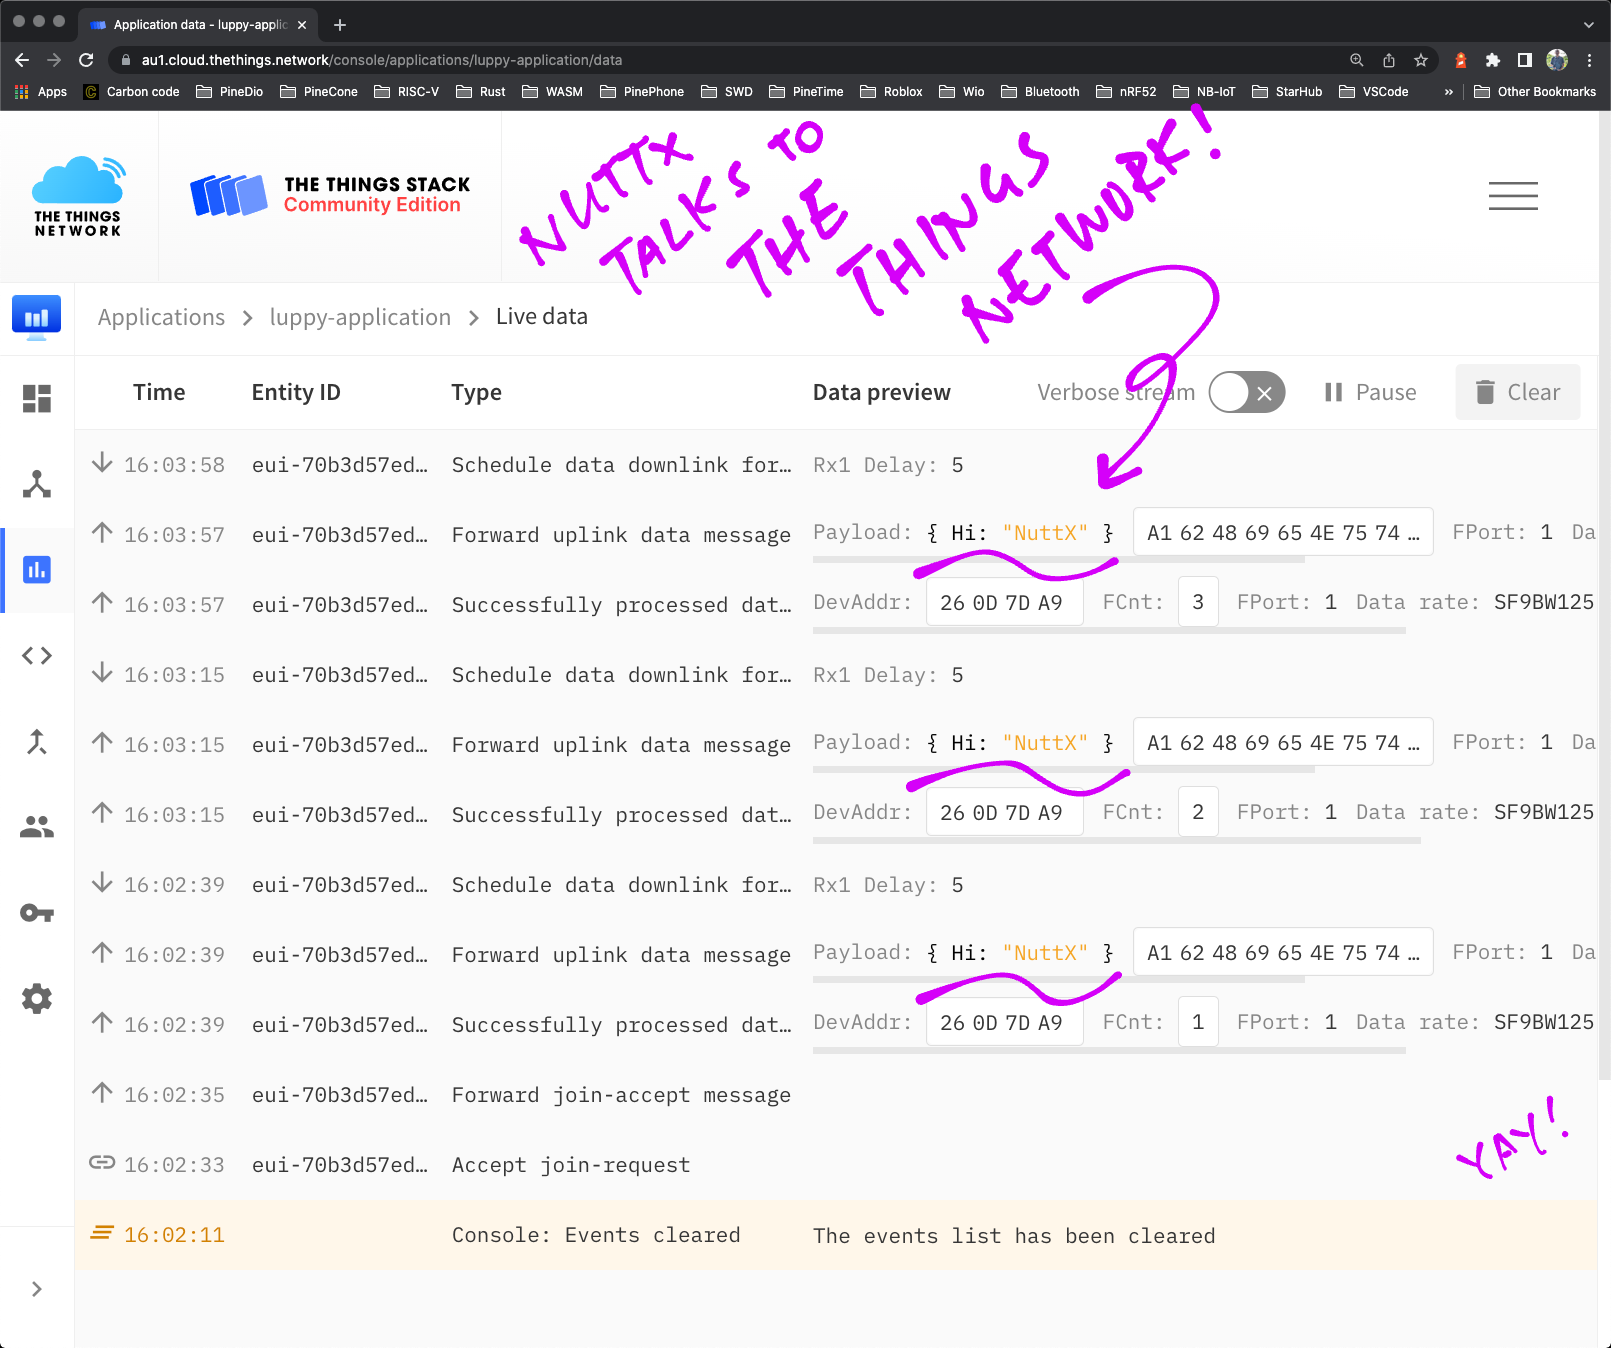
NuttX transmits a CBOR Payload to The Things Network Over LoRaWAN
This article is the expanded version of this Twitter Thread
We’re porting plenty of code to NuttX: LoRa, LoRaWAN and NimBLE Porting Layer. Do we expect any problems?
If we implement LoRa and LoRaWAN as NuttX Drivers, we’ll have to scrub the code to comply with the NuttX Coding Conventions.
This makes it harder to update the LoRaWAN Driver when there are changes in the LoRaWAN Spec. (Like for a new LoRaWAN Region)
Alternatively we may implement LoRa and LoRaWAN as External Libraries, similar to NimBLE for NuttX.
(The Makefile downloads the External Library during build)
But then we won’t get a proper NuttX Driver that exposes the ioctl() interface to NuttX Apps.
Conundrum. Lemme know your thoughts!
How do other Embedded Operating Systems implement LoRaWAN?
Mynewt embeds a Partial Copy of Semtech’s LoRaWAN Stack into its source tree.
Zephyr maintains a Complete Fork of the entire LoRaWAN Repo by Semtech. Which gets embedded during the Zephyr build.
We’re adopting the Zephyr approach to keep our LoRaWAN Stack in sync with Semtech’s.
We have already ported LoRaWAN to BL602 IoT SDK (see this), why are we porting again to NuttX?
Regrettably BL602 IoT SDK has been revamped (without warning) to the new “hosal” HAL (see this), and the LoRaWAN Stack will no longer work on the revamped BL602 IoT SDK.
For easier maintenance, we shall code our BL602 and BL604 projects with Apache NuttX OS instead.
(Which won’t get revamped overnight!)
Will NuttX become the official OS for PineDio Stack BL604 when it goes on sale?
It might! But first let’s get LoRaWAN and ST7789 Display running together on PineDio Stack.
LoRaWAN on NuttX is a great way to test a new gadget like PineDio Stack BL604!
Today we have tested: SPI Bus, GPIO Input / Output / Interrupt, Multithreading, Timers and Message Queues!
Is there another solution for the Nonce Quirk?
We could store the Last Used Nonce into Non-Volatile Memory to be sure that we don’t reuse the Nonce.
NimBLE Porting Layer needs POSIX Timers and Message Queues (plus more) to work. Follow the steps below to enable the features in menuconfig…
Select “RTOS Features” → “Disable NuttX Interfaces”
Uncheck “Disable POSIX Timers”
Uncheck “Disable POSIX Message Queue Support”
Select “RTOS Features” → “Clocks and Timers”
Check “Support CLOCK_MONOTONIC”
Select “RTOS Features” → “Work Queue Support”
Check “High Priority (Kernel) Worker Thread”
Select “RTOS Features” → “Signal Configuration”
Check “Support SIGEV_THHREAD”
Hit “Exit” until the Top Menu appears. (“NuttX/x64_64 Configuration”)
Our LoRaWAN Library generates Nonces by calling a Random Number Generator with Entropy Pool.
Follow these steps to enable the Entropy Pool in menuconfig…
Select “Crypto API”
Check “Crypto API Support”
Check “Entropy Pool and Strong Random Number Generator”
Hit “Exit” until the Top Menu appears. (“NuttX/x64_64 Configuration”)
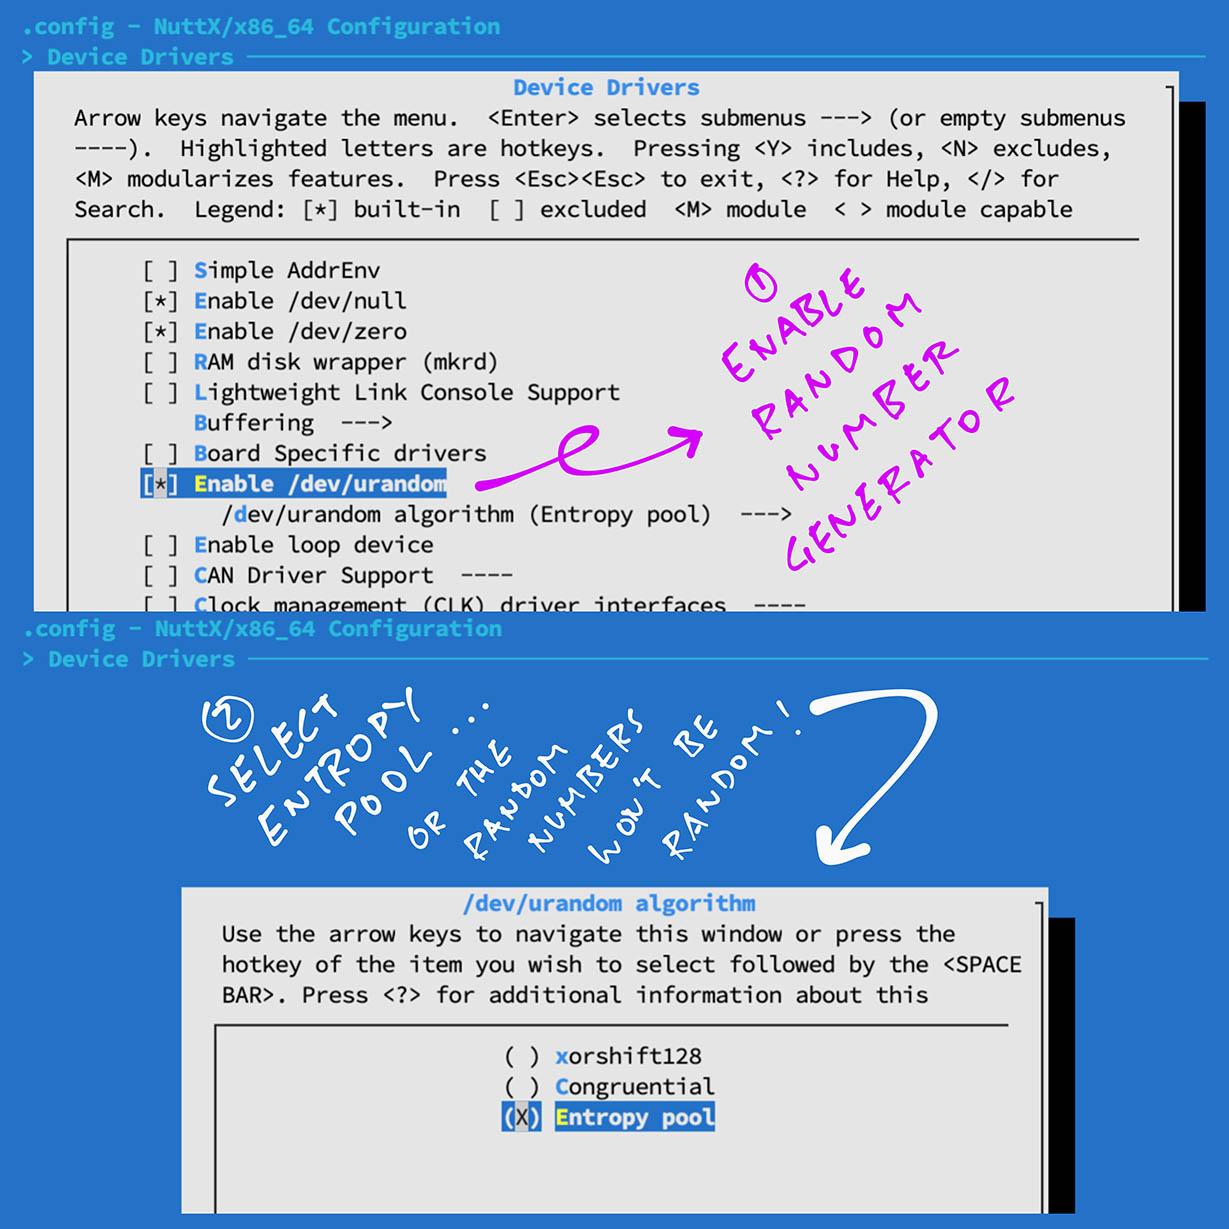
Then we enable the Random Number Generator…
Select “Device Drivers”
Check “Enable /dev/urandom”
Select “/dev/urandom algorithm”
Check “Entropy Pool”
Hit “Exit” until the Top Menu appears. (“NuttX/x64_64 Configuration”)
(For BL602 and ESP32)
Below are the steps to build, flash and run NuttX on BL602 and ESP32.
The instructions below will work on Linux (Ubuntu), WSL (Ubuntu) and macOS.
(Instructions for other platforms)
Follow these steps to build NuttX for BL602 or ESP32…
Install the build prerequisites…
Assume that we have downloaded the NuttX Source Code and configured the LoRaWAN Settings…
To build NuttX, enter this command…
makeWe should see…
LD: nuttx
CP: nuttx.hex
CP: nuttx.binFor WSL: Copy the NuttX Firmware to the c:\blflash directory in the Windows File System…
##  /mnt/c/blflash refers to c:\blflash in Windows
mkdir /mnt/c/blflash
cp nuttx.bin /mnt/c/blflash
For WSL we need to run blflash under plain old Windows CMD (not WSL) because it needs to access the COM port.
In case of problems, refer to the NuttX Docs…
For ESP32: See instructions here (Also check out this article)
For BL602: Follow these steps to install blflash…
We assume that our Firmware Binary File nuttx.bin has been copied to the blflash folder.
Set BL602 / BL604 to Flashing Mode and restart the board…
For PineDio Stack BL604:
Set the GPIO 8 Jumper to High (Like this)
Disconnect the USB cable and reconnect
Or use the Improvised Reset Button (Here’s how)
For PineCone BL602:
Set the PineCone Jumper (IO 8) to the H Position (Like this)
Press the Reset Button
For BL10:
Connect BL10 to the USB port
Press and hold the D8 Button (GPIO 8)
Press and release the EN Button (Reset)
Release the D8 Button
For Ai-Thinker Ai-WB2, Pinenut and MagicHome BL602:
Disconnect the board from the USB Port
Connect GPIO 8 to 3.3V
Reconnect the board to the USB port
Enter these commands to flash nuttx.bin to BL602 / BL604 over UART…
## For Linux: Change "/dev/ttyUSB0" to the BL602 / BL604 Serial Port
blflash flash nuttx.bin \
  --port /dev/ttyUSB0

## For macOS: Change "/dev/tty.usbserial-1410" to the BL602 / BL604 Serial Port
blflash flash nuttx.bin \
  --port /dev/tty.usbserial-1410 \
  --initial-baud-rate 230400 \
  --baud-rate 230400

## For Windows: Change "COM5" to the BL602 / BL604 Serial Port
blflash flash c:\blflash\nuttx.bin --port COM5For WSL: Do this under plain old Windows CMD (not WSL) because blflash needs to access the COM port.
(Flashing WiFi apps to BL602 / BL604? Remember to use bl_rfbin)
(More details on flashing firmware)
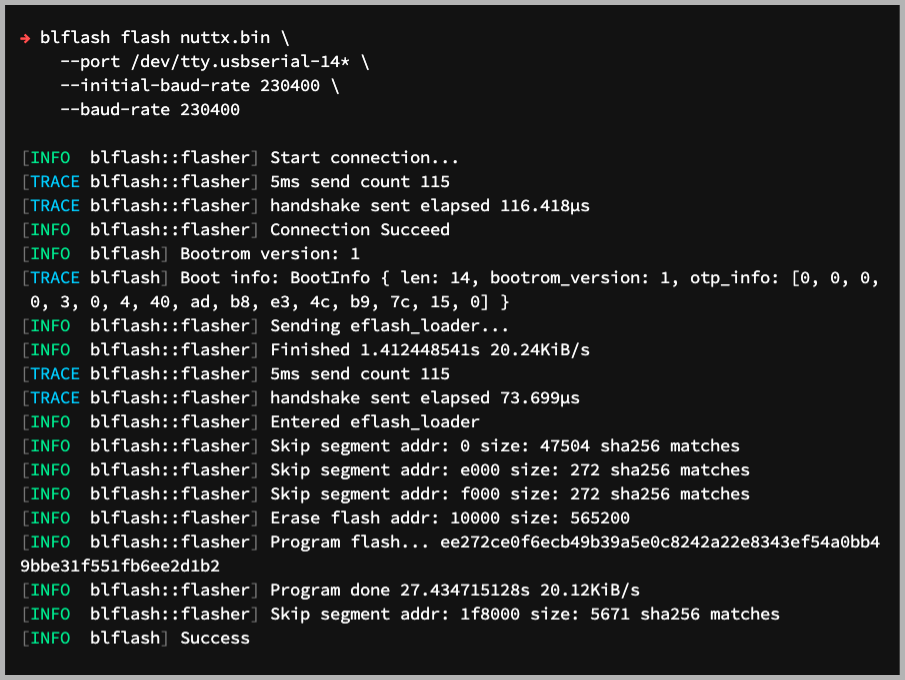
For ESP32: Use Picocom to connect to ESP32 over UART…
picocom -b 115200 /dev/ttyUSB0For BL602: Set BL602 / BL604 to Normal Mode (Non-Flashing) and restart the board…
For PineDio Stack BL604:
Set the GPIO 8 Jumper to Low (Like this)
Disconnect the USB cable and reconnect
Or use the Improvised Reset Button (Here’s how)
For PineCone BL602:
Set the PineCone Jumper (IO 8) to the L Position (Like this)
Press the Reset Button
For BL10:
For Ai-Thinker Ai-WB2, Pinenut and MagicHome BL602:
Disconnect the board from the USB Port
Connect GPIO 8 to GND
Reconnect the board to the USB port
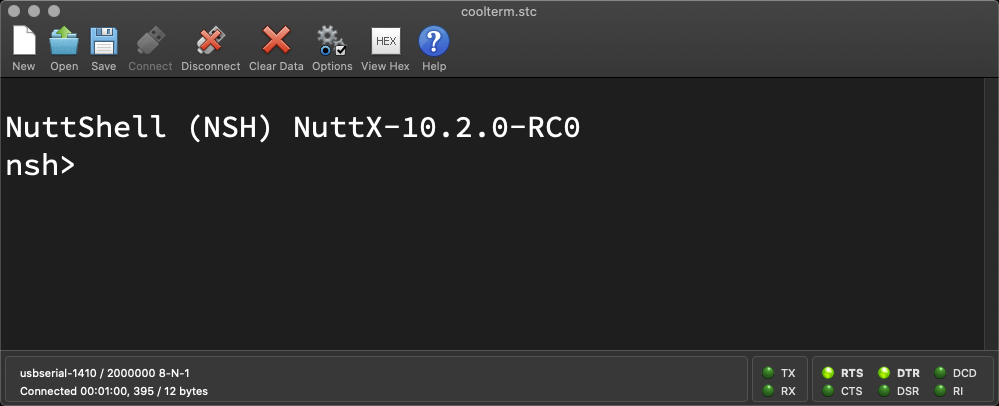
After restarting, connect to BL602 / BL604’s UART Port at 2 Mbps like so…
For Linux:
screen /dev/ttyUSB0 2000000For macOS: Use CoolTerm (See this)
For Windows: Use putty (See this)
Alternatively: Use the Web Serial Terminal (See this)
Press Enter to reveal the NuttX Shell…
NuttShell (NSH) NuttX-10.2.0-RC0
nsh>
Congratulations NuttX is now running on BL602 / BL604!
(More details on connecting to BL602 / BL604)
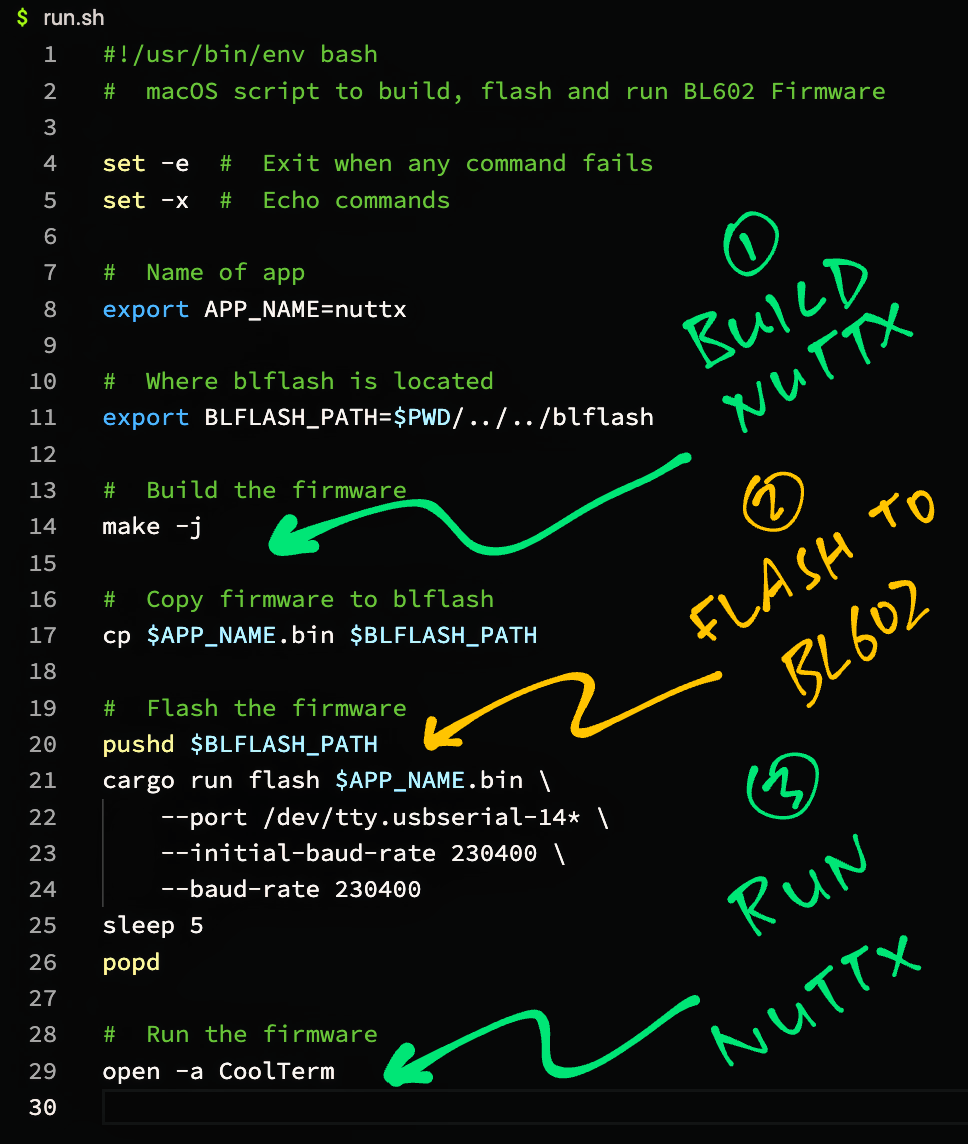
macOS Tip: Here’s the script I use to build, flash and run NuttX on macOS, all in a single step: run.sh
