📝 7 Aug 2022

Can we create a Zig program visually… The Drag-and-Drop way?
Let’s find out! Today we shall explore Blockly, the Scratch-like browser-based coding toolkit…
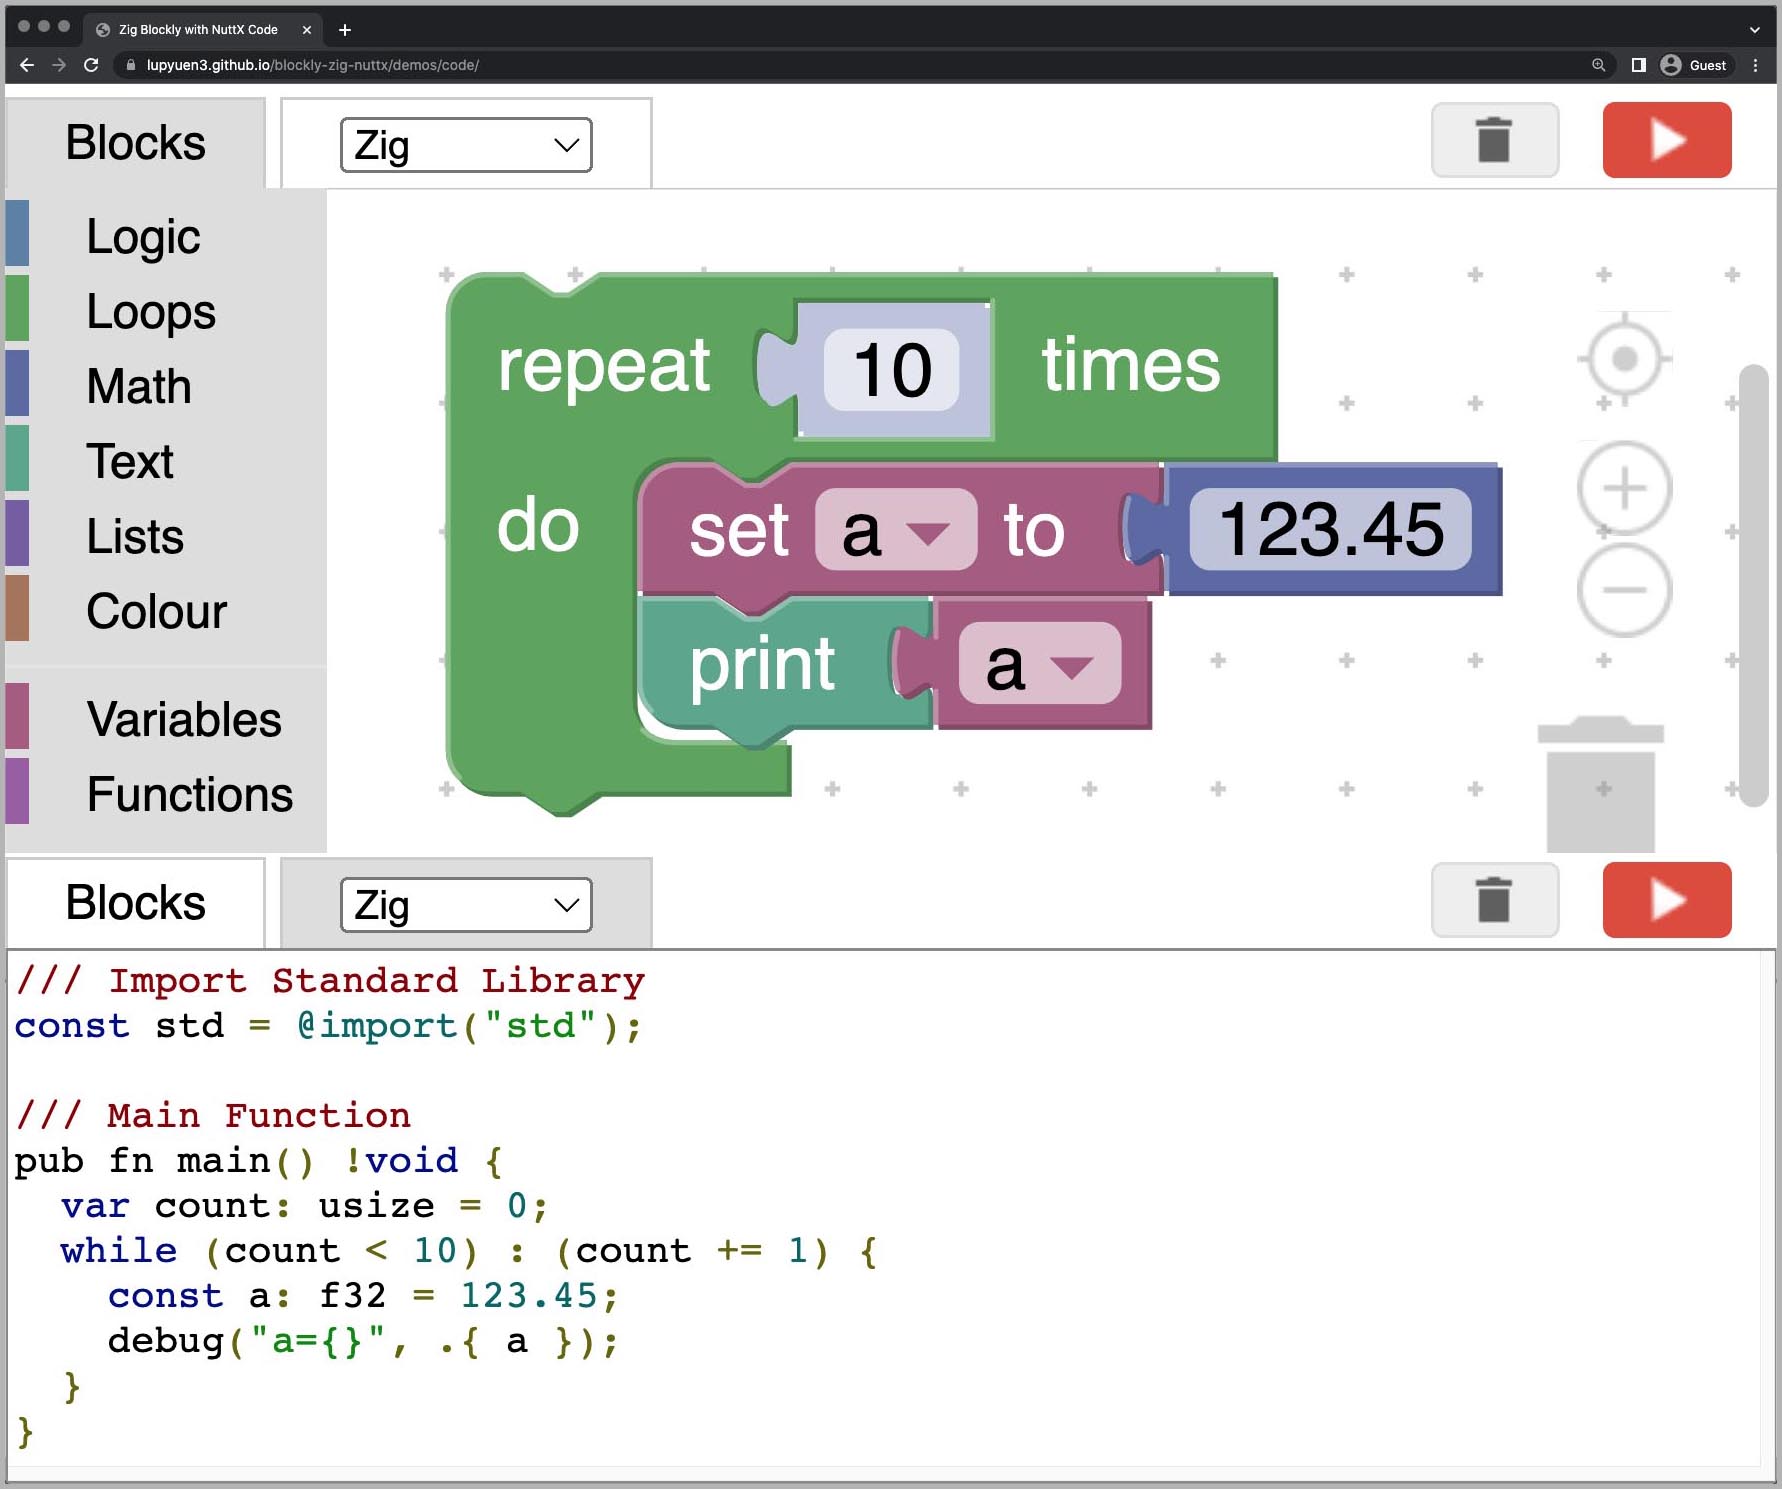
And how we might customise Blockly to create Zig programs visually. (Pic above)
Will it work for any Zig program?
We’re not quite done yet. We hit some interesting challenges, like Blockly’s “Typelessness” and Zig’s “Anti-Shadowing”.
But it might work for creating IoT Sensor Apps for Embedded Platforms like Apache NuttX RTOS.
(More about this below)
Let’s head down into our Zig experiment with Blocky…
And learn how how we ended up here…
What’s Visual Programming like with Blockly?
With Blockly, we create Visual Programs by dragging and dropping Interlocking Blocks. (Exactly like Scratch and MakeCode)
This is a Visual Program that loops 10 times, printing the number 123.45…
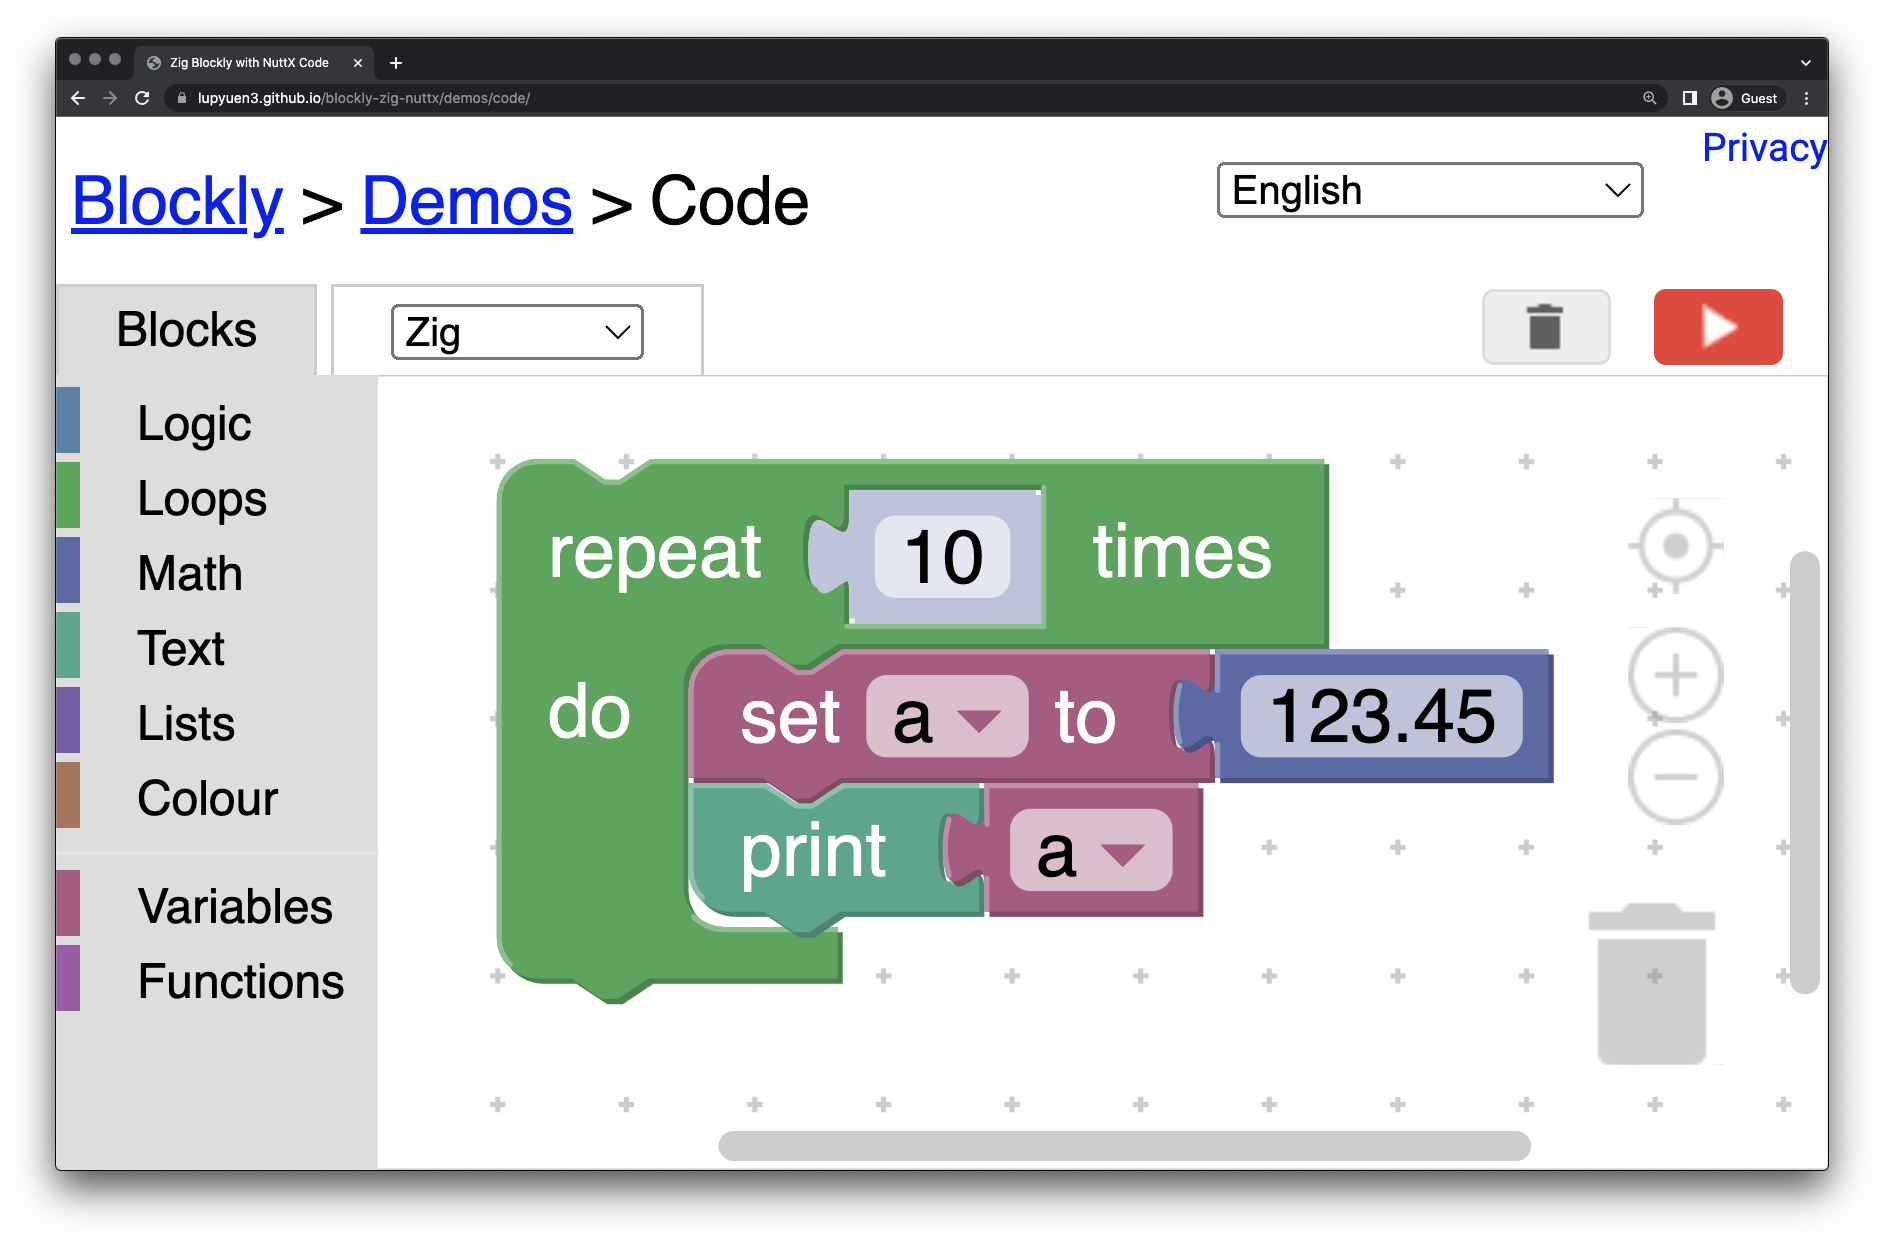
We can try dragging-n-dropping the Blocks here…
To find the above Blocks, click the Blocks Toolbox (at left) and look under “Loops”, “Variables”, “Math” and “Text”.
But will it produce a Zig program?
Yep if we click the Zig Tab…
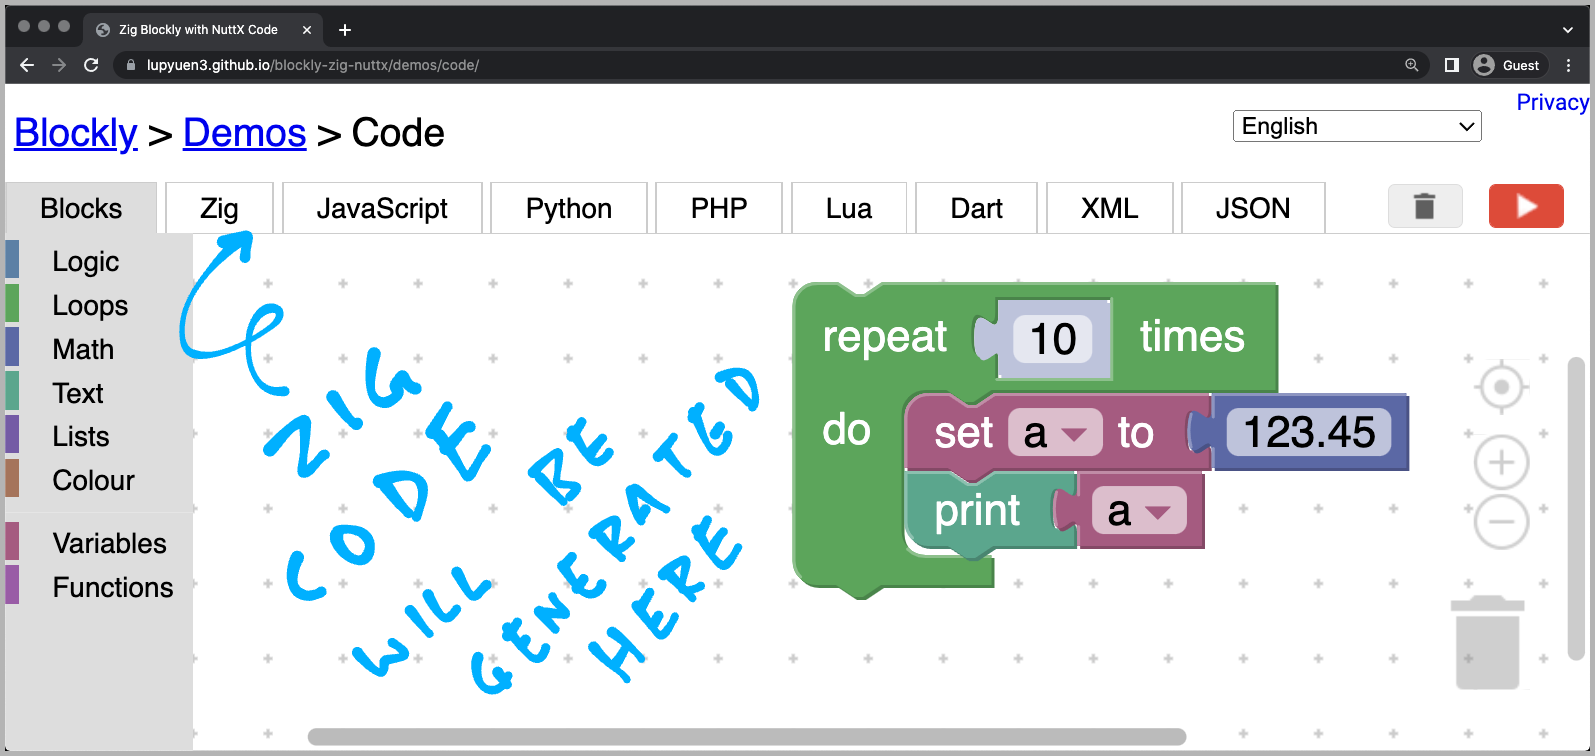
This Zig Program appears…
/// Import Standard Library
const std = @import("std");

/// Main Function
pub fn main() !void {
  var count: usize = 0;
  while (count < 10) : (count += 1) {
    const a: f32 = 123.45;
    debug("a={}", .{ a });
  }
}

/// Aliases for Standard Library
const assert = std.debug.assert;
const debug  = std.log.debug;
When we copy-n-paste the program and run it with Zig…
$ zig run a.zig
debug: a=1.23449996e+02
debug: a=1.23449996e+02
debug: a=1.23449996e+02
debug: a=1.23449996e+02
debug: a=1.23449996e+02
debug: a=1.23449996e+02
debug: a=1.23449996e+02
debug: a=1.23449996e+02
debug: a=1.23449996e+02
debug: a=1.23449996e+02
Indeed it produces the right result!
(Not the tidiest output, but we’ll come back to this)
Will this work with all Blocks?
Not quite. We customised Blockly to support the bare minimum of Blocks.
There’s plenty more to be customised for Zig. Lemme know if you’re keen to help! 🙏
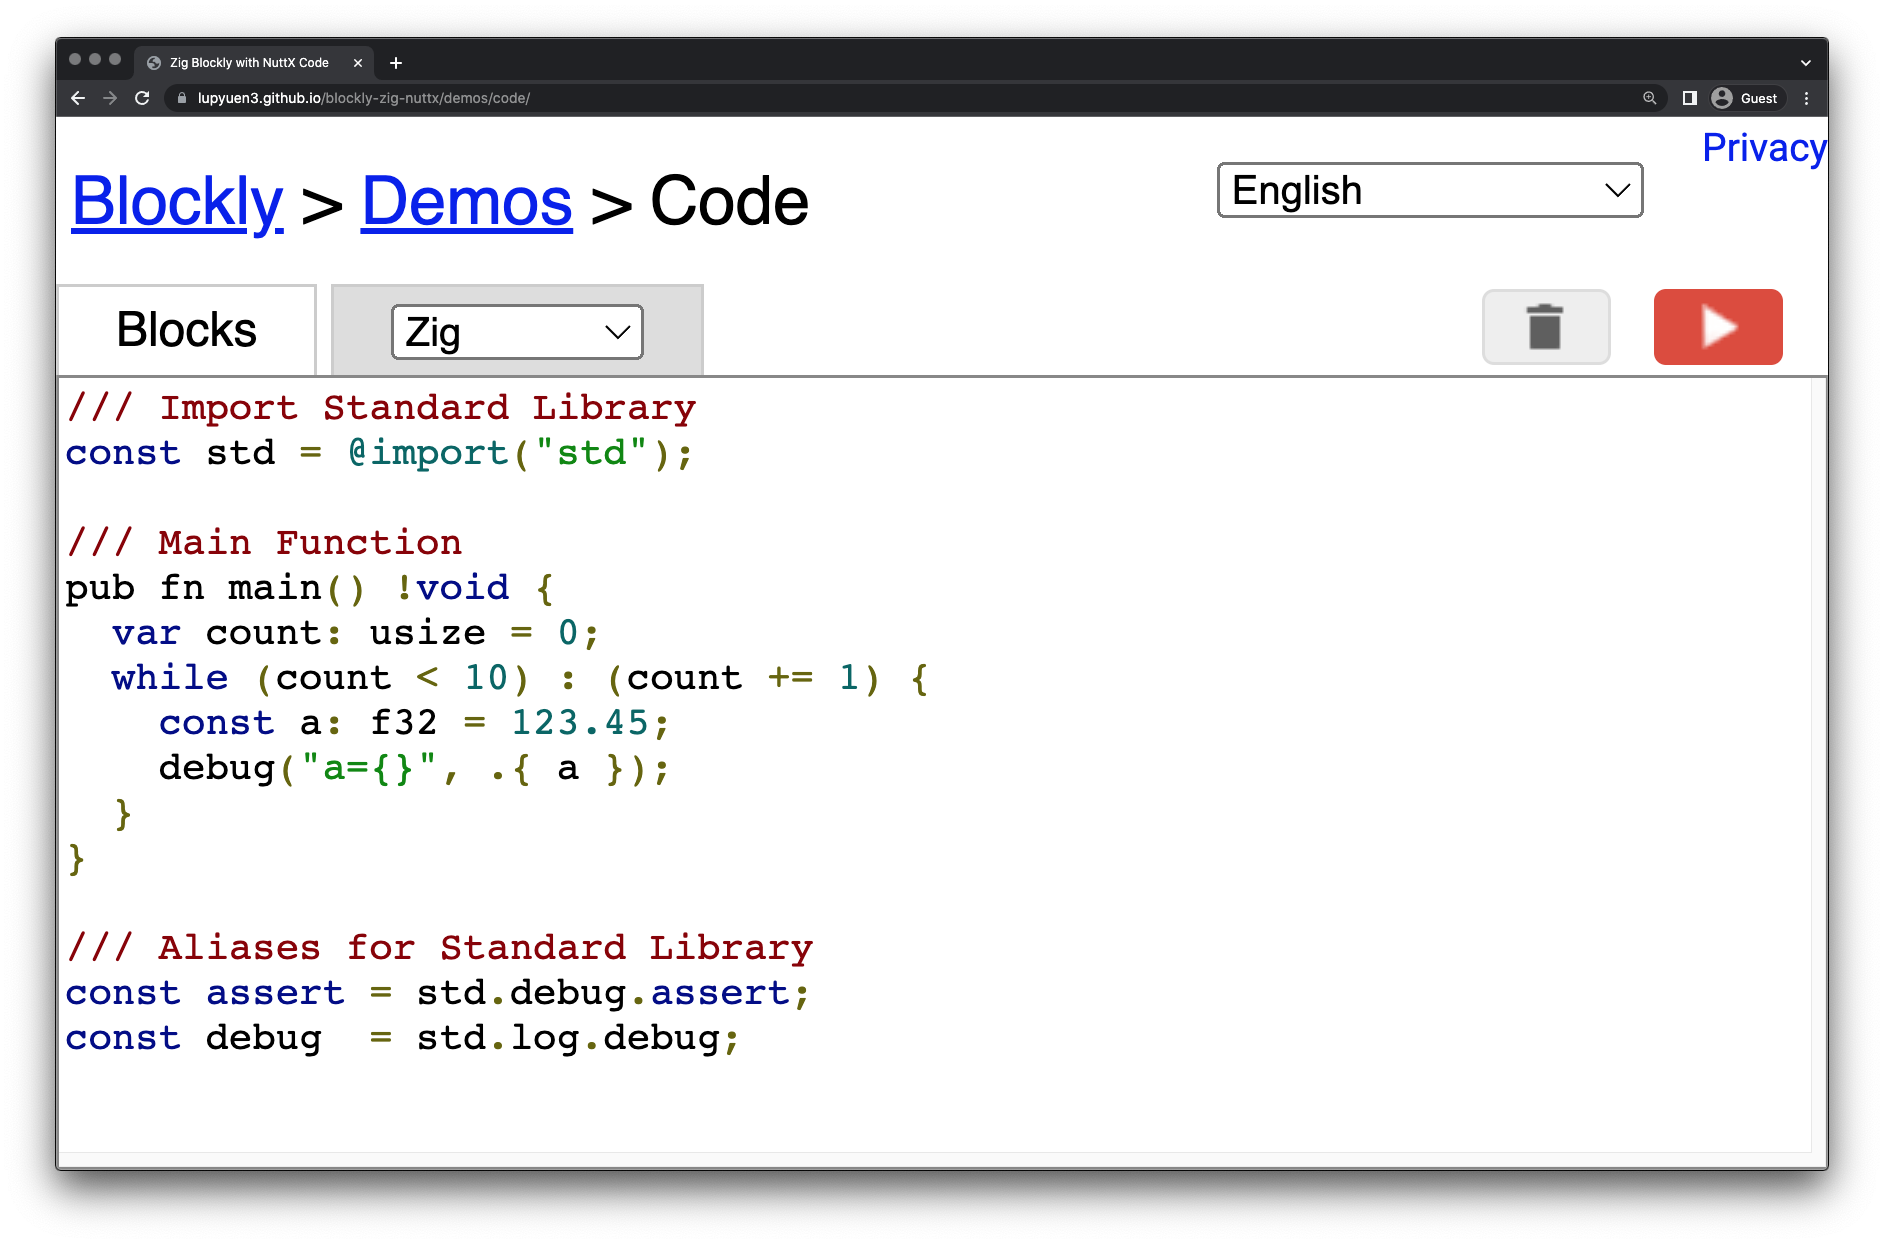
How did Blockly automagically output our Zig Program?
Blockly comes bundled with Code Generators that will churn out programs in JavaScript, Python, Dart, …
Sadly it doesn’t have one for Zig. So we built our own Zig Code Generator for Blockly…
Every Block generates its own Zig Code?
Our Code Generator needs to output Zig Code for every kind of Block.
(Which makes it tiresome to customise Blockly for Zig)
To understand the work involved, we’ll look at three Blocks and how our Code Generator handles them…
Set Variable
Print Expression
Repeat Loop
We’ll also study the Main Function that’s produced by our Code Generator.

Blockly will let us assign Values to Variables. (Pic above)
To keep things simple, we’ll handle Variables as Constants. And they shall be Floating-Point Numbers. (We’ll explain why)
Thus the Block above will generate this Zig code…
const a: f32 = 123.45;UPDATE: We have removed f32 from all const declarations, replying on Type Inference instead. This works better for supporting CBOR Messages. (Like so)
This is how we generate the code with a template (through String Interpolation): generators/zig/variables.js
Zig['variables_set'] = function(block) {
  // Variable setter.
  ...
  return `const ${varName}: f32 = ${argument0};\n`;
};
(More about String Interpolation)
Isn’t this (gasp) JavaScript?
Blockly is coded in plain old JavaScript. Hence we’ll write our Zig Code Generator in JavaScript too.
(Maybe someday we’ll convert the Zig Code Generator to WebAssembly and build it in Zig)

To print the value of an expression (pic above), we generate this Zig code…
debug("a={}", .{ a });Here’s the implementation in our Zig Code Generator: generators/zig/text.js
Zig['text_print'] = function(block) {
  // Print statement.
  ...
  return `debug("${msg}={}", .{ ${msg} });\n`;
};
(It won’t work with strings, we’ll handle that later)
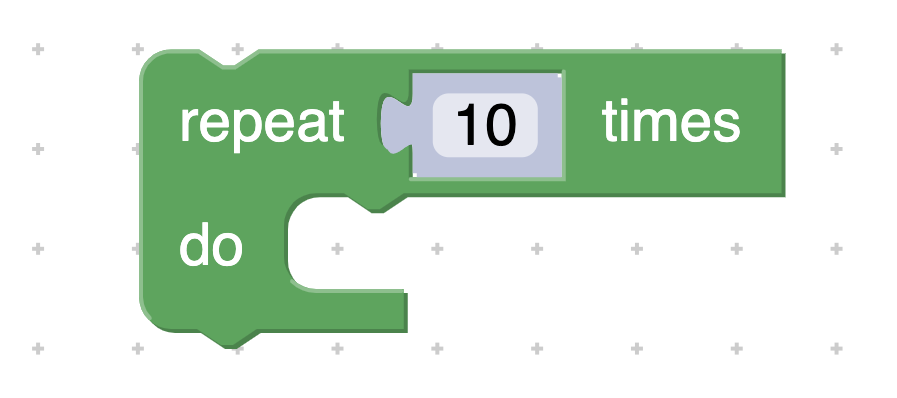
To run a repeating loop (pic above), we generate this Zig code…
var count: usize = 0;
while (count < 10) : (count += 1) {
  ...
}
With this template in our Zig Code Generator: generators/zig/loops.js
Zig['controls_repeat_ext'] = function(block) {
  // Repeat n times.
  ...
  code += [
    `var ${loopVar}: usize = 0;\n`,
    `while (${loopVar} < ${endVar}) : (${loopVar} += 1) {\n`,
    branch,
    '}\n'
  ].join('');
  return code;
};
What if we have two Repeat Loops? Won’t “count” clash?
Blockly will helpfully generate another counter like “count2”…
var count2: usize = 0;
while (count2 < 10) : (count2 += 1) {
  ...
}
(Try it out!)
To become a valid Zig program, our generated Zig code needs to be wrapped into a Main Function like this…
/// Import Standard Library
const std = @import("std");

/// Main Function
pub fn main() !void {
  // TODO: Generated Zig Code here
  ...
}

/// Aliases for Standard Library
const assert = std.debug.assert;
const debug  = std.log.debug;
We do this with another template in our Zig Code Generator: generators/zig.js
Zig.finish = function(code) {
  ...
  // Compose Main Function
  code = [
    '/// Main Function\n',
    'pub fn main() !void {\n',
    code,
    '}',
  ].join('');
The code above composes the Main Function.
Next we define the Header and Trailer…
  // Compose Zig Header
  const header = [
    '/// Import Standard Library\n',
    'const std = @import("std");\n',
  ].join('');

  // Compose Zig Trailer
  const trailer = [
    '/// Aliases for Standard Library\n',
    'const assert = std.debug.assert;\n',
    'const debug  = std.log.debug;\n',
  ].join('');
Finally we combine them and return the result…
  // Combine Header, Code,
  // Function Definitions and Trailer
  return [
    header,
    '\n',
    code,
    (allDefs == '') ? '' : '\n\n',
    allDefs.replace(/\n\n+/g, '\n\n').replace(/\n*$/, '\n\n'),
    trailer,
  ].join('');
};
Let’s talk about Function Definitions…
Can we define Zig Functions in Blockly?
Sure can! This Function Block…

(Parameters are defined in Function Settings)
Will generate this perfectly valid Zig Function…
fn do_something(x: f32, y: f32) !f32 {
  const a: f32 = 123.45;
  debug("a={}", .{ a });
  return x + y;
}
And calling the above function…
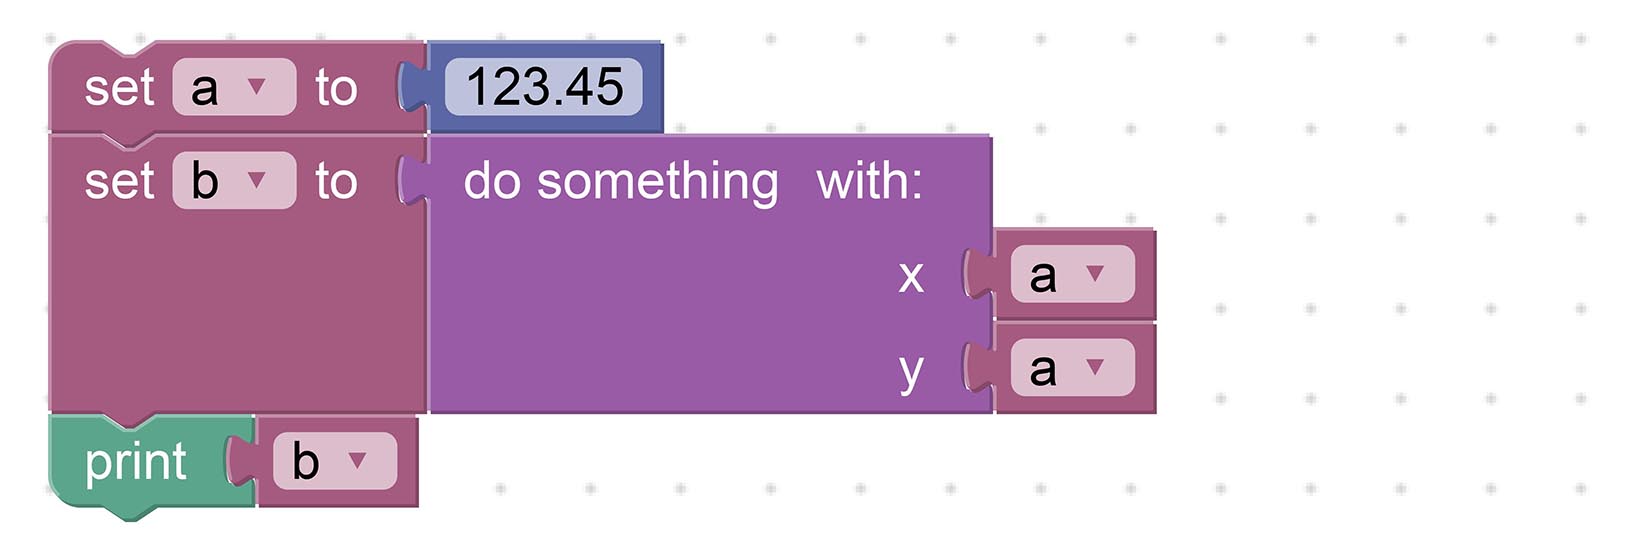
Works OK with Zig too…
const a: f32 = 123.45;
const b: f32 = try do_something(a, a);
debug("b={}", .{ b });
Thus indeed it’s possible to create Complex Blockly Apps with Zig. (Like this)
The above templates are defined in our Code Generator at generators/zig/procedures.js
Why are our Constants declared as Floating-Point f32?
Here comes the interesting challenge with Zig on Blockly…
Blockly is Typeless!
Blockly doesn’t recognise Types, so it will gladly accept this…

Which works fine with Dynamically-Typed Languages like JavaScript…
// Dynamic Type in JavaScript
var a;
a = 123.45;
a = 'abc';
But not for Statically-Typed Languages like Zig!
That’s why we constrain all Types as f32, until we figure out how to handle strings and other types…
// Static Type in Zig
const a: f32 = 123.45;
// Nope we won't accept "abc"
Won’t that severely limit our Zig Programs?
f32 is probably sufficient for simple IoT Sensor Apps.
Such apps work only with numeric Sensor Data (like temperature, humidity). And they don’t need to manipulate strings.
(More about this in a while)
What other challenges do we have with Zig on Blockly?
Our Astute Reader would have seen this Oncoming Wreckage (from miles away)…
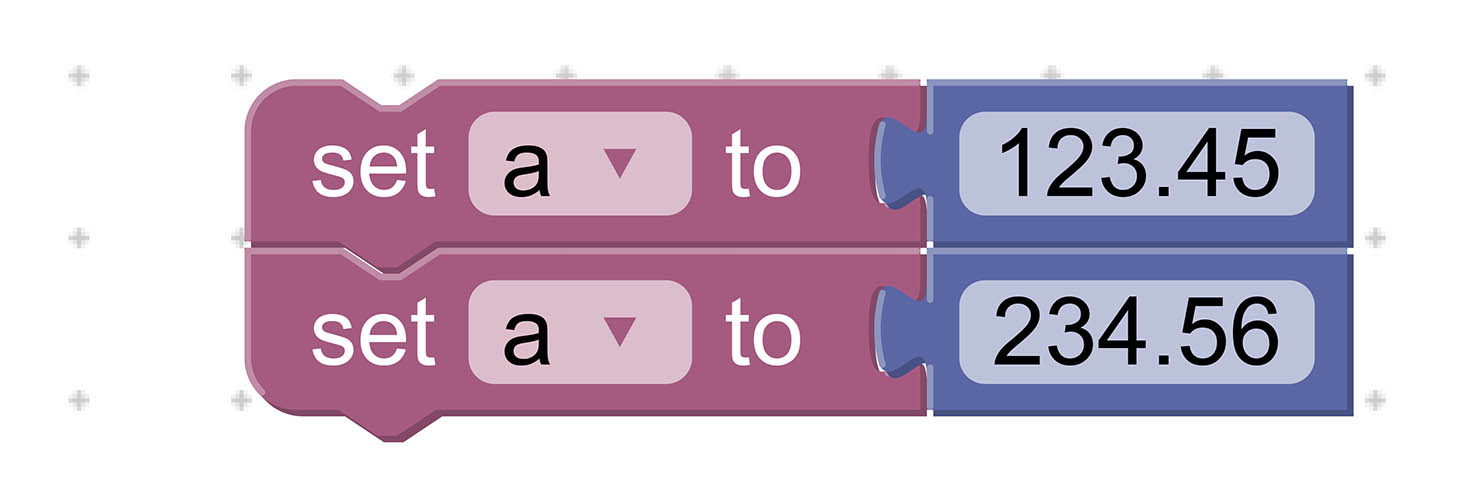
The Double Assignment above will cause Constant Problems…
// This is OK
const a: f32 = 123.45;

// Oops! `a` is redeclared...
const a: f32 = 234.56;
Our Code Generator will have to stop this somehow.
Why not declare as a Variable? (Instead of a Constant)
// This is OK
var a: f32 = undefined;
a = 123.45;
a = 234.56;
Call me stupendously stubborn, but I think Constants look neater than Variables?
Also we might have a problem with Shadowed Identifiers…
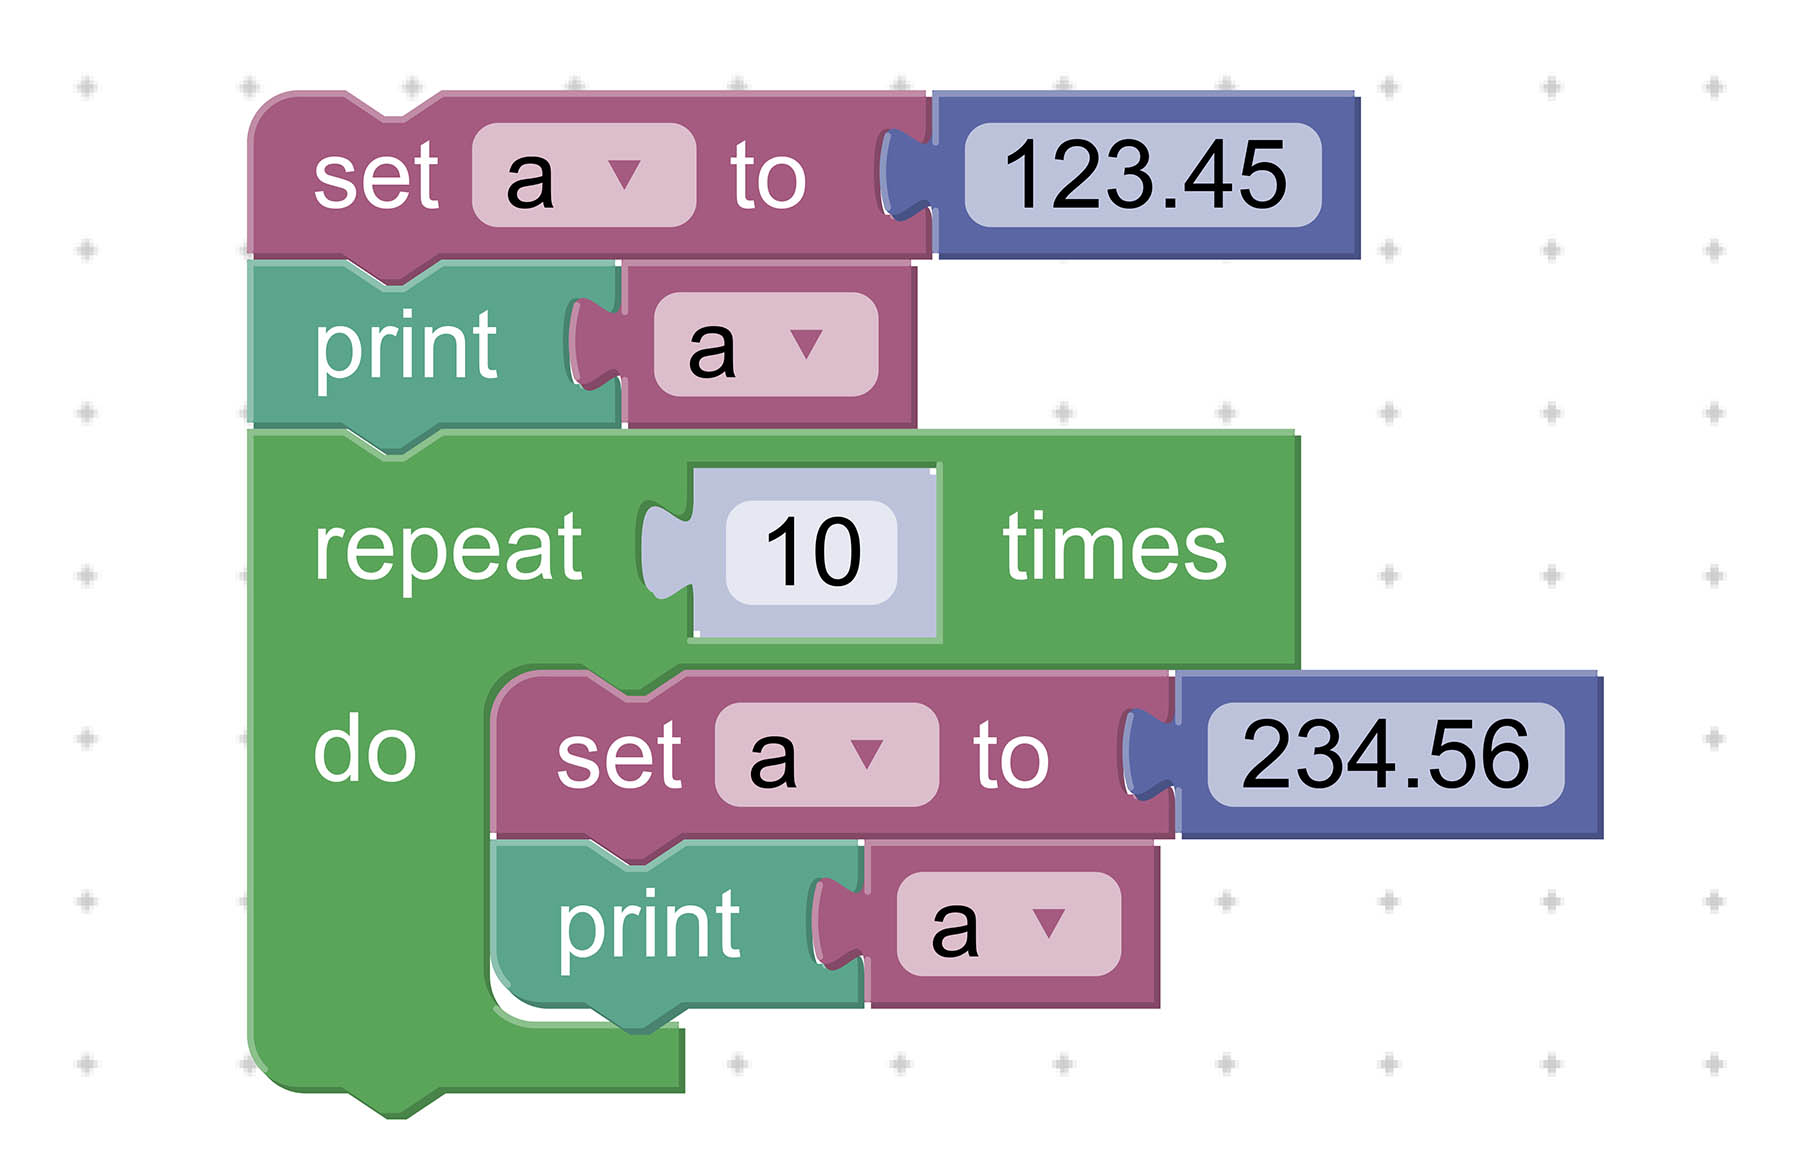
This code won’t compile with Zig even if we change const to var…
// This is OK
const a: f32 = 123.45;
debug("a={}", .{ a });

var count: usize = 0;
while (count < 10) : (count += 1) {

  // Oops! `a` is shadowed...
  const a: f32 = 234.56;
  debug("a={}", .{ a });
}So yeah, supporting Zig on Blockly can get really challenging.
(Though supporting C on Blockly without Type Inference would be a total nightmare!)
Can we build Blockly apps on Mobile Devices?
Blockly works OK with Mobile Web Browsers…
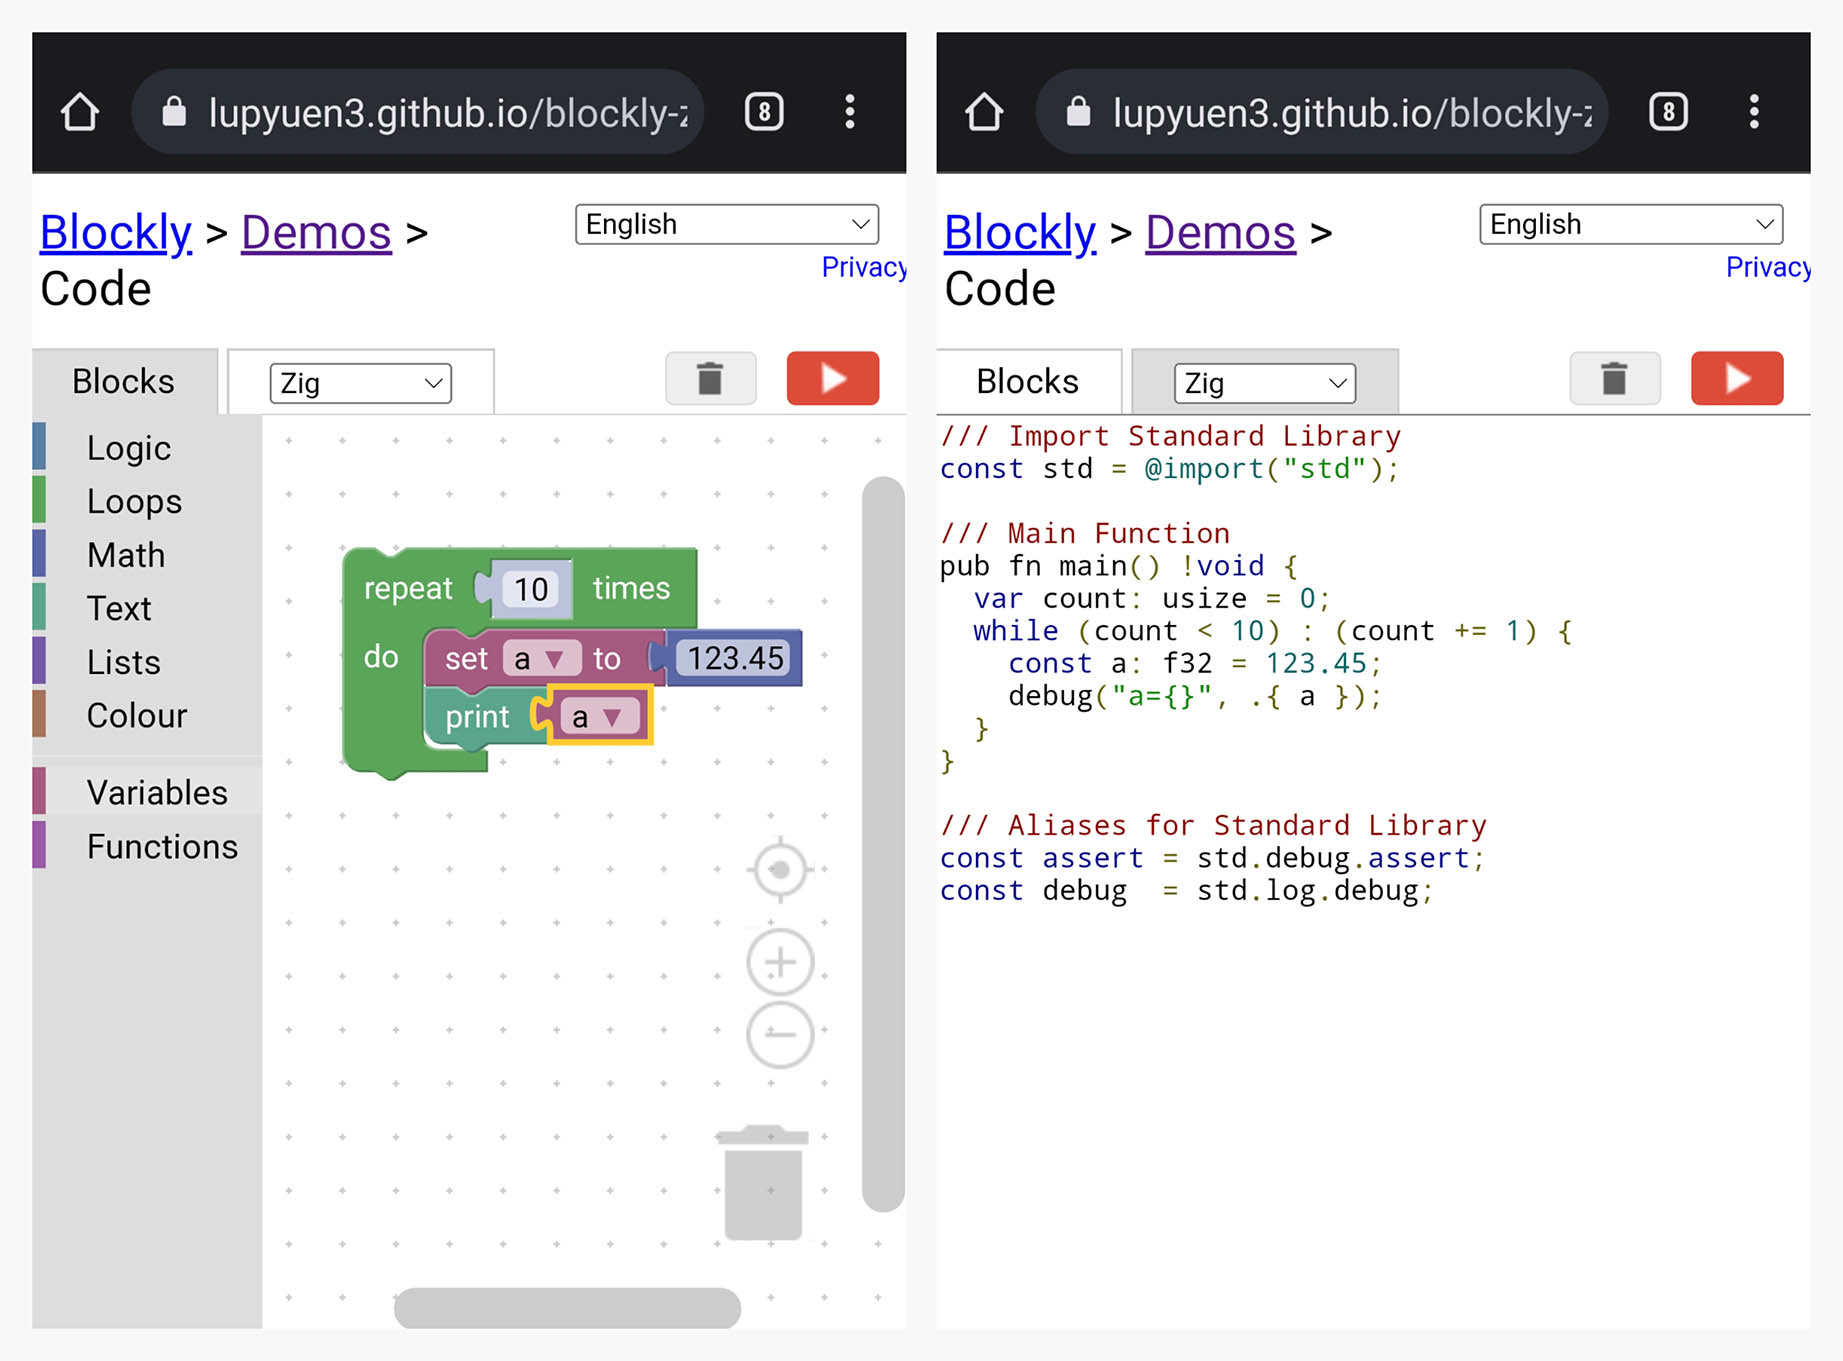
Is Blockly available as an offline, non-web Desktop App?
Not yet. But we could package Blockly as a VSCode Extension that will turn it into a Desktop App…
Or we might package Blockly into a Standalone App with Tauri…
Why would we need a Desktop App for Blockly?
It’s easier to compile the Generated Zig Code when we’re on a Desktop App.
And a Desktop App is more convenient for flashing the compiled code to Embedded Devices.
We said earlier that Blockly might be suitable for IoT Sensor Apps. Why?
Suppose we’re building an IoT Sensor Device that will monitor Temperature and Humidity.
The firmware in our device will periodically read and transmit the Sensor Data like this…
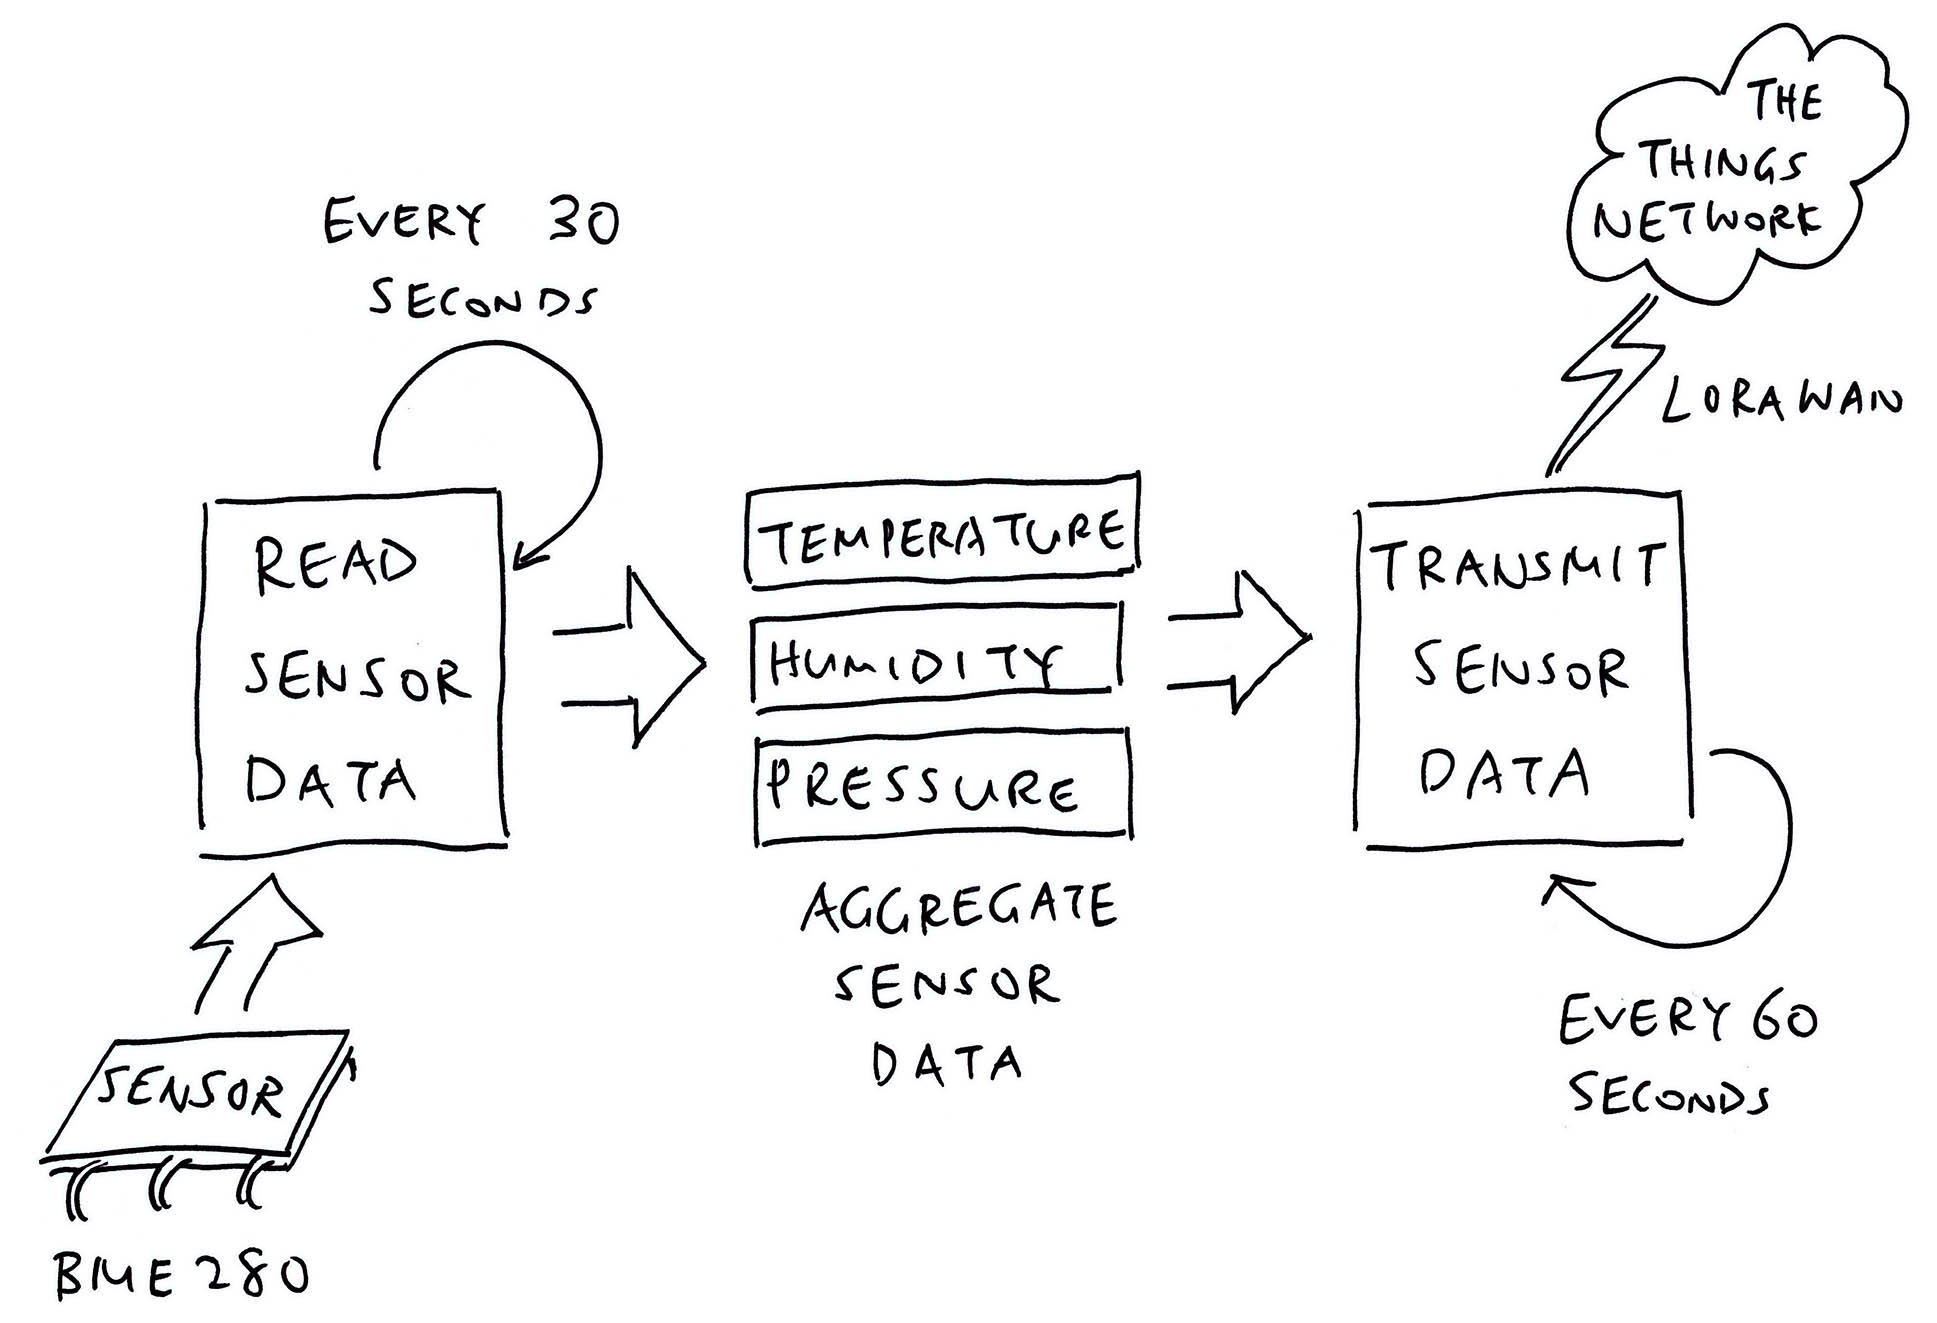
Which we might build with Blockly like so…
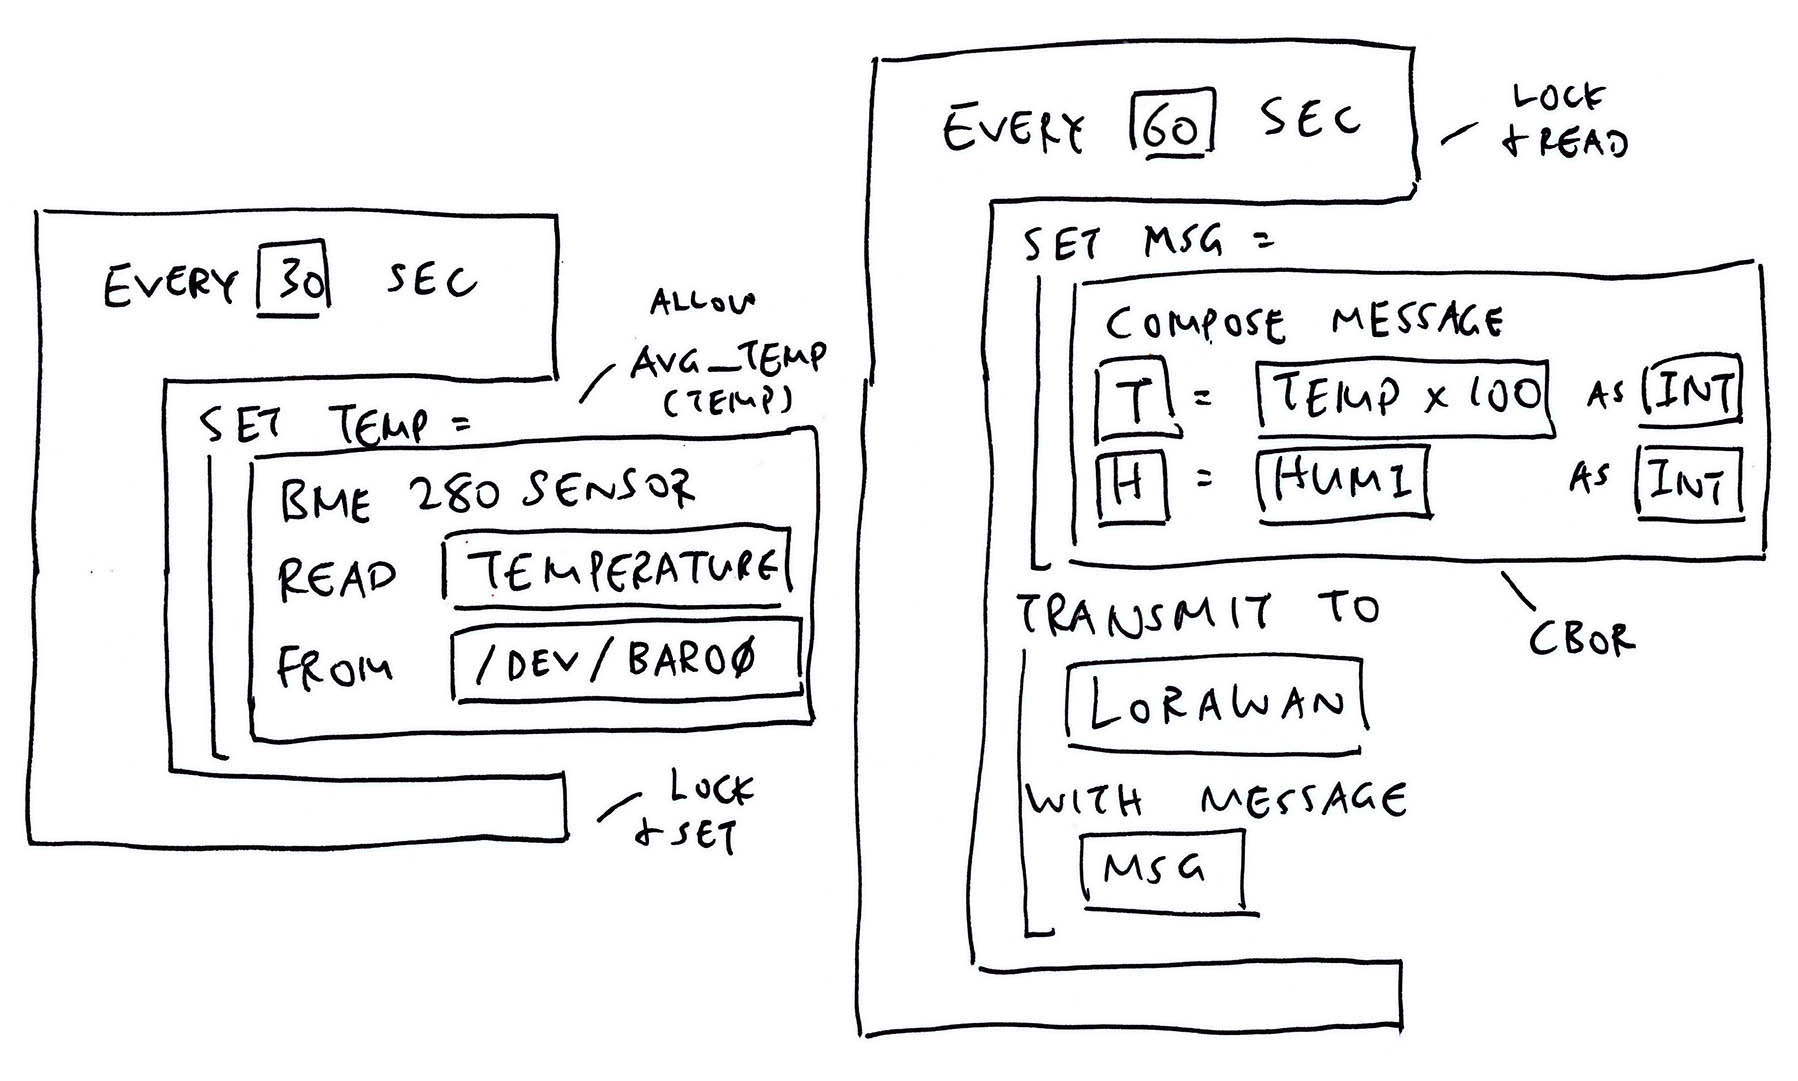
Whoa that’s a lot to digest!
We’ll break down this IoT Sensor App in the next section.
But why build IoT Sensor Apps with Blockly and Zig?
Types are simpler: Only Floating-Point Numbers will be supported for Sensor Data
(No strings needed)
Blockly is Typeless: With Zig we can use Type Inference to deduce the missing Types
(Doing this in C would be extremely painful)
Easier to experiment with various IoT Sensors: Temperature, Humidity, Air Pressure, …
(Or mix and match a bunch of IoT Sensors!)
Let’s talk about the reading and sending of Sensor Data…
Previously we talked about our IoT Sensor App reading Sensor Data (like Temperature) from a real sensor (like Bosch BME280).
This is how it might look in Blockly…
(We’ll populate Blockly with a whole bunch of Sensor Blocks like BME280)
And this is the Zig Code that we might auto-generate: visual-zig-nuttx/visual/visual.zig
// Read the Temperature
const temperature: f32 = blk: {

  // Open the Sensor Device
  const fd = c.open(
    "/dev/uorb/sensor_baro0",  // Path of Sensor Device
    c.O_RDONLY | c.O_NONBLOCK    // Open for read-only
  );

  // Close the Sensor Device when this block returns
  defer {
    _ = c.close(fd);
  }

  // If Sensor Data is available...
  var sensor_value: f32 = undefined;
  if (c.poll(&fds, 1, -1) > 0) {

    // Define the Sensor Data Type
    var sensor_data = std.mem.zeroes(c.struct_sensor_event_baro);
    const len = @sizeOf(@TypeOf(sensor_data));

    // Read the Sensor Data
    if (c.read(fd, &sensor_data, len) >= len) {

      // Remember the Sensor Value
      sensor_value = sensor_data.temperature;

    } else { std.log.err("Sensor data incorrect size", .{}); }
  } else { std.log.err("Sensor data not available", .{}); }

  // Return the Sensor Value
  break :blk sensor_value;
};

// Print the Temperature
debug("temperature={}", .{
  floatToFixed(temperature)
});
When we run this on Apache NuttX RTOS, it will actually fetch the Temperature from the Bosch BME280 Sensor!
What a huge chunk of Zig!
The complete implementation is a huger chunk of Zig, because we need to handle Errors. (See this)
But it might be hunky dory for Blockly. We just need to define one Block for every Sensor supported by NuttX. (Like BME280)
And every Block will churn out the Boilerplate Code (plus Error Handling) that we see above.
Surely some of the code can be refactored into reusable Zig Functions?
Refactoring the code can get tricky because the Sensor Data Struct and Fields are dependent on the Sensor…
// Define the Sensor Data Type
// Note: `sensor_event_baro` depends on the sensor
var sensor_data = std.mem.zeroes(
  c.struct_sensor_event_baro
);
const len = @sizeOf(@TypeOf(sensor_data));

// Read the Sensor Data
if (c.read(fd, &sensor_data, len) >= len) {

  // Remember the Sensor Value
  // Note: `temperature` depends on the sensor
sensor_value = sensor_data.temperature;(comptime Generics might help)
What’s floatToFixed?
// Read the Temperature as a Float
const temperature: f32 = ...

// Print the Temperature as a
// Fixed-Point Number (2 decimal places)
debug("temperature={}", .{
  floatToFixed(temperature)
});
That’s our tidy way of printing Fixed-Point Numbers (with 2 decimal places)…
temperature=23.45Instead of the awful 2.34500007e+01 we saw earlier.
(More about this in the Appendix)
What’s blk?
That’s how we return a value from the Block Expression…
// Read the Temperature
const temperature: f32 = blk: {

  // Do something
  var fd = ...

  // Return the Sensor Value
  break :blk 23.45;
};
This sets temperature to 23.45.
Block Expressions are a great way to prevent leakage of our Local Variables (like fd) into the Outer Scope and avoid Shadowing.
(More about Block Expressions)
Two sections ago we talked about our IoT Sensor App transmitting Sensor Data (like Temperature) to a Wireless IoT Network (like LoRaWAN).
We’ll do this in two steps…
Compose the Sensor Data Message
(Compress our Sensor Data into a tiny Data Packet)
Transmit the Sensor Data Message
(Over LoRaWAN)
Assume we’ve read Temperature and Humidity from our sensor.
This is how we shall compose a Sensor Data Message with Blockly…
The Block above will pack the Temperature and Humidity into this format…
{
  "t": 2345,
  "h": 6789
}
(Numbers have been scaled up by 100)
Then compress it with Concise Binary Object Representation (CBOR).
Why CBOR? Why not JSON?
The message above compressed with CBOR will require only 11 bytes! (See this)
That’s 8 bytes fewer than JSON! Tiny compressed messages will work better with Low-Bandwidth Networks like LoRaWAN.
After composing our Sensor Data Message, we shall transmit the Sensor Data Message with Blockly…
This Block transmits our compressed CBOR Message to the LoRaWAN Wireless Network.
Will Zig talk to LoRaWAN?
Yep we’ve previously created a Zig app for LoRaWAN and Apache NuttX RTOS…
We’ll reuse the code to transmit our message to LoRaWAN.
Is it OK to create Custom Blocks in Blockly? Like for “BME280 Sensor”, “Compose Message” and “Transmit Message”?
Yep here are the steps to create a Custom Block in Blockly…
When our Custom Blocks are done, we’re all set to create IoT Sensor Apps with Blockly!

This has been a fun experiment with Blockly. I hope we’ll extend it to make it more accessible to Zig Learners!
I’ll continue to customise Blockly for NuttX Sensors. Hopefully we’ll create IoT Sensor Apps the drag-n-drop way, real soon!
Check out my earlier work on Zig, NuttX, LoRaWAN and LVGL…
Many Thanks to my GitHub Sponsors for supporting my work! This article wouldn’t have been possible without your support.
Got a question, comment or suggestion? Create an Issue or submit a Pull Request here…
lupyuen.github.io/src/blockly.md
Earlier we talked about reading Floating-Point Sensor Data (like Temperature)…
And we wrote this to print our Sensor Data: visual-zig-nuttx/visual/visual.zig
// Assume we've read the Temperature as a Float
const temperature: f32 = 23.45;

// Print the Temperature as a
// Fixed-Point Number (2 decimal places)
debug("temperature={}", .{
  floatToFixed(temperature)
});
This prints the Temperature correctly as…
temperature=23.45Instead of the awful 2.34500007e+01 that we see typically with printed Floating-Point Numbers.
What’s floatToFixed?
We call floatToFixed to convert a Floating-Point Number to a Fixed-Point Number (2 decimal places) for printing.
(We’ll see floatToFixed in a while)
UPDATE: We no longer need to call floatToFixed when printing only one Floating-Point Number. The Debug Logger auto-converts it to Fixed-Point for us. (See this)
How do we represent Fixed-Point Numbers?
Our Fixed-Point Number has two Integer components…
int: The Integer part
frac: The Fraction part, scaled by 100
So to represent 123.456, we break it down as…
int = 123
frac = 45
We drop the final digit 6 when we convert to Fixed-Point.
In Zig we define Fixed-Point Numbers as a FixedPoint Struct…
/// Fixed Point Number (2 decimal places)
pub const FixedPoint = struct {

  /// Integer Component
  int: i32,

  /// Fraction Component (scaled by 100)
  frac: u8,

  /// Format the output for Fixed Point Number (like 123.45)
  pub fn format(...) !void { ... }
};(We’ll explain format in a while)
How do we convert Floating-Point to Fixed-Point?
Below is the implementation of floatToFixed, which receives a Floating-Point Number and returns the Fixed-Point Number (as a Struct): visual-zig-nuttx/visual/sensor.zig
/// Convert the float to a fixed-point number (`int`.`frac`) with 2 decimal places.
/// We do this because `debug` has a problem with floats.
pub fn floatToFixed(f: f32) FixedPoint {
  const scaled = @floatToInt(i32, f * 100.0);
  const rem = @rem(scaled, 100);
  const rem_abs = if (rem < 0) -rem else rem;
  return .{
    .int  = @divTrunc(scaled, 100),
    .frac = @intCast(u8, rem_abs),
  };
}
(See the docs: @floatToInt, @rem, @divTrunc, @intCast)
This code has been tested for positive and negative numbers.
Why handle Sensor Data as Fixed-Point Numbers? Why not Floating-Point?
When we tried printing the Sensor Data as Floating-Point Numbers, we hit some Linking and Runtime Issues…
Computations on Floating-Point Numbers are OK, only printing is affected. So we print the numbers as Fixed-Point instead.
(We observed these issues with Zig Compiler version 0.10.0, they might have been fixed in later versions of the compiler)
Isn’t our Sensor Data less precise in Fixed-Point?
Yep we lose some precision with Fixed-Point Numbers. (Like the final digit 6 from earlier)
But most IoT Gadgets will truncate Sensor Data before transmission anyway.
And for some data formats (like CBOR), we need fewer bytes to transmit Fixed-Point Numbers instead of Floating-Point…
Thus we’ll probably stick to Fixed-Point Numbers for our upcoming IoT projects.
How do we print Fixed-Point Numbers?
This works OK for printing Fixed-Point Numbers…
// Print the Temperature as a
// Fixed-Point Number (2 decimal places)
debug("temperature={}", .{
  floatToFixed(temperature)
});
Because our Fixed-Point Struct includes a Custom Formatter…
/// Fixed Point Number (2 decimal places)
pub const FixedPoint = struct {

  /// Integer Component
  int: i32,

  /// Fraction Component (scaled by 100)
  frac: u8,

  /// Format the output for Fixed Point Number (like 123.45)
  pub fn format(
    self: FixedPoint,
    comptime fmt: []const u8,
    options: std.fmt.FormatOptions,
    writer: anytype,
  ) !void {
    _ = fmt;
    _ = options;
    try writer.print("{}.{:0>2}", .{
      self.int,
      self.frac
    });
  }
};Why print the numbers as “{}.{:0>2}”?
Our Format String “{}.{:0>2}” says…
{} | Print int as a number |
. | Print . |
{:0>2} | Print frac as a 2-digit number, padded at the left by 0 |
Which gives us the printed output 123.45
This section explains how we added the Zig Tab to Blockly.
Blockly is bundled with a list of Demos…
lupyuen3.github.io/blockly-zig-nuttx/demos
There’s a Code Generation Demo that shows the code generated by Blockly for JavaScript, Python, Dart, …
lupyuen3.github.io/blockly-zig-nuttx/demos/code
Let’s add a Zig Tab that will show the Zig code generated by Blockly: demos/code/index.html
<!-- Inserted this to Load Messages: (Not sure why) -->
<script src="../../msg/messages.js"></script>
...
<tr id="tabRow" height="1em">
<td id="tab_blocks" class="tabon">...</td>
<td class="tabmin tab_collapse"> </td>
<!-- Inserted these two lines: -->
<td id="tab_zig" class="taboff tab_collapse">Zig</td>
<td class="tabmin tab_collapse"> </td>
...
<div id="content_blocks" class="content"></div>
<!-- Inserted this line: -->
<pre id="content_zig" class="content prettyprint lang-zig"></pre>We’ll see the Zig Tab like this…
lupyuen3.github.io/blockly-zig-nuttx/demos/code

Let’s generate the Zig code…
Blockly comes bundled with Code Generators for JavaScript, Python, Dart, …
Let’s create a Code Generator for Zig, by copying from the Dart Code Generator.
Copy generators/dart.js to generators/zig.js
Copy all files from generators/dart to generators/zig…
all.js
colour.js
lists.js
logic.js
loops.js
math.js
procedures.js
text.js
variables.js
variables_dynamic.jsEdit generators/zig.js and all files in generators/zig.
Change all “Dart” to “Zig”, remember to preserve case.
This is how we load our Code Generator…
Let’s load our Zig Code Generator in Blockly…
Add the Zig Code Generator to demos/code/index.html…
<!--  Load Zig Code Generator  -->
<script src="../../zig_compressed.js"></script>Enable the Zig Code Generator in demos/code/code.js…
// Inserted `zig`...
Code.TABS_ = [
  'blocks', 'zig', 'javascript', 'php', 'python', 'dart', 'lua', 'xml', 'json'
];
...
// Inserted `Zig`...
Code.TABS_DISPLAY_ = [
  'Blocks', 'Zig', 'JavaScript', 'PHP', 'Python', 'Dart', 'Lua', 'XML', 'JSON'
];
...
Code.renderContent = function() {
  ...
  } else if (content.id === 'content_json') {
    var jsonTextarea = document.getElementById('content_json');
    jsonTextarea.value = JSON.stringify(
        Blockly.serialization.workspaces.save(Code.workspace), null, 2);
    jsonTextarea.focus();
  // Inserted this...
  } else if (content.id == 'content_zig') {
Code.attemptCodeGeneration(Blockly.Zig);Add our Code Generator to the Build Task: scripts/gulpfiles/build_tasks.js
 const chunks = [
   // Added this...
   {
      name: 'zig',
      entry: 'generators/zig/all.js',
      reexport: 'Blockly.Zig',
   }
];Now we compile our Zig Code Generator…
Blockly builds fine with Linux, macOS and WSL. (But not plain old Windows CMD)
To build Blockly with the Zig Code Generator…
## Download Blockly and install the dependencies
git clone --recursive https://github.com/lupyuen3/blockly-zig-nuttx
cd blockly-zig-nuttx
npm install

## Build Blockly and the Code Generators.
## Run these steps when we change the Zig Code Generator.
npm run build
npm run publish

## When prompted "Is this the correct branch?",
## press N

## Instead of "npm run publish" (which can be slow), we may do this...
## cp build/*compressed* .

## For WSL: We can copy the generated files to c:\blockly-zig-nuttx for testing on Windows
## cp *compressed*      /mnt/c/blockly-zig-nuttx
## cp demos/code/*.*    /mnt/c/blockly-zig-nuttx/demos/code
## cp generators/zig.js /mnt/c/blockly-zig-nuttx/generators
## cp generators/zig/*  /mnt/c/blockly-zig-nuttx/generators/zig
This compiles and updates the Zig Code Generator in zig_compressed.js and zig_compressed.js.map
If we’re using VSCode, here’s the Build Task: .vscode/tasks.json
Finally we test our compiled Code Generator…
Browse to blockly-zig-nuttx/demos/code with a Local Web Server. (Like Web Server for Chrome)
We should see this…
lupyuen3.github.io/blockly-zig-nuttx/demos/code

Blockly will NOT render correctly with file://…, it must be http://localhost:port/…
Drag-and-drop some Blocks and click the Zig Tab.
The Zig Tab now shows the generated code in Zig.
Some of the generated code might appear as Dart (instead of Zig) because we haven’t completely converted our Code Generator from Dart to Zig.
In case of problems, check the JavaScript Console. (Ignore the storage.js error)
Can we save the Blocks? So we don’t need to drag them again when retesting?
Click the JSON Tab and copy the Blockly JSON that appears.
Whenever we rebuild Blockly and reload the site, just paste the Blockly JSON back into the JSON Tab. The Blocks will be automagically restored.