📝 23 Aug 2023
Update: Display Controller Registers are now listed in JH7110 PAC and VOUT CRG
Today we look deep inside the Display Controller of the RISC-V StarFive JH7110 SoC and figure out how it works.
But the JH7110 Display Controller is NOT documented!
Indeed! The Official JH7110 Doc only points to the Linux Driver Source Code.
(Plus a smattering of Display Registers)
Sounds a little disturbing?
Yeah goodbye olden days of Documented Display Registers! (Like for Allwinner A64)
But no worries! We’re here to decipher the Driver Source Code and document everything ourselves…
What’s inside the Direct Rendering Manager (DRM) Driver for JH7110
How it controls the Display Registers
To handle the Display Pipeline, Display Planes and Framebuffers
And how it talks to HDMI and MIPI DSI (Display Serial Interface)
Also how we might implement the driver ourselves (without Linux)
Why are we doing this?
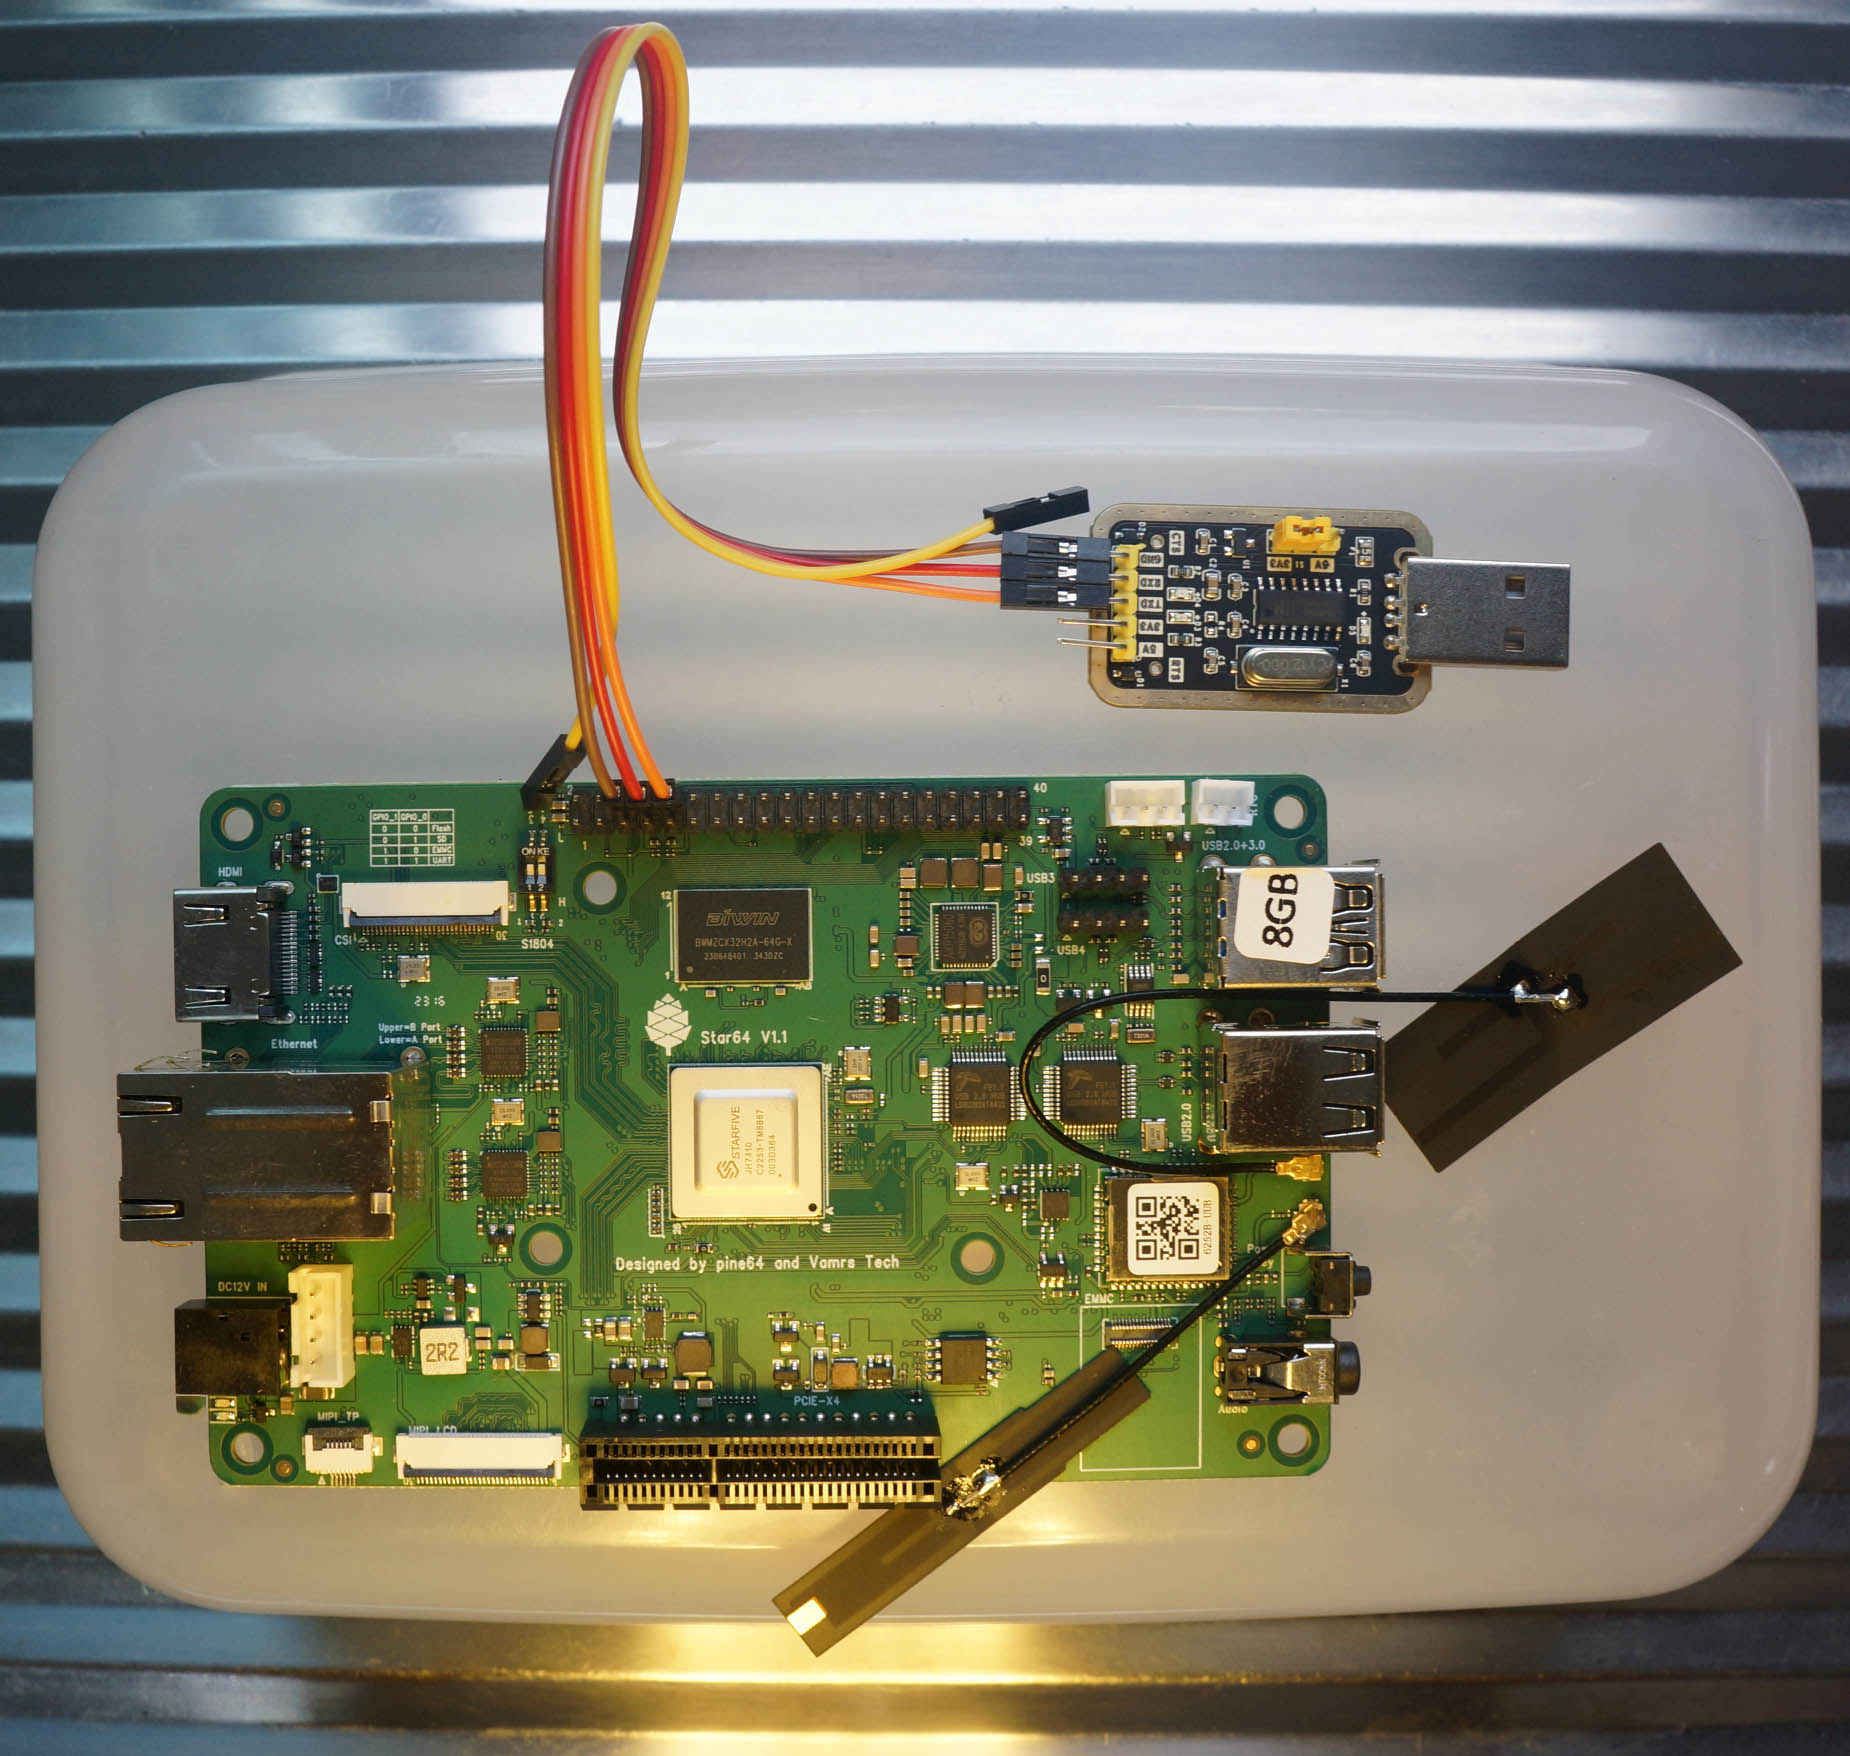
We’re building a HDMI Display Driver for Apache NuttX Real-Time Operating System (RTOS) on the Pine64 Star64 SBC. (Based on JH7110, just like VisionFive2)
Our analysis today will be super useful for creating our HDMI Driver for NuttX on Star64. (Pic below)
And hopefully this article will be helpful for porting other Operating Systems to JH7110!
What exactly is documented for JH7110 Display Controller?
Officially these are the JH7110 Display Controller docs…
But the crucial docs are confidential. (Sigh)
What about the Driver Source Code?
We have the official Linux Drivers for the Display Controller…
vs_dc.c - Display Controller
vs_dc_hw.c - Display Hardware
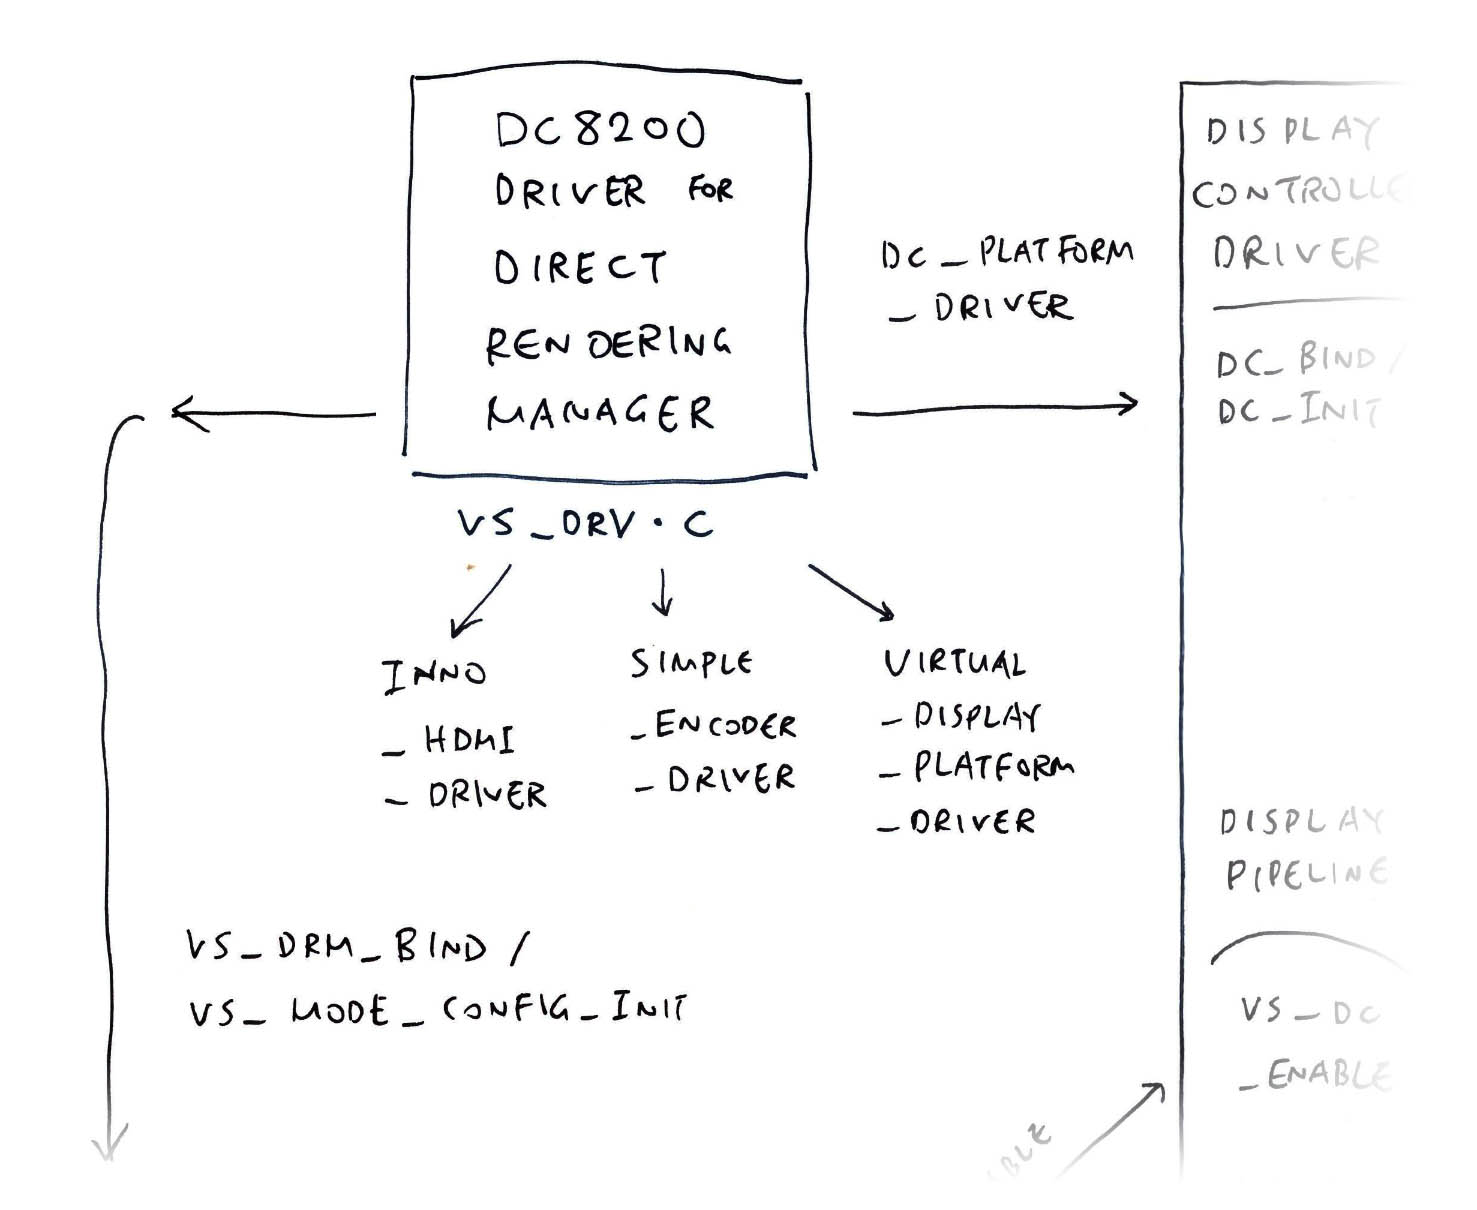
vs_drv.c - Driver for Direct Rendering Manager
vs_crtc.c - Display Pipeline
vs_plane.c - Display Plane
vs_simple_enc.c - Display Subsystem (DSS) Encoder
vs_gem.c - Graphics Execution Manager (Memory Buffers)
vs_virtual.c - Virtual Display
vs_dc_dec.c - Bitmap Decompression
Phew so many Source Files!
Yeah but they’re super helpful for understanding the Inner Workings of our Display Controller!
We’ll decipher the Driver Source Code in a while.
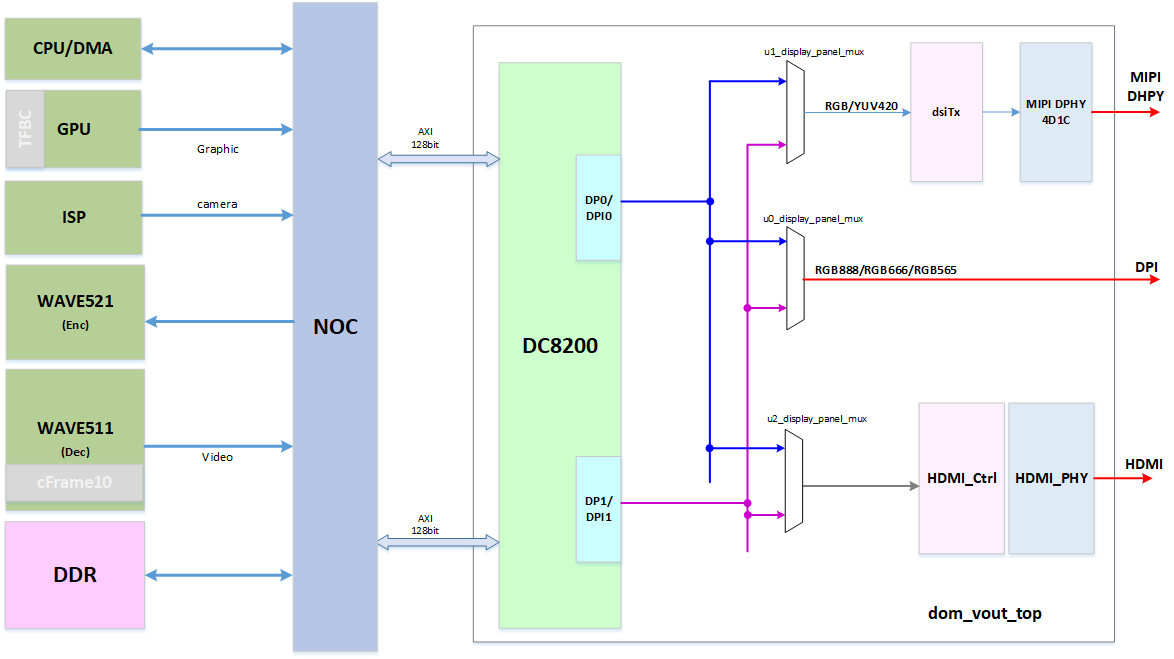
JH7110 Display Subsystem Block Diagram
What’s this DC8200?
From the pic above, we see that JH7110 uses a VeriSilicon DC8200 Dual Display Controller to drive these displays…
MIPI DPHY / DSI: Display Serial Interface
(For most LCD Panels, like in PineTab-V)
DPI: Display Parallel Interface
(For LCD Panels with Parallel RGB Interface)
HDMI Video Output
The Display Output Ports are named DPI0 and DPI1.
(AXI is the Advanced eXtensible Interface)
These are the Clock and Reset Signals for the Display Subsystem (VOUT)…
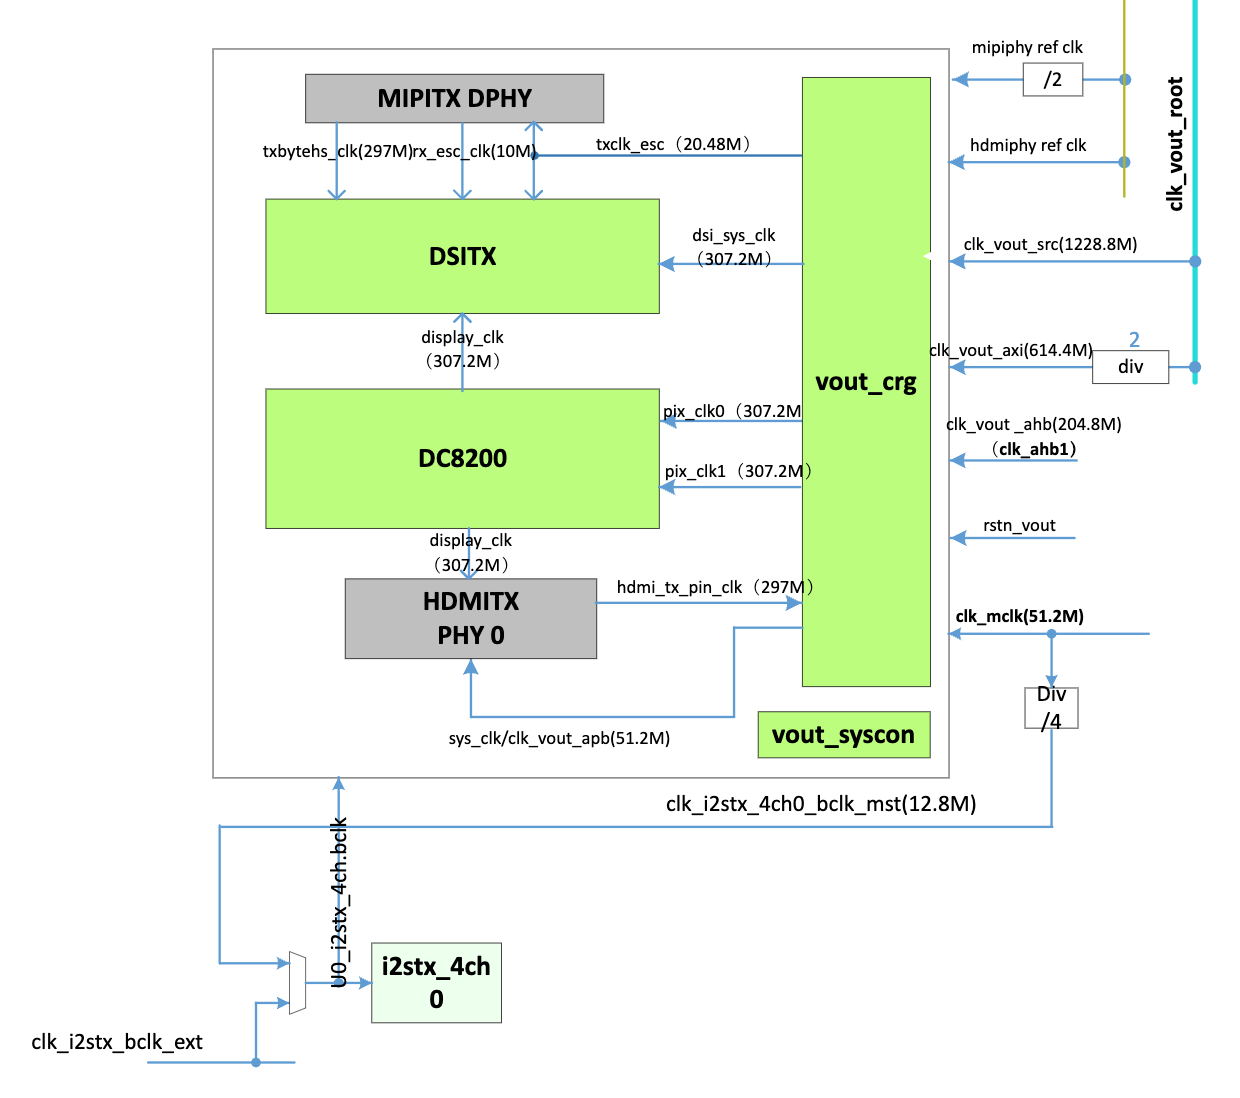
And for the Display Controller (DC8200)…
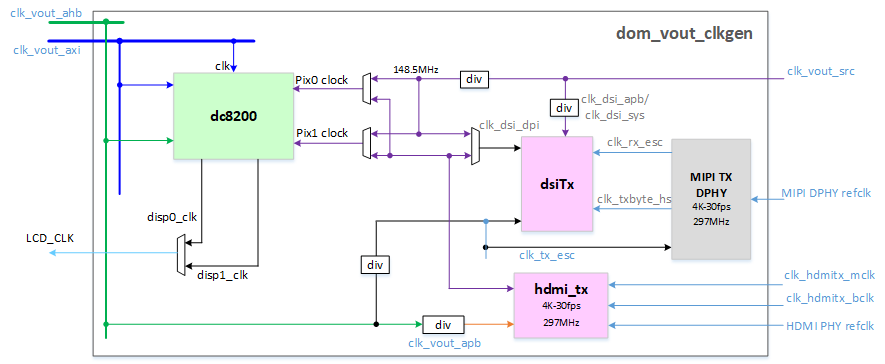
JH7110 Display Subsystem Clock and Reset
(Remember to Enable the Clocks and Deassert the Resets!)
The DC8200 Display Controller outputs to 2 displays simultaneously (like MIPI DSI + HDMI)…
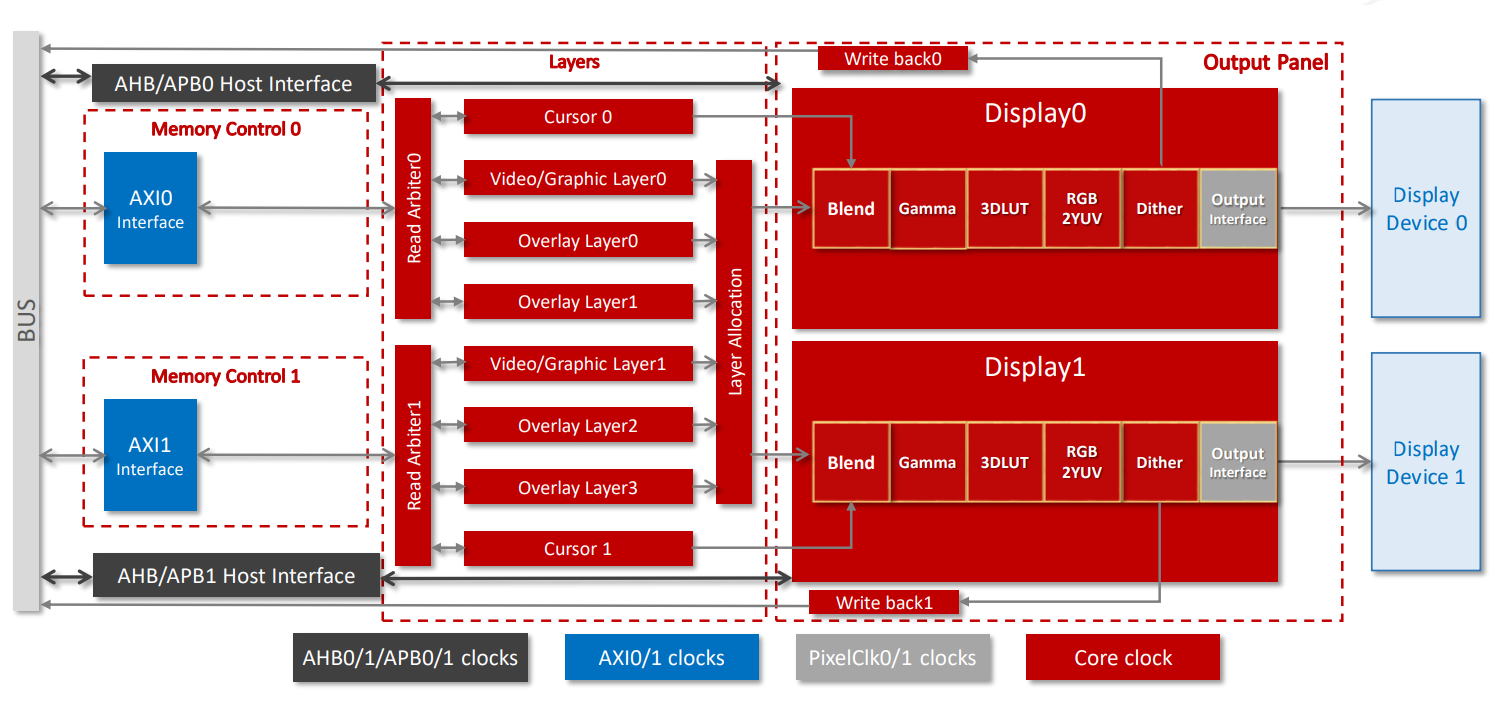
Block Diagram of DC8200 Display Controller
(AXI is the Advanced eXtensible Interface)
With support for…
Display Layers: Overlays for Cursor, Video, Graphics
Display Pipelines: Blending, Gamma, 3D LUT, RGB-to-YUV, Dithering
Display Output: HDMI, MIPI Display Serial Interface
We’ll explain the Display Layers (Overlays) and Display Pipelines in a while.
How are the Display Outputs mapped to MIPI DSI and HDMI?
The Linux Device Tree configures the mapping of Display Outputs to the Display Devices…
## Configure DC8200 Display Controller
&dc8200 {

  ## Display Outputs are mapped to...
  dc_out: port {

    ## DPI0: HDMI
    dc_out_dpi0: endpoint@0 {
      reg = <0>;
      remote-endpoint = <&hdmi_input0>;
    };

    ## DPI1: HDMI LCDC
    dc_out_dpi1: endpoint@1 {
      reg = <1>;
      remote-endpoint = <&hdmi_in_lcdc>;
    };

    ## DPI2: MIPI DSI
    dc_out_dpi2: endpoint@2 {
      reg = <2>;
      remote-endpoint = <&mipi_in>;
};Let’s dive into the Display Driver Code!
What’s this DRM?
Direct Rendering Manager (DRM) is the Linux Subsystem that talks to Display Controllers. (Like the DC8200 Display Controller in JH7110)
The pic above shows the DC8200 Driver for DRM (top left). It works like a façade for the other DC8200 Driver Modules. (Rest of the pic)
(Not to be confused with the other DRM, which is also video-related)
The DRM Driver for DC8200 is named “starfive”. These are the DRM Operations supported by the driver: vs_drv.c
// DRM Driver for DC8200 Display Controller
static struct drm_driver vs_drm_driver = {
  .driver_features    = DRIVER_MODESET | DRIVER_ATOMIC | DRIVER_GEM,
  .lastclose          = drm_fb_helper_lastclose,
  .prime_handle_to_fd = drm_gem_prime_handle_to_fd,
  .prime_fd_to_handle = drm_gem_prime_fd_to_handle,
  .gem_prime_import   = vs_gem_prime_import,
  .gem_prime_import_sg_table = vs_gem_prime_import_sg_table,
  .gem_prime_mmap     = vs_gem_prime_mmap,
  .dumb_create        = vs_gem_dumb_create,
#ifdef CONFIG_DEBUG_FS
  .debugfs_init       = vs_debugfs_init,
#endif
  .fops  = &fops,
  .name  = "starfive",
  .desc  = "VeriSilicon DRM driver",
  .date  = "20191101",
  .major = 1,
  .minor = 0,
};
(Nothing to see here, mostly DRM Boilerplate)
(We’ll come back to fops)
(Graphics Execution Manager “GEM” handles Memory Buffers)
Where are the fun bits of our Display Driver?
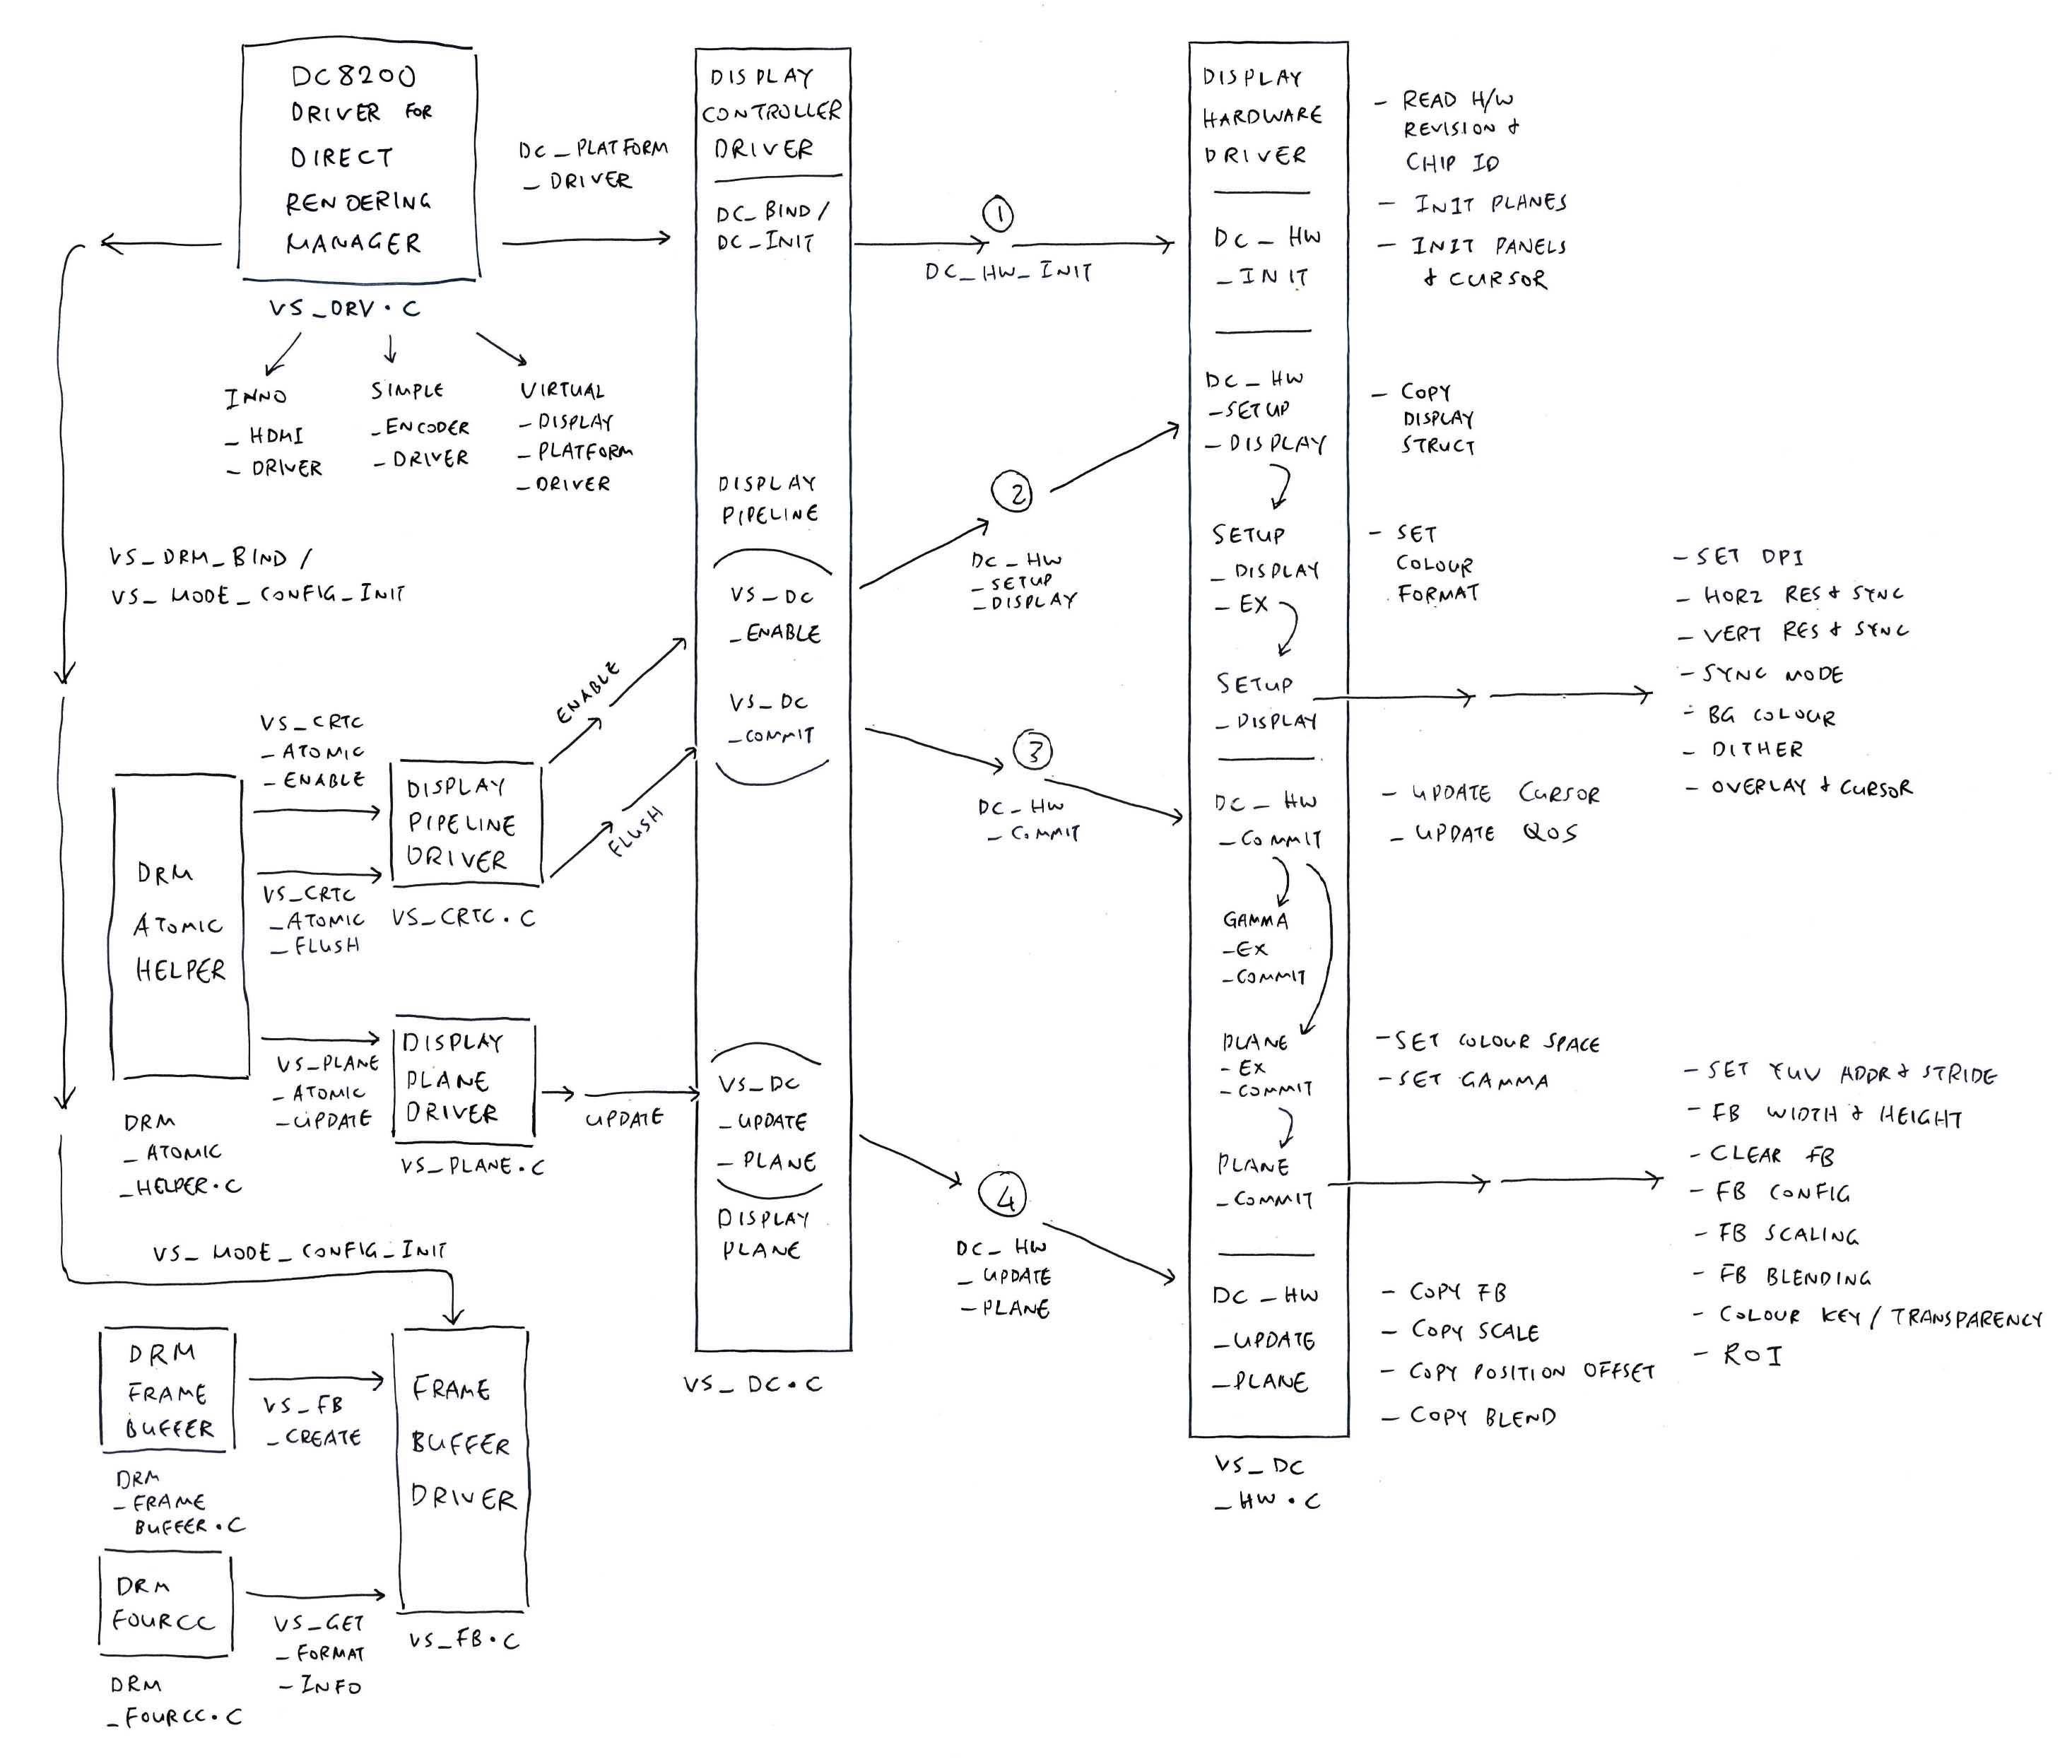
Remember our DRM Driver is only a façade. Most of the work is done by the Sub-Drivers for DC8200 (pic above): vs_drv.c
// Sub-Drivers for DC8200 Display Controller
static struct platform_driver *drm_sub_drivers[] = {

  // Display Controller Driver
  &dc_platform_driver,

#ifdef CONFIG_STARFIVE_INNO_HDMI
  // HDMI Controller Driver:
  // Inno HDMI 2.0 Transmitter for TSMC28HPC+
  &inno_hdmi_driver,
#endif

  // Display Subsystem (DSS) Encoder Driver
  &simple_encoder_driver,

#ifdef CONFIG_VERISILICON_VIRTUAL_DISPLAY
  // Virtual Display Driver
  &virtual_display_platform_driver,
#endif
};
We’ll see the Display Controller Driver in a while.
Who starts the Sub-Drivers?
At startup, vs_drm_init (in the DRM Driver) registers two things…
DC8200 Sub-Drivers: drm_sub_drivers
DC8200 DRM Plaform Driver: vs_drm_platform_driver
That’s how the Sub-Drivers are started.
What’s inside fops?
fops defines the File Operations supported by our DRM Driver: vs_drv.c
// File Operations for DC8200 Display Controller
static const struct file_operations fops = {
  .owner     = THIS_MODULE,
  .open      = drm_open,
  .release   = drm_release,
  .unlocked_ioctl = drm_ioctl,
  .compat_ioctl   = drm_compat_ioctl,
  .poll      = drm_poll,
  .read      = drm_read,
  .mmap      = vs_gem_mmap,
};
(Looks fairly standard for a DRM Driver)
Let’s talk about Display Drivers…
What’s inside a typical Display Driver?
How does it talk to the Display Hardware?
Before we dive too deep into our Driver Code, let’s talk about Display Drivers and how they control the Display Hardware.
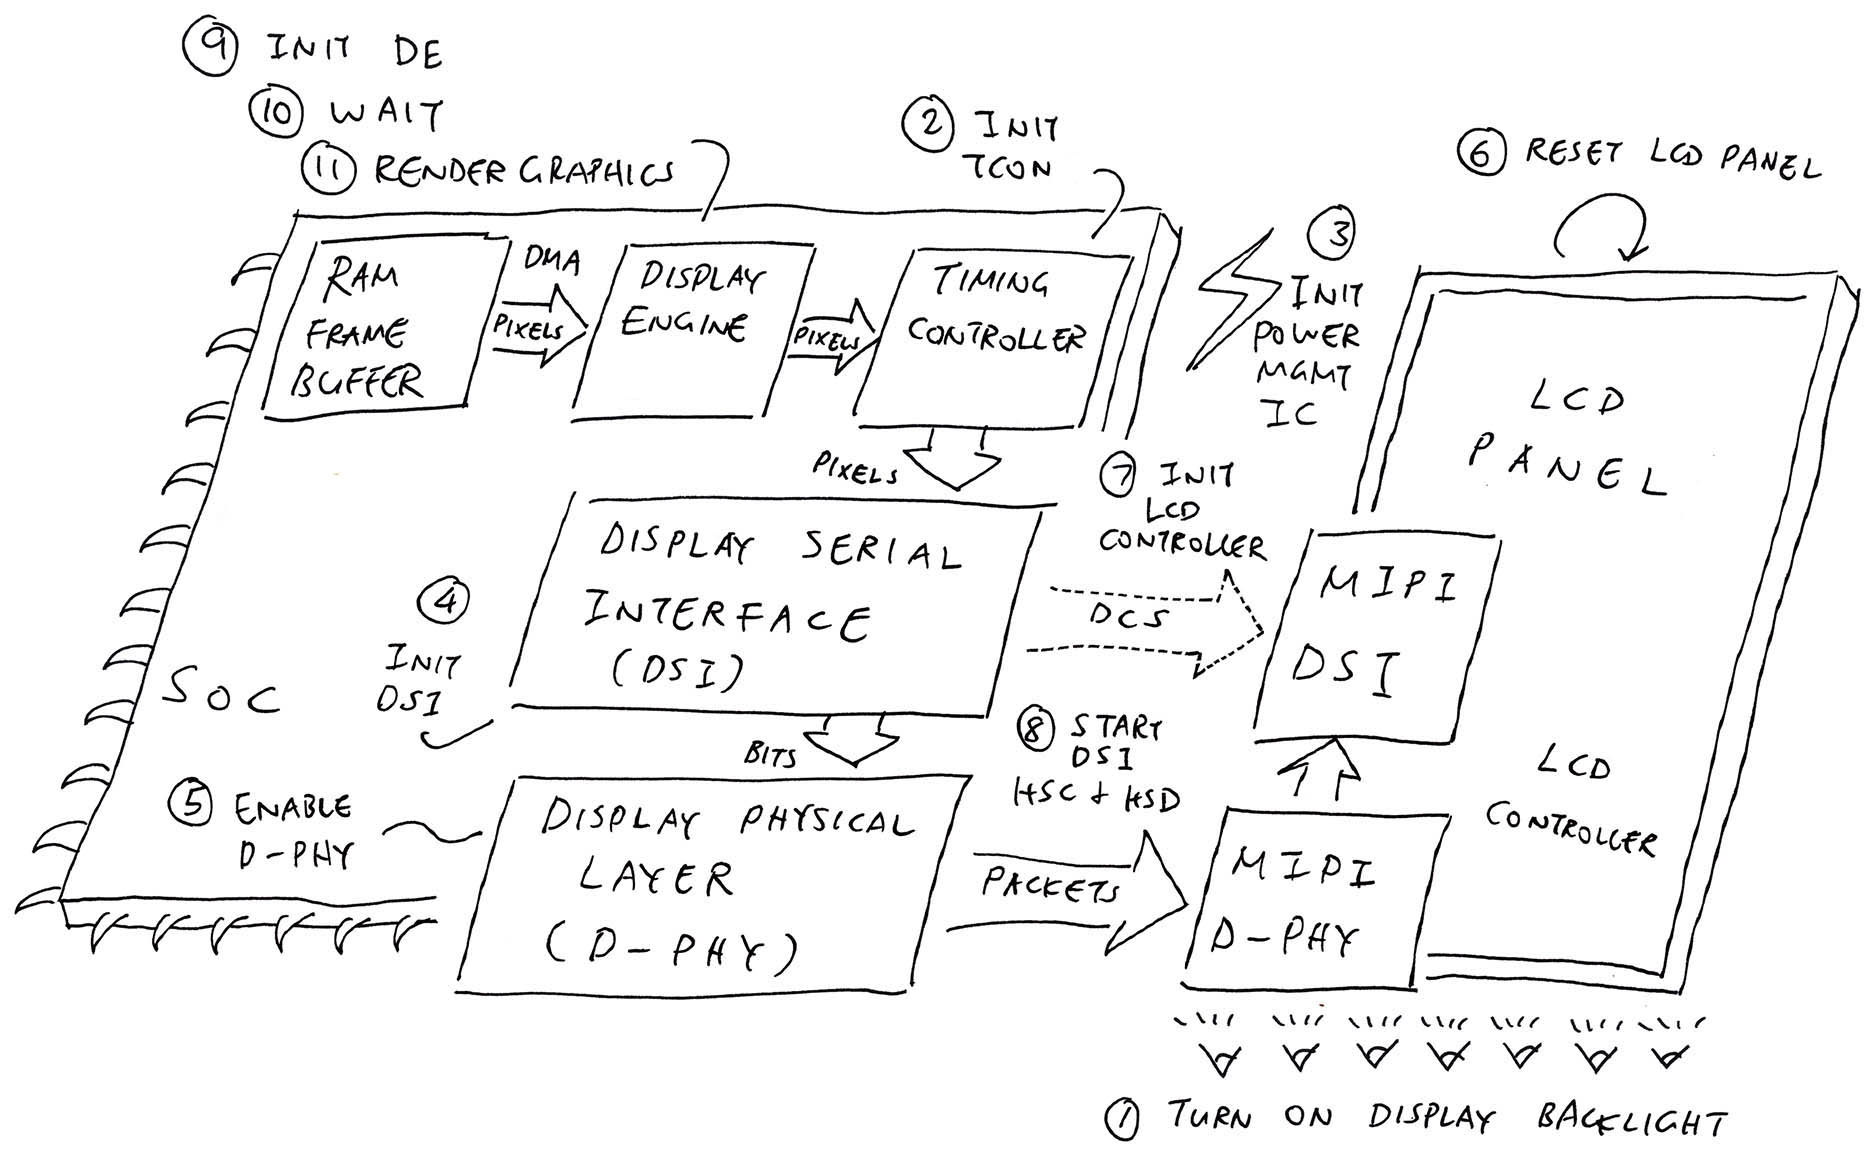
The pic above shows how a typical Display Driver will render graphics to a Display Device…
Our Apps will write the pixels into a RAM Framebuffer
Inside the SoC is a Display Pipeline (or Display Engine) that reads the Framebuffer (over DMA)
And pushes a continuous stream of pixels to a Display Device
(Over HDMI or MIPI Display Serial Interface)
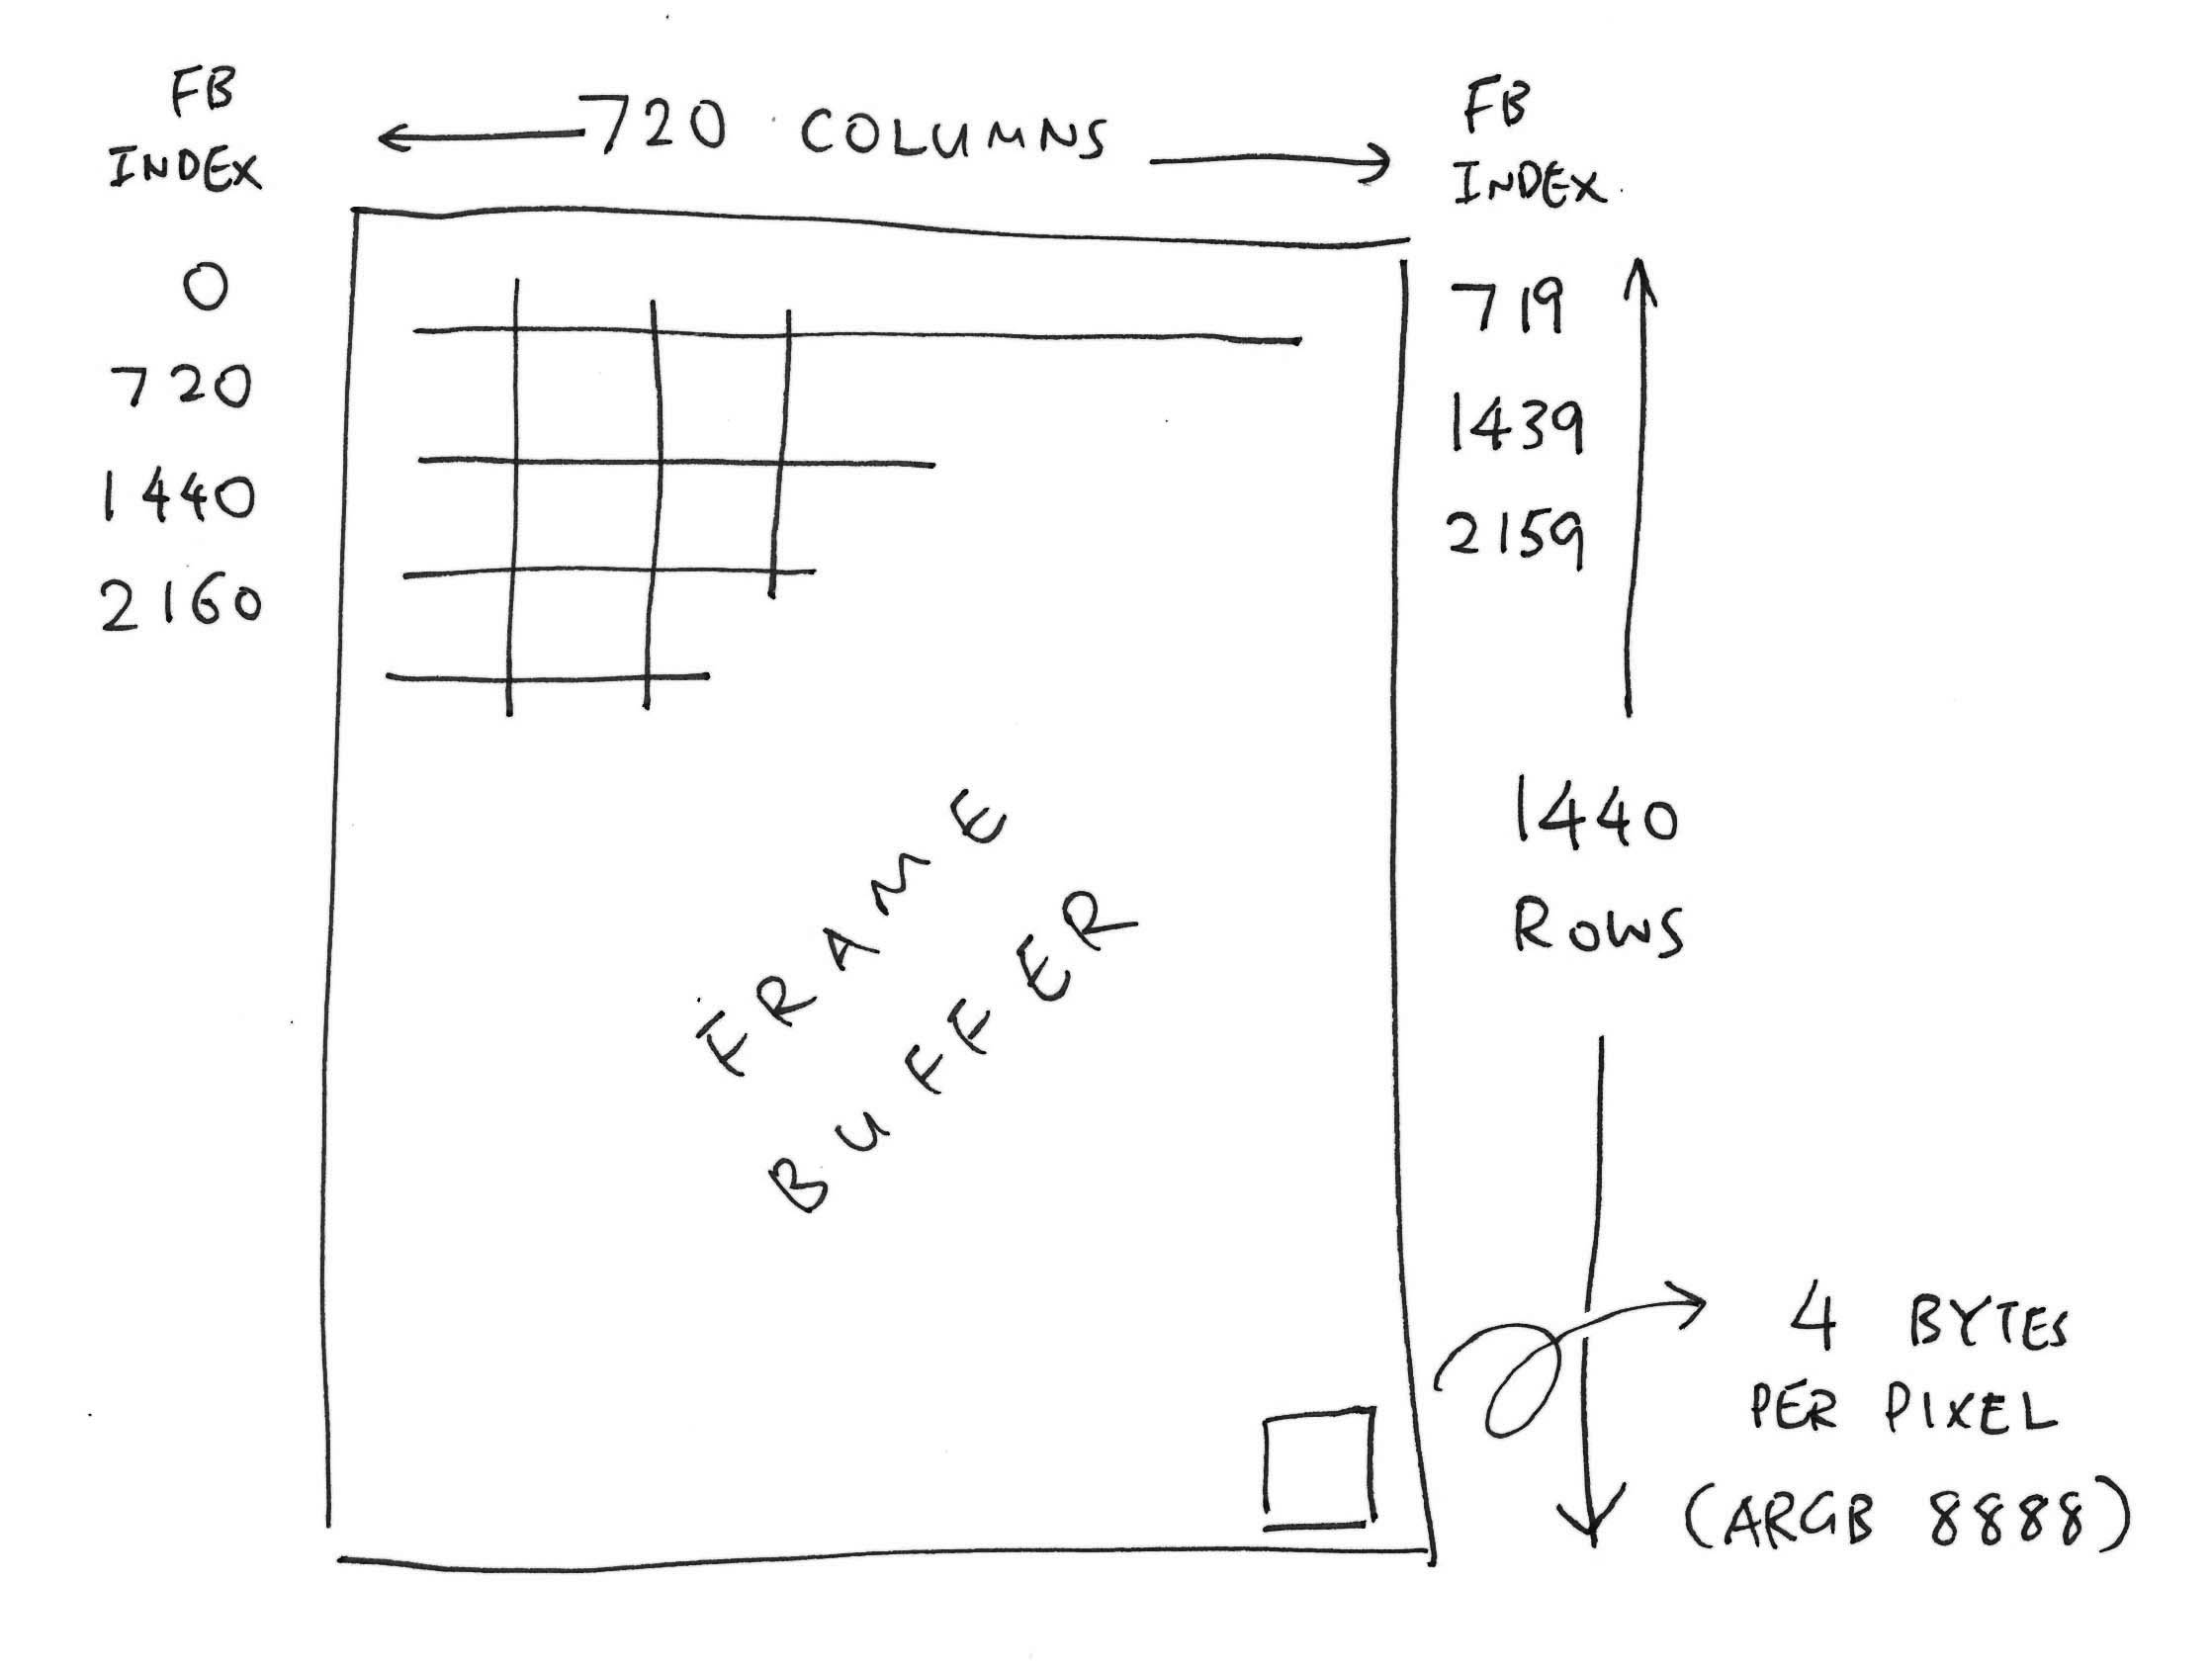
What’s a Framebuffer?
A Framebuffer is just a region of RAM that stores pixels in a Colour Format. (Like ARGB 8888)
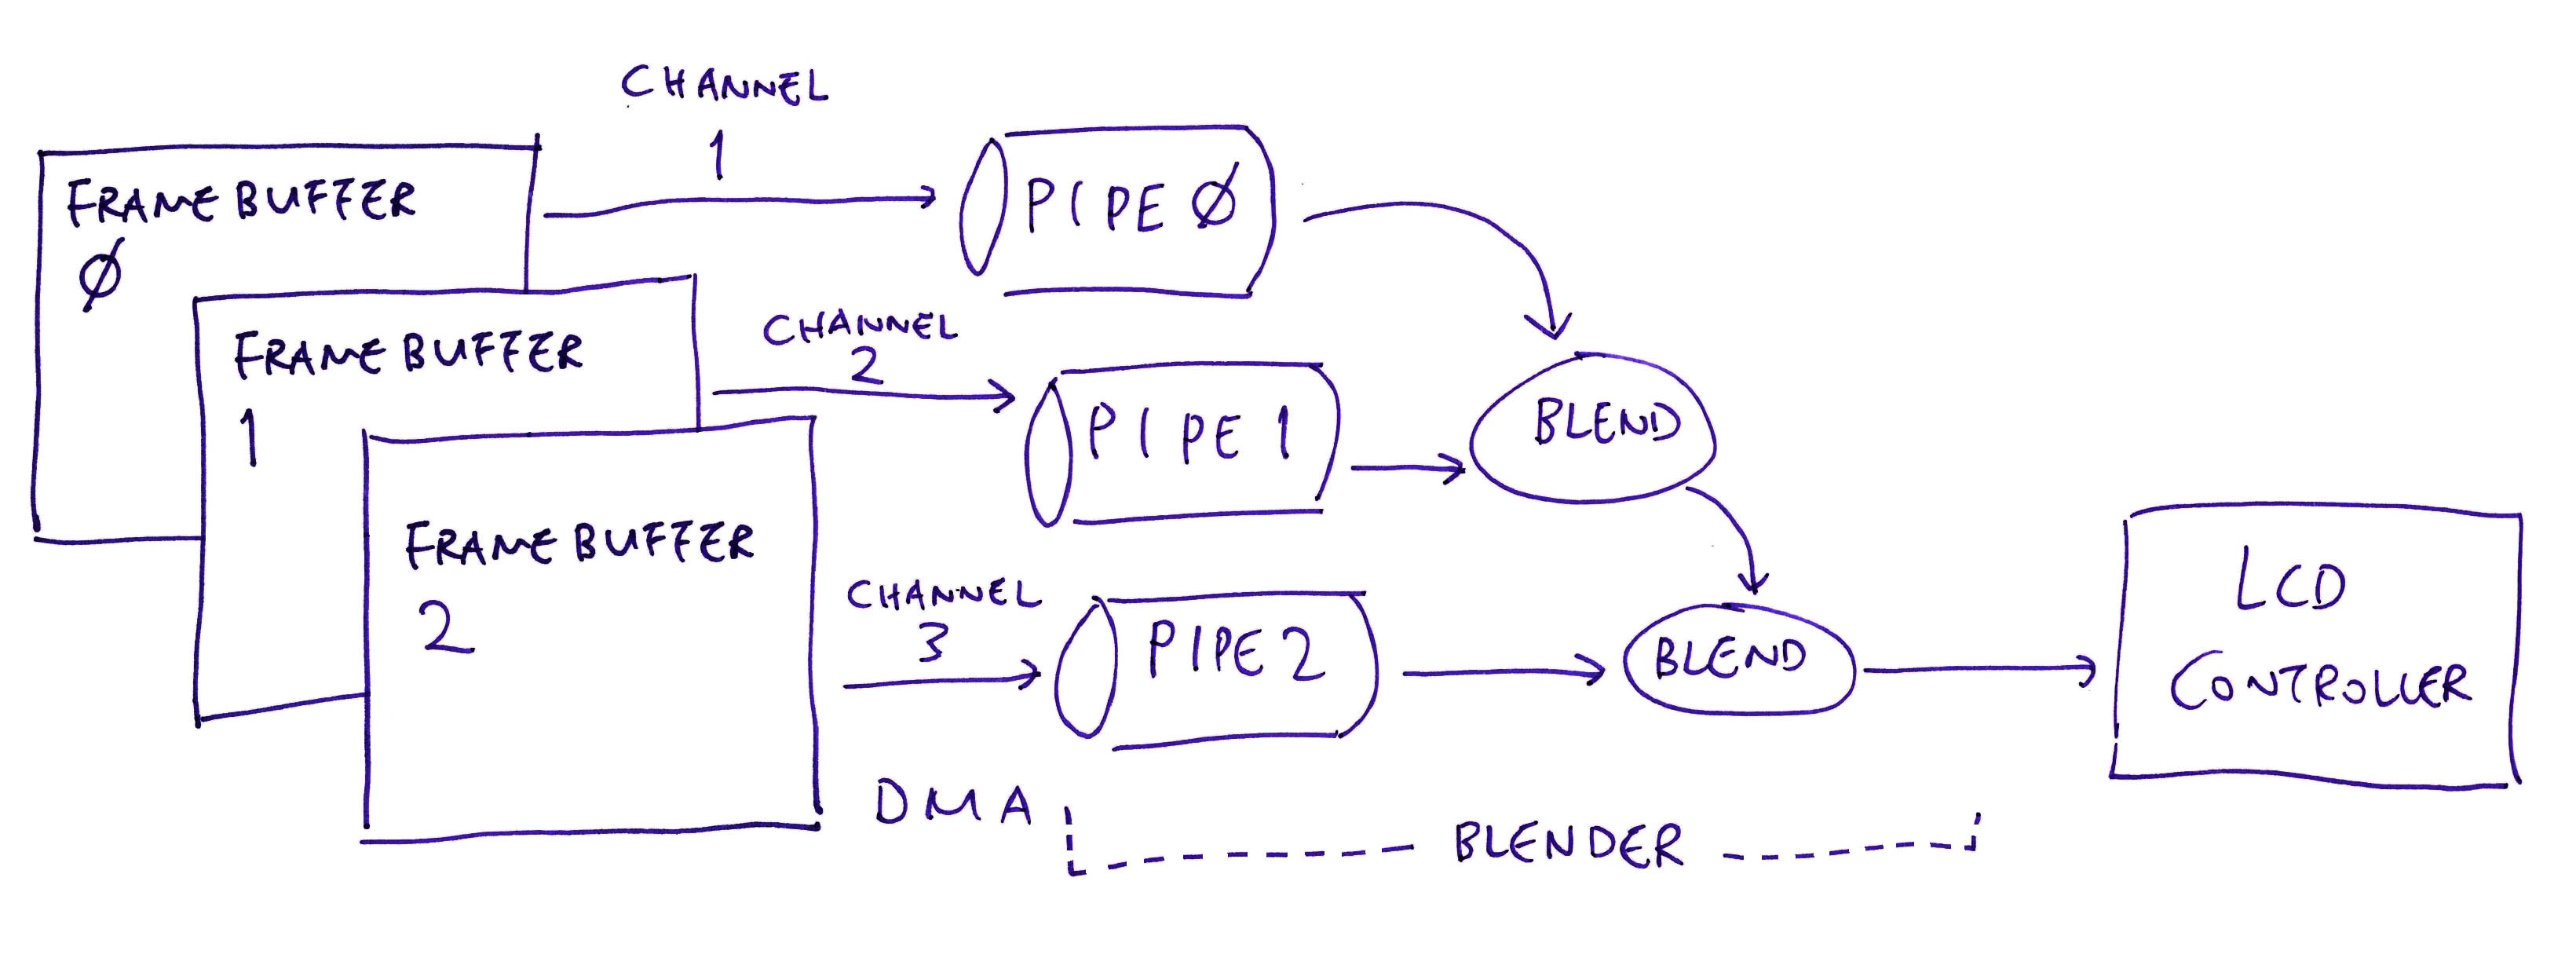
Multiple Framebuffers are supported. Framebuffers can be rendered as Opaque or Semi-Transparent Overlays…
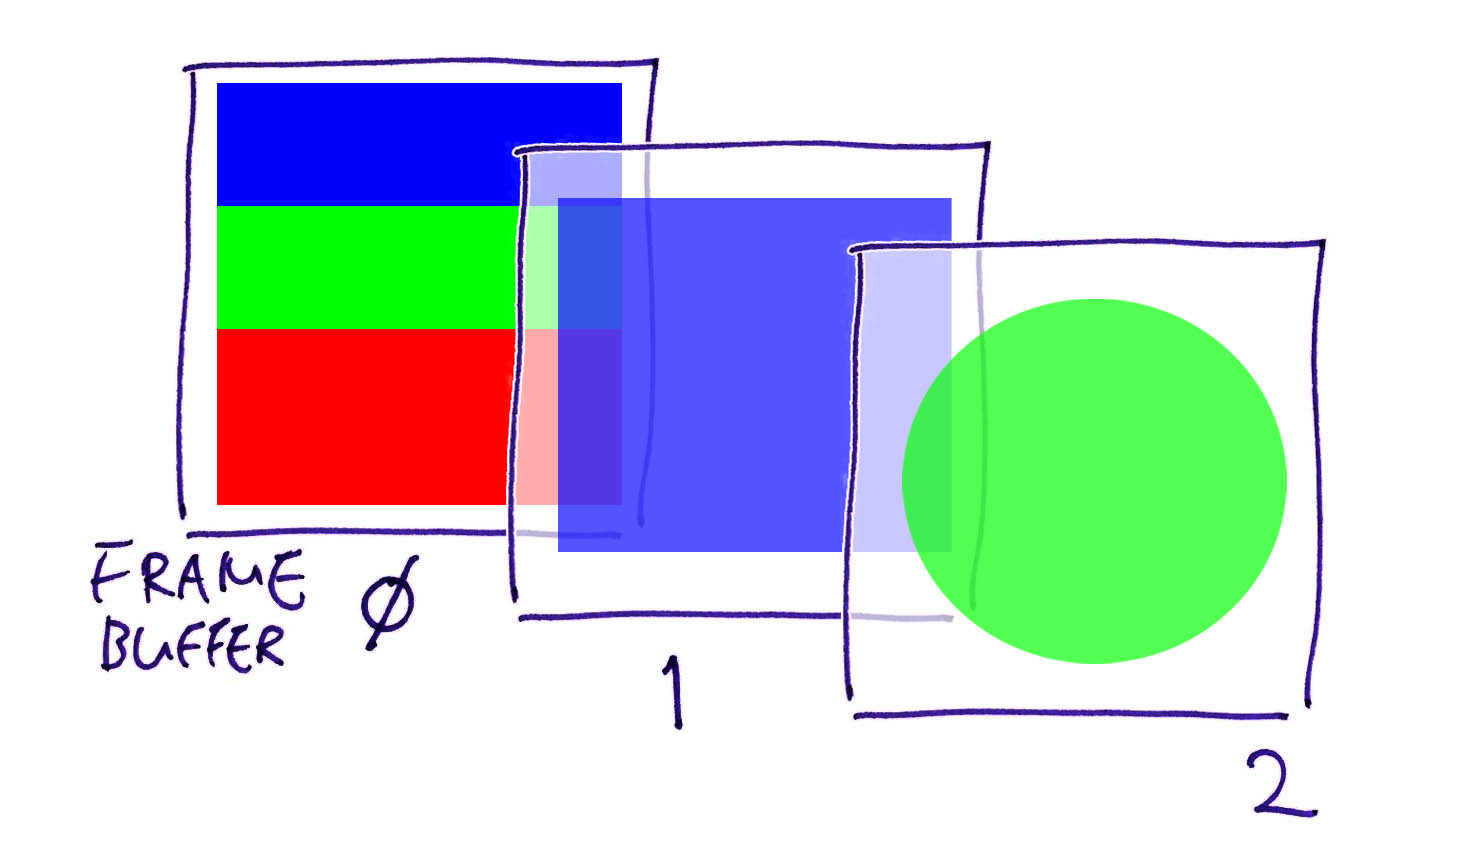
To do this, we configure the Display Pipeline to Blend the Framebuffers…
Internally, the Display Driver will manipulate the Display Hardware Registers to…
Configure the Framebuffers (and their RAM Addresses)
Configure the Display Pipelines (for Overlay Blending)
Configure the Display Output (for the Display Device)
Commit the Display Configuration (to the Display Controller)
And that’s how a typical Display Driver works in a Modern SoC!
Heading back to our scheduled programming…
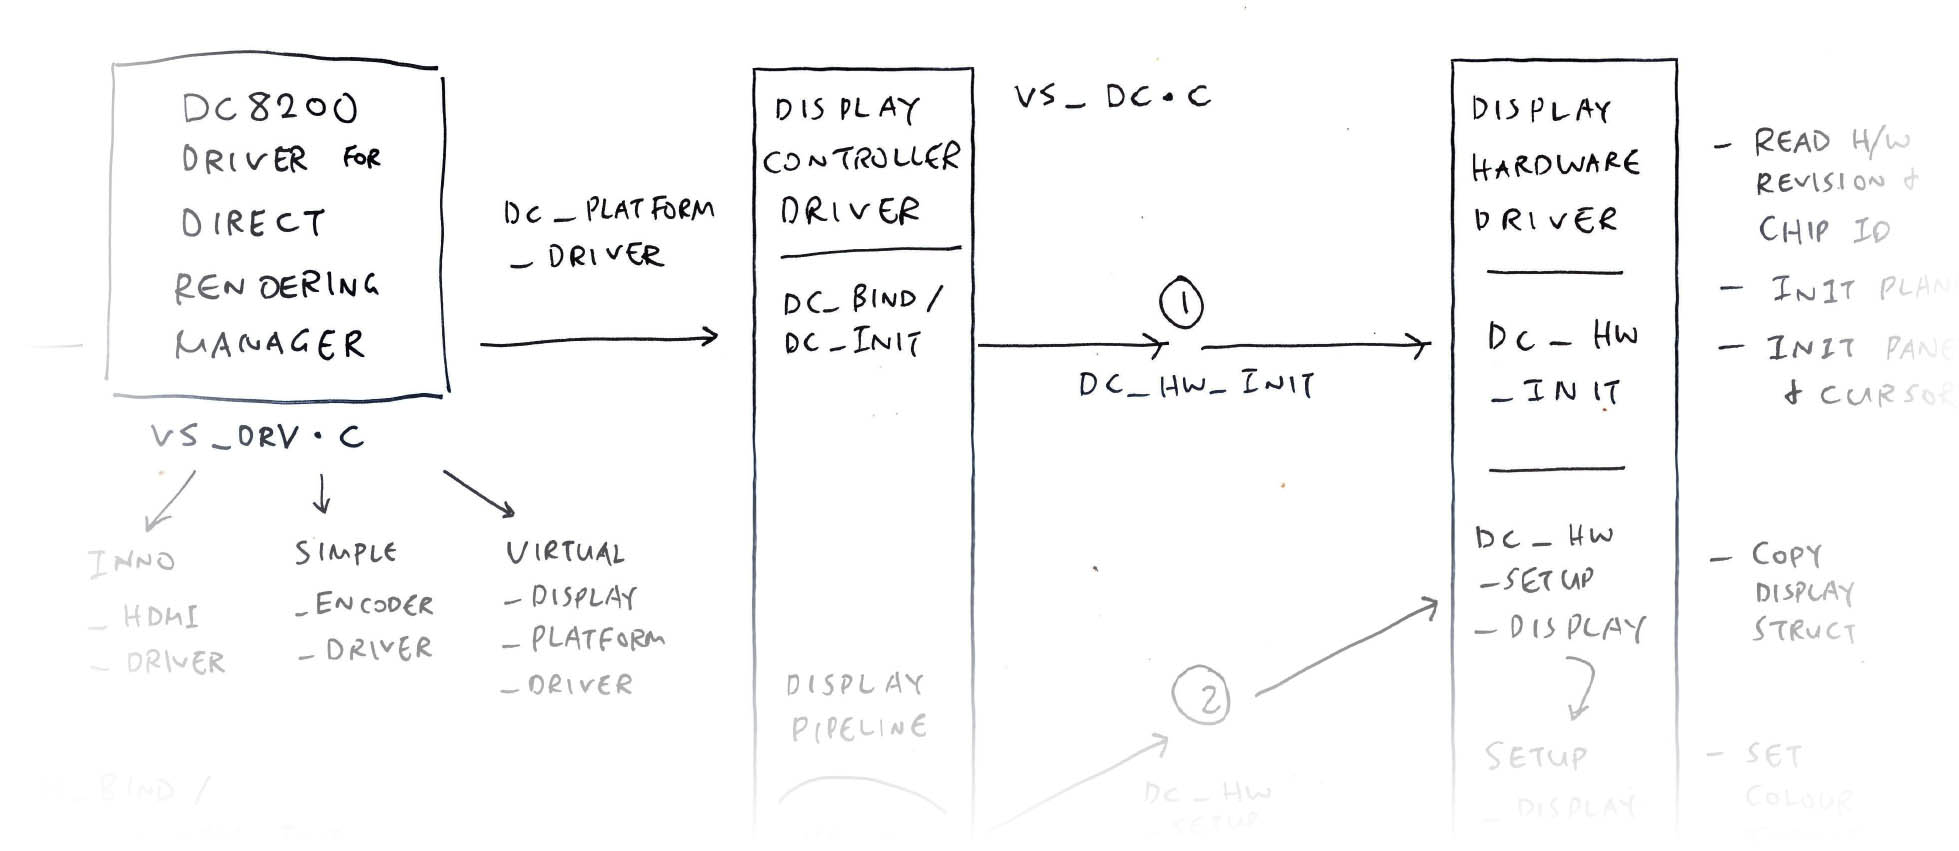
The DC8200 Display Controller Driver (pic above) is called by the the DC8200 DRM Driver. The driver exposes the Display Functions for…
Initialisation of Display Controller
Setup and Configuration of Display Pipeline
Update of Display Plane
The Display Controller Driver is named “vs-dc” (for VeriSilicon Display Controller): vs_dc.c
// DC8200 Display Controller Driver
struct platform_driver dc_platform_driver = {
  .probe  = dc_probe,
  .remove = dc_remove,
.name = "vs-dc"These are the Component Functions exposed by the Display Controller Driver to start the driver: vs_dc.c
// DC8200 Display Component Functions
const struct component_ops dc_component_ops = {
  .bind   = dc_bind,
  .unbind = dc_unbind,
};
What happens at startup?
At startup, the DRM Driver calls our Display Controller Driver at…
dc_bind and dc_init to setup the Clock and Reset Signals
Which calls our Display Hardware Driver at…
As we’ll see in the next section.
That’s all for our Display Controller Driver?
There’s more! We’ll come back to our Display Controller Driver for handling the Display Pipeline and Display Plane.

Now we do the exciting bit?
Finally! The Display Hardware Driver (pic above) is called by the Display Controller Driver (previous section) to manipulate the Display Hardware Registers and…
Initialise the Display Controller
Setup and Configure the Display Pipeline
Update the Display Plane
(This is the driver that we’ll reimplement in NuttX!)
Earlier we saw dc_init (from Display Controller Driver) calling the Display Hardware Driver at startup.
Here’s what happens inside dc_hw_init…
Read the Hardware Revision and Chip ID
Initialise every Display Plane (Layer)
Initialise every Display Panel (and Cursor)
Why read the Hardware Revision?
Depending on the Hardware Revision, the DC8200 Display Controller works a little differently. For Star64 SBC…
Hardware Revision is 0x5720 (DC_REV_0)
Chip ID is 0x30E
When we match the Hardware Revision with the Driver Code…
dc_info (Display Controller Info) says that 2 Display Panels and 8 Display Planes (Layers) are supported…
// Display Controller Info
static const struct vs_dc_info dc_info[] = {
  {
    // For DC_REV_0:
    .name      = "DC8200",
    .panel_num = 2,
    .plane_num = 8,
    .planes    = dc_hw_planes[DC_REV_0],
    .layer_num = 6,
    .max_bpc   = 10,
    .color_formats =
      DRM_COLOR_FORMAT_RGB444 |
      DRM_COLOR_FORMAT_YCRCB444 |
      DRM_COLOR_FORMAT_YCRCB422 |
      DRM_COLOR_FORMAT_YCRCB420,
    .gamma_size   = GAMMA_EX_SIZE,
    .gamma_bits   = 12,
    .pitch_alignment = 128,
    .pipe_sync    = false,
    .mmu_prefetch = false,
    .background   = true,
    .panel_sync   = true,
    .cap_dec      = true,  // This differs across Hardware Revisions
  }
dc_hw_planes (Display Planes Info) defines the 8 Display Planes (Layers)…
| Z Pos | Layer | Min Size | Max Size |
|---|---|---|---|
| 0 | Primary | 0 x 0 | 4096 x 4096 |
| 1 | Overlay | 0 x 0 | 4096 x 4096 |
| 2 | Overlay_1 | 0 x 0 | 4096 x 4096 |
| 3 | Primary_1 | 0 x 0 | 4096 x 4096 |
| 4 | Overlay_2 | 0 x 0 | 4096 x 4096 |
| 5 | Overlay_3 | 0 x 0 | 4096 x 4096 |
| 255 | Cursor | 32 x 32 | 64 x 64 |
| 255 | Cursor_1 | 32 x 32 | 64 x 64 |
Why are the layers interleaved?
That’s because the Display Planes (Layers) will be rendered to 2 separate displays (HDMI + MIPI DSI)…
| Display 0 | Display 1 |
|---|---|
| Primary | Primary_1 |
| Overlay | Overlay_2 |
| Overlay_1 | Overlay_3 |
| Cursor | Cursor_1 |
Block Diagram of DC8200 Display Controller
Our Display Hardware Driver will do other fun things! Let’s talk about the Display Pipelines and Display Planes…
Earlier we talked about Display Pipelines and how they…
Read pixels from one or more Framebuffers over DMA
Blend the Framebuffers / Display Planes / Layers into a single image
Apply bitmap effects like Gamma Correction
Push the image pixels to the Display Device (HDMI or MIPI DSI)
In Linux Direct Rendering Manager (DRM), the Display Pipeline is implemented as CRTC Functions: vs_dc.c
// Display Pipeline Functions for DC8200 Display Controller
static const struct vs_crtc_funcs dc_crtc_funcs = {
.enable = vs_dc_enable,
.disable = vs_dc_disable,
.mode_fixup = vs_dc_mode_fixup,
.set_gamma = vs_dc_set_gamma,
.enable_gamma = vs_dc_enable_gamma,
.enable_vblank = vs_dc_enable_vblank,
.commit = vs_dc_commit,
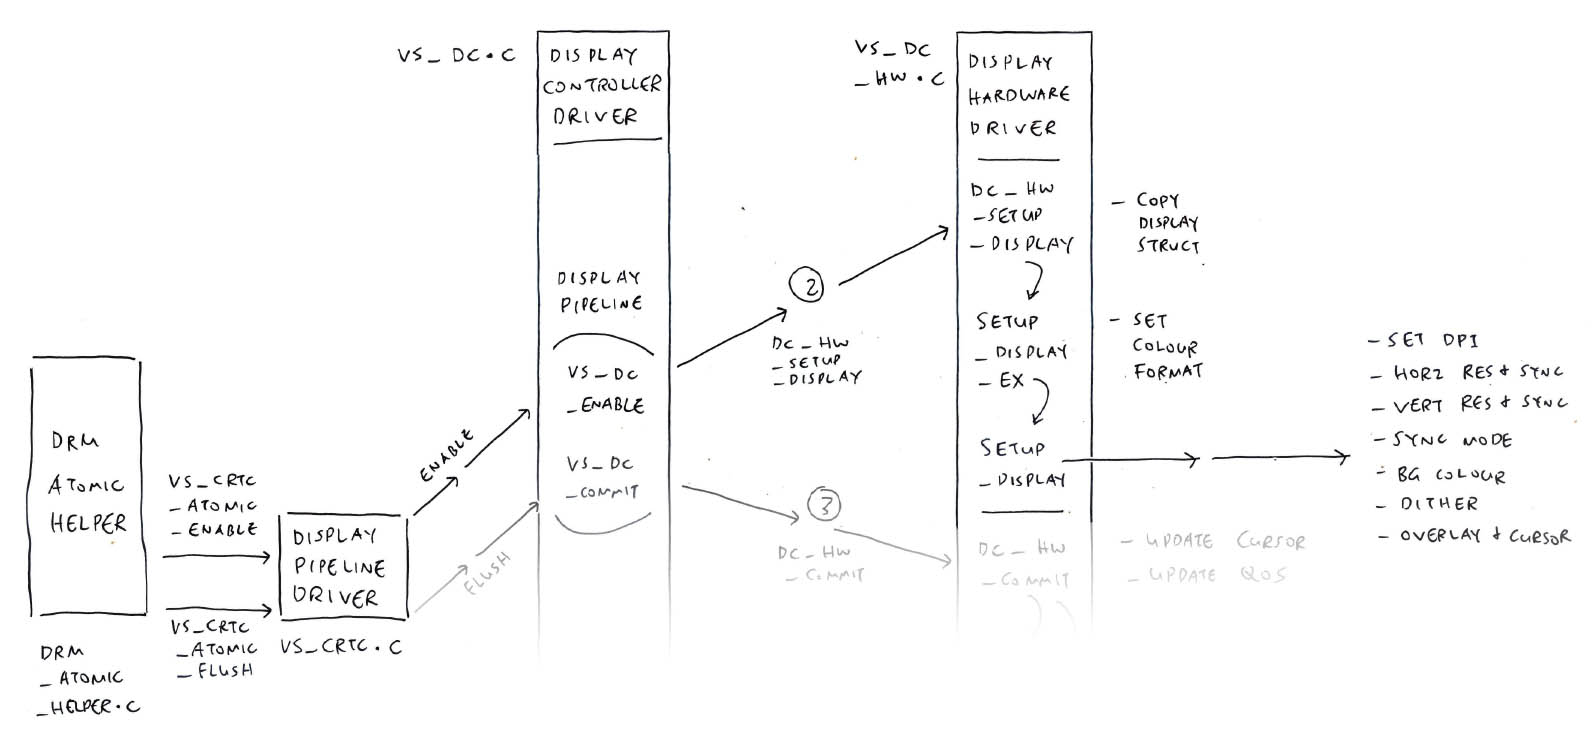
};How do we create a Display Pipeline?
From above, we see that DRM creates the Display Pipeline (pic above) by calling our Display Controller Driver at…
vs_dc_enable, to prepare the Clock and Reset Signals
Which calls…
What’s inside dc_hw_setup_display?
In our Display Hardware Driver, dc_hw_setup_display will…
Then setup_display_ex will…
Finally setup_display will do most of the work…
Who creates the Display Pipeline?
To create the Display Pipeline, vs_dc_enable (from above) is called by vs_crtc_atomic_enable…
// DC8200 Display Pipeline Helper Functions
static const struct drm_crtc_helper_funcs vs_crtc_helper_funcs = {
  .mode_fixup     = vs_crtc_mode_fixup,
  .atomic_enable  = vs_crtc_atomic_enable,
  .atomic_disable = vs_crtc_atomic_disable,
  .atomic_begin   = vs_crtc_atomic_begin,
  .atomic_flush   = vs_crtc_atomic_flush,
};Which is called by the Linux DRM Atomic Helper.
(We’ll see vs_crtc_atomic_flush in the next section)
(More about DRM Atomic Display)
And that’s how we create a Display Pipeline! Now we commit the Display Pipeline…
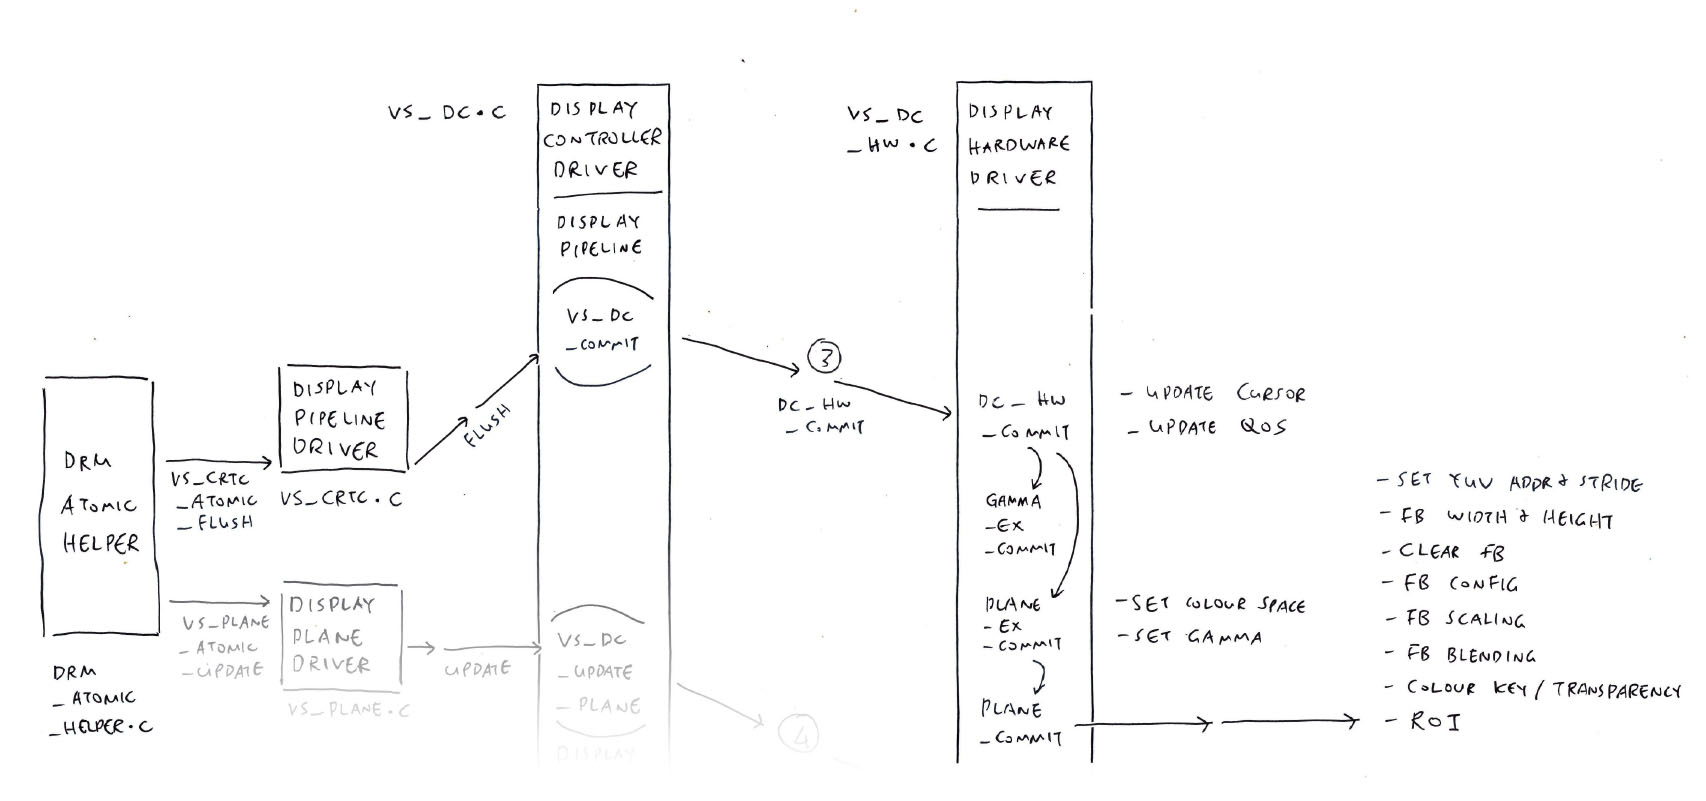
Why will we Commit a Display Pipeline?
A Display Pipeline won’t render any pixels… Until we Commit the Display Pipeline! (Pic above)
To Commit the Display Pipeline, the Linux Direct Rendering Manager (DRM) calls our Display Controller Driver at…
vs_dc_commit, which calls…
dc_hw_commit, from our Display Hardware Driver
What’s inside dc_hw_commit?
In our Display Hardware Driver, dc_hw_commit will…
What happens in plane_ex_commit?
plane_ex_commit will…
Then plane_commit will do these for every Display Plane (Layer)…
Who Commits the Display Pipeline?
To Commit the Display Pipeline, vs_dc_commit is called by vs_crtc_atomic_flush…
Which is called by the Linux DRM Atomic Helper.
(More about DRM Atomic Display)
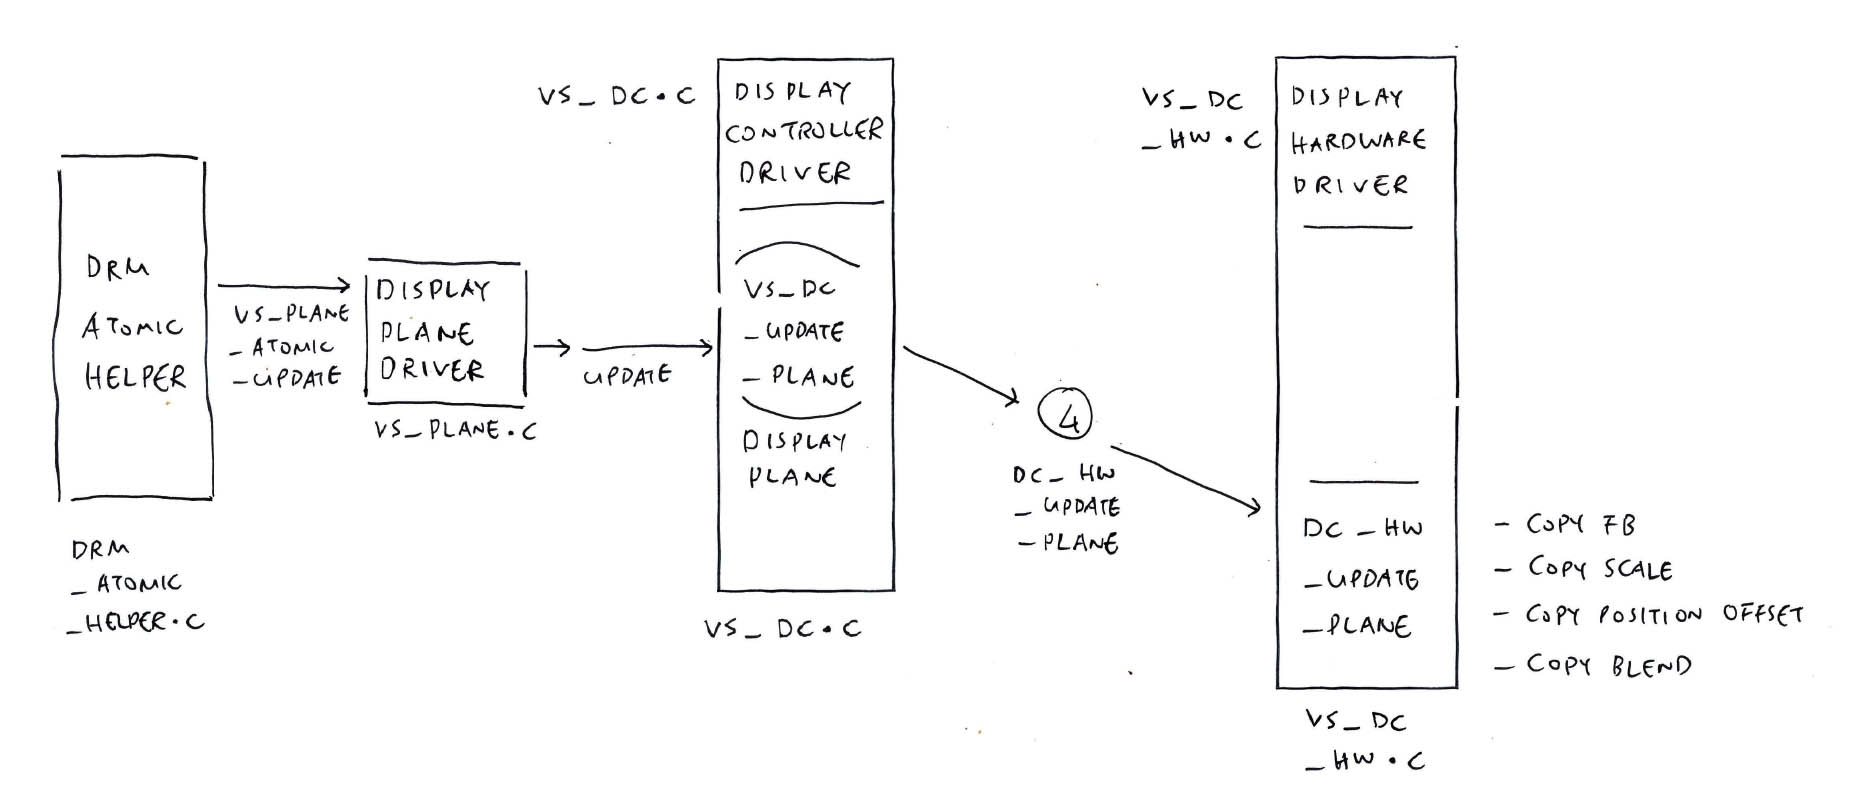
One last thing for today: How to Update the Display Plane. (Pic above)
(A Display Plane is a Layer of Pixels / Framebuffer that will be blended into the final image by a Display Pipeline)
Our Display Controller Driver exposes these Display Plane Functions: vs_dc.c
// Display Plane Functions for DC8200
static const struct vs_plane_funcs dc_plane_funcs = {
  .update  = vs_dc_update_plane,
  .disable = vs_dc_disable_plane,
  .check   = vs_dc_check_plane,
};
To update the Display Plane, the Linux Direct Rendering Manager (DRM) calls our Display Controller Driver at…
Which calls…
What’s inside update_plane?
update_plane (from our Display Controller Driver) will update the Display Plane…
Then dc_hw_update_plane (from our Display Hardware Driver) will…
Who calls our driver to update the Display Plane?
To update the Display Plane, vs_dc_update_plane is called by vs_plane_atomic_update…
// DC8200 Display Plane Helper Functions
const struct drm_plane_helper_funcs vs_plane_helper_funcs = {
  .atomic_check   = vs_plane_atomic_check,
  .atomic_update  = vs_plane_atomic_update,
  .atomic_disable = vs_plane_atomic_disable,
};Which is called by the Linux DRM Atomic Helper.
(More about DRM Atomic Display)
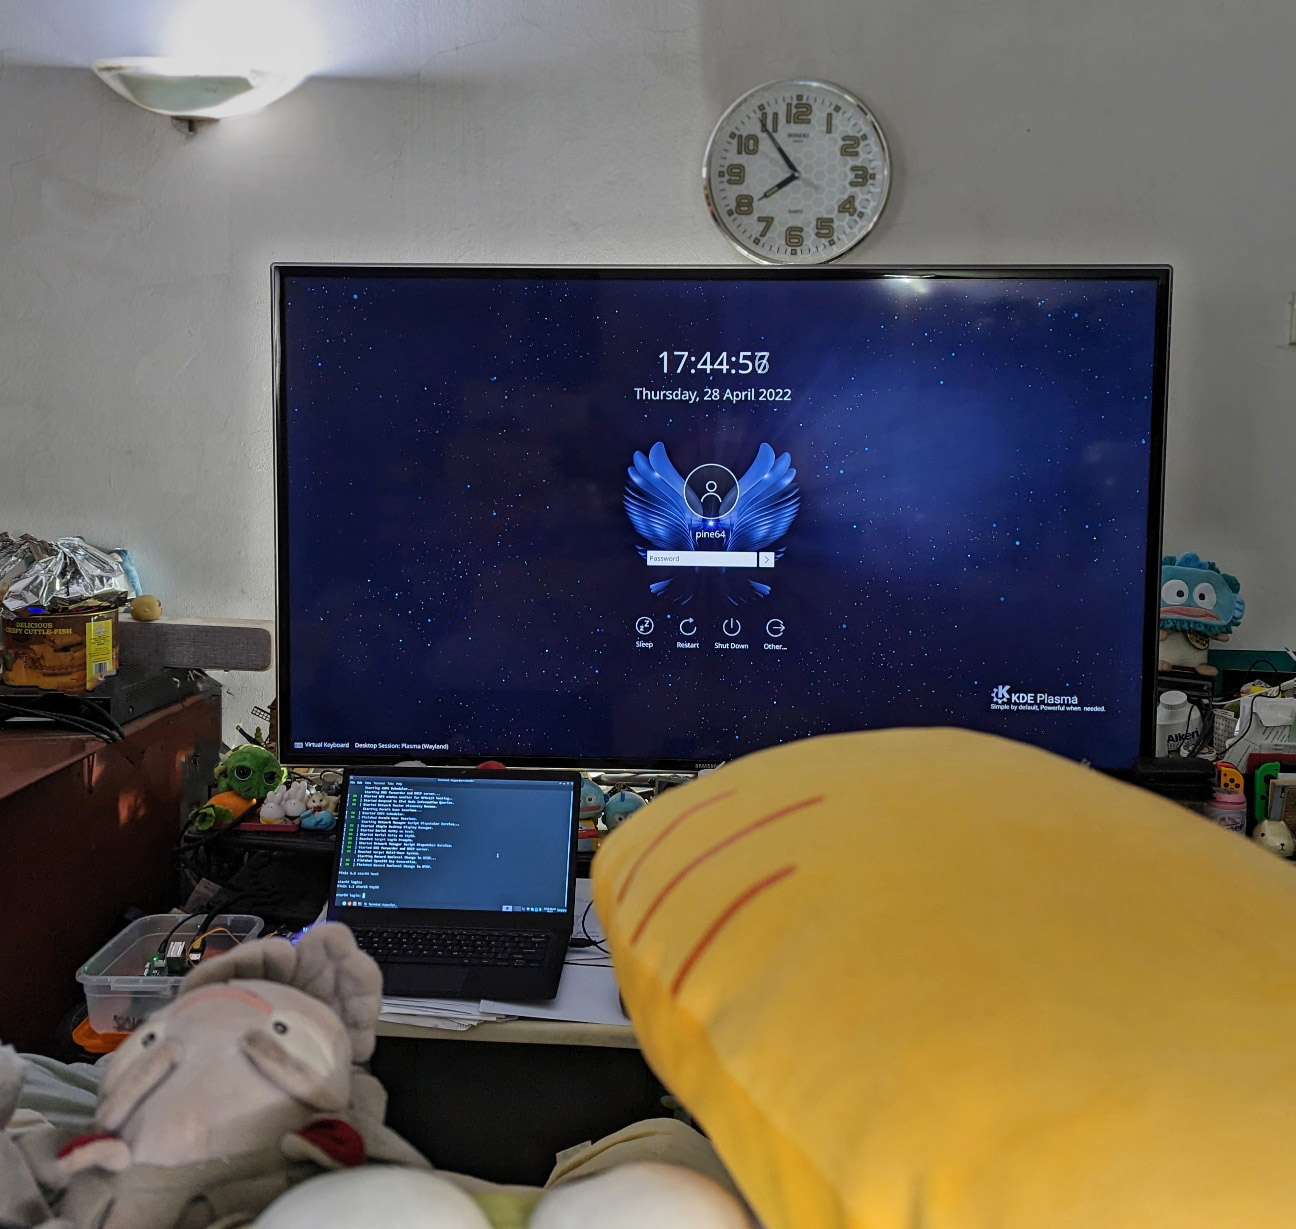
Yocto Linux with KDE Plasma on Star64 HDMI
We’re ready to build our NuttX Display Driver for JH7110?
Not quite. We have a bit more to explore, like the HDMI Controller for JH7110…
Justin (Fishwaldo) suggests that we check out the simpler HDMI Driver in U-Boot Bootloader…
When we port NuttX to the PineTab-V Tablet, we’ll need drivers for MIPI DSI and LCD Panel…
We might also need the Framebuffer Driver and Virtual Display Driver….
Sounds like a lot of work!
Yeah we’ll probably prototype our new driver in Zig before converting to C. Stay tuned for updates…
(Slightly annoying that New Zig won’t run on my Old Mac)
Today we created a Detailed Doc that explains the Inner Workings of the JH7110 Display Controller…
We deciphered the JH7110 Linux Driver Source Code
To figure out what’s inside the Direct Rendering Manager (DRM) Driver for JH7110
How it controls the Display Registers
To handle the Display Pipeline, Display Planes and Framebuffers
And how it talks to HDMI and MIPI DSI (Display Serial Interface)
So that someday we’ll implement the driver ourselves (without Linux)
I hope you’ll find this doc helpful too! Check out the next article…
Many Thanks to my GitHub Sponsors (and the awesome NuttX Community) for supporting my work! This article wouldn’t have been possible without your support.
Got a question, comment or suggestion? Create an Issue or submit a Pull Request here…
lupyuen.github.io/src/display2.md
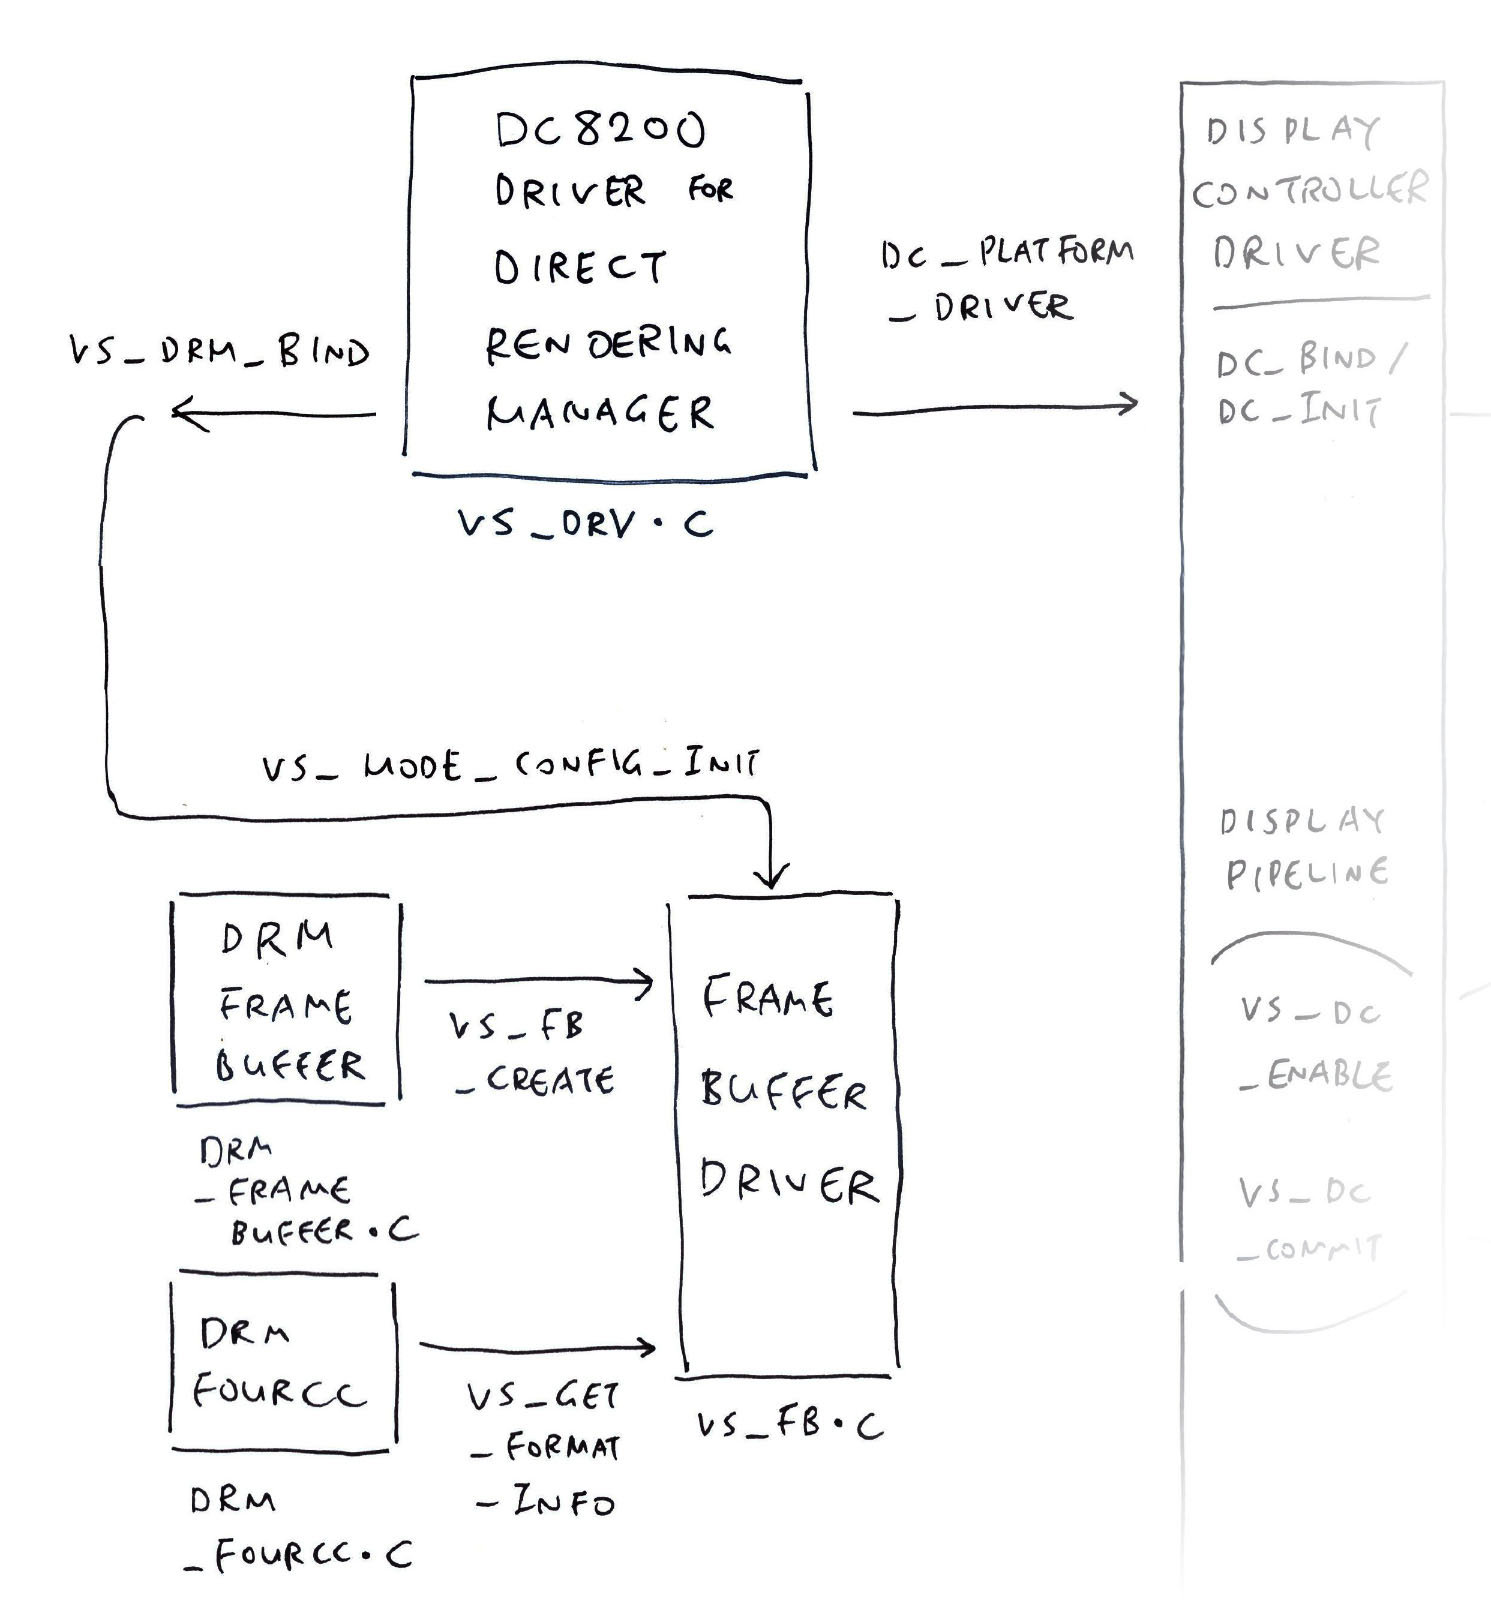
At startup, vs_drm_bind (from our DRM Driver) calls vs_mode_config_init to register the Framebuffer Driver. (Pic above)
The Framebuffer Driver exposes the following functions: vs_fb.c
// DC8200 Framebuffer Functions
static const struct drm_mode_config_funcs vs_mode_config_funcs = {
  .fb_create       = vs_fb_create,
  .get_format_info = vs_get_format_info,
  .output_poll_changed = drm_fb_helper_output_poll_changed,
  .atomic_check    = drm_atomic_helper_check,
  .atomic_commit   = drm_atomic_helper_commit,
};
Who creates the Framebuffer?
To create the Framebuffer, vs_fb_create is called by drm_framebuffer (from Linux DRM).
To get the Framebuffer Formats, vs_get_format_info is called by drm_fourcc (from Linux DRM).
Framebuffer Formats are defined in vs_formats.
JH7110 Display Subsystem Clock and Reset
Earlier we talked about our Display Controller Driver preparing the Clock and Reset Signals…
The pic above shows the Clock Signals for the JH7110 / DC8200 Display Controller. The Clock Signals and Reset Registers are defined here…
Let’s walk through dc_bind, dc_init and vs_dc_enable, to understand how they prepare the Clock and Reset Signals.
The Clock and Reset Names below don’t quite match the Official Docs above. Here’s what we tested…
At startup, our DRM Driver calls our Display Controller Driver at dc_bind to setup the Clock and Reset Signals. (Pic above)
dc_bind will do the following…
Call dc_init
Attach the I/O MMU Device
For Each Panel: Create the Display Pipeline
For Each Plane: Create the Display Plane
Update the Pitch Alignment
Disable Clock vout_top_lcd
Assert the DC8200 Reset
Disable the DC8200 Clock
Disable Clock vout_top
Disable Clock vout_clk
At startup, our DRM Driver calls our Display Controller Driver at dc_bind, which calls dc_init to setup the Clock and Reset Signals. (Pic above)
dc_init will do the following…
Enable Clock vout_clk
Deassert the DC8200 Reset
Enable Clock vout_top_lcd
Deassert vout_reset
Update the DSS Registers with this Mystery Code…
#ifdef CONFIG_DRM_I2C_NXP_TDA998X
  // tda998x-rgb2hdmi. For HDMI only?
  regmap_update_bits(dc->dss_regmap, 0x4, BIT(20), 1<<20);
#endif

#ifdef CONFIG_STARFIVE_DSI
  // For DSI only?
  regmap_update_bits(dc->dss_regmap, 0x8, BIT(3), 1<<3);
#endif
Call dc_hw_init
DRM creates the Display Pipeline (pic above) by calling our Display Controller Driver at vs_dc_enable, to prepare the Clock and Reset Signals…
vs_dc_enable will do the following…
Enable Clock vout_clk
Deassert the DC8200 Reset
Enable Clock vout_top_lcd
Update the DSS Registers with this Mystery Code…
regmap_update_bits(dc->dss_regmap, 0x4, BIT(20), 1<<20);
regmap_update_bits(dc->dss_regmap, 0x8, BIT(3), 1<<3);Call dc_hw_init
Set the Display Struct: Bus Format, Horizontal Sync, Vertical Sync, Sync Mode, Background Colour, Sync Enable and Dither Enable
If Display is MIPI DSI:
Set the Clock Rate for dc8200_pix0, dc8200_clk_pix1 and vout_top_lcd
If Display is HDMI:
Set the Clock hdmitx0_pixelclk
Call dc_hw_setup_display