📝 18 Feb 2024
QuickJS is a small JavaScript Engine that supports POSIX Functions.
Apache NuttX RTOS is a tiny Real-Time Operating System (for all kinds of devices) that’s compatible with POSIX.
Can we run QuickJS on NuttX? And Blink the LED in 4 lines of JavaScript?
// Blink the NuttX LED, on then off
const ULEDIOC_SETALL = 0x1d03;
const fd = os.open("/dev/userleds", os.O_WRONLY);
os.ioctl(fd, ULEDIOC_SETALL, 1);
os.ioctl(fd, ULEDIOC_SETALL, 0);
Let’s do it! In this article we…
Run QuickJS on Ox64 BL808 RISC-V SBC
Blink the LED by adding the ioctl() function
Reconfigure the NuttX App Stack (because it’s too tiny)
Analyse the Memory Footprint of QuickJS (Code + Data + Heap Size)
Test QuickJS in the Web Browser with NuttX Emulator (and a Simulated LED)
QuickJS is perfect for Iterative, Interactive Experiments on NuttX! We go hands-on (fingers too)…
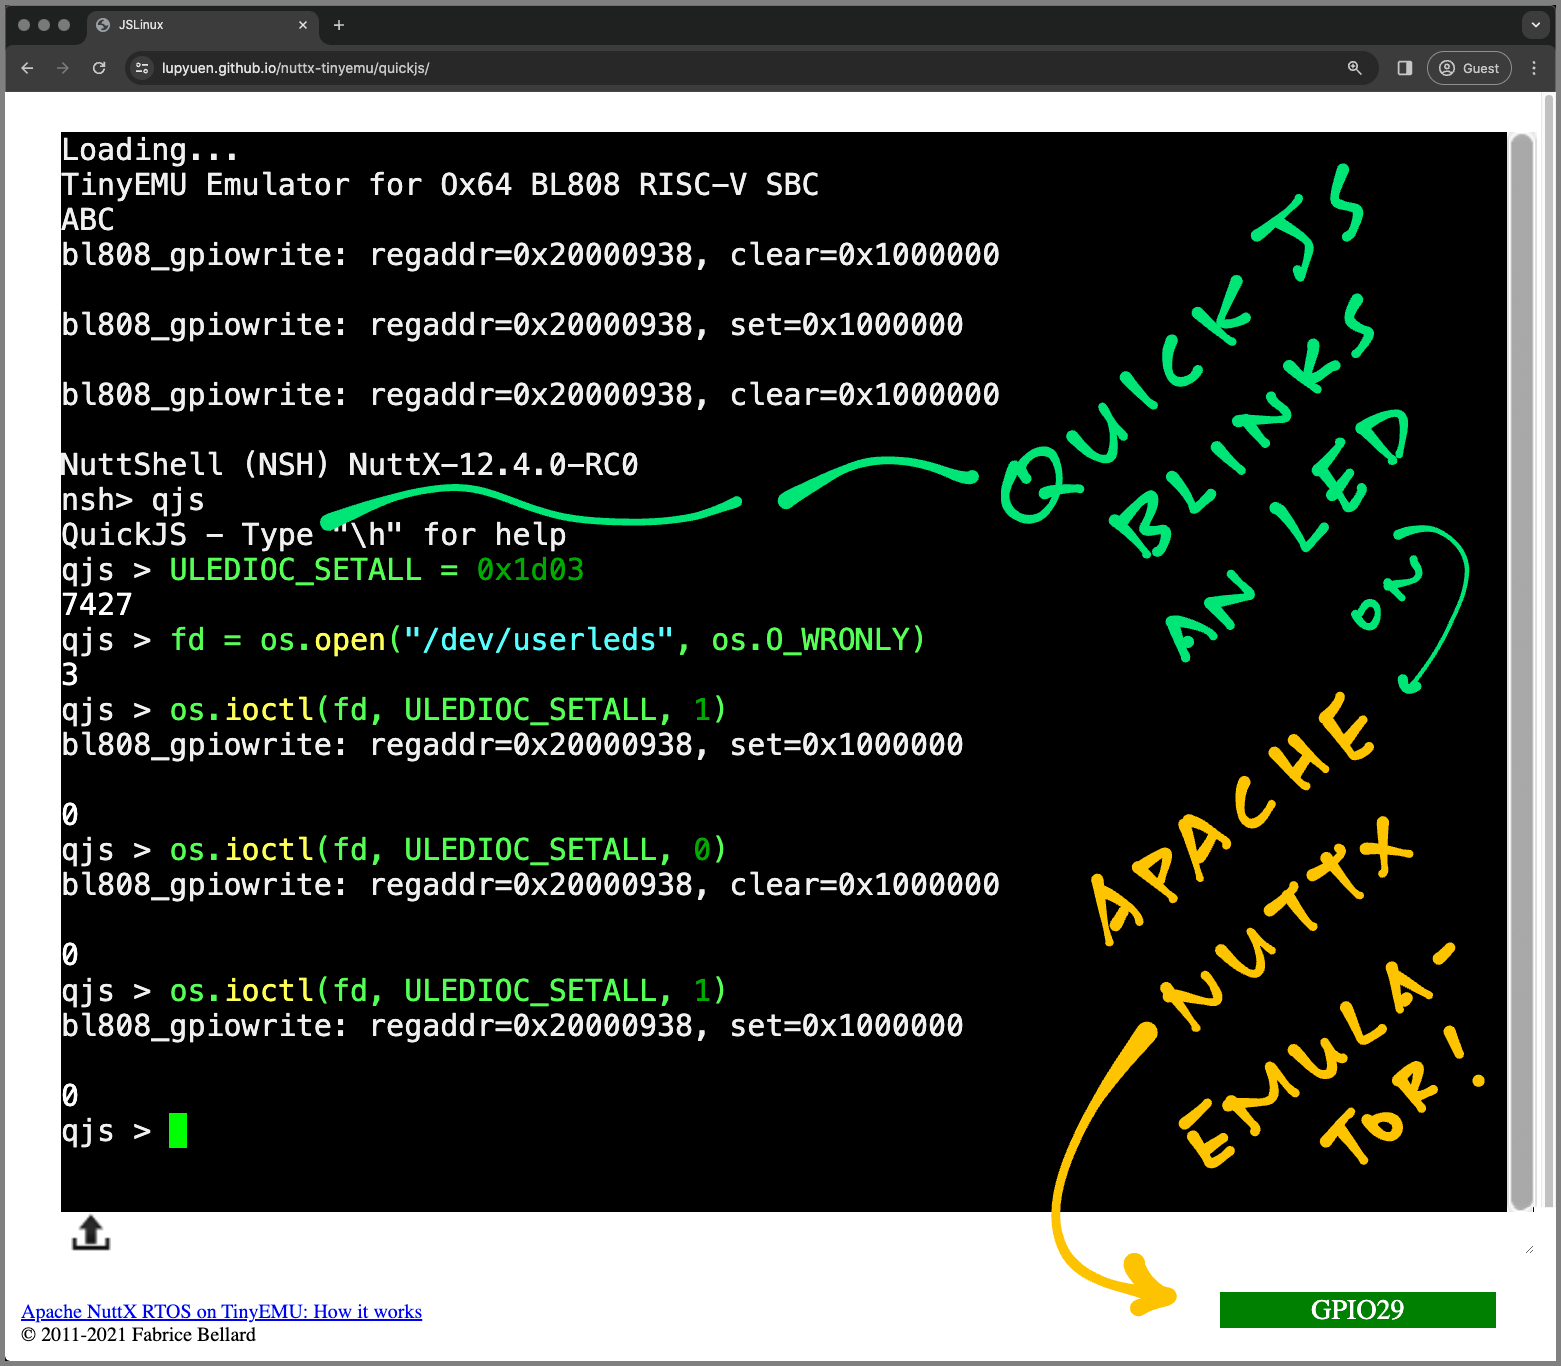
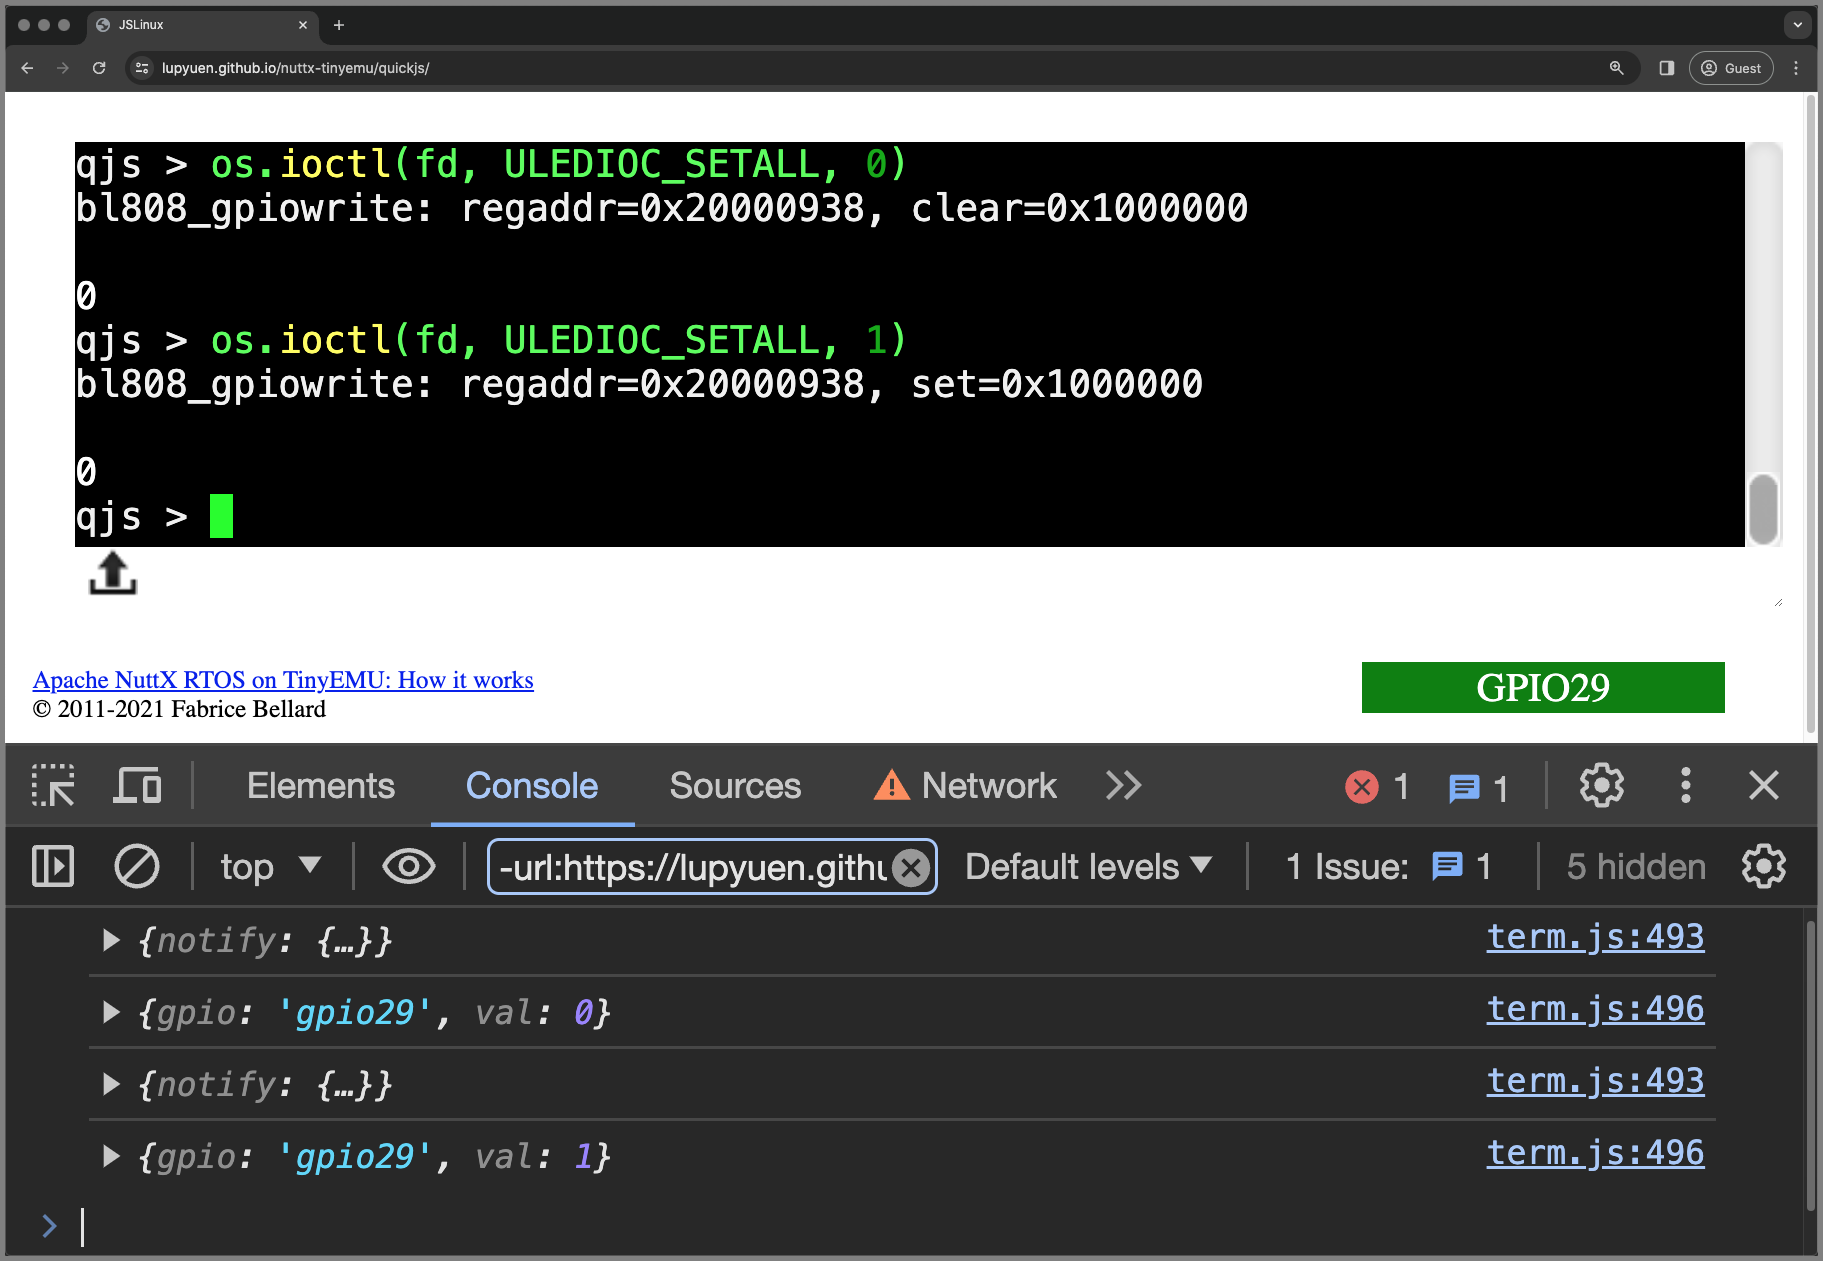
Click here to try QuickJS JavaScript Engine in NuttX Emulator (pic above)…
Now we do some Finger Exercises (sorry copy-pasta won’t work in the Emulator)
To start QuickJS: Enter this at the NSH Prompt…
qjsAt the QuickJS Prompt: We define the NuttX LED Command…
ULEDIOC_SETALL = 0x1d03Next we open the NuttX LED Device (write-only)…
fd = os.open("/dev/userleds", os.O_WRONLY)Watch what happens when we Flip On the LED…
os.ioctl(fd, ULEDIOC_SETALL, 1)GPIO 29 turns Green! (Pic above)
When we Flip Off the LED…
os.ioctl(fd, ULEDIOC_SETALL, 0)GPIO 29 goes back to Normal!
Our Demo does this…
NuttShell (NSH) NuttX-12.4.0-RC0
nsh> qjs
QuickJS - Type "\h" for help

## Define the NuttX LED Command
qjs > ULEDIOC_SETALL = 0x1d03
7427

## Open the NuttX LED Device (write-only)
qjs > fd = os.open("/dev/userleds", os.O_WRONLY)
3

## Flip LED On: GPIO 29 turns Green
qjs > os.ioctl(fd, ULEDIOC_SETALL, 1)

## Flip LED Off: GPIO 29 goes back to normal
qjs > os.ioctl(fd, ULEDIOC_SETALL, 0)Erm our fingers are hurting?
Try this Non-Interactive JavaScript with QuickJS…
nsh> qjs --std /system/bin/blink.js(Option “--std” will import the POSIX Functions)
Wow… A Blinky in JavaScript?
Yep we flipped this NuttX Blinky App from C to Interactive JavaScript!
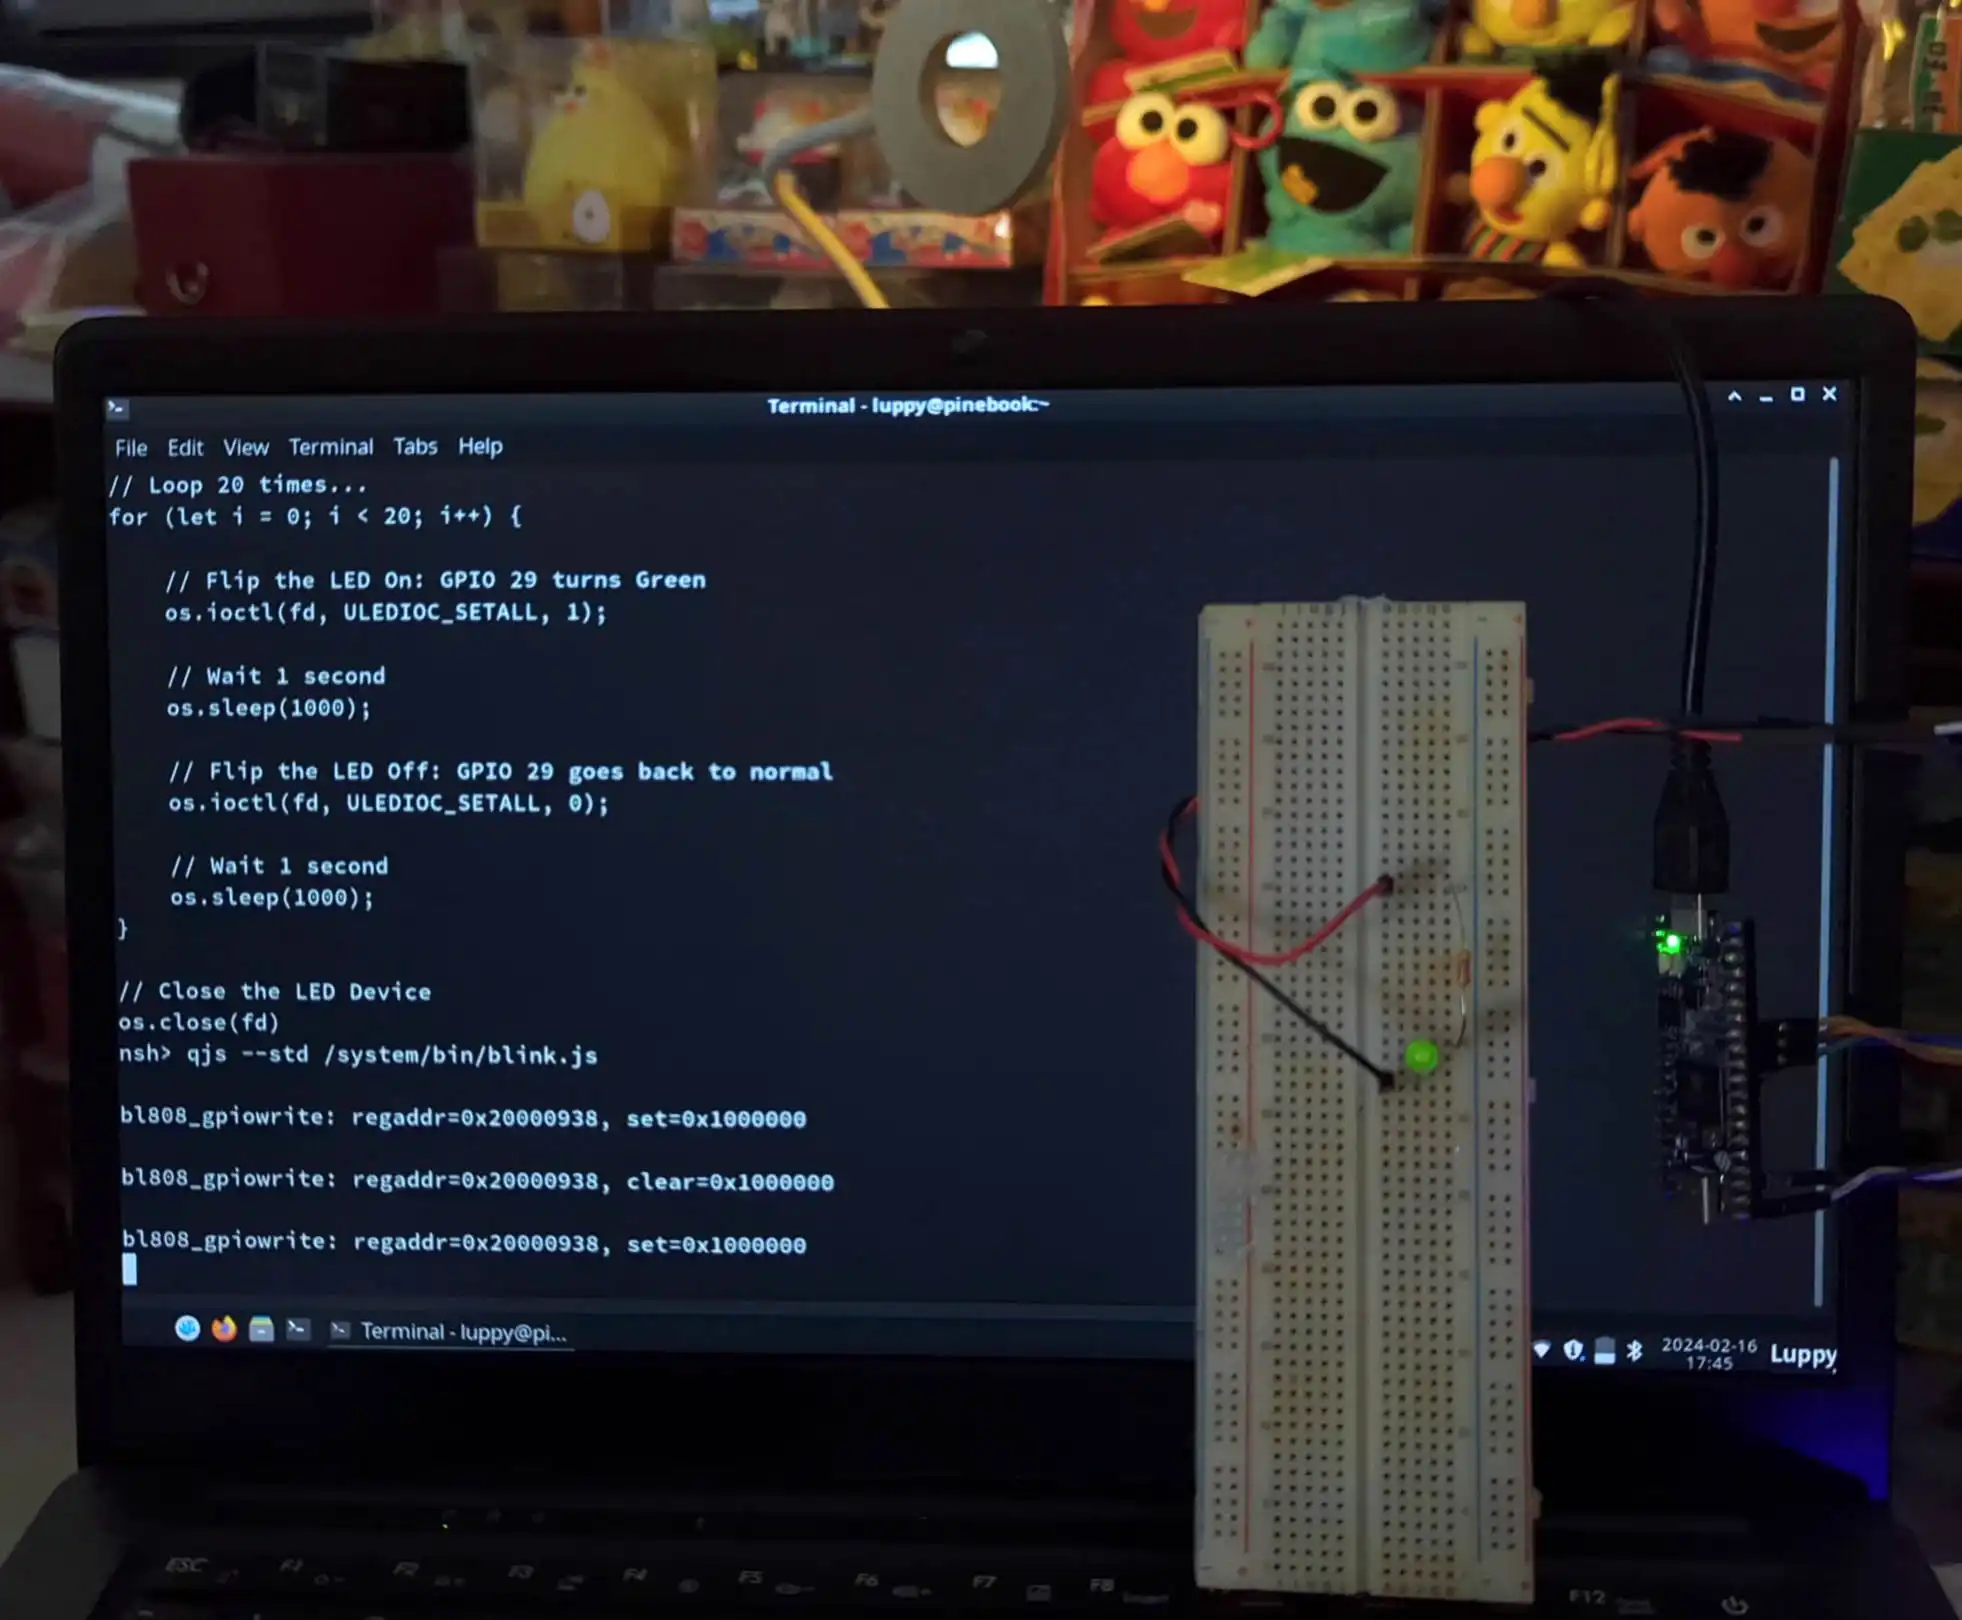
Does it work on Real Hardware?
The exact same QuickJS blinks a Real LED on Ox64 BL808 SBC, based on 64-bit RISC-V. (We’ll come back to this)
How did we make this happen? Read on to find out…
Auto-Test QuickJS with Expect Scripting
QuickJS compiles OK for NuttX?
Mostly. QuickJS compiles for NuttX with no code changes…
Then we hit some Missing Functions…
POSIX Functions: popen, pclose, pipe2, symlink, …
Dynamic Linking: dlopen, dlsym, dlclose
Math Functions: pow, floor, trunc, …
Atomic Functions: atomic_fetch_add_2, atomic_fetch_or_1, …
Can we fill in the missing functions?
POSIX Functions: The typical POSIX Functions are OK. The special ones are probably available if we tweak the Build Options for NuttX.
For now, we stick with the Basic NuttX Config and stub out the Advanced POSIX Functions.
Dynamic Linking: We won’t support Dynamic Linking for NuttX. We stubbed the missing functions.
Math Functions: We linked them with GCC Option “-lm”. The last few stragglers: We stubbed the functions.
Atomic Functions: We filled in the Missing Atomic Functions.
After these fixes, QuickJS builds OK for NuttX!
(How to build QuickJS for NuttX)
That’s plenty of stubbing. Will it break QuickJS?
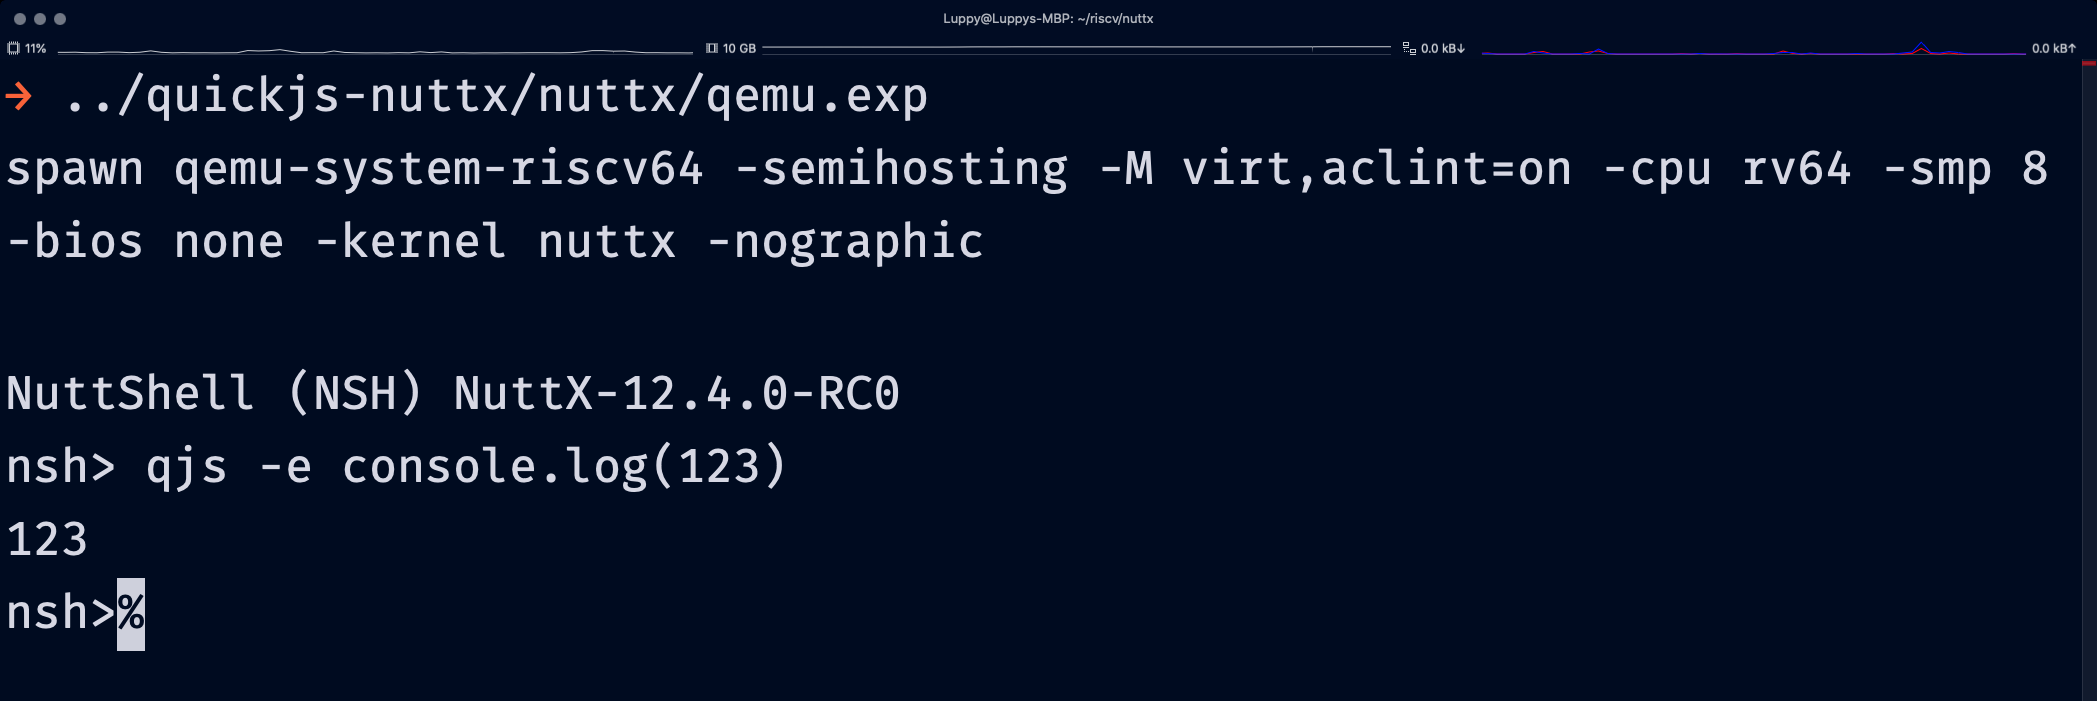
Thankfully we have Automated Testing with an Expect Script (pic above): qemu.exp
#!/usr/bin/expect
## Expect Script for Testing QuickJS with QEMU Emulator

## For every 1 character sent, wait 0.001 milliseconds
set send_slow {1 0.001}

## Start NuttX on QEMU Emulator
## Remove `-bios none` for newer versions of NuttX
spawn qemu-system-riscv64 \
  -semihosting \
  -M virt,aclint=on \
  -cpu rv64 \
  -bios none \
  -kernel nuttx \
  -nographic

## Wait for the prompt and enter this command
expect "nsh> "
send -s "qjs -e console.log(123) \r"

## Check the response...
expect {
  ## If we see this message, exit normally
  "nsh>" { exit 0 }

  ## If timeout, exit with an error
  timeout { exit 1 }
}
Before the Auto-Test, we solve the Auto-Crash…
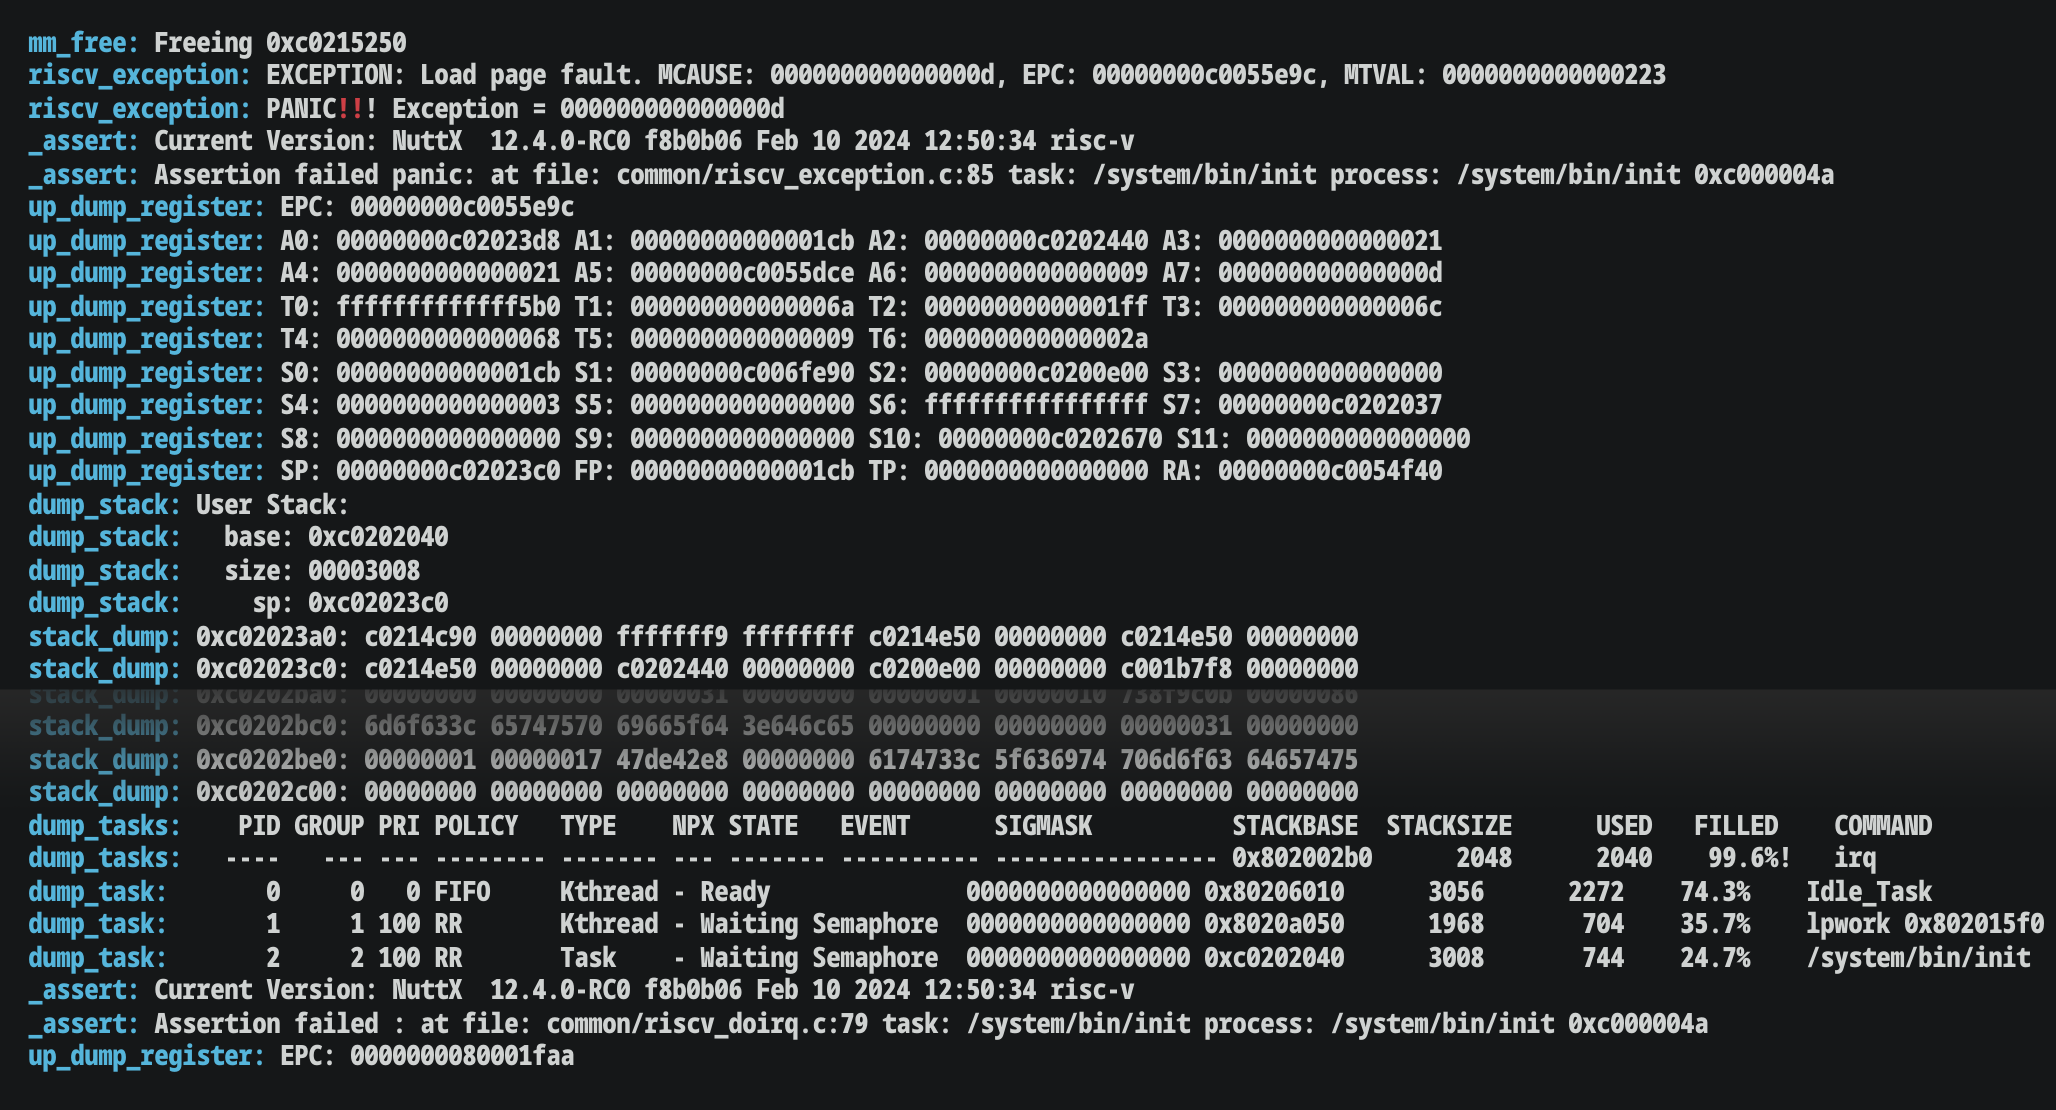
Loopy Stack Trace probably means Stack Full
QuickJS builds OK for NuttX. Does it run?
Sorry nope! QuickJS ran into Bizarre Crashes on NuttX (with looping Stack Traces, pic above)…
Strange Pointers (0xFFFF_FFFF) while reading the JavaScript Atoms
Unexpected Characters (0xFF) appeared in our JavaScript Strings
Malloc was Erasing our JavaScript Strings
Heap Memory got weirdly corrupted (even printf() failed)
After plenty of headscratching troubleshooting, this Vital Clue suddenly pops up…
riscv_exception: EXCEPTION: Load page fault. MCAUSE: 000000000000000d, EPC: 00000000c0006d52, MTVAL: ffffffffffffffff
PID GRP PRI POLICY TYPE NPX STATE EVENT STACKBASE SIZE USED FILLED COMMAND
0x802002b0 2048 2040 99.6%! irq
0 0 0 FIFO Kthread - Ready 0x80206010 3056 1856 60.7% Idle_Task
1 1 100 RR Kthread - Waiting Semaphore 0x8020a050 1968 704 35.7% lpwork 0x802015f0 0x80201618
2 2 100 RR Task - Waiting Semaphore 0xc0202040 3008 744 24.7% /system/bin/init
3 3 100 RR Task - Running 0xc0202050 1968 1968 100.0%! qjs }¼uq¦ü®²äÅThe last line shows that the QuickJS Stack (2 KB) is 100% Full! (With the Command Line incorrigibly corrupted)
We follow these steps to increase the App Stack Size…
Enter “make menuconfig”
Select “Library Routines > Program Execution Options”
Set “Default task_spawn Stack Size” to 65536
(That’s 64 KB)
Select “Library Routines > Thread Local Storage (TLS)”
Set “Maximum Stack Size (Log2)” to 16
(Because 2^16 = 64 KB)
Which becomes this in our NuttX Build Config: ox64/nsh/defconfig
## Upsize the App Stack to 64 KB
CONFIG_POSIX_SPAWN_DEFAULT_STACKSIZE=65536
CONFIG_TLS_LOG2_MAXSTACK=16
QuickJS crashes no more!
Lesson Learnt: If the NuttX Stack Dump loops forever, we’re probably Out Of Stack Space.
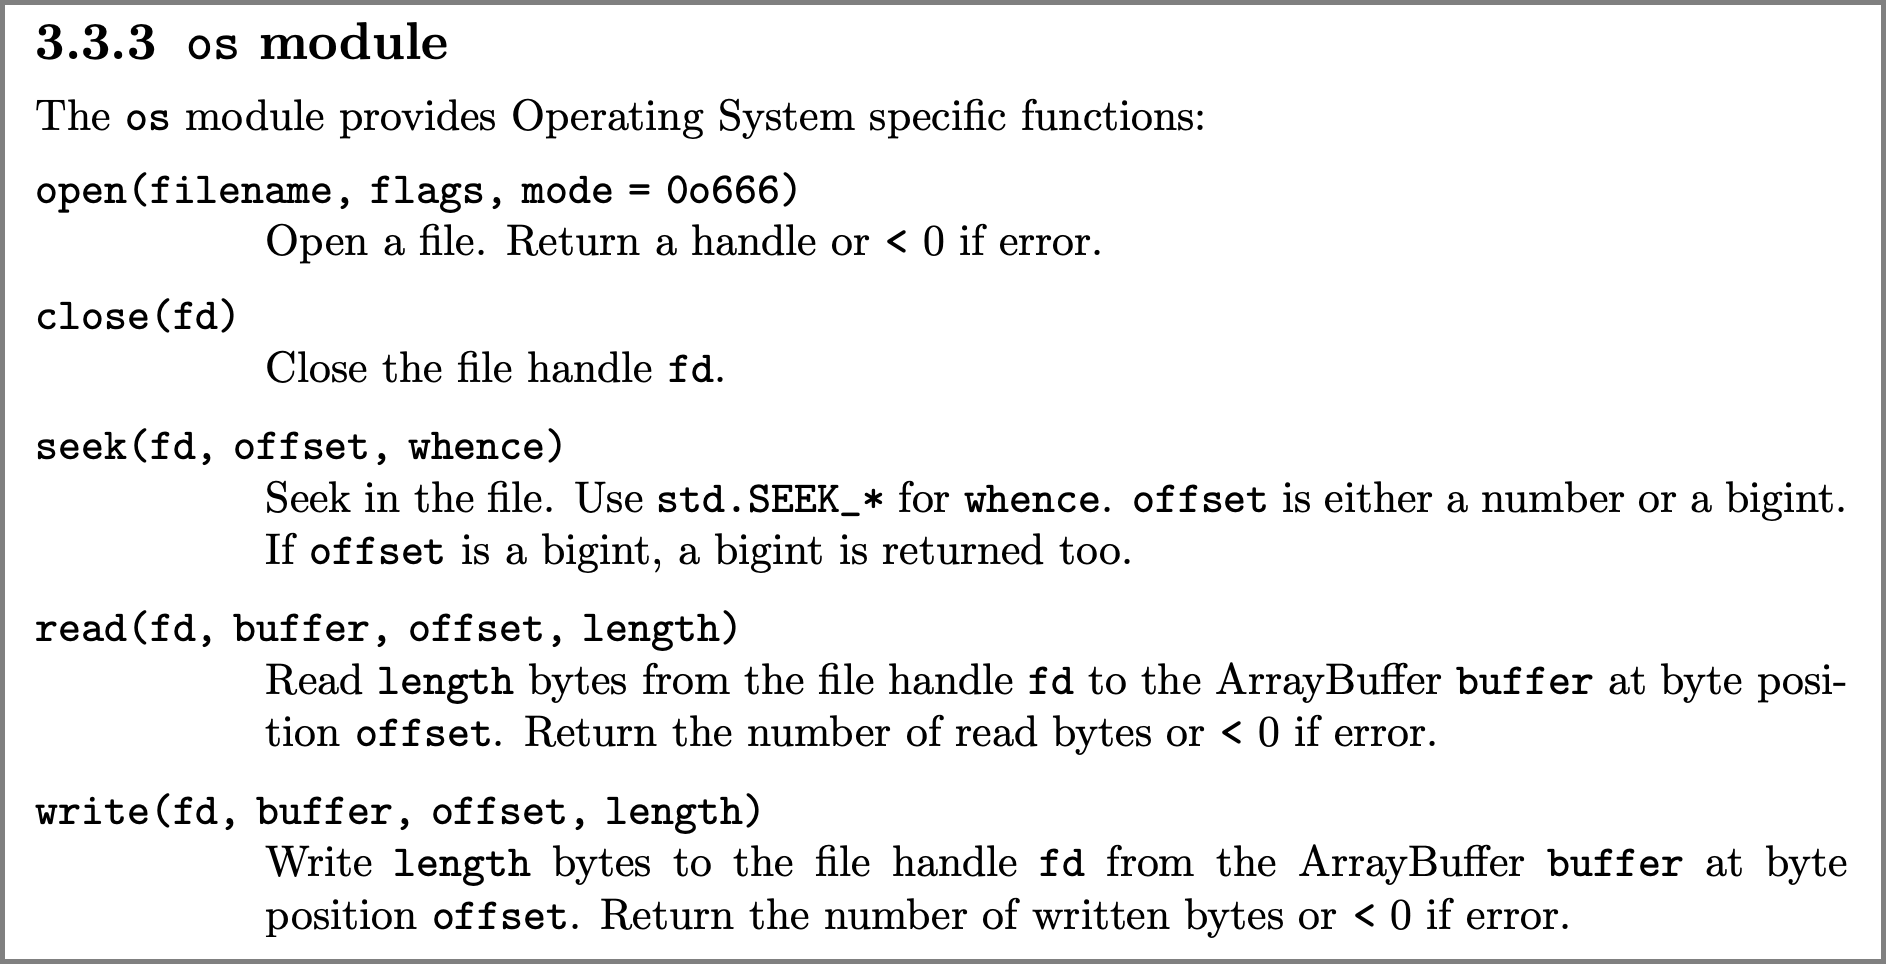
ioctl() doesn’t appear in the QuickJS Docs? (Pic above)
// Flip On the NuttX LED
const ULEDIOC_SETALL = 0x1d03;
const fd = os.open("/dev/userleds", os.O_WRONLY);
os.ioctl(fd, ULEDIOC_SETALL, 1);
That’s because we added ioctl() to QuickJS: quickjs-libc.c
// List of JavaScript Functions in `os` Module
static const JSCFunctionListEntry js_os_funcs[] = {
  ...
  // Declare our ioctl() function...
  JS_CFUNC_DEF(
    "ioctl",     // Function Name
    3,           // Parameters
    js_os_ioctl  // Implemented here
  ),
};

// Define our ioctl() function
static JSValue js_os_ioctl(JSContext *ctx, JSValueConst this_val, int argc, JSValueConst *argv) {
  int fd, req;       // ioctl() File Descriptor and Request Number
  int64_t arg, ret;  // ioctl() Parameter and Return Value
  BOOL is_bigint;    // True if we're using BigInt

  // First Arg is ioctl() File Descriptor (int32)
  if (JS_ToInt32(ctx, &fd, argv[0]))
    return JS_EXCEPTION;

  // Second Arg is ioctl() Request Number (int32)
  if (JS_ToInt32(ctx, &req, argv[1]))
    return JS_EXCEPTION;

  // Third Arg is ioctl() Parameter (int64)
  // TODO: What if it's int32? What about passing a Pointer to a C Struct?
  is_bigint = JS_IsBigInt(ctx, argv[2]);
  if (JS_ToInt64Ext(ctx, &arg, argv[2]))
    return JS_EXCEPTION;

  // Call NuttX ioctl()
  ret = ioctl(fd, req, arg);
  if (ret == -1)
    ret = -errno;

  // Return the Result as BigInt or Normal Integer
  if (is_bigint)
    return JS_NewBigInt64(ctx, ret);
  else
    return JS_NewInt64(ctx, ret);
}
After adding this code to QuickJS, ioctl() comes to life…
NuttShell (NSH) NuttX-12.4.0-RC0
nsh> qjs
QuickJS - Type "\h" for help

qjs > os.ioctl
function ioctl()

qjs > os.ioctl(1,2,3)
-25

qjs > os.ioctl(100,2,3)
-9
We test ioctl() on real hardware…
We added ioctl() to QuickJS. Does it work?
We test ioctl() on a Real Device with a Real LED: Ox64 BL808 RISC-V SBC. Right after these tweaks…
Add the GPIO Driver for Ox64 BL808
Add the LED Driver for Ox64 BL808
Increase the App Stack Size from 2 KB to 64 KB
Increase the RAM Disk Region from 16 MB to 40 MB
Patch the leds app for testing LED Driver
(Because task_create() is missing from Kernel Mode)
Follow these steps to download (or build) NuttX and QuickJS…
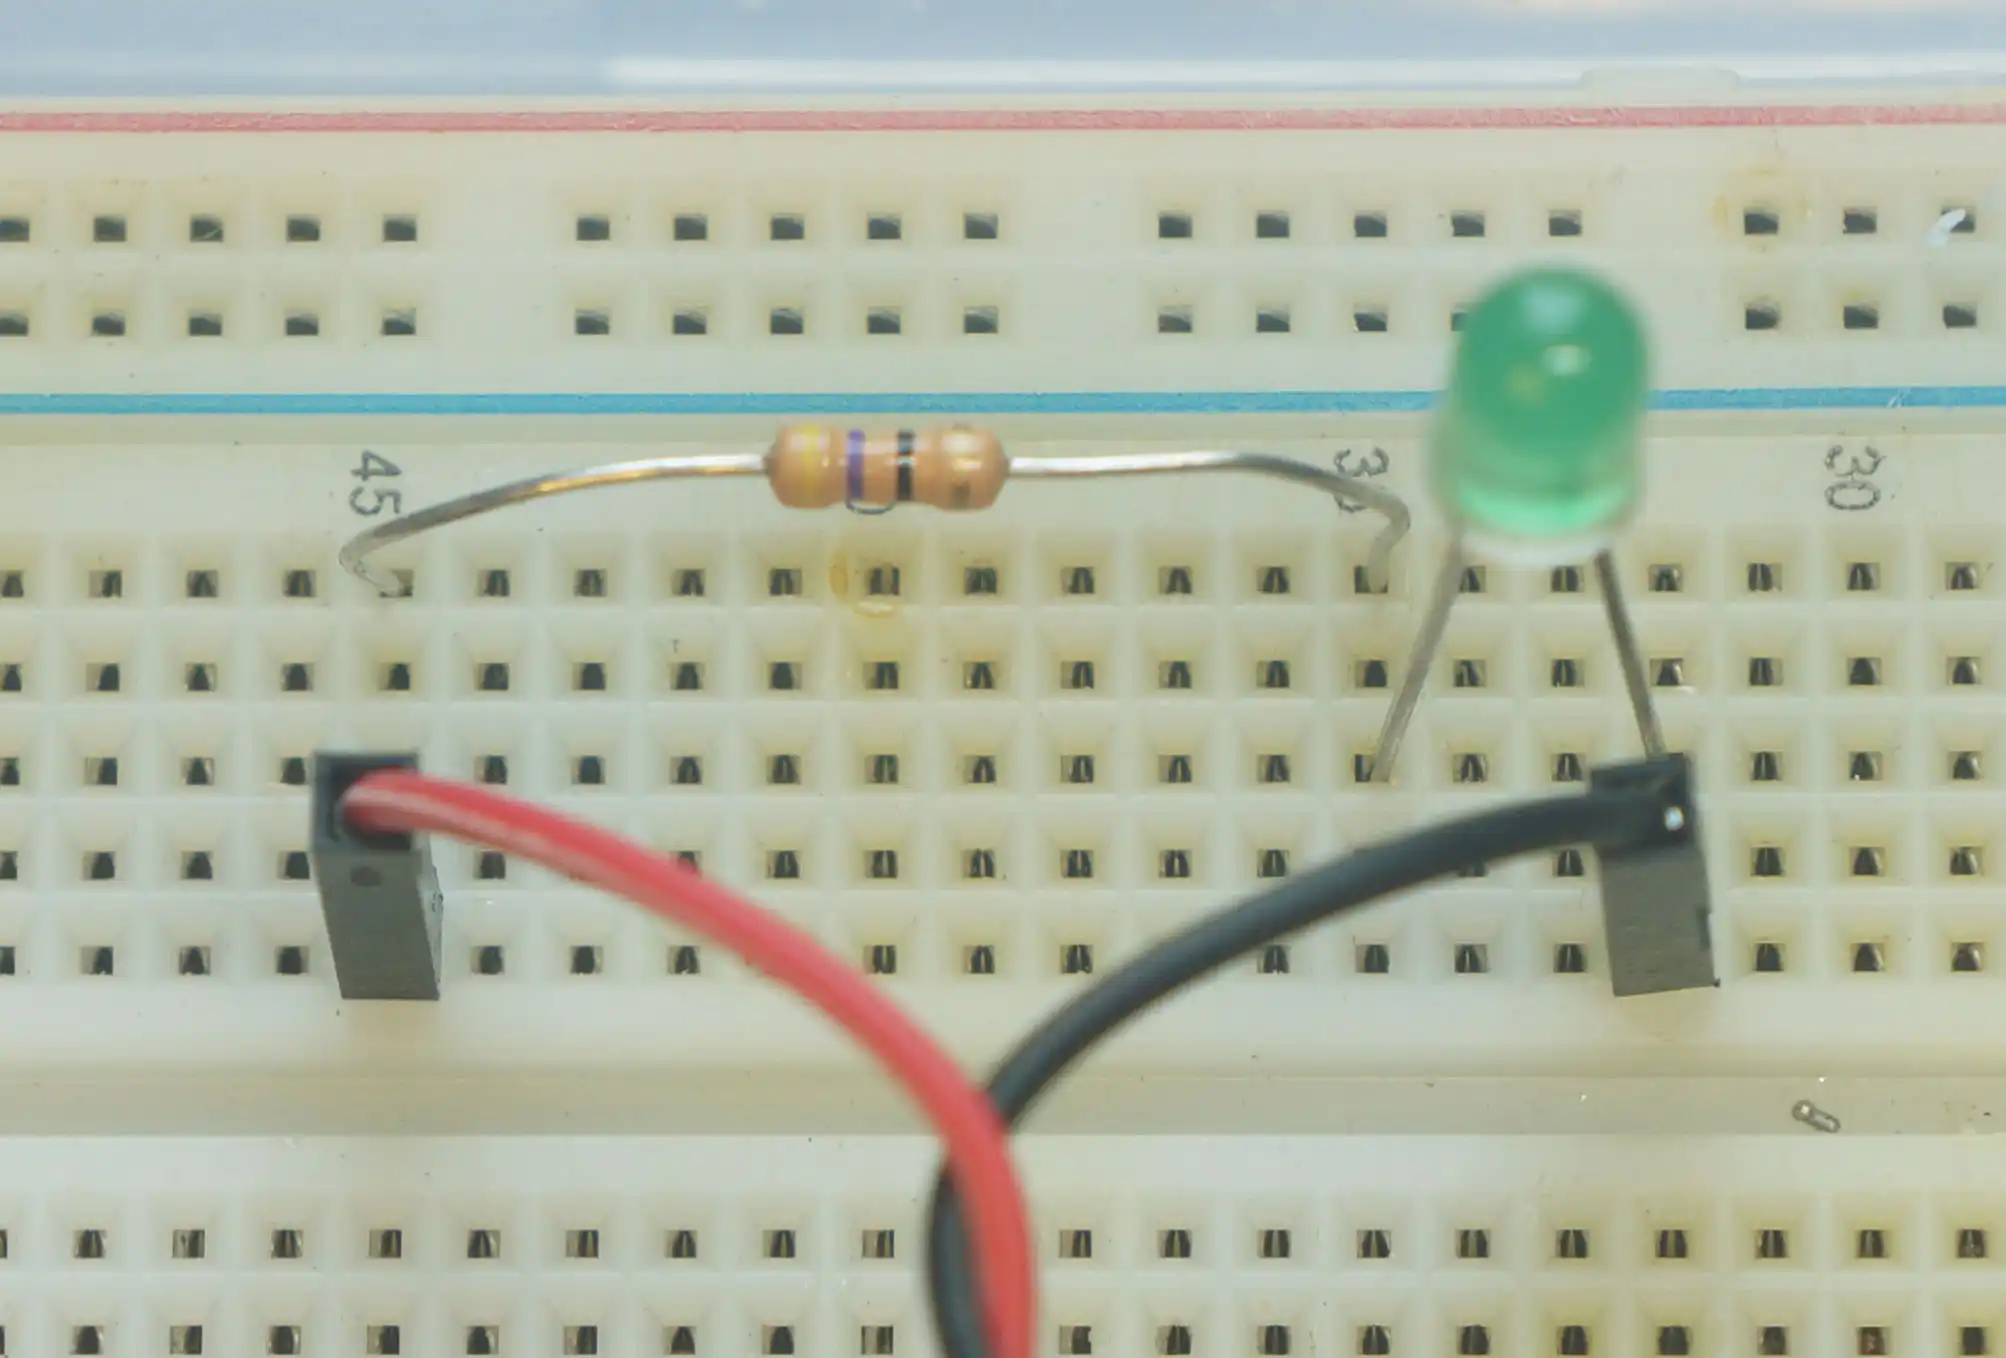
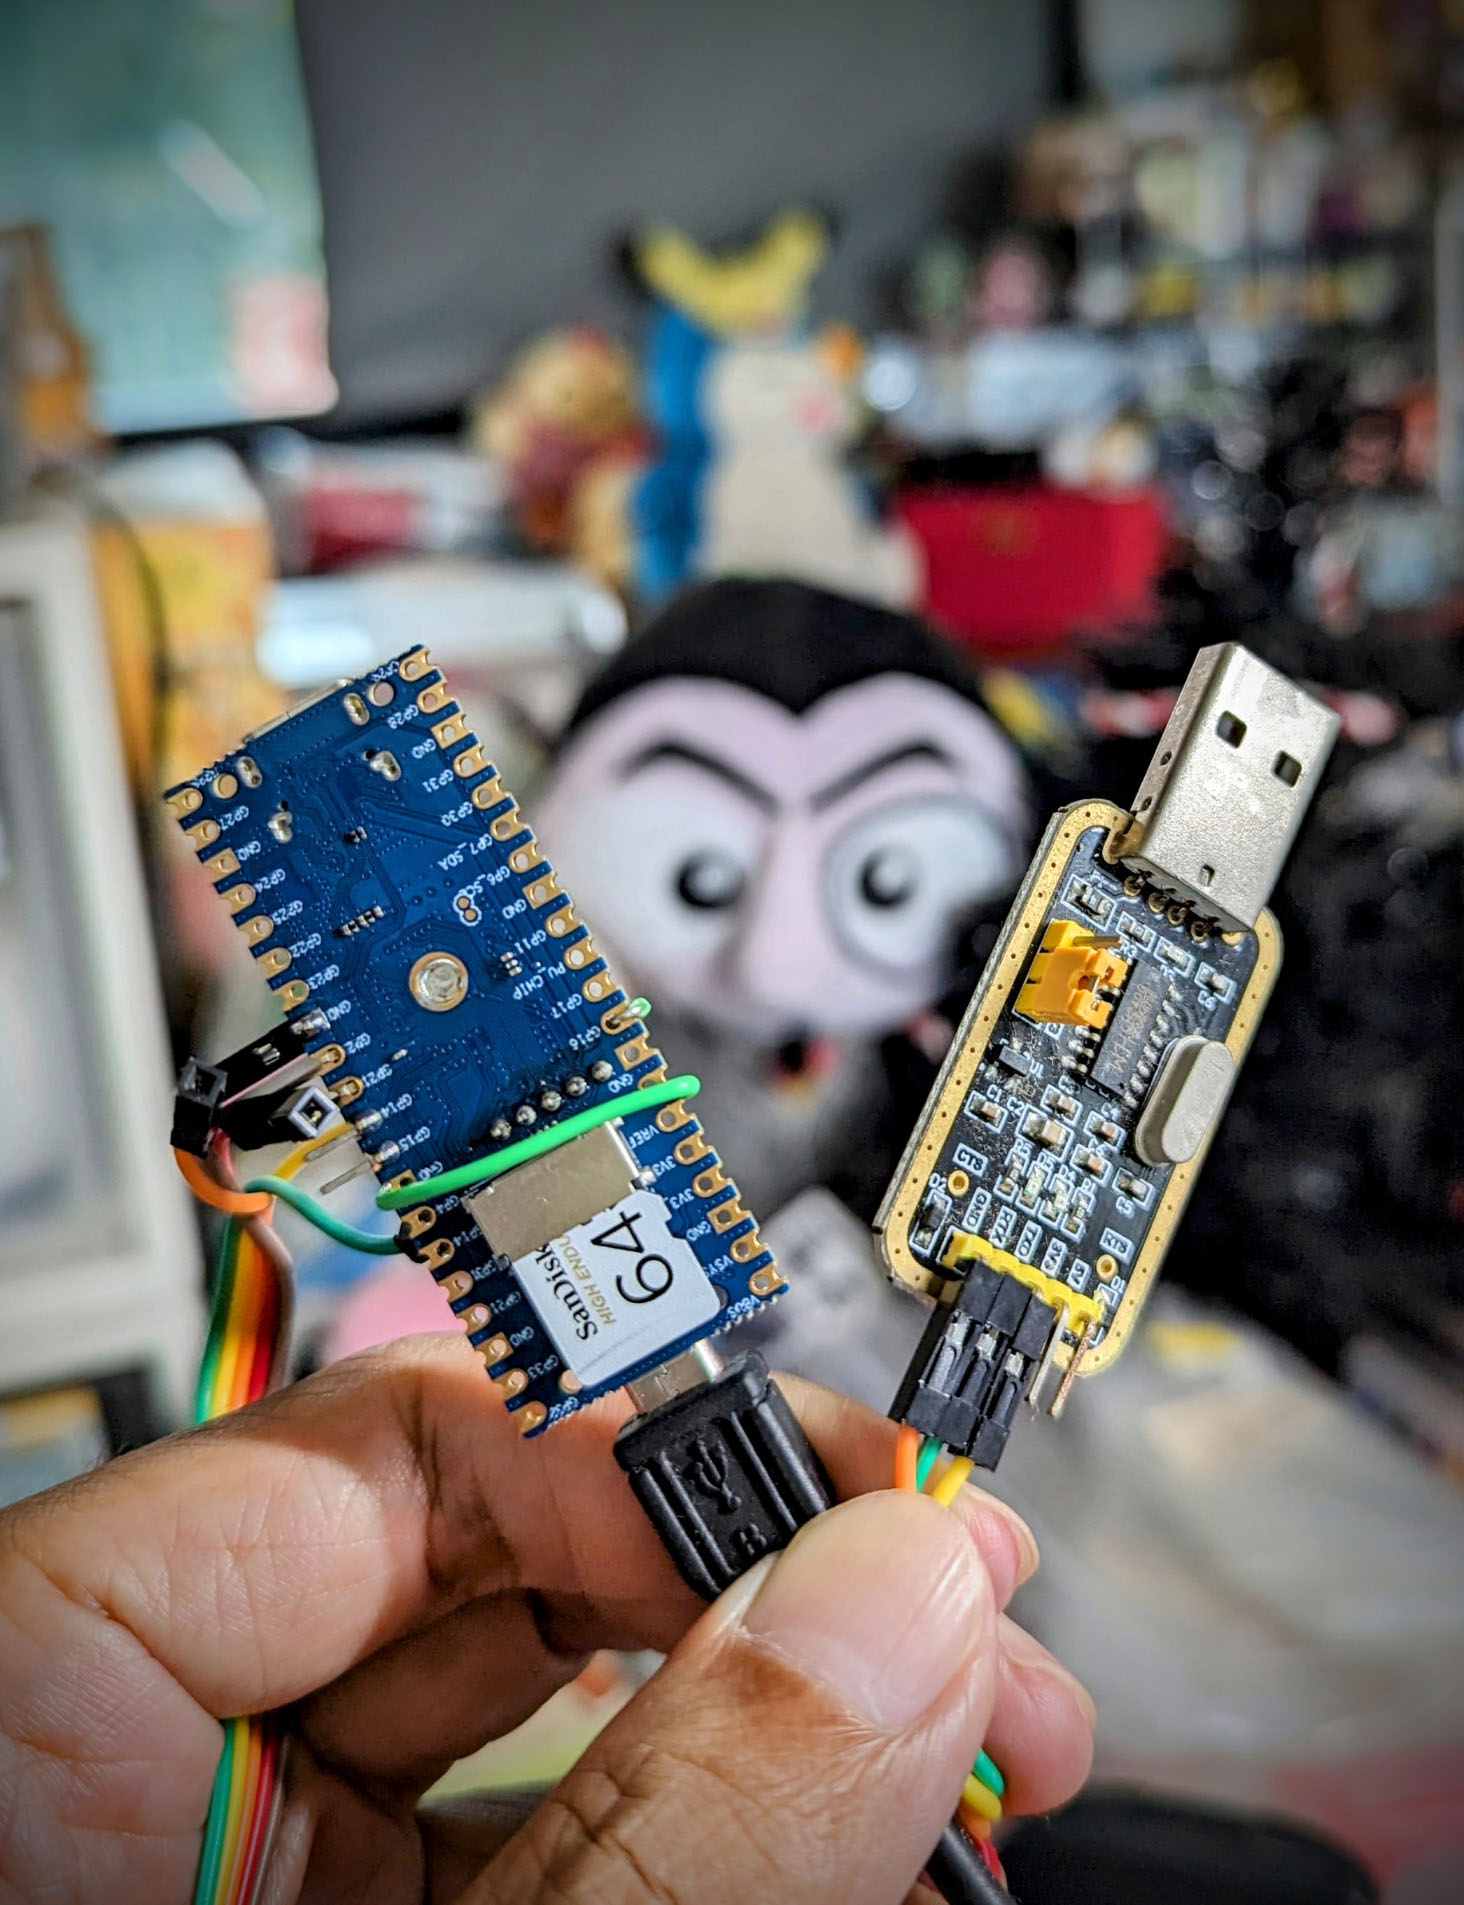
Connect an LED to Ox64 SBC at GPIO 29, Pin 21 (pic above)…
| Connect | To | Wire |
|---|---|---|
| Ox64 Pin 21 (GPIO 29) | Resistor (47 Ohm) | Red |
| Resistor (47 Ohm) | LED + (Curved Edge) | Breadboard |
| LED - (Flat Edge) | Ox64 Pin 23 (GND) | Black |
(Resistor is 47 Ohm, yellow-purple-black-gold, almost Karma Chameleon)
Boot NuttX on Ox64. Enter these commands…
NuttShell (NSH) NuttX-12.4.0-RC0
nsh> qjs
QuickJS - Type "\h" for help

## Define the NuttX LED Command
qjs > ULEDIOC_SETALL = 0x1d03
7427

## Open the NuttX LED Device (write-only)
qjs > fd = os.open("/dev/userleds", os.O_WRONLY)
3

## Flip LED to On
qjs > os.ioctl(fd, ULEDIOC_SETALL, 1)
bl808_gpiowrite: regaddr=0x20000938, set=0x1000000
0

## Flip LED to Off
qjs > os.ioctl(fd, ULEDIOC_SETALL, 0)
bl808_gpiowrite: regaddr=0x20000938, clear=0x1000000
0
(Or run the Blinky JavaScript)
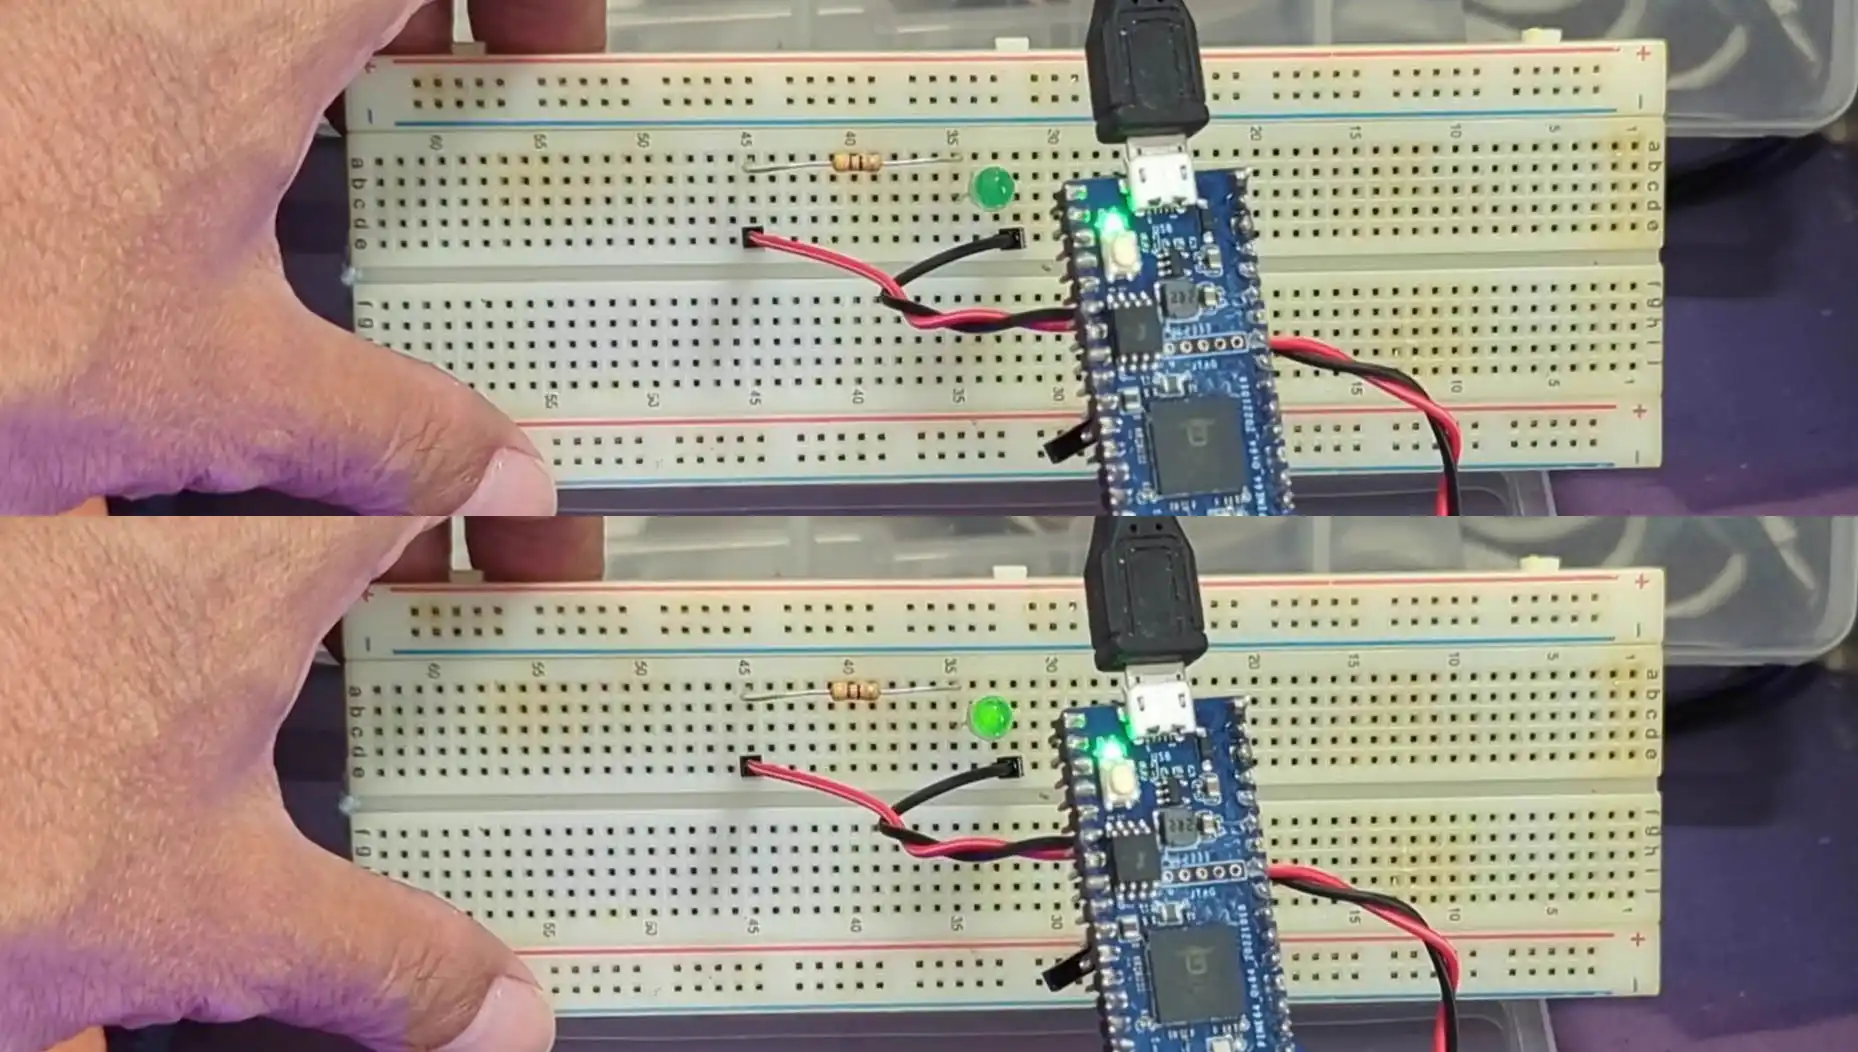
Yep ioctl() works great on a Real Device, with a Real LED!
If we don’t have an Ox64 SBC?
No worries, the exact same steps will work for QEMU Emulator (64-bit RISC-V)…
Add the LED Driver for QEMU
Increase the App Stack Size from 2 KB to 64 KB
Patch the leds app for testing LED Driver
When we download (or build) NuttX and QuickJS…
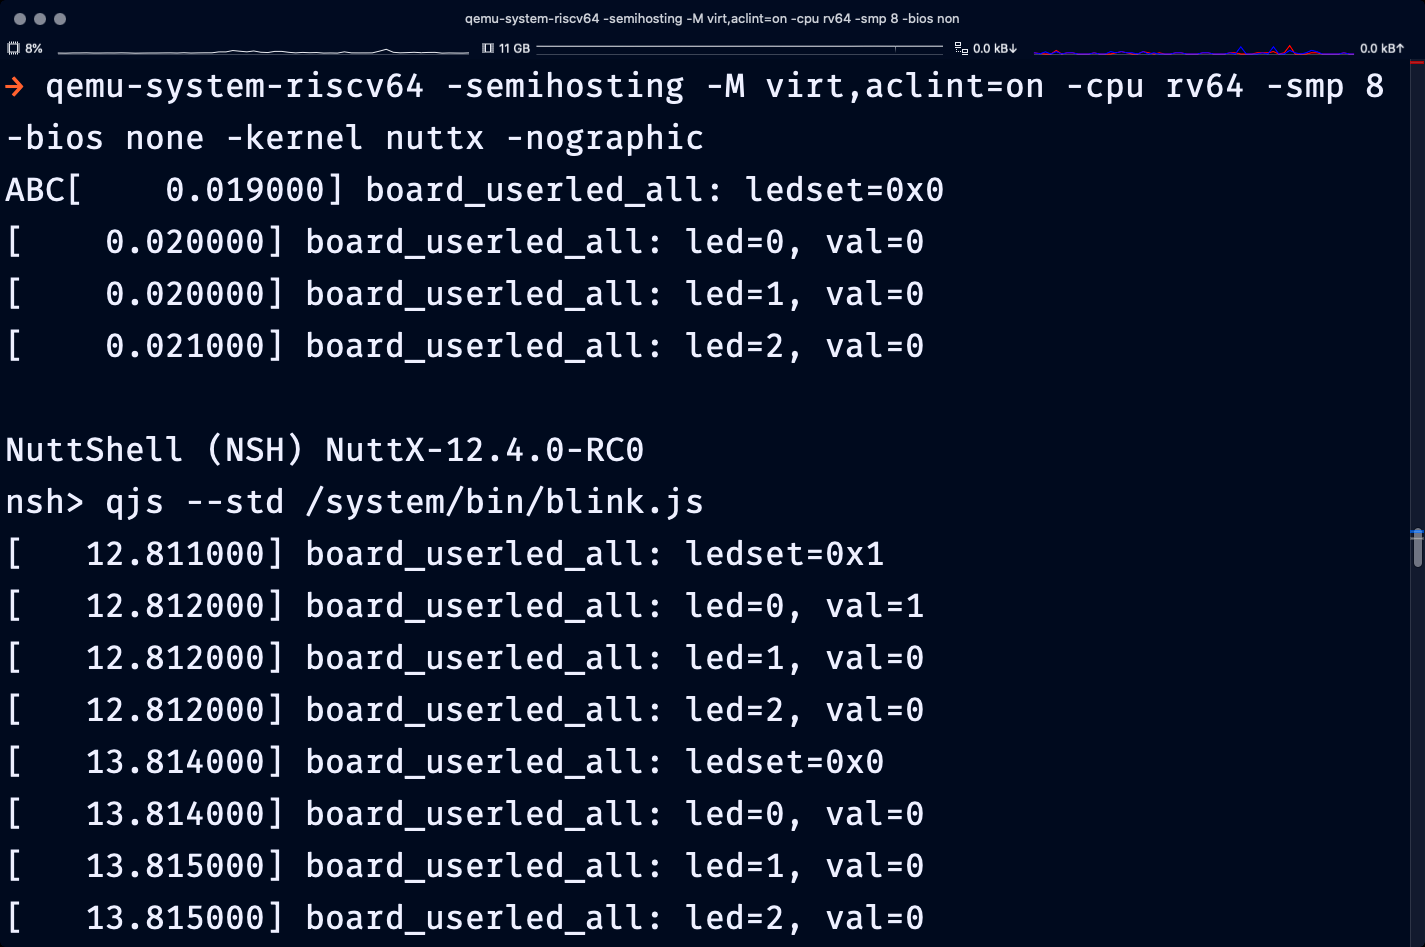
QuickJS blinks a Simulated LED on NuttX QEMU…
## Start NuttX on QEMU
## Remove `-bios none` for newer versions of NuttX
$ qemu-system-riscv64 -semihosting -M virt,aclint=on -cpu rv64 -bios none -kernel nuttx -nographic

## Run our Blinky JavaScript with QuickJS
NuttShell (NSH) NuttX-12.4.0-RC0
nsh> qjs --std /system/bin/blink.js
led=0, val=1
led=0, val=0
led=0, val=1
To Exit QEMU: Press Ctrl-A then x
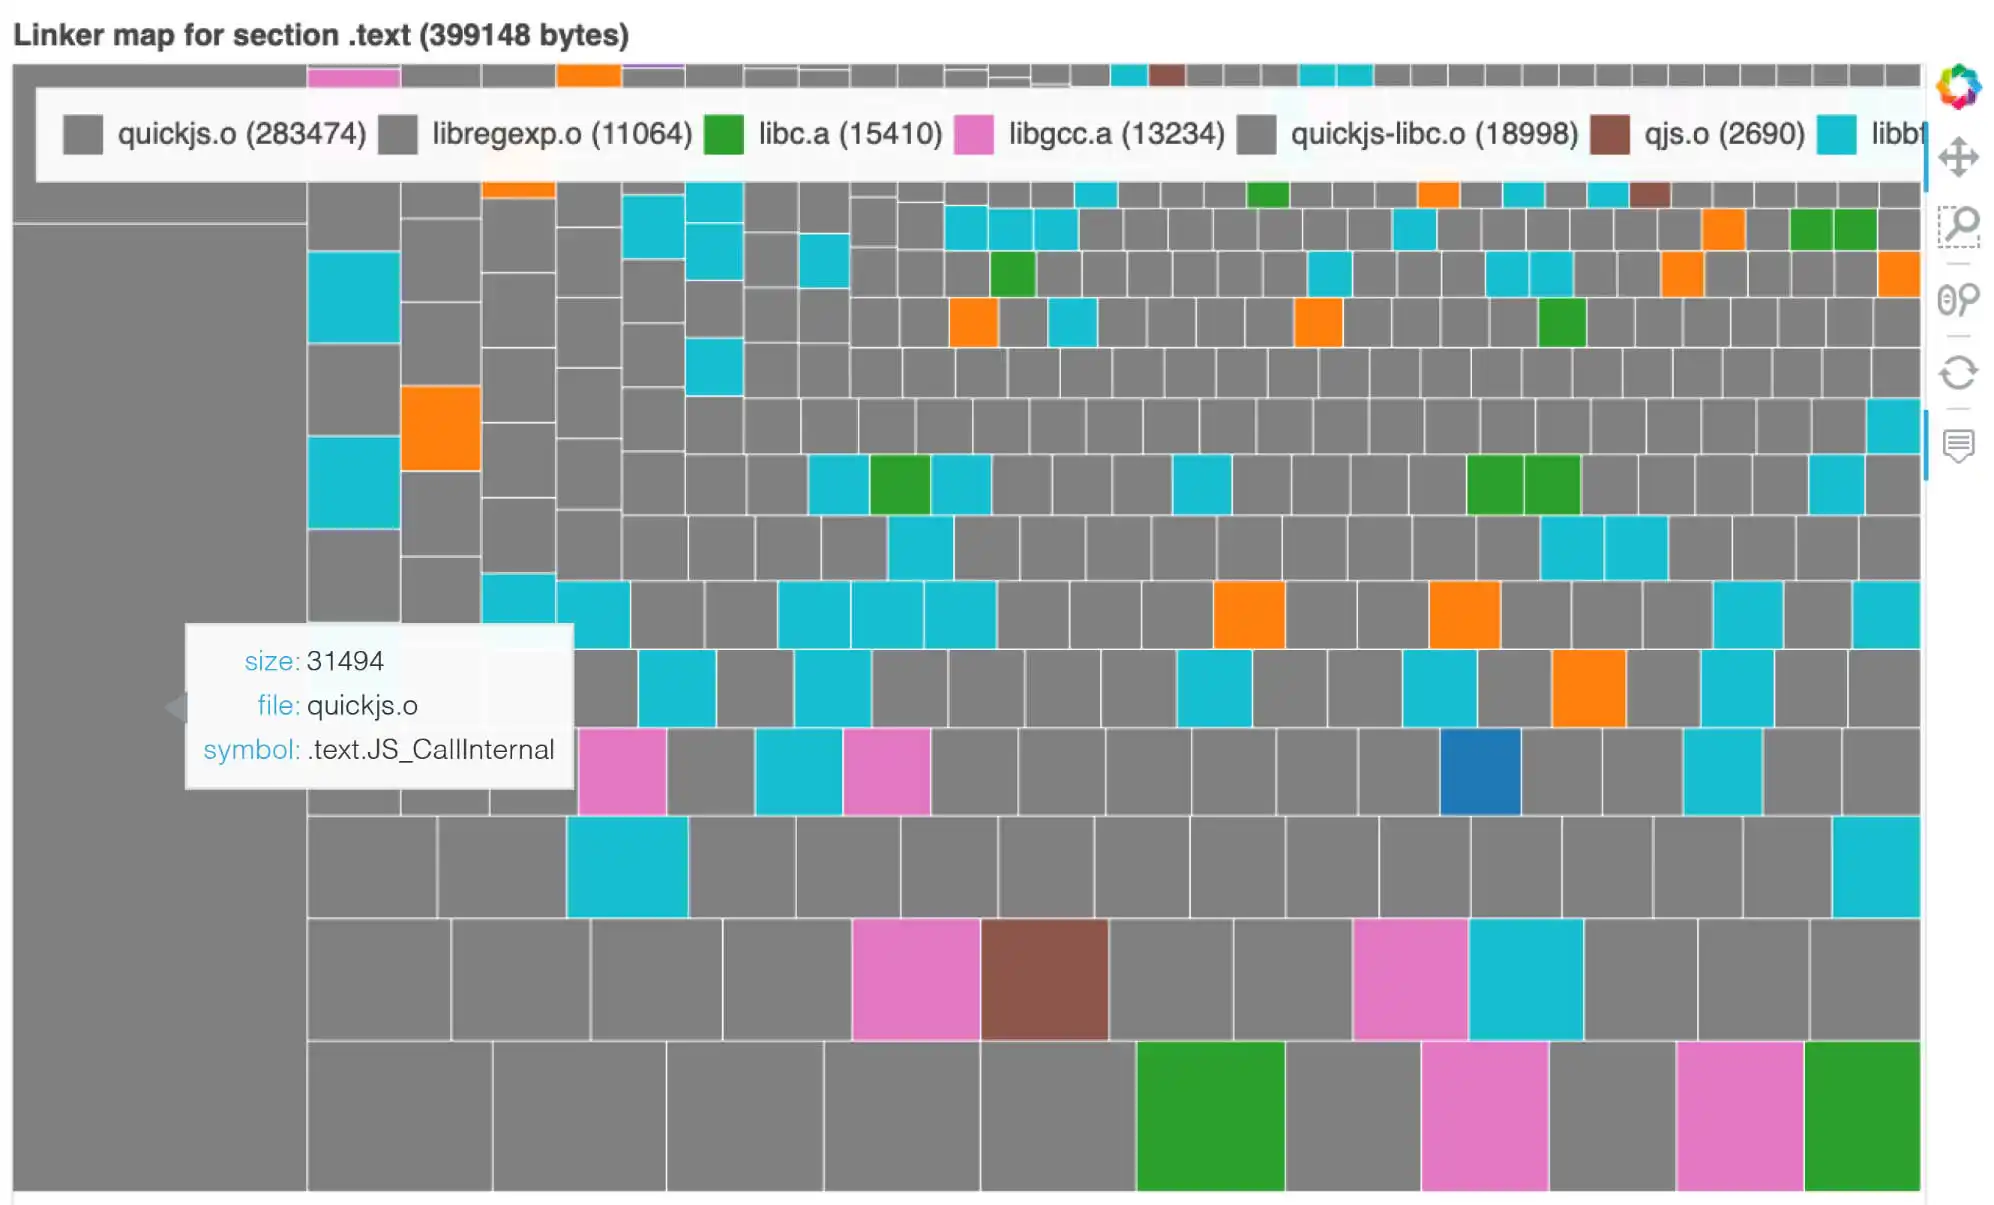
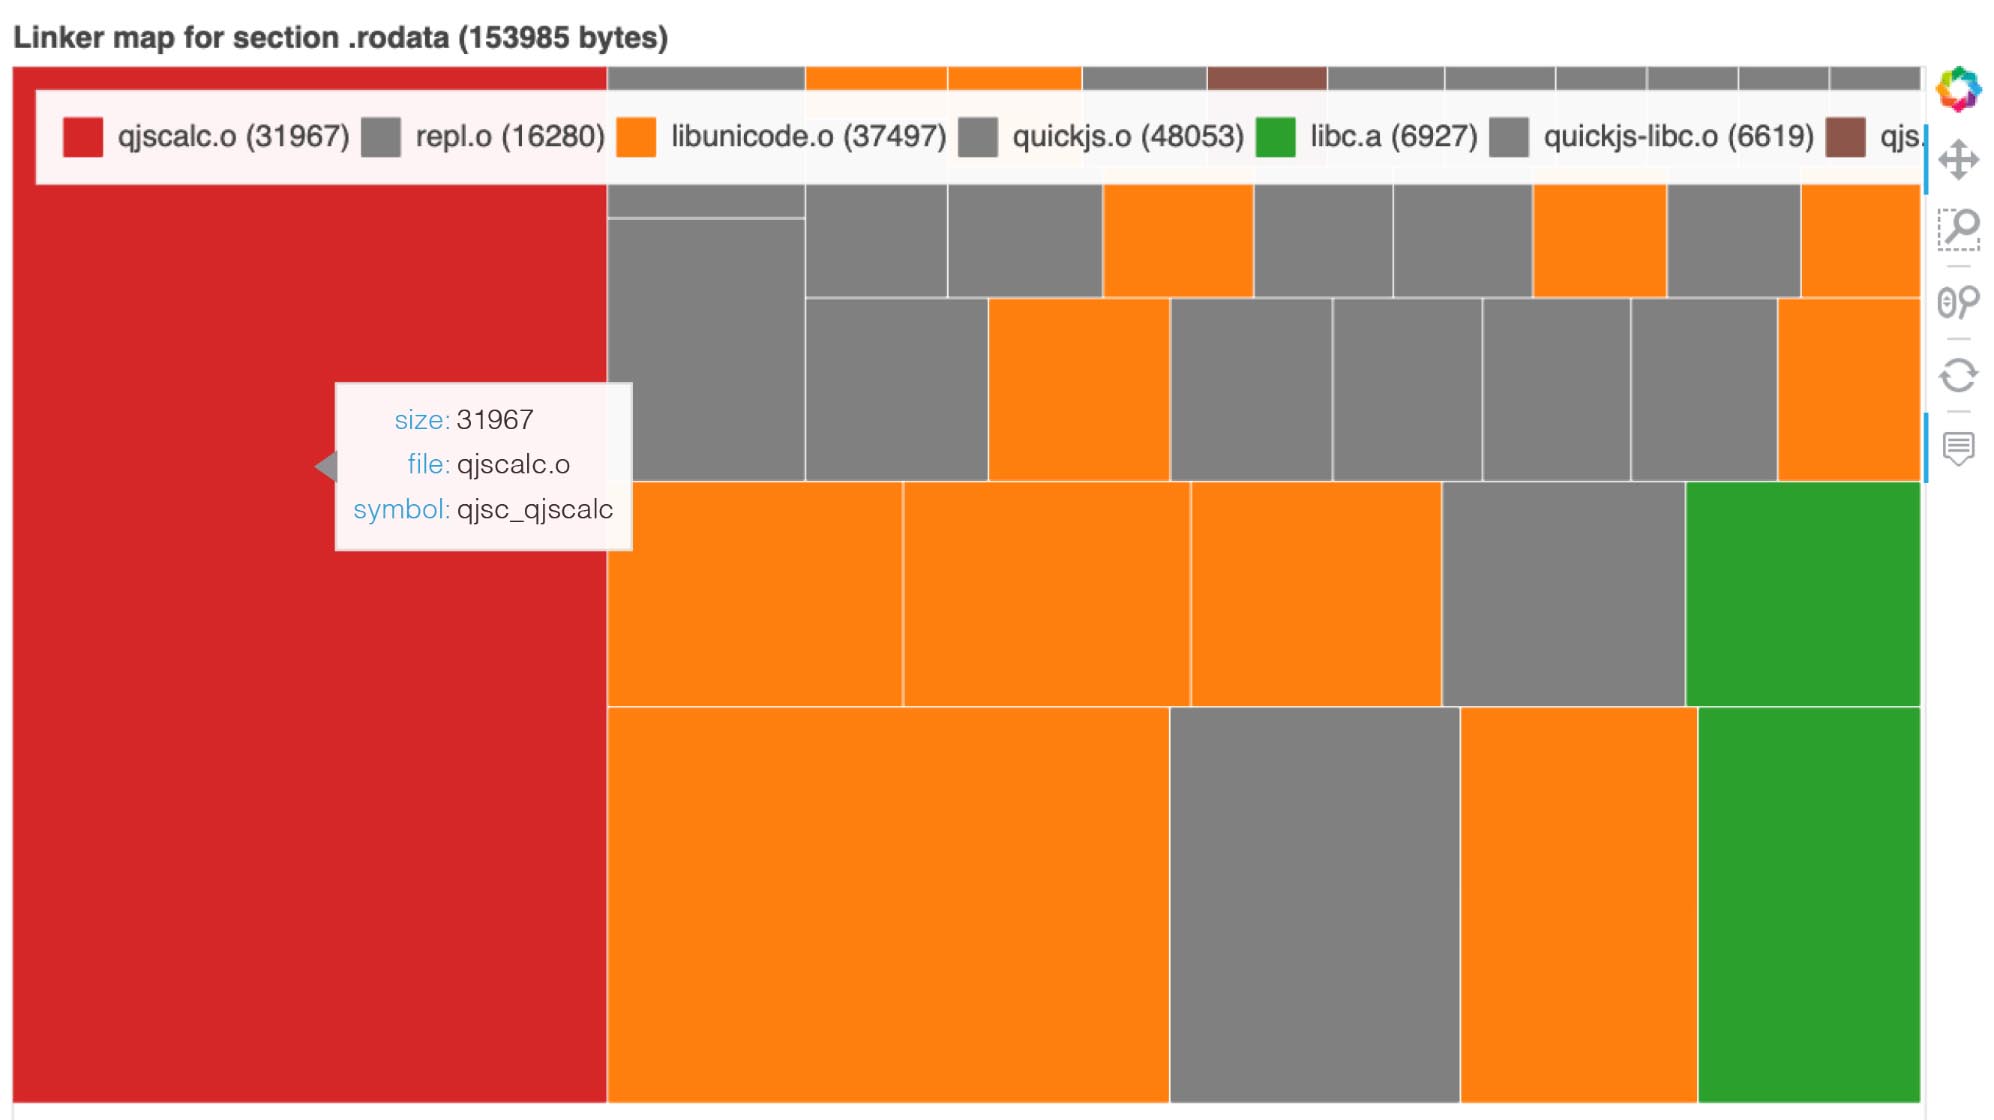
QuickJS Code Size rendered with linkermapviz
Will QuickJS run on all kinds of NuttX Devices?
$ riscv64-unknown-elf-size apps/bin/qjs
   text  data  bss     dec
 554847   260   94  555201
Probably not ALL devices? JavaScript needs a fair bit of RAM to run comfortably.
What’s the Memory Footprint like?
We ran linkermapviz on the QuickJS Linker Map for NuttX QEMU…
## Visualise the QuickJS Linker Map for NuttX QEMU.
## Produces linkermap.html: https://github.com/lupyuen/nuttx-tinyemu/blob/main/docs/quickjs/linkermap.html

git clone https://github.com/PromyLOPh/linkermapviz
cd linkermapviz
pip3 install .
linkermapviz < quickjs-nuttx/nuttx/qjs-riscv.map
Which produces the Visualised Linker Map for QuickJS. (Pics above and below)
Here are the sizes of QuickJS and its options…
| Size of Code + Data (Read-Only) | |
|---|---|
| QuickJS with All The Toppings | 554 KB |
| Without REPL | 538 KB |
| Without BigInt | 522 KB |
| Without BigInt, REPL | 506 KB |
What about Heap Memory Size?
Based on the NuttX Logs with Heap Logging Enabled: “Build Setup > Debug Options > Enable Debug Features > Memory Manager Debug Features > Info Output”
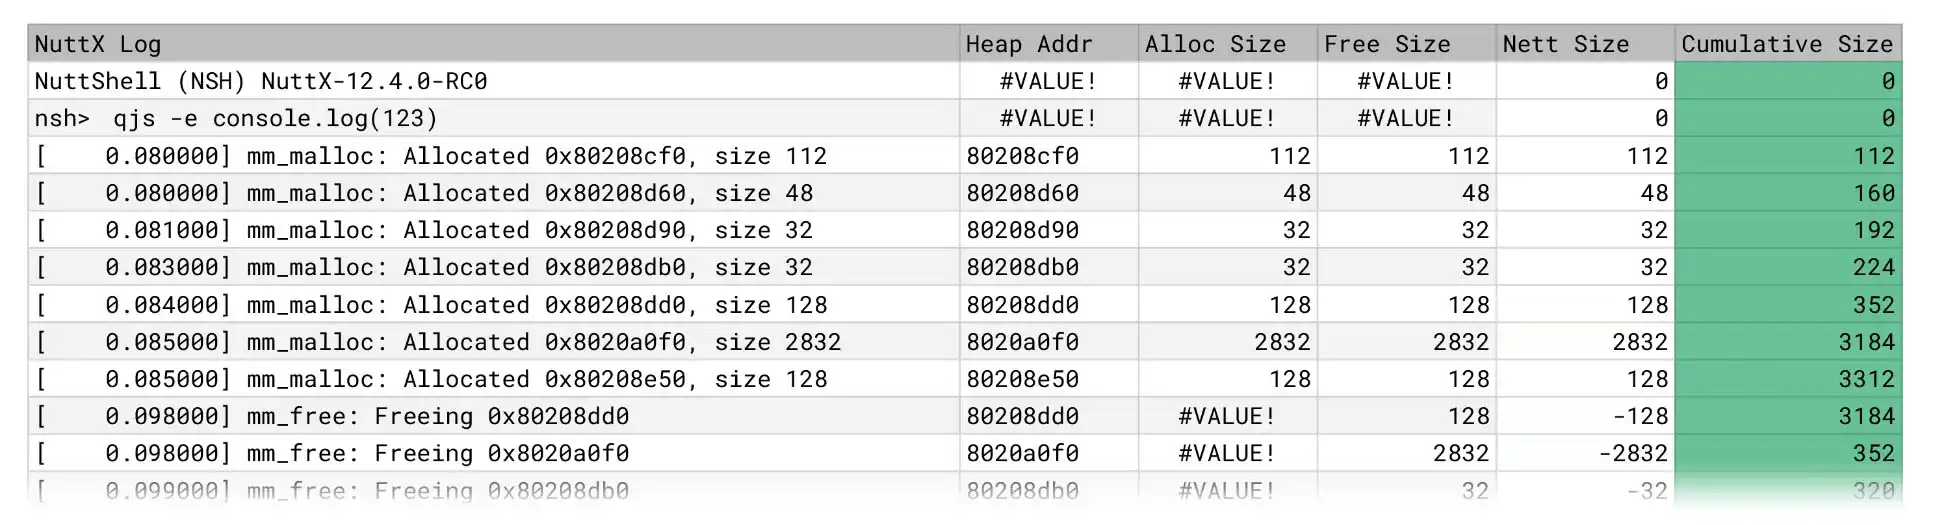
We compute the Heap Usage with a Spreadsheet (pic above)…
(“Free Size” might be inaccurate because it uses VLOOKUP for Top-Down Lookup, though we actually need Down-Top Lookup)
And we derive the QuickJS Heap Usage (pic below)…
| Max Heap Usage | |
|---|---|
| QuickJS without REPL | 276 KB |
| QuickJS with REPL | 371 KB |
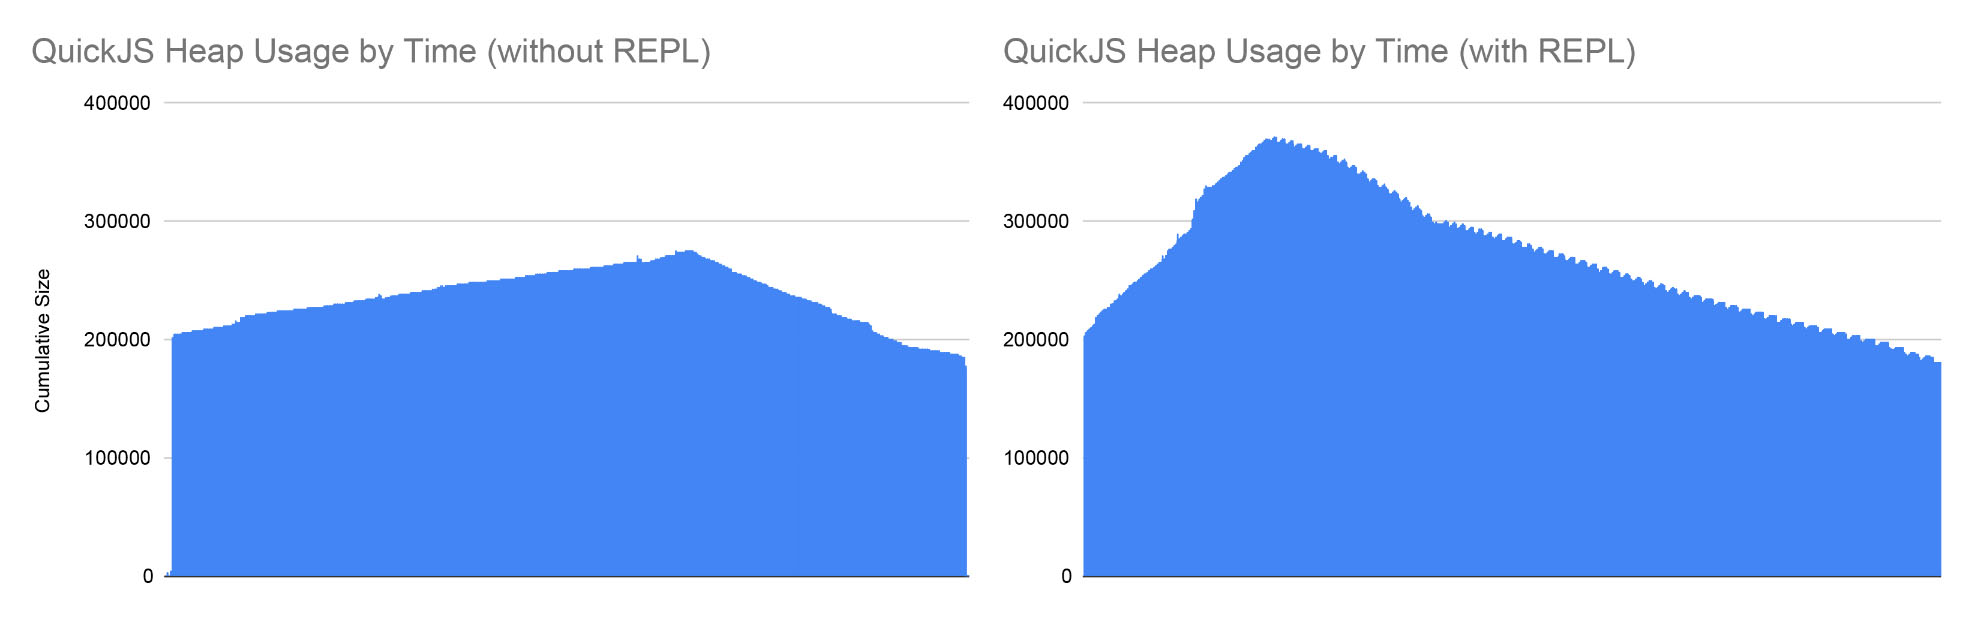
Which totals 782 KB for Barebones QuickJS. And a whopping 925 KB for Turducken QuickJS. (Nearly 1 MB for Code + Data + Heap!)
For newer Upsized NuttX Gadgets that are Extra Roomy (and Vroomy), there’s a high chance that we can run QuickJS…
And experiment with all kinds of NuttX Drivers via ioctl(). The Interactive JavaScript Way!
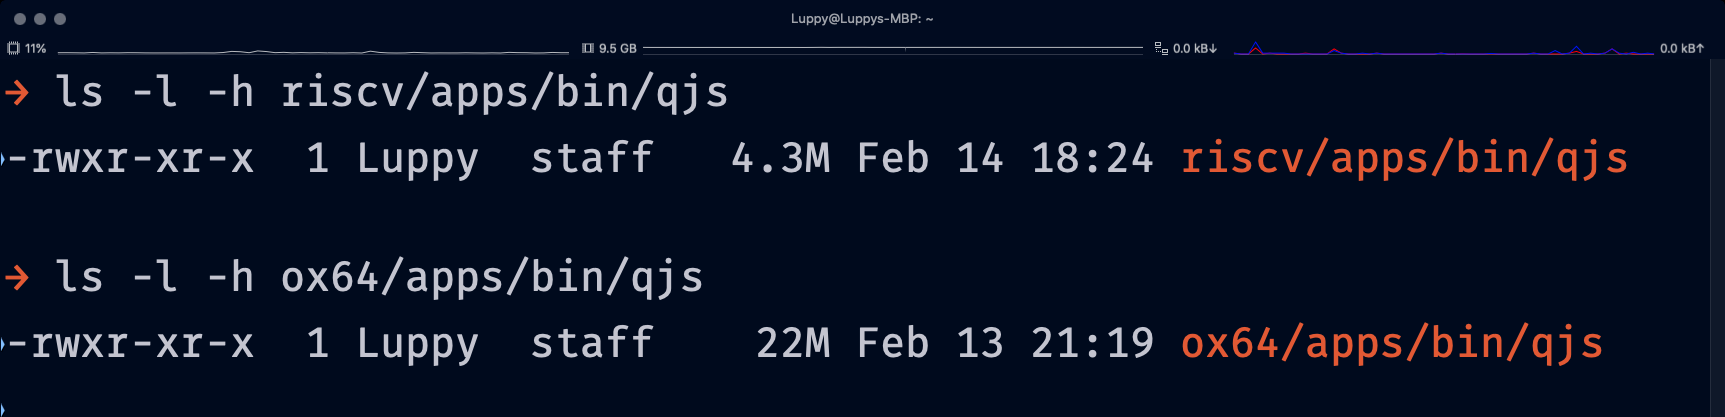
QEMU vs Ox64 QuickJS: Any diff? (Pic above)
QuickJS for NuttX QEMU is more Memory-Efficient because it uses Full Linking.
(Instead of ELF Loader patching the Relocatable Symbols at runtime)
Ox64 QuickJS was slower and multi-deca-mega-chonky: 22 MB! So we switched to QuickJS with Full Linking, QuickJS is now 4 MB on Ox64. (Similar to QEMU)
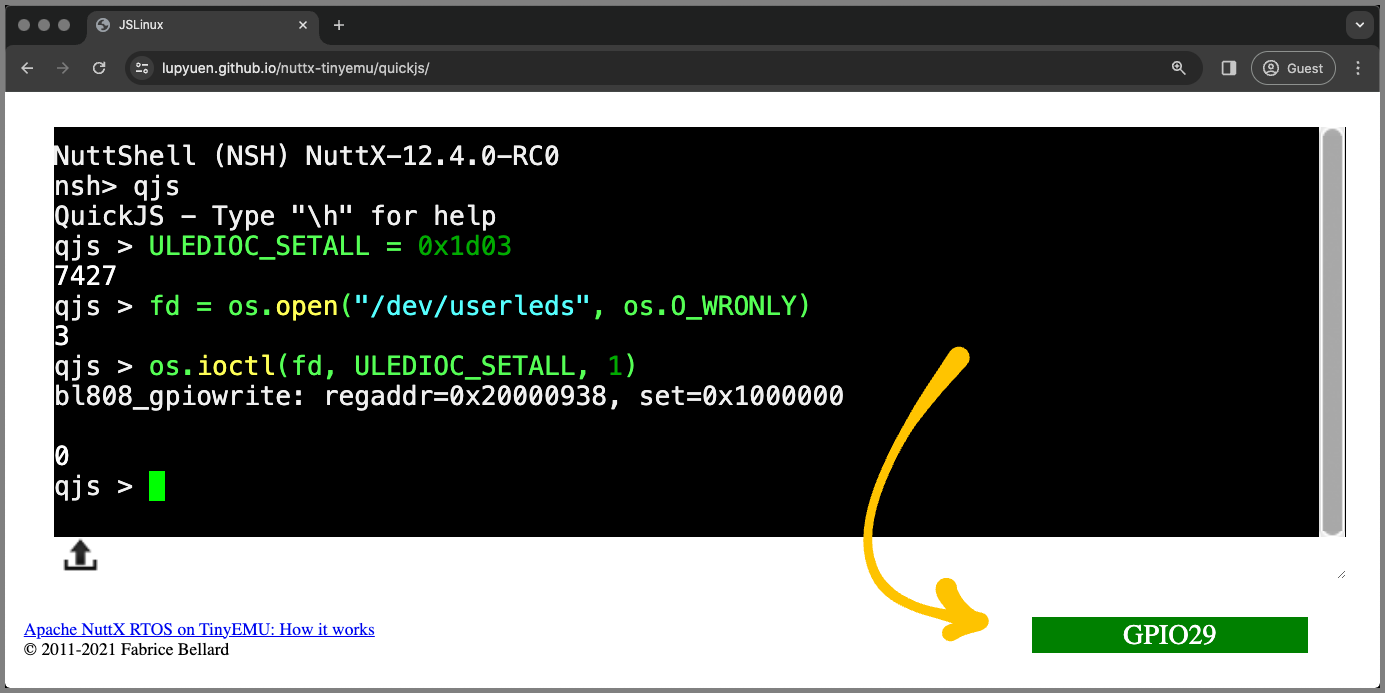
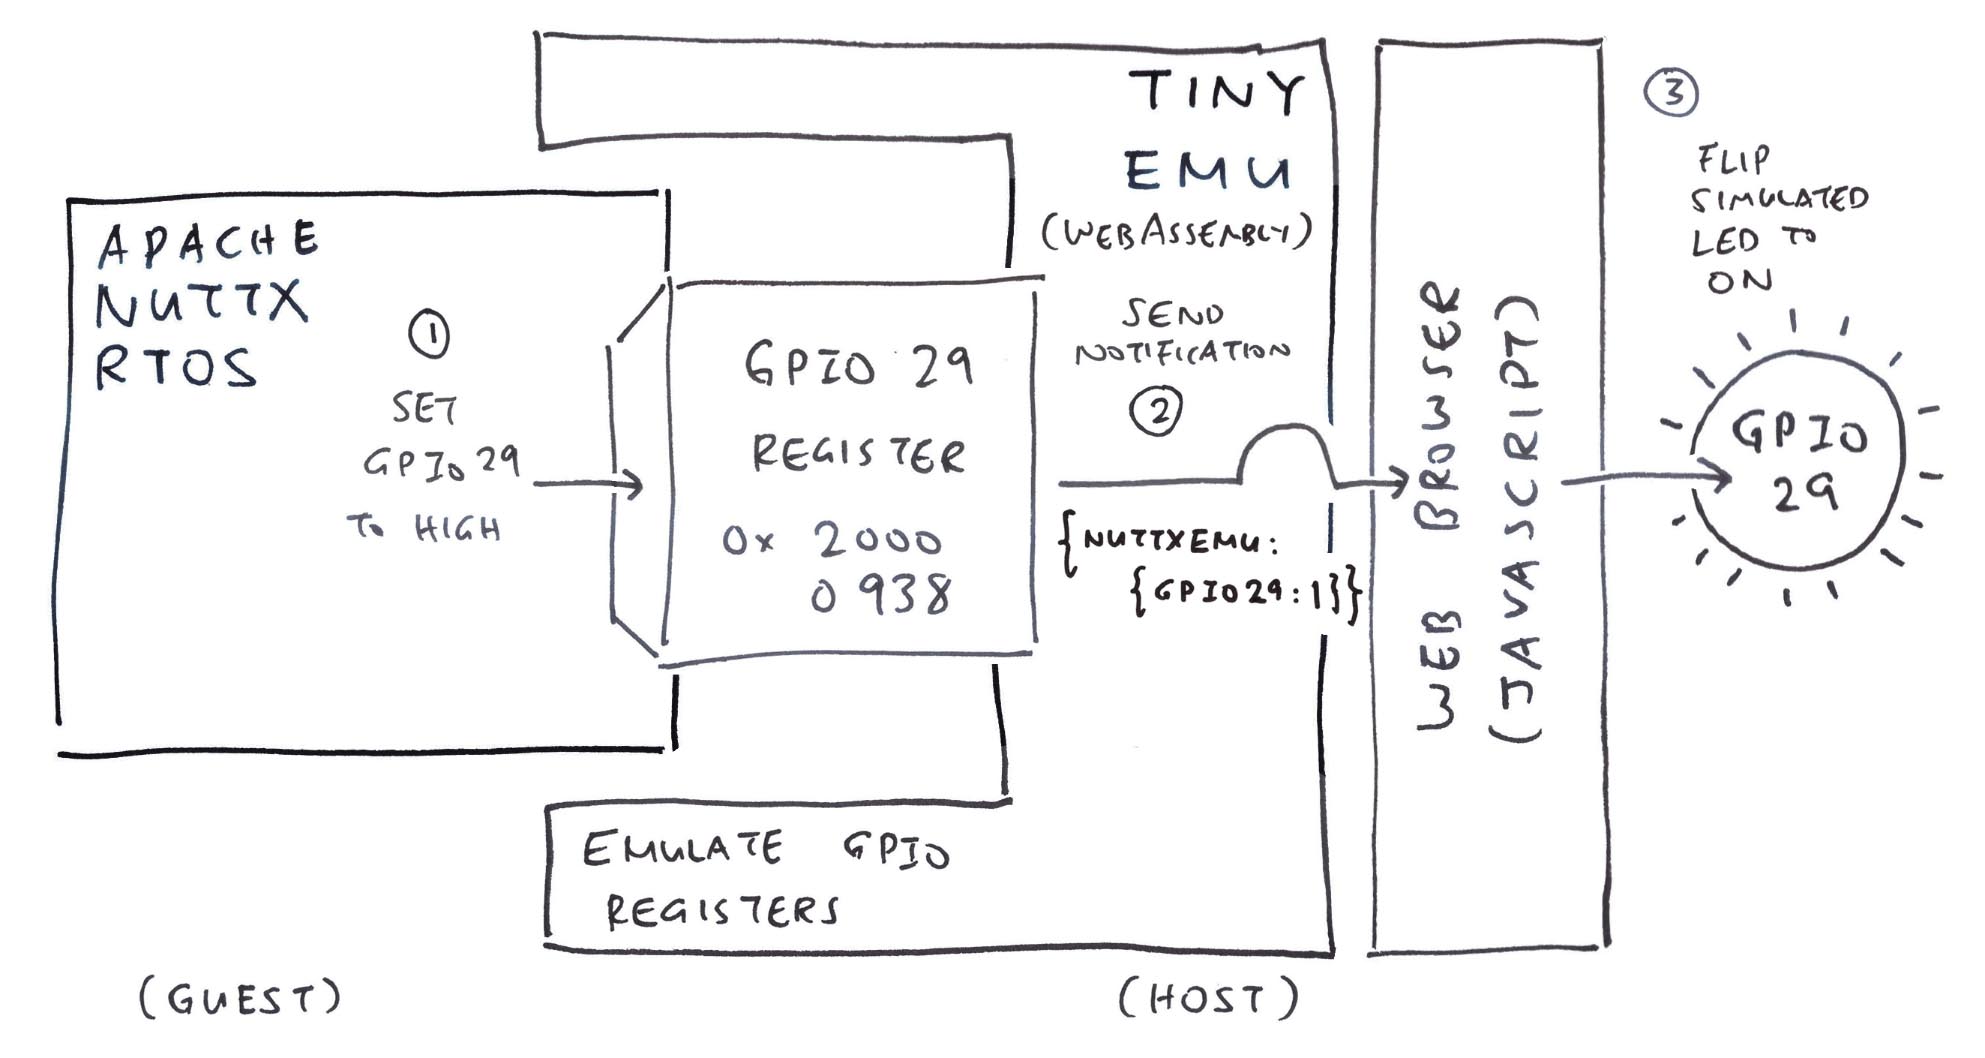
NuttX Emulator blinks a Simulated LED…
How does it work? (Pic above, lower right)
We modded NuttX Emulator (in WebAssembly) to…
Watch for updates to GPIO Registers
(Like 0x2000_0938 for GPIO 29)
Notify our Web Browser JavaScript of any updates
(Like {“nuttxemu”:{“gpio29”:1}})
And our Web Browser JavaScript Flips the Simulated LED
(On or Off)
Here’s our NuttX Emulator (WebAssembly) intercepting all Writes to GPIO 29: riscv_cpu.c
// WebAssembly called by TinyEmu to emulate
// Writes to RISC-V Addresses
int target_write_slow(...) {
  ...
  // Intercept Writes to Memory-Mapped I/O
  switch(paddr) {

    // If we're writing to BL808 GPIO 29 (0x2000_0938)...
    case 0x20000938: {
      // Send an Emulator Notification to the Console:
      // {"nuttxemu":{"gpio29":1}}

      // Check if the Output Bit is Off or On
      #define reg_gpio_xx_o 24
      const char b =
        ((val & (1 << reg_gpio_xx_o)) == 0)
        ? '0' : '1';

      // Send the Notification to Console
      char notify[] = "{\"nuttxemu\":{\"gpio29\":0}}\r\n";
      notify[strlen(notify) - 5] = b;
      print_console(NULL, notify, strlen(notify));
    }
Which sends a Notification to the Web Browser (JavaScript), saying that the GPIO Output has changed…
{"nuttxemu":
  {"gpio29": 1}
}
Our Web Browser (JavaScript) receives the Notification and Flips the Simulated LED: term.js
// JavaScript called by our WebAssembly
// to print something to Console
Term.prototype.write = function(str) {

  // If this is a Notification JSON from Emulator WebAssembly:
  // {"nuttxemu":{"gpio29":1}}
  if (str.indexOf(`{"nuttxemu":`) == 0) {

    // Get the GPIO Number and GPIO Value from JSON
    const notify = JSON.parse(str).nuttxemu;  // {gpio29:1}
    const gpio   = Object.keys(notify)[0];    // "gpio29"
    const val    = notify[gpio];              // 0 or 1

    // Render the GPIO in HTML:
    // <td id="gpio29" class="gpio_on">GPIO29</td>
    document.getElementById("status").style.width = document.getElementById("term_wrap").style.width;  // Space out the GPIO Status
    const gpio_status = document.getElementById(gpio);
    gpio_status.style.display = "block";

    // GPIO Off or On
    gpio_status.className = (val == 0)
      ? "gpio_off"  // Normal CSS Style
      : "gpio_on";  // Green CSS Style
    return;         // Don't show in Console Output
}(status and gpio29 are in HTML)
(gpio_off and gpio_on are in CSS)
Emulator Notifications won’t appear in the Emulator Console Output. (Because we suppressed them)
We’ll see the Notifications in the JavaScript Console. (Pic below)
Thanks to the QuickJS Team, we have a fun new way to Experiment Interactively with NuttX Gadgets!
We ran QuickJS on Ox64 BL808 RISC-V SBC and NuttX Emulator
Blinking the LED works great after we added the ioctl() function
Memory Footprint of QuickJS might reach 1 MB (if we’re using all the features)
How will you use QuickJS on NuttX? Lemme know!
Many Thanks to my GitHub Sponsors (and the awesome NuttX Community) for supporting my work! This article wouldn’t have been possible without your support.
Got a question, comment or suggestion? Create an Issue or submit a Pull Request here…
lupyuen.github.io/src/quickjs.md
Auto-Test QuickJS with Expect Scripting
Before building QuickJS: Build NuttX for QEMU or Ox64…
(Or download the NuttX and QuickJS Binaries from these links)
Then follow these steps to build QuickJS for NuttX (QEMU or Ox64)…
## Download and build QuickJS for NuttX
git clone https://github.com/lupyuen/quickjs-nuttx
cd quickjs-nutttx/nuttx
./build.shRemember to…
Set the Toolchain Path
Select QuickJS for NuttX QEMU
Do Full Linking for Smaller Ox64 Binaries
How did we figure out the steps to build QuickJS for NuttX?
We ran “make --trace” to observe the QuickJS Build: make.log
## Build QuickJS for Debian x64 and observe the build
$ make --trace

## Build qjs.o
gcc \
  -g \
  -Wall \
  -MMD \
  -MF .obj/qjs.o.d \
  -Wno-array-bounds \
  -Wno-format-truncation \
  -fwrapv  \
  -D_GNU_SOURCE \
  -DCONFIG_VERSION=\"2024-01-13\" \
  -DCONFIG_BIGNUM \
  -O2 \
  -c \
  -o .obj/qjs.o \
  qjs.c

## Omitted: Build a bunch of other binaries
...
## Link them together
gcc \
  -g \
  -rdynamic \
  -o qjs \
  .obj/qjs.o \
  .obj/repl.o \
  .obj/quickjs.o \
  .obj/libregexp.o \
  .obj/libunicode.o \
  .obj/cutils.o \
  .obj/quickjs-libc.o \
  .obj/libbf.o \
  .obj/qjscalc.o \
  -lm \
  -ldl \
  -lpthread
And we know that NuttX builds NuttX Apps like this…
## Build NuttX Apps for QEMU and observe the build
$ cd ../apps
$ make --trace import

## Compile hello app
## For riscv-none-elf-gcc: "-march=rv64imafdc_zicsr_zifencei"
## For riscv64-unknown-elf-gcc: "-march=rv64imafdc"
riscv-none-elf-gcc \
  -c \
  -fno-common \
  -Wall \
  -Wstrict-prototypes \
  -Wshadow \
  -Wundef \
  -Wno-attributes \
  -Wno-unknown-pragmas \
  -Wno-psabi \
  -fno-common \
  -pipe  \
  -Os \
  -fno-strict-aliasing \
  -fomit-frame-pointer \
  -ffunction-sections \
  -fdata-sections \
  -g \
  -mcmodel=medany \
  -march=rv64imafdc_zicsr_zifencei \
  -mabi=lp64d \
  -isystem apps/import/include \
  -isystem apps/import/include \
  -D__NuttX__  \
  -I "apps/include"   \
  hello_main.c \
  -o  hello_main.c.workspaces.bookworm.apps.examples.hello.o

## Link hello app
## For riscv-none-elf-ld: "rv64imafdc_zicsr/lp64d"
## For riscv64-unknown-elf-ld: "rv64imafdc/lp64d
riscv-none-elf-ld \
  --oformat elf64-littleriscv \
  -e _start \
  -Bstatic \
  -Tapps/import/scripts/gnu-elf.ld \
  -Lapps/import/libs \
  -L "xpack-riscv-none-elf-gcc-13.2.0-2/lib/gcc/riscv-none-elf/13.2.0/rv64imafdc_zicsr/lp64d" \
  apps/import/startup/crt0.o  \
  hello_main.c.workspaces.bookworm.apps.examples.hello.o \
  --start-group \
  -lmm \
  -lc \
  -lproxies \
  -lgcc apps/libapps.a \
  xpack-riscv-none-elf-gcc-13.2.0-2/lib/gcc/riscv-none-elf/13.2.0/rv64imafdc_zicsr/lp64d/libgcc.a \
  --end-group \
-o apps/bin/hello(Ox64 Build is a little different)
Thus we…
Combine everything above into our QuickJS Build Script
(Later we’ll merge into the NuttX Makefiles)
Add an Expect Script for auto-testing QuickJS on QEMU
(Pic above)
Everything builds OK without changing any code in QuickJS! Though we stubbed out some functions because NuttX works a little differently.
repl.c and qjscalc.c are missing?
They’re generated by the QuickJS Compiler…
## Compile the REPL from JavaScript to C
./qjsc -c -o repl.c -m repl.js

## Compile the BigNum Calculator from JavaScript to C
./qjsc -fbignum -c -o qjscalc.c qjscalc.js
So we borrow the output from another QuickJS Build (Debian x64) and add to NuttX…
nuttx/repl.c: Interactive-Mode REPL for QuickJS
nuttx/qjscalc.c: BigNum Calculator for QuickJS
What’s inside repl.c and qjscalc.c?
They contain plenty of JavaScript Bytecode for REPL and BigNum Calculator. Brilliant!
/* File generated automatically by the QuickJS compiler. */
#include <inttypes.h>
const uint32_t qjsc_repl_size = 16280;
const uint8_t qjsc_repl[16280] = {
 0x02, 0xa5, 0x03, 0x0e, 0x72, 0x65, 0x70, 0x6c,
 0x2e, 0x6a, 0x73, 0x06, 0x73, 0x74, 0x64, 0x04, ...
That’s why REPL and BigNum will require more Heap Memory, to execute the extra JavaScript Bytecode.
In this article, we compiled a Work-In-Progress Version of Apache NuttX RTOS for QEMU RISC-V (64-bit Kernel Mode) that has these updates…
Add the LED Driver for QEMU
Increase the App Stack Size from 2 KB to 64 KB
Patch the leds app for testing LED Driver
We may download the NuttX Binaries for QEMU…
Download the NuttX Kernel: nuttx
Copy to $HOME/nuttx/
Download the NuttX Apps: apps-bin.zip
Unzip and copy the files inside (not the folder) into $HOME/apps/bin/
(We should see $HOME/apps/bin/qjs and blink.js)
Then run…
$ cd $HOME/nuttx/
$ qemu-system-riscv64 \
    -semihosting \
    -M virt,aclint=on \
    -cpu rv64 \
    -bios none \
    -kernel nuttx \
    -nographic
(Remove -bios none for newer versions of NuttX)
Or if we prefer to build NuttX ourselves…
## Download the WIP NuttX Source Code
git clone \
  --branch qemuled \
  https://github.com/lupyuen2/wip-nuttx \
  nuttx
git clone \
  --branch qemuled \
  https://github.com/lupyuen2/wip-nuttx-apps \
  apps

## Configure NuttX for QEMU RISC-V (64-bit Kernel Mode)
cd nuttx
tools/configure.sh rv-virt:knsh64

## Build NuttX
make

## Dump the disassembly to nuttx.S
riscv64-unknown-elf-objdump \
  --syms --source --reloc --demangle --line-numbers --wide \
  --debugging \
  nuttx \
  >nuttx.S \
  2>&1

## Build the Apps Filesystem
make -j 8 export
pushd ../apps
./tools/mkimport.sh -z -x ../nuttx/nuttx-export-*.tar.gz
make -j 8 import
popd
(Remember to install the Build Prerequisites and Toolchain)
This produces the NuttX ELF Image nuttx that we’ll boot on QEMU RISC-V Emulator in a while.
But first: We build QuickJS for QEMU, which will produce qjs and blink.sh in the apps/bin folder…
Now we boot nuttx on QEMU RISC-V Emulator…
## Start the QEMU RISC-V Emulator (64-bit) with NuttX RTOS
qemu-system-riscv64 \
  -semihosting \
  -M virt,aclint=on \
  -cpu rv64 \
  -bios none \
  -kernel nuttx \
  -nographic
(Remove -bios none for newer versions of NuttX)
At the NuttX Prompt, enter…
qjs --std /system/bin/blink.jsQuickJS runs our Blinky JavaScript and blinks a Simulated LED…
## Remove `-bios none` for newer versions of NuttX
$ qemu-system-riscv64 -semihosting -M virt,aclint=on -cpu rv64 -bios none -kernel nuttx -nographic

NuttShell (NSH) NuttX-12.4.0-RC0
nsh> qjs --std /system/bin/blink.js
led=0, val=1
led=0, val=0
led=0, val=1To Exit QEMU: Press Ctrl-A then x
In this article, we compiled a Work-In-Progress Version of Apache NuttX RTOS for Ox64 that has these updates…
Add the GPIO Driver for Ox64 BL808
Add the LED Driver for Ox64 BL808
Increase the App Stack Size from 2 KB to 64 KB
Increase the RAM Disk Region from 16 MB to 40 MB
Patch the leds app for testing LED Driver
We may download the NuttX Binaries for Ox64…
Download the NuttX Image: Image
Prepare a Linux microSD for Ox64 as described in the previous article.
Copy the Image file (from above) and overwrite the Image in the Linux microSD…
## Overwrite the Linux Image
## on Ox64 microSD
cp Image \
  "/Volumes/NO NAME/Image"
diskutil unmountDisk /dev/disk2
Insert the microSD into Ox64 and power up Ox64.
Ox64 boots OpenSBI, which starts U-Boot Bootloader, which starts NuttX Kernel and the NuttX Shell (NSH).
At the NuttX Prompt, enter…
qjs --std /system/bin/blink.jsQuickJS executes our Blinky JavaScript and blinks our LED on GPIO 29…
NuttShell (NSH) NuttX-12.4.0-RC0
nsh> qjs --std /system/bin/blink.js

bl808_gpiowrite: regaddr=0x20000938, set=0x1000000
bl808_gpiowrite: regaddr=0x20000938, clear=0x1000000
bl808_gpiowrite: regaddr=0x20000938, set=0x1000000
bl808_gpiowrite: regaddr=0x20000938, clear=0x1000000Or if we prefer to build NuttX ourselves…
## Download the WIP NuttX Source Code
git clone \
  --branch gpio2 \
  https://github.com/lupyuen2/wip-nuttx \
  nuttx
git clone \
  --branch gpio2 \
  https://github.com/lupyuen2/wip-nuttx-apps \
  apps

## Configure NuttX for Ox64 BL808 RISC-V SBC
cd nuttx
tools/configure.sh ox64:nsh

## Build NuttX
make

## Export the NuttX Kernel
## to `nuttx.bin`
riscv64-unknown-elf-objcopy \
  -O binary \
  nuttx \
  nuttx.bin

## Dump the disassembly to nuttx.S
riscv64-unknown-elf-objdump \
  --syms --source --reloc --demangle --line-numbers --wide \
  --debugging \
  nuttx \
  >nuttx.S \
  2>&1

## Dump the hello_nim disassembly to hello_nim.S
riscv64-unknown-elf-objdump \
  --syms --source --reloc --demangle --line-numbers --wide \
  --debugging \
  ../apps/bin/hello_nim \
  >hello_nim.S \
  2>&1
(Remember to install the Build Prerequisites and Toolchain)
We build the NuttX Apps Filesystem that contains NuttX Shell and NuttX Apps…
## Build the Apps Filesystem
make -j 8 export
pushd ../apps
./tools/mkimport.sh -z -x ../nuttx/nuttx-export-*.tar.gz
make -j 8 import
popd
Next we build QuickJS for Ox64, which will produce qjs and blink.sh in the apps/bin folder…
We bundle QuickJS into the Initial RAM Disk and append it to the NuttX Image…
## Generate the Initial RAM Disk `initrd`
## in ROMFS Filesystem Format
## from the Apps Filesystem `../apps/bin`
## and label it `NuttXBootVol`
genromfs \
  -f initrd \
  -d ../apps/bin \
  -V "NuttXBootVol"

## Prepare a Padding with 64 KB of zeroes
head -c 65536 /dev/zero >/tmp/nuttx.pad

## Append Padding and Initial RAM Disk to NuttX Kernel
cat nuttx.bin /tmp/nuttx.pad initrd \
>ImageThis produces the NuttX Image for Ox64: Image
Follow the earlier instructions to copy Image to a Linux microSD, boot it on Ox64 and run QuickJS. (Pic below)
What about the NuttX Image for Ox64 Emulator? (Pic above)
The exact same Build Outputs from above, we copied to the NuttX Emulator for Ox64.