📝 28 Jan 2024
Every day we’re auto-building Apache NuttX RTOS for Ox64 BL808 SBC…
Can we test NuttX on Ox64 automatically after building?
Yes we can! With a little help from the Ox64 BL808 Emulator that we created last week…
But our Ox64 Emulator was incomplete?
Today we fill in the missing pieces of our Ox64 Emulator and run it for Automated Testing…
We boot NuttX in Supervisor Mode
(Instead of Machine Mode)
Emulate OpenSBI for setting the System Timer
(And read the System Time)
Emulate the UART Interrupts for Console Input
(By modding the VirtIO Console)
Execute everything with Expect Scripting
(Based on good old TCL)
Which becomes our Daily Automated Testing
(Triggered every day by GitHub Actions)
We begin with the easier bit: Scripting our Ox64 Emulator…
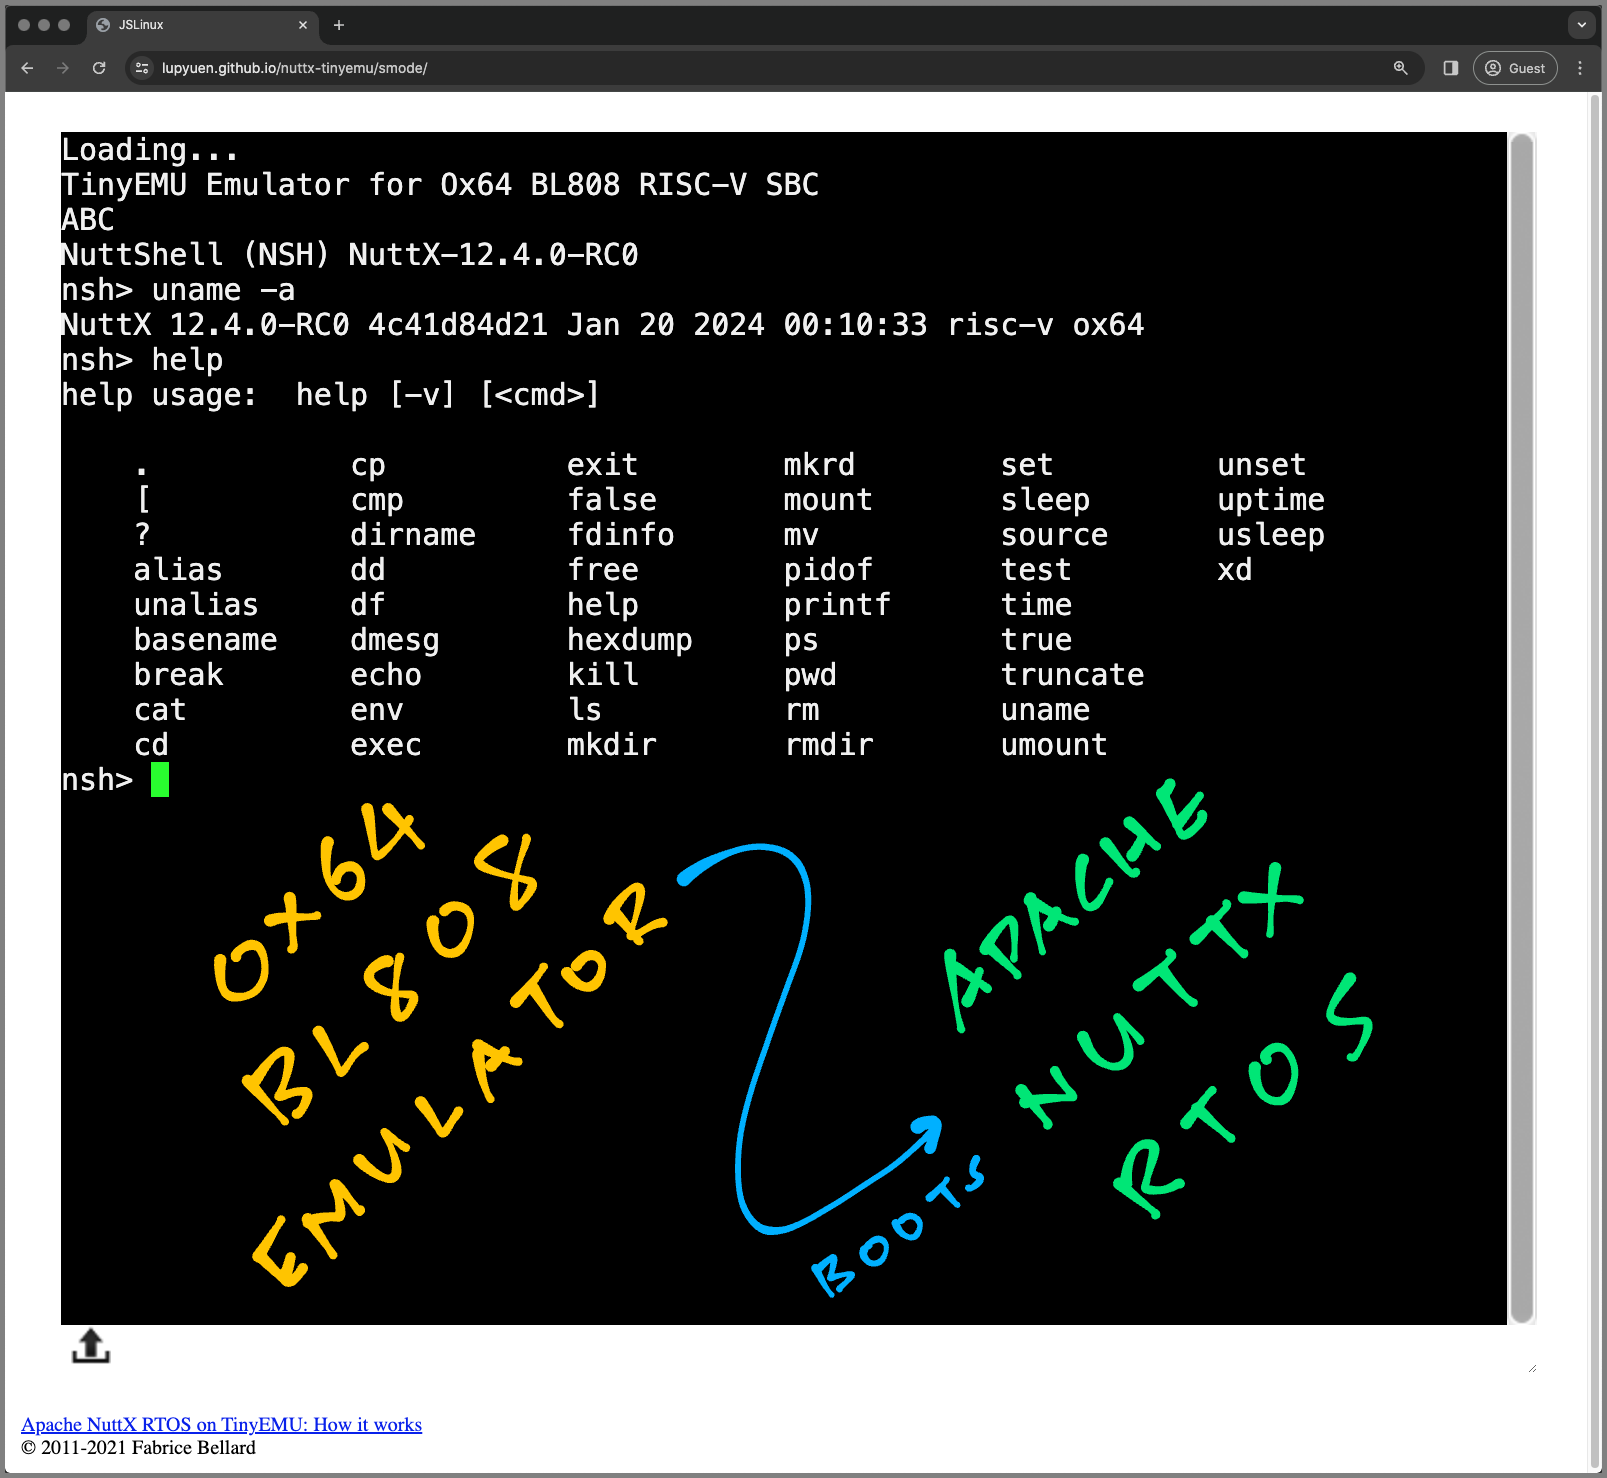
Ox64 BL808 Emulator runs in a Web Browser too
What’s this “Expect Scripting”?
expect is a cool Command-Line Tool that sends commands to another app and checks the responses.
How is it used for Automated Testing?
Normally when we start our Ox64 Emulator, it boots NuttX and waits for our command…
## Start our Ox64 Emulator with NuttX
$ ./temu nuttx.cfg

TinyEMU Emulator for Ox64 BL808 RISC-V SBC
NuttShell (NSH) NuttX-12.4.0-RC0
nsh>(nuttx.cfg is our TinyEMU Config)
With an Expect Script, we can feed our commands automatically into the Emulator…
## Run our Expect Script...
$ ./nuttx.exp

## Which starts the Ox64 Emulator...
spawn ./temu nuttx.cfg

  ## And sends a Command to the Emulator
  nsh> uname -a
  NuttX 12.4.0-RC0 55ec92e181 Jan 24 2024 00:11:08 risc-v ox64
  nsh>
That’s why we create an Expect Script to test Ox64 NuttX.
What’s nuttx.exp?
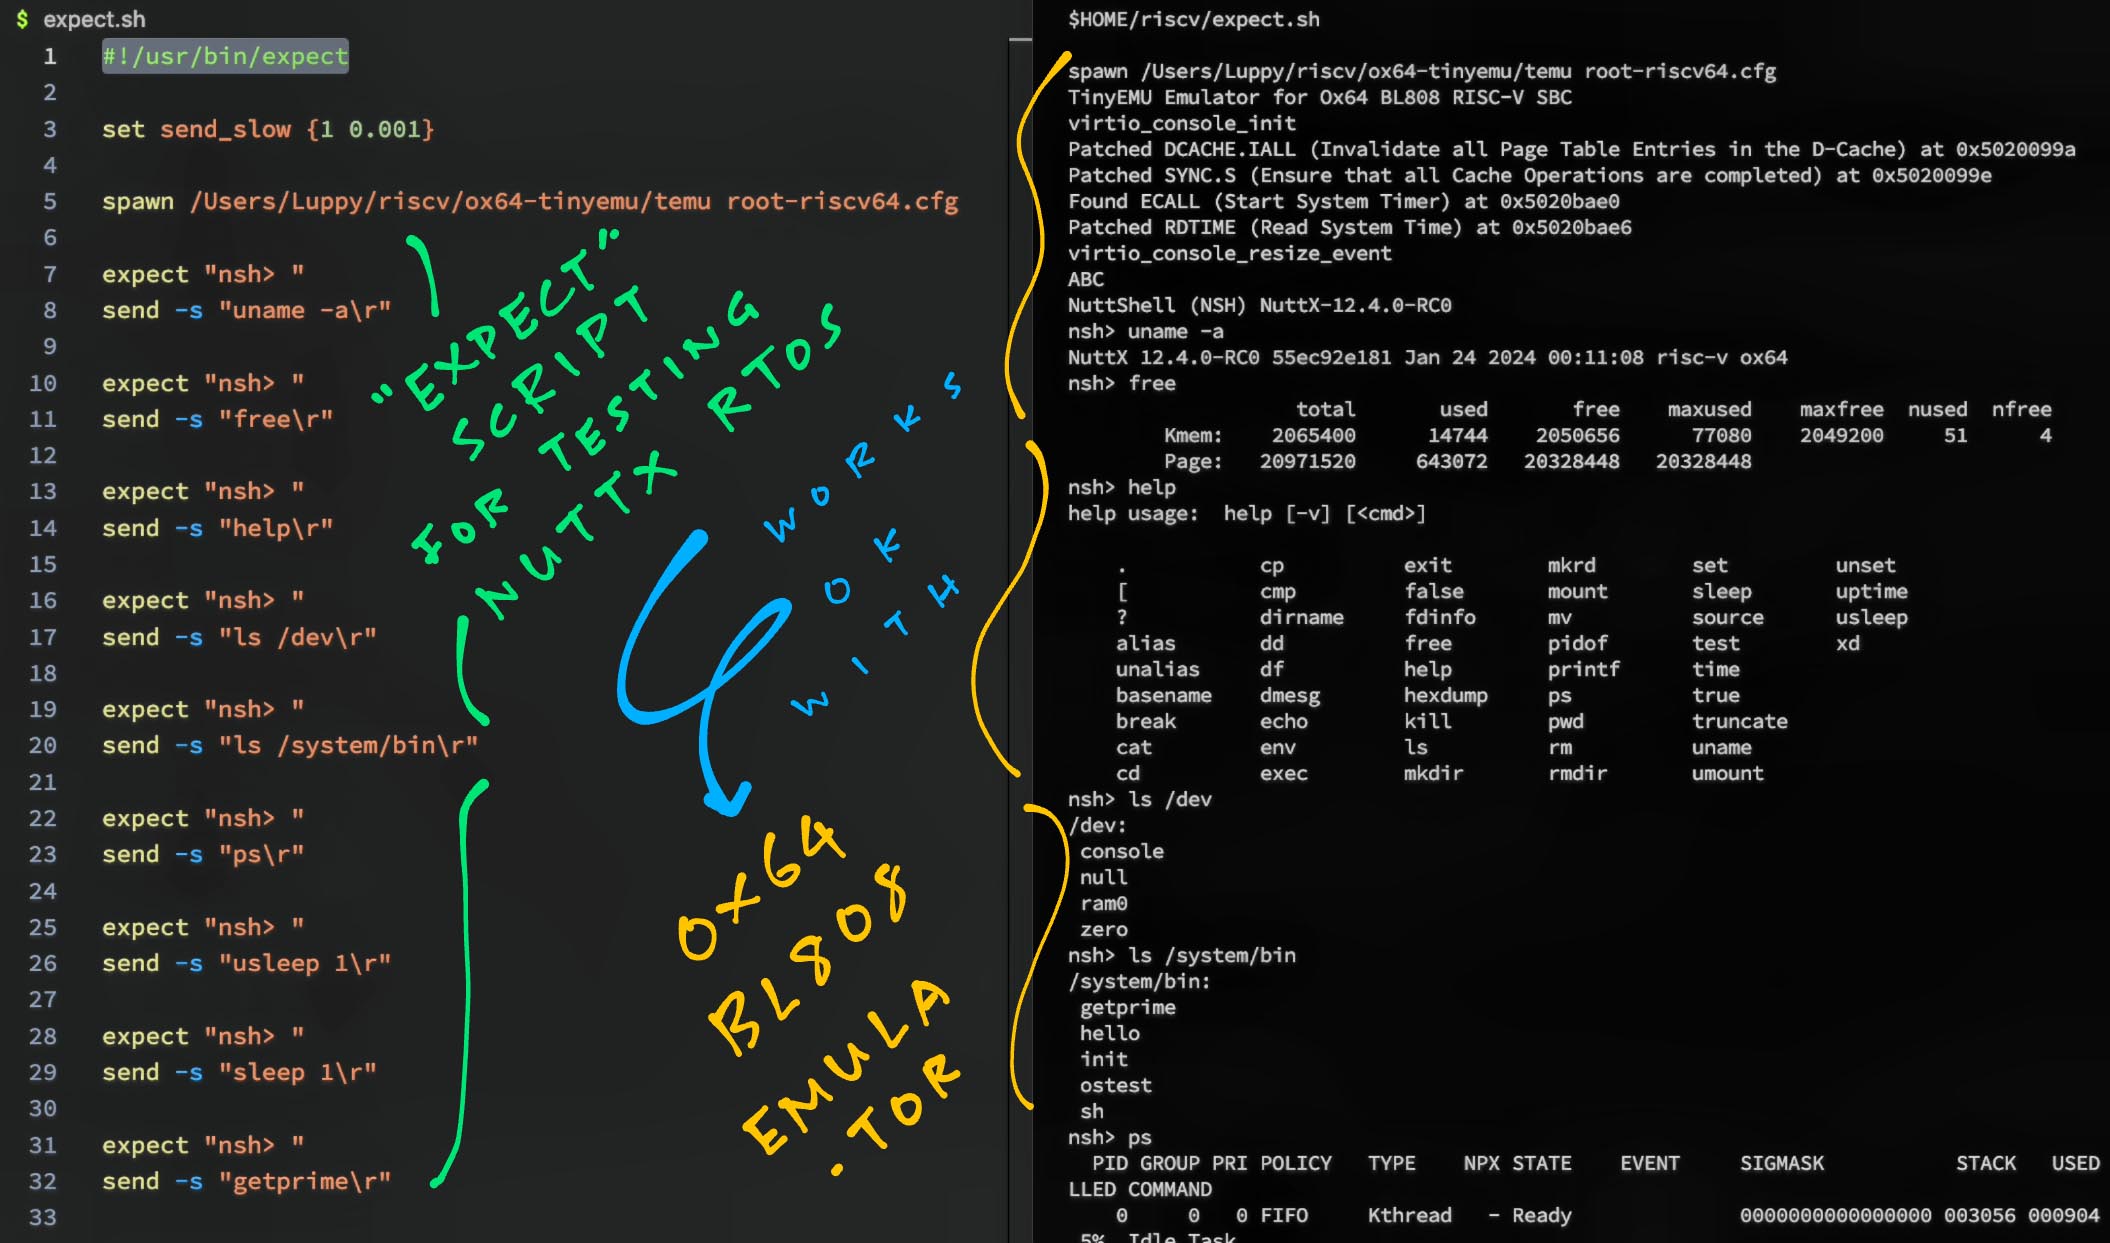
That’s our Expect Script containing the commands that will be sent to our Ox64 Emulator: nuttx.exp
#!/usr/bin/expect
## Expect Script for Testing NuttX with Ox64 BL808 Emulator

## For every 1 character sent, wait 0.001 milliseconds
set send_slow {1 0.001}

## Start the Ox64 BL808 Emulator
spawn ./temu nuttx.cfg

## Wait for the prompt and enter `uname -a`
## `send -s` will send slowly (0.001 ms per char)
expect "nsh> "
send -s "uname -a\r"
Will it work for complicated tests?
Yep we may use Pattern Matching and Timeout Detection in our script: nuttx.exp
## Wait for the prompt and enter `ostest`
expect "nsh> "
send -s "ostest\r"

## Wait at most 30 seconds
set timeout 30

## Check the response...
expect {
  ## If we see this message, exit normally
  "ostest_main: Exiting with status -1" { exit 0 }

  ## If timeout, exit with an error
  timeout { exit 1 }
}
Which works great for thoroughly exercising NuttX on our Ox64 Emulator…
## Run our Expect Script to start Ox64 Emulator...
$ ./nuttx.exp
spawn ./temu nuttx.cfg

  ## And run all kinds of NuttX Tests
  nsh> ostest
  ...
  ostest_main: Exiting with status -1
  nsh>

## Our Expect Script completes successfully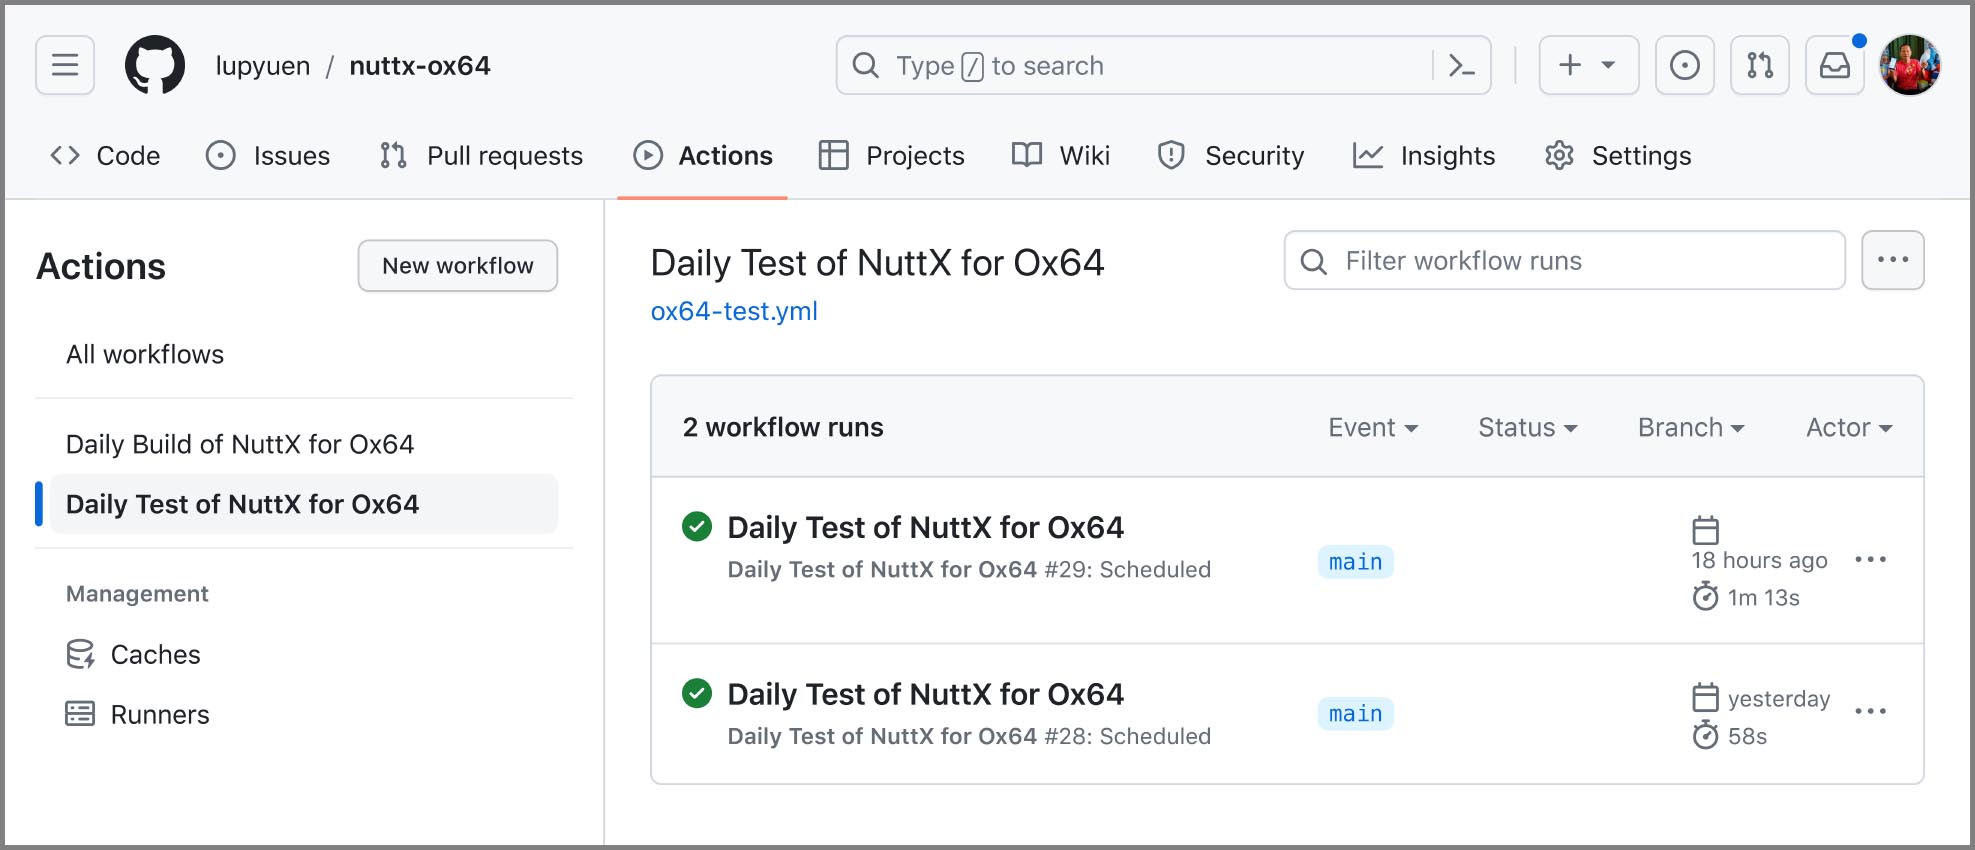
NuttX for Ox64 gets tested every day
We run this every day?
GitHub Actions will start our Automated Test every day at 12:55am (GMT): ox64-test.yml
## Run our Automated Test
## Every day at 0:55 UTC
## (After Daily Build at 0:00 UTC)
on:
  schedule:
    - cron: '55 0 * * *'
(Why not one o’clock? It’s too busy)
What happens during Daily Automated Testing?
First it builds our Ox64 BL808 Emulator: ox64-test.yml
## Install `expect` and the Build Prerequisites on Ubuntu
sudo apt -y update
sudo apt -y install \
  expect libcurl4-openssl-dev libssl-dev zlib1g-dev libsdl2-dev wget

## Build our Ox64 BL808 Emulator
git clone https://github.com/lupyuen/ox64-tinyemu
pushd ox64-tinyemu
make
cp temu ..
popd
For macOS: We need extra steps…
brew install openssl sdl2
make \
  CFLAGS="-I$(brew --prefix)/opt/openssl/include -I$(brew --prefix)/opt/sdl2/include" \
  LDFLAGS="-L$(brew --prefix)/opt/openssl/lib -L$(brew --prefix)/opt/sdl2/lib" \
  CONFIG_MACOS=y
Next we download the Daily NuttX Build…
## Location of Daily NuttX Builds
## `outputs.date` looks like `2024-01-25`
url=https://github.com/lupyuen/nuttx-ox64/releases/download/nuttx-ox64-${{ steps.date.outputs.date }}

## Download the NuttX Build and print the Git Hash
wget $url/Image
wget $url/nuttx.hash
cat nuttx.hash

## Git Hash looks like...
## NuttX Source: https://github.com/apache/nuttx/tree/501896415589aa1a0264b0765746d8bdb43bdf42
## NuttX Apps: https://github.com/apache/nuttx-apps/tree/a16fb23dd752e84849ffcf865fc5d6d5ac745e43(outputs.date is defined here)
And we start our Test Script…
## Download the Test Script from github.com/lupyuen/nuttx-ox64
url=https://github.com/lupyuen/nuttx-ox64/raw/main
wget $url/nuttx.cfg
wget $url/nuttx.exp

## Run the Test Script
chmod +x nuttx.exp
./nuttx.exp(nuttx.cfg is our TinyEMU Config)
(nuttx.exp is our Expect Script)
That’s everything we need for Daily Automated Testing! Our Ox64 Emulator will emulate ostest and launch a whole bunch of tests…
Automated Testing doesn’t look so hard?
That’s because we did the tough work inside our Ox64 BL808 Emulator! Let’s look back at the challenging bits…
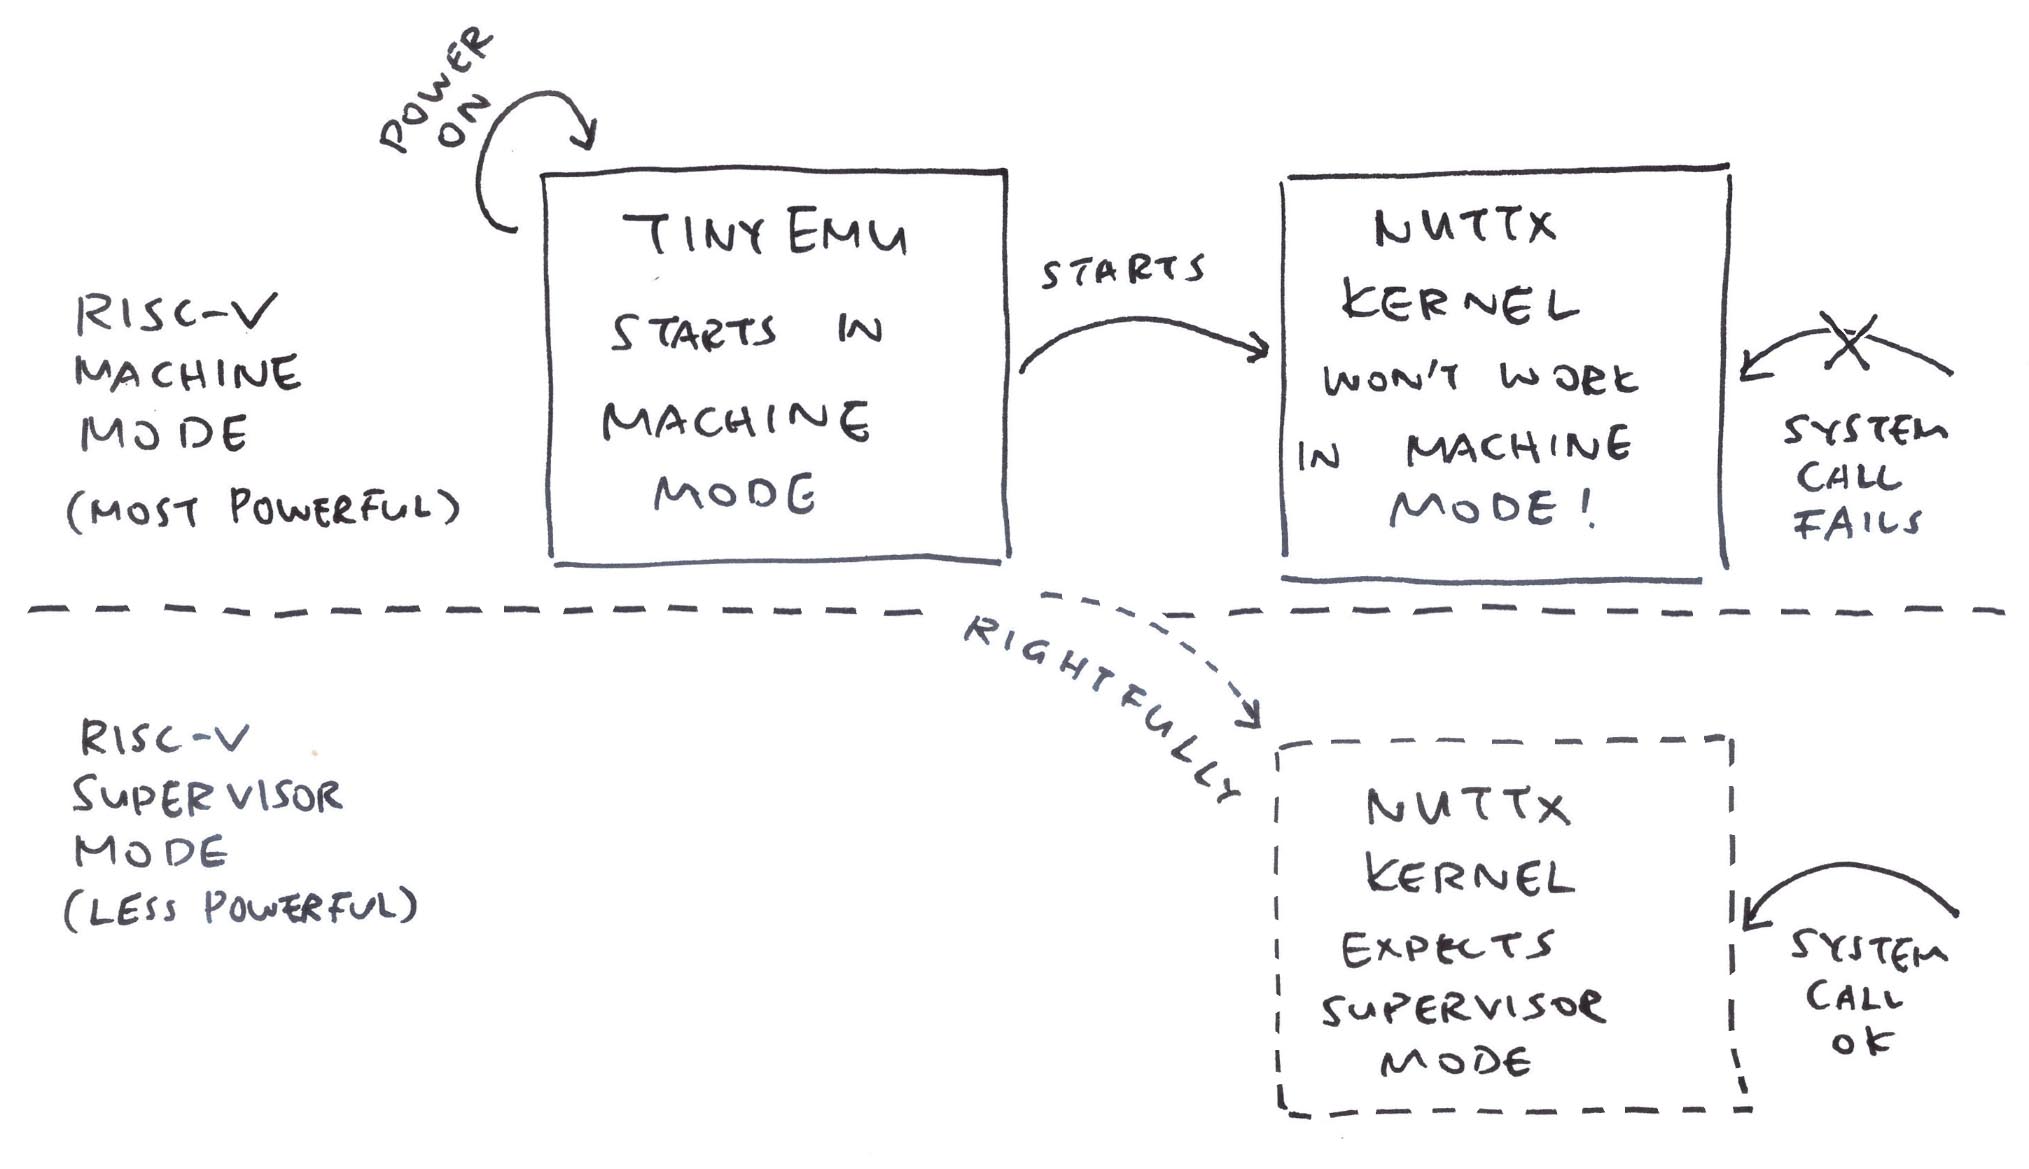
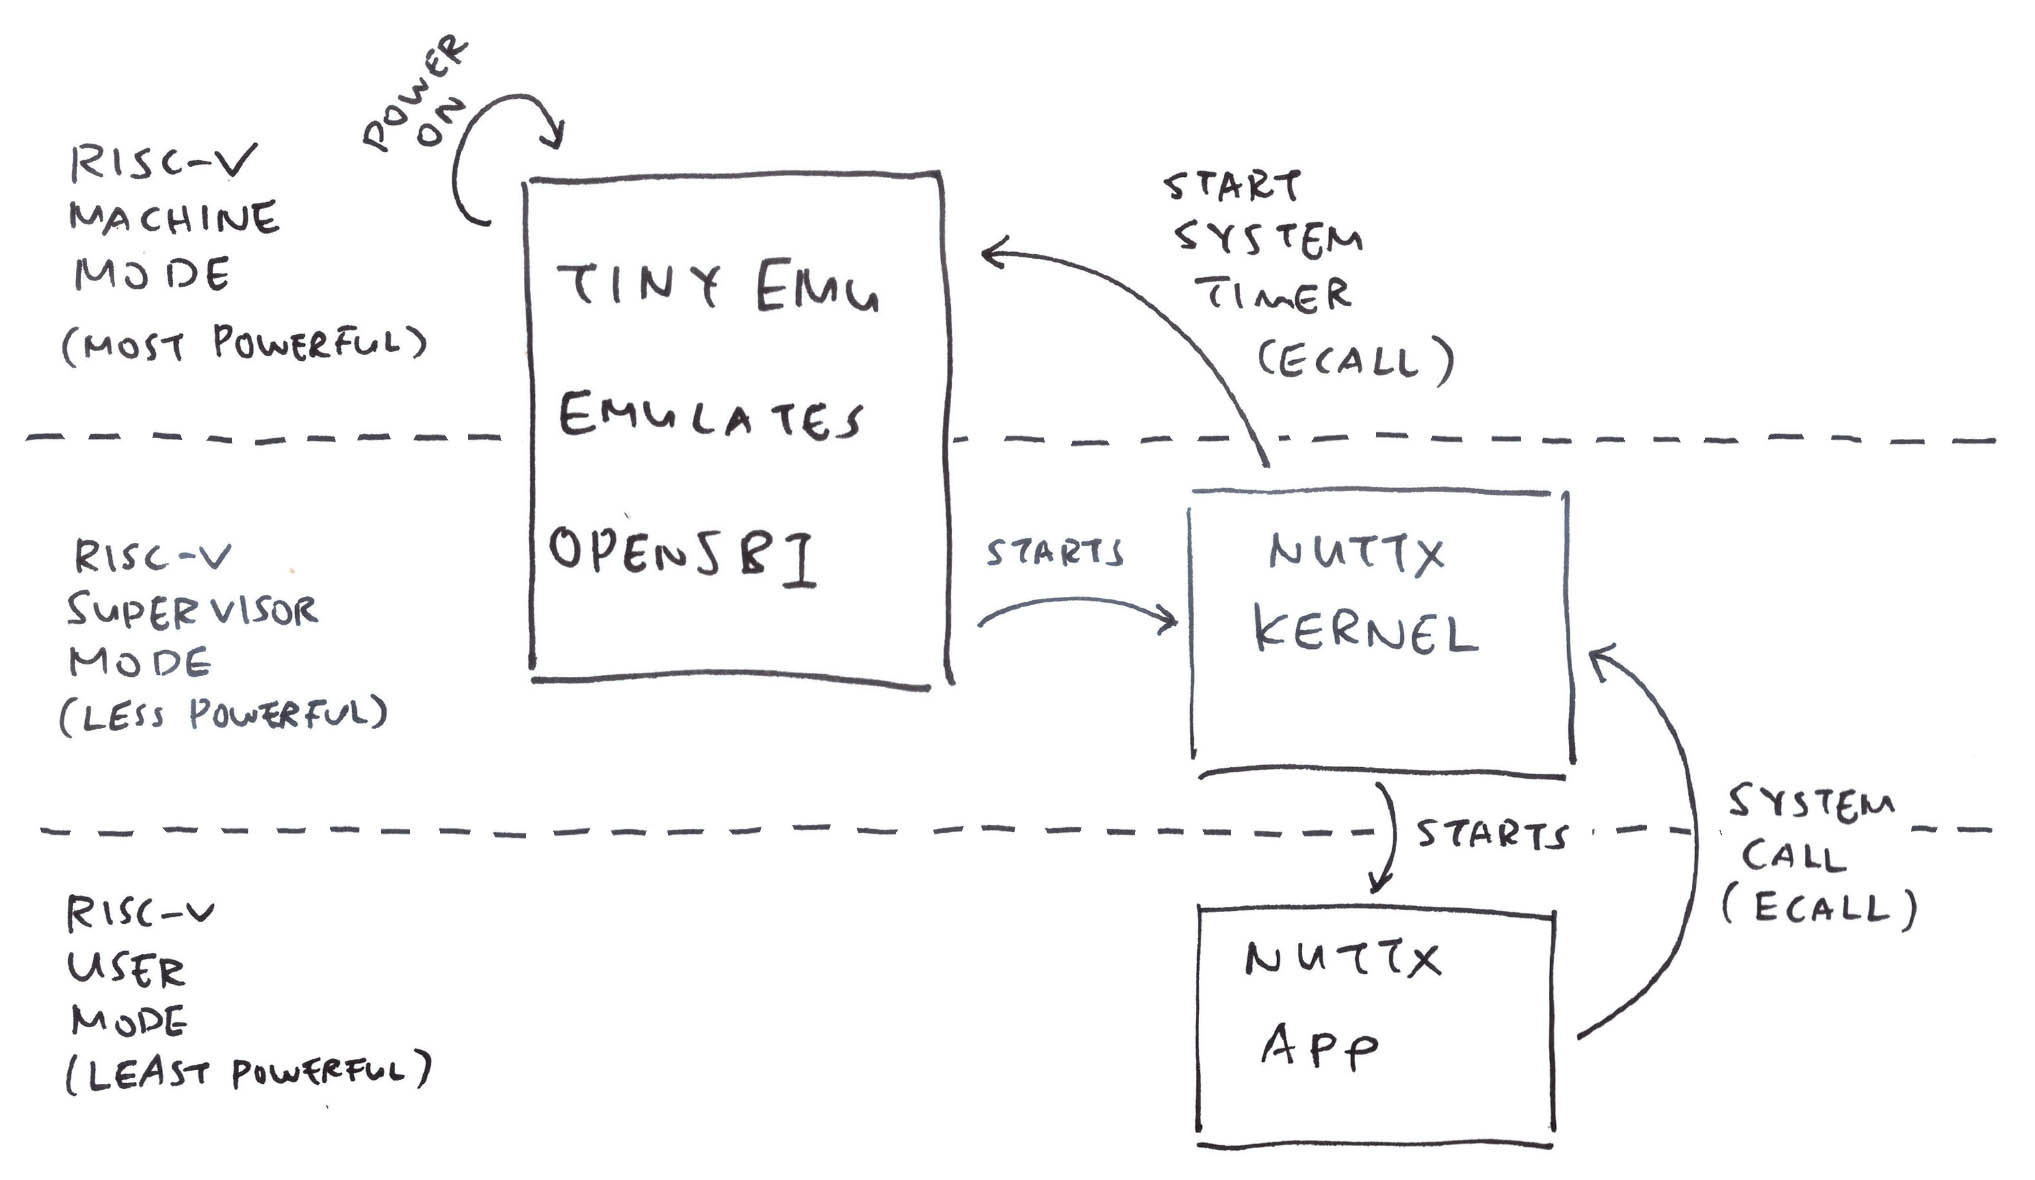
What’s this Supervisor Mode? Why does it matter?
We created our Ox64 Emulator with the TinyEMU RISC-V Emulator. And TinyEMU boots NuttX in RISC-V Machine Mode. (Pic above)
Which won’t work because NuttX expects to run in RISC-V Supervisor Mode…
All Operating Systems should boot in Machine Mode. Right?
Actually a RISC-V SBC (like Ox64) will boot the OpenSBI Supervisor Binary Interface in Machine Mode…
Followed by the NuttX Kernel (or Linux Kernel) in Supervisor Mode…
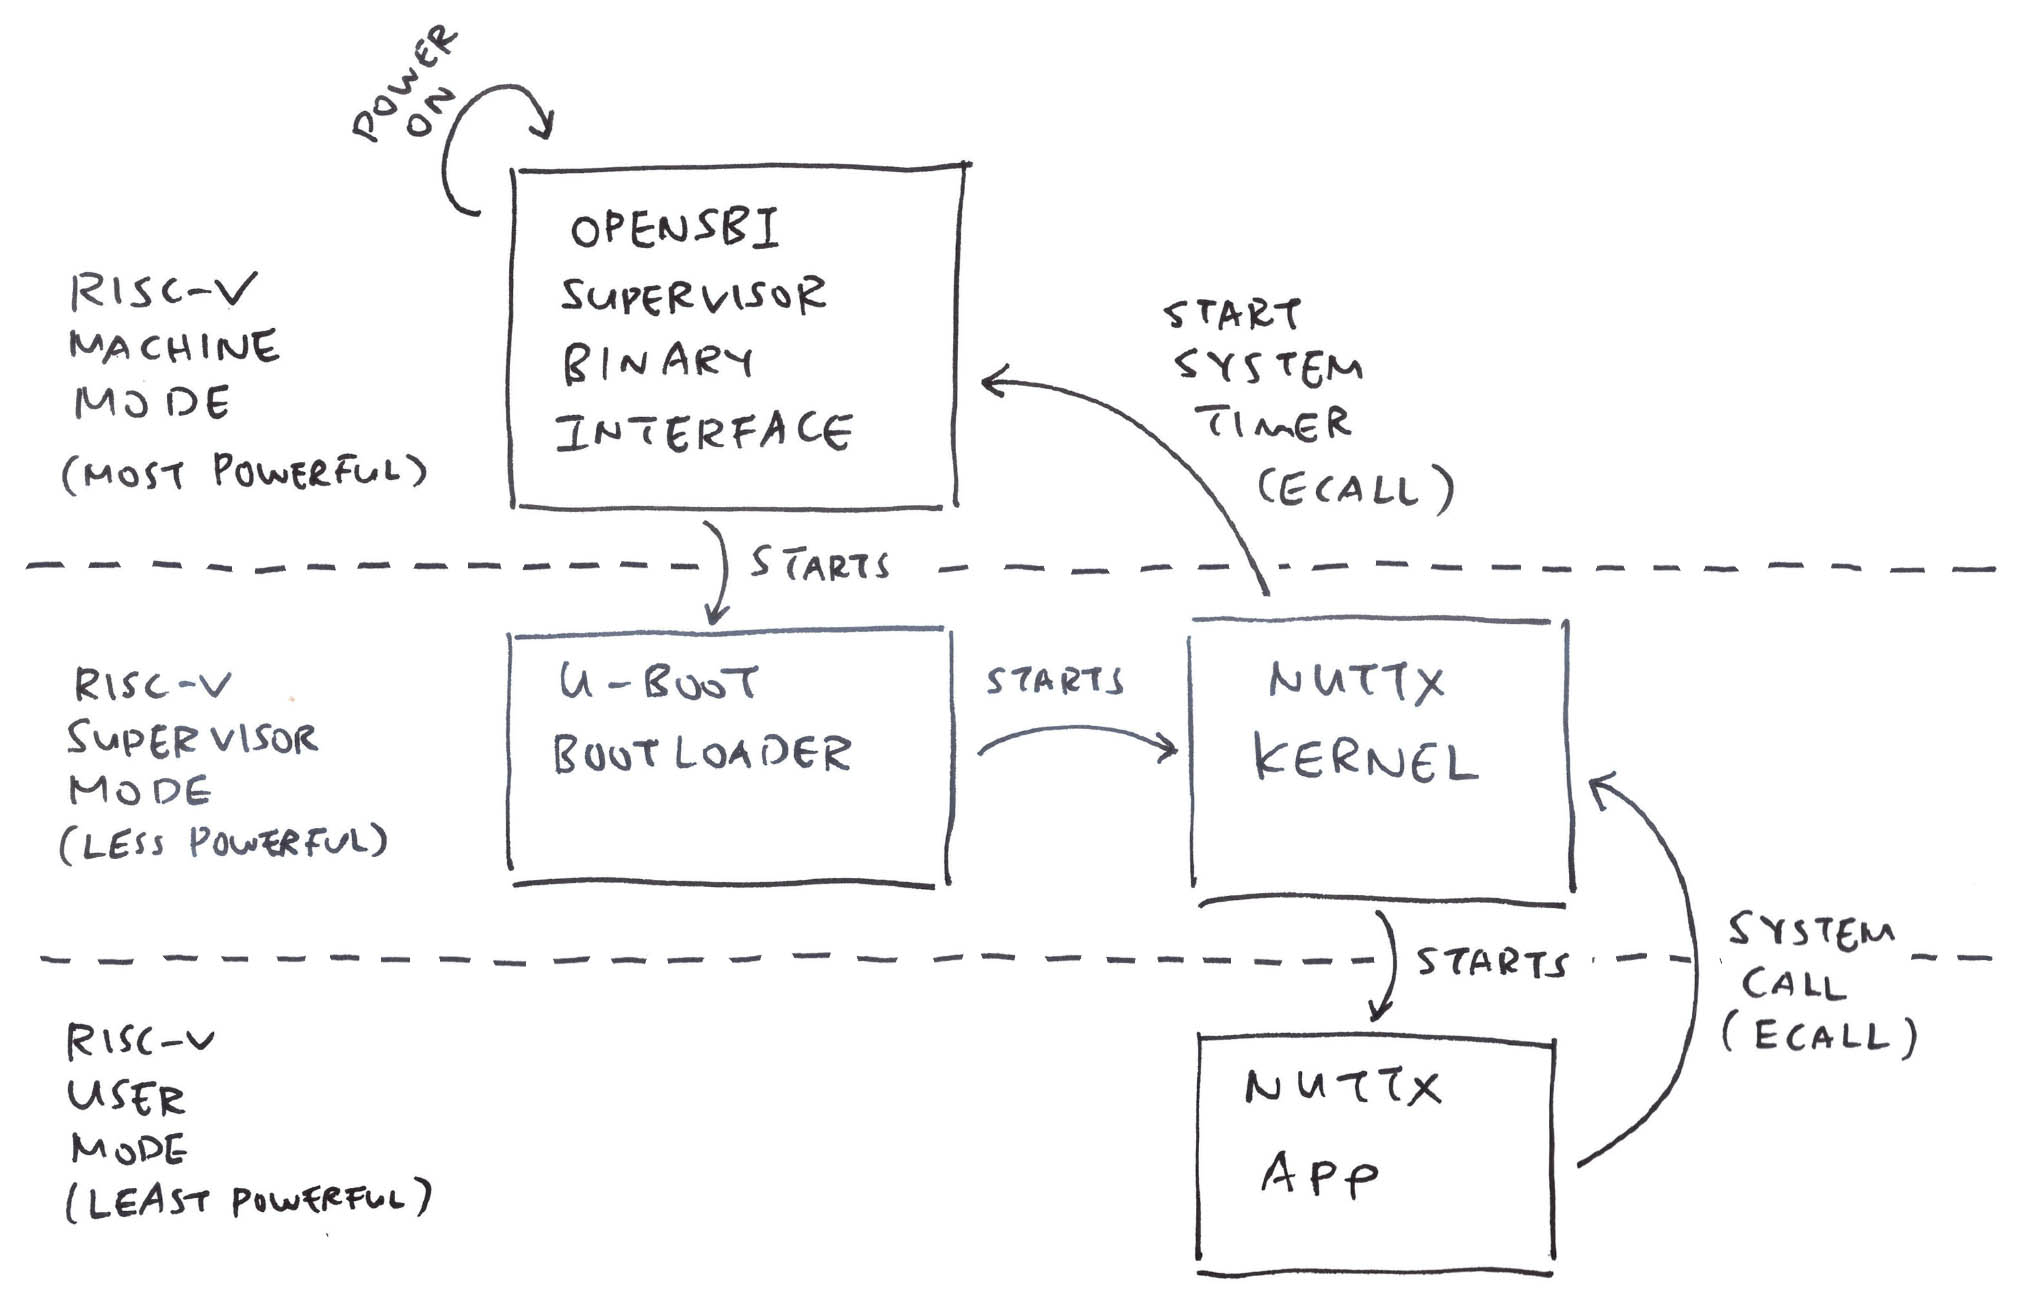
How to fix this?
We tweak TinyEMU to boot NuttX in Supervisor Mode (instead of Machine Mode)…
We do this in the TinyEMU Boot Code: riscv_machine.c
// At Startup: Init the TinyEMU Boot Code...
void copy_bios(...) {
  ...
  // Load RAM_BASE_ADDR into Register T0.
  // That's 0x5020_0000, the Start Address of
  // NuttX Kernel (Linux too)
  auipc t0, RAM_BASE_ADDR

  // Load the Device Tree into Register A1.
  // (Used by Linux but not NuttX)
  auipc a1, dtb
  addi  a1, a1, dtb

  // Load the Hart ID (CPU ID: 0) into Register A0
  csrr  a0, mhartid
The code above comes from the original TinyEMU Emulator.
Next comes the code that we specially inserted for our Ox64 Emulator: riscv_machine.c
  // Previously: We jump to RAM_BASE_ADDR in Machine Mode
  // Now: We jump to RAM_BASE_ADDR in Supervisor Mode...

  // Delegate all Exceptions to Supervisor Mode (instead of Machine Mode)
  // We set MEDELEG CSR Register to 0xFFFF
  lui   a5, 0x10   ; nop  // A5 is 0x10000
  addiw a5, a5, -1 ; nop  // A5 is 0xFFFF
  csrw  medeleg, a5

  // Delegate all Interrupts to Supervisor Mode (instead of Machine Mode)
  // We set MIDELEG CSR Register to 0xFFFF
  csrw  mideleg, a5

  // Rightfully: Follow the OpenSBI Settings for Ox64
  // Boot HART MIDELEG: 0x0222
// Boot HART MEDELEG: 0xB109(MEDELEG and MIDELEG explained)
The code above delegates all Exceptions and Interrupts to RISC-V Supervisor Mode. (Instead of Machine Mode)
Next we set the Previous Privilege Mode to Supervisor Mode (we’ll see why)…
  // Clear these bits in MSTATUS CSR Register...
  // MPP (Bits 11 and 12): Clear the Previous Privilege Mode
  lui   a5, 0xffffe ; nop
  addiw a5, a5, 2047
  csrc  mstatus, a5

  // Set these bits in MSTATUS CSR Register...
  // MPPS (Bit 11): Previous Privilege Mode is Supervisor Mode
  // SUM  (Bit 18): Allow Supervisor Mode to access Memory of User Mode
  lui   a5, 0x41
  addiw a5, a5, -2048
csrs mstatus, a5(MSTATUS and SUM are explained here)
Why set Previous Privilege to Supervisor Mode? So we can execute an MRET (Return from Machine Mode) that will jump to the Previous Privilege… Supervisor Mode!
  // Jump to RAM_BASE_ADDR in Supervisor Mode:
  // Set the MEPC CSR Register to RAM_BASE_ADDR
  // Then Return from Machine Mode to Supervisor Mode
  csrw  mepc, t0
  mret
Do we need so much Boot Code?
Yes! Check out what happens if we remove some bits of our Boot Code from TinyEMU…
NuttX can’t access the System Timer because it runs in RISC-V Supervisor Mode…
What can we do to help?
NuttX will make a System Call (ECALL) to OpenSBI to start the System Timer (pic above)…
And NuttX reads the System Time through the TIME CSR Register: riscv_sbi.c
// Fetch the System Time...
uint64_t riscv_sbi_get_time(void) {

  // Read the TIME CSR Register, which becomes
  // the `RDTIME` RISC-V Instruction
  return READ_CSR(time);
}
Thus we emulate the OpenSBI System Timer and the TIME CSR Register.
At Startup: We search for the ECALL to OpenSBI and remember the ECALL Address: riscv_machine.c
// Scan the Kernel Image for Special Instructions...
uint8_t *kernel_ptr = get_ram_ptr(s, RAM_BASE_ADDR, TRUE);
for (int i = 0; i < 0x10000; i++) {

  // If we find the ECALL Instruction:
  // 00000073 ecall
  const uint8_t ecall[] = { 0x73, 0x00, 0x00, 0x00 };
  if (memcmp(&kernel_ptr[i], ecall, sizeof(ecall)) == 0) {

    // Remember the ECALL Address
    ecall_addr = RAM_BASE_ADDR + i;
  }
What about the TIME CSR Register?
The TIME CSR Register gets assembled into the RDTIME RISC-V Instruction…
// Read the TIME CSR Register, which becomes
// the `RDTIME` RISC-V Instruction
nuttx/arch/risc-v/src/common/supervisor/riscv_sbi.c:126
  riscv_sbi_get_time():
    return READ_CSR(time);
5020bae6: c0102573 rdtime a0However RDTIME isn’t supported by TinyEMU. (Needs the Zicntr Extension)
Hence we patch RDTIME to become ECALL, and we emulate later: riscv_machine.c
  // If we find the RDTIME Instruction: (Read System Time)
  // c0102573 rdtime a0
  const uint8_t rdtime[] = { 0x73, 0x25, 0x10, 0xc0 };
  if (memcmp(&kernel_ptr[i], rdtime, sizeof(rdtime)) == 0) {

    // Patch RDTIME to become ECALL:
    // 00000073 ecall
    const uint8_t ecall[] = { 0x73, 0x00, 0x00, 0x00 };
    memcpy(&kernel_ptr[i], ecall,  sizeof(ecall));

    // Remember the RDTIME Address
    rdtime_addr = RAM_BASE_ADDR + i;
  }
How to handle both ECALLs? Check the details here…
Anything else we patched?
We patched these Special RISC-V Instructions to become ECALL: DCACHE.IALL and SYNC.S
## Ox64 Emulator patches the Special Instructions
$ ./temu nuttx.cfg

TinyEMU Emulator for Ox64 BL808 RISC-V SBC
Patched DCACHE.IALL (Invalidate all Page Table Entries in the D-Cache)
  at 0x5020099a
Patched SYNC.S (Ensure that all Cache Operations are completed)
  at 0x5020099e
Found ECALL (Start System Timer)
  at 0x5020bae0
Patched RDTIME (Read System Time)
at 0x5020bae6These instructions are specific to T-Head C906 CPU (and won’t work in TinyEMU). NuttX calls them to Flush the MMU Cache.
(Though we don’t emulate them right now)
Ox64 SBC has a UART Controller that will handle Console Input…
How do we emulate the Ox64 UART Controller?
Previously we emulated the BL808 UART Registers to do Console Output…
Console Input is tricky… We need to emulate UART Interrupts! (Pic above)
Any UART Controller in TinyEMU that we can reuse?
TinyEMU has a VirtIO Console that works like a UART Controller.
Let’s hack TinyEMU’s VirtIO Console so that it behaves like BL808 UART Controller.
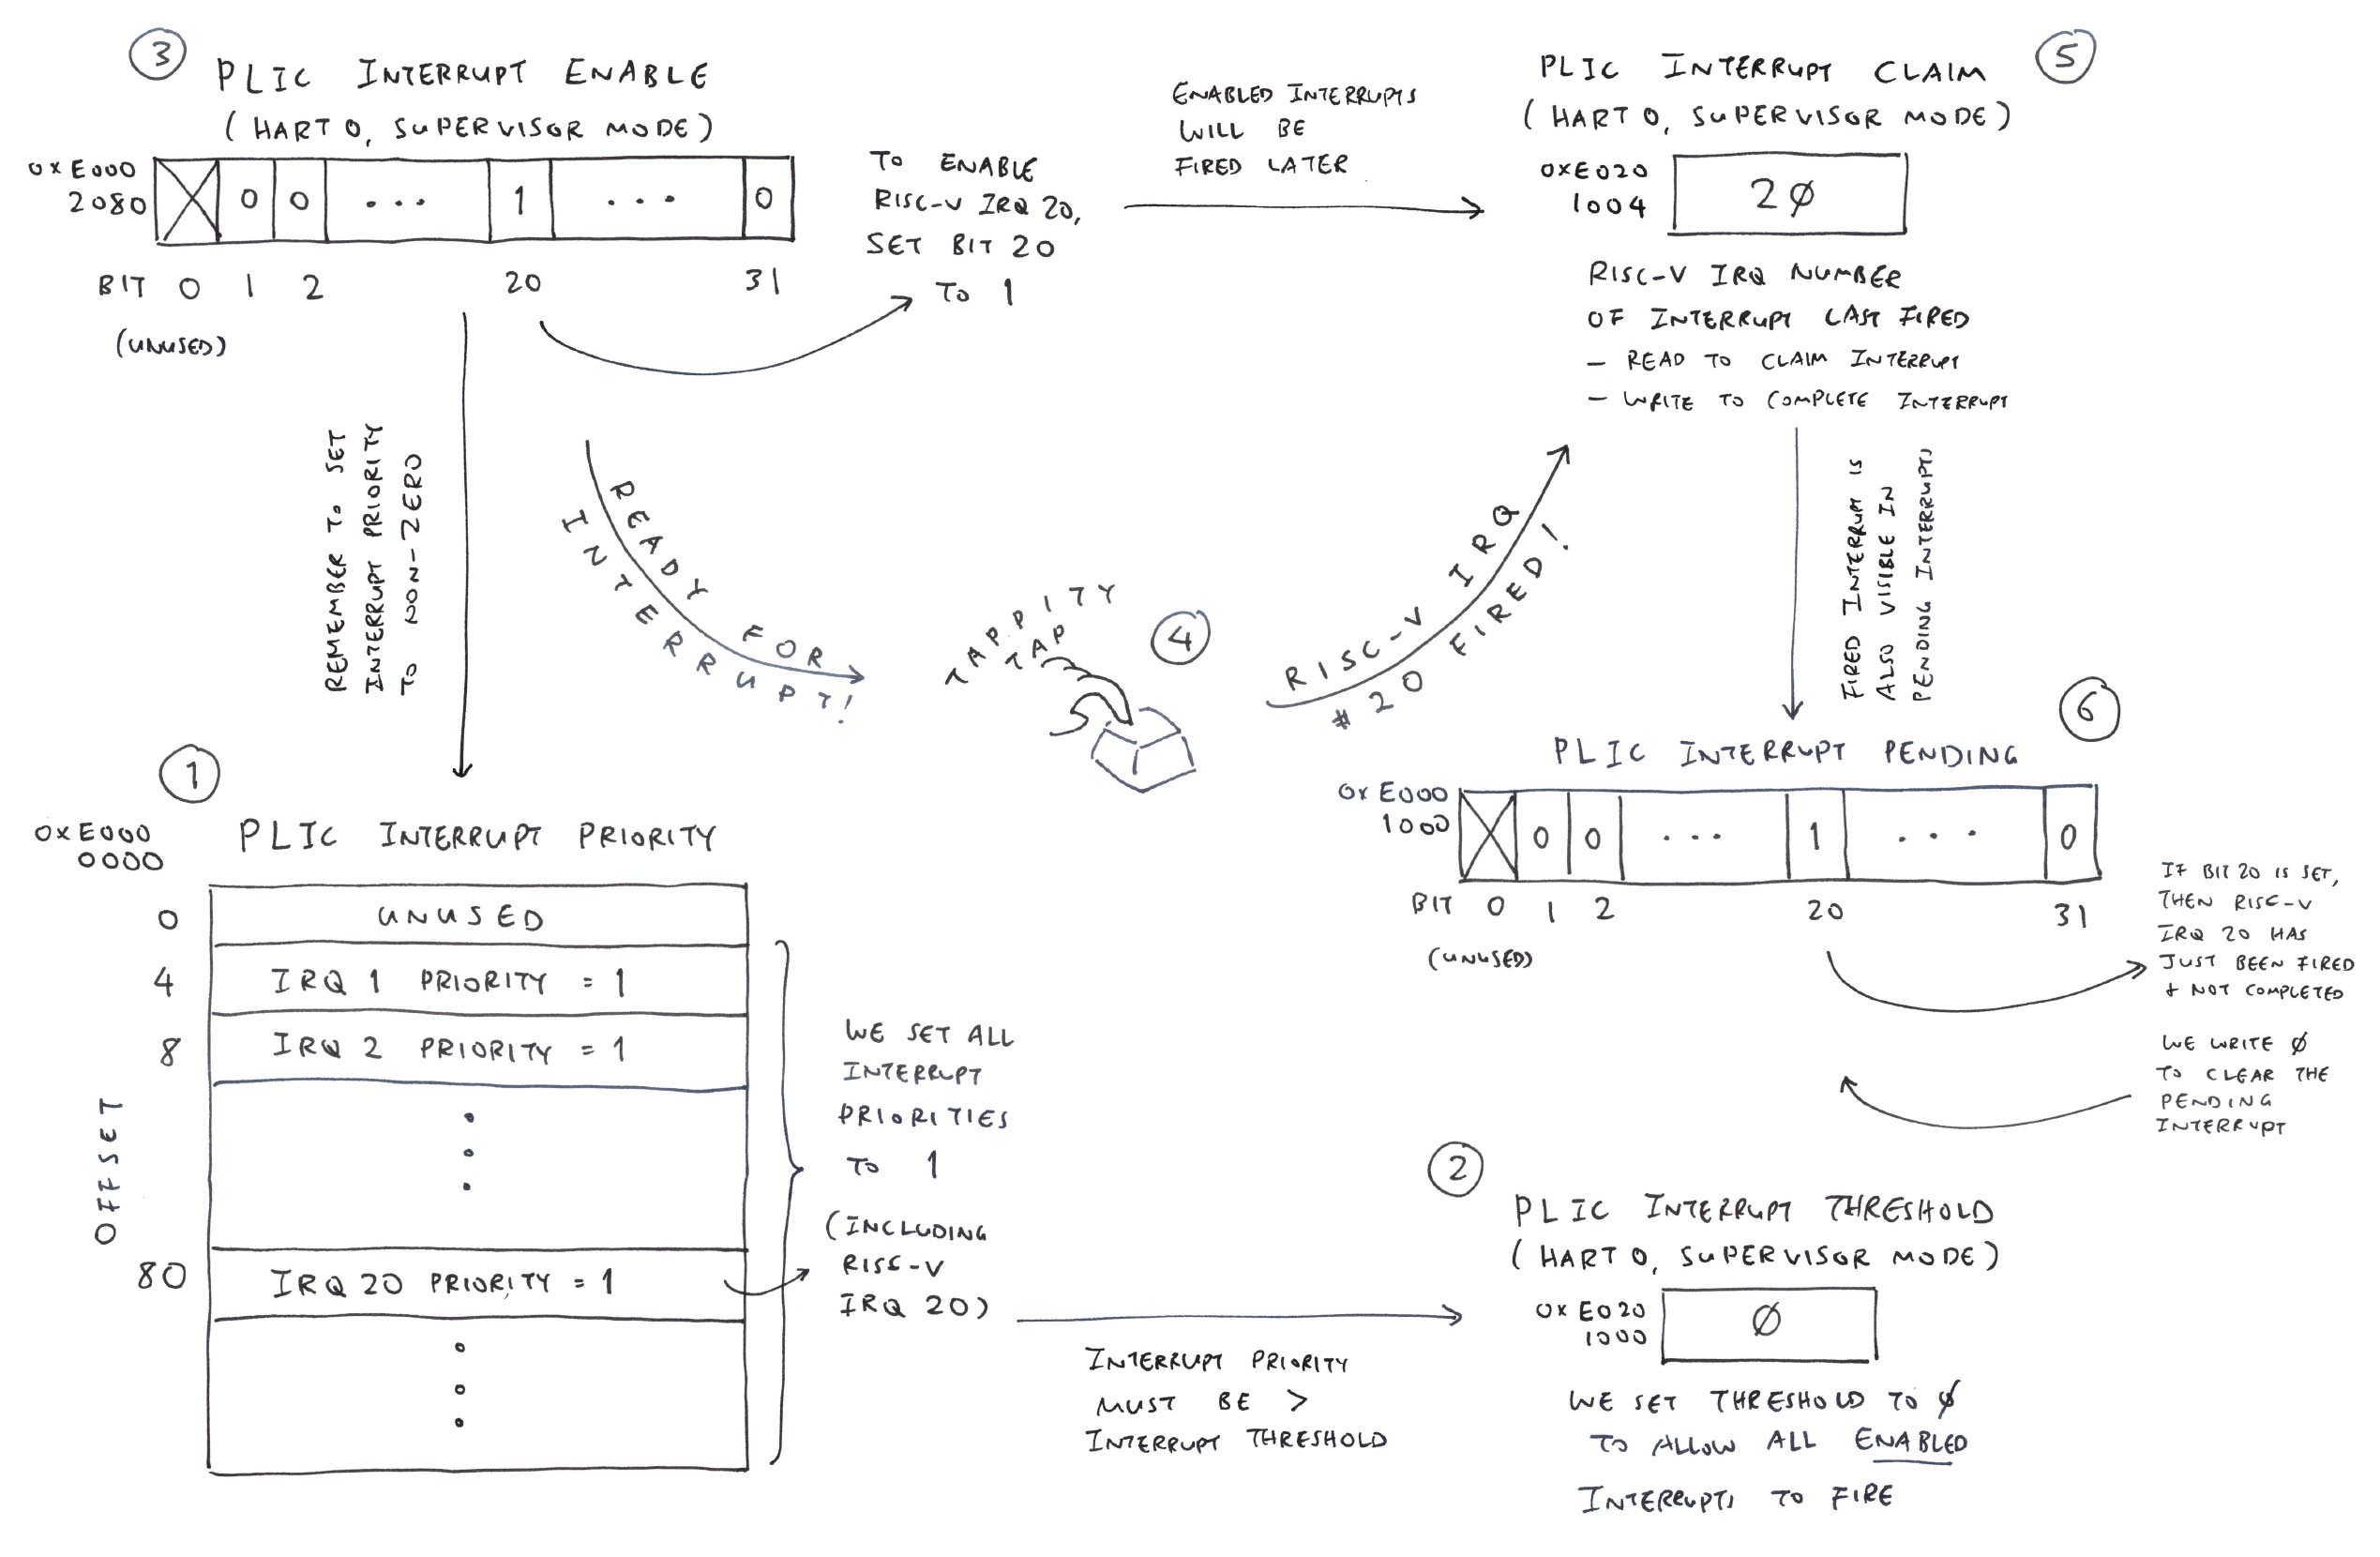
We tweak the VirtIO Interrupt Number so it triggers the same Interrupt as BL808 UART3: riscv_machine.c
// VirtIO now emulates
// BL808 UART3 Interrupt
#define VIRTIO_IRQ 20
When we detect a keypress, we trigger the UART Interrupt: virtio.c
// When we receive a keypress...
int virtio_console_write_data(VIRTIODevice *s, const uint8_t *buf, int buf_len) {

  // Pass the keypress to NuttX later
  set_input(buf[0]);

  // Trigger the UART Interrupt
  s->int_status |= 1;
set_irq(s->irq, 1);When we run this: TinyEMU loops forever handling UART Interrupts :-(
Surely we need to Clear the UART Interrupt?
We check our BL808 UART Driver in NuttX: bl808_serial.c
// NuttX Interrupt Handler for BL808 UART
int uart_interrupt(int irq, void *context, void *arg) {

  // At 0x3000_2020: Read the UART Interrupt Status (uart_int_sts)
  int_status = getreg32(BL808_UART_INT_STS(uart_idx));

  // At 0x3000_2024: Read the UART Interrupt Mask (uart_int_mask)
  int_mask = getreg32(BL808_UART_INT_MASK(uart_idx));

  // If UART Interrupt Status says there's UART Input...
  if ((int_status & UART_INT_STS_URX_END_INT) &&
    !(int_mask & UART_INT_MASK_CR_URX_END_MASK)) {

    // At 0x3000_2028: Clear the UART Interrupt (uart_int_clear)
    putreg32(UART_INT_CLEAR_CR_URX_END_CLR, BL808_UART_INT_CLEAR(uart_idx));

    // At 0x3000_208C: Read the UART Input (uart_fifo_rdata)
uart_recvchars(dev);(uart_recvchars is defined here)
Aha! We must emulate the BL808 UART Registers above…
UART Interrupt Status should say there’s UART Input
UART Interrupt Mask should return 0
UART Clear Interrupt should clear the VirtIO Interrupt
UART Input should return the keypress
Now we see NuttX correctly handling the UART Interrupt triggered by TinyEMU…
## When we press a key...
## TinyEMU triggers the UART Interrupt
plic_set_irq: irq_num=20, state=1
plic_update_mip: set_mip, pending=0x80000, served=0x0
raise_exception: cause=-2147483639
raise_exception2: cause=-2147483639, tval=0x0

## NuttX Claims the UART Interrupt
plic_read: offset=0x201004
plic_update_mip: reset_mip, pending=0x80000, served=0x80000

## NuttX handles the UART Interrupt in Interrupt Handler
virtio_ack_irq
plic_set_irq: irq_num=20, state=0
plic_update_mip: reset_mip, pending=0x0, served=0x80000

## NuttX Completes the UART Interrupt
plic_write: offset=0x201004, val=0x14
plic_update_mip: reset_mip, pending=0x0, served=0x0Finally Console Input works OK yay!
Some more tweaks to TinyEMU VirtIO for Console Input…
We always allow VirtIO to Write Data
We’re always Ready for VirtIO Writes
We disable the Console Resize Event
(Because the UART Interrupt crashes NuttX at startup)
We created a tool that’s super helpful for validating our Daily NuttX Builds, checking if they’ll actually boot OK on Ox64…
We created an Ox64 Emulator with TinyEMU RISC-V Emulator
Fixed it to boot NuttX in Supervisor Mode
Emulated OpenSBI for setting the System Timer
Emulated the UART Interrupts for Console Input
Then we ran everything with an Expect Script
Which becomes our Daily Automated Testing
Previously we tried creating a PinePhone Emulator, but Arm64 Emulation was way too difficult. Ox64 with RISC-V is so much easier!
Many Thanks to my GitHub Sponsors (and the awesome NuttX Community) for supporting my work! This article wouldn’t have been possible without your support.
Got a question, comment or suggestion? Create an Issue or submit a Pull Request here…
lupyuen.github.io/src/tinyemu3.md
Earlier we saw a big chunk of TinyEMU Boot Code (pic above) that will start NuttX in RISC-V Supervisor Mode (instead of Machine Mode)…
Can’t we call MRET directly? And jump from Machine Mode to Supervisor Mode?
// Load RAM_BASE_ADDR into Register T0.
// That's 0x5020_0000, the Start Address of
// NuttX Kernel (Linux too)
auipc t0, RAM_BASE_ADDR

// Testing: Can we jump like this?
// Jump to RAM_BASE_ADDR in Supervisor Mode:
// Set the MEPC CSR Register to RAM_BASE_ADDR
// Then Return from Machine Mode to Supervisor Mode
csrw  mepc, t0
mret
Watch what happens when we run it…
## Illegal Instruction in RISC-V User Mode (priv=U)
raise_exception2: cause=2
  tval=0x10401073
  pc=50200074
  priv=U
  mstatus=a00000080
TinyEMU halts with an Illegal Instuction. The offending code is here: bl808_head.S
nuttx/arch/risc-v/src/chip/bl808_head.S:124
  /* Disable all interrupts (i.e. timer, external) in sie */
  csrw sie, zero
50200074: 10401073 csrw sie, zero“csrw sie” writes to SIE (Supervisor-Mode Interrupt Enable). And SIE is a Supervisor-Mode CSR Register.
Why is this instruction invalid?
The instruction is invalid because we’re running in RISC-V User Mode (priv=U), not Supervisor Mode!
Somehow MRET has jumped from Machine Mode to User Mode.
To fix this, we set the Previous Privilege Mode to Supervisor Mode (so MRET will jump to Supervisor Mode)…
// Clear these bits in MSTATUS CSR Register...
// MPP (Bits 11 and 12): Clear the Previous Privilege Mode
lui   a5, 0xffffe ; nop
addiw a5, a5, 2047
csrc  mstatus, a5

// Set these bits in MSTATUS CSR Register...
// MPPS (Bit 11): Previous Privilege Mode is Supervisor Mode
// SUM  (Bit 18): Allow Supervisor Mode to access Memory of User Mode
lui   a5, 0x41
addiw a5, a5, -2048
csrs  mstatus, a5

// Return from Machine Mode to Supervisor Mode
mret(SUM is needed for NuttX Apps)
(Why Register A5? Because we copied from the NuttX QEMU Boot Code)
(Why NOP? Because TinyEMU needs every Boot Instruction padded to 32 bits)
Now what happens?
NuttX Shell makes a System Call (ECALL) to NuttX Kernel. Which is supposed to jump from RISC-V User Mode to Supervisor Mode…
## NuttX Kernel starts NuttX Shell
nx_start_application: Starting init task: /system/bin/init

## NuttX Shell makes an ECALL from User Mode (priv=U)
raise_exception2: cause=8, tval=0x0
  pc=800019c6
  priv=U
  mstatus=a000400a1
  mideleg=00
  mie=00
  mip=80

## But TinyEMU jumps to Machine Mode! (priv=M)
raise_exception2: cause=2, tval=0x0
  pc=00
  priv=M
  mstatus=a000400a1
  mideleg=00
  mie=00
  mip=80
Nope, it actually jumps from RISC-V User Mode (priv=U) to Machine Mode (priv=M)! (Instead of Supervisor Mode)
To fix this: We delegate all Exceptions and Interrupts to RISC-V Supervisor Mode. (Instead of Machine Mode)
// Delegate all Exceptions to Supervisor Mode (instead of Machine Mode)
// We set MEDELEG CSR Register to 0xFFFF
lui   a5, 0x10   ; nop  // A5 is 0x10000
addiw a5, a5, -1 ; nop  // A5 is 0xFFFF
csrw  medeleg, a5

// Delegate all Interrupts to Supervisor Mode (instead of Machine Mode)
// We set MIDELEG CSR Register to 0xFFFF
csrw  mideleg, a5

// Rightfully: Follow the OpenSBI Settings for Ox64
// Boot HART MIDELEG: 0x0222
// Boot HART MEDELEG: 0xB109(MEDELEG is the Machine Exception Delegation Register)
(MIDELEG is the Machine Interrupt Delegation Register)
(MEDELEG and MIDELEG are explained here)
Does it work?
Finally NuttX Shell starts OK! And User-Mode ECALLs are working perfectly yay!
nx_start_application:
  Starting init task:
    /system/bin/init
NuttShell (NSH) NuttX-12.4.0
nsh>That’s why we need the big chunk of TinyEMU Boot Code that we saw earlier.
Earlier we talked about emulating OpenSBI to start the System Timer (pic above)…
And at startup, we captured the address of the System Call (ECALL) from NuttX Kernel (Supervisor Mode) to OpenSBI (Machine Mode): riscv_machine.c
## Ox64 Emulator patches the Special Instructions
$ ./temu nuttx.cfg

TinyEMU Emulator for Ox64 BL808 RISC-V SBC
Patched DCACHE.IALL (Invalidate all Page Table Entries in the D-Cache)
  at 0x5020099a
Patched SYNC.S (Ensure that all Cache Operations are completed)
  at 0x5020099e
Found ECALL (Start System Timer)
  at 0x5020bae0
Patched RDTIME (Read System Time)
at 0x5020bae6This is how we emulate the ECALL to OpenSBI: riscv_cpu.c
// Called by TinyEMU to handle RISC-V Exceptions
void raise_exception2(RISCVCPUState *s, uint32_t cause, target_ulong tval) {
  ...
  // If this is an ECALL from Supervisor Mode...
  // (Not ECALL from User Mode)
  if (cause == CAUSE_SUPERVISOR_ECALL) {

    // If Program Counter is the
    // ECALL to OpenSBI...
    if (s->pc == ecall_addr) {

      // We emulate the OpenSBI Set Timer Function:
      // https://github.com/riscv-non-isa/riscv-sbi-doc/blob/v1.0.0/riscv-sbi.adoc#61-function-set-timer-fid-0

      // Clear the Pending Timer Interrupt Bit
      // (Says the SBI Spec)
      riscv_cpu_reset_mip(s, MIP_STIP);

      // If Parameter A0 is not -1, set the System Timer (timecmp)
      // (Parameter A0 is Register X10)
      uint64_t timecmp = s->reg[10];
      if (timecmp != (uint64_t) -1) {
        set_timecmp(NULL, timecmp);
      }

      // Skip to the next instruction (RET)
      s->pc += 4;
      return;
set_timecmp sets the Machine-Mode System Timer: riscv_machine.c
// Set the System Timer
void set_timecmp(RISCVMachine *machine0, uint64_t timecmp) {

  // At Startup: Remember the RISC-V Machine and return
  static RISCVMachine *machine = NULL;
  if (machine0 != NULL) { machine = machine0; return; }

  // Otherwise set the System Timer
  if (machine == NULL) { puts("set_timecmp: machine is null"); return; }
  machine->timecmp = timecmp;
}(set_timecmp is initialised by riscv_machine_init)
Note that nothing will happen unless we trigger a Supervisor-Mode Timer Interrupt to NuttX…
We’re emulating the OpenSBI System Timer with the Machine-Mode System Timer?
Exactly! We do the same for reading the System Time…
Just now we talked about emulating the RDTIME RISC-V Instruction for reading the System Time…
And at startup we do these: riscv_machine.c
Capture the address of the RDTIME Instruction
Patch the RDTIME Instruction to become a System Call (ECALL)
## Ox64 Emulator patches the Special Instructions
$ ./temu nuttx.cfg

TinyEMU Emulator for Ox64 BL808 RISC-V SBC
Patched DCACHE.IALL (Invalidate all Page Table Entries in the D-Cache)
  at 0x5020099a
Patched SYNC.S (Ensure that all Cache Operations are completed)
  at 0x5020099e
Found ECALL (Start System Timer)
  at 0x5020bae0
Patched RDTIME (Read System Time)
at 0x5020bae6This is how we emulate the Patched ECALL to read the System Time: riscv_cpu.c
// Called by TinyEMU to handle RISC-V Exceptions
void raise_exception2(RISCVCPUState *s, uint32_t cause, target_ulong tval) {
  ...
  // If this is an ECALL from Supervisor Mode...
  // (Not ECALL from User Mode)
  if (cause == CAUSE_SUPERVISOR_ECALL) {

    // If Program Counter is the
    // (formerly) RDTIME Instruction...
    if (s->pc == rdtime_addr) {

      // We emulate the RDTIME Instruction to fetch the System Time:
      // https://five-embeddev.com/riscv-isa-manual/latest/counters.html#zicntr-standard-extension-for-base-counters-and-timers

      // Return the System Time in Register A0
      // (Which is aliased to Register X10)
      s->reg[10] = real_time;

      // Skip to the next instruction (RET)
      s->pc += 4;
return; (set_timecmp is explained here)
(real_time is explained in the next section)
Note that nothing will happen unless we trigger a Supervisor-Mode Timer Interrupt to NuttX…
Previously we discussed the emulation of the System Timer…
But nothing will happen unless we trigger a Supervisor-Mode Timer Interrupt to NuttX!
This is how we trigger the Timer Interrupt: riscv_machine.c
// Called by TinyEMU periodically to check the System Timer
static int riscv_machine_get_sleep_duration(VirtMachine *s1, int delay) {
  ...
  // Pass the System Time to raise_exception2()
  real_time = rtc_get_time(m);

  // If the Timer Interrupt has not been triggered...
  if (!(riscv_cpu_get_mip(s) & MIP_STIP)) {

    // And the System Timer has expired...
    const int64_t delay2 = m->timecmp - rtc_get_time(m);
    if (delay2 <= 0) {

      // We trigger the Timer Interrupt
      // for Supervisor Mode
      riscv_cpu_set_mip(s, MIP_STIP);
    }
  }
Again we’re reusing the Machine-Mode System Timer, to trigger the Supervisor-Mode Timer Interrupt.
With this Timer Interrupt, usleep (and other Timer Functions) will work perfectly in NuttX…
Loading...
TinyEMU Emulator for Ox64 BL808 RISC-V SBC
NuttShell (NSH) NuttX-12.4.0-RC0
nsh> usleep 1
nsh>