📝 14 Jan 2024
(Live Demo of NuttX on TinyEMU)
Apache NuttX RTOS is a tiny operating system for 64-bit RISC-V Machines and many other platforms. (Arm, x64, ESP32, …)
TinyEMU is a barebones RISC-V Emulator that runs in a Web Browser. (Thanks to WebAssembly)
Can we boot NuttX inside a Web Browser, with a little help from TinyEMU? In this article we…
Boot NuttX in TinyEMU RISC-V Emulator
Modify NuttX for HTIF Console
(Berkeley Host-Target Interface)
Explore VirtIO Console with OpenAMP Library
(Virtual I/O and Open Asymmetric Multi-Processing)
And run all this in our Web Browser
(With WebAssembly)
Why are we doing this?
We might run NuttX in a Web Browser and emulate the Ox64 BL808 RISC-V SBC. Which is great for testing NuttX Apps like Nim Blinky LED! (LVGL Graphical Apps too)
Also Imagine: A NuttX Dashboard that lights up in Real-Time, as the various NuttX Drivers are activated… Impossible is Nothing when NuttX runs in a Web Browser!
(Sorry QEMU Emulator is a bit too complex to customise)
Let’s get started with TinyEMU!
We begin by installing TinyEMU RISC-V Emulator at the Command Line…
## Install TinyEMU on macOS
## https://github.com/fernandotcl/homebrew-fernandotcl
## https://github.com/lupyuen/ox64-tinyemu/blob/upstream/.github/workflows/ci.yml#L22-L32
brew tap fernandotcl/homebrew-fernandotcl
brew install --HEAD fernandotcl/fernandotcl/tinyemu

## Install TinyEMU on Ubuntu
## https://github.com/lupyuen/ox64-tinyemu/blob/upstream/.github/workflows/ci.yml#L6-L13
sudo apt install libcurl4-openssl-dev libssl-dev zlib1g-dev libsdl2-dev
git clone https://github.com/fernandotcl/TinyEMU
cd TinyEMU
make
sudo make install

## Check TinyEMU. Should show:
## temu version 2019-02-10
temu

## Boot RISC-V Linux on TinyEMU (pic below)
## To Exit TinyEMU: Press Ctrl-A then `x`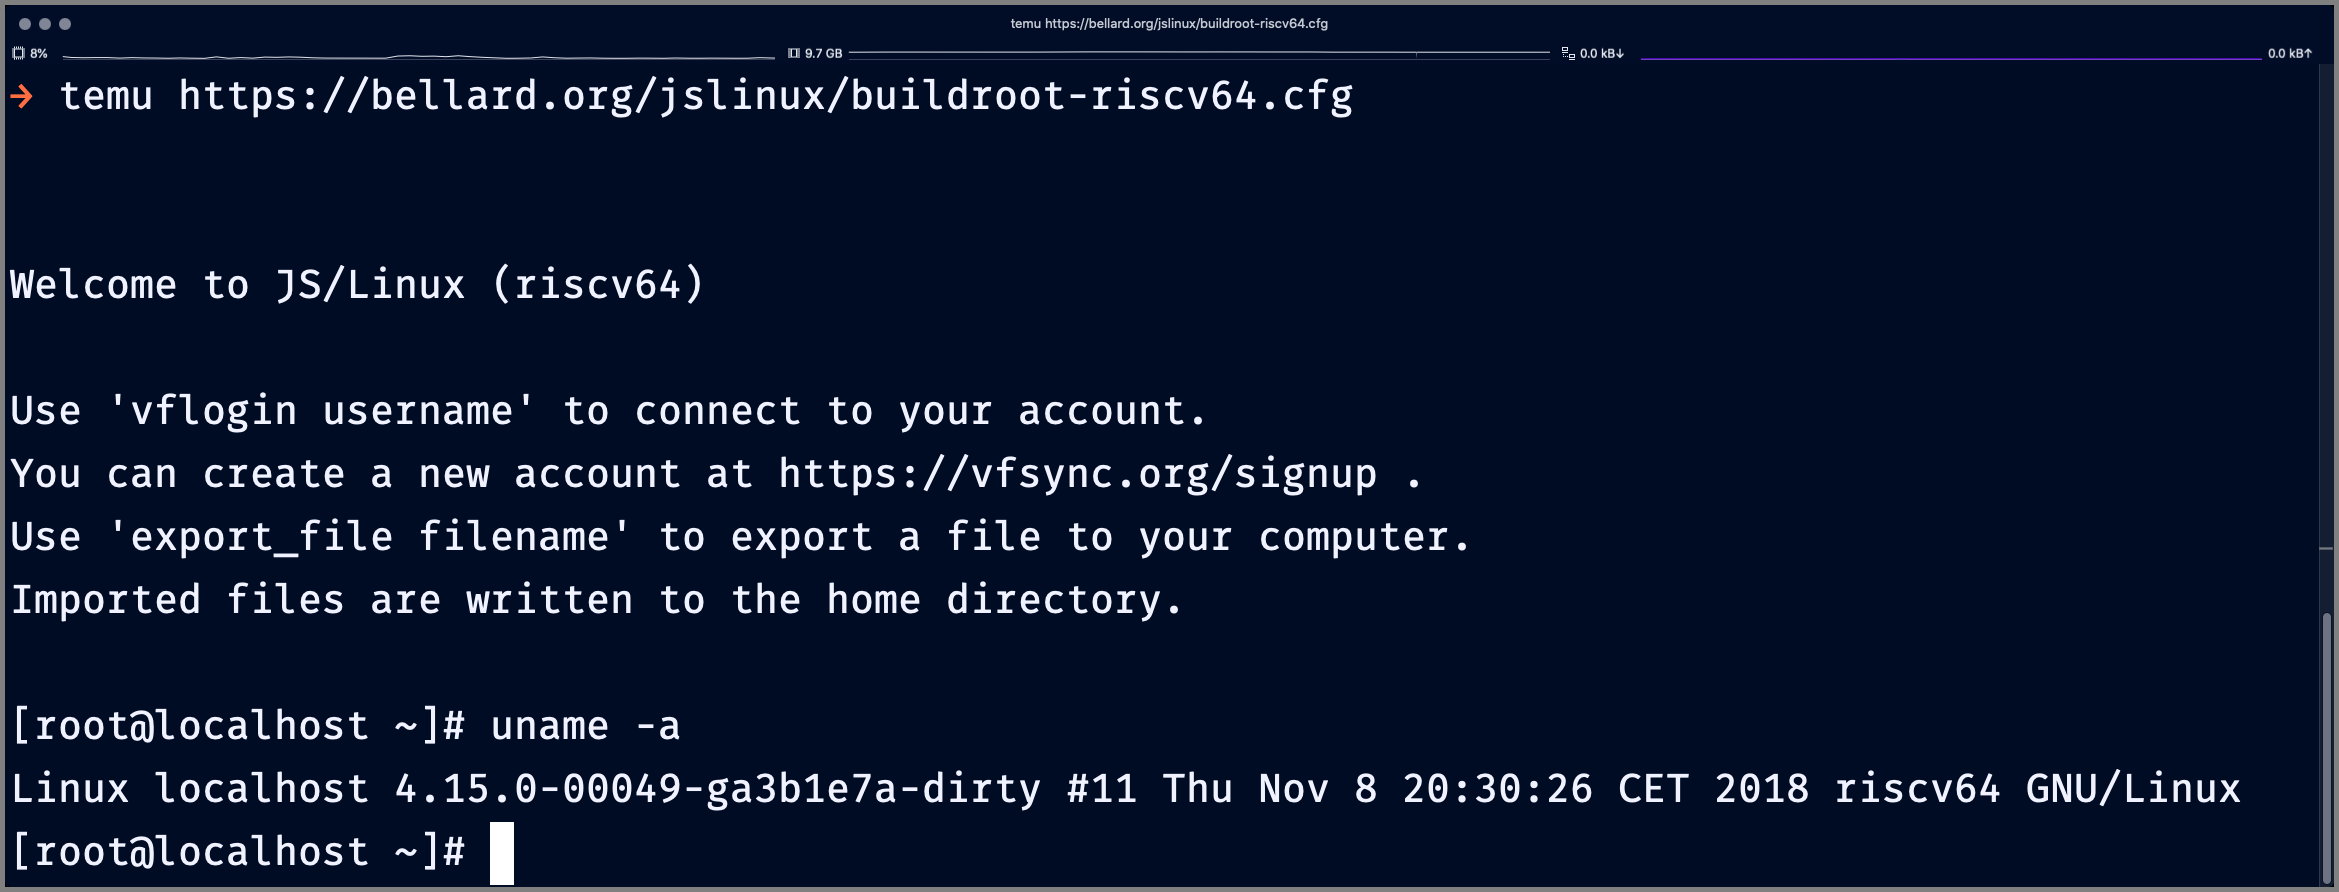
temu https://bellard.org/jslinux/buildroot-riscv64.cfgWhat about TinyEMU for the Web Browser?
No Worries! Everything that runs in Command Line TinyEMU… Will also run in Web Browser TinyEMU!
We tweak NuttX for TinyEMU…
Will TinyEMU boot our Operating System?
TinyEMU is hardcoded to run at these RISC-V Addresses: riscv_machine.c
// RISC-V Addresses for TinyEMU Emulator
#define LOW_RAM_SIZE           0x00010000  // 64KB
#define RAM_BASE_ADDR          0x80000000
#define CLINT_BASE_ADDR        0x02000000
#define CLINT_SIZE             0x000c0000

// HTIF Console and Virtual I/O
#define DEFAULT_HTIF_BASE_ADDR 0x40008000
#define VIRTIO_BASE_ADDR       0x40010000
#define VIRTIO_SIZE            0x1000
#define VIRTIO_IRQ             1

// Interrupt Controller and Framebuffer
#define PLIC_BASE_ADDR         0x40100000
#define PLIC_SIZE              0x00400000
#define FRAMEBUFFER_BASE_ADDR  0x41000000
Thus TinyEMU will boot our NuttX Kernel at 0x8000_0000. (RAM_BASE_ADDR)
(Yep TinyEMU has a Graphics Framebuffer)
And we set this Boot Address in NuttX?
Actually we don’t! NuttX for QEMU Emulator (64-bit RISC-V) is already configured to boot at 0x8000_0000: ld.script
/* NuttX boots at 0x80000000 */
SECTIONS {
  . = 0x80000000;
  .text : { _stext = . ;
So we’re all ready to boot NuttX QEMU on TinyEMU!
How to start the TinyEMU Emulator?
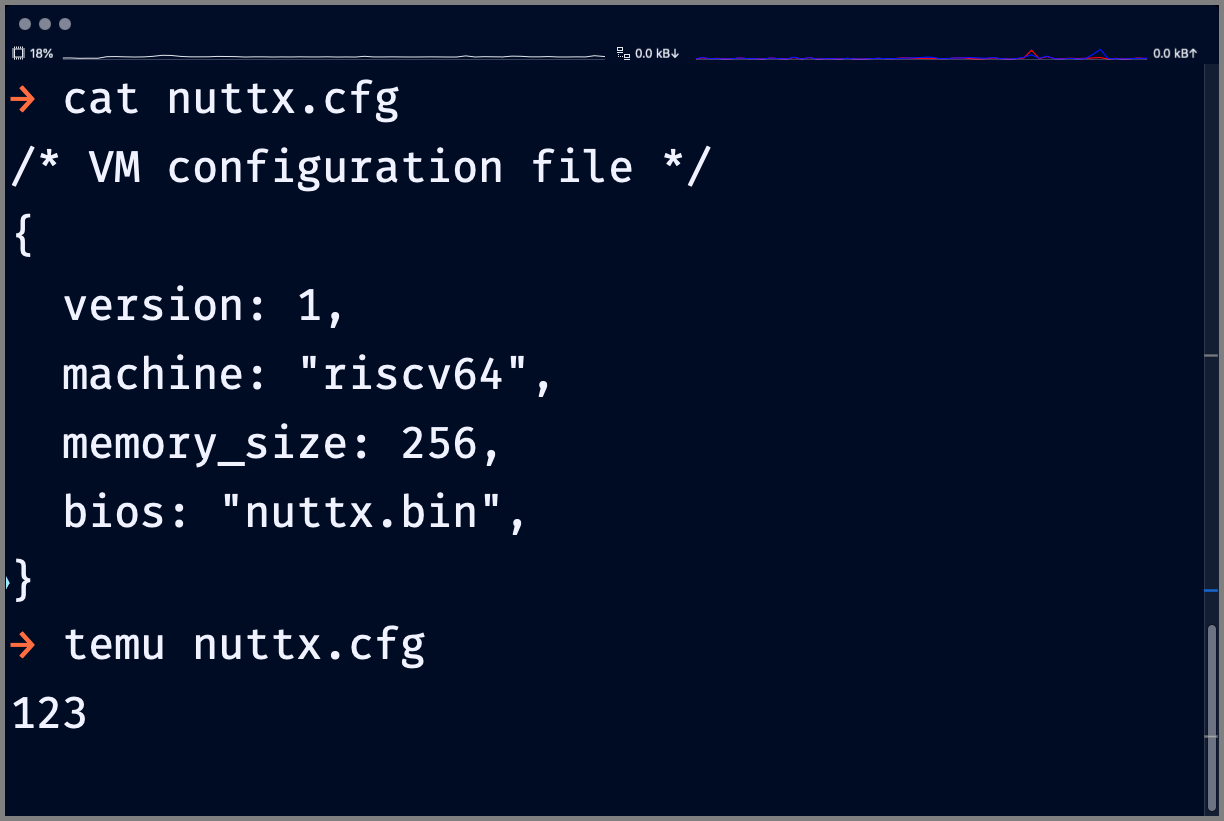
We create a TinyEMU Configuration File: nuttx.cfg
/* VM configuration file */
{
  version: 1,
  machine: "riscv64",
  memory_size: 256,
  bios: "nuttx.bin",
}
This will start the 64-bit RISC-V Emulator and boot it with our NuttX Kernel: nuttx.bin
(Booting Linux? It’s more complicated)
NuttX Kernel comes from?
Download nuttx.bin from the Test Release or Full Release…
Or build it ourselves with these steps.
(About Test Version vs Full Version)
That’s all we need?
You bet! Just go ahead and boot NuttX in TinyEMU…
## Boot NuttX in TinyEMU
## To Exit TinyEMU: Press Ctrl-A then `x`
$ temu nuttx.cfgHuh! We’re booting NuttX QEMU on TinyEMU?
Exactly… Nothing will appear in TinyEMU!
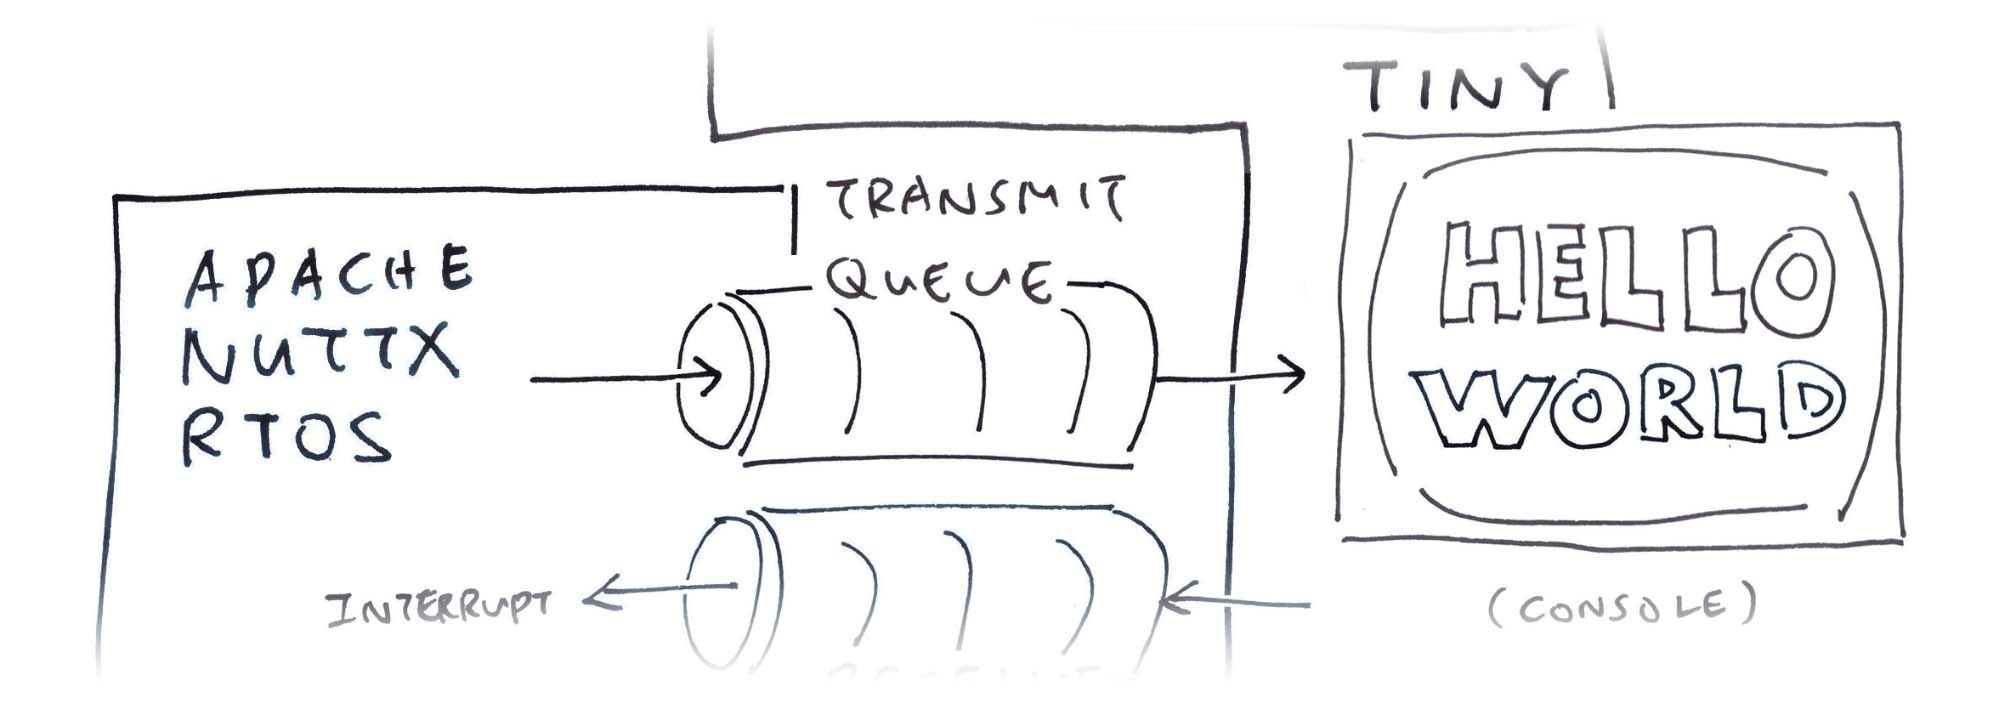
To watch NuttX run, we need HTIF Console…
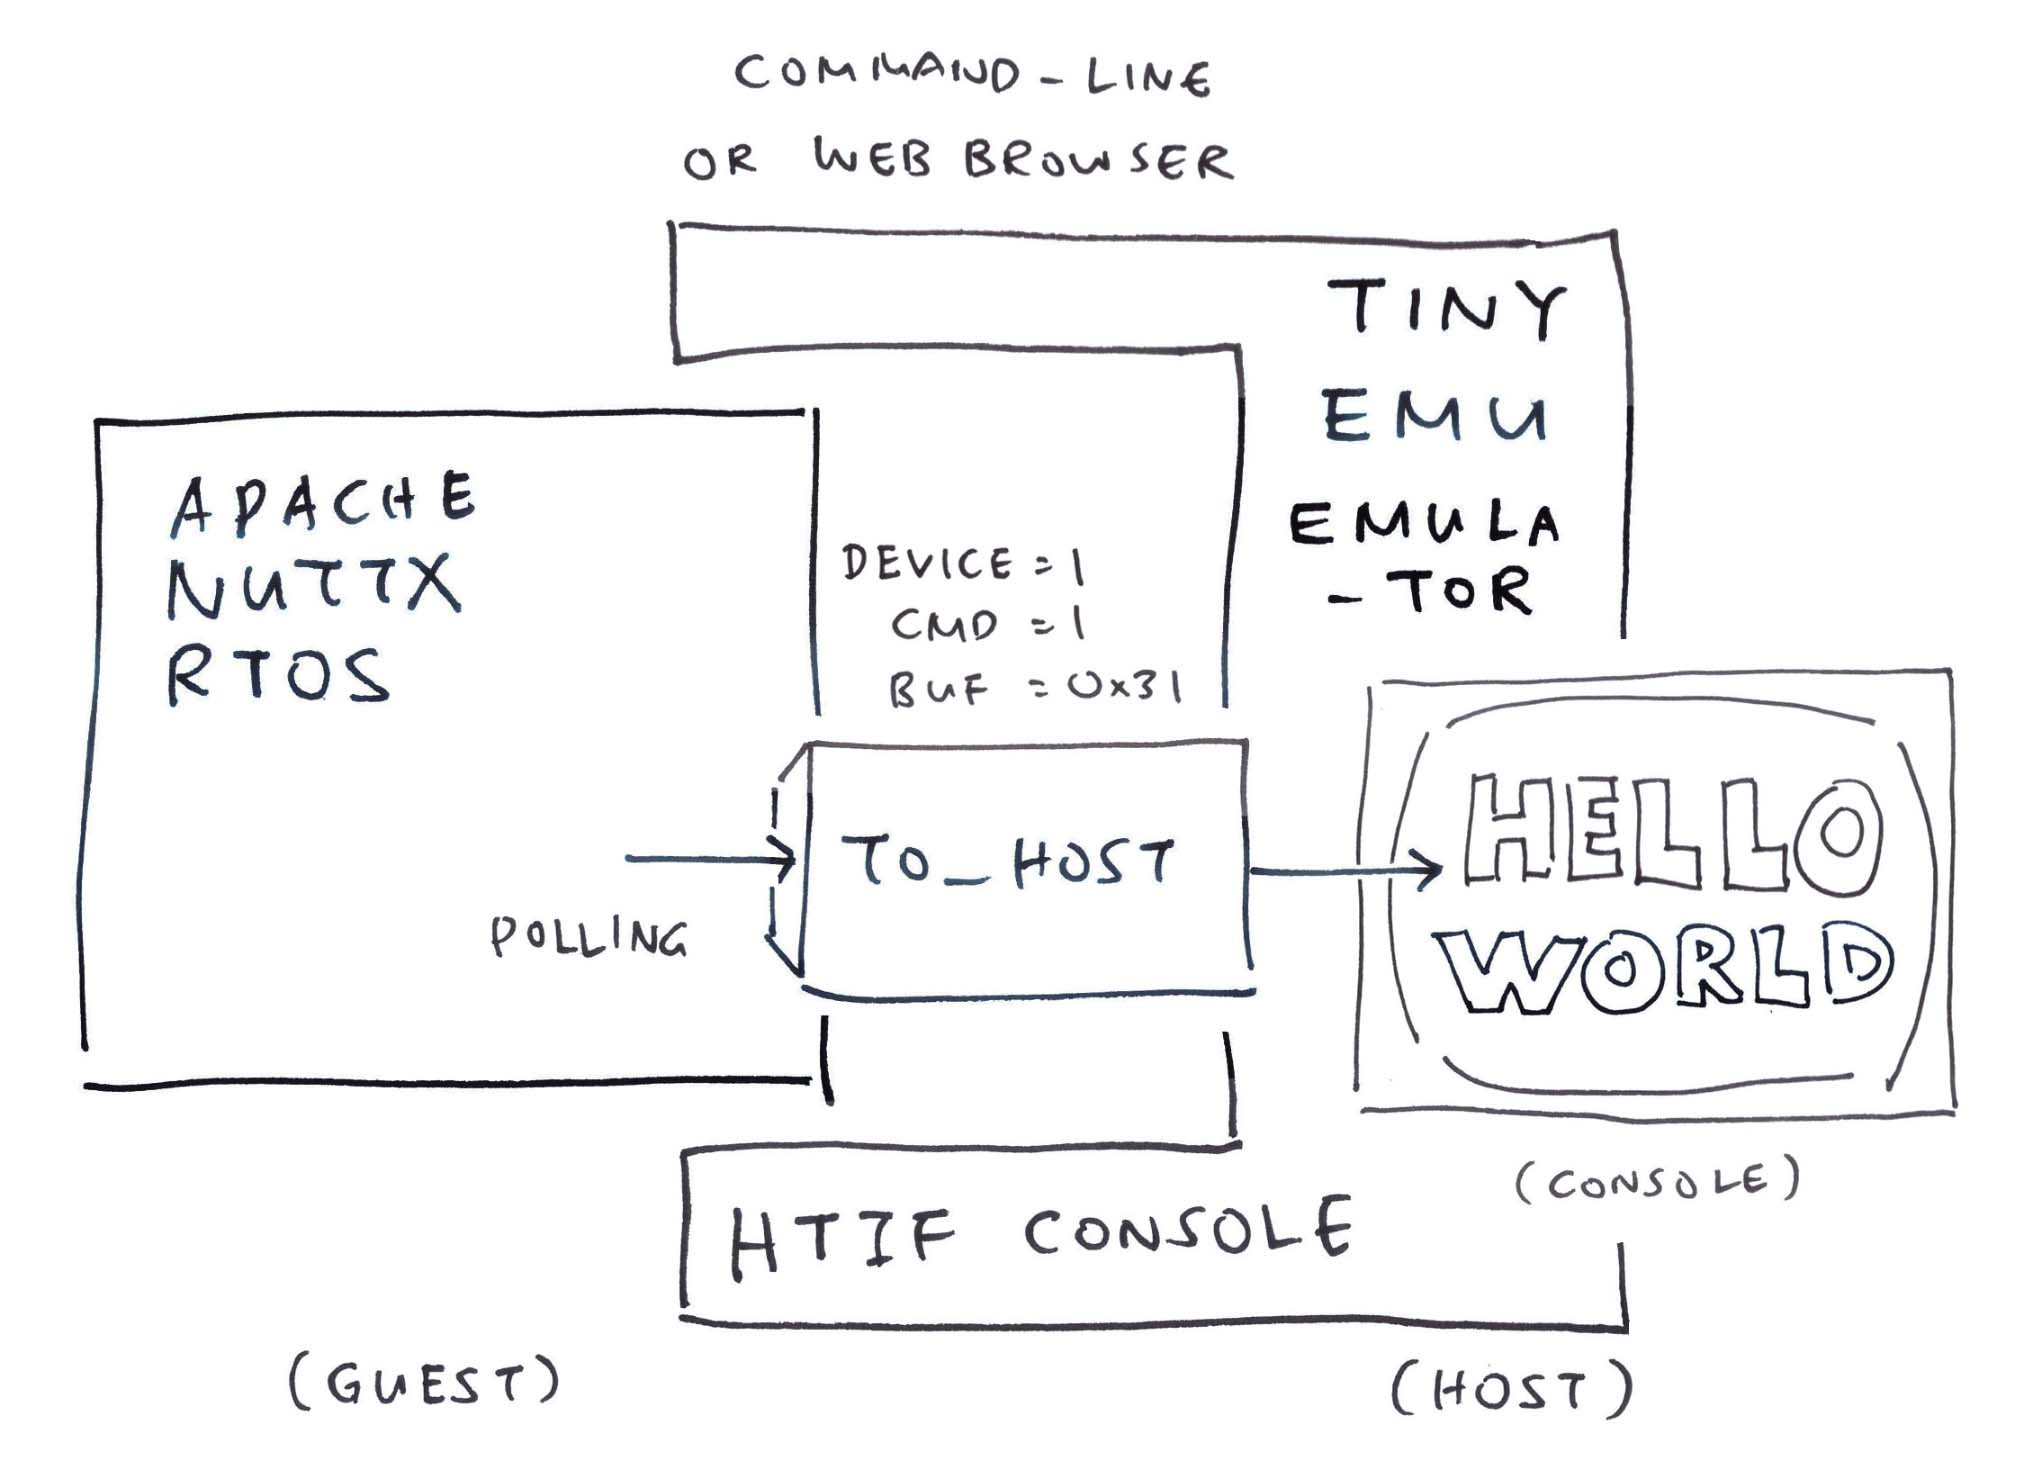
Printing to the TinyEMU Console: What will we need?
TinyEMU supports Berkeley Host-Target Interface (HTIF) for Console Output. (Pic above)
HTIF comes from the olden days of the RISC-V Spike Emulator…
“HTIF is a tether between a Simulation Host and Target, not something that’s supposed to resemble a real hardware device”
“It’s not a RISC-V Standard; it’s a UC Berkeley Standard”
But how does it work?
Use the Source, Luke! TinyEMU handles HTIF Commands like so: riscv_machine.c
// Handle a HTIF Command in TinyEMU:
// `tohost` contains the HTIF Command
static void htif_handle_cmd(RISCVMachine *s) {

  // Bits 56 to 63 indicate the `device`
  // Bits 48 to 55 indicate the `command`
  uint32_t device = s->htif_tohost >> 56;
  uint32_t cmd    = (s->htif_tohost >> 48) & 0xff;

  // If `tohost` is 1: Quit the Emulator
  if (s->htif_tohost == 1) {
    printf("\nPower off.\n");
    exit(0);

  // If `device` and `command` are 1:
  // Print `buf` (Bits 0 to 7) to Console Output
  } else if (device == 1 && cmd == 1) {
    uint8_t buf[1];
    buf[0] = s->htif_tohost & 0xff;
    s->common.console->write_data(s->common.console->opaque, buf, 1);
So to print “1” (ASCII 0x31) to the HTIF Console, we set…
device
= (htif_tohost >> 56)
= 1
cmd
= (htif_tohost >> 48)
= 1
buf
= (htif_tohost & 0xFF)
= 0x31
Which means that we write this value to htif_tohost…
1 << 56) | (1 << 48) | 0x31 0x0101_0000_0000_0031Where is htif_tohost?
According to riscv_machine_init and htif_write…
htif_tohost is at 0x4000_8000 (DEFAULT_HTIF_BASE_ADDR)
Thus we print to HTIF Console like this…
// Print `1` to HTIF Console
*(volatile uint64_t *) 0x40008000 // HTIF Base Address
  = 0x0101000000000031ul;         // device=1, cmd=1, buf=0x31
We test it in our NuttX Boot Code…
We’re checking if NuttX is alive on TinyEMU…
Can we print something in our NuttX Boot Code?
This will be a little delicate: Our NuttX Boot Code is in RISC-V Assembly!
(Because it’s the first thing that runs when NuttX boots)
From the previous section, we print “123” to TinyEMU’s HTIF Console like so…
// Print `1` to HTIF Console
*(volatile uint64_t *) 0x40008000 // HTIF Base Address
  = 0x0101000000000031ul;         // device=1, cmd=1, buf=0x31

// Do the same for `2` and `3`
*(volatile uint64_t *) 0x40008000 = 0x0101000000000032ul;
*(volatile uint64_t *) 0x40008000 = 0x0101000000000033ul;
We flip it (and reverse it) into RISC-V Assembly…
/* Print `123` to HTIF Console           */
/* Load HTIF Base Address to Register t0 */
li  t0, 0x40008000

/* Load to Register t1 the HTIF Command to print `1` */
li  t1, 0x0101000000000031
/* Store 64-bit double-word from Register t1 to HTIF Base Address, Offset 0 */
sd  t1, 0(t0)

/* Load to Register t1 the HTIF Command to print `2` */
li  t1, 0x0101000000000032
/* Store 64-bit double-word from Register t1 to HTIF Base Address, Offset 0 */
sd  t1, 0(t0)

/* Load to Register t1 the HTIF Command to print `3` */
li  t1, 0x0101000000000033
/* Store 64-bit double-word from Register t1 to HTIF Base Address, Offset 0 */
sd t1, 0(t0)(li loads a Value into a Register)
(sd stores a 64-bit Double-Word from a Register into an Address Offset)
Then we work it into our NuttX Boot Code: qemu_rv_head.S
Does it work?
Yep, NuttX prints something to the HTIF Console! Now we know that NuttX Boot Code is actually alive and running on TinyEMU (pic above)…
## Boot NuttX in TinyEMU
## To Exit TinyEMU: Press Ctrl-A then `x`
$ temu nuttx.cfg
123
To see more goodies, we patch the NuttX UART Driver…
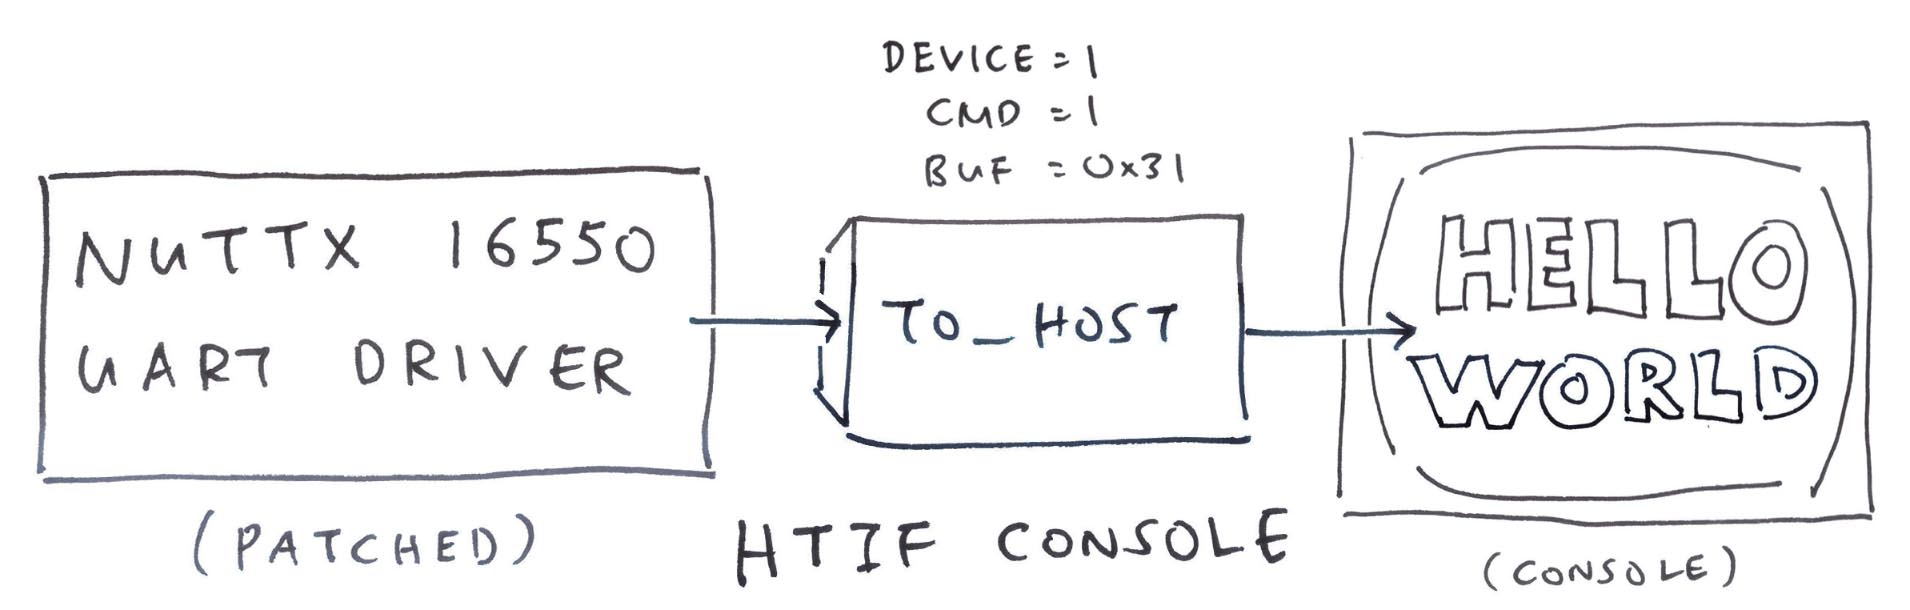
NuttX on TinyEMU has been awfully quiet…
Can we fix the UART Driver so that NuttX can print things?
NuttX is still running on the QEMU UART Driver. (16550 UART)
We make a quick patch so that we’ll see something in TinyEMU’s HTIF Console (pic above): uart_16550.c
// Write one character to the UART Driver
static void u16550_putc(FAR struct u16550_s *priv, int ch) {

  // Hardcode the HTIF Base Address and print...
  *(volatile uint64_t *) 0x40008000
    // device=1, cmd=1, buf=ch
    = 0x0101000000000000ul | ch;
}
We skip the reading and writing of other UART Registers (because we’ll patch them later): uart_16550.c
// Read UART Register
static inline uart_datawidth_t u16550_serialin(FAR struct u16550_s *priv, int offset) {
  return 0;  // Commented out the rest
}

// Write UART Register
static inline void u16550_serialout(FAR struct u16550_s *priv, int offset, uart_datawidth_t value) {
  // Commented out the rest
}
And we won’t wait for UART Ready: uart_16550.c
// Wait until UART is not busy
static int u16550_wait(FAR struct u16550_s *priv) {
  return OK;  // Nopez! No waiting for now
}
What happens when we run this?
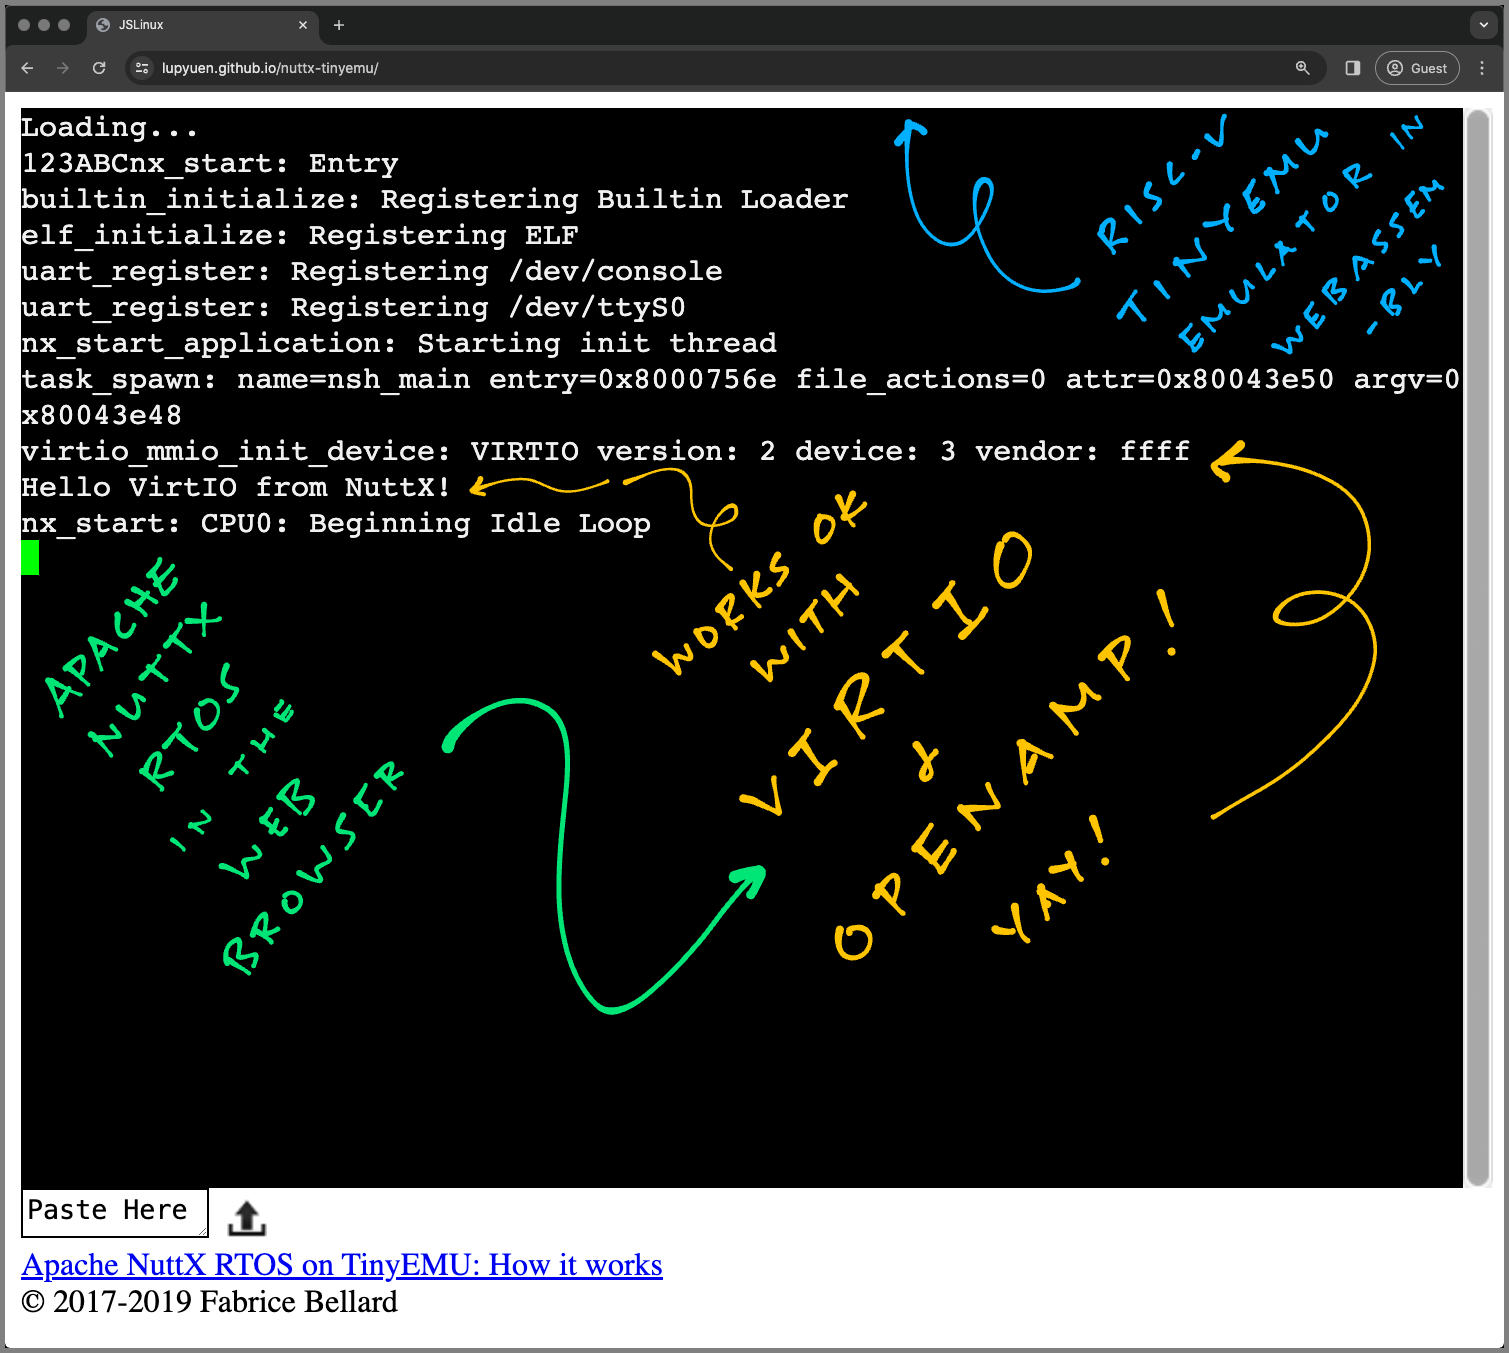
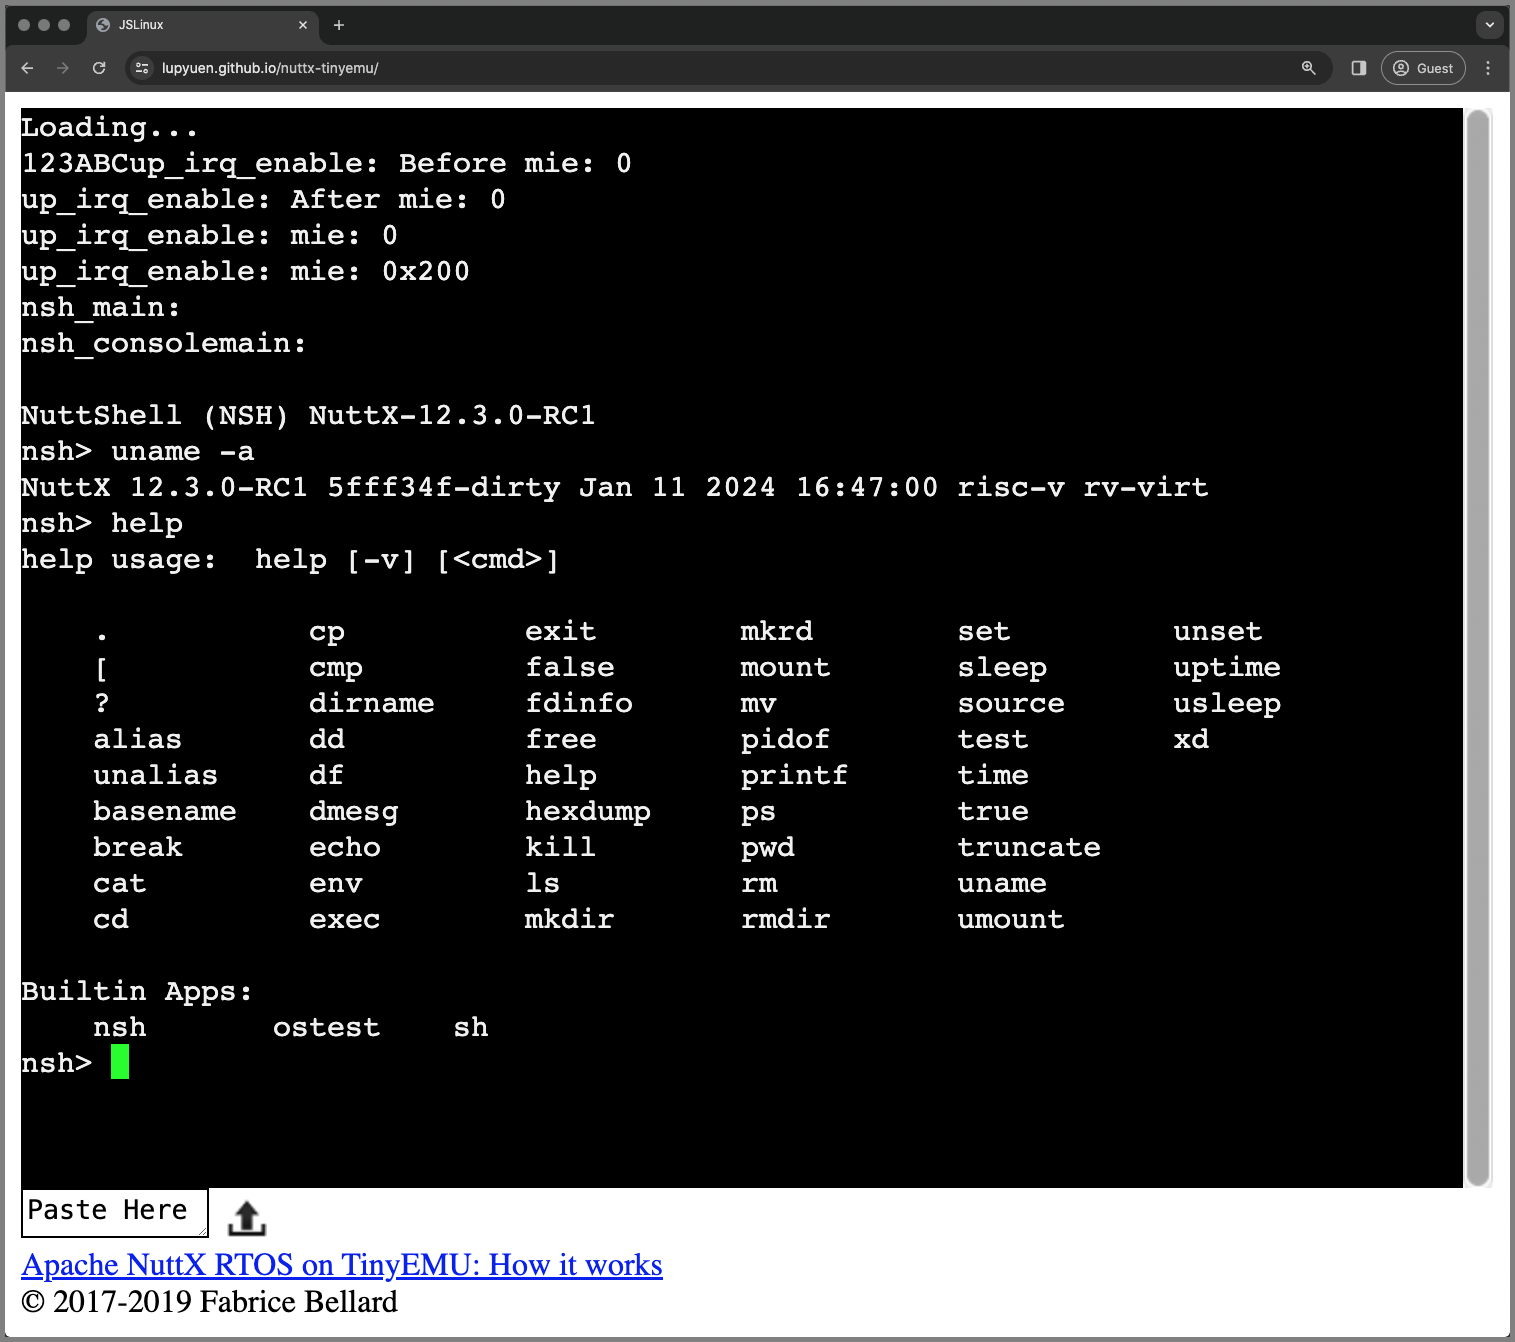
We see NuttX booting OK on TinyEMU! (Later we’ll fix the NuttX Shell)
$ temu nuttx.cfg
123ABC
nx_start: Entry
mm_initialize: Heap: name=Umem, start=0x80035700 size=33335552
mm_addregion: [Umem] Region 1: base=0x800359a8 size=33334864
builtin_initialize: Registering Builtin Loader
elf_initialize: Registering ELF

uart_register: Registering /dev/console
uart_register: Registering /dev/ttyS0
nx_start_application: Starting init thread
task_spawn: name=nsh_main entry=0x80006fde file_actions=0 attr=0x80035670 argv=0x80035668
nx_start: CPU0: Beginning Idle LoopWe promote NuttX from Command Line to Web Browser…
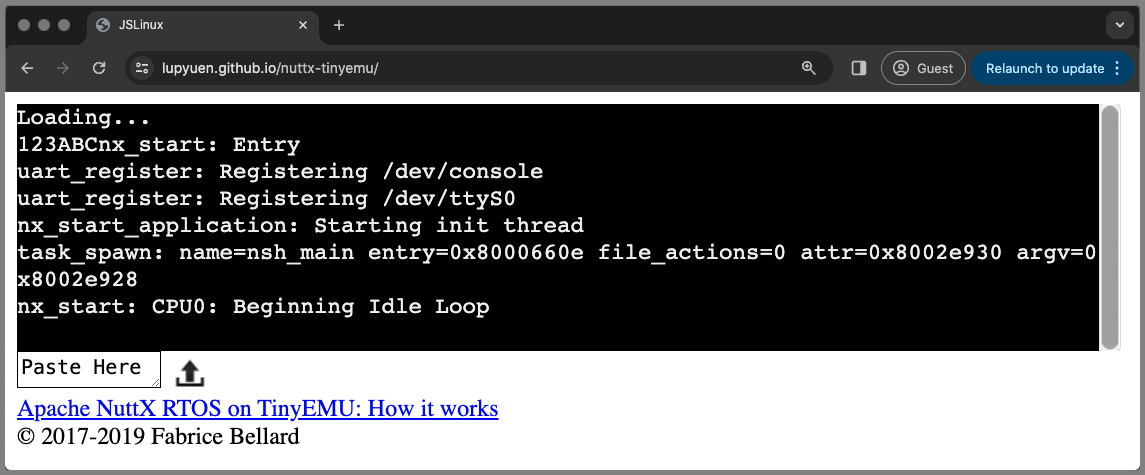
NuttX booting in a Web Browser
Will NuttX run in the Web Browser?
Amazingly, Yes! Click below to see the Demo (pic above) and the Source Files…
WebAssembly Demo: NuttX on TinyEMU
WebAssembly Files: nuttx-tinyemu/docs
So Cool! How did we make this?
We copied the TinyEMU Config and NuttX Kernel to our Web Server…
## Copy to Web Server: NuttX Config and Kernel
cp nuttx.cfg $HOME/nuttx-tinyemu/docs/root-riscv64.cfg
cp nuttx.bin $HOME/nuttx-tinyemu/docs/

## For Troubleshooting: Copy the RISC-V Disassembly, Build Config, Git Hash
cp nuttx.S nuttx.config nuttx.hash  \
$HOME/nuttx-tinyemu/docs/The other WebAssembly Files were provided by TinyEMU (compiled with Emscripten)…
Precompiled JSLinux Demo: jslinux-2019-12-21.tar.gz
Like we said: Everything that runs in Command Line TinyEMU… Will also run in Web Browser TinyEMU!
Can we test this locally?
Our Web Browser won’t load WebAssembly Files from the File System.
To test on our computer, we need a Local Web Server…
## Install Web Server based on https://github.com/TheWaWaR/simple-http-server
cargo install simple-http-server
git clone https://github.com/lupyuen/nuttx-tinyemu
simple-http-server nuttx-tinyemu/docs
Then browse to…
http://0.0.0.0:8000/index.htmlAnd NuttX appears in our Web Browser! (Pic above)
But something’s missing: Where’s the Console Input?
To do Console Input, we need VirtIO Console…
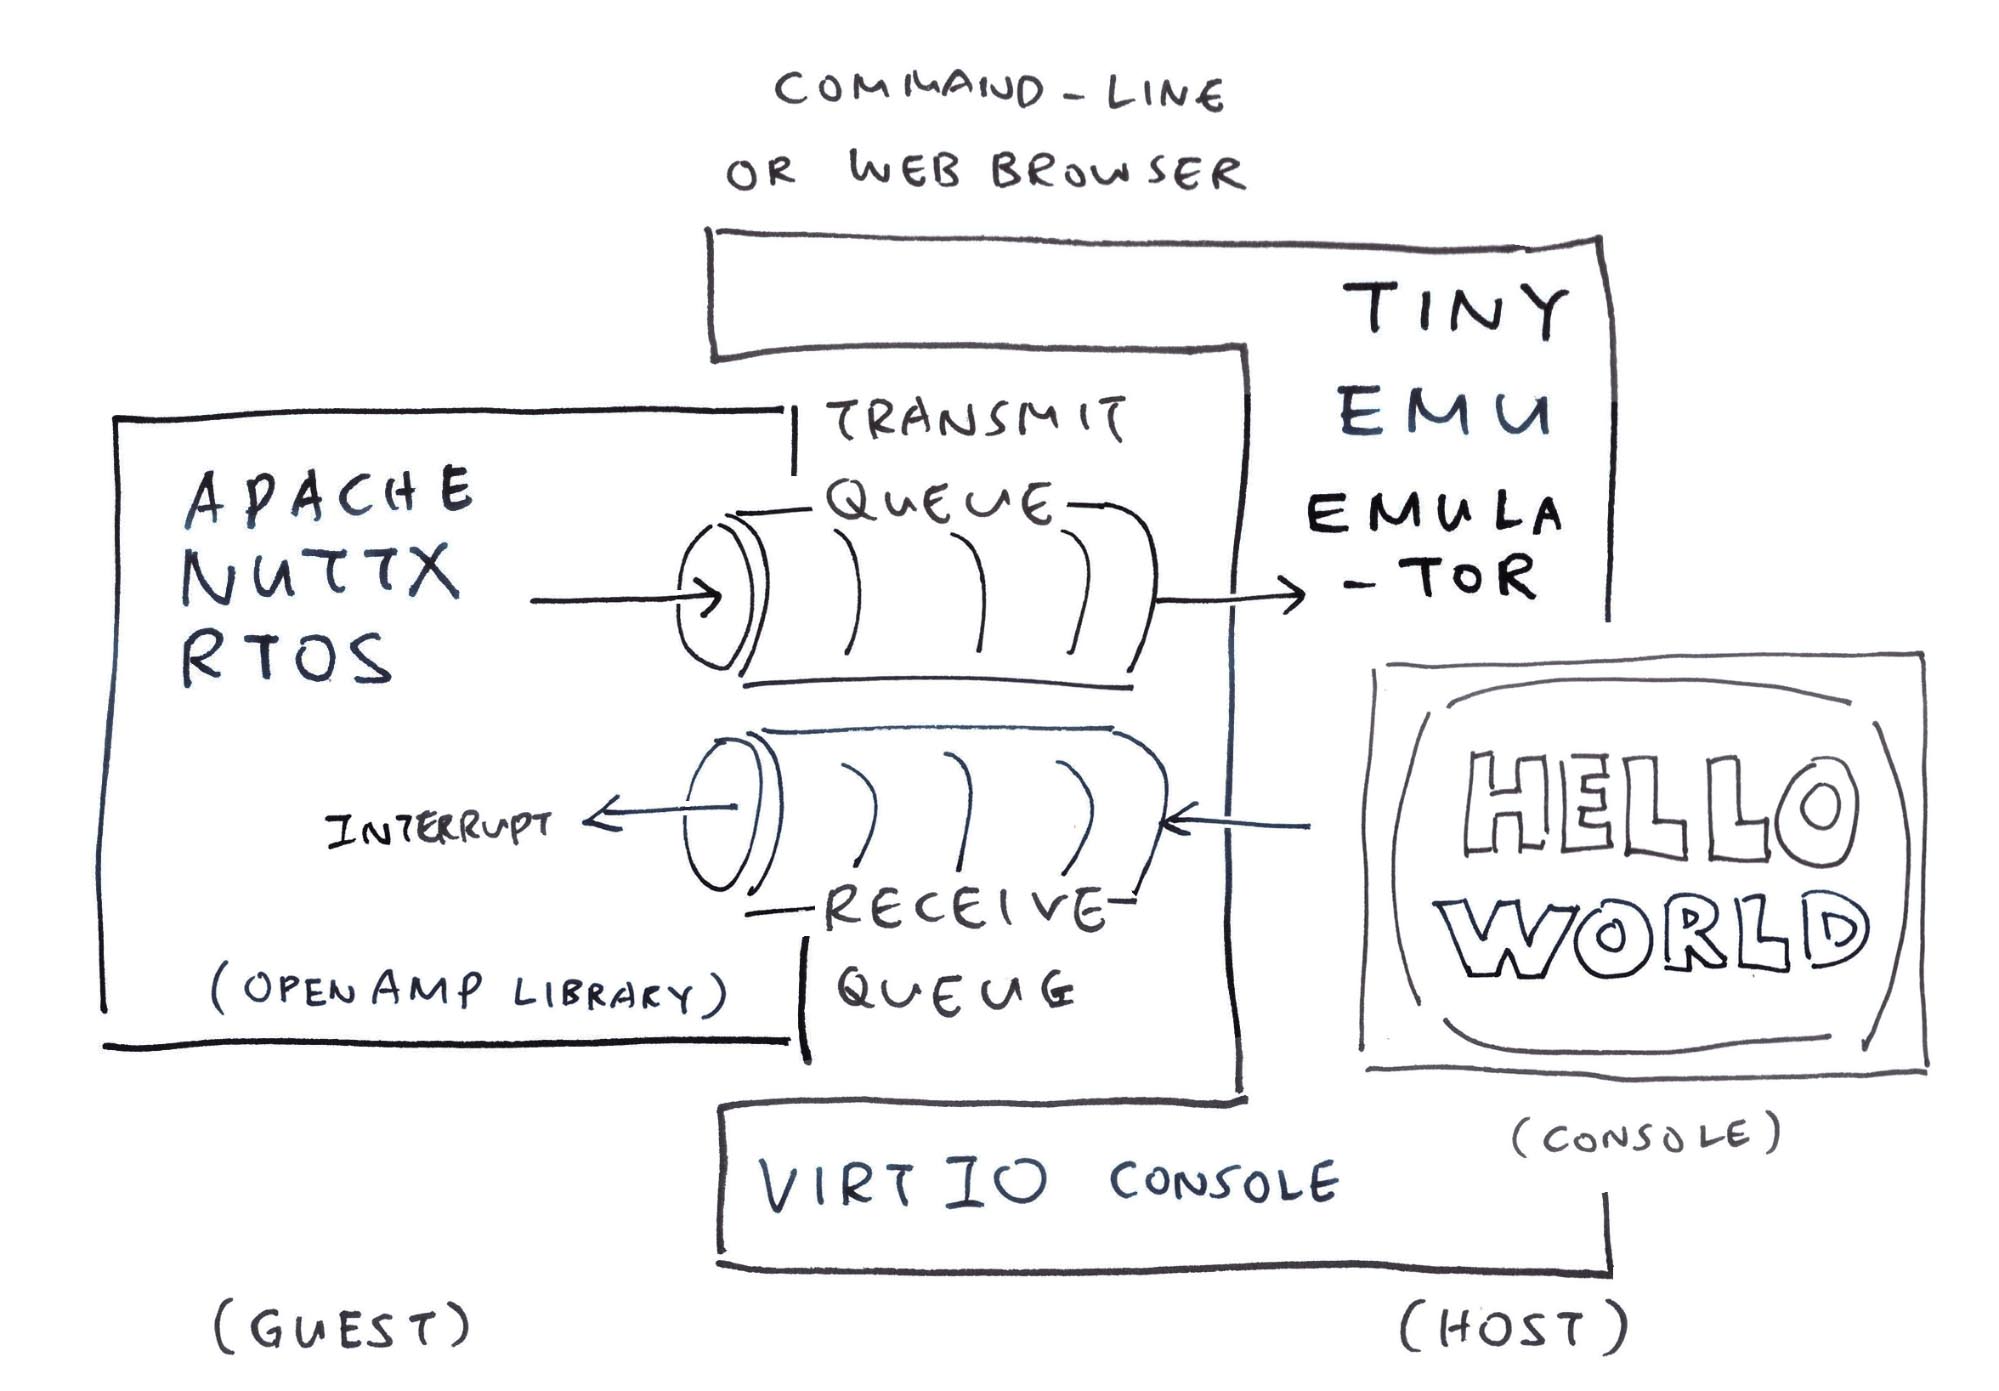
We need Console Input for NuttX Shell…
Can’t we do it with TinyEMU’s HTIF Console?
HTIF Console supports Polling of Input and Output, but not Interrupts. (A bit like OpenSBI Console)
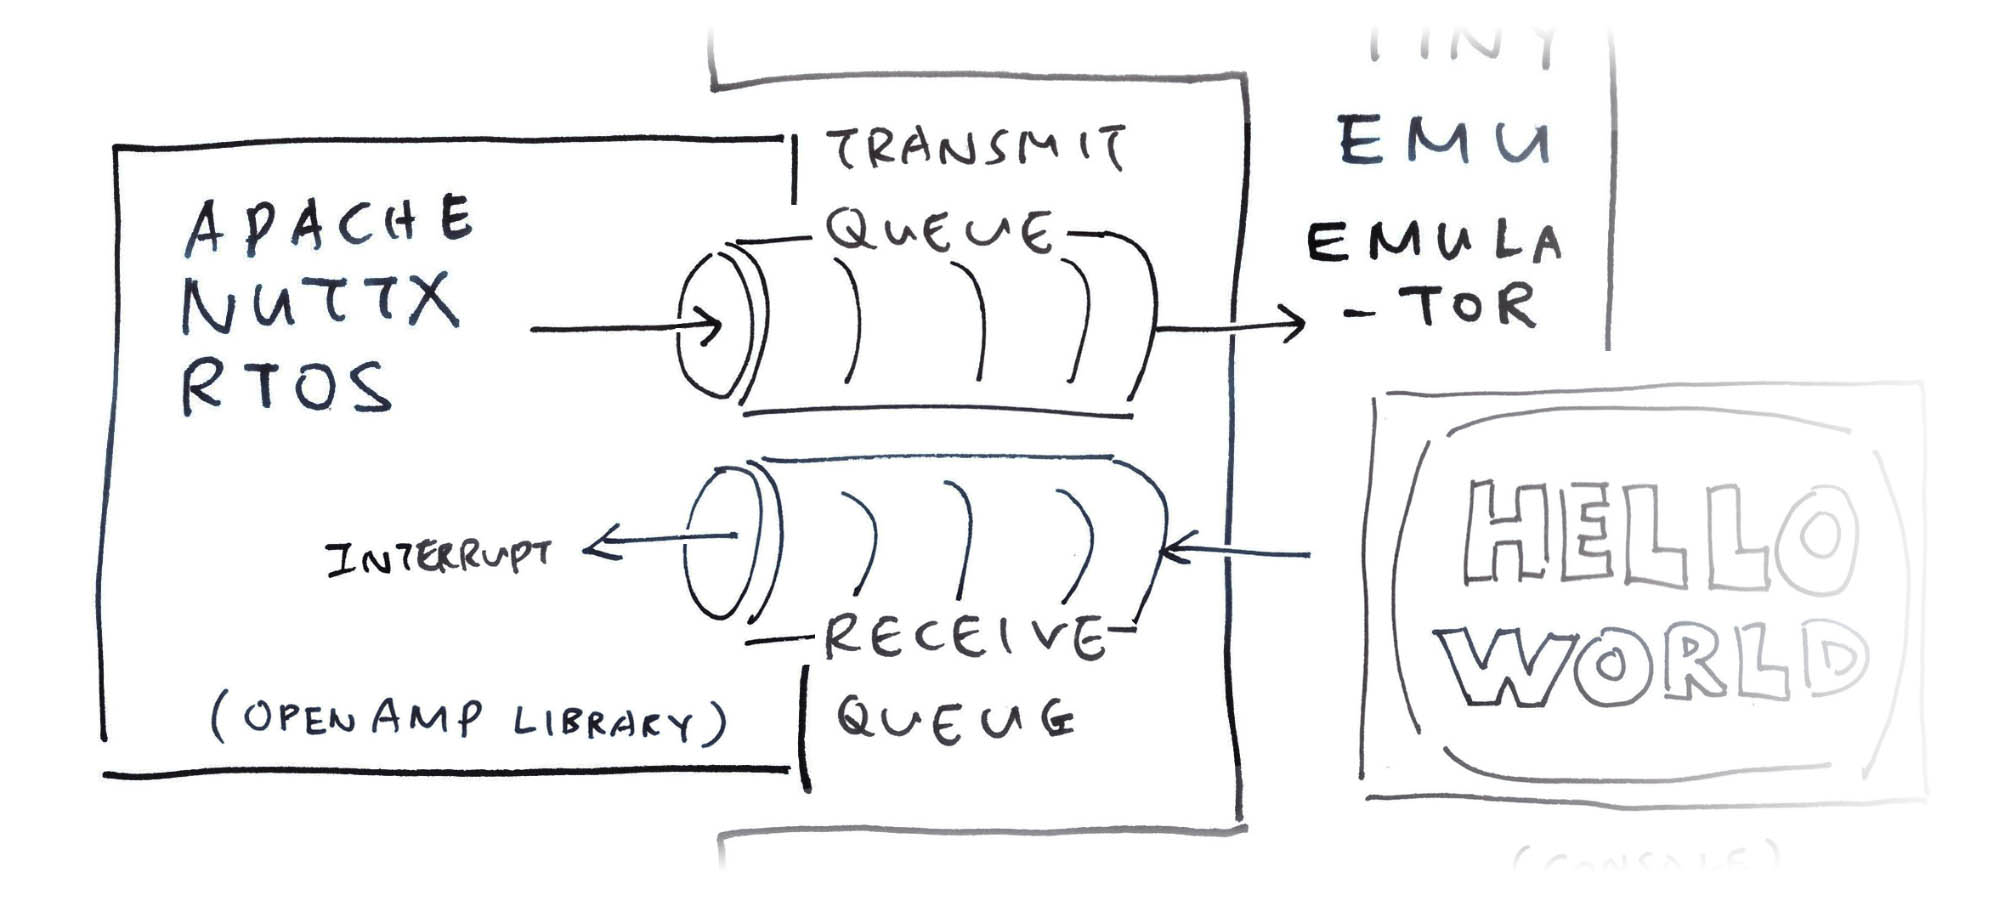
To do proper Console Input / Output with Interrupts, we need VirtIO Console. (Pic above)
What’s VirtIO?
Virtual I/O Device (VirtIO) is a Standardised Interface that allows Virtual Machines to access Consoles, Storage Devices and Network Adapters.
And it works with TinyEMU! (A bit like RISC-V Semihosting)
What about NuttX?
NuttX provides VirtIO Drivers, built upon the OpenAMP Library…
“Running NuttX with VirtIO on QEMU” (YouTube)
And OpenAMP is?
Open Asymmetric Multi-Processing (OpenAMP) provides the Message Queue Library for VirtIO Guests (like NuttX) to call VirtIO Hosts (like TinyEMU)…
OpenAMP libmetal (supports NuttX)
“Introduction to OpenAMP” (Page 4)
We have all the layers, let’s assemble our cake and print to VirtIO Console (pic above)…
Initialise the VirtIO Console
Create the VirtIO Queue
Send the VirtIO Message
Isn’t there a VirtIO Console Driver in NuttX?
Yeah NuttX has a VirtIO Serial Driver. But we’ll do it ourselves anyway and discover the inner workings of VirtIO and OpenAMP!
How will NuttX VirtIO talk to TinyEMU?
Previously we saw the TinyEMU Config for VirtIO: riscv_machine.c
// VirtIO Settings in TinyEMU
#define VIRTIO_BASE_ADDR 0x40010000
#define VIRTIO_SIZE      0x1000
#define VIRTIO_IRQ       1
We copy these VirtIO Settings to NuttX QEMU: qemu_rv_appinit.c
// VirtIO Settings in NuttX
#define QEMU_VIRTIO_MMIO_NUM     1  // Number of VirtIO Devices
#define QEMU_VIRTIO_MMIO_BASE    0x40010000
#define QEMU_VIRTIO_MMIO_REGSIZE 0x1000
#define QEMU_VIRTIO_MMIO_IRQ     (RISCV_IRQ_EXT + 1)
MMIO means that NuttX will access VirtIO over Memory-Mapped I/O. (Instead of PCI)
With these settings, VirtIO and OpenAMP will start correctly on NuttX…
$ temu nuttx.cfg
virtio_mmio_init_device:
  VIRTIO version: 2
  device: 3
vendor: ffffThis says…
NuttX has validated the VirtIO Magic Number from TinyEMU
(Otherwise NuttX will halt)
NuttX has detected the VirtIO Console in TinyEMU
How does it work?
At NuttX Startup: board_app_initialize calls…
qemu_virtio_register_mmio_devices (to register all VirtIO MMIO Devices) which calls…
virtio_register_mmio_device (to register a VirtIO MMIO Device)
Next we create a VirtIO Queue and send some data…
(virtio_register_mmio_device is explained here)
NuttX VirtIO + OpenAMP are talking OK to TinyEMU. What next?
To send data to VirtIO Console, we need a VirtIO Queue (pic above): virtio-mmio.c
// At Startup: Init VirtIO Device
// Based on virtio_serial_init
// https://github.com/apache/nuttx/blob/master/drivers/virtio/virtio-serial.c#L445-L511

// Configure the VirtIO Driver Features
struct virtio_device *vdev = &vmdev->vdev;
virtio_set_status(vdev, VIRTIO_CONFIG_STATUS_DRIVER);
virtio_set_features(vdev, 0);
virtio_set_status(vdev, VIRTIO_CONFIG_FEATURES_OK);

// Configure the 2 VirtQueues: Transmit and Receive
#define VIRTIO_SERIAL_RX  0
#define VIRTIO_SERIAL_TX  1
#define VIRTIO_SERIAL_NUM 2
const char *vqnames[VIRTIO_SERIAL_NUM];
vqnames[VIRTIO_SERIAL_RX] = "virtio_serial_rx";
vqnames[VIRTIO_SERIAL_TX] = "virtio_serial_tx";

// No Callbacks for now
vq_callback callbacks[VIRTIO_SERIAL_NUM];
callbacks[VIRTIO_SERIAL_RX] = NULL;
callbacks[VIRTIO_SERIAL_TX] = NULL;

// Create the VirtQueues: Transmit and Receive
int ret = virtio_create_virtqueues(
  vdev, 0, VIRTIO_SERIAL_NUM, vqnames, callbacks
);

// VirtIO Driver is finally OK!
virtio_set_status(vdev, VIRTIO_CONFIG_STATUS_DRIVER_OK);
Now we have 2 VirtIO Queues: Transmit and Receive. Let’s message them…
(virtio_set_status comes from OpenAMP)
(virtio_create_virtqueues too)
To print something, we write to the Transmit Queue (pic above): virtio-mmio.c
// Send data to VirtIO Device
// Based on virtio_serial_dmasend
// https://github.com/apache/nuttx/blob/master/drivers/virtio/virtio-serial.c#L310-L345

// Get the Transmit VirtQueue
struct virtqueue *vq = vdev->vrings_info[VIRTIO_SERIAL_TX].vq;

// Set the VirtQueue Buffer
static char *HELLO_MSG = "Hello VirtIO from NuttX!\r\n";
struct virtqueue_buf vb[2];
vb[0].buf = HELLO_MSG;
vb[0].len = strlen(HELLO_MSG);
uintptr_t len = strlen(HELLO_MSG);

// Add the Buffer to the Transmit VirtQueue:
// 1 Readable Buffer, 0 Writeable Buffers
virtqueue_add_buffer(
  vq, vb, 1, 0, (void *)len
);

// Notify the VirtIO Host (TinyEMU)
virtqueue_kick(vq);
And we’re done! One final test for today…
(virtqueue_add_buffer comes from OpenAMP)
NuttX sends data to TinyEMU Console over VirtIO and OpenAMP…
What happens when we run this?
NuttX prints correctly to TinyEMU’s VirtIO Console. Our VirtIO Queue is working perfectly! (Pic above)
$ temu nuttx.cfg
Hello VirtIO from NuttX!Still no NuttX Shell?
We’ve proven that NuttX VirtIO + OpenAMP are totally hunky dory with TinyEMU’s VirtIO Console.
Up Next: We configure NuttX to use the VirtIO Serial Driver. Then NuttX Shell will appear and we can enter NuttX Commands! (Pic below)
(Only 8 files modified!)
Everything shall be explained in the next article. Here’s a sneak peek…
Today we’ve built some cool things that might Emulate NuttX Gadgets in the Web Browser (like Ox64 BL808 SBC) or light up a Real-Time NuttX Dashboard…
We booted NuttX in TinyEMU RISC-V Emulator
Added support for HTIF Console
Tested VirtIO Console with OpenAMP Library
And everything works great on the web thanks to Emscripten and WebAssembly!
How will you use NuttX in a Web Browser? Please lemme know 🙏
Many Thanks to my GitHub Sponsors (and the awesome NuttX Community) for supporting my work! This article wouldn’t have been possible without your support.
Got a question, comment or suggestion? Create an Issue or submit a Pull Request here…
lupyuen.github.io/src/tinyemu.md
In this article we saw 2 Work-In-Progress versions of NuttX for TinyEMU…
Test Version: Print to VirtIO Console and halt
Full Version: NuttX Shell with Full VirtIO support
Here are the steps to build both versions of NuttX for TinyEMU…
## Download the WIP NuttX Source Code:
## Branch tinyemu: Test Version
## Branch tinyemu2: Full Version
git clone \
  --branch tinyemu2 \
  https://github.com/lupyuen2/wip-nuttx \
  nuttx
git clone \
  --branch tinyemu2 \
  https://github.com/lupyuen2/wip-nuttx-apps \
  apps

## Configure NuttX for TinyEMU (borrowed from 64-bit QEMU Flat Mode)
cd nuttx
tools/configure.sh rv-virt:nsh64

## Build NuttX
make

## Export the Binary Image to nuttx.bin
riscv64-unknown-elf-objcopy \
  -O binary \
  nuttx \
  nuttx.bin

## Dump the disassembly to nuttx.S
riscv64-unknown-elf-objdump \
  --syms --source --reloc --demangle --line-numbers --wide \
  --debugging \
  nuttx \
  >nuttx.S \
  2>&1

## Copy the config
cp .config nuttx.config

## Record the Git Hash
hash1=`git rev-parse HEAD`
pushd ../apps
hash2=`git rev-parse HEAD`
popd
echo NuttX Source: https://github.com/apache/nuttx/tree/$hash1 >nuttx.hash
echo NuttX Apps: https://github.com/apache/nuttx-apps/tree/$hash2 >>nuttx.hash

## Download the TinyEMU Config for NuttX
wget --output-document=nuttx.cfg https://raw.githubusercontent.com/lupyuen/nuttx-tinyemu/main/docs/root-riscv64.cfg

## Copy to Web Server
cp nuttx.cfg $HOME/nuttx-tinyemu/docs/root-riscv64.cfg
cp nuttx.bin $HOME/nuttx-tinyemu/docs/
cp nuttx.S $HOME/nuttx-tinyemu/docs/
cp nuttx.hash $HOME/nuttx-tinyemu/docs/
cp nuttx.config $HOME/nuttx-tinyemu/docs/
(Remember to install the Build Prerequisites and Toolchain)
This produces the NuttX Kernel nuttx.bin that we may boot on TinyEMU RISC-V Emulator…
## Download the TinyEMU Config for NuttX
wget --output-document=nuttx.cfg https://raw.githubusercontent.com/lupyuen/nuttx-tinyemu/main/docs/root-riscv64.cfg

## Start the TinyEMU RISC-V Emulator with NuttX RTOS
temu nuttx.cfg
To Exit TinyEMU: Press Ctrl-A then x
How did we configure the NuttX Build?
We modified the NuttX Config “rv-virt:nsh64” (64-bit RISC-V QEMU Flat Mode) like this…
## Configure NuttX Build and save the Build Config
make menuconfig \
  && make savedefconfig \
  && grep -v CONFIG_HOST defconfig \
  >boards/risc-v/qemu-rv/rv-virt/configs/nsh64/defconfig
Inside menuconfig, we selected…
Open Asymmetric Multi Processing
Device Drivers
Device Drivers > Virtio Device Support
Build Setup > Debug Options
Application Configuration > Testing
For the Full Version, we added…
Device Drivers > Virtio Device Support
Device Drivers > Serial Driver Support
Then Save and Exit menuconfig.
Why enable “Simple AddrEnv”?
We need to enable CONFIG_DEV_SIMPLE_ADDRENV (“Simple AddrEnv”). Otherwise the NuttX Build fails…
riscv64-unknown-elf-ld: nuttx/staging/libopenamp.a(io.o): in function `metal_io_phys_to_offset_':
nuttx/openamp/libmetal/lib/system/nuttx/io.c:105: undefined reference to `up_addrenv_pa_to_va'
riscv64-unknown-elf-ld: nuttx/staging/libopenamp.a(io.o): in function `metal_io_offset_to_phys_':
nuttx/openamp/libmetal/lib/system/nuttx/io.c:99: undefined reference to `up_addrenv_va_to_pa'
up_addrenv_va_to_pa is defined in drivers/misc/addrenv.c
Right now we’re running NuttX in Flat Mode. Can NuttX run in Kernel Mode on TinyEMU?
NuttX Kernel Mode requires RISC-V Semihosting to access the NuttX Apps Filesystem. Which is supported by QEMU but not TinyEMU.
But we can Append the Initial RAM Disk to the NuttX Kernel. So yes it’s possible to run NuttX in Kernel Mode with TinyEMU, with some additional Mounting Code.