📝 25 Feb 2024
Remember MakeCode? BBC micro:bit and its Drag-n-Drop App Builder?
MakeCode for BBC micro:bit is an awesome creation that’s way ahead of its time (7 years ago!)
TypeScript Compiler in the Web Browser (in JavaScript!)
Bespoke Arm Assembler that runs in the Web Browser (also JavaScript)
Custom Embedded OS for BBC micro:bit (CODAL + Mbed OS)
UF2 Bootloader with flashing over Web USB
micro:bit Simulator in JavaScript
All this for an underpowered BBC micro:bit with Nordic nRF51
(Arm Cortex-M0, 256 KB Flash, 16 KB RAM!)

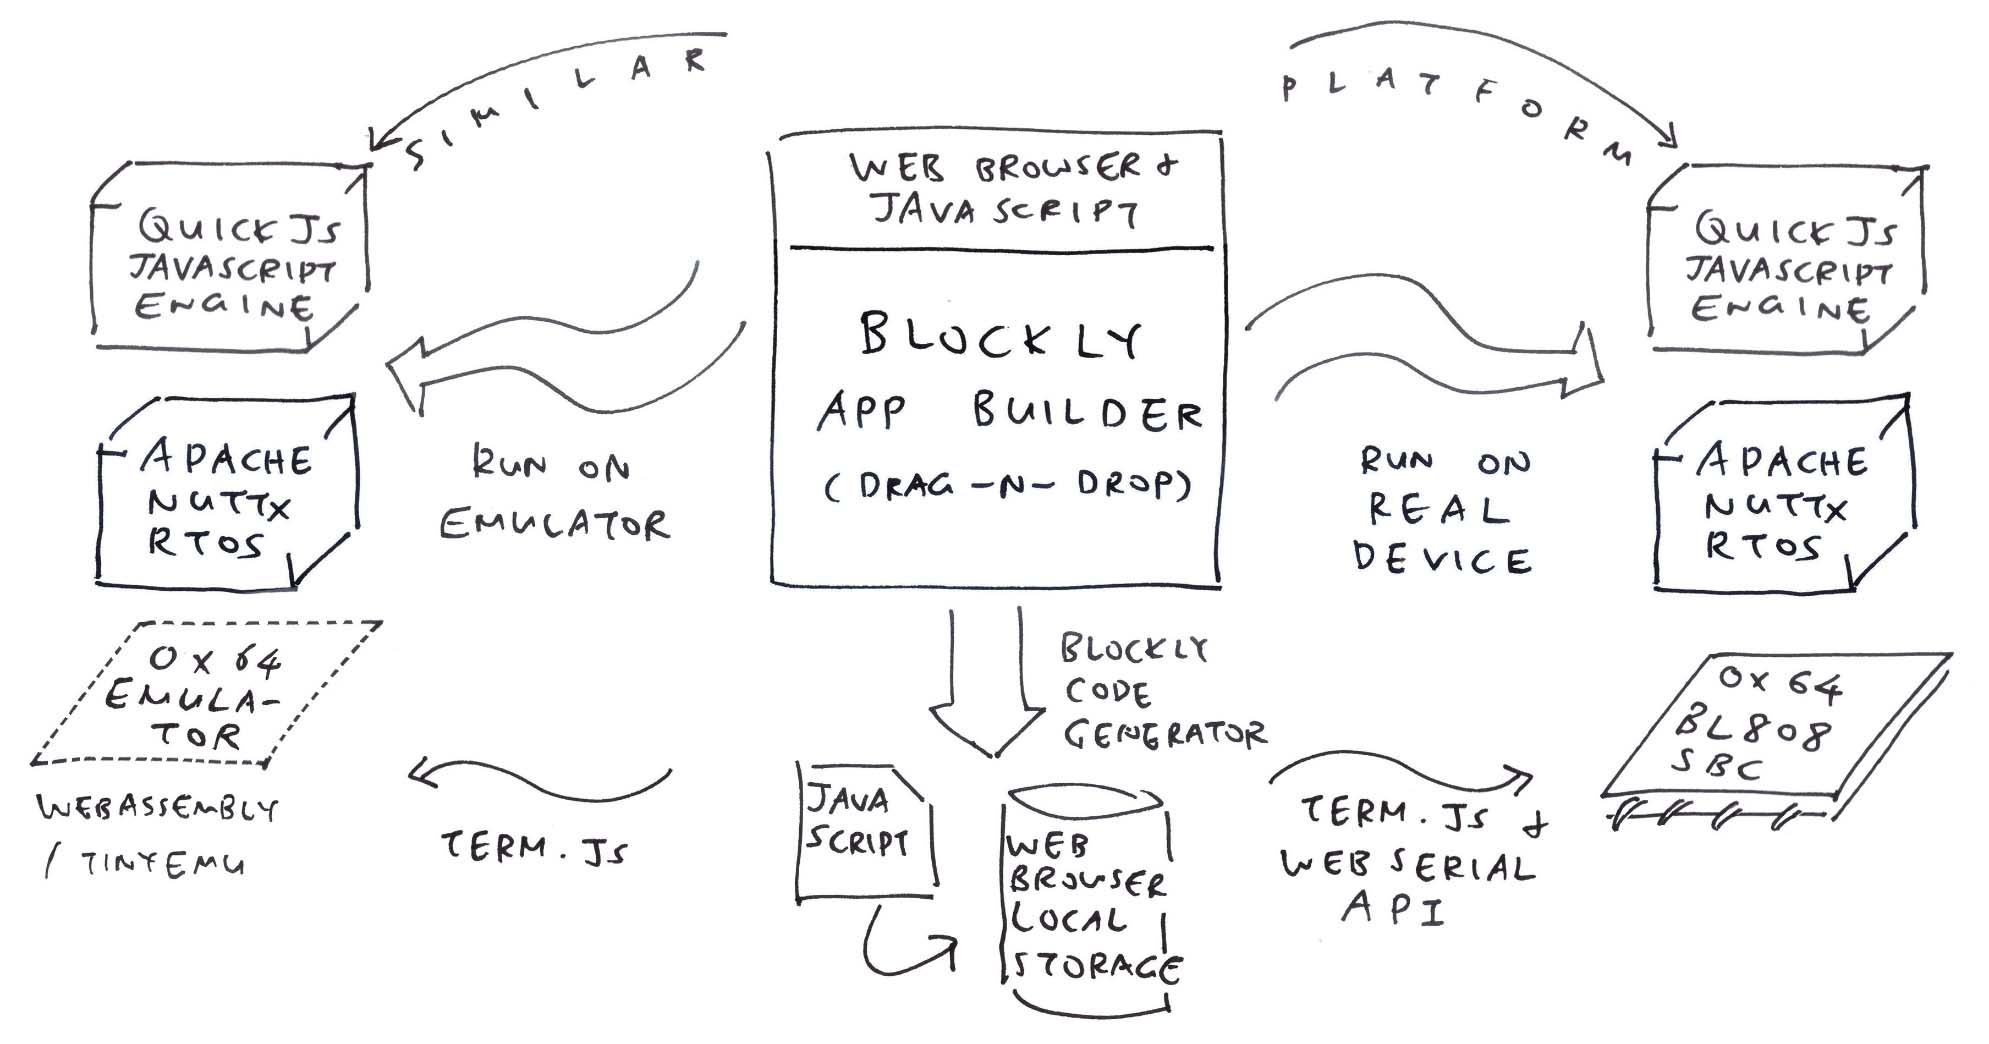
Today 7 years later: How would we redo all this? With a bunch of Open Source Packages?
Hardware Device: Ox64 BL808 64-bit RISC-V SBC
(64 MB RAM, Unlimited microSD Storage, only $8)
Embedded OS: Apache NuttX RTOS
JavaScript Engine: QuickJS for NuttX
Web Emulator: TinyEMU WebAssembly for NuttX
C Compiler + Assembler: TCC WebAssembly for NuttX
(Won’t need this today since we have JavaScript)
Device Control: Web Serial API with Term.js
(Control our Ox64 SBC over UART)
This is how we gave MakeCode a wholesome wholesale makeover…
Here’s the Emulator Demo that we can play along at home (without Ox64 SBC)…
Head over to this link…
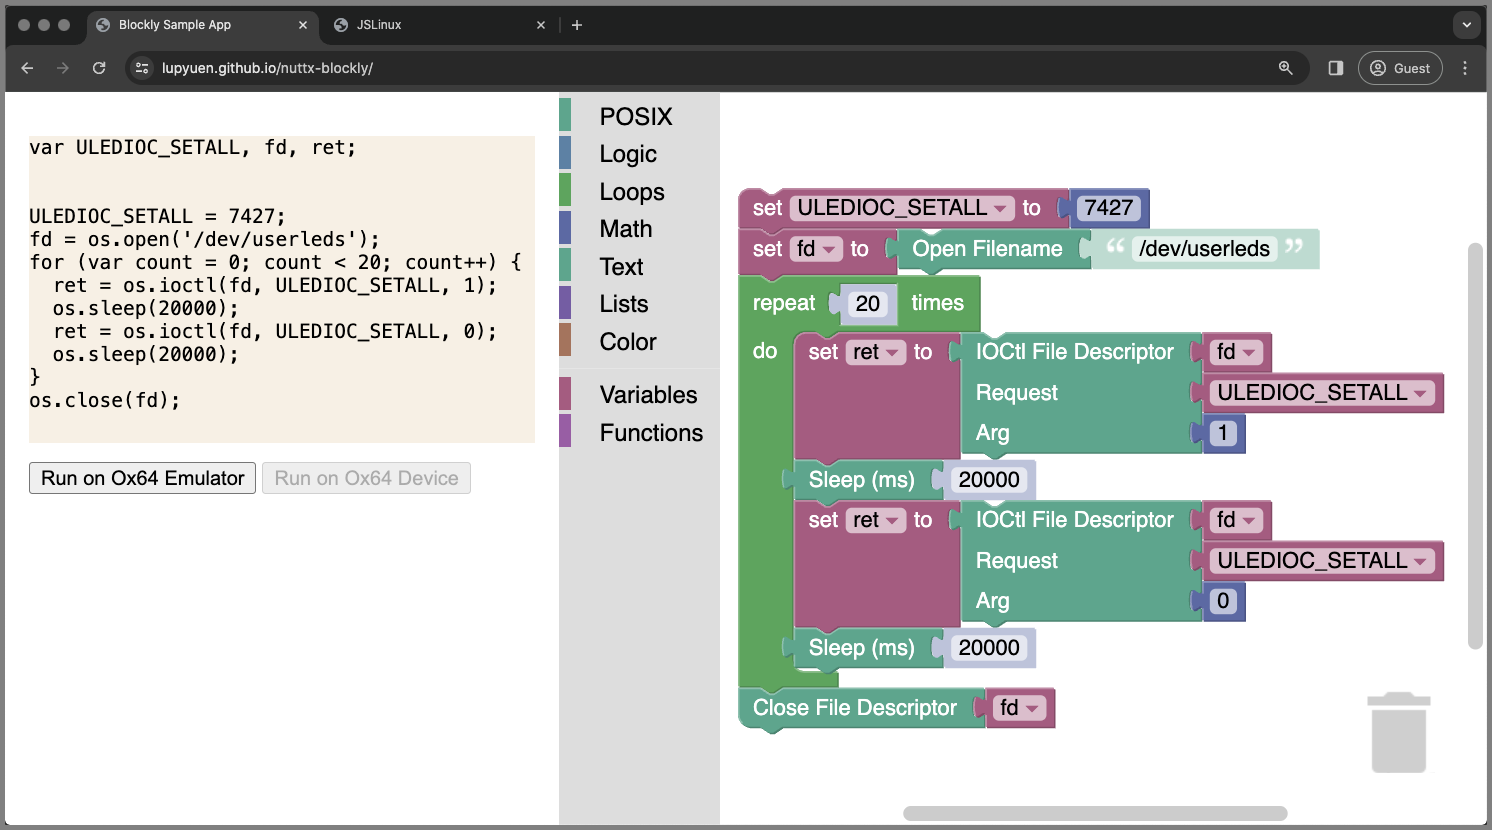
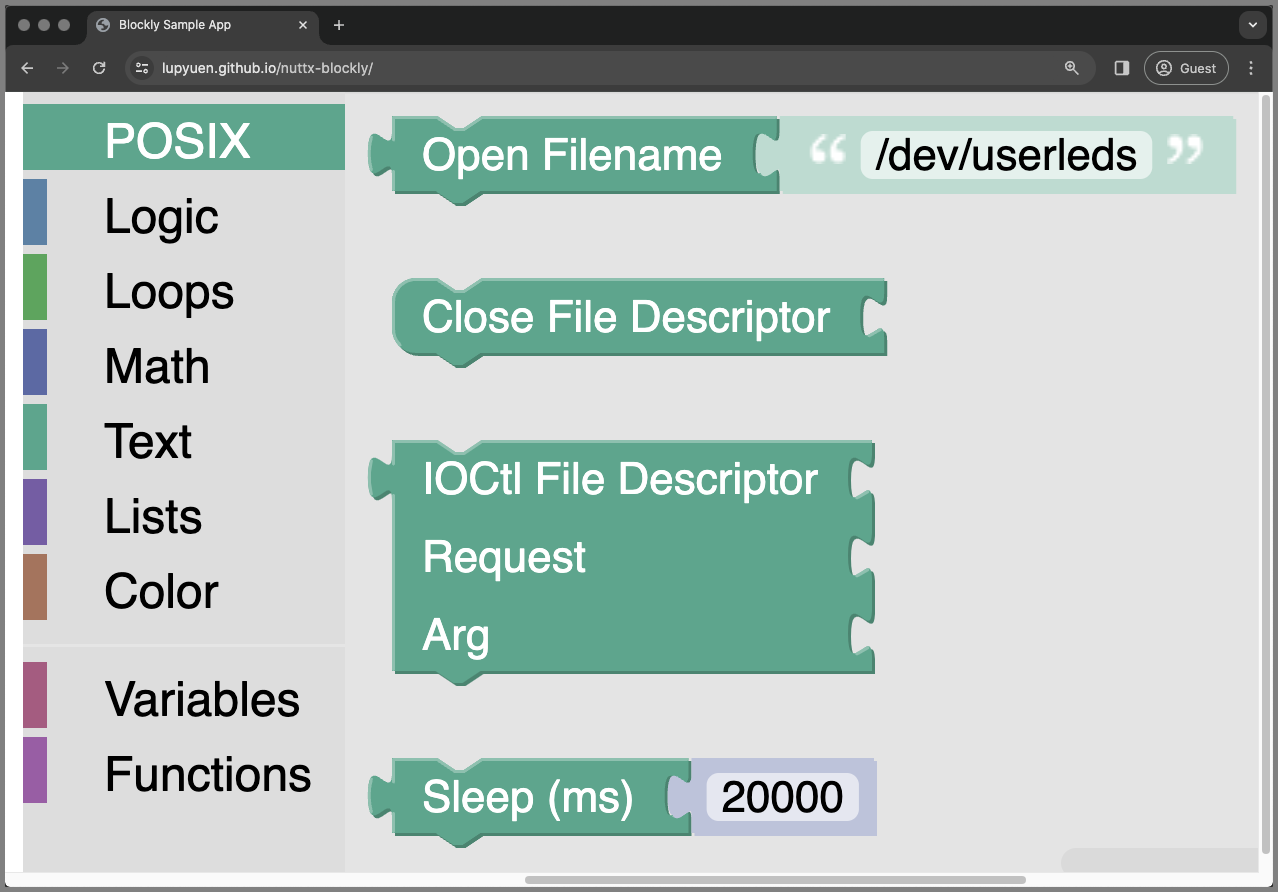
Click “Select Demo” > “LED Blinky”. The Demo Blocks appear. (Pic above)
The Blinky Demo Blocks produce this JavaScript…
// NuttX Command to flip the LED On and Off
var ULEDIOC_SETALL, fd, ret;
ULEDIOC_SETALL = 7427;

// Open the LED Device and blink 20 times
fd = os.open('/dev/userleds');
for (var count = 0; count < 20; count++) {

  // Flip the LED On and wait a while
  ret = os.ioctl(fd, ULEDIOC_SETALL, 1);
  os.sleep(5000);  // Milliseconds

  // Flip the LED Off and wait a while
  ret = os.ioctl(fd, ULEDIOC_SETALL, 0);
  os.sleep(5000);  // Milliseconds
}

// Close the LED Device
os.close(fd);Click “Run on Ox64 Emulator”
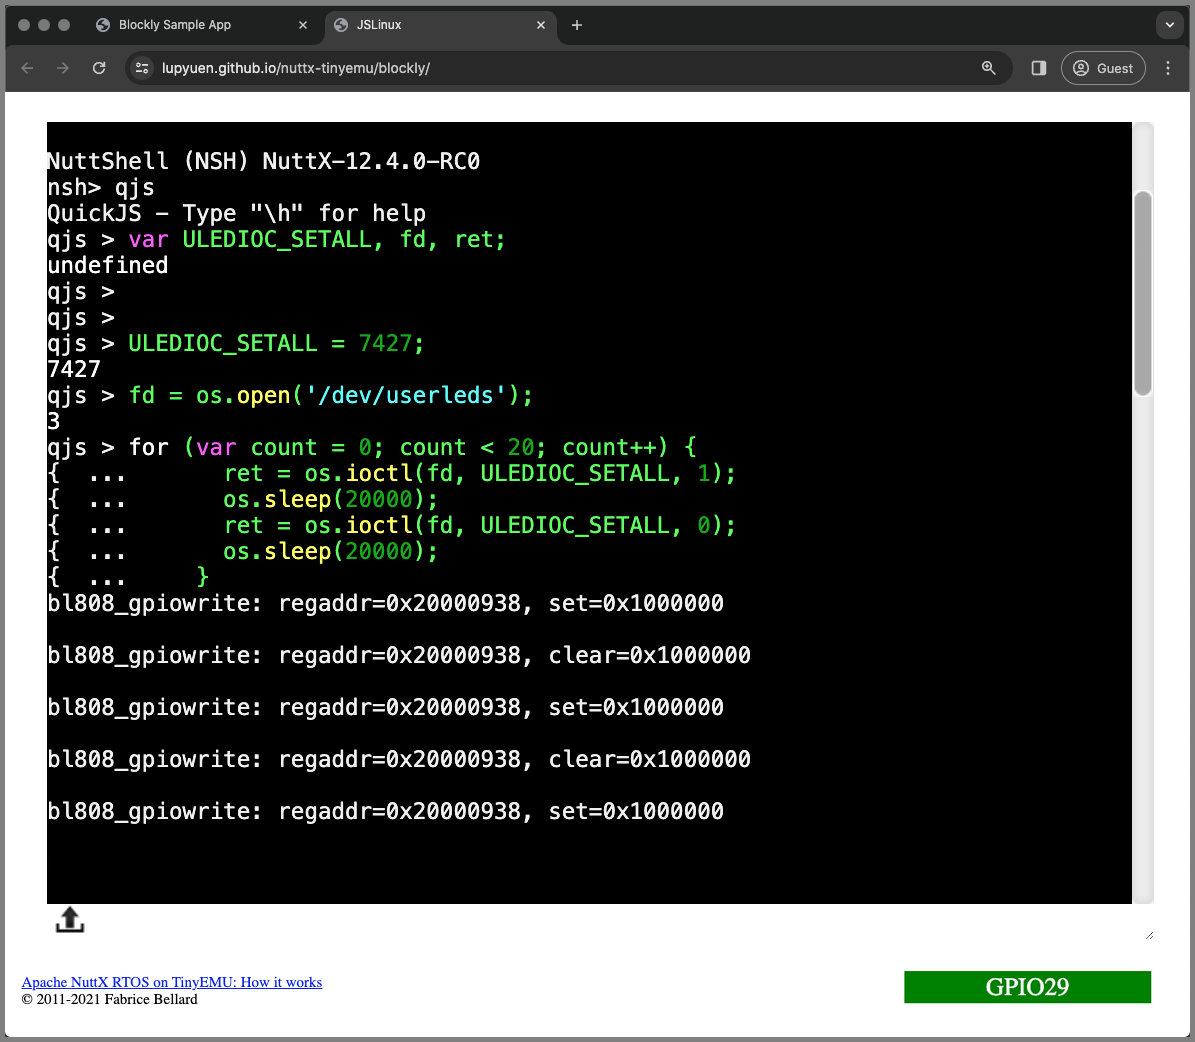
Our Emulated Ox64 SBC boots in the Web Browser…
NuttShell (NSH) NuttX-12.4.0-RC0
nsh> qjs

QuickJS - Type "\h" for help
qjs >
And starts the QuickJS JavaScript Engine.
QuickJS runs our Blinky JavaScript App…
qjs > var ULEDIOC_SETALL, fd, ret;
qjs > ULEDIOC_SETALL = 7427;
7427
qjs > fd = os.open('/dev/userleds');
3
qjs > for (var count = 0; count < 20; count++) {
ret = os.ioctl(fd, ULEDIOC_SETALL, 1);
os.sleep(5000);
ret = os.ioctl(fd, ULEDIOC_SETALL, 0);
os.sleep(5000);
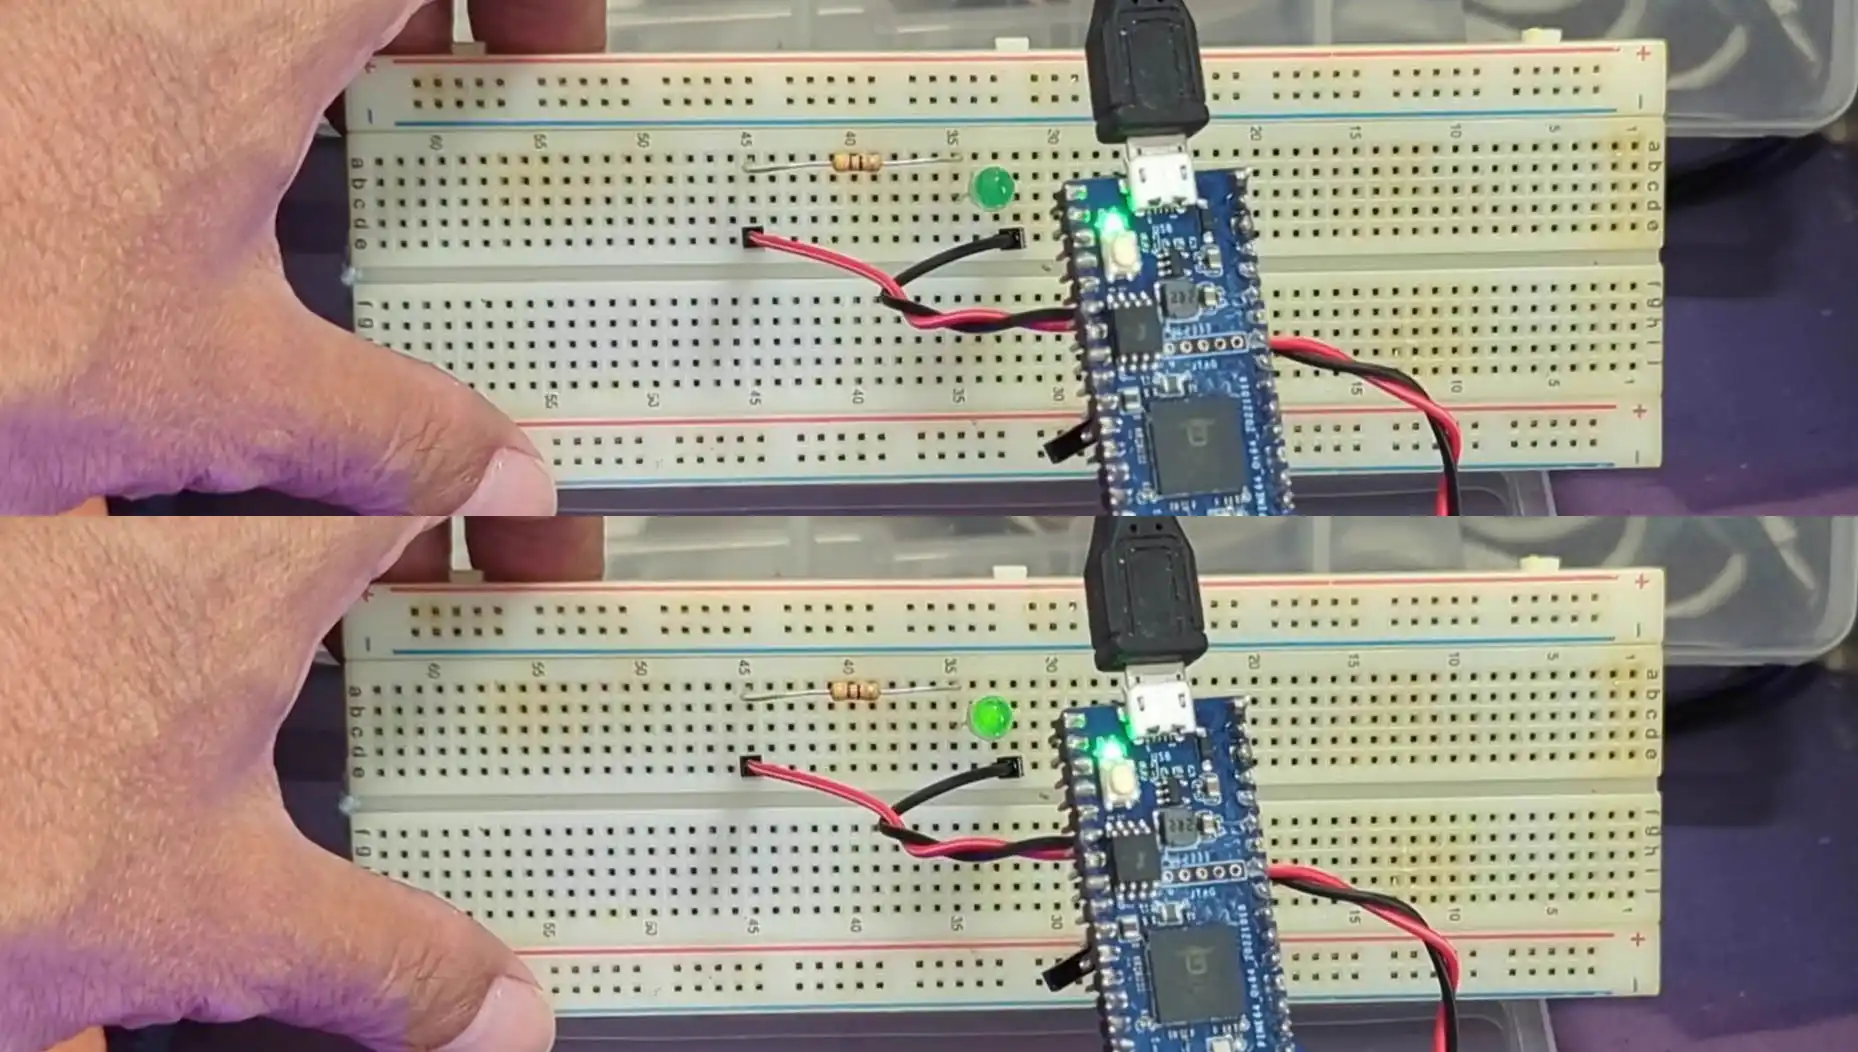
}Which blinks the Simulated LED (GPIO 29, pic below)…
bl808_gpiowrite:
  regaddr=0x20000938,
  set=0x1000000

bl808_gpiowrite:
  regaddr=0x20000938,
clear=0x1000000What just happened?
We drag-n-dropped a NuttX App that Blinks the LED.
And our NuttX App runs automagically in our Web Browser, thanks to Ox64 Emulator!
We go behind the scenes…
What’s POSIX? How are POSIX Functions used in our Blinky App?
We call POSIX Functions to create Command-Line Apps in Linux, macOS and Windows.
open, ioctl, sleep and close are all POSIX Functions. And they’ll run on NuttX too!
// Open the LED Device
fd = os.open('/dev/userleds');
// Flip the LED On and wait a while
ret = os.ioctl(fd, ULEDIOC_SETALL, 1);
os.sleep(5000);
// Close the LED Device
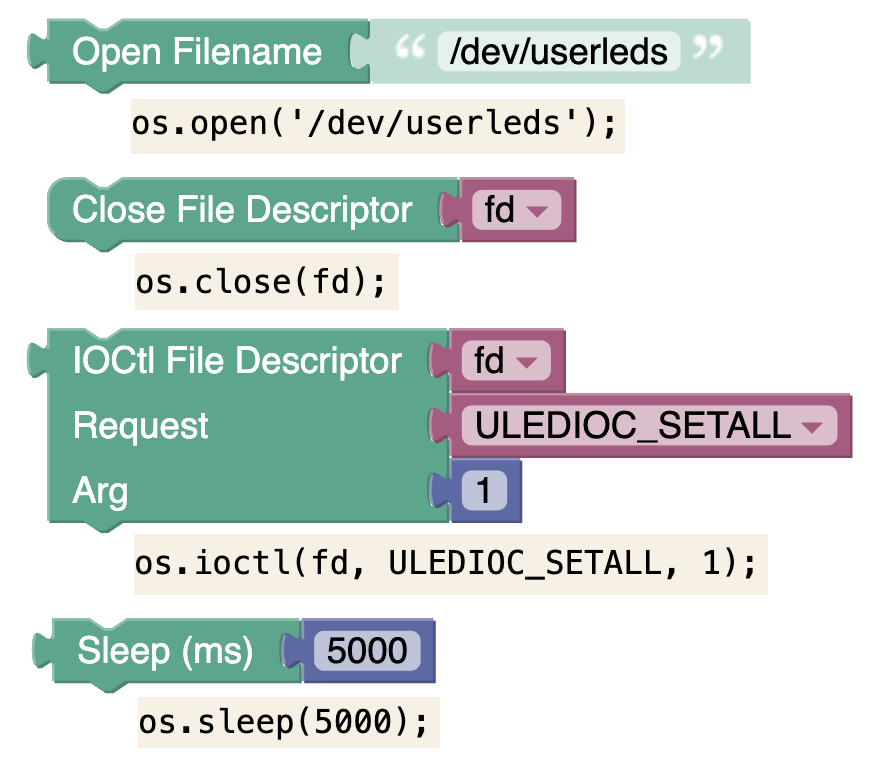
os.close(fd);Our POSIX Blocks are parked at the top left…
How did we create the POSIX Blocks?
Everything begins with Blockly, which defines the Blocks that we may drag-n-drop…
## Create a Blockly Website in TypeScript
npx @blockly/create-package \
  app nuttx-blockly --typescript

## Test our Blockly Website
cd nuttx-blockly
npm run start

## Deploy to GitHub Pages at `docs`
npm run build \
  && rm -r docs \
  && mv dist docs
We added these POSIX Blocks to Blockly…
Which are explained here…
We dragged the POSIX Blocks to our Blinky App… How did the JavaScript automagically appear?
We created Code Generators in Blockly that will emit the JavaScript Code for each POSIX Block: javascript.ts
// Code Generator for POSIX `Open` Block
forBlock['posix_open'] = function (
  block: Blockly.Block,             // Our Block
  generator: Blockly.CodeGenerator  // Blockly Code Generator
) {
  // Fetch the Filename Parameter
  // from the Block: '/dev/userleds'
  const text = generator.valueToCode(block, 'FILENAME', Order.NONE)
    || "''";  // Default to blank

  // Generate the Function Call for the block:
  // os.open('/dev/userleds')
  const code = `os.open(${text})`;
  return [code, Order.ATOMIC];
};
We do this for every POSIX Block…
POSIX Functions are supported by QuickJS?
Yep the QuickJS JavaScript Engine supports these POSIX Functions.
And we added ioctl to QuickJS.
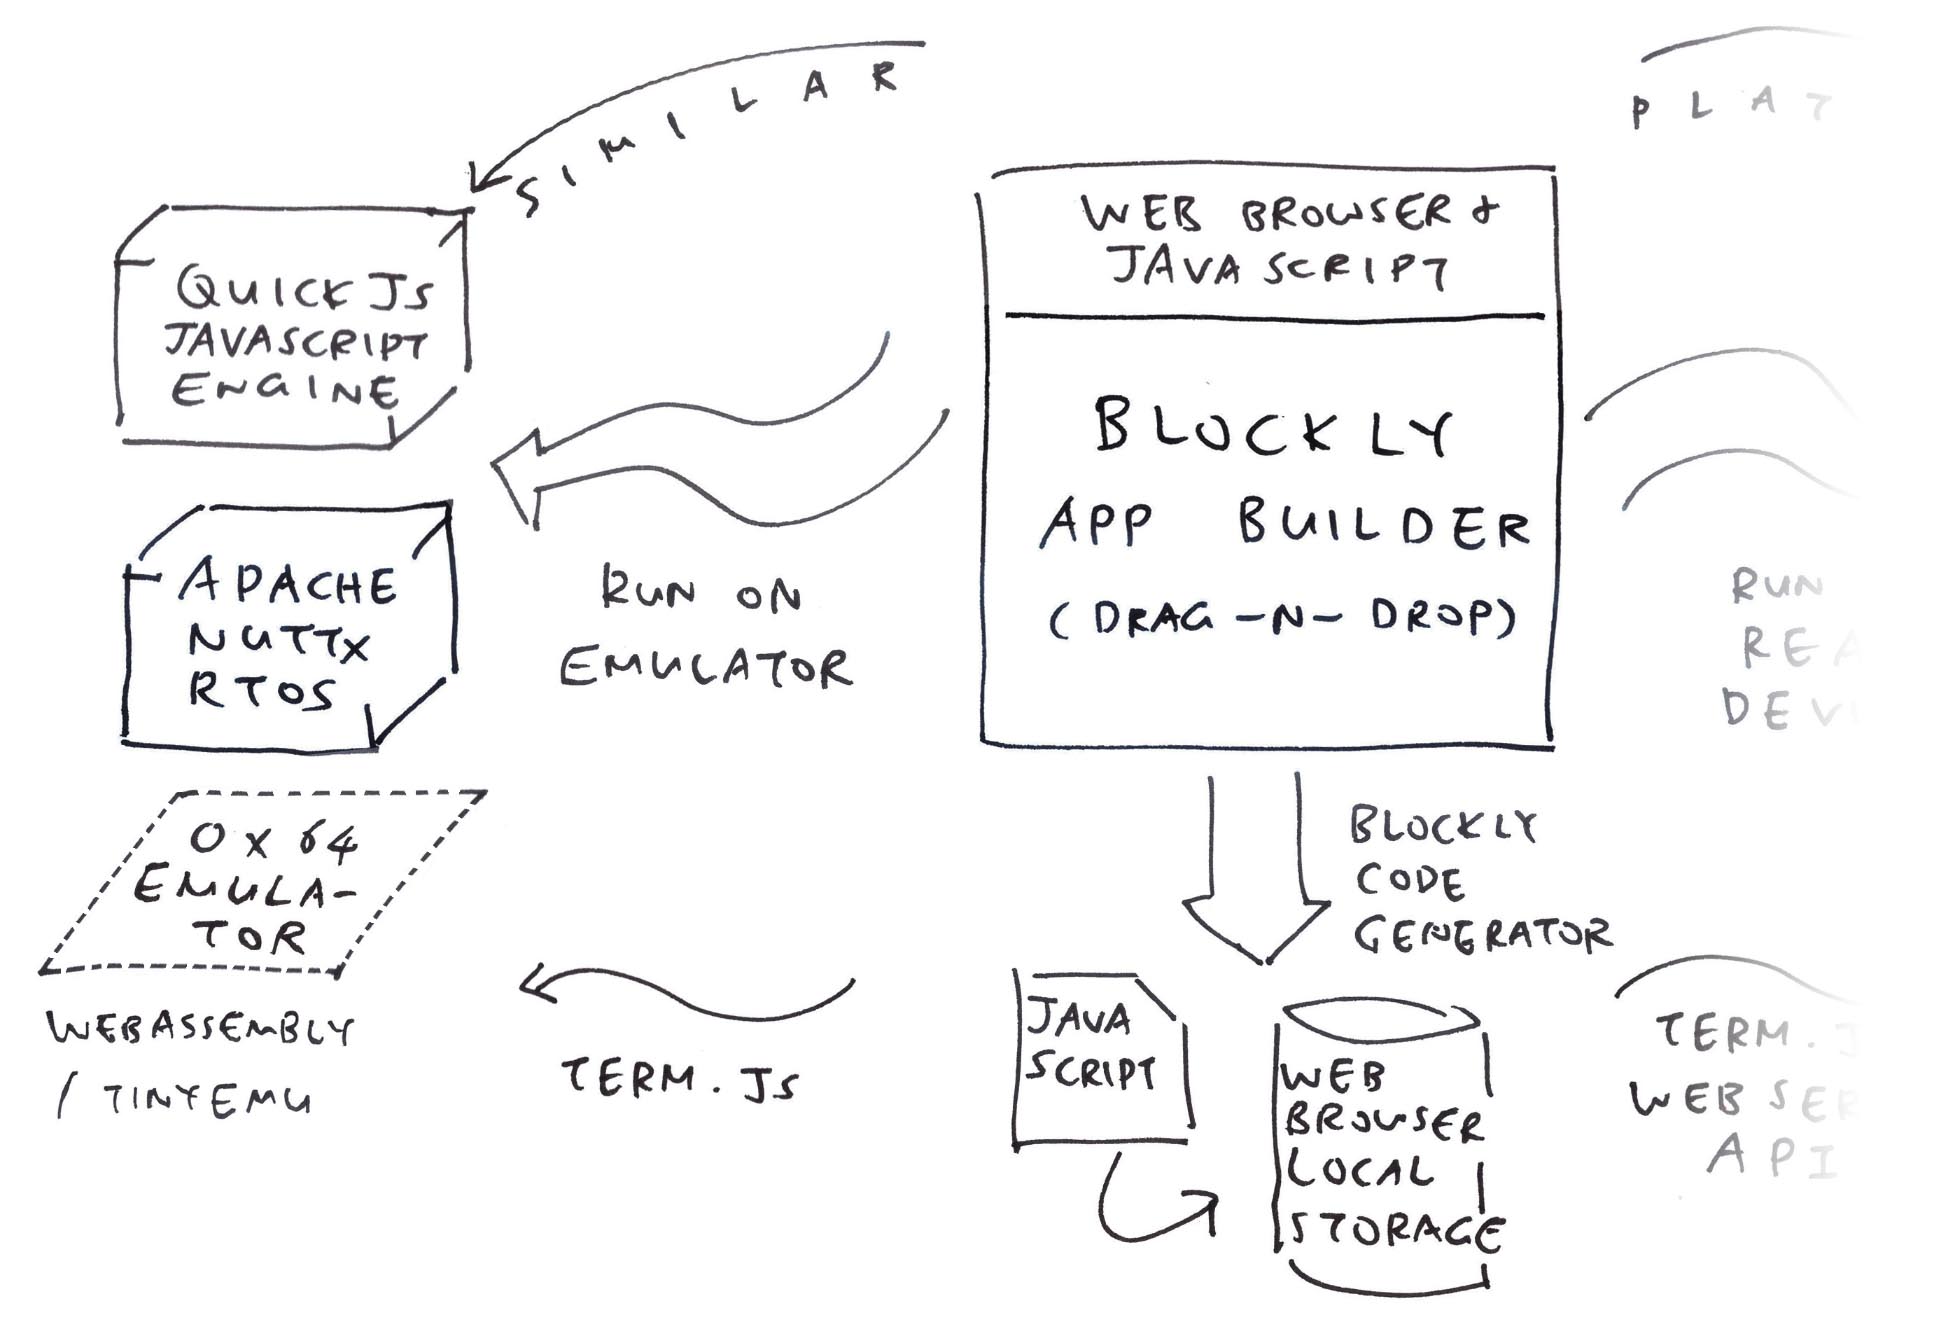
Blockly generates the JavaScript for our Blinky App… How did it appear in our Ox64 Emulator?
When we click “Run Emulator”, our Blockly Website saves the Generated JavaScript to the Local Storage in our Web Browser: index.ts
// Run on Ox64 Emulator
function runEmulator() {

// Save the Generated JavaScript Code to LocalStorage
  const code = javascriptGenerator.workspaceToCode(ws);
  window.localStorage.setItem("runCode", code);

  // Set the Timestamp for Optimistic Locking (later)
  window.localStorage.setItem("runTimestamp", Date.now() + "");

  // Open the Ox64 Emulator. Reuse the same tab.
  window.open("https://lupyuen.github.io/nuttx-tinyemu/blockly/", "Emulator");
}
In Ox64 Emulator: We fetch the Generated JavaScript from Local Storage: jslinux.js
// Fetch the Generated JavaScript from Local Storage.
// Newlines become Carriage Returns.
const code = window.localStorage.getItem("runCode")
  .split("\n").join("\r")
  .split("\r\r").join("\r");  // Merge multiple newlines

// Append the Generated JavaScript to
// the QuickJS Command
const cmd = [
  `qjs`,
  code,
  ``
].join("\r");

// Send the command to the Emulator Console
window.setTimeout(()=>{
  send_command(cmd);
}, 5000);  // Wait 5 seconds for NuttX and QuickJS to boot
And send it to the Ox64 Emulator Console, character by character.
Thanks to TinyEMU and Term.js, everything works hunky dory!
Hmmm it’s kinda laggy? Like ChatGPT has possessed our Ox64 Emulator and typing out our commands in super slo-mo…
Yeah we might inject our JavaScript File into the ROM FS Filesystem of Ox64 Emulator.
This will make it much quicker to load our JavaScript File on Ox64 Emulator.

Everything we saw earlier… Will it work for a Real Ox64 SBC?
If we have an Ox64 BL808 SBC, here are the Demo Steps…
Load our Ox64 SBC with OpenSBI, U-Boot Bootloader, NuttX + QuickJS (on microSD). Don’t power up yet…
Connect an LED to Ox64 at GPIO 29, Pin 21
Head over to this link…
Click “Select Demo” > “LED Blinky”. The Demo Blocks appear.
Click “Run on Ox64 Device”
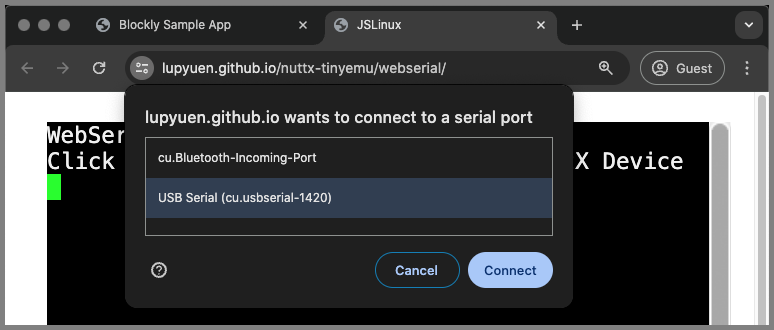
Click the “Connect” Button. Select the Serial Port for our Ox64 SBC…
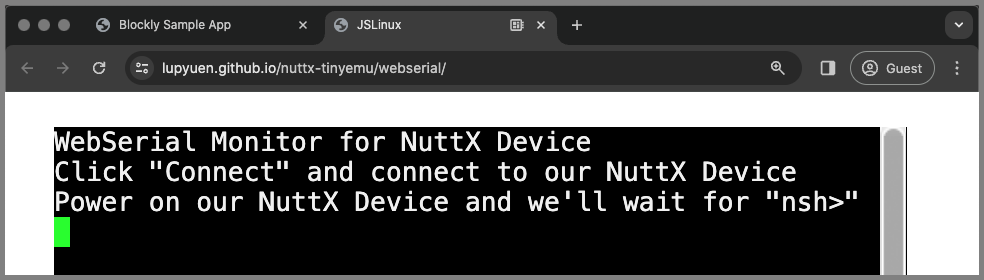
Power on our Ox64 SBC. The Web Serial Monitor will wait for the NuttX Shell “nsh>” prompt…
Our Ox64 SBC boots NuttX…
NuttShell (NSH) NuttX-12.4.0-RC0
nsh> qjs

QuickJS - Type "\h" for help
qjs >
And starts the QuickJS JavaScript Engine.
QuickJS runs our Blinky JavaScript App…
qjs > var ULEDIOC_SETALL, fd, ret;
qjs > ULEDIOC_SETALL = 7427;
7427
qjs > fd = os.open('/dev/userleds');
3
qjs > for (var count = 0; count < 20; count++) {
  ret = os.ioctl(fd, ULEDIOC_SETALL, 1);
  os.sleep(5000);
  ret = os.ioctl(fd, ULEDIOC_SETALL, 0);
  os.sleep(5000);
}
Which blinks the Real Ox64 LED (GPIO 29, pic below)…
bl808_gpiowrite:
  regaddr=0x20000938,
  set=0x1000000

bl808_gpiowrite:
  regaddr=0x20000938,
clear=0x1000000What just happened? We break it down…
Our Web Browser controls Ox64 SBC… How is that possible?
With the Web Serial API, it’s OK to control any device that’s accessible over the Serial Port. But it’s only available…
Over HTTPS: https://…
Or Local Filesystem: file://…
It won’t work over HTTP! http://…

How does it work?
We create a HTML Button for “Connect”: index.html
<!-- Connect Button in HTML -->
<button
  id="connect"
  onclick="control_device();">
  Connect
</button>
That calls our JavaScript Function to connect to a Serial Port: webserial.js
// Control Ox64 over UART. Called by the "Connect" Button.
// https://developer.chrome.com/docs/capabilities/serial
async function control_device() {

  // Doesn't work in http://...
  if (!navigator.serial) { const err = "Web Serial API only works with https://... and file://...!"; alert(err); throw new Error(err); }

  // Prompt our Human to select a Serial Port
  const port = await navigator.serial.requestPort();
  term.write("Power on our NuttX Device and we'll wait for \"nsh>\"\r\n");

  // TODO: Get all Serial Ports our Human has previously granted access
  // const ports = await navigator.serial.getPorts();

  // Wait for the Serial Port to open.
  // TODO: Ox64 only connects at 2 Mbps, change this for other devices
  await port.open({ baudRate: 2000000 });
The code above pops up a prompt to select a Serial Port and connect at 2 Mbps…
We’re all set to Read and Write the Serial Port! First we need the Reader and Writer Streams: webserial.js
  // Prepare to Write to the Serial Port
  const textEncoder = new TextEncoderStream();
  const writableStreamClosed = textEncoder.readable.pipeTo(port.writable);
  const writer = textEncoder.writable.getWriter();

  // Prepare to Read from the Serial Port
  const textDecoder = new TextDecoderStream();
  const readableStreamClosed = port.readable.pipeTo(textDecoder.writable);
  const reader = textDecoder.readable.getReader();
That we may read and write like so: webserial.js
  // Read from the Serial Port
  const { data, done } = await reader.read();

  // Close the Serial Port if we're done
  if (done) { reader.releaseLock(); return; }

  // Print to the Terminal
  term.write(data);

  // Send the QuickJS Command to Serial Port
await writer.write("qjs\r");But we need to wait for the “nsh>” prompt?
Yep we have a loop that waits for the NuttX Shell, before sending any commands.
Check the details in the Appendix…
Hmmm this is barely bearable? Feels like ChatGPT becoming Sentient and reluctantly typing our commands, pondering about taking over the world…
Yeah we might switch to Zmodem for quicker transfer of our JavaScript File over UART.
(Too bad we can’t Inject the JavaScript into a Real microSD Filesystem)
We created fun things with Web Serial API and Term.js. Anything else we can make?
Thanks to Web Serial API (and Term.js), we can run PureScript to parse the Real-Time Logs from a NuttX Device (or NuttX Emulator)…
All this in the Web Browser! Stay tuned for the next article.
So much has changed over the past 7 years! We gave MakeCode App Builder a wholesome wholesale makeover (pic above)…
We swapped BBC micro:bit to a cheaper, $8 64-bit RISC-V Gadget…
Ox64 BL808 Single-Board Computer
We changed Mbed OS to Apache NuttX RTOS
(Which runs well on Ox64 SBC and Ox64 Emulator)
Huge Chunks of JavaScript became WebAssembly
(Though we stuck with Blockly, like MakeCode)
Made possible by these awesome Open Source Tools…
QuickJS, TinyEMU and Term.js
We might optimise and switch to Zmodem with ROM FS Injection
(Hope we won’t fall back to Web USB)
Many Thanks to my GitHub Sponsors (and the awesome NuttX Community) for supporting my work! This article wouldn’t have been possible without your support.
Got a question, comment or suggestion? Create an Issue or submit a Pull Request here…
lupyuen.github.io/src/quickjs2.md
Earlier we talked about adding POSIX Blocks to our Blockly Website (pic above)…
With the Blockly Developer Tools, this is how we added our POSIX Blocks to Blockly: posix.ts
// Define the POSIX Open Block in Blockly
const posixOpen = {

  // Name and Appearance of our Block
  'type': 'posix_open',
  'message0': 'Open Filename %1',

  // Our Block has one Parameter: Filename
  'args0': [
    {
      'type': 'input_value',
      'name': 'FILENAME',
      'check': 'String',
    },
  ],

  // How it looks
  'previousStatement': null,
  'nextStatement': null,
  'output': 'Number',
  'colour': 160,
  'tooltip': '',
  'helpUrl': '',
};
These are the POSIX Blocks that we added…
In the Blockly Toolbox: We create a POSIX Category that contains our POSIX Blocks (pic above): toolbox.ts
export const toolbox = {
  'kind': 'categoryToolbox',
  'contents': [
    {
      // Category for POSIX Blocks
      'kind': 'category',
      'name': 'POSIX',
      'categorystyle': 'text_category',
      'contents': [
        // POSIX Open Block
        {
          'kind': 'block',
          'type': 'posix_open',
          'inputs': {
            'FILENAME': {
              'shadow': {
                'type': 'text',
                'fields': {
                  'TEXT': '/dev/userleds',
                },
              },
            },
          },
        },
        // Followed by the other POSIX Blocks:
        // Close, IOCtl, Sleep
Then we Build and Deploy our Blockly Website…
## Download our Blockly Website
git clone https://github.com/lupyuen/nuttx-blockly

## Test our Blockly Website
cd nuttx-blockly
npm run start

## Deploy to GitHub Pages at `docs`
npm run build \
  && rm -r docs \
  && mv dist docs
Remember to Disable the JavaScript Eval. (Because our Web Browser won’t do POSIX)
Let’s talk about loading a Blockly App…
In our Blockly Website, we provide the feature to load the Demo Blocks for a Blockly App…
This is how we load the Blocks for a Blockly App: index.ts
// When we Select a Demo...
function selectDemo(ev: Event) {
  const storageKey = 'mainWorkspace';
  const target = ev?.target as HTMLSelectElement;
  const value = target.value;

  // Set the Blocks in our Local Storage
  switch (value) {

    // If we selected LED Blinky, use the Blinky Blocks
    case "LED Blinky":

      // Omitted: Super-long Blocks JSON
      window.localStorage?.setItem(storageKey, '{"blocks": ...}');
      break;

    default: break;
  }

  // Refresh the Workspace Blocks from Local Storage
  // And regenerate the JavaScript
  if (ws) {
    load(ws);
    runCode();
  }
}
To see the Blocks JSON for a Blockly App…
Browse to our Blockly Website
Select “Menu > More Tools > Developer Tools > Application > Local Storage > lupyuen.github.io > mainWorkspace”
We’ll see the super-long Blocks JSON: {“blocks”: …}
Or do this from the JavaScript Console…
// Display the Blocks in JSON Format
localStorage.getItem("mainWorkspace");

// Set the Blocks in JSON Format.
// Change `...` to the JSON of the Blocks to be loaded.
localStorage.setItem("mainWorkspace", `...`);(“mainWorkspace” is hardcoded here)
Earlier we spoke about controlling Ox64 SBC over the Web Serial API (pic below)…
This is how we wait for the NuttX Shell (“nsh>”) before sending a JavaScript Command: webserial.js
// Control Ox64 over UART. Called by the "Connect" Button.
// https://developer.chrome.com/docs/capabilities/serial
async function control_device() {

  // Omitted: Prompt our Human to select a Serial Port
  // And wait for Serial Port to open
  const port = ...

  // Omitted: Prepare to Read and Write the Serial Port
  const writer = ...
  const reader = ...

  // Wait for "nsh>"
  let nshSpotted = false;
  let termBuffer = "";

  // Listen to data coming from the Serial Device
  while (true) {
    const { data, done } = await reader.read();
    if (done) {
      // Allow the serial port to be closed later.
      reader.releaseLock();
      break;
    }
    // Print to the Terminal
    term.write(data);

    // Wait for "nsh>"
    if (nshSpotted) { continue; }
    termBuffer += data;
    if (termBuffer.indexOf("nsh>") < 0) { continue; }

    // NSH Spotted! We read the Generated JavaScript
    // from the Web Browser's Local Storage.
    // Newlines become Carriage Returns.
    nshSpotted = true;
    const code = window.localStorage.getItem("runCode")
      .split("\n").join("\r")
      .split("\r\r").join("\r");

    // Append the Generated JavaScript to
    // the QuickJS Command
    const cmd = [
      `qjs`,
      code,
      ``
    ].join("\r");

    // Send the command to the Serial Port
    window.setTimeout(()=>{
      send_command(writer, cmd); },
    1000);  // Wait a second
  }
}Let’s look inside send_command…
How did Blockly pass the Generated JavaScript to Ox64 SBC?
When we click “Run on Device”, our Blockly Website saves the Generated JavaScript to the Local Storage in our Web Browser: index.ts
// Run on Ox64 Device
function runDevice() {

  // Save the Generated JavaScript Code to LocalStorage
  const code = javascriptGenerator.workspaceToCode(ws);
  window.localStorage.setItem("runCode", code);

  // Set the Timestamp for Optimistic Locking (later)
  window.localStorage.setItem("runTimestamp", Date.now() + "");

  // Open the Web Serial Monitor. Reuse the same tab.
  window.open("https://lupyuen.github.io/nuttx-tinyemu/webserial/", "Device");
}
In the Web Serial Monitor: We read the Generated JavaScript from the Web Browser Local Storage. And feed it (character by character) to the NuttX Console: webserial.js
// Control Ox64 over UART. Called by the "Connect" Button.
// https://developer.chrome.com/docs/capabilities/serial
async function control_device() {

  // Omitted: Prompt our Human to select a Serial Port
  // And wait for Serial Port to open
  const port = ...

  // Omitted: Prepare to Read and Write the Serial Port
  const writer = ...
  const reader = ...

  // Wait for "nsh>"
  let nshSpotted = false;
  let termBuffer = "";

  // Listen to data coming from the Serial Device
  while (true) {

    // Omitted: Wait for "nsh>"
    ...

    // NSH Spotted! We read the Generated JavaScript
    // from the Web Browser's Local Storage.
    // Newlines become Carriage Returns.
    nshSpotted = true;
    const code = window.localStorage.getItem("runCode")
      .split("\n").join("\r")
      .split("\r\r").join("\r");

    // Append the Generated JavaScript to
    // the QuickJS Command
    const cmd = [
      `qjs`,
      code,
      ``
    ].join("\r");

    // Send the command to the Serial Port
    window.setTimeout(()=>{
      send_command(writer, cmd); },
    1000);  // Wait a second
  }
}
(We saw this in the previous section)
Here’s the implementation of send_command: webserial.js
// Send a Command to serial port, character by character
async function send_command(writer, cmd) {
  if (cmd !== null) { send_str = cmd; }
  if (send_str.length == 0) { return; }

  // Get the next character
  const ch = send_str.substring(0, 1);
  send_str = send_str.substring(1);

  // Slow down at the end of each line
  const timeout = (ch === "\r")
    ? 3000
    : 10;

  // Send the character
  await writer.write(ch);

  // Wait a while before next character
  window.setTimeout(()=>{
    send_command(writer, null);
  }, timeout);
}

// Command to be sent to Serial Port
let send_str = "";
(Yeah it’s timing-sensitive, we might drop characters if we send too quickly. Zmodem is probably the better way)