📝 5 May 2024
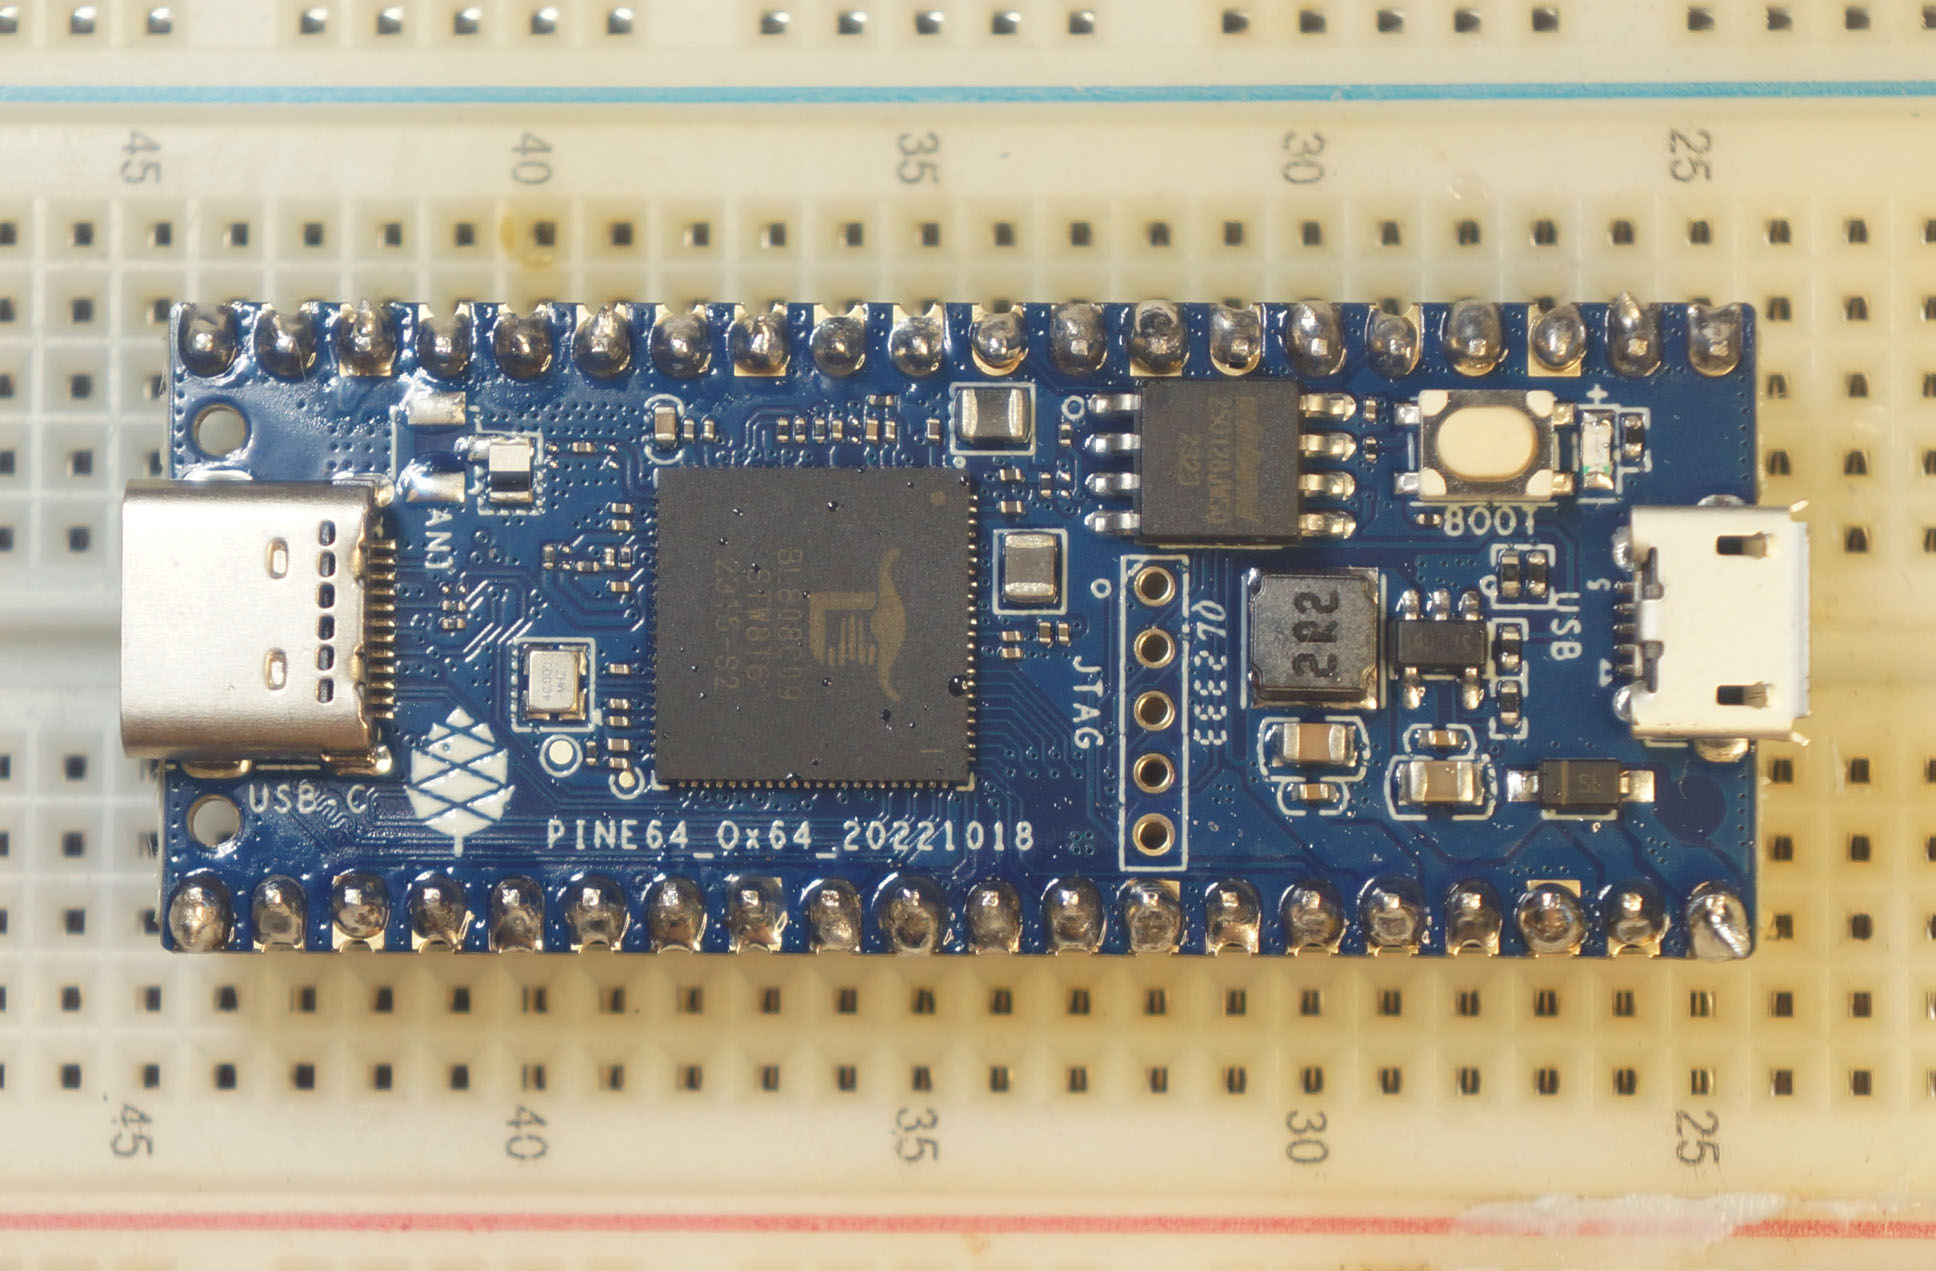
Will Rust Apps run on a 64-bit RISC-V SBC? Like Ox64 BL808 SBC? (Pic below)
Let’s find out!
We take a Barebones Rust App (“Hello World!”)
Compile it for QEMU RISC-V Emulator (64-bit)
Run it on QEMU Emulator with Apache NuttX RTOS
Do the same on Ox64 BL808 SBC (via MicroSD)
We’ll discuss the Quirky Workarounds
Because NuttX Apps work differently in Kernel Mode vs Flat Mode
Below is the Simplest Rust App that will run on Apache NuttX RTOS.
We begin with the Rust Declarations: hello_rust_main.rs
// main() function not needed
#![no_main]

// Use Rust Core Library (instead of Rust Standard Library)
#![no_std]

// Import printf() from C into Rust
extern "C" {
  pub fn printf(
    format: *const u8,  // Equivalent to `const char *`
    ...                 // Optional Arguments
  ) -> i32;             // Returns `int`
} // TODO: Standardise `i32` as `c_int`The code above imports the printf() function from C into Rust.
This is how we call it in Rust: hello_rust_main.rs
// Main Function exported by Rust to C.
// Don't mangle the Function Name.
#[no_mangle]
pub extern "C" fn hello_rust_main(
  _argc: i32,              // Equivalent to `int argc`
  _argv: *const *const u8  // Equivalent to `char **argv`
) -> i32 {                 // Returns `int`

  // Calling a C Function might have Unsafe consequences
  unsafe {
    printf(                 // Call printf() with...
      b"Hello, Rust!!\n\0"  // Byte String terminated by null
        as *const u8        // Cast as `const char *`
    );
  }

  // Exit with status 0
  0
}
Rust expects us to provide a Panic Handler. We write a simple one: hello_rust_main.rs
// Import the Panic Info for our Panic Handler
use core::panic::PanicInfo;

// Handle a Rust Panic. Needed for [no_std]
#[panic_handler]
fn panic(
  _panic: &PanicInfo<'_>  // Receives the Panic Info and Stack Trace
) -> ! {                  // Never returns

  // TODO: Print the Panic Info and Stack Trace
  // For now, we loop forever
  loop {}
}
That’s all for our barebones app! Now we compile it…
Before testing on a Real RISC-V SBC, let’s test on QEMU Emulator for RISC-V…
Follow these steps to build NuttX for QEMU Emulator (64-bit RISC-V)…
If we Enable Build Tracing: We’ll see…
## Build NuttX with Tracing Enabled
$ make --trace

## Compile "hello_main.c" with GCC Compiler
## For xPack Toolchain:
## Change all `riscv64-unknown-elf` to `riscv-none-elf`
riscv64-unknown-elf-gcc \
  -march=rv64imafdc \
  -mabi=lp64d \
  -c \
  -Dmain=hello_main \
  hello_main.c \
  -o hello_main.c...apps.examples.hello.o \
  ...

## Compile "hello_rust_main.rs" with Rust Compiler
rustc \
  --target riscv64i-unknown-none-elf \
  --edition 2021 \
  --emit obj \
  -g \
  -C panic=abort \
  -O \
  hello_rust_main.rs \
-o hello_rust_main.rs...apps.examples.hello_rust.oIf the Build Fails:
“Could not find specification for target riscv64i-unknown-none-elf”
Then our Rust Target is incorrect. We run this…
## Add the Rust Target for 64-bit RISC-V Hard-Float
$ rustup target add riscv64gc-unknown-none-elf
$ pushd ../apps/examples/hello_rust

## `$hello` becomes `hello_main.c...apps.examples.hello.o`
## `$hello_rust` becomes `hello_rust_main.rs...apps.examples.hello_rust.o`
## `$hello_rust_1` becomes `hello_rust_main.rs...apps.examples.hello_rust_1.o`
$ hello=$(basename ../hello/*hello.o)
$ hello_rust=`
  echo $hello \
  | sed "s/hello_main.c/hello_rust_main.rs/" \
  | sed "s/hello.o/hello_rust.o/"
  `
$ hello_rust_1=`
  echo $hello_rust \
  | sed "s/hello_rust.o/hello_rust_1.o/"
  `

## Compile our Rust App for 64-bit RISC-V Hard-Float
$ rustc \
  --target riscv64gc-unknown-none-elf \
  --edition 2021 \
  --emit obj \
  -g \
  -C panic=abort \
  -O \
  hello_rust_main.rs \
  -o $hello_rust
$ cp $hello_rust $hello_rust_1

## Return to NuttX Folder and complete the build
$ popd
$ make
(We’ll come back to this)
This produces the NuttX ELF Image nuttx that we’ll boot on QEMU RISC-V Emulator.
We’re ready to boot NuttX on QEMU Emulator and run our Rust App!
Download and install QEMU Emulator…
## For macOS:
brew install qemu
## For Debian and Ubuntu:
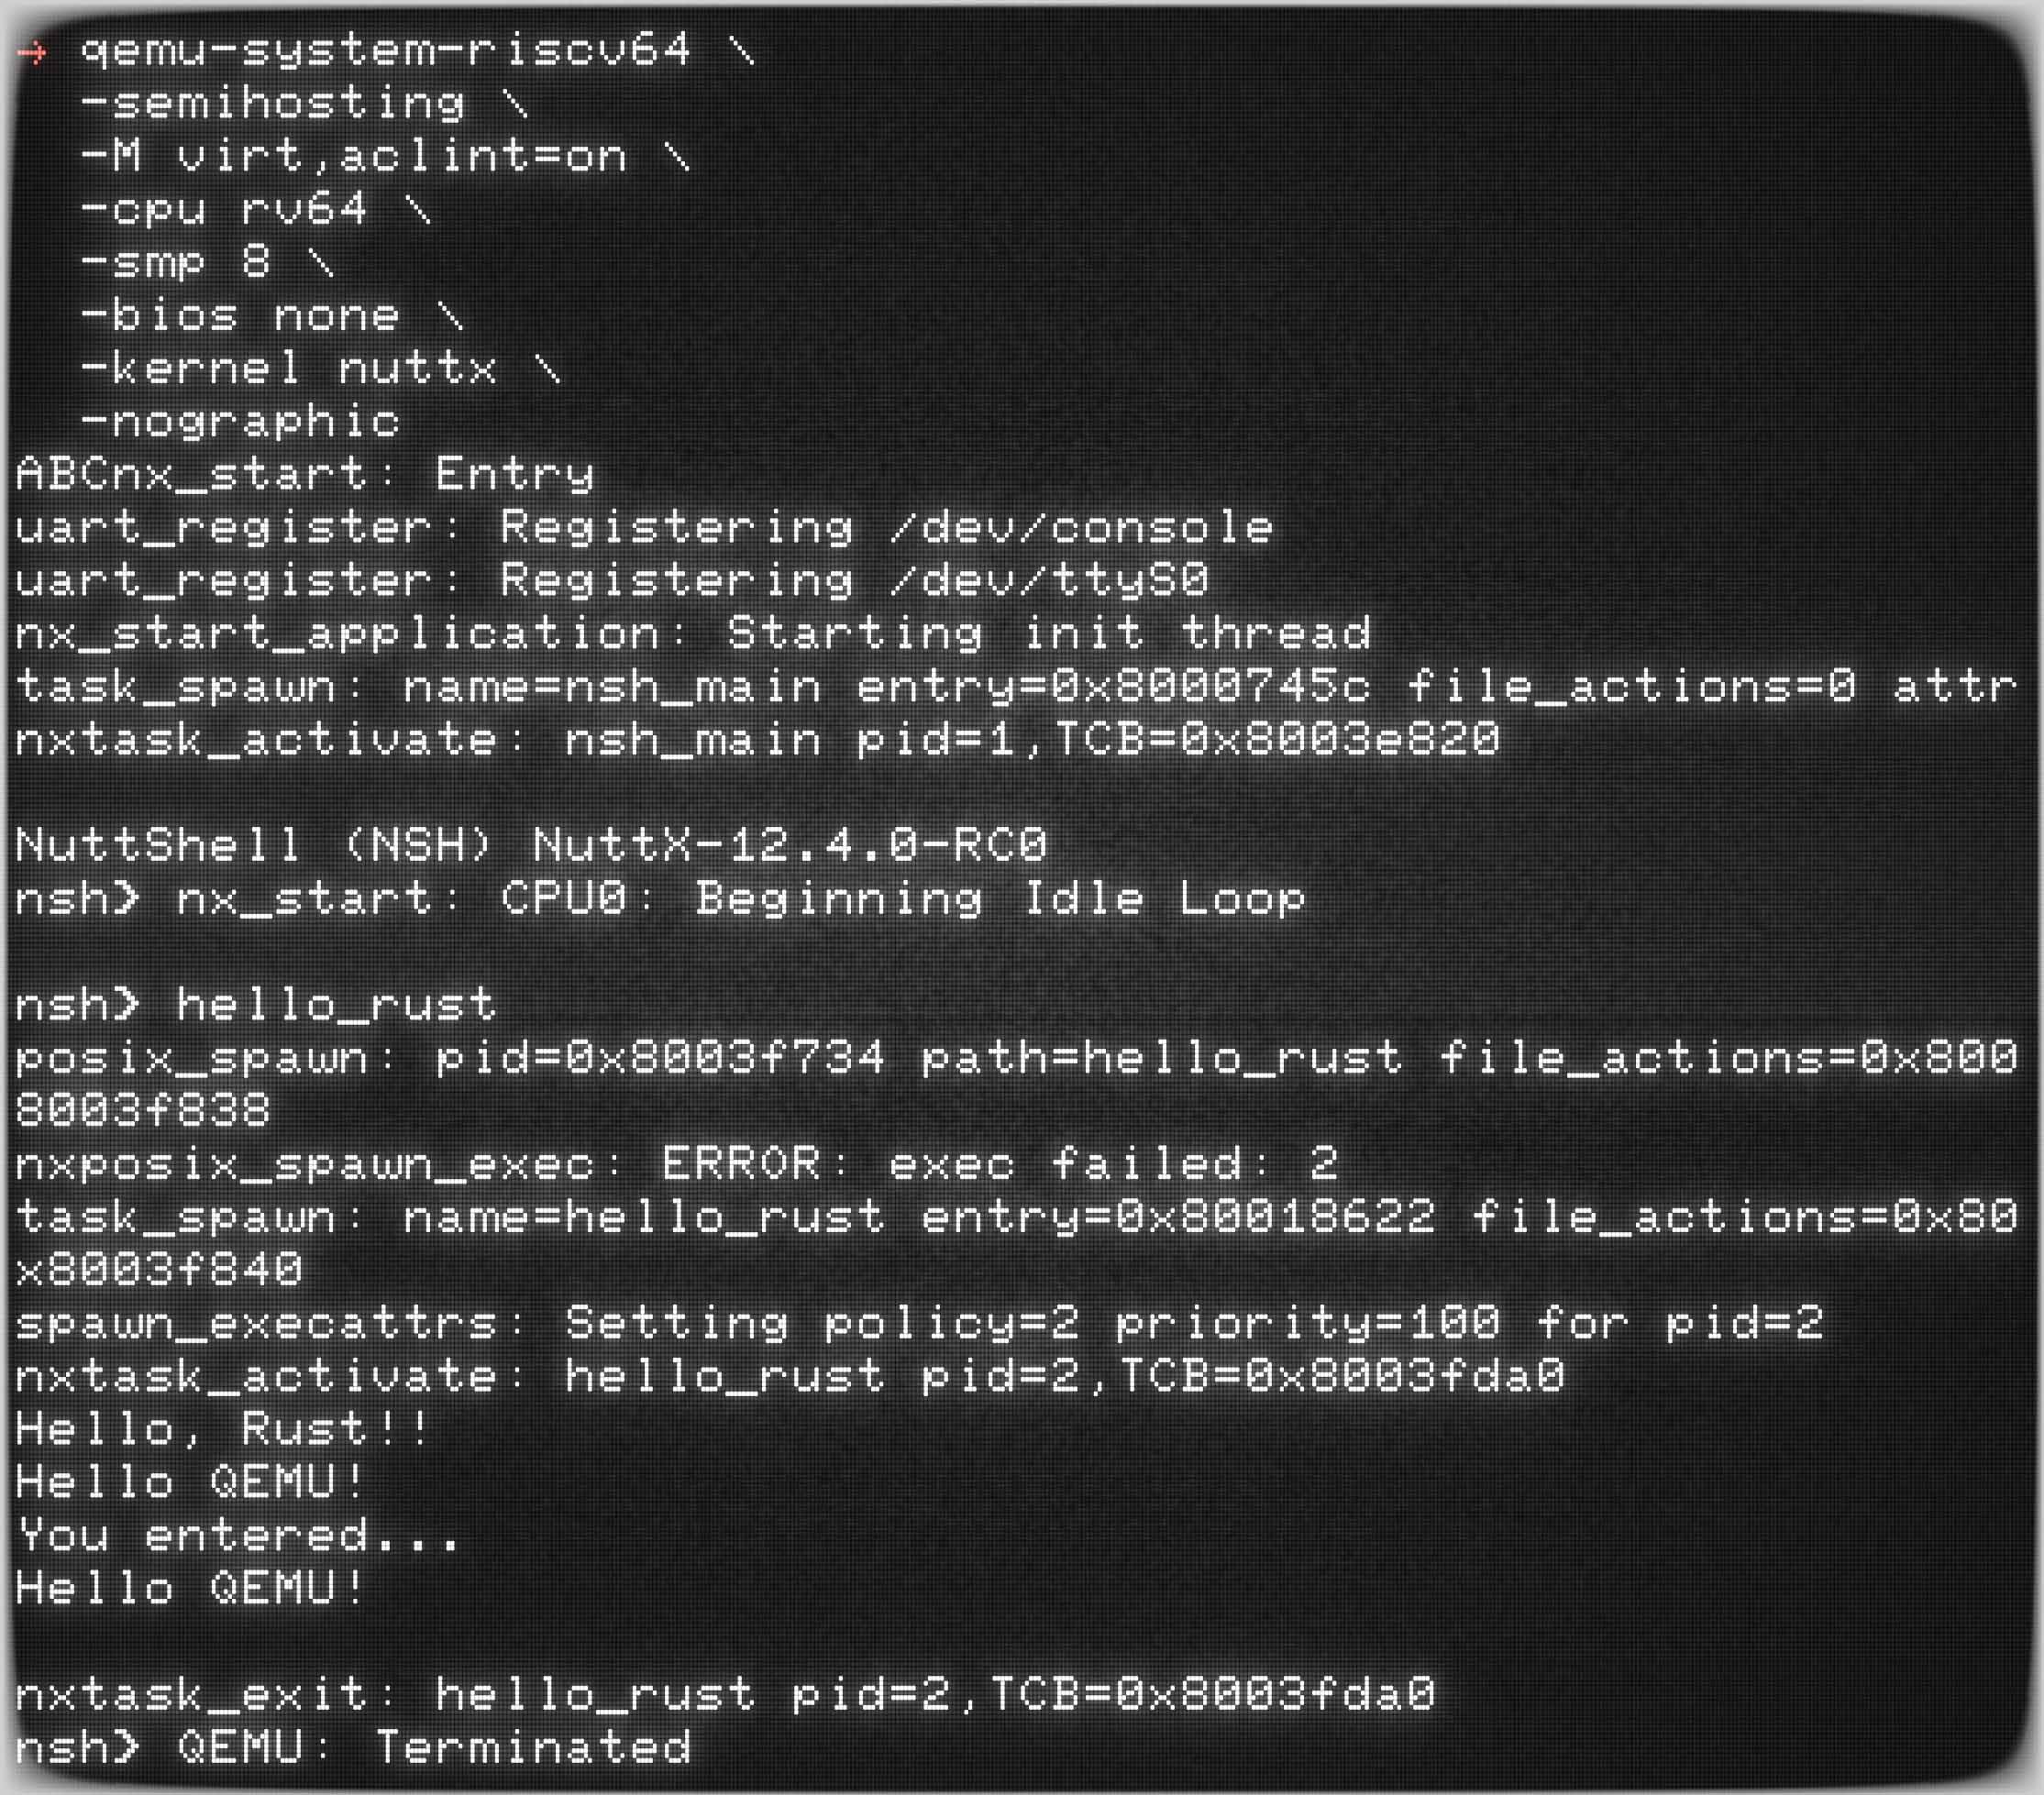
sudo apt install qemu-system-riscv64Start the QEMU RISC-V Emulator (64-bit) with the NuttX ELF Image nuttx from the previous section…
qemu-system-riscv64 \
  -semihosting \
  -M virt,aclint=on \
  -cpu rv64 \
  -bios none \
  -kernel nuttx \
  -nographic
NuttX is now running in the QEMU Emulator! (Pic above)
NuttShell (NSH) NuttX-12.4.0-RC0
nsh>
Enter “hello_rust” to run our Rust Demo App (which will print something)
nsh> hello_rust
Hello, Rust!!Enter “help” to see the available commands…
nsh> help
help usage:  help [-v] [<cmd>]

    .           cp          exit        mkdir       rmdir       umount
    [           cmp         expr        mkrd        set         unset
    ?           dirname     false       mount       sleep       uptime
    alias       dd          fdinfo      mv          source      usleep
    unalias     df          free        pidof       test        xd
    basename    dmesg       help        printf      time
    break       echo        hexdump     ps          true
    cat         env         kill        pwd         truncate
    cd          exec        ls          rm          uname

Builtin Apps:
    hello         hello_rust    nsh           ostest        sh
To Exit QEMU: Press Ctrl-A then x
UPDATE: We have fixed the Rust Target for QEMU 64-bit RISC-V…
Earlier we saw this error. Why did our Rust Build fail?
$ rustc hello_rust_main.rs --target riscv64i-unknown-none-elf ...

Could not find specification for target
  "riscv64i-unknown-none-elf"
Run `rustc --print target-list`
for a list of built-in targetsRust Compiler doesn’t recognise riscv64i as a valid Rust Target for 64-bit RISC-V…
## List the Built-In Rust Targets for RISC-V
$ rustup target list | grep riscv

## Nope no riscv64i!
riscv32i-unknown-none-elf
riscv32imac-unknown-none-elf
riscv32imc-unknown-none-elf
riscv64gc-unknown-linux-gnu
riscv64gc-unknown-none-elf
riscv64imac-unknown-none-elf
Is riscv64i the correct target for QEMU?
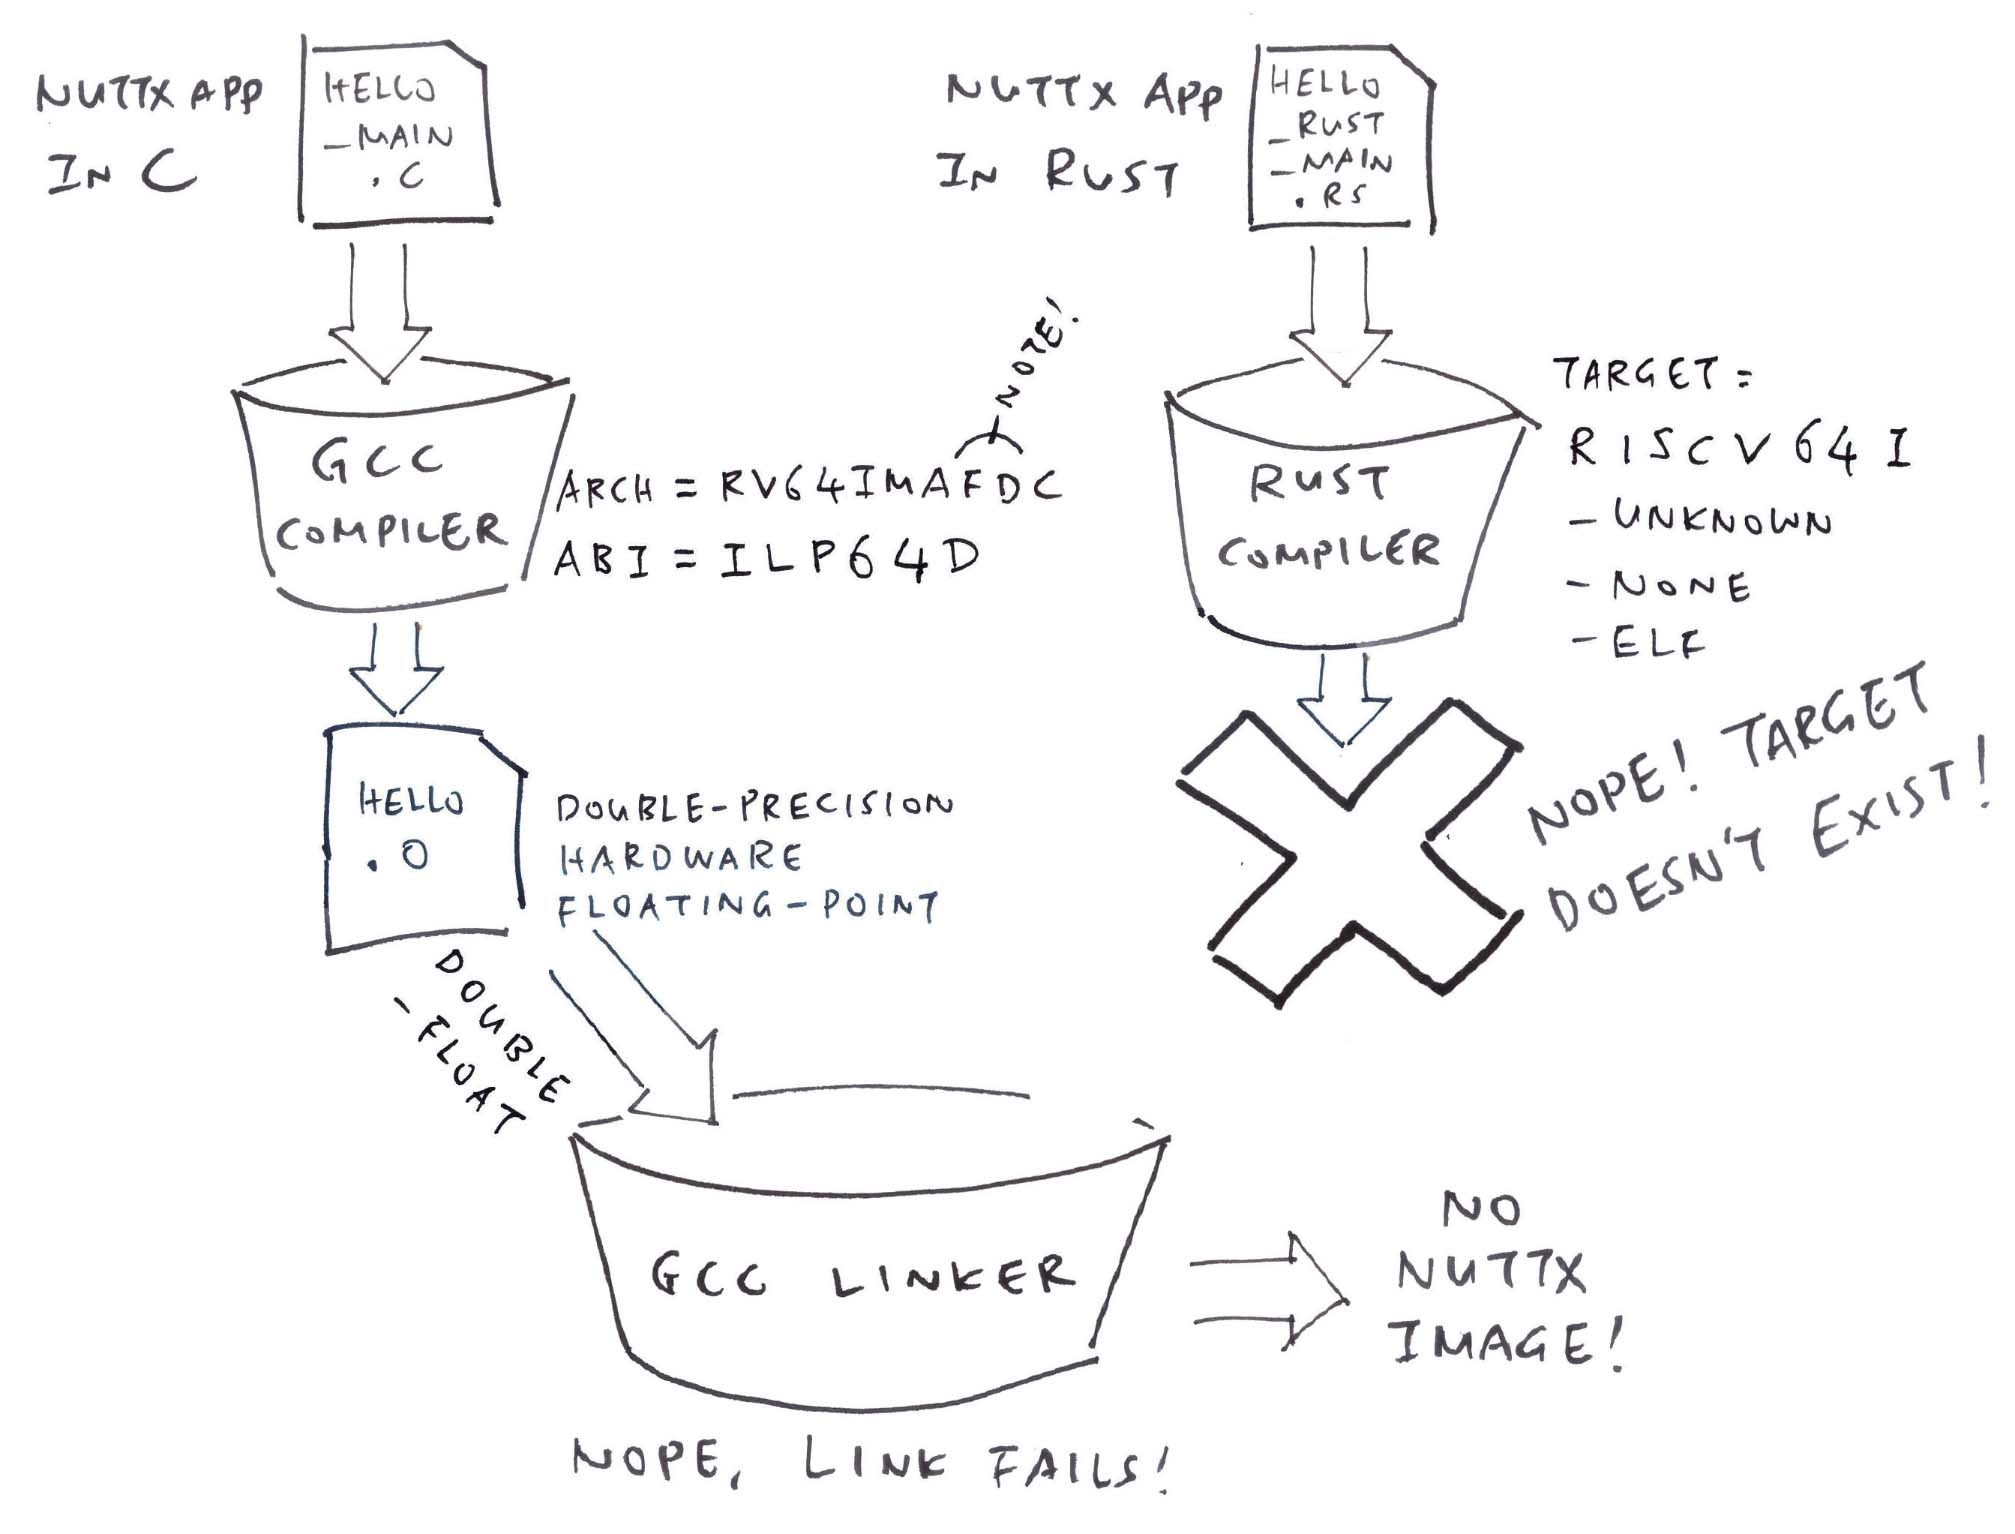
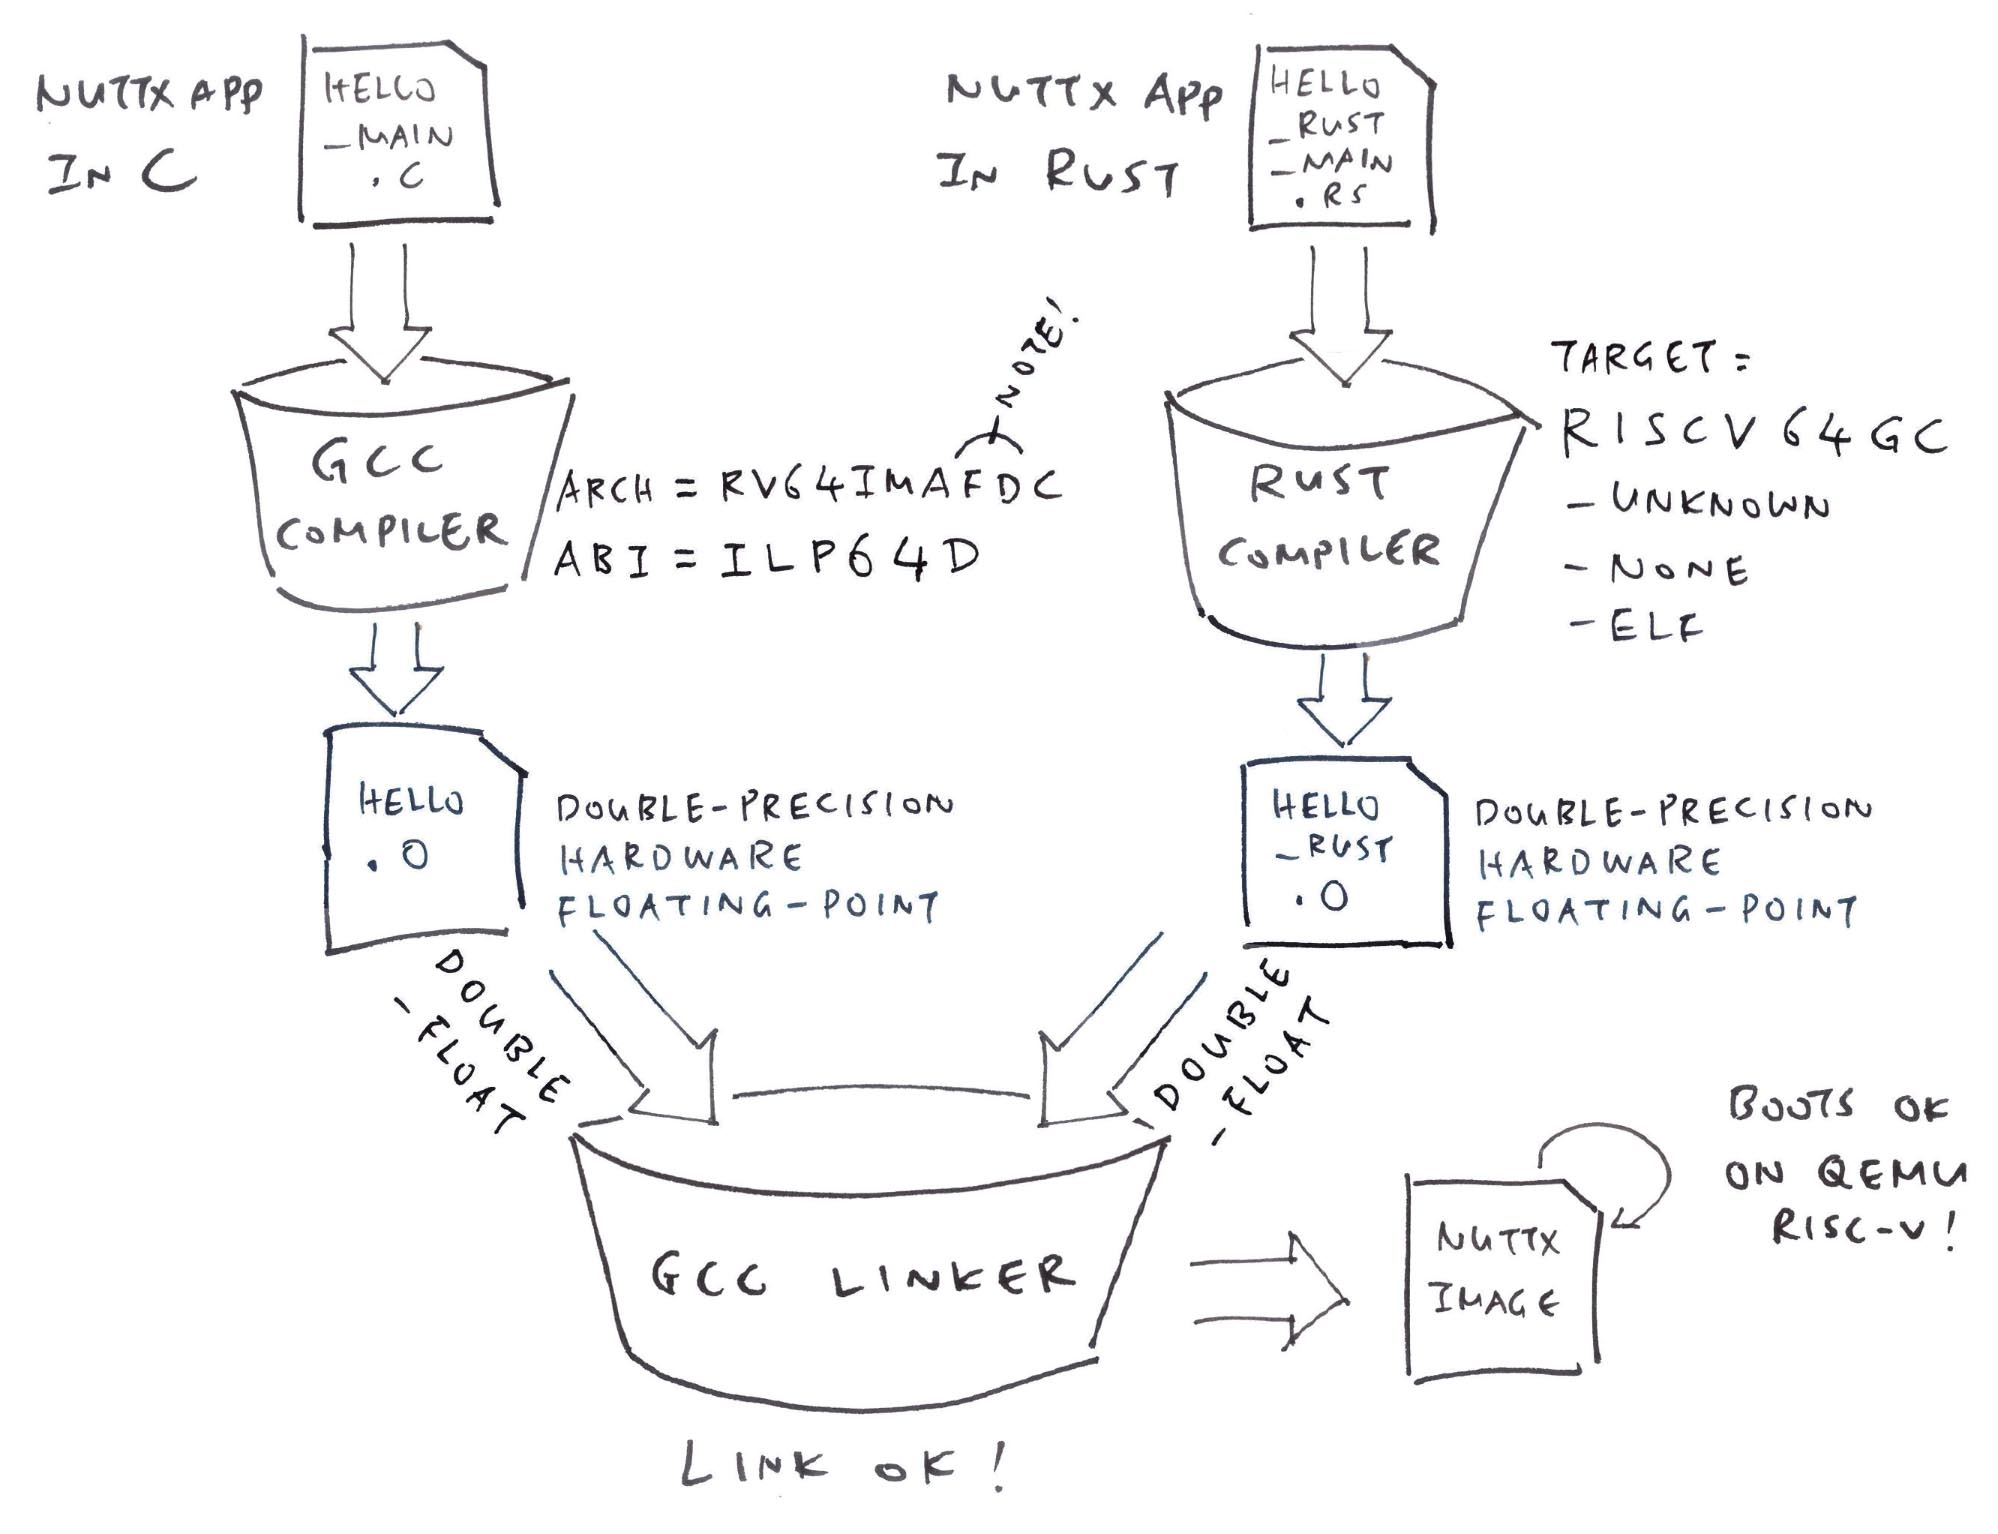
Remember earlier we saw GCC Compiler and Rust Compiler…
| GCC Compiler | Rust Compiler |
|---|---|
| riscv64-unknown-elf-gcc hello_main.c | rustc hello_rust_main.rs |
| -march rv64imafdc | –target riscv64i-unknown-none-elf |
| -mabi lp64d |
From above we see that GCC Compiler uses Hardware Floating-Point, but Rust Compiler somehow selected Software Floating-Point! (Pic above)
| GCC Compiler | Rust Compiler |
|---|---|
| rv64imafdc | riscv64i |
| - I: Integer | - I: Integer |
| - F: Single Hard-Float | (Default is Soft-Float) |
| - D: Double Hard-Float | (Default is Soft-Float) |
Let’s harmonise Rust Compiler with GCC Compiler: We select rv64gc, since it’s closest to Hardware Floating-Point…
## Add the Rust Target for 64-bit RISC-V Hard-Float
$ rustup target add riscv64gc-unknown-none-elf
$ pushd ../apps/examples/hello_rust

## `$hello` becomes `hello_main.c...apps.examples.hello.o`
## `$hello_rust` becomes `hello_rust_main.rs...apps.examples.hello_rust.o`
## `$hello_rust_1` becomes `hello_rust_main.rs...apps.examples.hello_rust_1.o`
$ hello=$(basename ../hello/*hello.o)
$ hello_rust=`
  echo $hello \
  | sed "s/hello_main.c/hello_rust_main.rs/" \
  | sed "s/hello.o/hello_rust.o/"
  `
$ hello_rust_1=`
  echo $hello_rust \
  | sed "s/hello_rust.o/hello_rust_1.o/"
  `

## Compile our Rust App for 64-bit RISC-V Hard-Float
$ rustc \
  --target riscv64gc-unknown-none-elf \
  --edition 2021 \
  --emit obj \
  -g \
  -C panic=abort \
  -O \
  hello_rust_main.rs \
  -o $hello_rust
$ cp $hello_rust $hello_rust_1

## Return to NuttX Folder and complete the build
$ popd
$ makeThis fixes our build. For now! (Pic below)
(QEMU officially supports rv64gc)
(“gc” in “rv64gc” denotes IMAFDC)
Our Rust App runs OK on QEMU RISC-V. What about Ox64 BL808 SBC?
Let’s compile our Rust App for Ox64 BL808 RISC-V SBC (also 64-bit)…
Follow these steps to build NuttX for Ox64…
Remember to Rename the Main Function. Edit this file…
apps/examples/hello_rust/hello_rust_main.rsLook for this line in hello_rust_main.rs…
pub extern "C" fn hello_rust_main(...)And rename the function to…
pub extern "C" fn main(...)(We’ll see why)
If we Enable Build Tracing: We’ll see…
## Build NuttX with Tracing Enabled
$ make --trace import

## Compile "hello_main.c" with GCC Compiler
## For xPack Toolchain:
## Change all `riscv64-unknown-elf` to `riscv-none-elf`
riscv64-unknown-elf-gcc \
  -march=rv64imafdc \
  -mabi=lp64d \
  -c \
  hello_main.c \
  -o  hello_main.c...apps.examples.hello.o \
  ...

## But "hello_rust_main.rs" won't get compiled by Rust Compiler!If the Build Fails:
“target hello_rust_install does not exist”
Then our Makefile Target is missing. We run this…
## Assume the Current Folder is NuttX Apps Folder.
## Add the Rust Target for 64-bit RISC-V Hard-Float
$ rustup target add riscv64gc-unknown-none-elf
$ pushd ../apps/examples/hello_rust

## `$hello` becomes `hello_main.c...apps.examples.hello.o`
## `$hello_rust` becomes `hello_rust_main.rs...apps.examples.hello_rust.o`
$ hello=$(basename ../hello/*hello.o)
$ hello_rust=`
  echo $hello \
  | sed "s/hello_main.c/hello_rust_main.rs/" \
  | sed "s/hello.o/hello_rust.o/"
  `

## Compile our Rust App for 64-bit RISC-V Hard-Float
$ rustc \
  --target riscv64gc-unknown-none-elf \
  --edition 2021 \
  --emit obj \
  -g \
  -C panic=abort \
  -O \
  hello_rust_main.rs \
  -o $hello_rust

## Return to NuttX Apps Folder and build the NuttX Apps
$ popd
$ make import
(We’ll come back to this)
Complete the NuttX Build according to the instructions here.
This produces Image, containing the NuttX Kernel + NuttX Apps. Which we’ll boot on Ox64 SBC.
Follow these steps to boot NuttX on Ox64 SBC and run our Rust App…
Flash OpenSBI and U-Boot Bootloader to Ox64
Prepare a Linux microSD for Ox64 as described in the previous article
Copy the Image file from the previous section.
Overwrite the Image in the Linux microSD.
Insert the microSD into Ox64 and power up Ox64
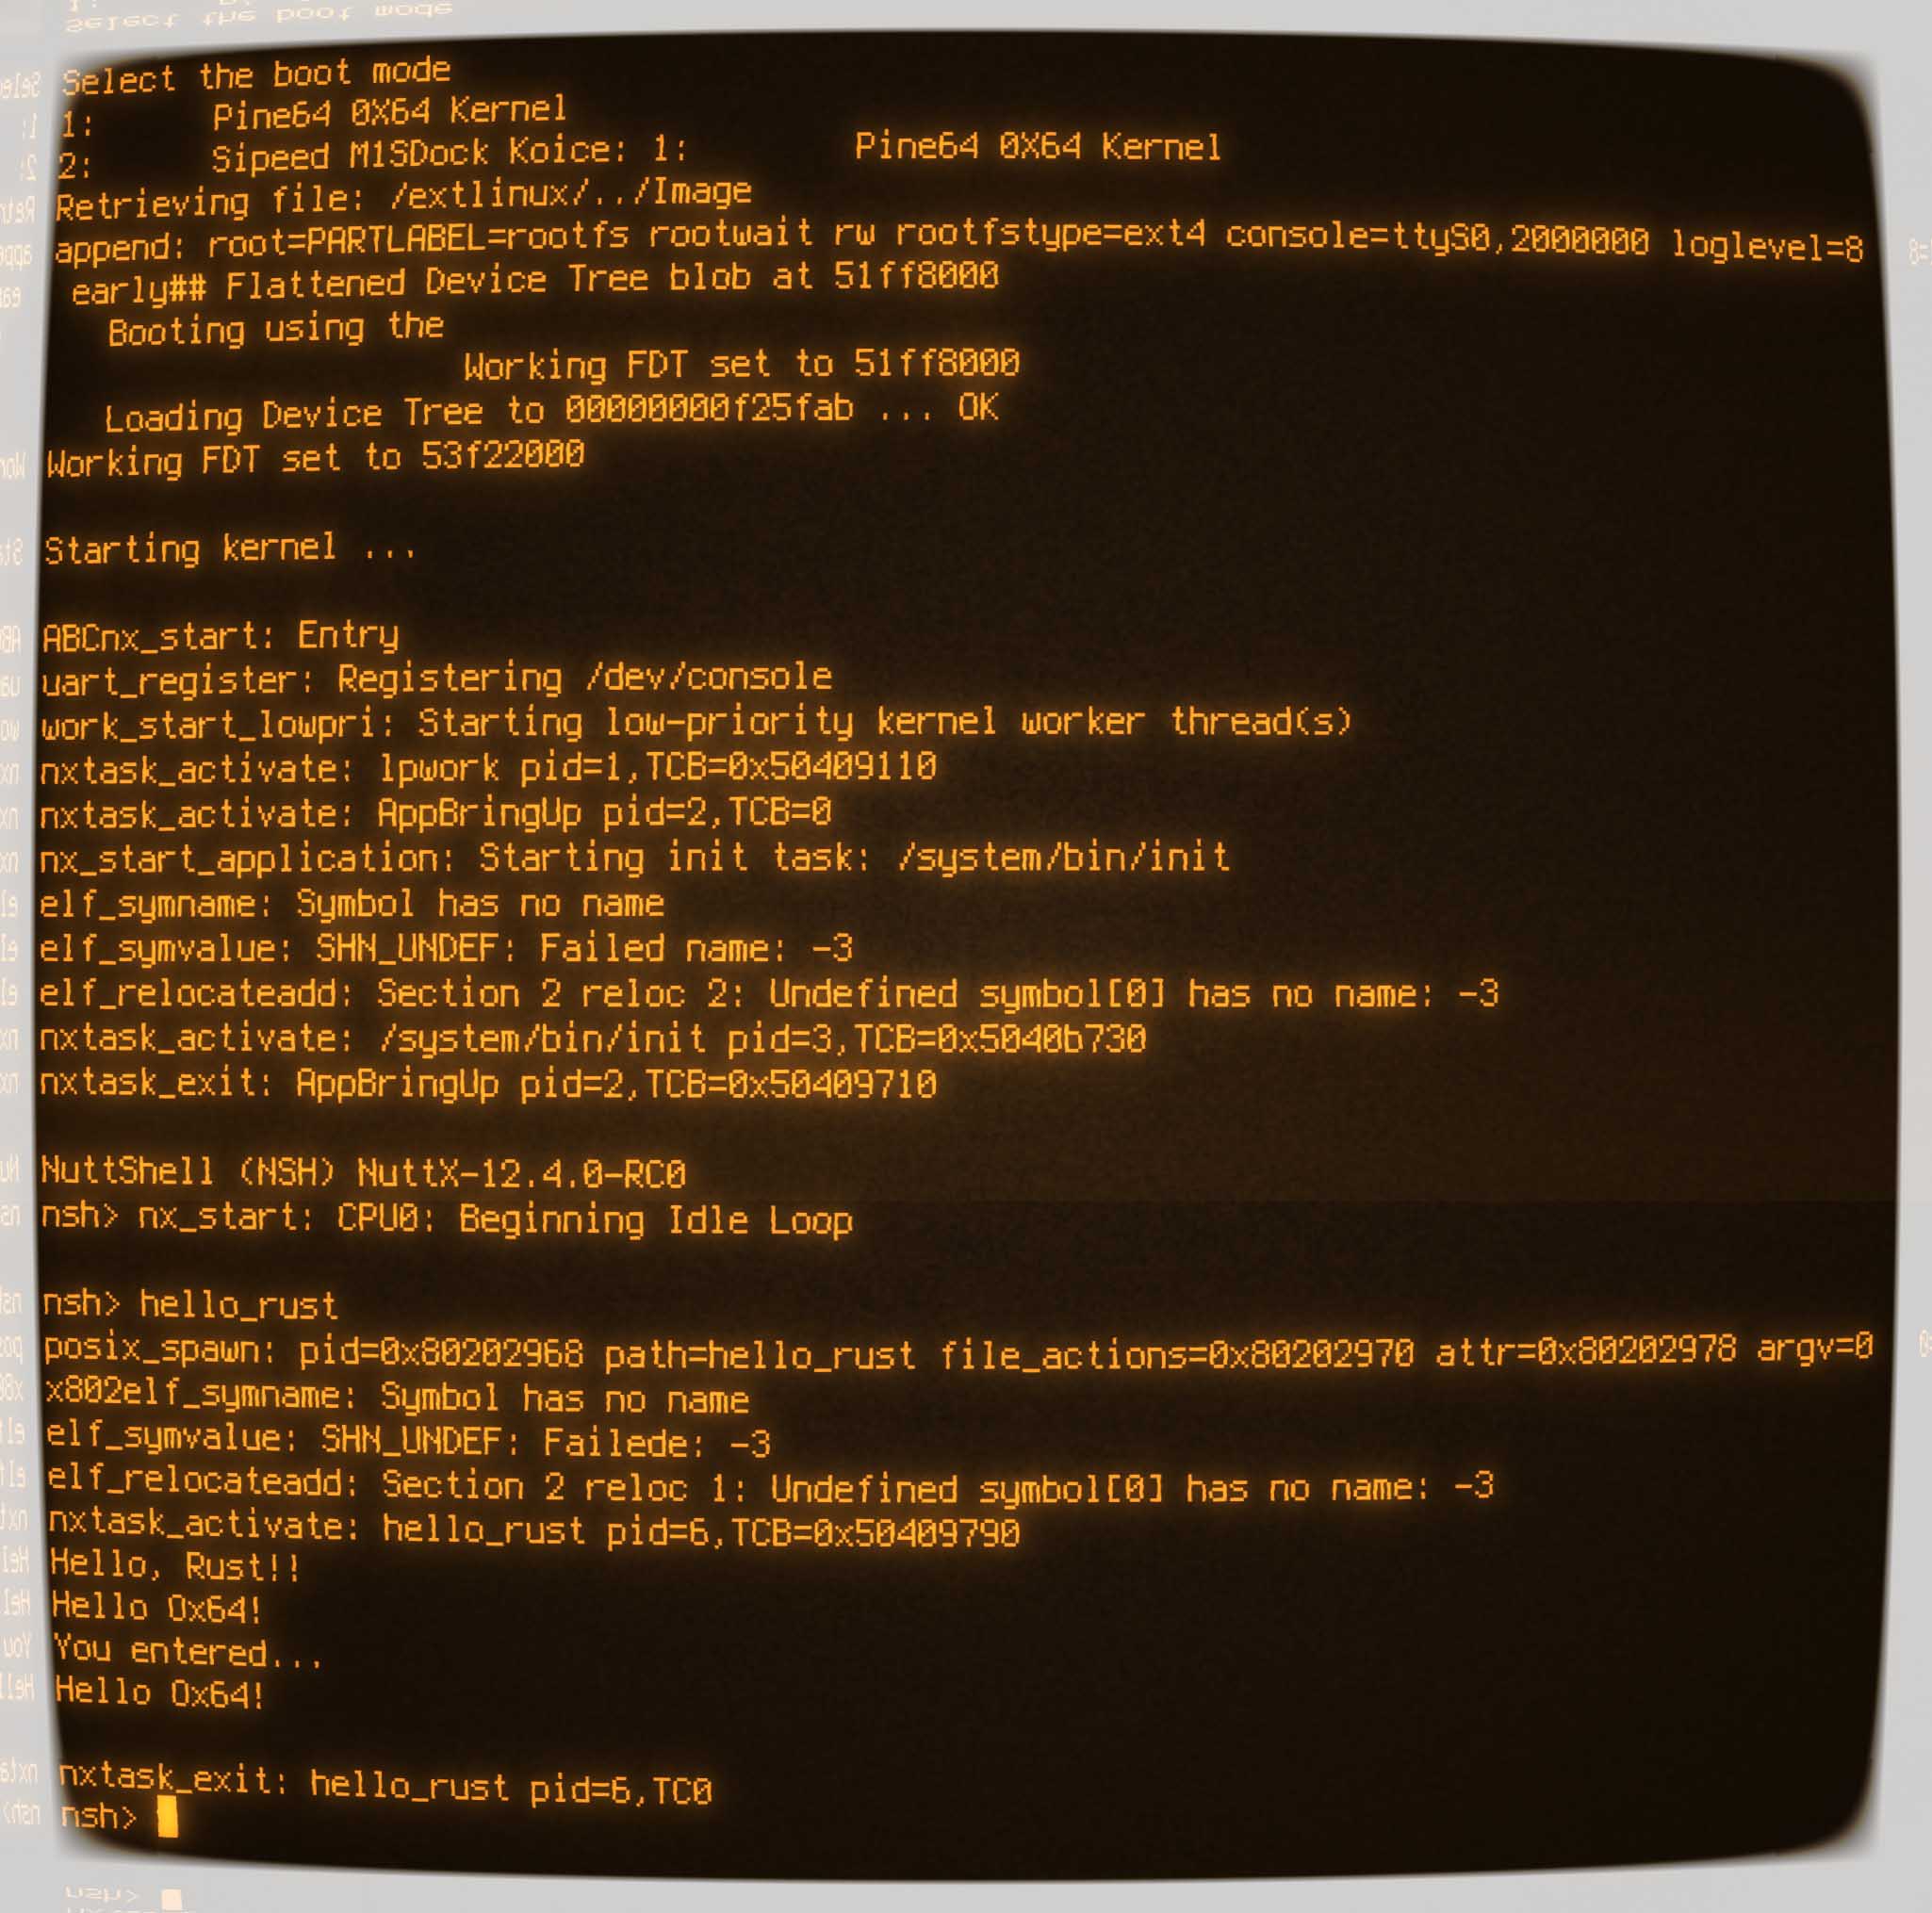
NuttX is now running on Ox64 SBC! (Pic above)
NuttShell (NSH) NuttX-12.4.0-RC0
nsh>
Enter “hello_rust” to run our Rust Demo App (which will print something)
nsh> hello_rust
Hello, Rust!!
Yep our Rust App works great on Ox64 BL808 RISC-V SBC!
If we don’t have an Ox64 SBC: The Ox64 Emulator works OK too…
Why the funny fixes for NuttX Ox64?
Earlier we saw 2 workarounds for our Ox64 NuttX Build…
We renamed the Main Function
We fixed the Makefile Target
That’s because Ox64 Apps are a little more complicated than QEMU Apps…
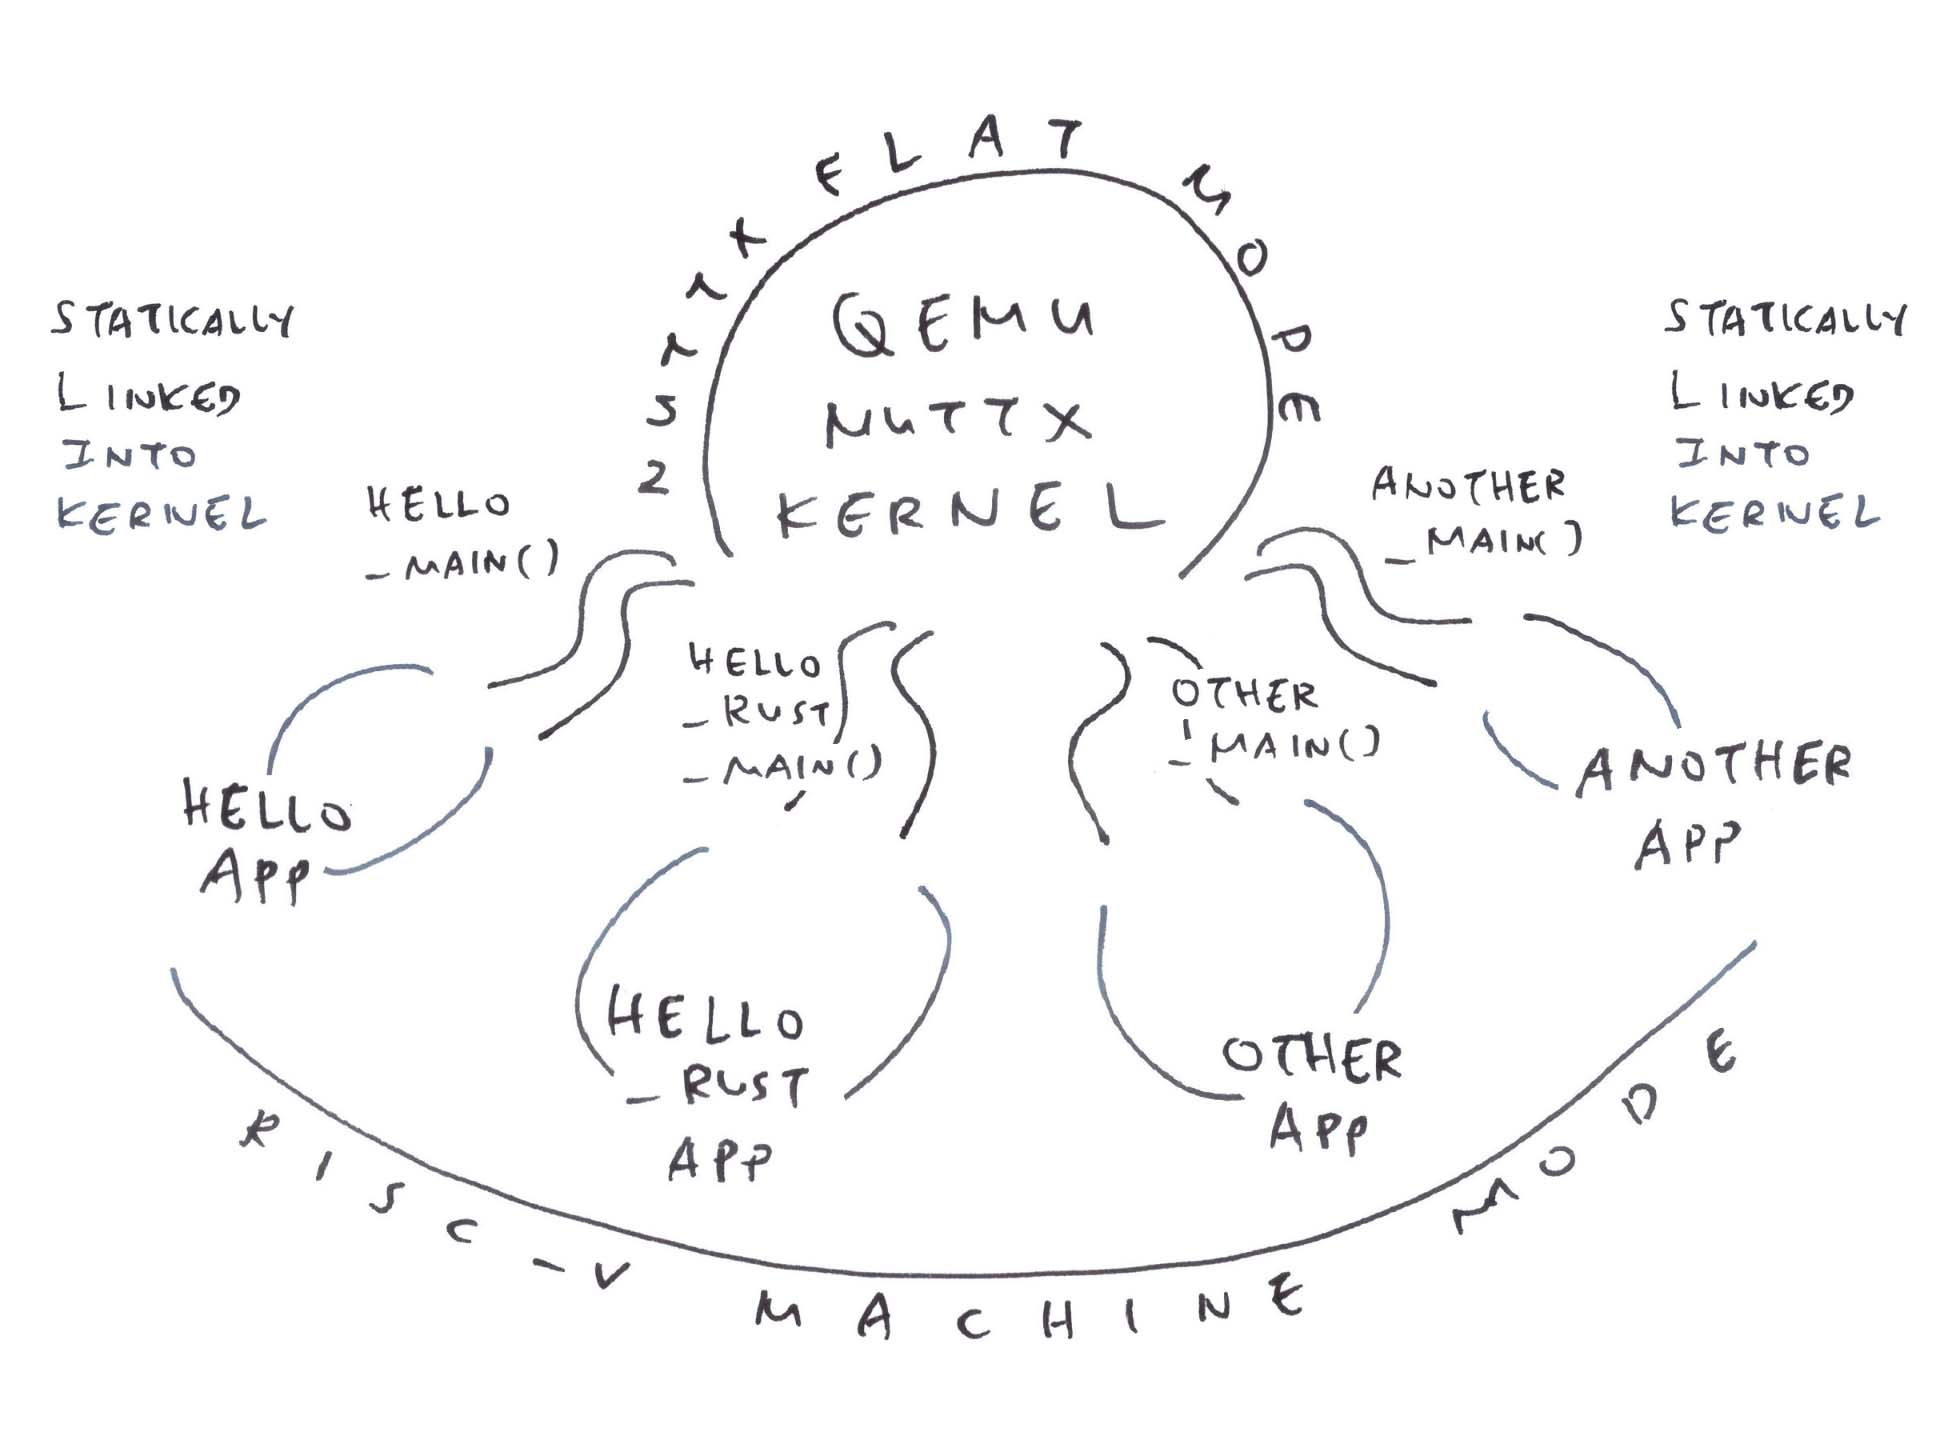
NuttX QEMU runs in Flat Mode (pic above)
NuttX Apps are Statically Linked into NuttX Kernel
Main Functions for Apps are named hello_main(), hello_rust_main(), …
No Memory Protection between Apps and Kernel
Everything runs in RISC-V Machine Mode
A little easier to troubleshoot
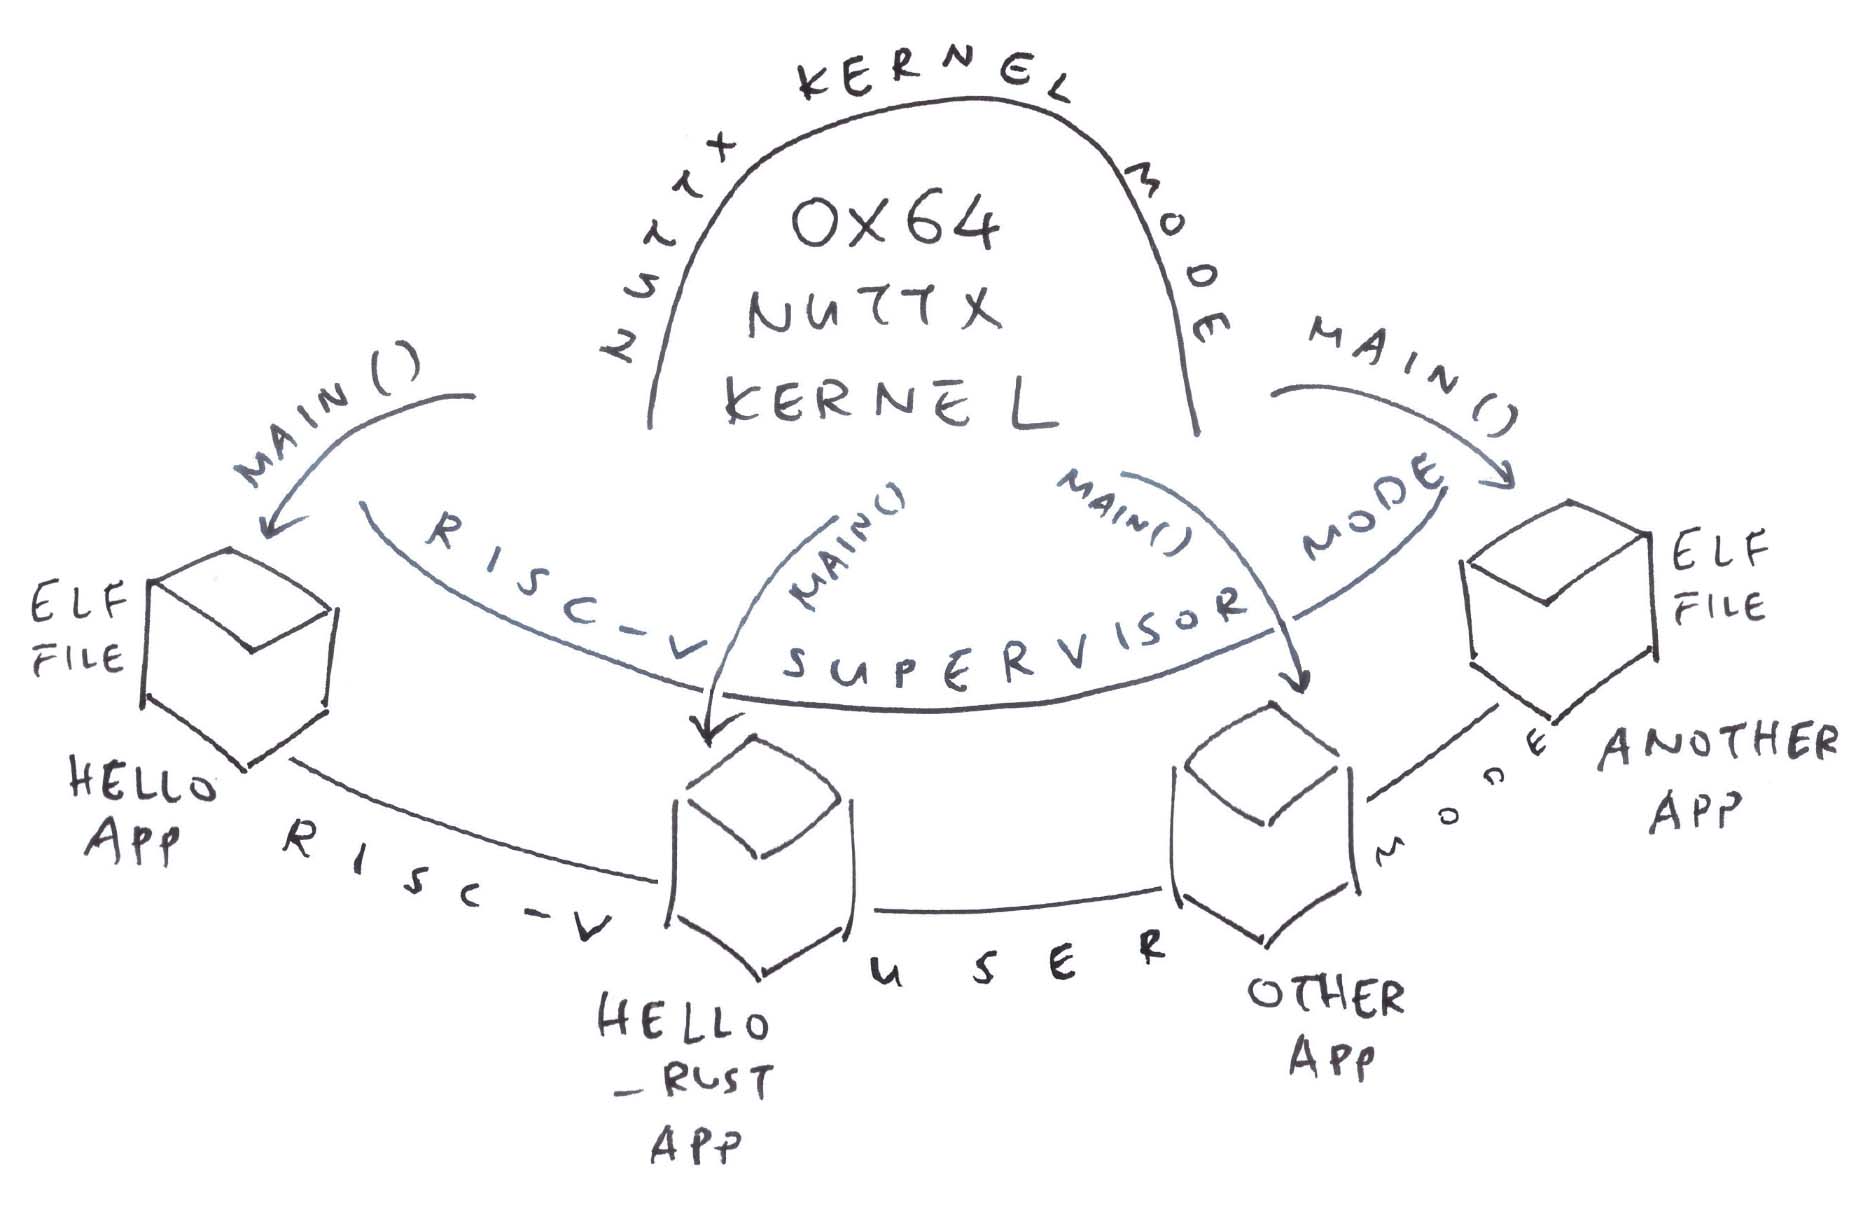
NuttX Ox64 runs in Kernel Mode (pic below)
NuttX Apps are Separate ELF Files
Main Functions for Apps are all named main()
Apps and Kernel live in Protected Memory Regions
Kernel runs in RISC-V Supervisor Mode
Apps run in RISC-V User Mode
More realistic for Actual Hardware
That’s why the Rust Build for Ox64 (Kernel Mode) is more complex than QEMU (Flat Mode). We’ll fix these issues in Google Summer of Code!
What about Complex Rust Apps? Will they run on Ox64 SBC?
We’ll do an LED Blinky App in Rust. Also in Google Summer of Code!
Can we run NuttX QEMU in Kernel Mode?
Yep we can switch “rv-virt:nsh64” to “rv-virt:knsh64”. Like this…
## Download NuttX
git clone https://github.com/apache/nuttx nuttx
git clone https://github.com/apache/nuttx-apps apps

## Configure NuttX for Kernel Mode (instead of Flat Mode)
cd nuttx
./tools/configure.sh rv-virt:knsh64

## Build the NuttX Kernel
make
make export

## Build the NuttX Apps
pushd ../apps
./tools/mkimport.sh -z -x ../nuttx/nuttx-export-*.tar.gz
make import
popd

## Boot NuttX in Kernel Mode (instead of Flat Mode)
qemu-system-riscv64 \
  -nographic -semihosting \
  -M virt,aclint=on \
  -cpu rv64 -kernel nuttx
Yes indeed, Rust Apps will run hunky dory on a 64-bit RISC-V SBC. Like Ox64 BL808 SBC!
We took a Barebones Rust App (“Hello World!”)
Compiled it for QEMU RISC-V Emulator (64-bit)
Ran it on QEMU Emulator with Apache NuttX RTOS
We did the same on Ox64 BL808 SBC (via MicroSD)
Though we used some Quirky Workarounds
Because NuttX Apps work differently in Kernel Mode vs Flat Mode
We’ll see more Rust Apps on RISC-V, for Google Summer of Code!
Check out the new article…
Many Thanks to my GitHub Sponsors (and the awesome NuttX Community) for supporting my work! This article wouldn’t have been possible without your support.
Got a question, comment or suggestion? Create an Issue or submit a Pull Request here…
lupyuen.github.io/src/rust5.md
Follow these steps to build NuttX for QEMU Emulator (64-bit RISC-V)…
Install the Build Prerequisites, skip the RISC-V Toolchain…
Download the RISC-V Toolchain for riscv64-unknown-elf…
Download and configure NuttX for QEMU RISC-V 64-bit…
mkdir nuttx
cd nuttx
git clone https://github.com/apache/nuttx nuttx
git clone https://github.com/apache/nuttx-apps apps

cd nuttx
tools/configure.sh rv-virt:nsh64
make menuconfig
In menuconfig, browse to “Device Drivers > System Logging”
Disable this option…
Prepend Timestamp to Syslog MessageBrowse to “Build Setup > Debug Options”
Select the following options…
Enable Debug Features
Enable Error Output
Enable Warnings Output
Enable Informational Debug Output
Enable Debug Assertions
Enable Debug Assertions Show Expression
Scheduler Debug Features
Scheduler Error Output
Scheduler Warnings Output
Scheduler Informational Output
Browse to “Application Configuration > Examples”
Select “Hello Rust Example”
Select it Twice so that “<M>” changes to “<*>”
Save and exit menuconfig.
Build the NuttX Project and dump the RISC-V Disassembly to nuttx.S (for easier troubleshooting)…
## Add the Rust Target for RISC-V 64-bit (Hard-Float)
rustup target add riscv64gc-unknown-none-elf

## Build the NuttX Project
make

## Dump the NuttX Disassembly to `nuttx.S`
## For xPack Toolchain:
## Change all `riscv64-unknown-elf` to `riscv-none-elf`
riscv64-unknown-elf-objdump \
  -t -S --demangle --line-numbers --wide \
  nuttx \
  >nuttx.S \
2>&1If the Build Fails:
“Could not find specification for target riscv64i-unknown-none-elf”
Then our Rust Target is incorrect. We fix it like this…
This produces the NuttX ELF Image nuttx that we may boot on QEMU RISC-V Emulator…
Follow these steps to build NuttX for Ox64 BL808 SBC…
Install the Build Prerequisites, skip the RISC-V Toolchain…
Download the RISC-V Toolchain for riscv64-unknown-elf…
Download and configure NuttX for Ox64 BL808 SBC…
mkdir nuttx
cd nuttx
git clone https://github.com/apache/nuttx nuttx
git clone https://github.com/apache/nuttx-apps apps

cd nuttx
tools/configure.sh ox64:nsh
make menuconfig
In menuconfig, browse to “Device Drivers > System Logging”
Disable this option…
Prepend Timestamp to Syslog MessageBrowse to “Build Setup > Debug Options”
Select the following options…
Enable Debug Features
Enable Error Output
Enable Warnings Output
Enable Informational Debug Output
Enable Debug Assertions
Enable Debug Assertions Show Expression
Scheduler Debug Features
Scheduler Error Output
Scheduler Warnings Output
Scheduler Informational Output
Browse to “Application Configuration > Examples”
Select “Hello Rust Example”
Select it Twice so that “<M>” changes to “<*>”
Save and exit menuconfig.
Rename the Main Function of our Rust App…
Build the NuttX Project…
## Add the Rust Target for RISC-V 64-bit (Hard-Float)
rustup target add riscv64gc-unknown-none-elf

## Build the NuttX Project
make

## Export the NuttX Kernel
## to `nuttx.bin`
## For xPack Toolchain:
## Change all `riscv64-unknown-elf` to `riscv-none-elf`
riscv64-unknown-elf-objcopy \
  -O binary \
  nuttx \
  nuttx.bin

## Dump the disassembly to nuttx.S
## For xPack Toolchain:
## Change all `riscv64-unknown-elf` to `riscv-none-elf`
riscv64-unknown-elf-objdump \
  --syms --source --reloc --demangle --line-numbers --wide \
  --debugging \
  nuttx \
  >nuttx.S \
2>&1Export the NuttX Kernel Interface…
## Export the NuttX Kernel Interface
make -j 8 export
pushd ../apps
./tools/mkimport.sh -z -x ../nuttx/nuttx-export-*.tar.gzBuild the NuttX Apps…
## Build the NuttX Apps
make -j 8 importIf the Build Fails:
“target hello_rust_install does not exist”
Then our Makefile Target is missing. We fix it like this…
Complete the NuttX Build…
## Return to the NuttX Folder
popd

## Generate the Initial RAM Disk `initrd`
## in ROMFS Filesystem Format
## from the Apps Filesystem `../apps/bin`
## and label it `NuttXBootVol`
genromfs \
  -f initrd \
  -d ../apps/bin \
  -V "NuttXBootVol"

## Prepare a Padding with 64 KB of zeroes
head -c 65536 /dev/zero >/tmp/nuttx.pad

## Append Padding and Initial RAM Disk to NuttX Kernel
cat nuttx.bin /tmp/nuttx.pad initrd \
  >Image
This produces the NuttX Image for Ox64: Image
Copy it to MicroSD and boot on Ox64 SBC…
Or run it on Ox64 Emulator…
Earlier we compiled NuttX for Ox64…
This is how we boot NuttX and test our Rust App on Ox64 BL808 Emulator…
## Build Ox64 Emulator
## https://github.com/lupyuen/nuttx-ox64/blob/main/.github/workflows/ox64-test.yml
$ sudo apt -y install \
  expect libcurl4-openssl-dev libssl-dev zlib1g-dev libsdl2-dev wget
$ git clone https://github.com/lupyuen/ox64-tinyemu
$ pushd ox64-tinyemu
$ make
$ cp temu ..
$ popd

## Run Ox64 Emulator. Assume `Image` is in the Curent Folder.
$ wget https://github.com/lupyuen/nuttx-ox64/raw/main/nuttx.cfg
$ ./temu nuttx.cfg

TinyEMU Emulator for Ox64 BL808 RISC-V SBC
NuttShell (NSH) NuttX-12.4.0-RC0
nsh> hello_rust
Hello, Rust!!For macOS: We need extra steps…
brew install openssl sdl2
make \
  CFLAGS="-I$(brew --prefix)/opt/openssl/include -I$(brew --prefix)/opt/sdl2/include" \
  LDFLAGS="-L$(brew --prefix)/opt/openssl/lib -L$(brew --prefix)/opt/sdl2/lib" \
CONFIG_MACOS=yWhy did we rename the Main Function?
Earlier we modified this file…
apps/examples/hello_rust/hello_rust_main.rsBy changing this line in hello_rust_main.rs…
pub extern "C" fn hello_rust_main(...)To this…
pub extern "C" fn main(...)But why? Watch what happens if we don’t rename the Main Function. Let’s test with Ox64 BL808 Emulator…
## Omitted: Build Ox64 Emulator
## https://lupyuen.codeberg.page/articles/rust5#appendix-run-nuttx-on-ox64-emulator

## Run Ox64 Emulator. Assume `Image` is in the Curent Folder.
$ wget https://github.com/lupyuen/nuttx-ox64/raw/main/nuttx.cfg
$ ./temu nuttx.cfg

TinyEMU Emulator for Ox64 BL808 RISC-V SBC
NuttShell (NSH) NuttX-12.4.0-RC0
nsh> hello_rust
nsh: hello_rust: command not foundHuh? Why is hello_rust not found?
To find out, we Enable Logging for Binary Loader and Scheduler…
## Enable Logging for Binary Loader and Scheduler
CONFIG_DEBUG_BINFMT=y
CONFIG_DEBUG_BINFMT_ERROR=y
CONFIG_DEBUG_BINFMT_WARN=y
CONFIG_DEBUG_SCHED=y
CONFIG_DEBUG_SCHED_ERROR=y
CONFIG_DEBUG_SCHED_INFO=y
CONFIG_DEBUG_SCHED_WARN=y
Now it tells us why it failed…
## Run Ox64 Emulator. Assume `Image` is in the Curent Folder.
$ wget https://github.com/lupyuen/nuttx-ox64/raw/main/nuttx.cfg
$ ./temu nuttx.cfg

TinyEMU Emulator for Ox64 BL808 RISC-V SBC
NuttShell (NSH) NuttX-12.4.0-RC0
nsh> hello_rust

elf_symvalue: SHN_UNDEF: Exported symbol "main" not found
exec_internal: ERROR: Failed to load program 'hello_rust': -2
nsh: hello_rust: command not foundIt failed because the main() function is missing!
As explained earlier: NuttX Apps for Ox64 are more complex (than QEMU) because they are compiled as Separate ELF Files…
Somehow the NuttX Makefiles won’t emit the correct Main Function for Rust ELF Files. Thus we edit this file…
apps/examples/hello_rust/hello_rust_main.rsChange this line in hello_rust_main.rs…
pub extern "C" fn hello_rust_main(...)To this…
pub extern "C" fn main(...)Then we rebuild NuttX. And it works!
NuttShell (NSH) NuttX-12.4.0-RC0
nsh> hello_rust
Hello, Rust!!
Won’t Flat Mode have the same Main Function problem as Kernel Mode?
Remember earlier we saw this…
## Build NuttX with Tracing Enabled
$ make --trace

## Compile "hello_main.c" with GCC Compiler
## For xPack Toolchain:
## Change all `riscv64-unknown-elf` to `riscv-none-elf`
riscv64-unknown-elf-gcc \
  -march=rv64imafdc \
  -mabi=lp64d \
  -c \
  -Dmain=hello_main \
  hello_main.c \
  -o hello_main.c...apps.examples.hello.o \
  ...
Which works because GCC Compiler renames the Main Function: “-Dmain=hello_main”
Sadly we can’t do this in Rust. We’ll seek a solution in Google Summer of Code!
Why is the Makefile Target missing for Ox64?
$ make import

Makefile:52: target 'apps/examples/hello_rust_install' does not exist
make[3]: *** No rule to make target 'hello_rust_main.rs...apps.examples.hello_rust.o', needed by 'apps/bin/hello_rust'. Stop.As explained earlier: NuttX Apps for Ox64 are more complex (than QEMU) because they are compiled as Separate ELF Files…
Somehow the NuttX Makefiles won’t produce Rust ELF Files correctly. Thus we build ourselves…
## Assume the Current Folder is NuttX Apps Folder.
## Add the Rust Target for 64-bit RISC-V Hard-Float
$ rustup target add riscv64gc-unknown-none-elf
$ pushd ../apps/examples/hello_rust

## `$hello` becomes `hello_main.c...apps.examples.hello.o`
## `$hello_rust` becomes `hello_rust_main.rs...apps.examples.hello_rust.o`
$ hello=$(basename ../hello/*hello.o)
$ hello_rust=`
  echo $hello \
  | sed "s/hello_main.c/hello_rust_main.rs/" \
  | sed "s/hello.o/hello_rust.o/"
  `

## Compile our Rust App for 64-bit RISC-V Hard-Float
$ rustc \
  --target riscv64gc-unknown-none-elf \
  --edition 2021 \
  --emit obj \
  -g \
  -C panic=abort \
  -O \
  hello_rust_main.rs \
  -o $hello_rust

## Return to NuttX Apps Folder and build the NuttX Apps
$ popd
$ make importComplete the NuttX Build according to the instructions here.
This produces Image, containing the NuttX Kernel + NuttX Apps. Which we’ll boot on Ox64 SBC…
Or run on Ox64 Emulator…