📝 19 Aug 2024
(Update: Rust Standard Library is now supported on NuttX!)
My student Rushabh Gala has just completed his project for Google Summer of Code. Rushabh has created Safer Rust Apps for Apache NuttX RTOS…
In this article we walk through Rushabh’s contributions. And understand how we’re evolving Rust Apps for NuttX…
Blinking the LED in Rust
Handling Errors returned by NuttX
Testing on QEMU RISC-V Emulator
And maybe Linux / macOS / Windows
But No Crates Allowed in NuttX!
Be wary of the Main Function and Panic Handler
We created LED Drivers for QEMU and Ox64 BL808 SBC
And we’re running Daily Build and Test of our Rust App
Thanks to our Updated Docker Image for Continuous Integration
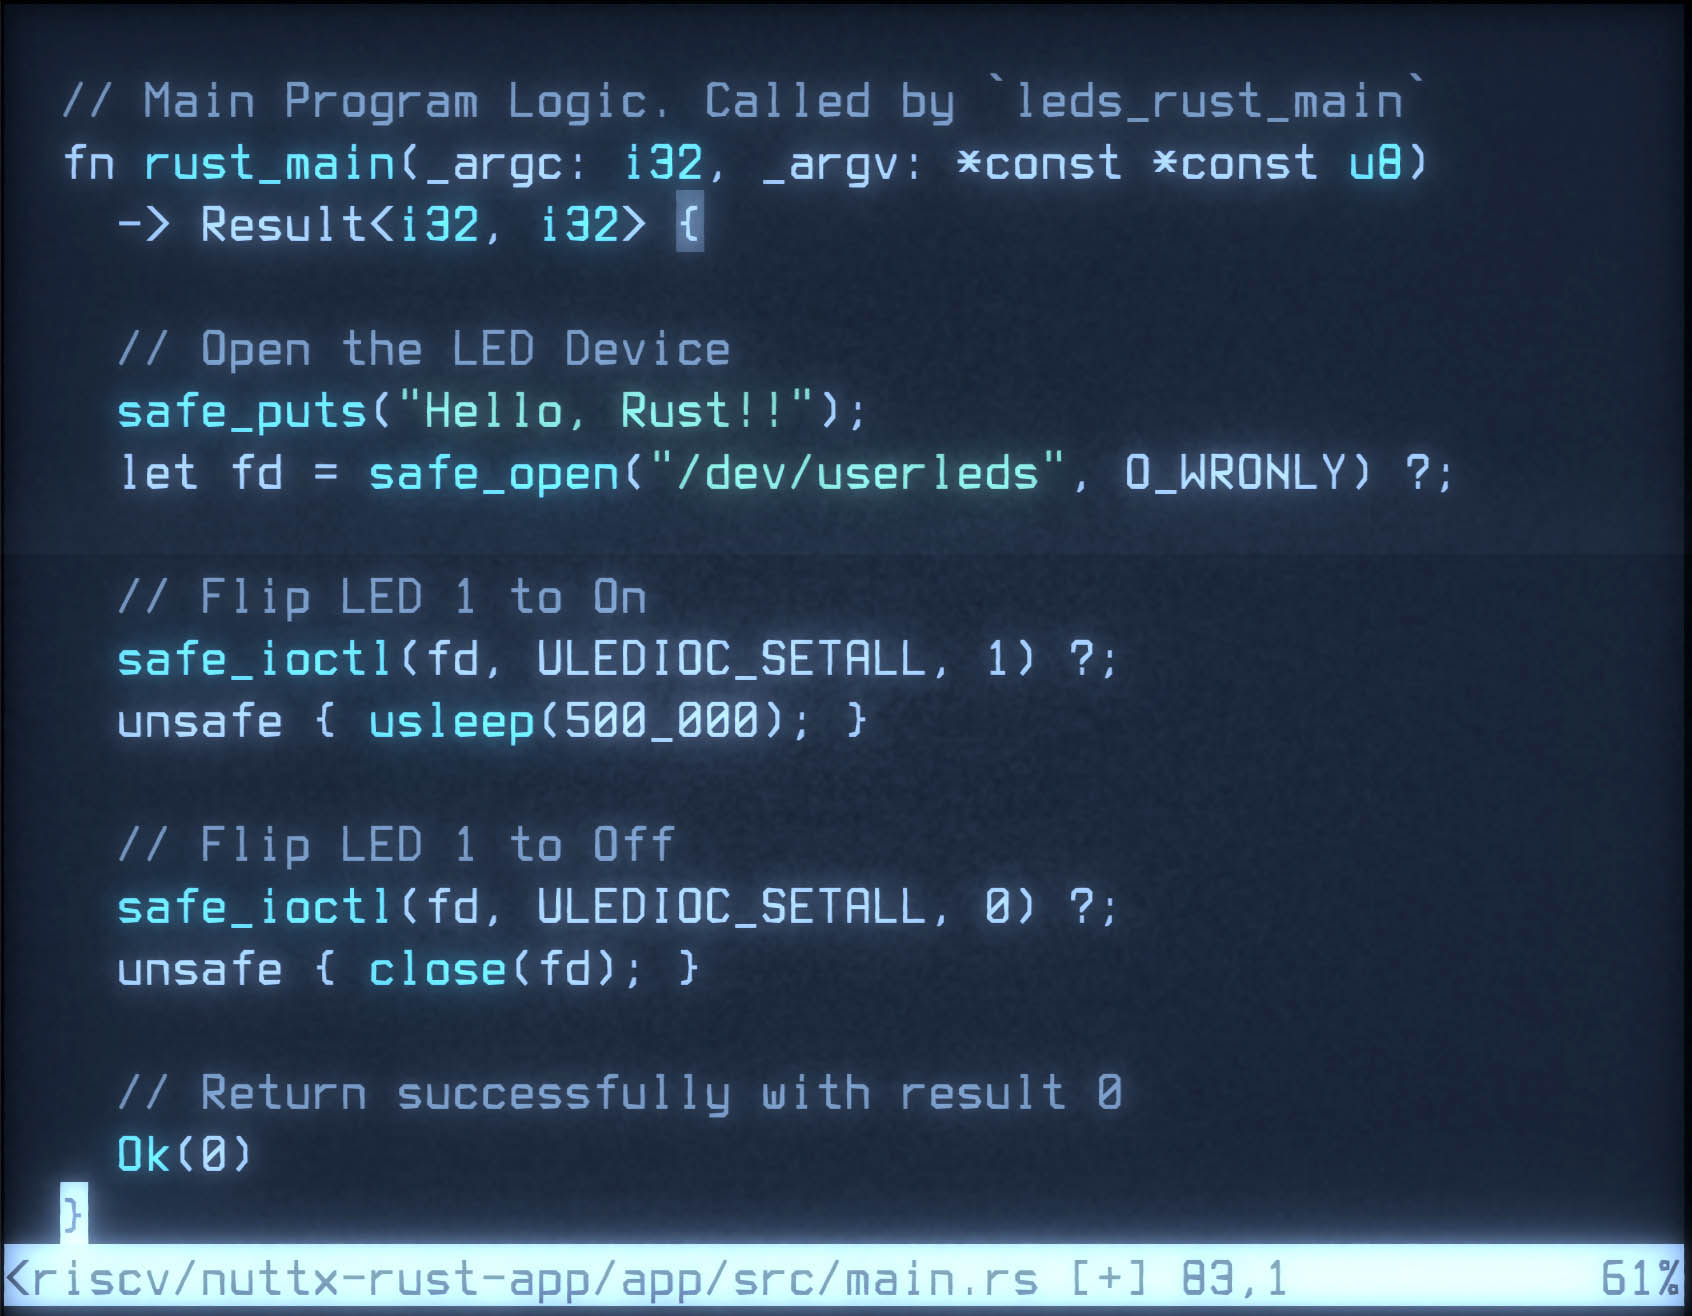
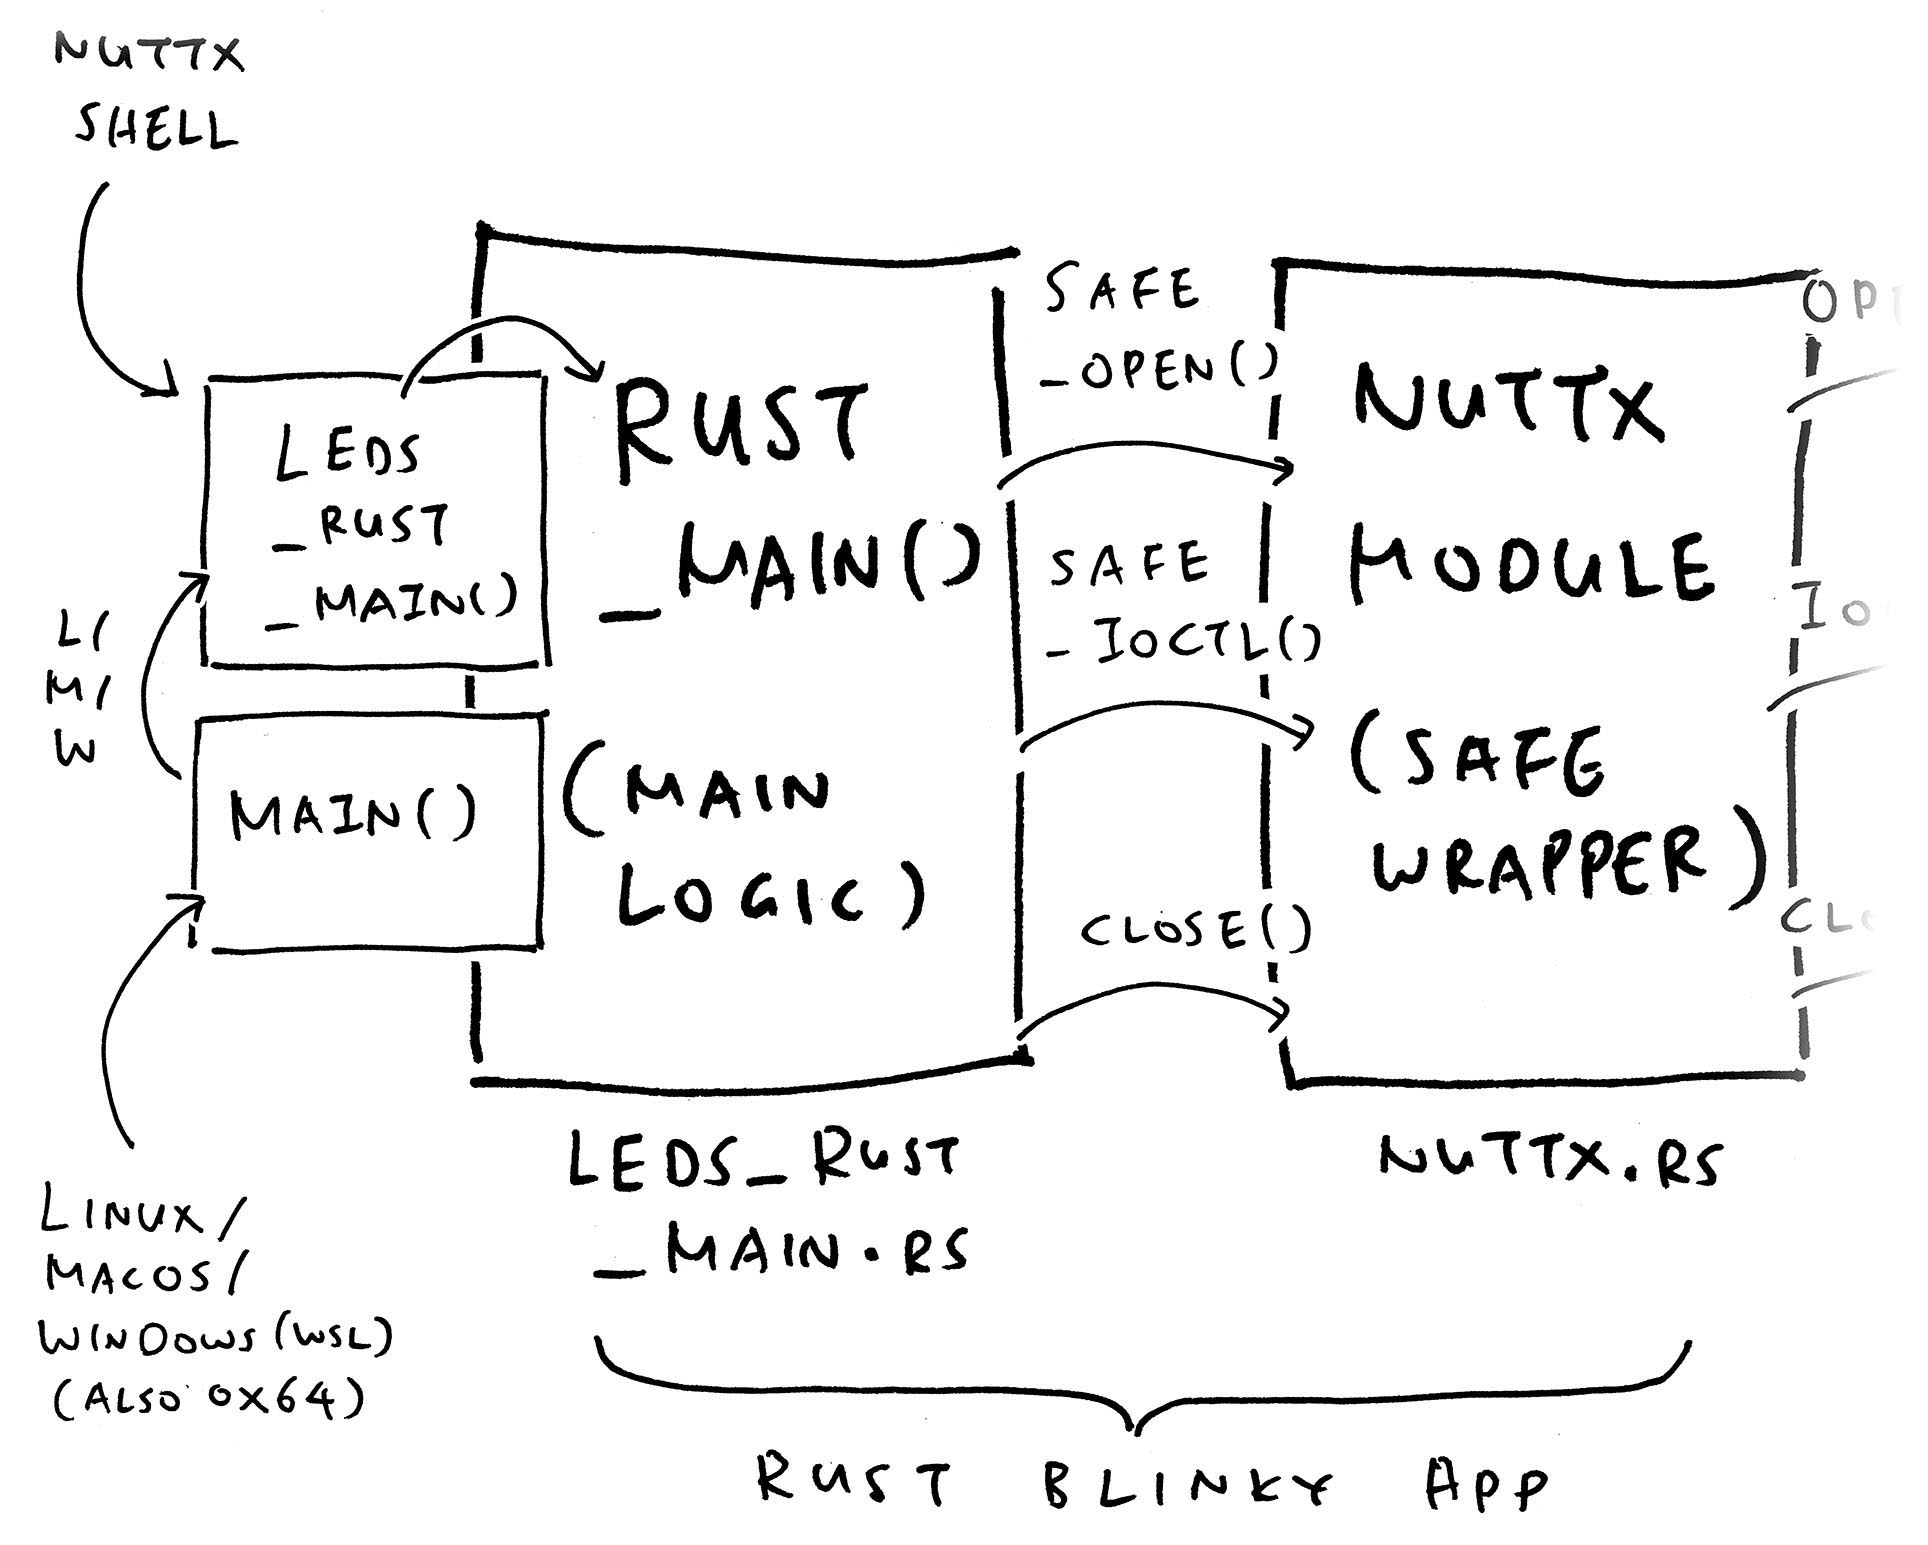
This is how we Blink the LED in a NuttX Rust App: leds_rust_main.rs
// Main Program Logic. Called by `leds_rust_main`
fn rust_main(_argc: i32, _argv: *const *const u8)  // Args from NuttX Shell
  -> Result<i32, i32> {  // Return a Result Code (int) or Error Code (int)

  // Open the LED Device
  safe_puts("Hello, Rust!!");
  let fd = safe_open("/dev/userleds", O_WRONLY) ?;  // Quit on error

  // Flip LED 1 to On
  safe_ioctl(fd, ULEDIOC_SETALL, 1) ?;  // Quit on error
  unsafe { usleep(500_000); }

  // Flip LED 1 to Off
  safe_ioctl(fd, ULEDIOC_SETALL, 0) ?;  // Quit on error
  unsafe { close(fd); }

  // Return successfully with result 0
  Ok(0)
}(Mirrored here: nuttx-rust-app/app/src/main.rs)
Our Rust Blinky App looks mighty similar to the C Version! But with simpler Error Handling than C. (We’ll talk more)
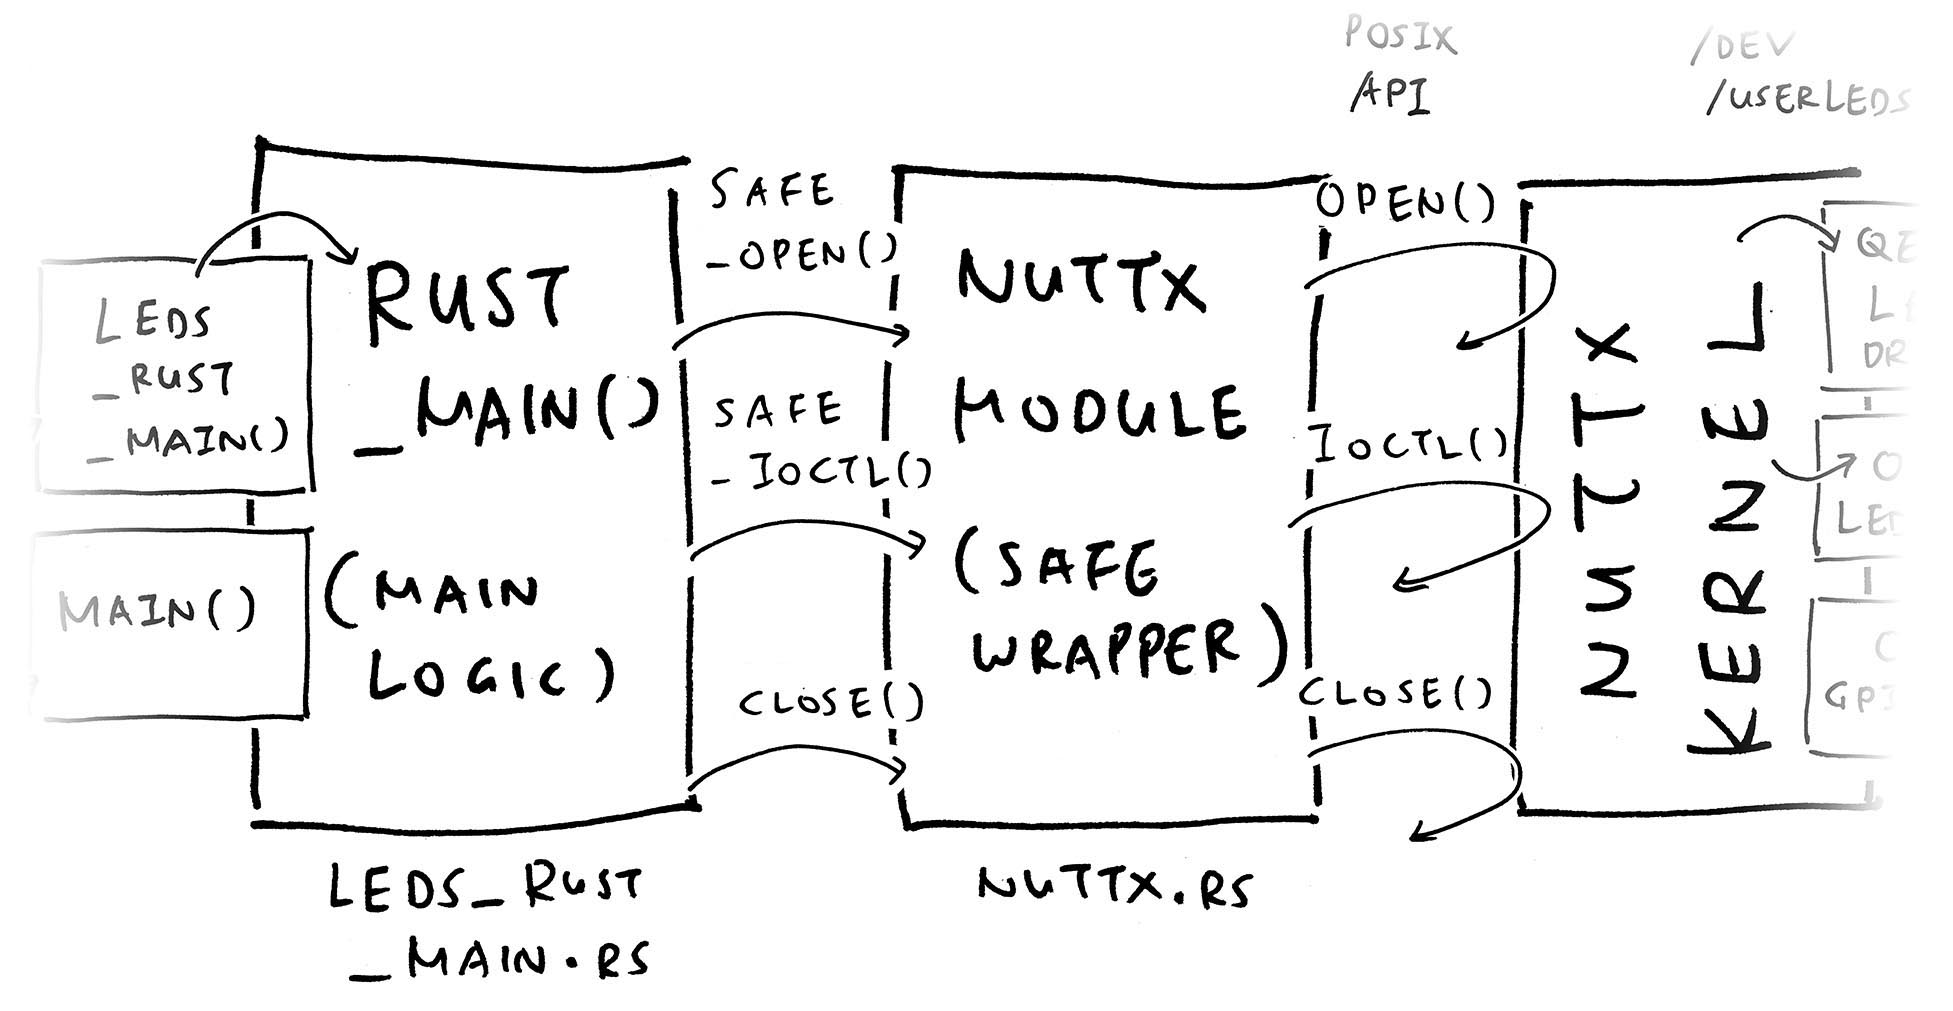
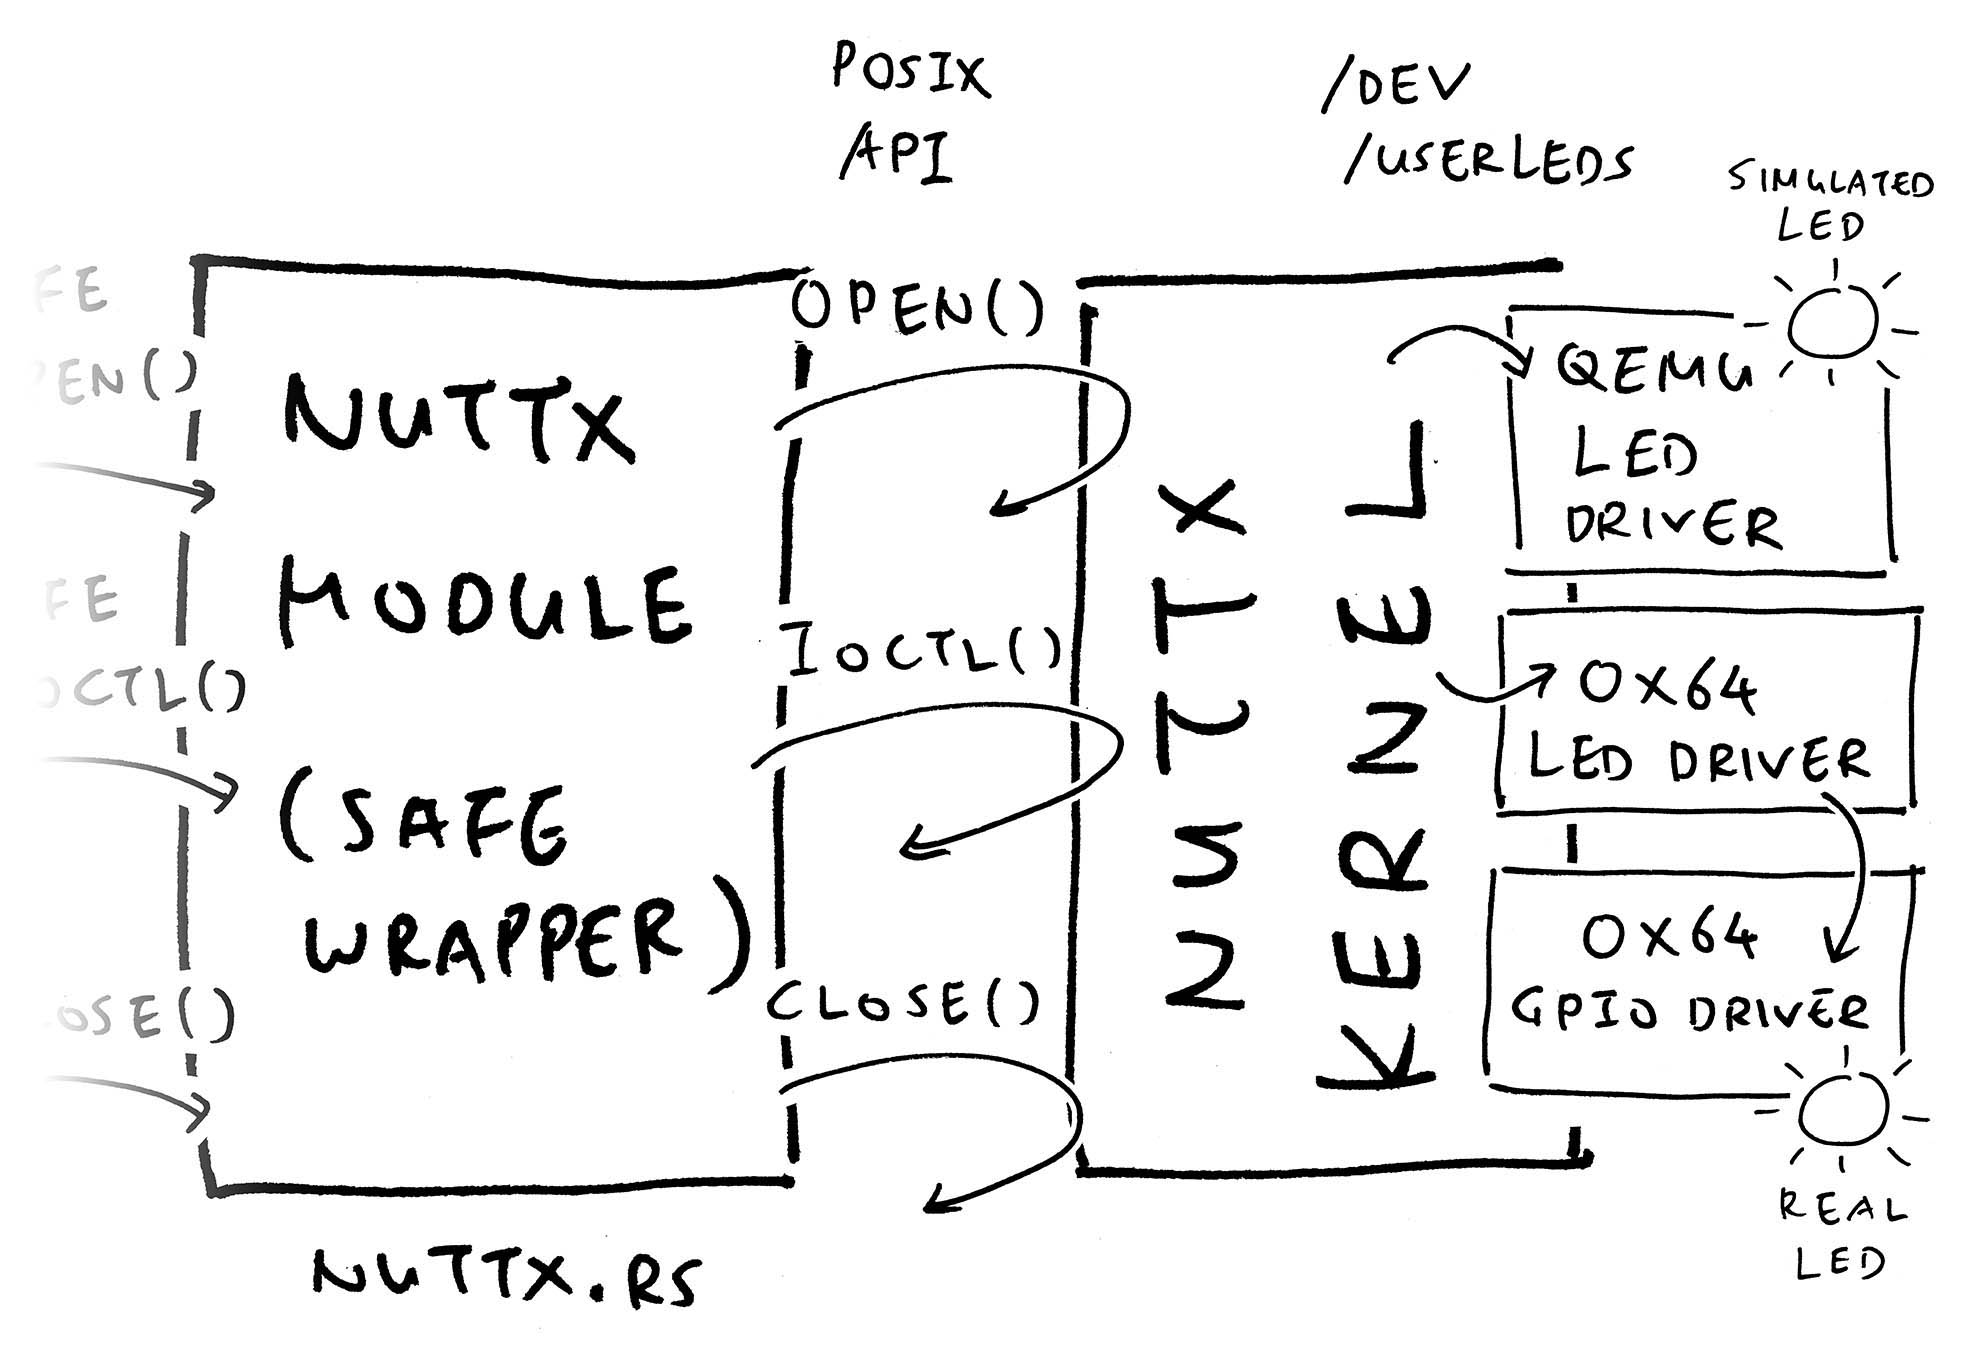
What are safe_open and safe_ioctl?
They are safer versions of open and ioctl, from our NuttX Module. Inside the NuttX Module we…
Define the Safe Wrappers: safe_*
Plus the NuttX Constants: O_WRONLY and ULEDIOC_SETALL
We import the NuttX Module into our Rust App like so: leds_rust_main.rs
// Comment out these lines for testing on Linux / macOS / Windows
#![no_main]  // For NuttX Only: No Main Function
#![no_std]   // For NuttX Only: Use Rust Core Library (instead of Rust Standard Library)

// Import the NuttX Module
mod nuttx;
use nuttx::*;
And yes this code runs on Linux, macOS and Windows! We’ll come back to this, first we test on QEMU…
To test Rust Blinky on QEMU RISC-V Emulator, follow these steps…
## TODO: Install the NuttX Build Prerequisites, skip the RISC-V Toolchain
## https://lupyuen.codeberg.page/articles/nuttx#install-prerequisites
## TODO: Download the xPack Toolchain for RISC-V
## https://lupyuen.codeberg.page/articles/riscv#appendix-xpack-gnu-risc-v-embedded-gcc-toolchain-for-64-bit-risc-v
## Install the Rust Target for QEMU RISC-V 64-bit
rustup target add riscv64gc-unknown-none-elf
## Install QEMU Emulator for RISC-V
sudo apt install qemu-system-riscv64 ## For Linux
brew install qemu ## For macOS
## Download the Source Code for NuttX Kernel and Apps
git clone https://github.com/apache/nuttx
git clone https://github.com/apache/nuttx-apps apps
cd nuttx
## Configure the NuttX Build: QEMU RISC-V 64-bit with LED Driver and Rust
tools/configure.sh rv-virt:leds64_rust
## Build the NuttX Kernel. Ignore the warning: `nuttx has a LOAD segment with RWX permissions`
make
## Boot the NuttX Kernel in QEMU RISC-V 64-bit
qemu-system-riscv64 \
-semihosting \
-M virt,aclint=on \
-cpu rv64 \
-bios none \
-kernel nuttx \
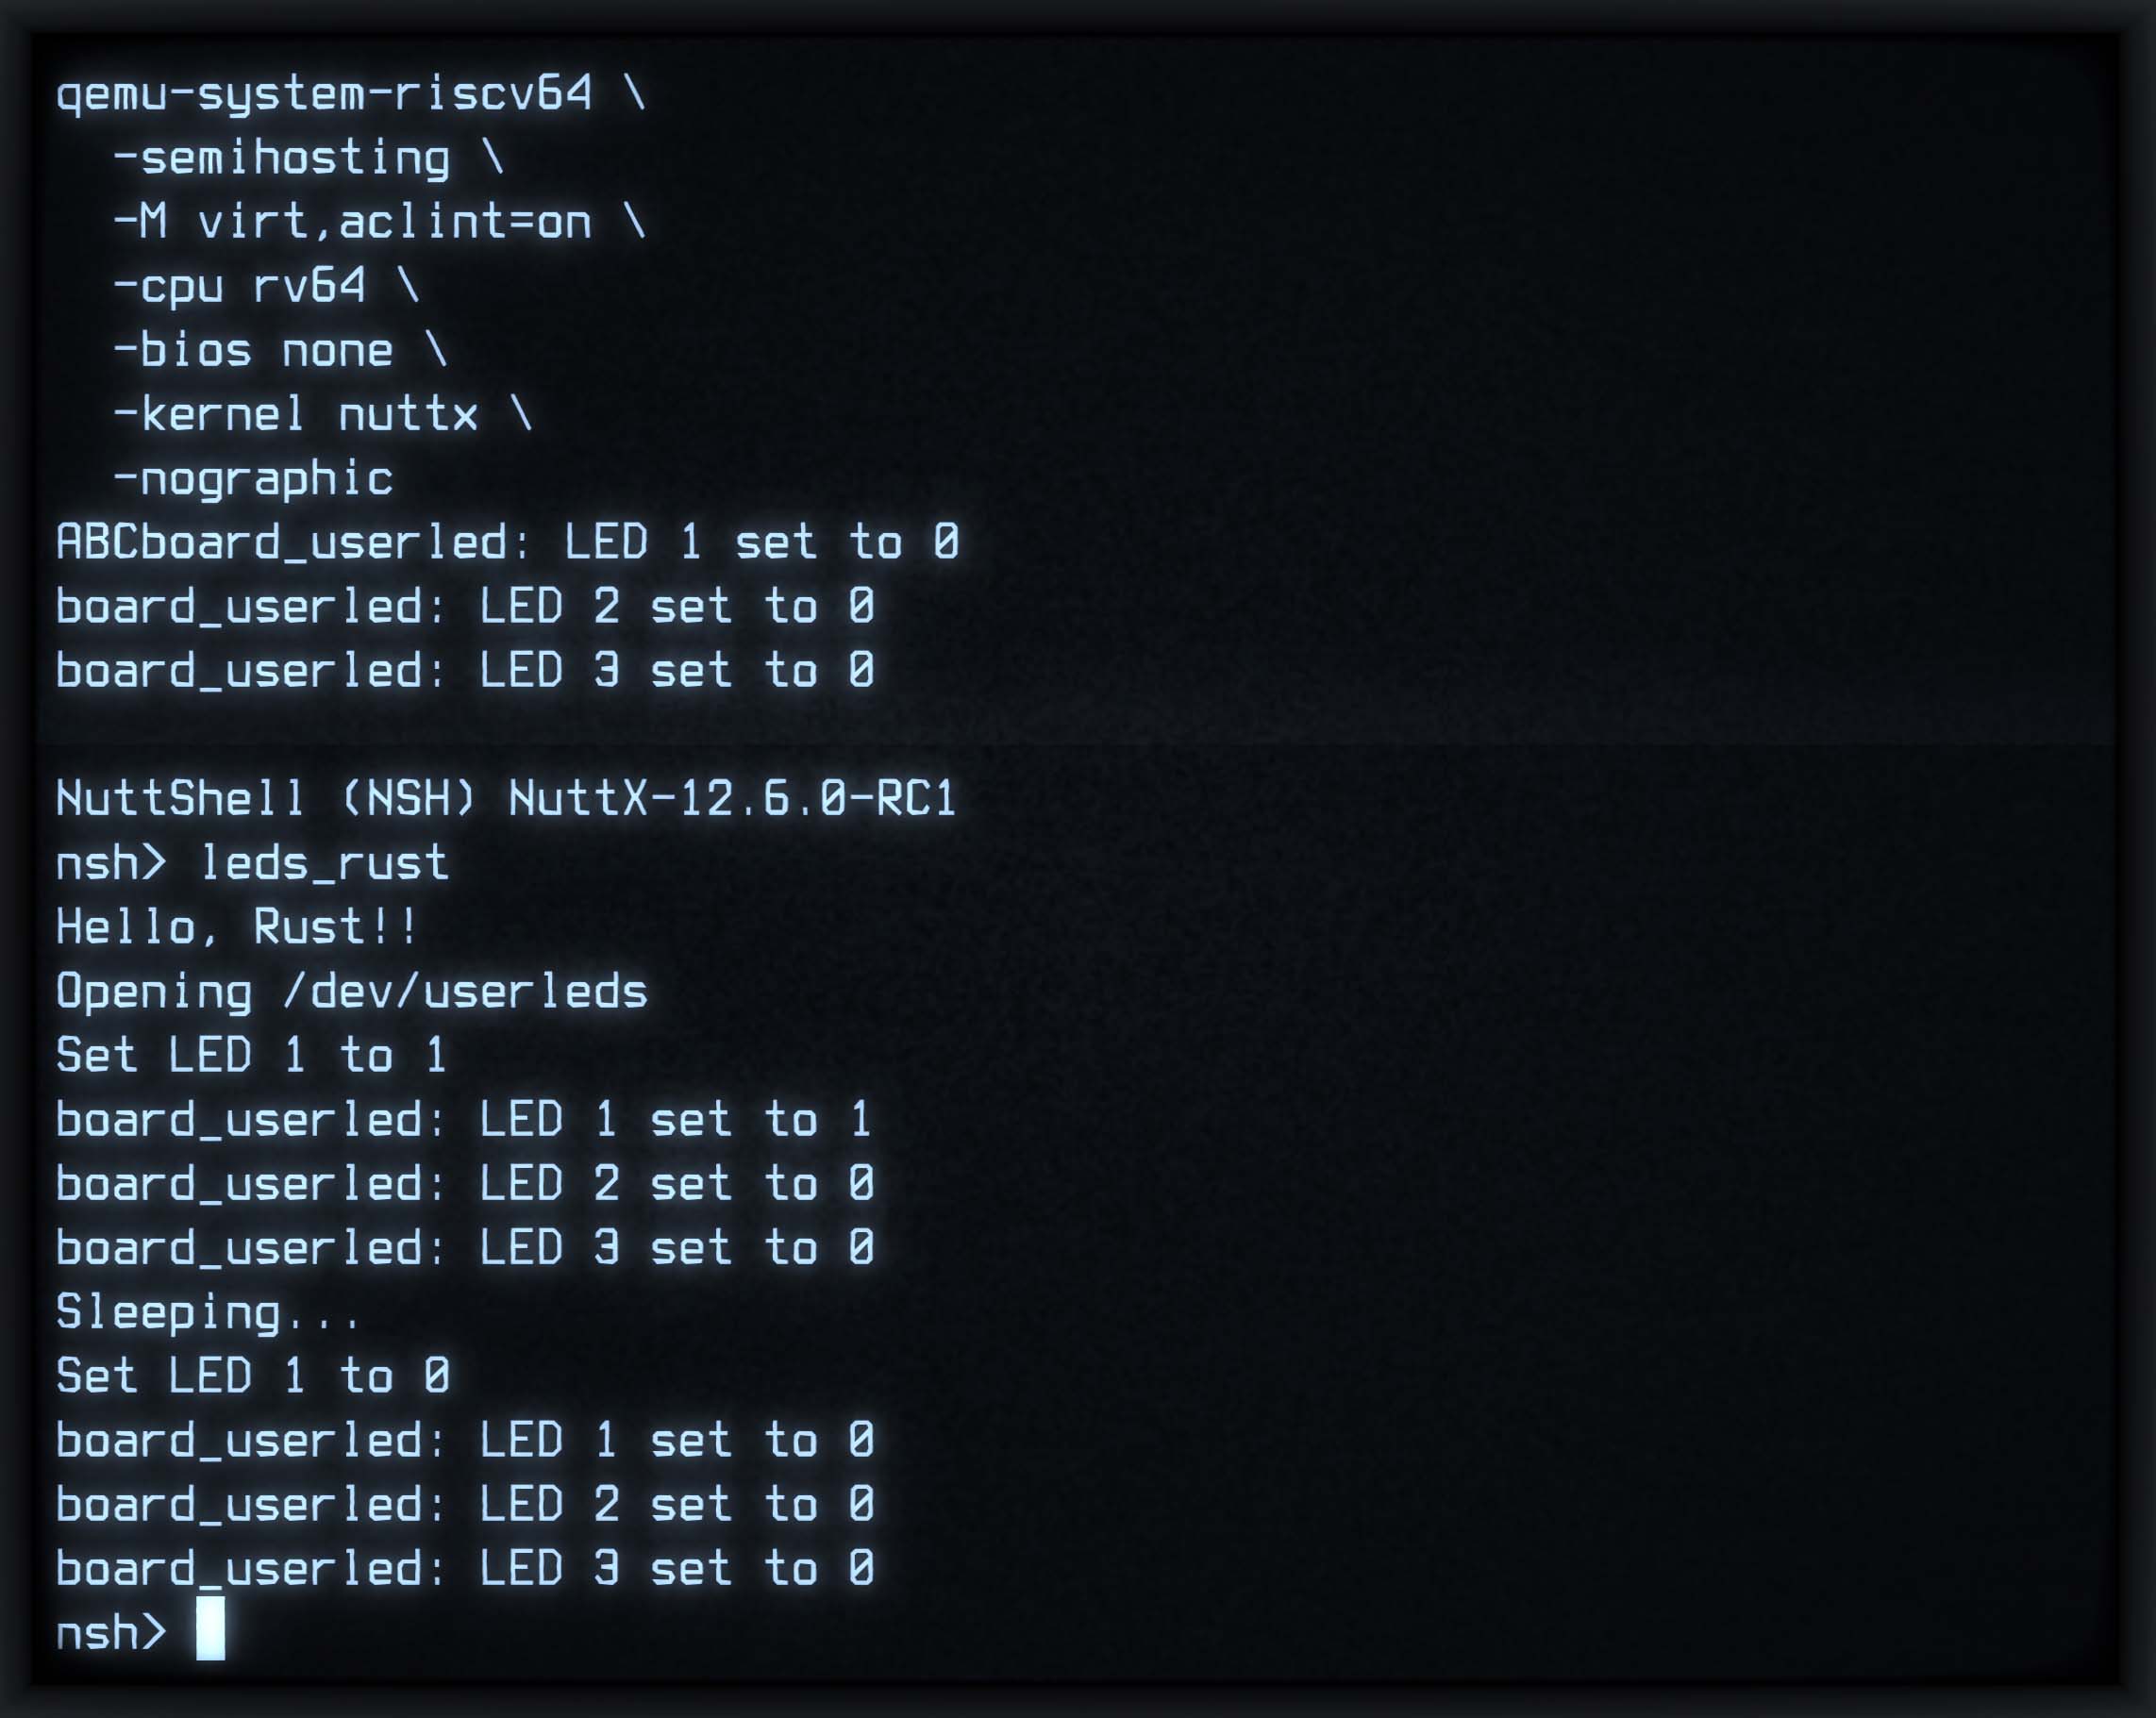
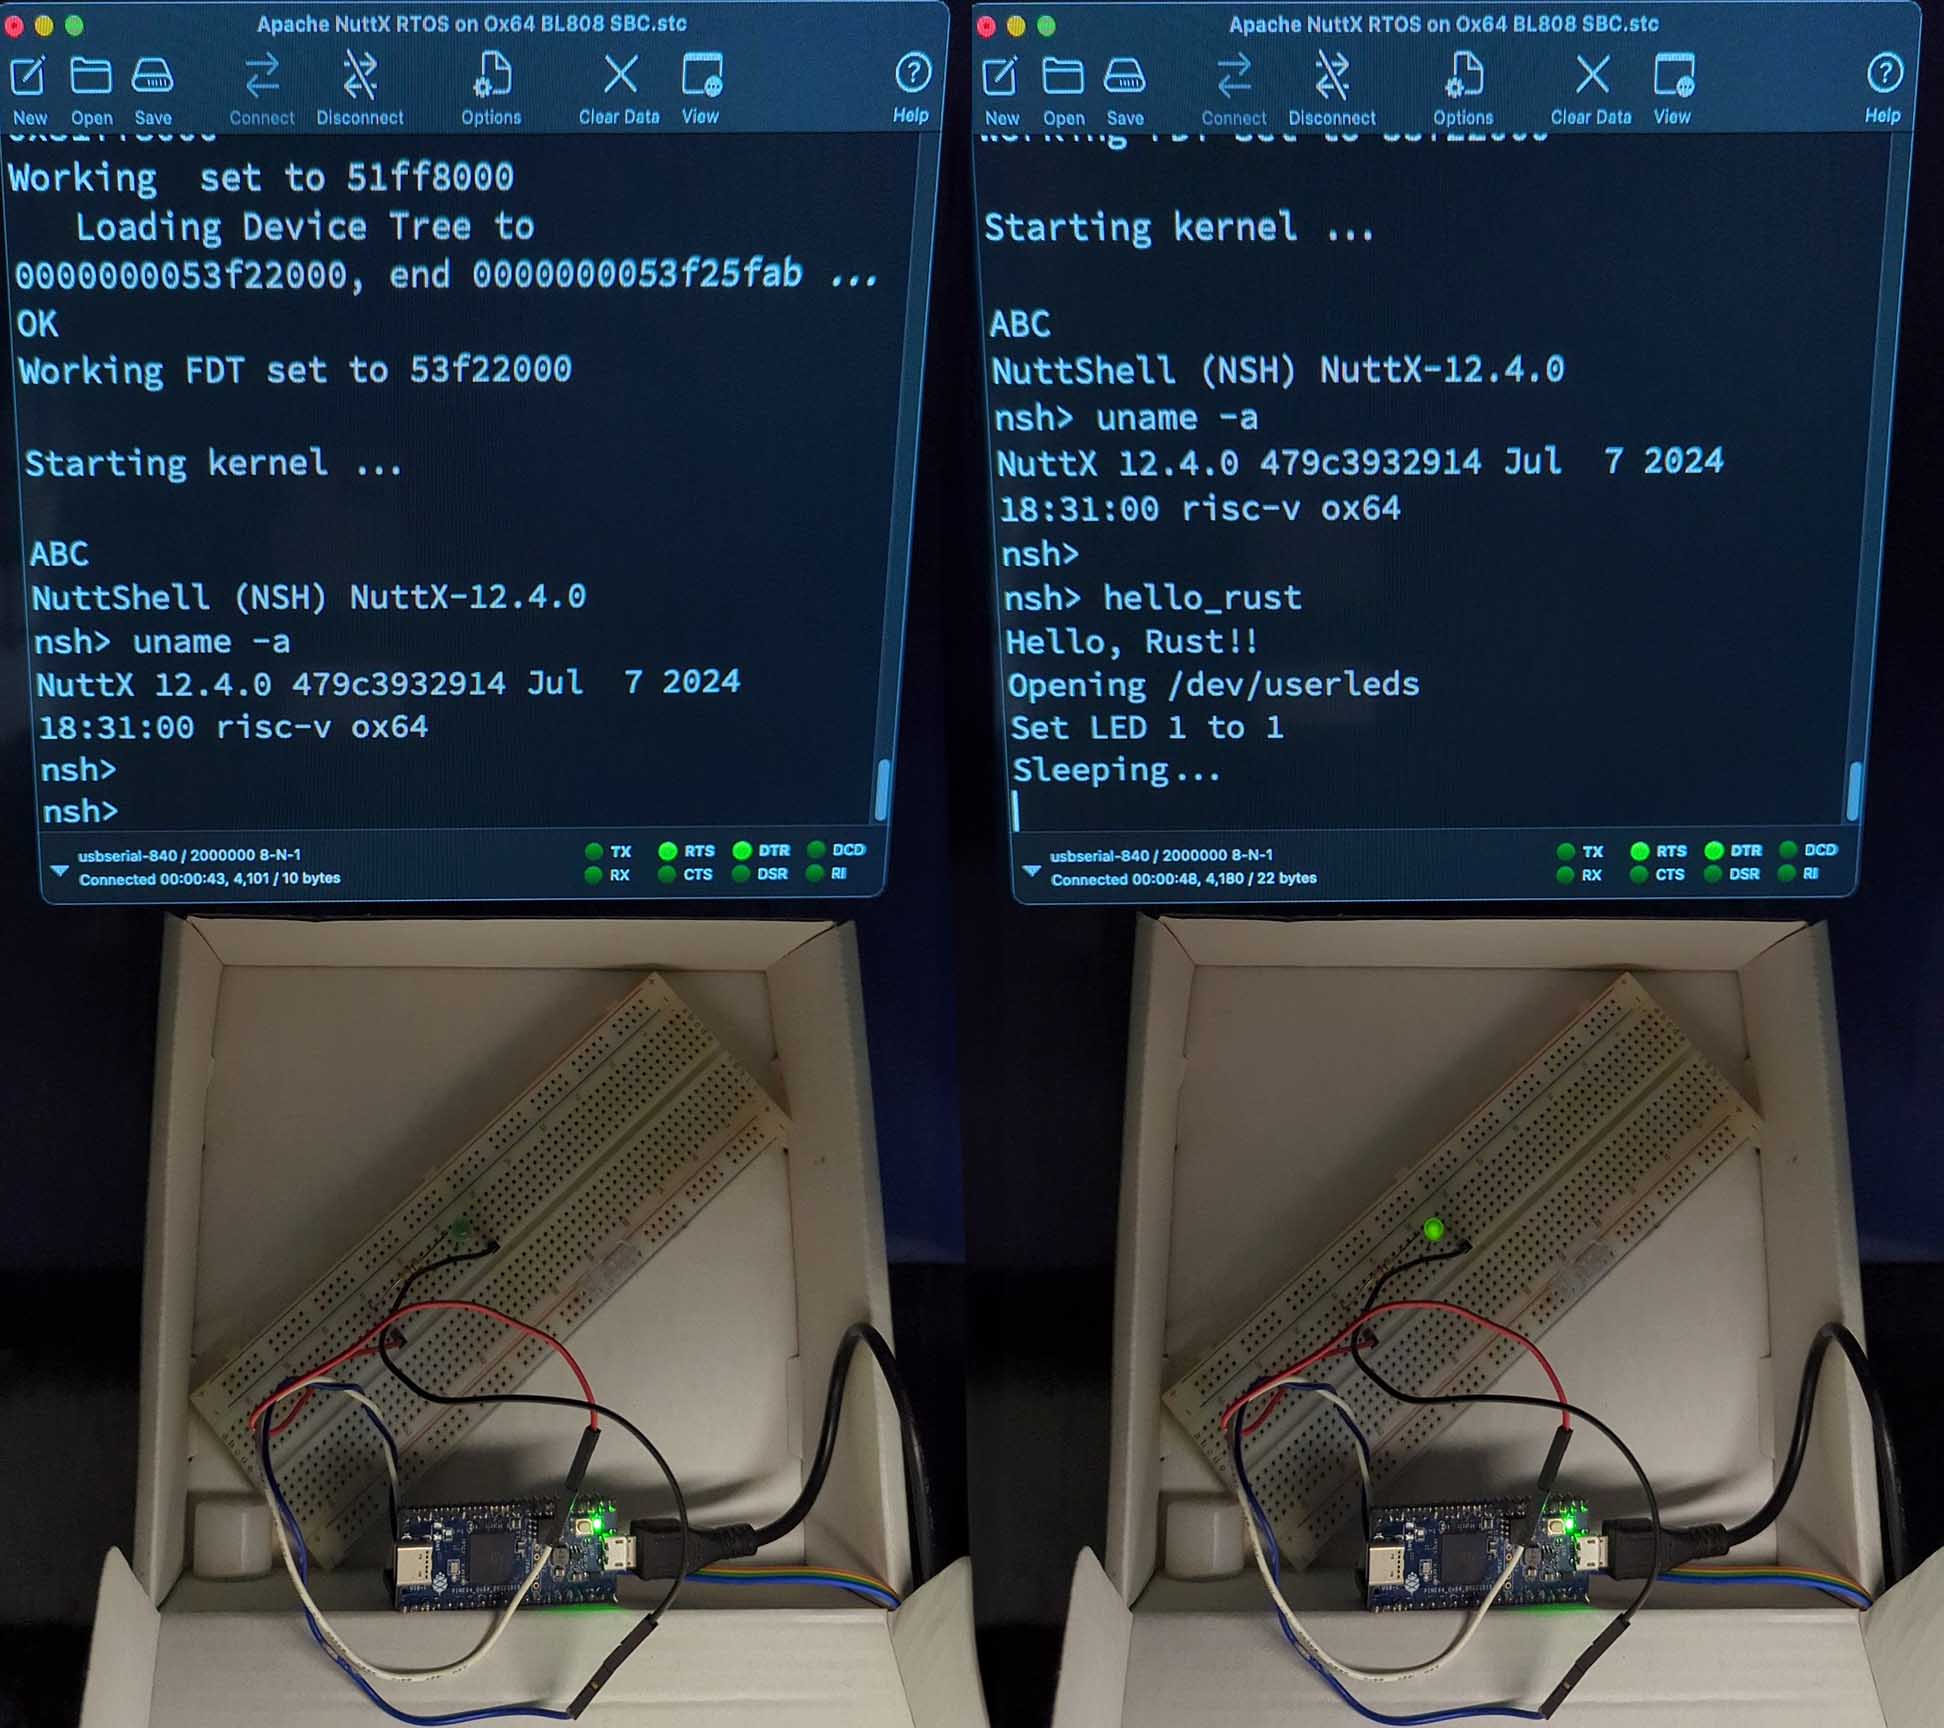
-nographicAt the NSH Prompt: Enter “leds_rust” (pic above)
NuttShell (NSH) NuttX-12.6.0-RC1
nsh> leds_rust
Hello, Rust!!
Opening /dev/userleds

Set LED 1 to 1
board_userled: LED 1 set to 1
board_userled: LED 2 set to 0
board_userled: LED 3 set to 0
Sleeping...

Set LED 1 to 0
board_userled: LED 1 set to 0
board_userled: LED 2 set to 0
board_userled: LED 3 set to 0
Rust blinks our Simulated LED on NuttX QEMU! Let’s head back inside the code…
(QEMU RISC-V 32-bit needs a Custom Rust Target)
Why the funny question mark? (Pic above)
let fd = safe_open(  // Open the LED Device...
  "/dev/userleds",   // Device Path
  O_WRONLY           // Open for Write-Only
) ?;                 // Quit on error
Remember in C we check the Result Value at every call to open and ioctl… Now with safe_open and safe_ioctl, Rust does the checking for us!
If something goes wrong, the code above will exit the function with an Error Value. (Like if “/dev/userleds” doesn’t exist)
Our NuttX App becomes a little safer with the Question Mark Operator, by auto-checking the results of System Calls.
(Rust Compiler will warn us if we forget the Question Mark)
But usleep and close are still unsafe?
// Wait a while
unsafe { usleep(500_000); }
...
// Close the LED Device
unsafe { close(fd); }
Yeah there’s not much point in wrapping usleep and close? Since we don’t check the Return Values.
(safe_puts has a limited Buffer Size)
Can we auto-close the File Descriptor when it goes out of scope?
Probably, if we do Managed File Descriptors. But that’s way beyond the size, scope and scale of GSoC.

Will our NuttX App actually run on Linux, macOS and Windows?
// Comment out these lines for testing on Linux / macOS / Windows
#![no_main]  // For NuttX Only: No Main Function
#![no_std]   // For NuttX Only: Use Rust Core Library (instead of Rust Standard Library)
Yep indeed! Just comment out the above lines and our Rust Blinky App will run on Linux / macOS / Windows (WSL)…
$ git clone https://github.com/lupyuen/nuttx-rust-app
$ cd nuttx-rust-app
$ cd app
$ cargo run
Hello, Rust!!
Opening /dev/userleds
ERROR: rust_main() failed with error -1
Though it fails (as expected) because “/dev/userleds” doesn’t exist on Linux / macOS / Windows. (Pic above)
This greatly simplifies our NuttX App Development: We could (potentially) compile and run our NuttX App on our Local Computer, before testing on NuttX!
(Rust Analyzer won’t work inside NuttX Projects sigh)
We saw the LED Blinky code in rust_main. Who calls rust_main?
Remember that rust_main returns a Result Type: leds_rust_main.rs
// `rust_main` accepts the args from NuttX Shell
// And returns a Result Code (int) or Error Code (int)
fn rust_main(_argc: i32, _argv: *const *const u8)
  -> Result<i32, i32> { ... }
But NuttX expects us to provide a Main Function named leds_rust_main. And it shall return an Integer Result. (Not a Result Type)
Thus we create an leds_rust_main function that calls rust_main (pic above) and returns the right result: leds_rust_main.rs
// For NuttX: This will be called by NuttX Shell
// For Linux / macOS / Windows: This wil be called by `main`
#[no_mangle]
pub extern "C" fn leds_rust_main(argc: i32, argv: *const *const u8)  // Args from NuttX Shell
  -> i32 {  // Return a Result Code (0) or Error Code (negative)

  // Call the program logic in Rust Main
  let res = rust_main(argc, argv);

  // If Rust Main returns an error, print it.
  // We won't wrap `printf`, because it needs VarArgs.
  if let Err(e) = res {
    unsafe { printf(b"ERROR: rust_main() failed with error %d\n\0" as *const u8, e); }
    e  // Return the Error Code
  } else {
    0  // Or return the Result Code 0
  }
}
What about Linux / macOS / Windows?
They expect us to provide a main function…
Thus we do this: leds_rust_main.rs
// For Linux / macOS / Windows: Define the Main Function
#[cfg(not(target_os = "none"))]
fn main() {
  // Call Rust Main without args
  leds_rust_main(
    0,                 // argc: Zero Args
    core::ptr::null()  // argv: Null Pointer
  );
}
Anything else specific to NuttX?
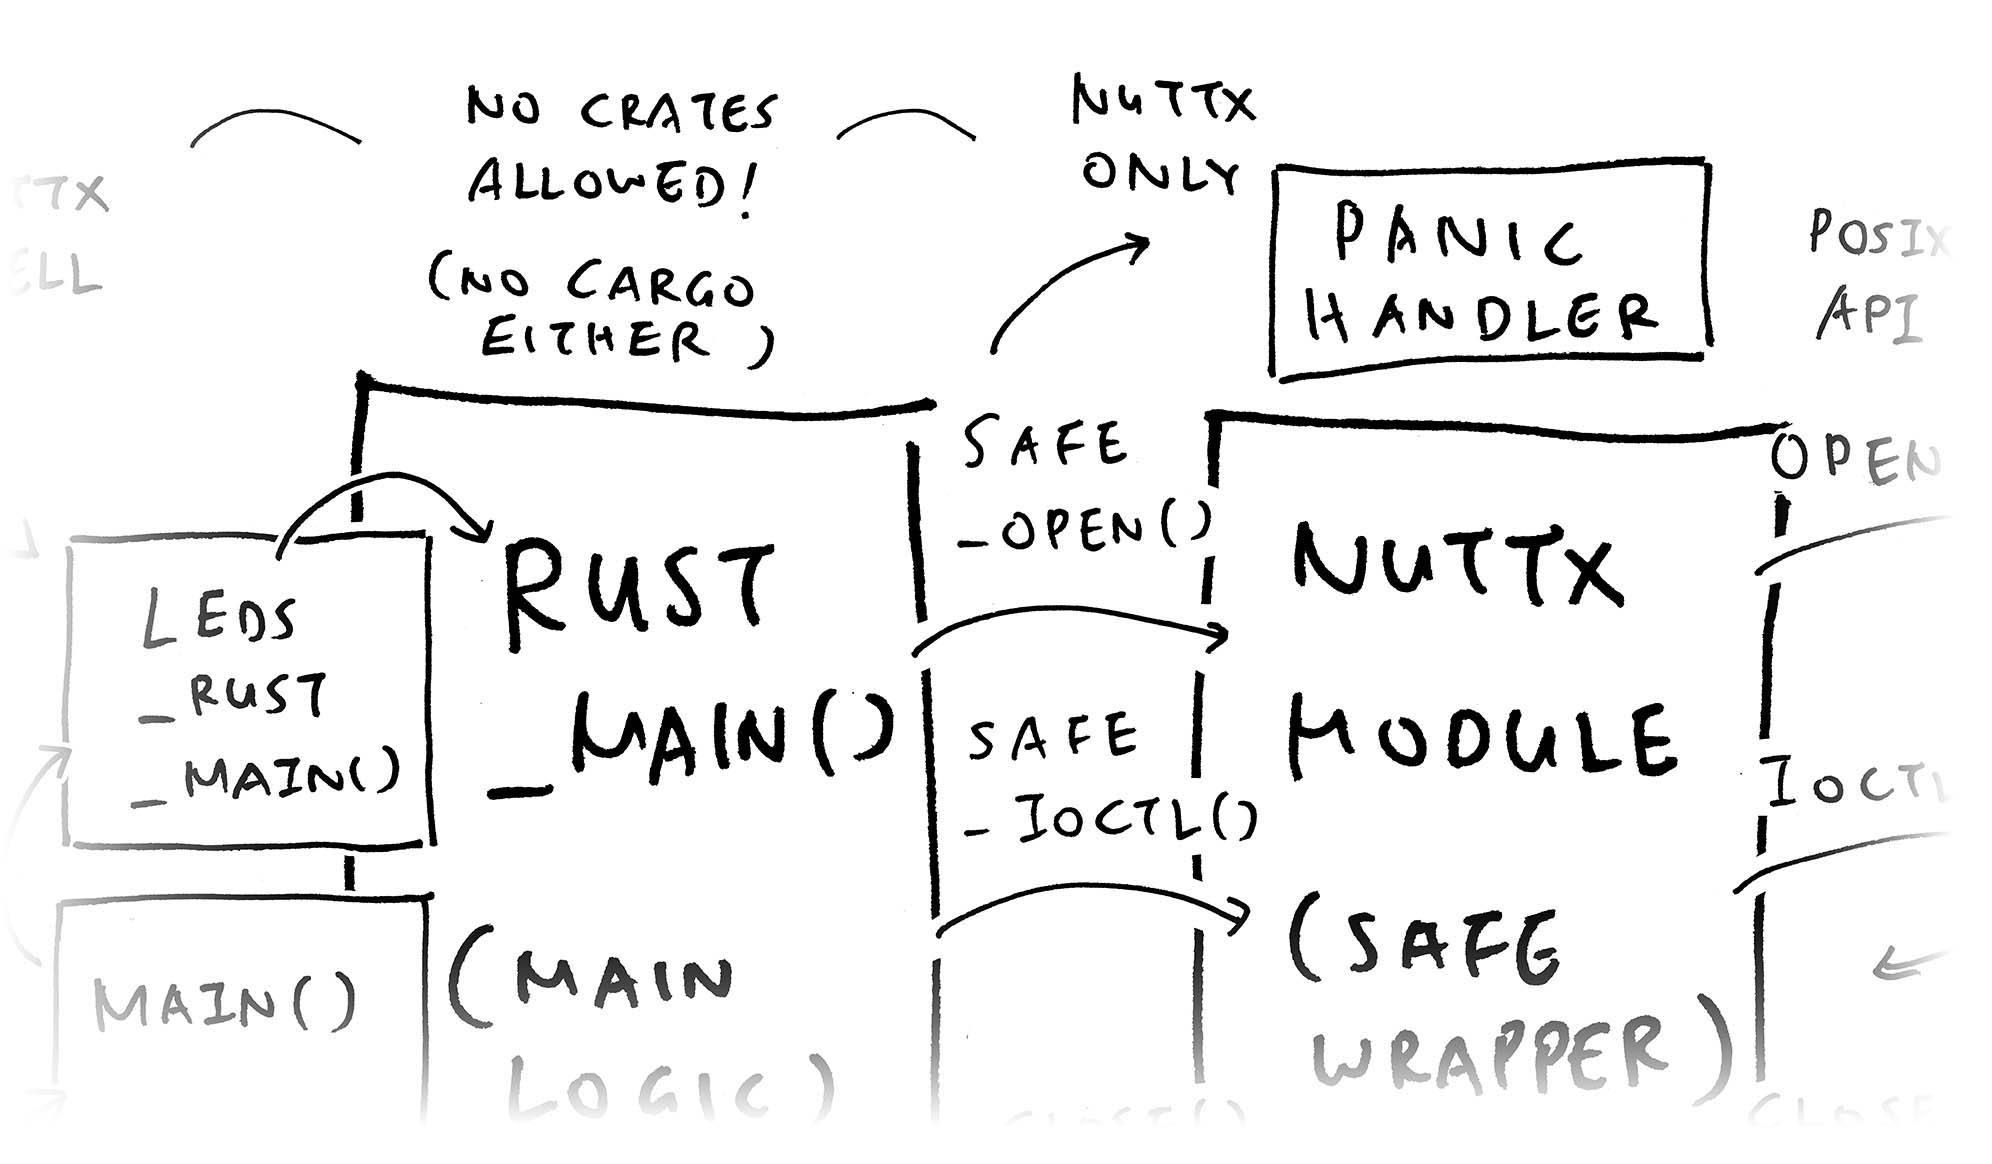
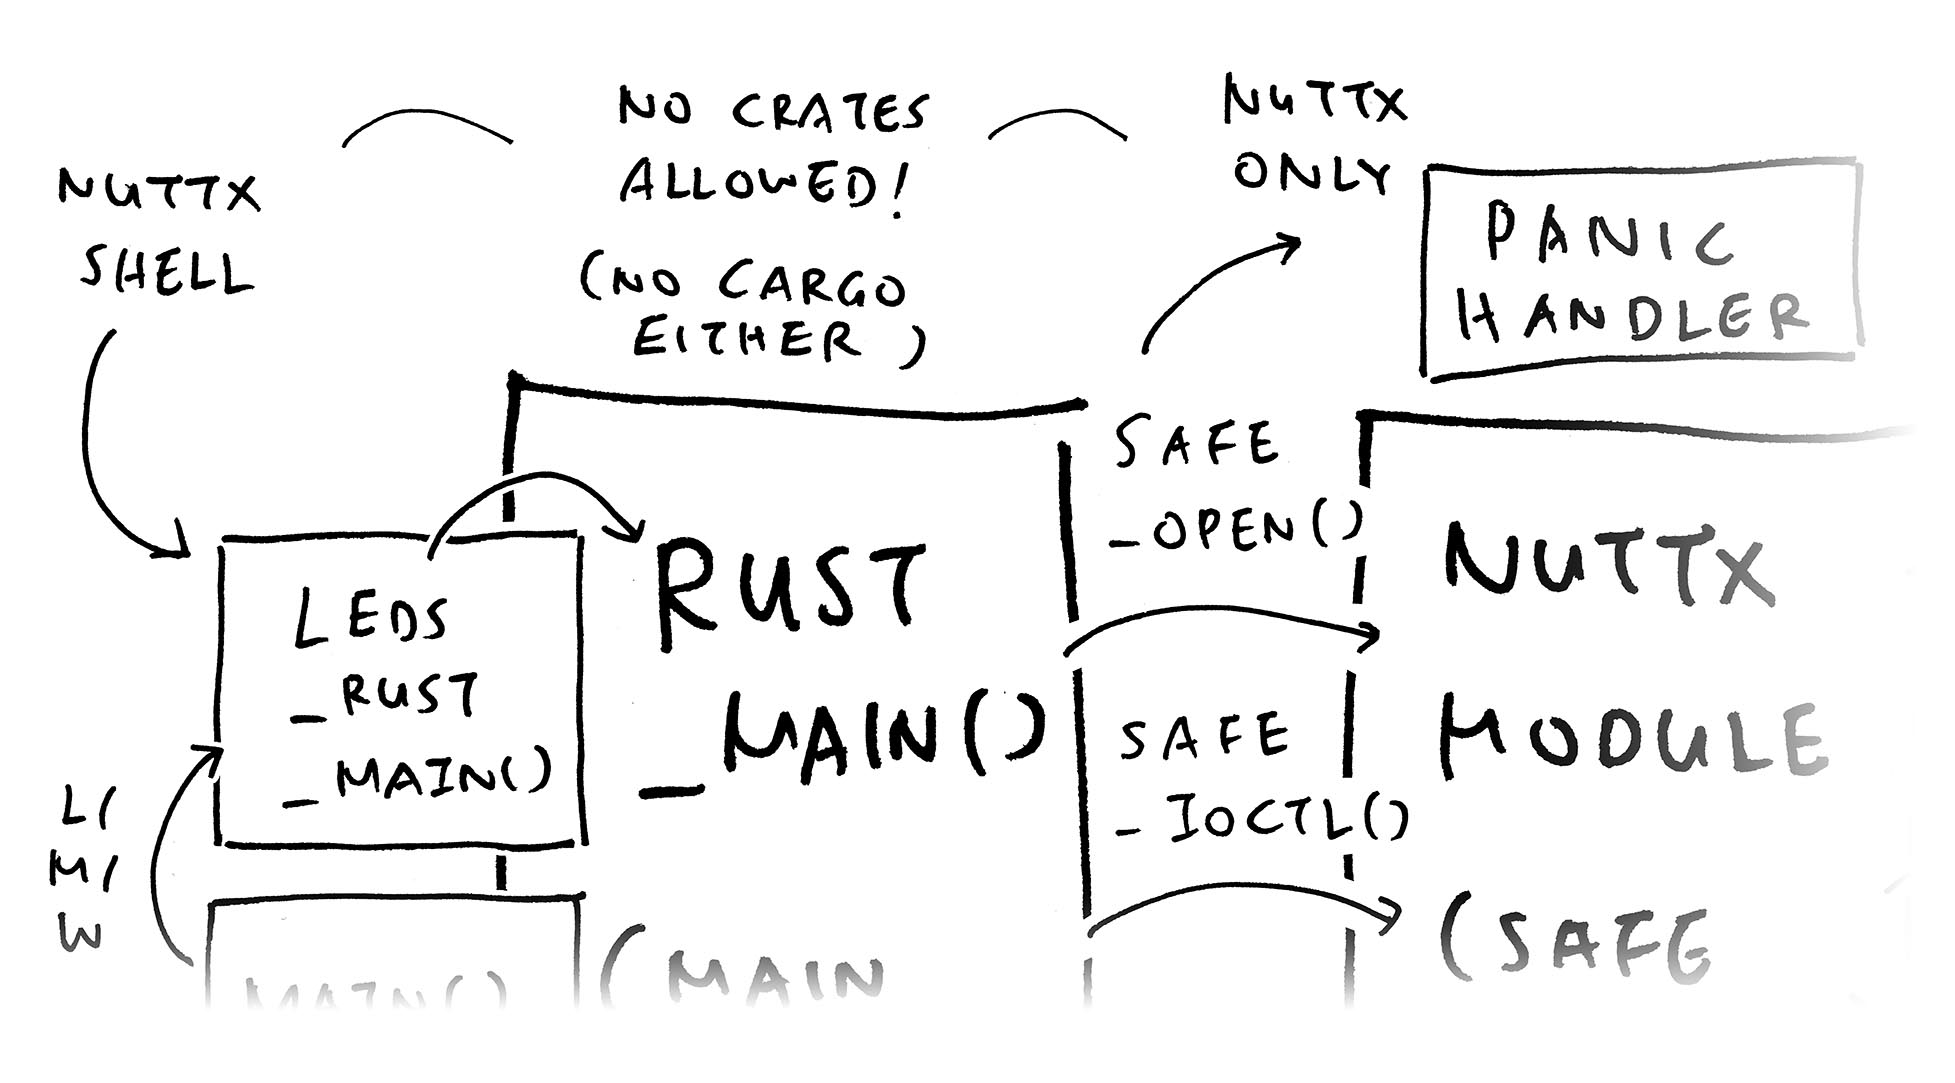
Yep NuttX Apps run on the Rust Core Library (no_std) and require a Panic Handler.
That’s why we need this: leds_rust_main.rs
// For NuttX Only: Import the Panic Type
#[cfg(target_os = "none")]
use core::{
  panic::PanicInfo,
  result::Result::{self, Err, Ok},
};

// For NuttX Only: Define the Panic Handler for `no_std`
#[cfg(target_os = "none")]
#[panic_handler]
fn panic(_panic: &PanicInfo<'_>) -> ! {
  loop {}
}
(Sorry cfg won’t work for no_main and no_std)
(Update: NuttX now supports Cargo and Tokio!)
We’re coding Rust in a strange way. Why not use crates and cargo?
Ah that’s because NuttX doesn’t support Rust Crates! We can’t use cargo either, NuttX Build will call rustc directly…
## Configure the NuttX Project
## for QEMU RISC-V 64-bit including Rust
$ tools/configure.sh rv-virt:leds64_rust

## Build the NuttX Project
## Which calls `rustc`
$ make
Which complicates our coding of NuttX Rust Apps. That’s why we hope to test them first on Linux / macOS / Windows.
(NuttX Module nuttx.rs should probably live in a Common Source Folder)
(Maybe NuttX will allow some crates, similar to Rust for Linux Kernel)
12 weeks of GSoC: What else have we implemented?
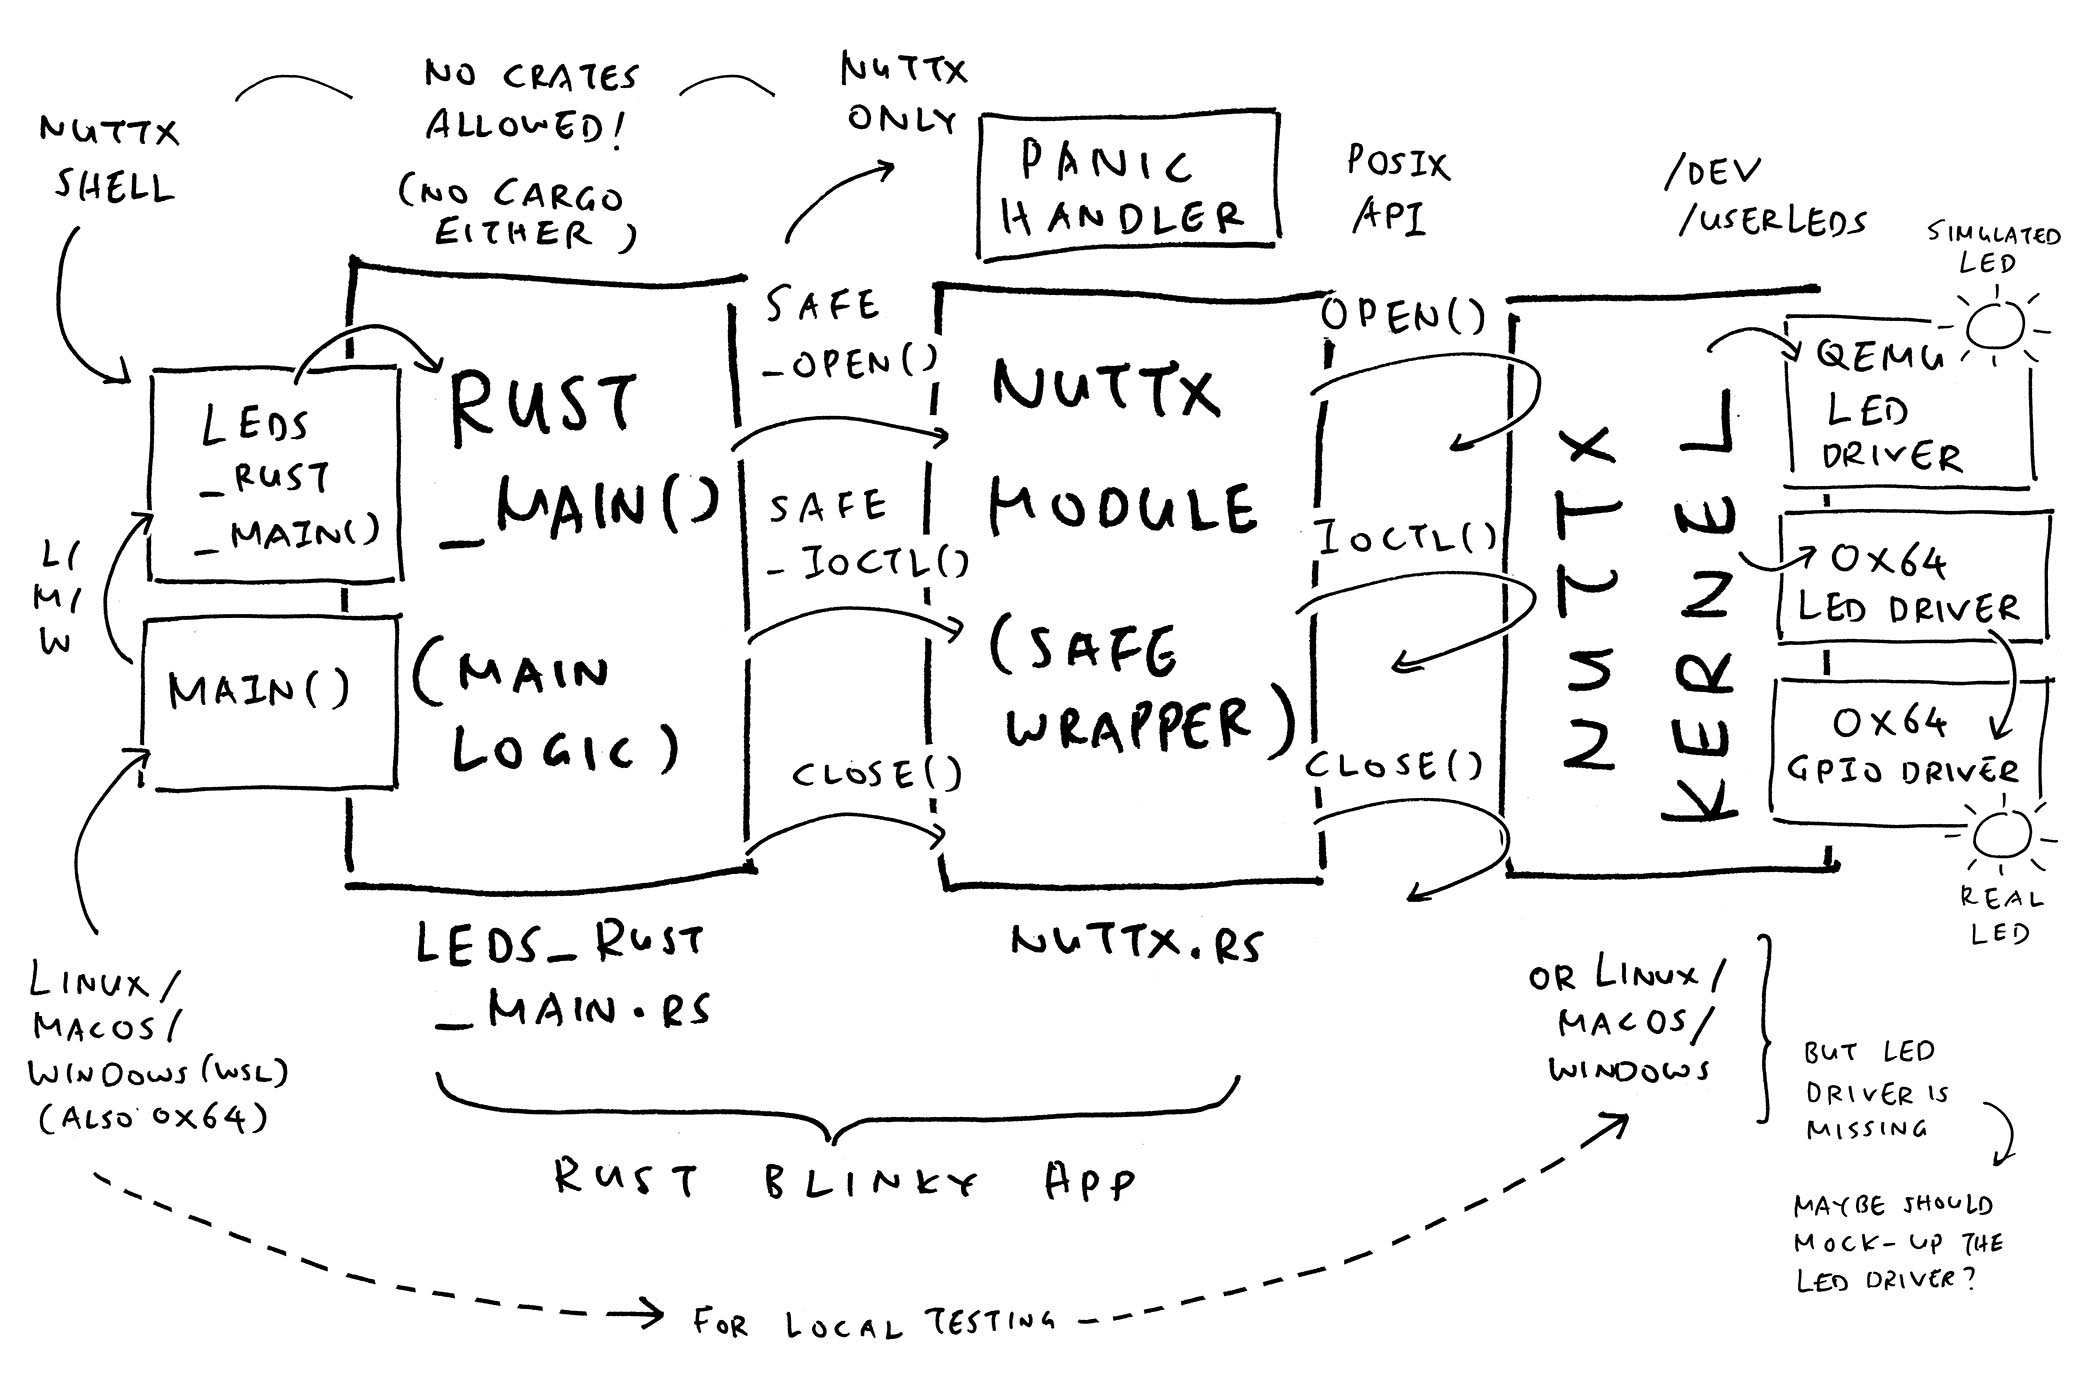
Remember our Blinky NuttX App in Rust? Well a NuttX App ain’t really a NuttX App… Unless it runs on Real Hardware!
We tested our Rust Blinky App on Ox64 BL808 RISC-V SBC (pic above). Which needs us to create the GPIO and LED Drivers for Ox64 SBC…
What about folks without Ox64 SBC?
We created the LED Driver for QEMU RISC-V Emulator, which will blink a Simulated LED on NuttX. (Pic above)
Everyone can run the Rust Blinky App (from above) and reproduce the exact same results, thanks to the QEMU LED Driver…

Our Rust Blinky App: Will it break someday?
Yeah it’s possible that our Rust App will someday fail to build or execute correctly…
Rust Compiler might change and break our app
(Since we’re not calling it the cargo way)
NuttX Makefiles might cause problems for Rust Apps
(Because NuttX is mostly in C, not Rust)
That’s why we extended the Continuous Integration workflow for NuttX…
Every NuttX Pull Request will now trigger a rebuild of our Rust Blinky App. If anything breaks, we’ll find out right away!
Why so complicated?
That’s because the NuttX Continuous Integration (CI) runs inside a Docker Container. Which requires delicate modding…
NuttX CI also compiles hello_rust for NuttX Simulator. Though it’s simpler and doesn’t need a Special Rust Target for the Docker Image.
Will we know if the Rust Blinky App fails to execute correctly?
Every day through GitHub Actions: We’re testing the Rust Blinky App on QEMU RISC-V Emulator. (Pic above)
If Rust Blinky fails to execute (or produces the wrong output), GitHub Actions will notify us…
Anything else we’re testing daily?
If something goes wrong: We need to be clear whether it’s our Rust App Failing vs NuttX QEMU Failing. That’s why we also test NuttX QEMU every day at GitHub Actions…
Wow that’s plenty of coding for 12 weeks of GSoC!
Indeed, we tracked all Coding Tasks in our GSoC Task Spreadsheet. And we recorded Daily Updates in the NuttX Discord Channel.
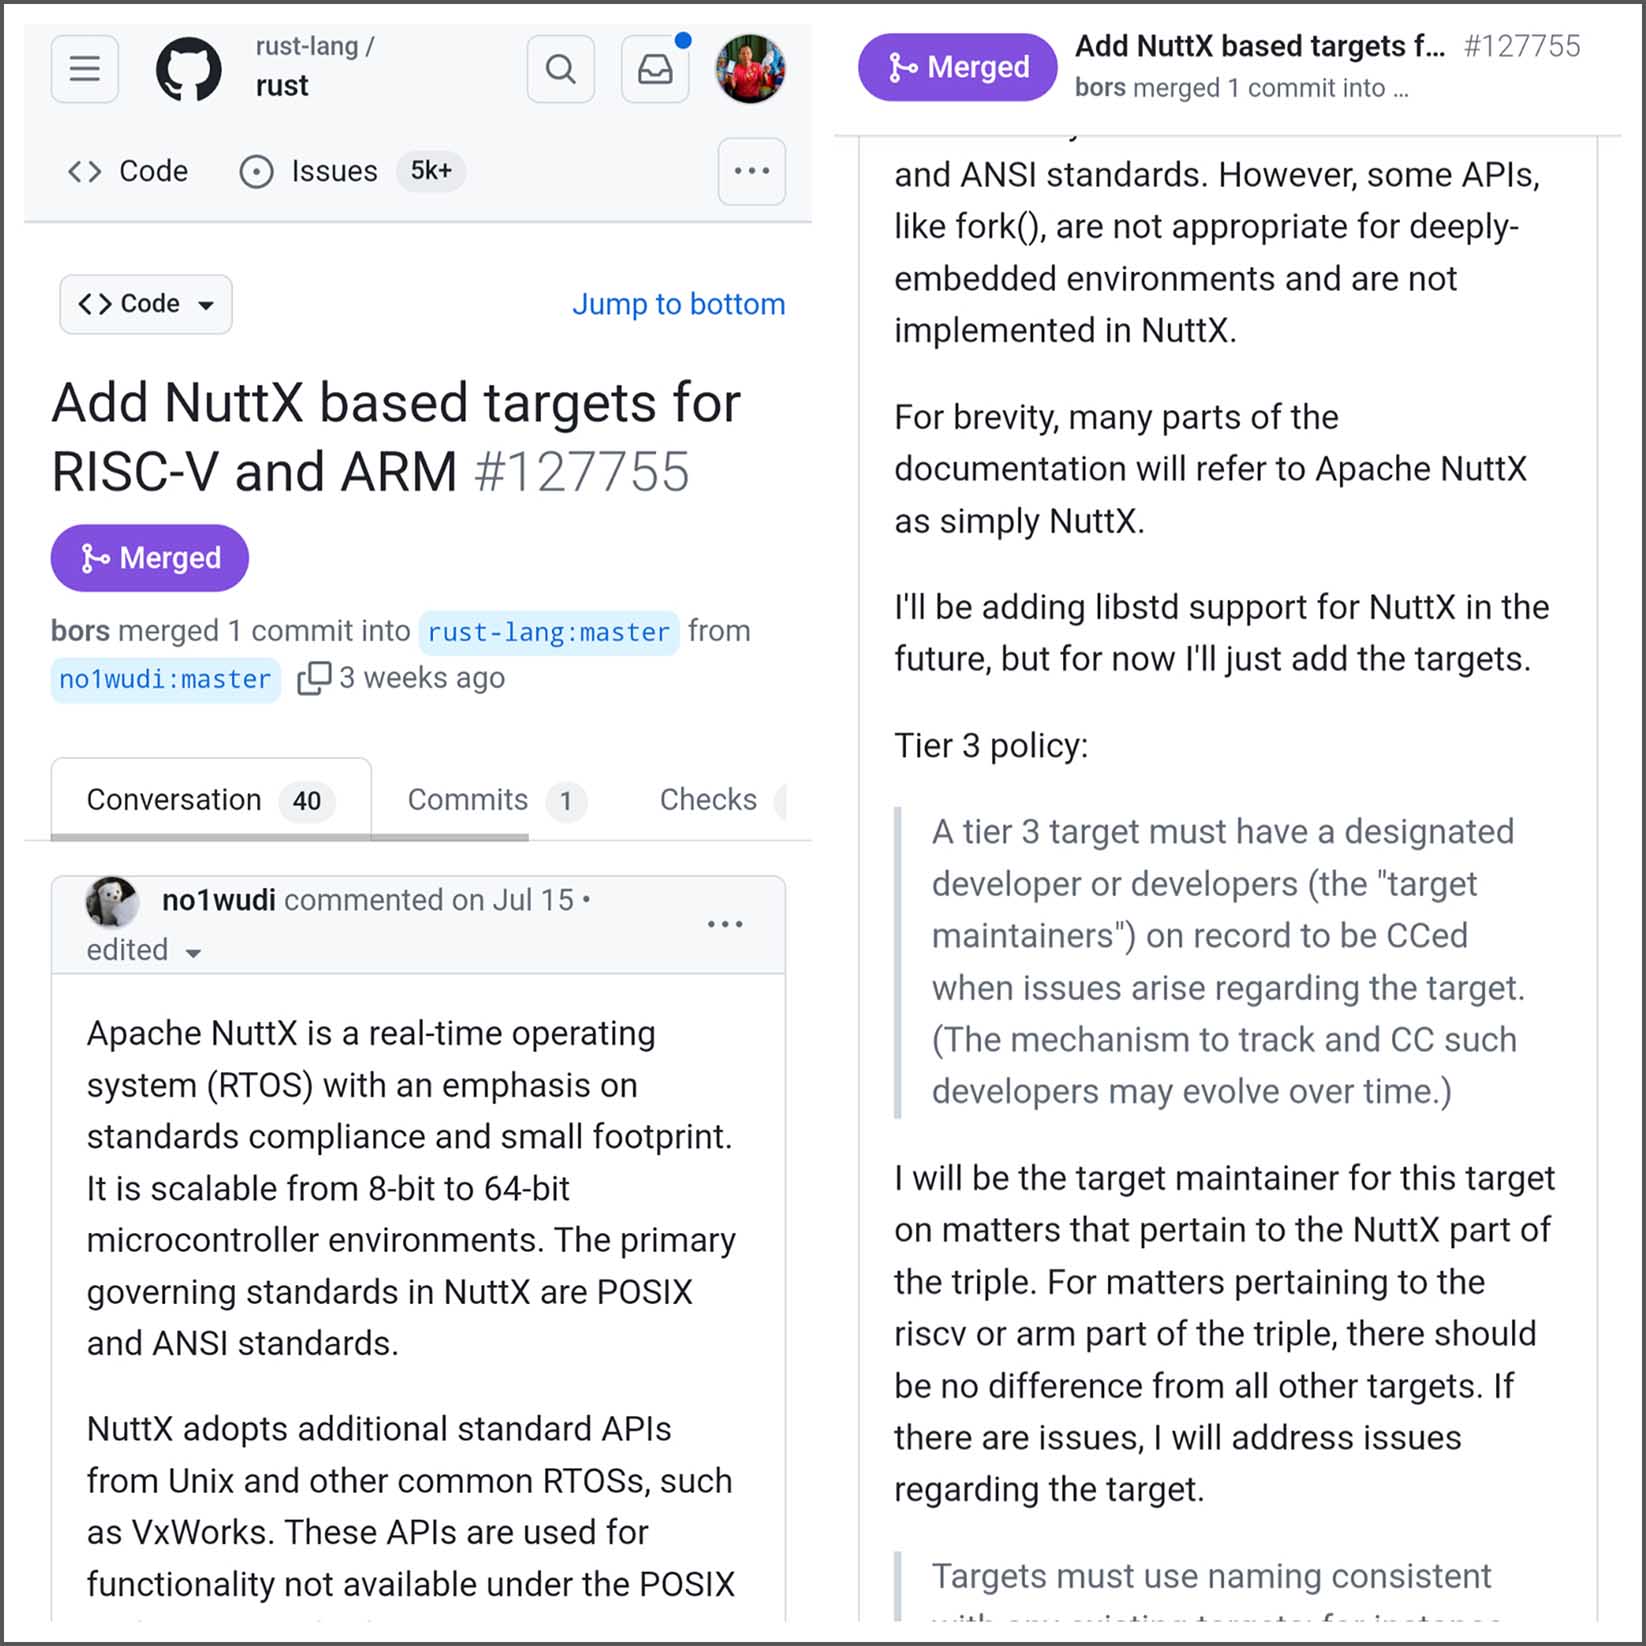
Will Rust officially support NuttX?
The NuttX Community is now prepping NuttX as Tier 3 Target to Rust. (First step is approved! Pic above)
Everything in this article… Becomes redundant?
Soon we’ll have lots of Coding and Testing to implement NuttX as Tier 3 Target, that works with the Rust Standard Library.
Meanwhile, we can call NuttX Safe Wrappers (prescribed in this article) to build Rust Apps for NuttX, the Interim Way.
These are the Early Days of Rust Apps on Apache NuttX RTOS. We talked about…
Blinking the LED in Rust
Handling Errors returned by NuttX
Testing on QEMU RISC-V Emulator
And possibly Linux / macOS / Windows
But NuttX Won’t Allow Any Crates!
(Someday it might? Similar to Rust for Linux Kernel)
Be wary of the Main Function and Panic Handler!
(NuttX works differently from Linux / macOS / Windows)
Check out the LED Drivers we created
(For testing QEMU Emulator and Ox64 BL808 SBC)
We’re running Daily Build and Test of our Rust App
(With our Updated Docker Image for Continuous Integration)
Check out the next article…
Many Thanks to my GitHub Sponsors (and the awesome NuttX Community) for supporting my work! This article wouldn’t have been possible without your support.
Special Thanks to Mr Rushabh Gala: Sorry it’s my first GSoC, I could have done better, I’m grateful for your patience and understanding 🙏
Got a question, comment or suggestion? Create an Issue or submit a Pull Request here…
lupyuen.github.io/src/rust6.md
(Update: NuttX now supports Cargo and Tokio!)
Shall we implement Rust Embedded HAL on NuttX?
Actually I’m not too clear if we should stick to the Official Rust Embedded HAL for NuttX. Here’s why…
To blink an LED in Rust Embedded HAL: We fetch the GPIO, then switch it off and on…
But there’s no need to do this in NuttX! We simply open the LED Device /dev/userleds. And control it via ioctl…
Rust Embedded HAL feels strange when we force-fit it into NuttX. I2C will have similar issues…
If we look at Rust on Zephyr: They propose to call a Native Zephyr API to blink the LED…
// Proposed Rust on Zephyr
#![no_std]
#![no_main]

#[zephyr::entry]
fn main() {
  let dt = zephyr::devicetree::take().unwrap();
  let led = dt.chosen.led0;
  loop {
    led.toggle().unwrap();
    zephyr::sys::sleep(1000);
  }
}
My gut feel is that we should do it the Zephyr way. But make it POSIX-like. Thus we should drop nuttx-embedded-hal altogether :-)
What about Rustix?
Rustix is kinda heavy I think? It does Owned File Descriptors that will auto-close when they go out of scope. There might be a lot of dependencies inside?
Earlier I wrote this…
Can we auto-close the File Descriptor when it goes out of scope? Probably, if we do Managed File Descriptors. But that’s way beyond the size, scope and scale of GSoC.
Update: We’re reassessing Rustix for NuttX. Simpler is swell but we’ll run into problems with I/O Safety sigh. Check out the new article…
Earlier we said that our Rust Blinky App might someday fail to build or execute correctly. That’s why we…
Trigger a Rebuild of our Rust Blinky App on every NuttX Pull Request
Run and Test our Rust Blinky App every day at GitHub Actions
If anything breaks, we’ll find out right away!
How to test our app with GitHub Actions?
Every day at GitHub Actions: We boot NuttX on QEMU RISC-V (64-bit) and verify the output of “leds_rust” (pic above)
## Start the QEMU Emulator for 64-bit RISC-V
$ spawn qemu-system-riscv64 \
  -semihosting \
  -M virt,aclint=on \
  -cpu rv64 \
  -bios none \
  -kernel nuttx \
  -nographic

## Run `leds_rust` and verify the output
NuttShell (NSH) NuttX-12.6.0-RC1
nsh> leds_rust
Hello, Rust!!
Opening /dev/userleds

Set LED 1 to 1
board_userled: LED 1 set to 1
board_userled: LED 2 set to 0
board_userled: LED 3 set to 0
Sleeping...

Set LED 1 to 0
board_userled: LED 1 set to 0
board_userled: LED 2 set to 0
board_userled: LED 3 set to 0Here’s the GitHub Actions Workflow (pic below) to build and run Rust Blinky: qemu-riscv-leds64-rust.yml
## Download the Source Code for NuttX Kernel and Apps
git clone https://github.com/apache/nuttx
git clone https://github.com/apache/nuttx-apps apps
cd nuttx

## Install the Rust Target for QEMU RISC-V 64-bit
rustup target add riscv64gc-unknown-none-elf

## Configure the NuttX Build: QEMU RISC-V 64-bit with LED Driver and Rust
tools/configure.sh rv-virt:leds64_rust

## Build the NuttX Kernel. Ignore the warning: `nuttx has a LOAD segment with RWX permissions`
make

## Install QEMU Emulator for RISC-V
sudo apt install qemu-system-riscv64

## Test NuttX and Rust Blinky with our Expect Script
wget https://raw.githubusercontent.com/lupyuen/nuttx-riscv64/main/qemu-riscv-leds64-rust.exp
chmod +x qemu-riscv-leds64-rust.exp
./qemu-riscv-leds64-rust.exp
Which calls our Expect Script to test Rust Blinky: qemu-riscv-leds64-rust.exp
#!/usr/bin/expect
## Expect Script for Testing NuttX Rust Blinky with QEMU Emulator

## Wait at most 10 seconds
set timeout 10

## For every 1 character sent, wait 0.01 milliseconds
set send_slow {1 0.01}

## Start the QEMU Emulator for 64-bit RISC-V
spawn qemu-system-riscv64 \
  -semihosting \
  -M virt,aclint=on \
  -cpu rv64 \
  -bios none \
  -kernel nuttx \
  -nographic

## Wait for the prompt and enter `leds_rust`
expect "nsh> "
send -s "leds_rust\r"

## Check the response: LEDs 1, 2 and 3 should be Off
expect "board_userled: LED 1 set to 0"
expect "board_userled: LED 2 set to 0"
expect {
  ## If we see this message, continue normally
  "board_userled: LED 3 set to 0" {}

  ## If timeout, exit with an error
  ## And rerminate the session: Ctrl-A x
  timeout {
    send "\x01x"
    puts "\n===== Error: Test Failed\n"
    exit 1
  }
}

## Terminate the session: Ctrl-A x
send "\x01x"
puts "\n===== Test OK\n"
exit 0
But our test is incomplete: We need to know if NuttX on QEMU is really OK…
If something goes wrong with Rust Blinky: We need to be clear whether it’s our Rust App Failing vs NuttX QEMU Failing. That’s why we also test NuttX QEMU every day at GitHub Actions. (Pic above)
NuttX for QEMU RISC-V comes in Multiple Flavours, we test four of the popular flavours every day…
32-bit RISC-V, Flat Build:
rv-virt:nsh
32-bit RISC-V, Kernel Build:
rv-virt:knsh
64-bit RISC-V, Flat Build:
rv-virt:nsh64
64-bit RISC-V, Kernel Build:
rv-virt:knsh64
What’s inside the GitHub Actions Workflow?
Every day at GitHub Actions: We boot NuttX on QEMU RISC-V and verify the output of OSTest…
## Start the QEMU Emulator for 32-bit RISC-V
$ spawn qemu-system-riscv32 \
  -semihosting \
  -M virt,aclint=on \
  -cpu rv32 \
  -bios none \
  -kernel nuttx \
  -nographic

## Run `ostest` and verify the output
NuttShell (NSH) NuttX-12.6.0-RC1
nsh> ostest
...
ostest_main: Exiting with status 0Here’s the GitHub Actions Workflow to build and run NuttX QEMU RISC-V (32-bit): qemu-riscv-nsh.yml
## Download the Source Code for NuttX Kernel and Apps
git clone https://github.com/apache/nuttx
git clone https://github.com/apache/nuttx-apps apps
cd nuttx

## Configure the NuttX Build: QEMU RISC-V 32-bit (Flat Build)
tools/configure.sh rv-virt:nsh

## Build the NuttX Kernel. Ignore the warning: `nuttx has a LOAD segment with RWX permissions`
make

## Install QEMU Emulator for RISC-V (32-bit)
sudo apt install qemu-system-riscv32

## Test NuttX and OSTest with our Expect Script
wget https://raw.githubusercontent.com/lupyuen/nuttx-riscv64/main/qemu-riscv-nsh.exp
chmod +x qemu-riscv-nsh.exp
./qemu-riscv-nsh.exp
Which calls our Expect Script to boot NuttX and run OSTest: qemu-riscv-nsh.exp
#!/usr/bin/expect
## Expect Script for Testing NuttX with QEMU Emulator

## Wait at most 300 seconds
set timeout 300

## For every 1 character sent, wait 0.01 milliseconds
set send_slow {1 0.01}

## Start the QEMU Emulator for 32-bit RISC-V
spawn qemu-system-riscv32 \
  -semihosting \
  -M virt,aclint=on \
  -cpu rv32 \
  -bios none \
  -kernel nuttx \
  -nographic

## Wait for the prompt and enter `ostest`
expect "nsh> "
send -s "ostest\r"

## Check the response...
expect {
  ## If we see this message, exit normally
  "ostest_main: Exiting with status 0" {
    ## Terminate the session: Ctrl-A x
    send "\x01x"
    puts "\n===== Test OK\n"
    exit 0
  }

  ## If timeout, exit with an error
  timeout {
    ## Terminate the session: Ctrl-A x
    send "\x01x"
    puts "\n===== Error: Test Failed\n"
    exit 1
  }
}
But there’s a problem: OSTest for 64-bit QEMU RISC-V fails on GitHub Actions…
Every day at GitHub Actions: We boot NuttX on QEMU RISC-V Emulator (32-bit and 64-bit) and test it with OSTest…
But we have problems?
Yeah OSTest for 64-bit QEMU RISC-V fails on GitHub Actions, wonder why…
64-bit RISC-V Flat Build
rv-virt:nsh64 crashes with…
“fpu_test: Started task FPU#1 / riscv_exception: Illegal instruction”
64-bit RISC-V Kernel Build
rv-virt:knsh64 hangs at…
“ostest_main: Started user_main”
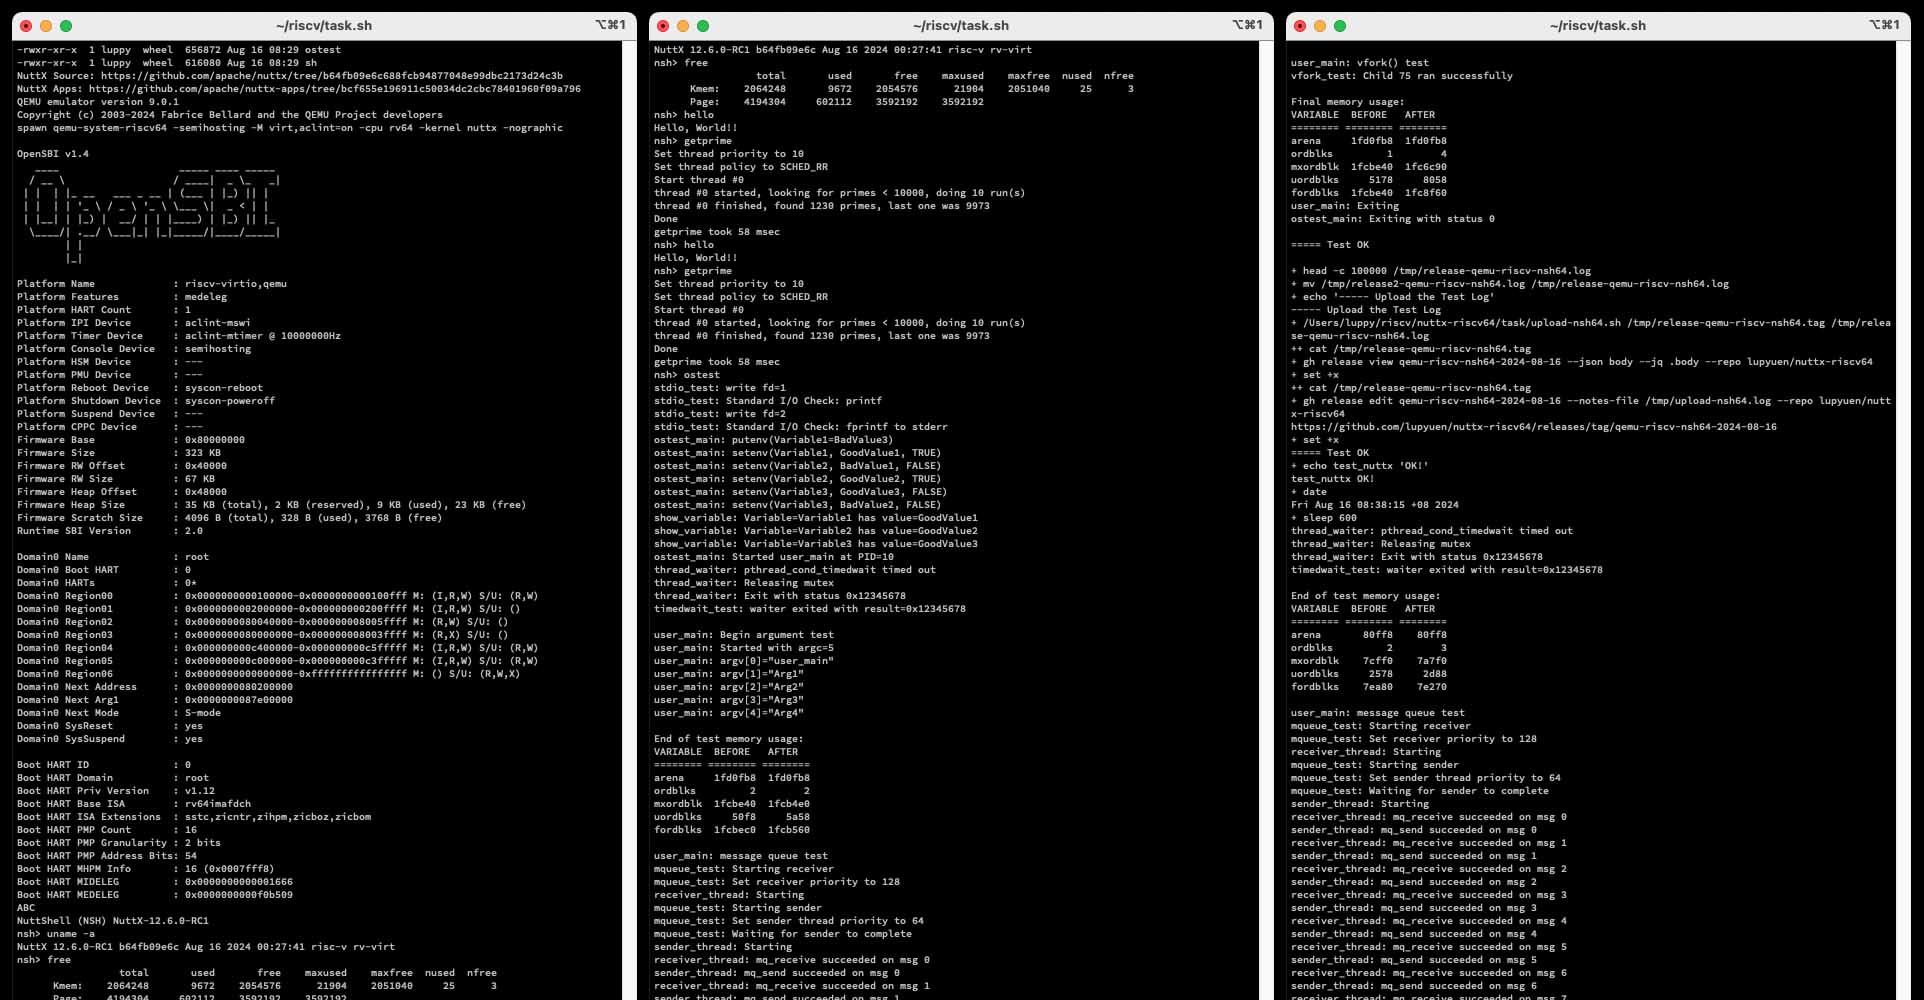
That’s why I run a script on my Home Computer to download the 64-bit Daily Builds and run OSTest locally (pic above)
64-bit RISC-V Flat Build
rv-virt:nsh64
64-bit RISC-V Kernel Build
rv-virt:knsh64
What’s inside the scripts?
Inside our Task Script: We wait for the 64-bit NuttX Daily Build to be published as a GitHub Release: task-nsh64.sh
## Background Task: Automated Testing of Apache NuttX RTOS for QEMU RISC-V 64-bit Flat Build
export BUILD_PREFIX=qemu-riscv-nsh64

## Wait for GitHub Release, then test NuttX
for (( ; ; ))
do
  ## Build Date is today (YYYY-MM-DD)
  BUILD_DATE=$(date +'%Y-%m-%d')
  test_nuttx $BUILD_DATE

  ## Wait a while
  sleep 600
done

## Wait for GitHub Release, then test NuttX on SBC
function test_nuttx {
  ...
  ## Download the NuttX Build
  local date=$1
  NUTTX_ZIP=/tmp/$BUILD_PREFIX-$date-nuttx.zip
  wget -q \
    https://github.com/lupyuen/nuttx-riscv64/releases/download/$BUILD_PREFIX-$date/nuttx.zip \
    -O $NUTTX_ZIP
  ...
  ## Run the NuttX Test
  test-nsh64.sh \
    >/tmp/release-$BUILD_PREFIX.log \
    2>&1
  ...
  ## Upload the Test Log
  upload-nsh64.sh \
    /tmp/release-$BUILD_PREFIX.tag \
    /tmp/release-$BUILD_PREFIX.log
}
Then we call our Test Script to boot NuttX on QEMU and verify the output of OSTest: test-nsh64.sh
## Test Script: Apache NuttX RTOS for QEMU RISC-V 64-bit Flat Build
BUILD_PREFIX=qemu-riscv-nsh64

## Build Date is today (YYYY-MM-DD)
BUILD_DATE=$(date +'%Y-%m-%d')

## Download the latest NuttX build
wget -q https://github.com/lupyuen/nuttx-riscv64/releases/download/$BUILD_PREFIX-$BUILD_DATE/nuttx.zip
unzip -o nuttx.zip

## Write the Release Tag for populating the GitHub Release Notes later
echo "$BUILD_PREFIX-$BUILD_DATE" >/tmp/release-$BUILD_PREFIX.tag

## Boot NuttX on QEMU and run OSTest
wget https://raw.githubusercontent.com/lupyuen/nuttx-riscv64/main/qemu-riscv-nsh64.exp
chmod +x qemu-riscv-nsh64.exp
./qemu-riscv-nsh64.exp(qemu-riscv-nsh64.exp is here)
Finally our Task Script calls our Upload Script, to upload the Test Log into the GitHub Release Notes: upload-nsh64.sh
## Upload Test Log to GitHub Release Notes of Apache NuttX RTOS for QEMU RISC-V 64-bit Flat Build
## Parameters: Release Tag, Test Log
repo=lupyuen/nuttx-riscv64
tag=$1
log=$2

## Preserve the Auto-Generated GitHub Release Notes.
## Fetch the current GitHub Release Notes and extract the body text.
gh release view \
  `cat $tag` \
  --json body \
  --jq '.body' \
  --repo $repo \
  >/tmp/upload-nsh64.old

## Find the position of the Previous Test Log, starting with "```"
cat /tmp/upload-nsh64.old \
  | grep '```' --max-count=1 --byte-offset \
  | sed 's/:.*//g' \
  >/tmp/upload-nsh64-previous-log.txt
prev=`cat /tmp/upload-nsh64-previous-log.txt`

## If Previous Test Log exists, discard it
if [ "$prev" != '' ]; then
  cat /tmp/upload-nsh64.old \
    | head --bytes=$prev \
    >>/tmp/upload-nsh64.log
else
  ## Else copy the entire Release Notes
  cat /tmp/upload-nsh64.old \
    >>/tmp/upload-nsh64.log
  echo "" >>/tmp/upload-nsh64.log
fi

## Show the Test Status
grep "^===== " $log \
  | colrm 1 6 \
  >>/tmp/upload-nsh64.log

## Enquote the Test Log without Carriage Return and Terminal Control Characters.
## The long pattern for sed doesn't work on macOS.
echo '```text' >>/tmp/upload-nsh64.log
cat $log \
  | tr -d '\r' \
  | tr -d '\r' \
  | sed 's/\x08/ /g' \
  | sed 's/\x1B(B//g' \
  | sed 's/\x1B\[K//g' \
  | sed 's/\x1B[<=>]//g' \
  | sed 's/\x1B\[[0-9:;<=>?]*[!]*[A-Za-z]//g' \
  | sed 's/\x1B[@A-Z\\\]^_]\|\x1B\[[0-9:;<=>?]*[-!"#$%&'"'"'()*+,.\/]*[][\\@A-Z^_`a-z{|}~]//g' \
  >>/tmp/upload-nsh64.log
echo '```' >>/tmp/upload-nsh64.log

## Upload the Test Log to the GitHub Release Notes
gh release edit \
  `cat $tag` \
  --notes-file /tmp/upload-nsh64.log \
  --repo $repo