📝 13 Jul 2023
Testing a new Operating System like Apache NuttX RTOS (or Linux) can get painfully tedious on a Single-Board Computer…
Swapping, reflashing and rebooting a MicroSD Card, again and again and again!
(Like how we tested NuttX on PinePhone)
Thankfully there’s a better way: Booting NuttX (or Linux) over the Local Network, with U-Boot Bootloader and TFTP!
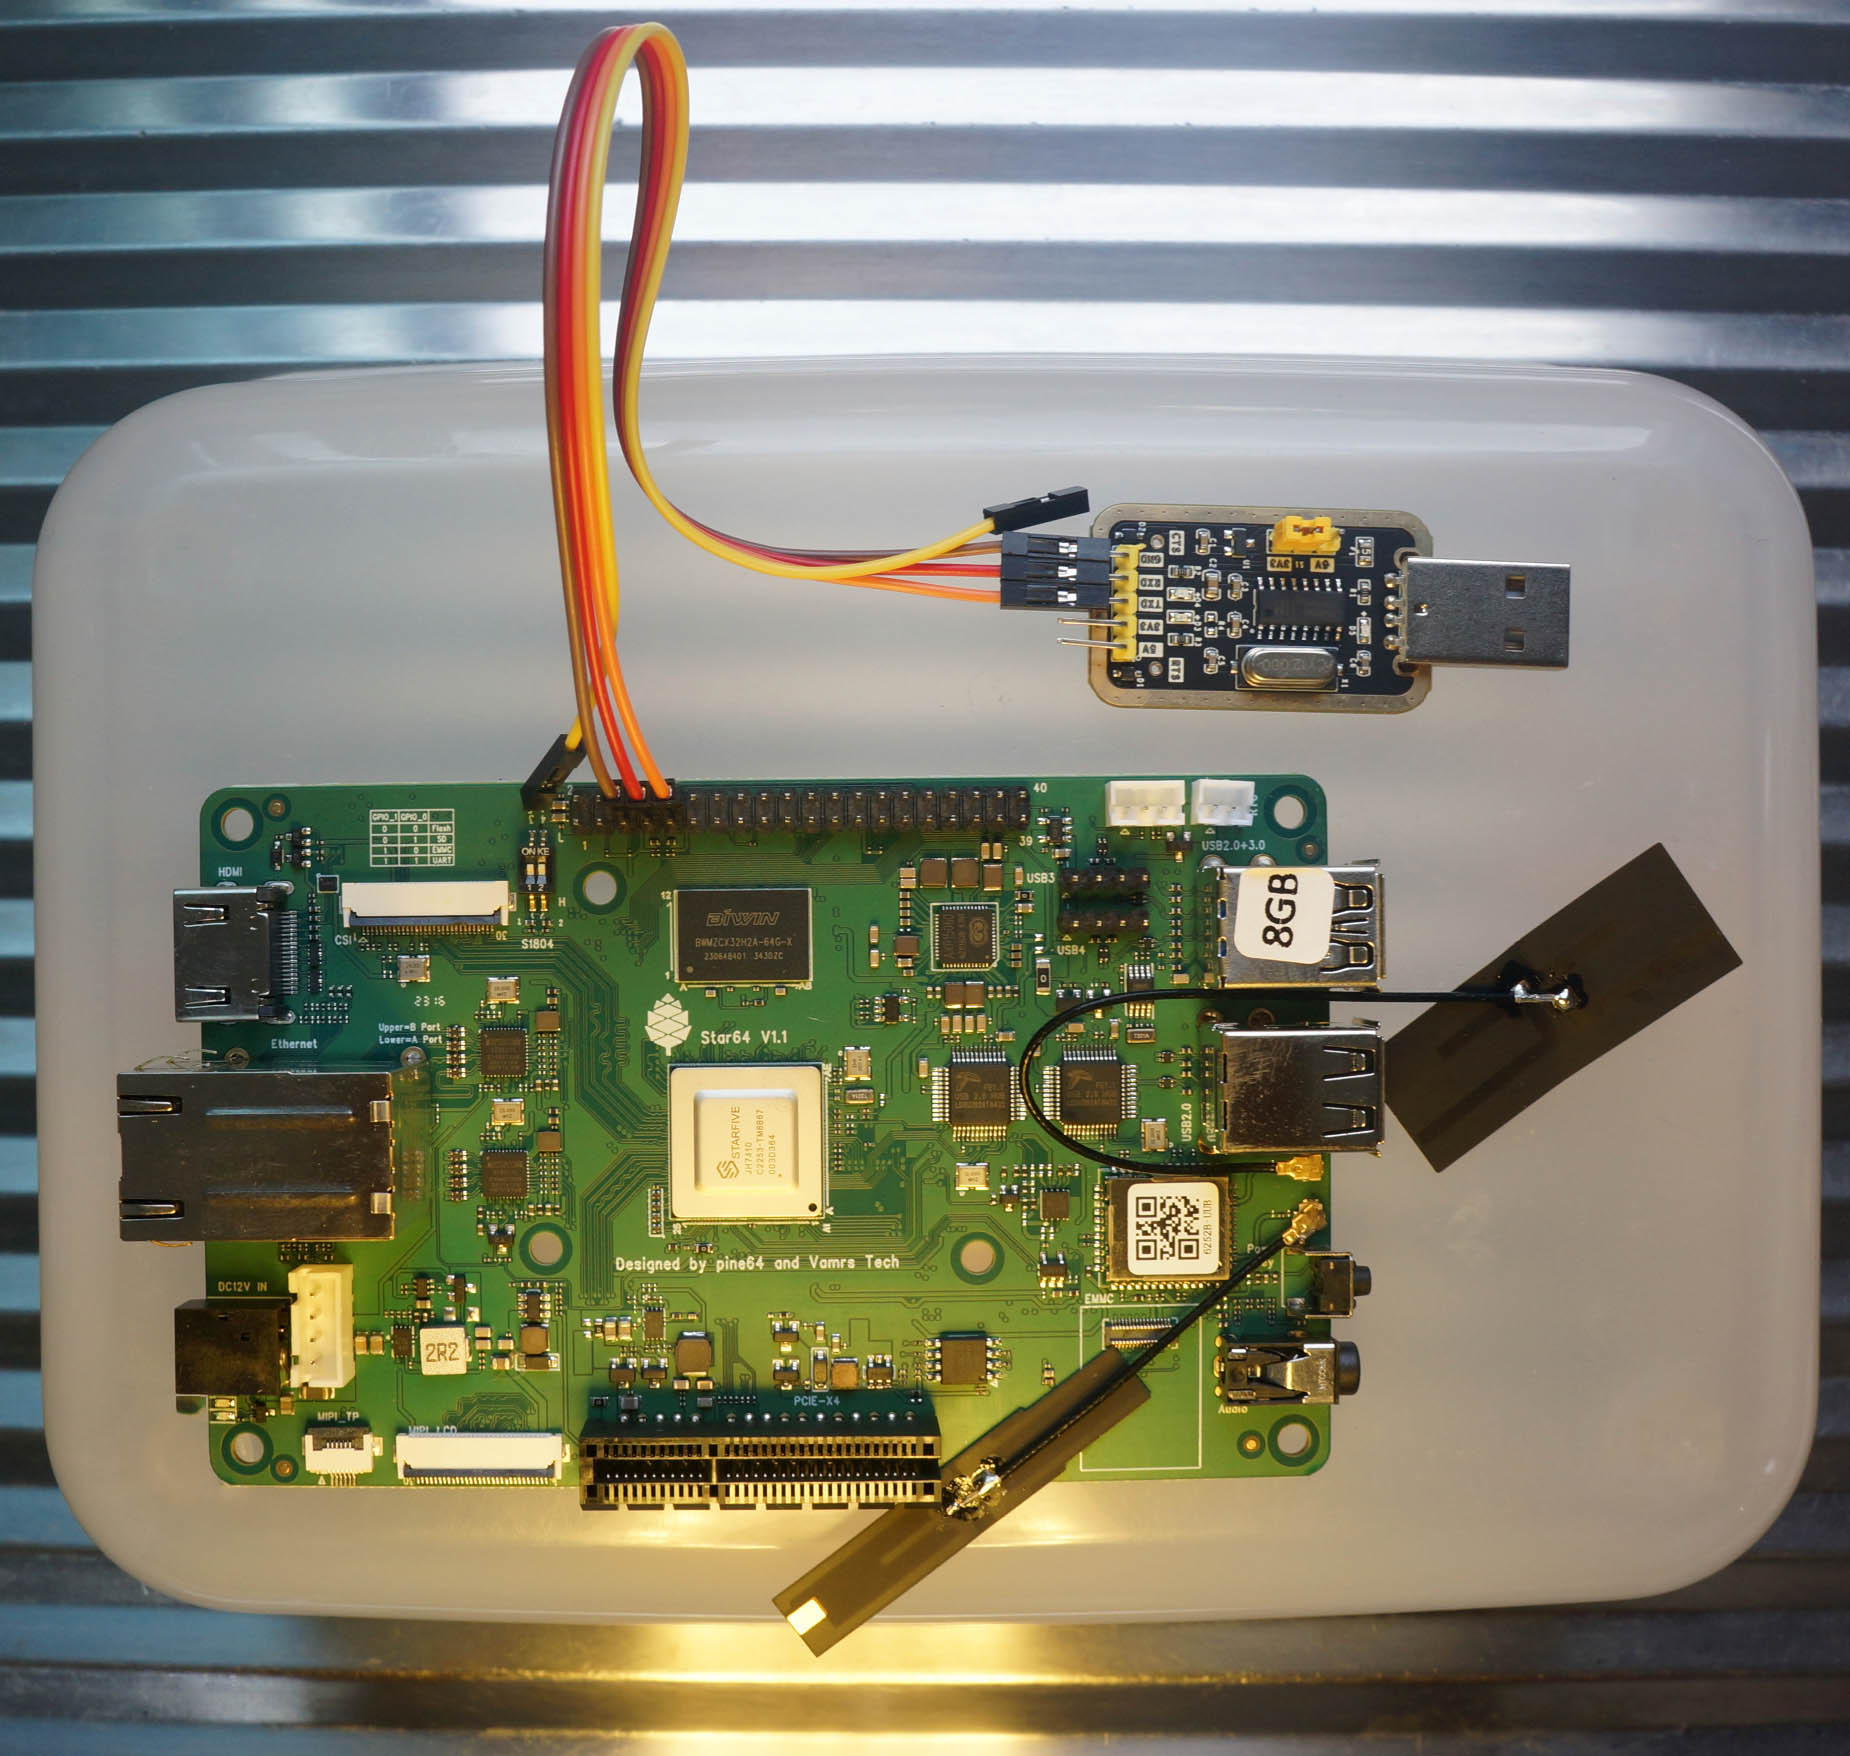
Today we’ll configure TFTP Network Boot on Pine64 Star64, the new 64-bit RISC-V Single-Board Computer (SBC).
(Powered by StarFive JH7110 SoC)
(Watch the Demo Video on YouTube)
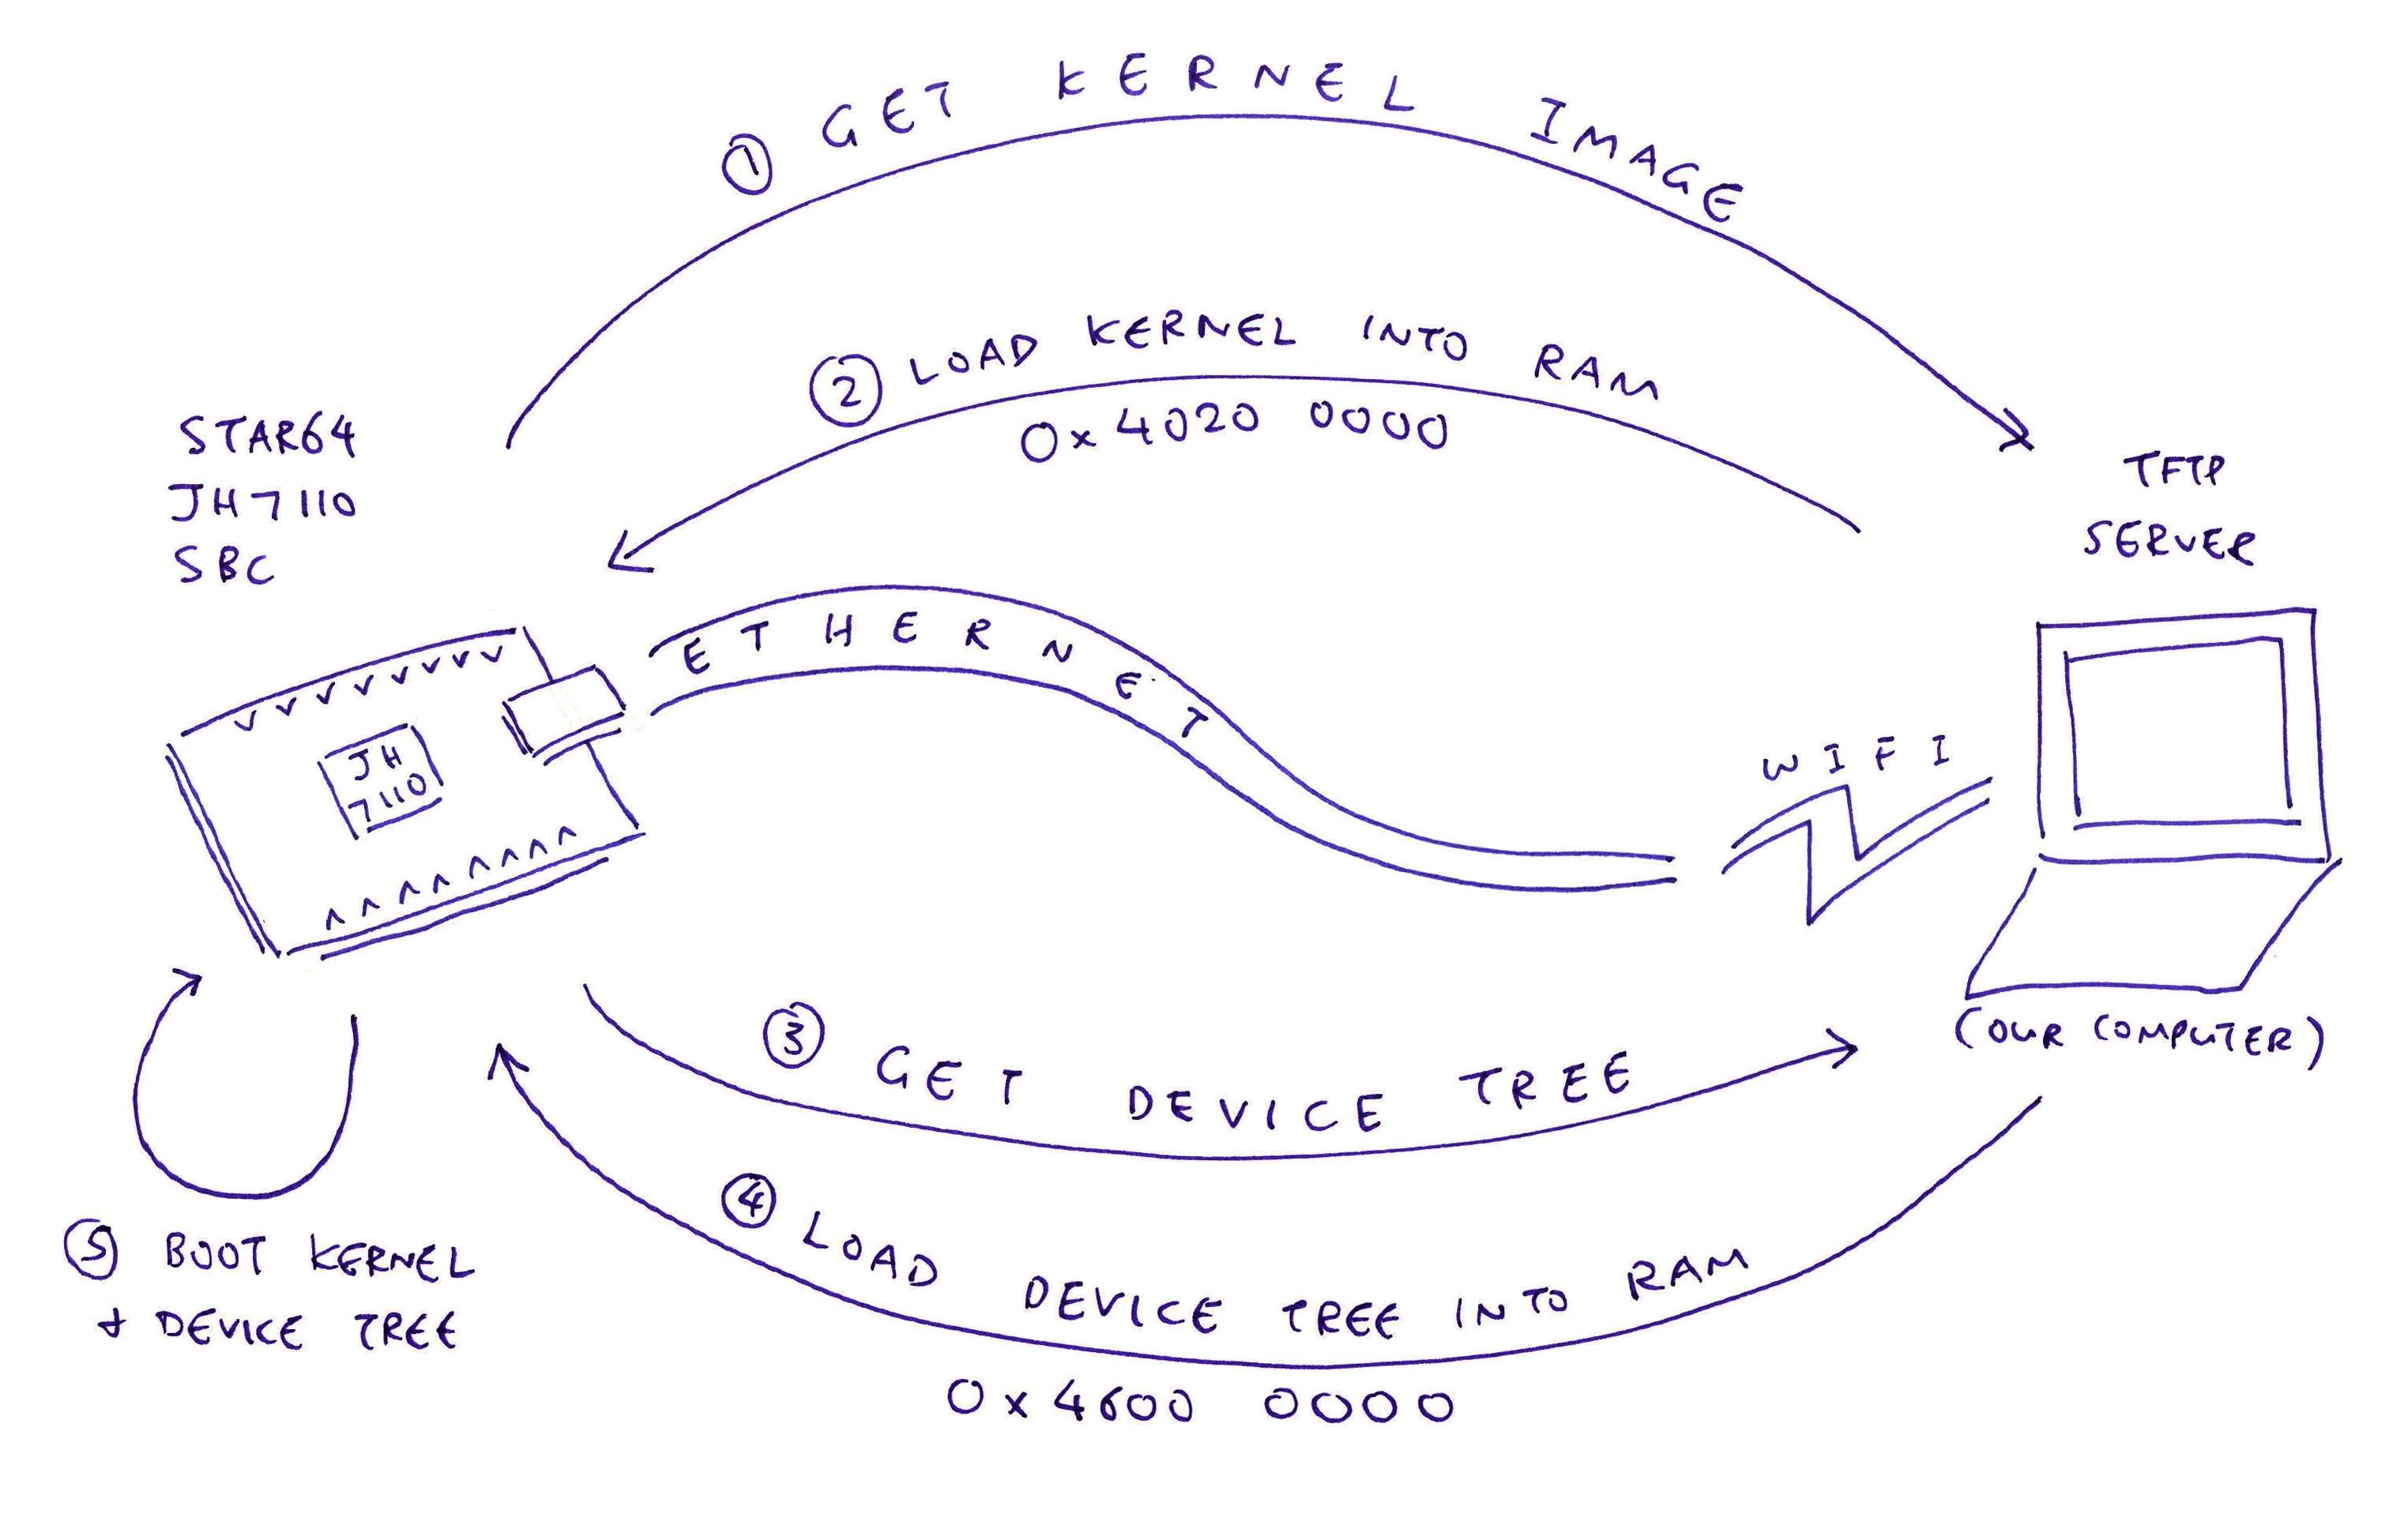
The pic above shows our Grand Plan for today…
We’ll install TFTP Server on our Computer
(Which will provide the Kernel Image and Device Tree for Star64)
Star64 SBC will fetch the Kernel Image from our Computer
(NuttX or Linux)
Our SBC will load the Kernel into RAM
(At RAM Address 0x4020 0000)
Star64 will fetch the Linux Device Tree from our Computer
(NuttX doesn’t need it, but we’ll do it anyway)
Our SBC will load the Device Tree into RAM
(At RAM Address 0x4600 0000)
Our SBC will also fetch and load the Initial RAM Disk
(At RAM Address 0x4610 0000)
Star64 will boot the Kernel from RAM, with the Device Tree and Initial RAM Disk
(NuttX or Linux)
We’ll configure the SBC to do this every time it powers on
(It will try MicroSD first, before the Network Boot)
Do we install anything on our SBC?
Everything we need is already in the Internal Flash Memory of our SBC!
Inside our SBC Flash Memory is the U-Boot Bootloader. Which normally boots from MicroSD, but can be configured for Network Boot.
Let’s find out how…
What’s this TFTP Server? (Pic above)
That’s a simple program (running on our Computer) that handles the Trivial File Transfer Protocol (TFTP).
It dishes out files over the Local Network (via UDP not TCP), when requested by our SBC.
Follow these steps to install the tftpd TFTP Server on our Linux / macOS / Windows Computer…
## Install `tftpd` in Rust
cargo install tftpd

## Create a folder for the TFTP Files
mkdir $HOME/tftproot

## Start the TFTP Server. Needs `sudo` because
## Port 69 is a privileged low port.
## Send Duplicate Packets to prevent TFTP Timeouts.
## https://lupyuen.codeberg.page/articles/tftp2#send-everything-twice
sudo $HOME/.cargo/bin/tftpd \
  --duplicate-packets 1 \
  -i 0.0.0.0 \
  -p 69 \
  -d "$HOME/tftproot"

## Or use `nohup` to keep it running continuously
nohup sudo $HOME/.cargo/bin/tftpd --duplicate-packets 1 -i 0.0.0.0 -p 69 -d "$HOME/tftproot" &
tail -f nohup.out(duplicate-packets is needed to prevent TFTP Timeouts)
(xinetd + tftpd might cause TFTP Timeouts)
(tftp_server won’t work, it only supports localhost)
We should see…
Running TFTP Server on 0.0.0.0:69 in $HOME/tftproot

## Later we'll see the dishy files...
## Sending a.txt to 127.0.0.1:57125
##   Sent a.txt to 127.0.0.1:57125
## Sending a.txt to 192.168.x.x:33499
##   Sent a.txt to 192.168.x.x:33499
Let’s test the server…
## Create a Test File for TFTP
echo Test123 >$HOME/tftproot/a.txt

## Fetch the Test File over TFTP.
## TODO: Change `192.168.x.x` to our Computer's IP Address
curl -v tftp://127.0.0.1/a.txt
curl -v tftp://192.168.x.x/a.txt(localhost won’t work because of IPv6, I think)
We should see our Test File…
* Trying 192.168.x.x:69...
* getpeername() failed with errno 107: Transport endpoint is not connected
* Connected to 192.168.x.x () port 69 (#0)
* getpeername() failed with errno 107: Transport endpoint is not connected
* set timeouts for state 0; Total  300000, retry 6 maxtry 50
...
Test123
(Ignore the warnings)
Our TFTP Server is up! In olden days we would actually do this…
$ tftp 127.0.0.1
tftp> get a.txt
Received 8 bytes in 0.0 seconds
tftp> quitBut curl is so much simpler!
How to copy the Kernel to our TFTP Server?
We build Apache NuttX RTOS with these steps…
This produces the NuttX Kernel Image nuttx.bin that we’ll copy to our TFTP Folder…
## Copy NuttX Binary Image `nuttx.bin` to TFTP Folder
cp nuttx.bin $HOME/tftproot/Image

## Test NuttX Binary Image over TFTP.
## TODO: Change `192.168.x.x` to our Computer's IP Address
curl -v tftp://192.168.x.x/Image

## We should see:
## `Warning: Binary output can mess up your terminal`
For Linux: Copy the Linux Kernel File Image to our TFTP Folder.
What about the Linux Device Tree?
(NuttX won’t need it, but let’s do it anyway)
For NuttX: Copy the Device Tree jh7110-visionfive-v2.dtb from the StarFive VisionFive2 Software Releases to our TFTP Folder…
## Download the Device Tree for VisionFive2
wget https://github.com/starfive-tech/VisionFive2/releases/download/VF2_v3.1.5/jh7110-visionfive-v2.dtb

## Rename the Device Tree to Star64
cp \
  jh7110-visionfive-v2.dtb \
  jh7110-star64-pine64.dtb

## Copy to TFTP Folder
cp jh7110-star64-pine64.dtb $HOME/tftproot

## Test the Device Tree over TFTP
## TODO: Change `192.168.x.x` to our Computer's IP Address
curl -v tftp://192.168.x.x/jh7110-star64-pine64.dtb

## We should see:
## `Warning: Binary output can mess up your terminal`
For Linux: Just copy the Linux Device Tree jh7110-star64-pine64.dtb to our TFTP Folder.
Finally we copy the Initial RAM Disk “initrd” (NuttX or Linux) to our TFTP Folder…
## Copy Initial RAM Disk to TFTP Folder
cp initrd $HOME/tftproot

## Test the Initial RAM Disk over TFTP
## TODO: Change `192.168.x.x` to our Computer's IP Address
curl -v tftp://192.168.x.x/initrd

## We should see:
## `Warning: Binary output can mess up your terminal`
Let’s test this…
We’re ready to test U-Boot Bootloader with TFTP!
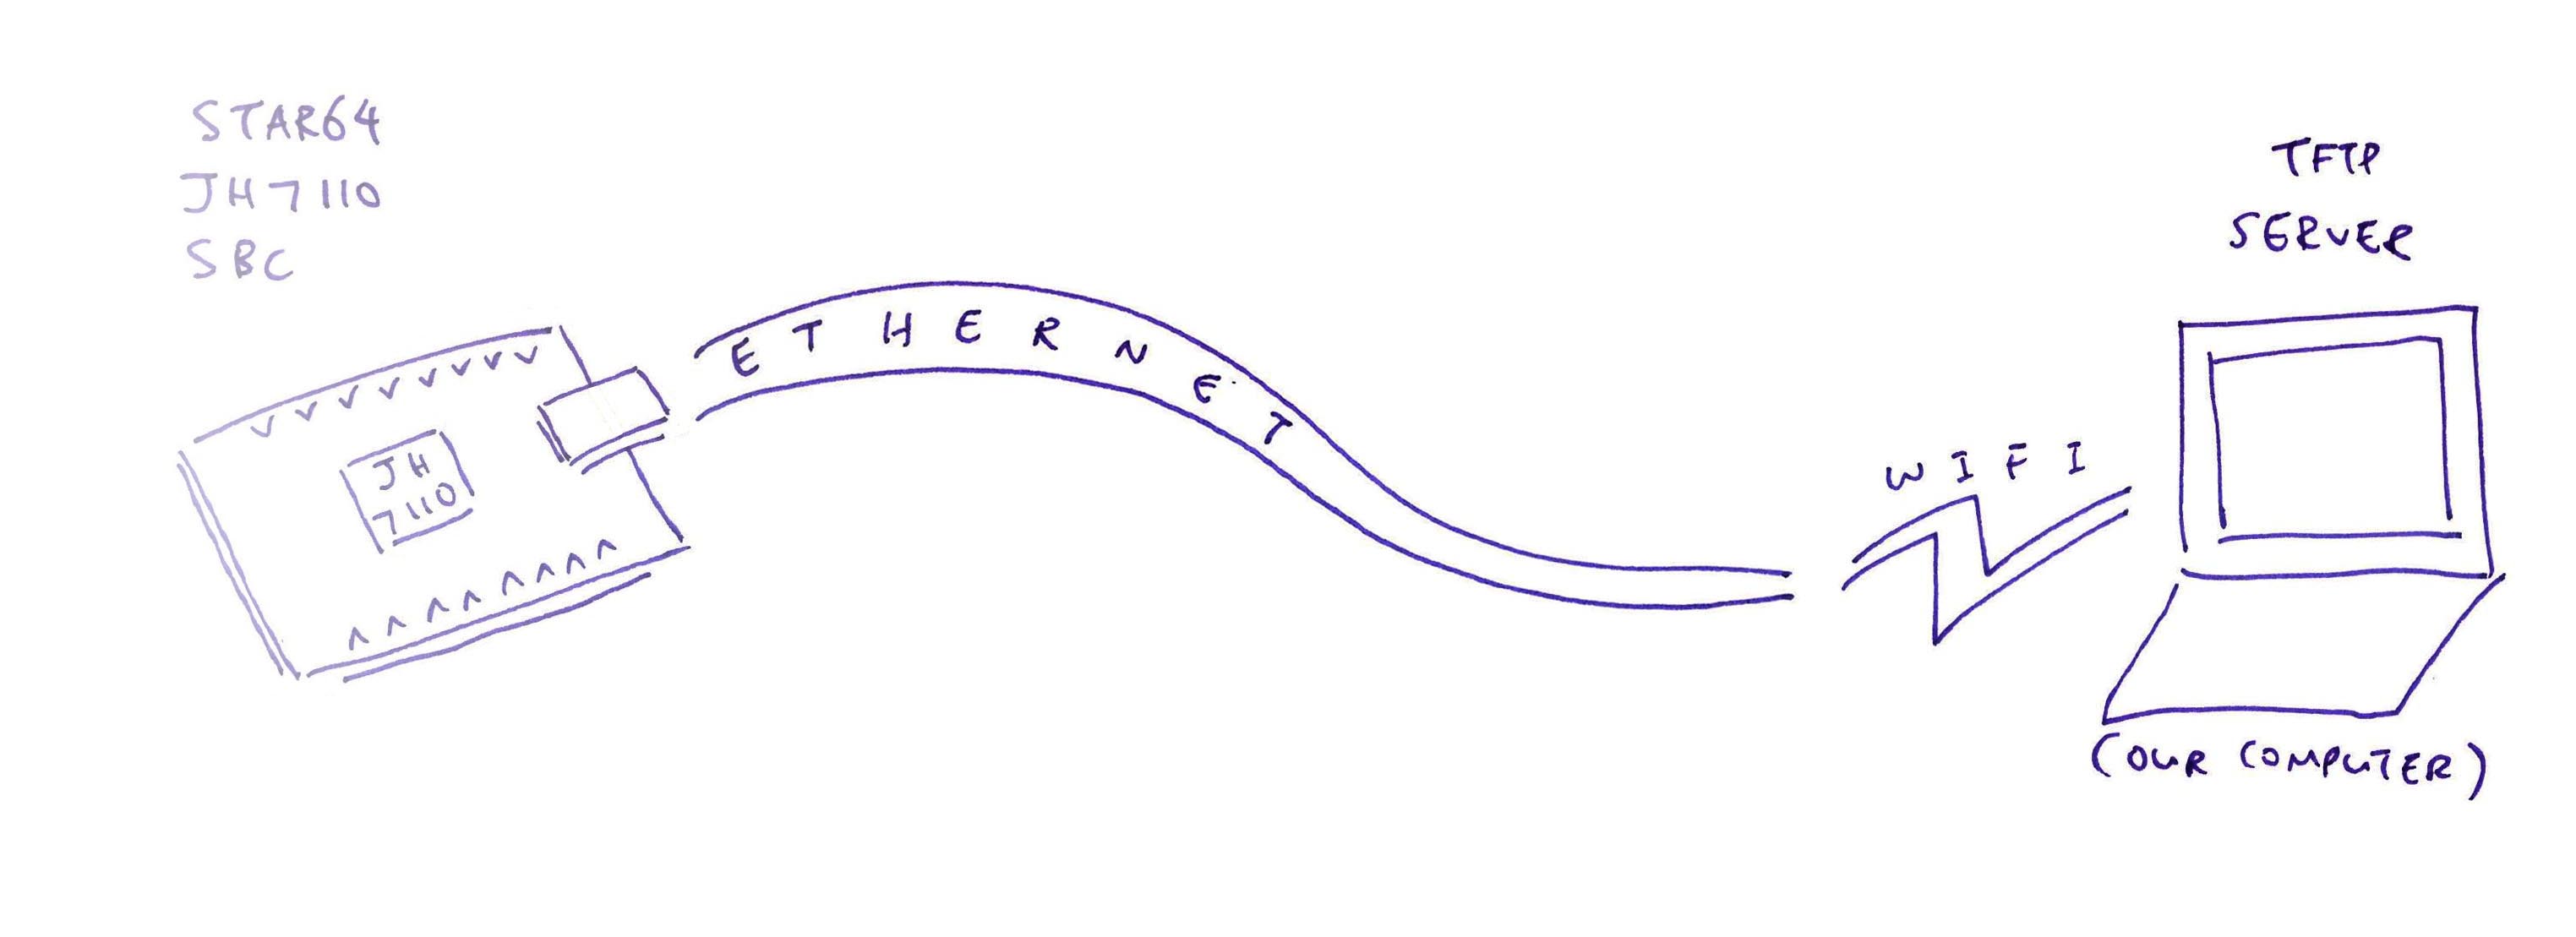
Connect Star64 to the Ethernet Wired Network. (Pic above)
Connect to the Serial Console and power up without a MicroSD Card.
Star64 fails to boot over the network, but that’s OK…
BOOTP broadcast 1
  *** Unhandled DHCP Option in OFFER/ACK: 43
  DHCP client bound to address 192.168.x.x (351 ms)

TFTP from server 192.168.x.x; our IP address is 192.168.x.x
  Filename 'boot.scr.uimg'.

Load address: 0x43900000
  TFTP server died; starting again

Load address: 0x40200000
  TFTP server died; starting again

StarFive #That’s because we don’t have a BOOTP Server or a DHCP+TFTP Combo Server.
Since we have a Dedicated TFTP Server, we run these U-Boot Commands at the prompt…
## Set the TFTP Server IP
## TODO: Change `192.168.x.x` to our Computer's IP Address
setenv tftp_server 192.168.x.x

## Assume Initial RAM Disk is max 16 MB
setenv ramdisk_size 0x1000000

## Load the NuttX Image from TFTP Server
## kernel_addr_r=0x40200000
## tftp_server=192.168.x.x
tftpboot ${kernel_addr_r} ${tftp_server}:Image

## Load the Device Tree from TFTP Server
## fdt_addr_r=0x46000000
## tftp_server=192.168.x.x
tftpboot ${fdt_addr_r} ${tftp_server}:jh7110-star64-pine64.dtb

## Set the RAM Address of Device Tree
## fdt_addr_r=0x46000000
fdt addr ${fdt_addr_r}

## Load Initial RAM Disk over TFTP
## ramdisk_addr_r=0x46100000
## tftp_server=192.168.x.x
tftpboot ${ramdisk_addr_r} ${tftp_server}:initrd

## Boot the NuttX Image with the Initial RAM Disk and Device Tree
## kernel_addr_r=0x40200000
## ramdisk_addr_r=0x46100000
## ramdisk_size=0x1000000
## fdt_addr_r=0x46000000
booti ${kernel_addr_r} ${ramdisk_addr_r}:${ramdisk_size} ${fdt_addr_r}Our Star64 SBC shall (pic above)…
Fetch the Kernel over TFTP
Load the Kernel into RAM
Fetch the Device Tree over TFTP
Load the Device Tree into RAM
Load the Initial RAM Disk into RAM
Boot the Kernel
Like so…
$ setenv tftp_server 192.168.x.x

$ setenv ramdisk_size 0x1000000

$ tftpboot ${kernel_addr_r} ${tftp_server}:Image
Filename 'Image'.
Load address: 0x40200000
Loading: 221.7 KiB/s done
Bytes transferred = 2097832 (2002a8 hex)

$ tftpboot ${fdt_addr_r} ${tftp_server}:jh7110-star64-pine64.dtb
Filename 'jh7110-star64-pine64.dtb'.
Load address: 0x46000000
Loading: 374 KiB/s done
Bytes transferred = 50235 (c43b hex)

$ fdt addr ${fdt_addr_r}

$ tftpboot ${ramdisk_addr_r} ${tftp_server}:initrd
Filename 'initrd'.
Load address: 0x46100000
Loading: 189.5 KiB/s done
Bytes transferred = 8020992 (7a6400 hex)

$ booti ${kernel_addr_r} ${ramdisk_addr_r}:${ramdisk_size} ${fdt_addr_r}
Flattened Device Tree blob at 46000000
Booting using the fdt blob at 0x46000000
Using Device Tree in place at 0000000046000000, end 000000004600f43a(It might load quicker if we connect our Computer to the Ethernet Wired Network, instead of WiFi)
And NuttX (or Linux) boots magically over the Network, no more MicroSD yay!
Starting kernel ...
clk u5_dw_i2c_clk_core already disabled
clk u5_dw_i2c_clk_apb already disabled
123067DFAGHBC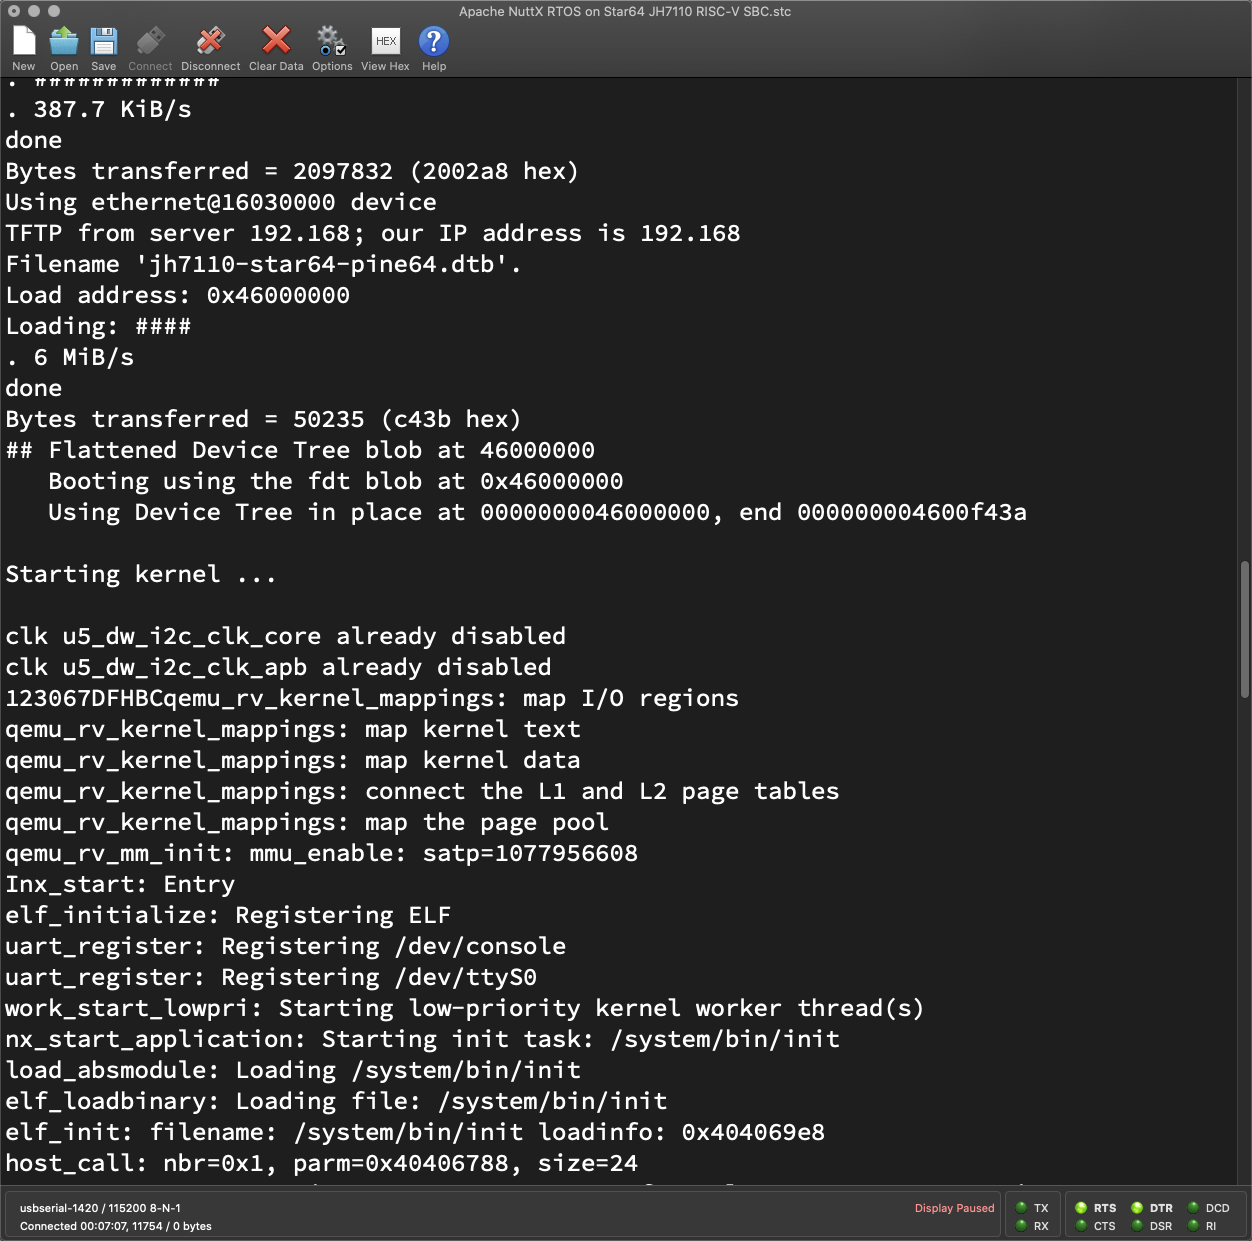
But can we Auto-Boot from Network, every time we power on?
Sure can! The trick is to use the saveenv command, which will save the U-Boot Settings into the Internal Flash Memory…
## Remember the TFTP Server IP.
## TODO: Change `192.168.x.x` to our Computer's IP Address
setenv tftp_server 192.168.x.x
## Check that it's correct
printenv tftp_server
## Save it for future reboots
saveenv

## Assume Initial RAM Disk is max 16 MB
setenv ramdisk_size 0x1000000
## Check that it's correct
printenv ramdisk_size
## Save it for future reboots
saveenv

## Add the Boot Command for TFTP
setenv bootcmd_tftp 'if tftpboot ${kernel_addr_r} ${tftp_server}:Image ; then if tftpboot ${fdt_addr_r} ${tftp_server}:jh7110-star64-pine64.dtb ; then if fdt addr ${fdt_addr_r} ; then if tftpboot ${ramdisk_addr_r} ${tftp_server}:initrd ; then booti ${kernel_addr_r} ${ramdisk_addr_r}:${ramdisk_size} ${fdt_addr_r} ; fi ; fi ; fi ; fi'
## Check that it's correct
printenv bootcmd_tftp
## Save it for future reboots
saveenv

## Test the Boot Command for TFTP, then reboot
run bootcmd_tftp

## Remember the Original Boot Targets
setenv orig_boot_targets "$boot_targets"
## Should show `mmc0 dhcp`
printenv boot_targets
## Save it for future reboots
saveenv

## Add TFTP to the Boot Targets
setenv boot_targets "$boot_targets tftp"
## Should show `mmc0 dhcp  tftp`
printenv boot_targets
## Save it for future reboots
saveenvNow Star64 will Auto-Boot from the Network, every time we power up! (Pic above)
(Watch the Demo Video on YouTube)
(It will try to boot from MicroSD before Network)
What if we change our mind?
We can switch back to the Original Boot Targets…
## Restore the Boot Targets
setenv boot_targets "$orig_boot_targets"
## Should show `mmc0 dhcp`
printenv boot_targets
## Save it for future reboots
saveenv
What’s boot_targets?
U-Boot Bootloader defines a list of Targets for Auto-Booting…
## On Power Up: Try booting from MicroSD,
## then from DHCP+TFTP Combo Server
boot_targets=mmc0 dhcp
We added TFTP to the Boot Targets (pardon the space)…
## We added TFTP to the Boot Targets
boot_targets=mmc0 dhcp  tftp
Thus U-Boot will execute our TFTP Boot Script bootcmd_tftp at startup.
What’s bootcmd_tftp?
bootcmd_tftp expands to this U-Boot Script…
## Load the NuttX Image from TFTP Server
## kernel_addr_r=0x40200000
## tftp_server=192.168.x.x
if tftpboot ${kernel_addr_r} ${tftp_server}:Image;
then

  ## Load the Device Tree from TFTP Server
  ## fdt_addr_r=0x46000000
  if tftpboot ${fdt_addr_r} ${tftp_server}:jh7110-star64-pine64.dtb;
  then

    ## Set the RAM Address of Device Tree
    ## fdt_addr_r=0x46000000
    if fdt addr ${fdt_addr_r};
    then

      ## Load the Intial RAM Disk from TFTP Server
      ## ramdisk_addr_r=0x46100000
      if tftpboot ${ramdisk_addr_r} ${tftp_server}:initrd;
      then

        ## Boot the NuttX Image with the Initial RAM Disk and Device Tree
        ## kernel_addr_r=0x40200000
        ## ramdisk_addr_r=0x46100000
        ## ramdisk_size=0x1000000
        ## fdt_addr_r=0x46000000
        booti ${kernel_addr_r} ${ramdisk_addr_r}:${ramdisk_size} ${fdt_addr_r};
      fi;
    fi;
  fi;
fiWhich does the same thing as the previous section: Boot NuttX (or Linux) over the Network at startup.
Hmmm why do we see TFTP Timeouts?
Yeah frequent TFTP Timeouts (“T” below) are affecting our NuttX Testing on Star64 JH7110 SBC. Effective Transfer Rate is only 430 kbps!
Loading: . ##############T ###################################################
. ####################T #########T ####################################
. 53.7 KiB/sCheck out the solution here…
Home Assistant controls our Smart Power Plug
With Network Boot running, we’re now ready for Automated Testing of Apache NuttX RTOS on Star64 SBC!
(With a Smart Power Plug and Home Assistant to reboot our SBC)
Porting NuttX to Star64 JH7110 becomes so much faster. Stay tuned for updates!
Many Thanks to my GitHub Sponsors for supporting my work! This article wouldn’t have been possible without your support.
Got a question, comment or suggestion? Create an Issue or submit a Pull Request here…
Earlier we saw boot_targets and bootcmd_tftp. How do they work?
We talked about boot_targets and bootcmd_tftp…
Let’s figure out how they will Auto-Boot NuttX (or Linux) from the Network…
At startup, U-Boot Bootloader always executes the Boot Script in bootcmd.
bootcmd is set to…
## Load the VisionFive 2 Environment from MMC
run load_vf2_env;

## Load the Boot Environment from MMC
run importbootenv;

## Load the Distro Environment from MMC
run load_distro_uenv;

## Run the `boot2` script (missing)
run boot2;

## For every Boot Target:
## Run the Boot Command
run distro_bootcmdWhich executes distro_bootcmd
distro_bootcmd is set to…
## For Every Boot Target...
for target in ${boot_targets};

  ## Run the Boot Command for the Target
  do run bootcmd_${target};
donePreviously we changed boot_targets to…
mmc0 dhcp tftpWhich means U-Boot will execute this sequence…
bootcmd_mmc0: Try to boot from MicroSD
(See below)
bootcmd_dhcp: Try to boot from DHCP+TFTP Combo Server
(See below)
bootcmd_tftp: Try to boot from TFTP
We saw bootcmd_tftp earlier…
It boots NuttX (or Linux) over the Network via TFTP.
And that’s how U-Boot Bootloader boots NuttX (or Linux) over the Network at startup!
Note: Don’t use the special variable serverip, it will change after running tftpboot!
What’s in bootcmd_mmc0?
bootcmd_mmc0 tries to boot from MicroSD…
## Set Device Number
devnum=0;

## Boot from MMC
run mmc_bootmmc_boot is…
if mmc dev ${devnum};
then
  devtype=mmc;
  run scan_dev_for_boot_part;
fi;

mmcbootenv=run scan_mmc_dev;
setenv bootpart ${devnum}:${mmcpart};

if mmc rescan;
then
  run loadbootenv && run importbootenv;
  run ext4bootenv && run importbootenv;

  if test -n $uenvcmd;
  then
    echo Running uenvcmd ...;
    run uenvcmd;
  fi;
fiWhat about bootcmd_dhcp?
bootcmd_dhcp tries to boot from DHCP+TFTP Combo Server.
It assumes that the DHCP Server is also a TFTP Server.
(We should probably disable autoload)
bootcmd_dhcp is set to…
devtype=dhcp;

## Load the Boot Script from DHCP+TFTP Server
## scriptaddr=0x43900000
## boot_script_dhcp=boot.scr.uimg
if dhcp ${scriptaddr} ${boot_script_dhcp};
then
  source ${scriptaddr};
fi;

## Set the EFI Variables
## fdtfile=starfive/starfive_visionfive2.dtb
setenv efi_fdtfile ${fdtfile};
setenv efi_old_vci ${bootp_vci};
setenv efi_old_arch ${bootp_arch};
setenv bootp_vci PXEClient:Arch:00027:UNDI:003000;
setenv bootp_arch 0x1b;

## Load the Kernel Image from DHCP+TFTP Server...
## kernel_addr_r=0x40200000
if dhcp ${kernel_addr_r};
then

  ## Load the Device Tree from the DHCP+TFTP Server
  ## fdt_addr_r=0x46000000
  ## efi_fdtfile=starfive/starfive_visionfive2.dtb
  tftpboot ${fdt_addr_r} dtb/${efi_fdtfile};

  ## Set the RAM Address of Device Tree
  ## fdt_addr_r=0x46000000
  if fdt addr ${fdt_addr_r};
  then

    ## Boot the EFI Kernel Image
    ## fdt_addr_r=0x46000000
    bootefi ${kernel_addr_r} ${fdt_addr_r};
  else

    ## Boot the EFI Kernel Image
    ## fdtcontroladdr=fffc6aa0
    bootefi ${kernel_addr_r} ${fdtcontroladdr};
  fi;
fi;

## Unset the EFI Variables
setenv bootp_vci ${efi_old_vci};
setenv bootp_arch ${efi_old_arch};
setenv efi_fdtfile;
setenv efi_old_arch;
setenv efi_old_vci;We used this as the template for our TFTP Boot Script bootcmd_tftp.
We talked about the U-Boot Bootloader in previous articles…
Below are the U-Boot Bootloader Commands mentioned in this article.
We ran “help <command>” to explain the commands…
dhcp - boot image via network using DHCP/TFTP protocol
tftpboot - boot image via network using TFTP protocol
(Same as dhcp Command?)
Note: Don’t use the special variable serverip, it will change after running tftpboot!
booti - boot Linux kernel ‘Image’ format from memory
booti [addr [initrd[:size]] [fdt]]
boot Linux flat or compressed ‘Image’ stored at ‘addr’
The argument ‘initrd’ is optional and specifies the address of an initrd in memory. The optional parameter ‘:size’ allows specifying the size of a RAW initrd.
Currently only booting from gz, bz2, lzma and lz4 compression types are supported. In order to boot from any of these compressed images, user have to set kernel_comp_addr_r and kernel_comp_size environment variables beforehand.
Since booting a Linux kernel requires a flat device-tree, a third argument providing the address of the device-tree blob is required. To boot a kernel with a device-tree blob but without an initrd image, use a ‘-’ for the initrd argument.
bootefi - Boots an EFI payload from memory
bootefi <image address> [fdt address]
boot EFI payload stored at address <image address>.
If specified, the device tree located at <fdt address> gets exposed as EFI configuration table.
bootefi bootmgr [fdt address]
load and boot EFI payload based on BootOrder/BootXXXX variables.
If specified, the device tree located at <fdt address> gets exposed as EFI configuration table.
Will it work for NuttX?
Nope it won’t, since NuttX isn’t a UEFI Binary…
$ bootefi ${kernel_addr_r} ${fdt_addr_r}
Card did not respond to voltage select! : -110
Card did not respond to voltage select! : -110
No EFI system partition
No UEFI binary known at 0x40200000
That’s why we call booti to boot NuttX.
fdt - flattened device tree utility commands
fdt addr [-c] <addr> [<length>]
Set the [control] fdt location to <addr>
fdt apply <addr>
Apply overlay to the DT
fdt move <fdt> <newaddr> <length>
Copy the fdt to <addr> and make it active
fdt resize [<extrasize>]
Resize fdt to size + padding to 4k addr + some optional <extrasize> if needed
fdt print <path> [<prop>]
Recursive print starting at <path>
fdt list <path> [<prop>]
Print one level starting at <path>
fdt get value <var> <path> <prop>
Get <property> and store in <var>
fdt get name <var> <path> <index>
Get name of node <index> and store in <var>
fdt get addr <var> <path> <prop>
Get start address of <property> and store in <var>
fdt get size <var> <path> [<prop>]
Get size of [<property>] or num nodes and store in <var>
fdt set <path> <prop> [<val>]
Set <property> [to <val>]
fdt mknode <path> <node>
Create a new node after <path>
fdt rm <path> [<prop>]
Delete the node or <property>
fdt header [get <var> <member>]
Display header info
get - get header member <member> and store it in <var>
fdt bootcpu <id>
Set boot cpuid
fdt memory <addr> <size>
Add/Update memory node
fdt rsvmem print
Show current mem reserves
fdt rsvmem add <addr> <size>
Add a mem reserve
fdt rsvmem delete <index>
Delete a mem reserves
fdt chosen [<start> <end>]
Add/update the /chosen branch in the tree
<start>/<end> - initrd start/end addr
Note: Dereference aliases by omitting the leading ‘/’, e.g. fdt print ethernet0.