📝 16 Feb 2025
We’re always Making Things Better (and making better things) with Apache NuttX RTOS. Today we talk about our new Test Bot for Pull Requests.
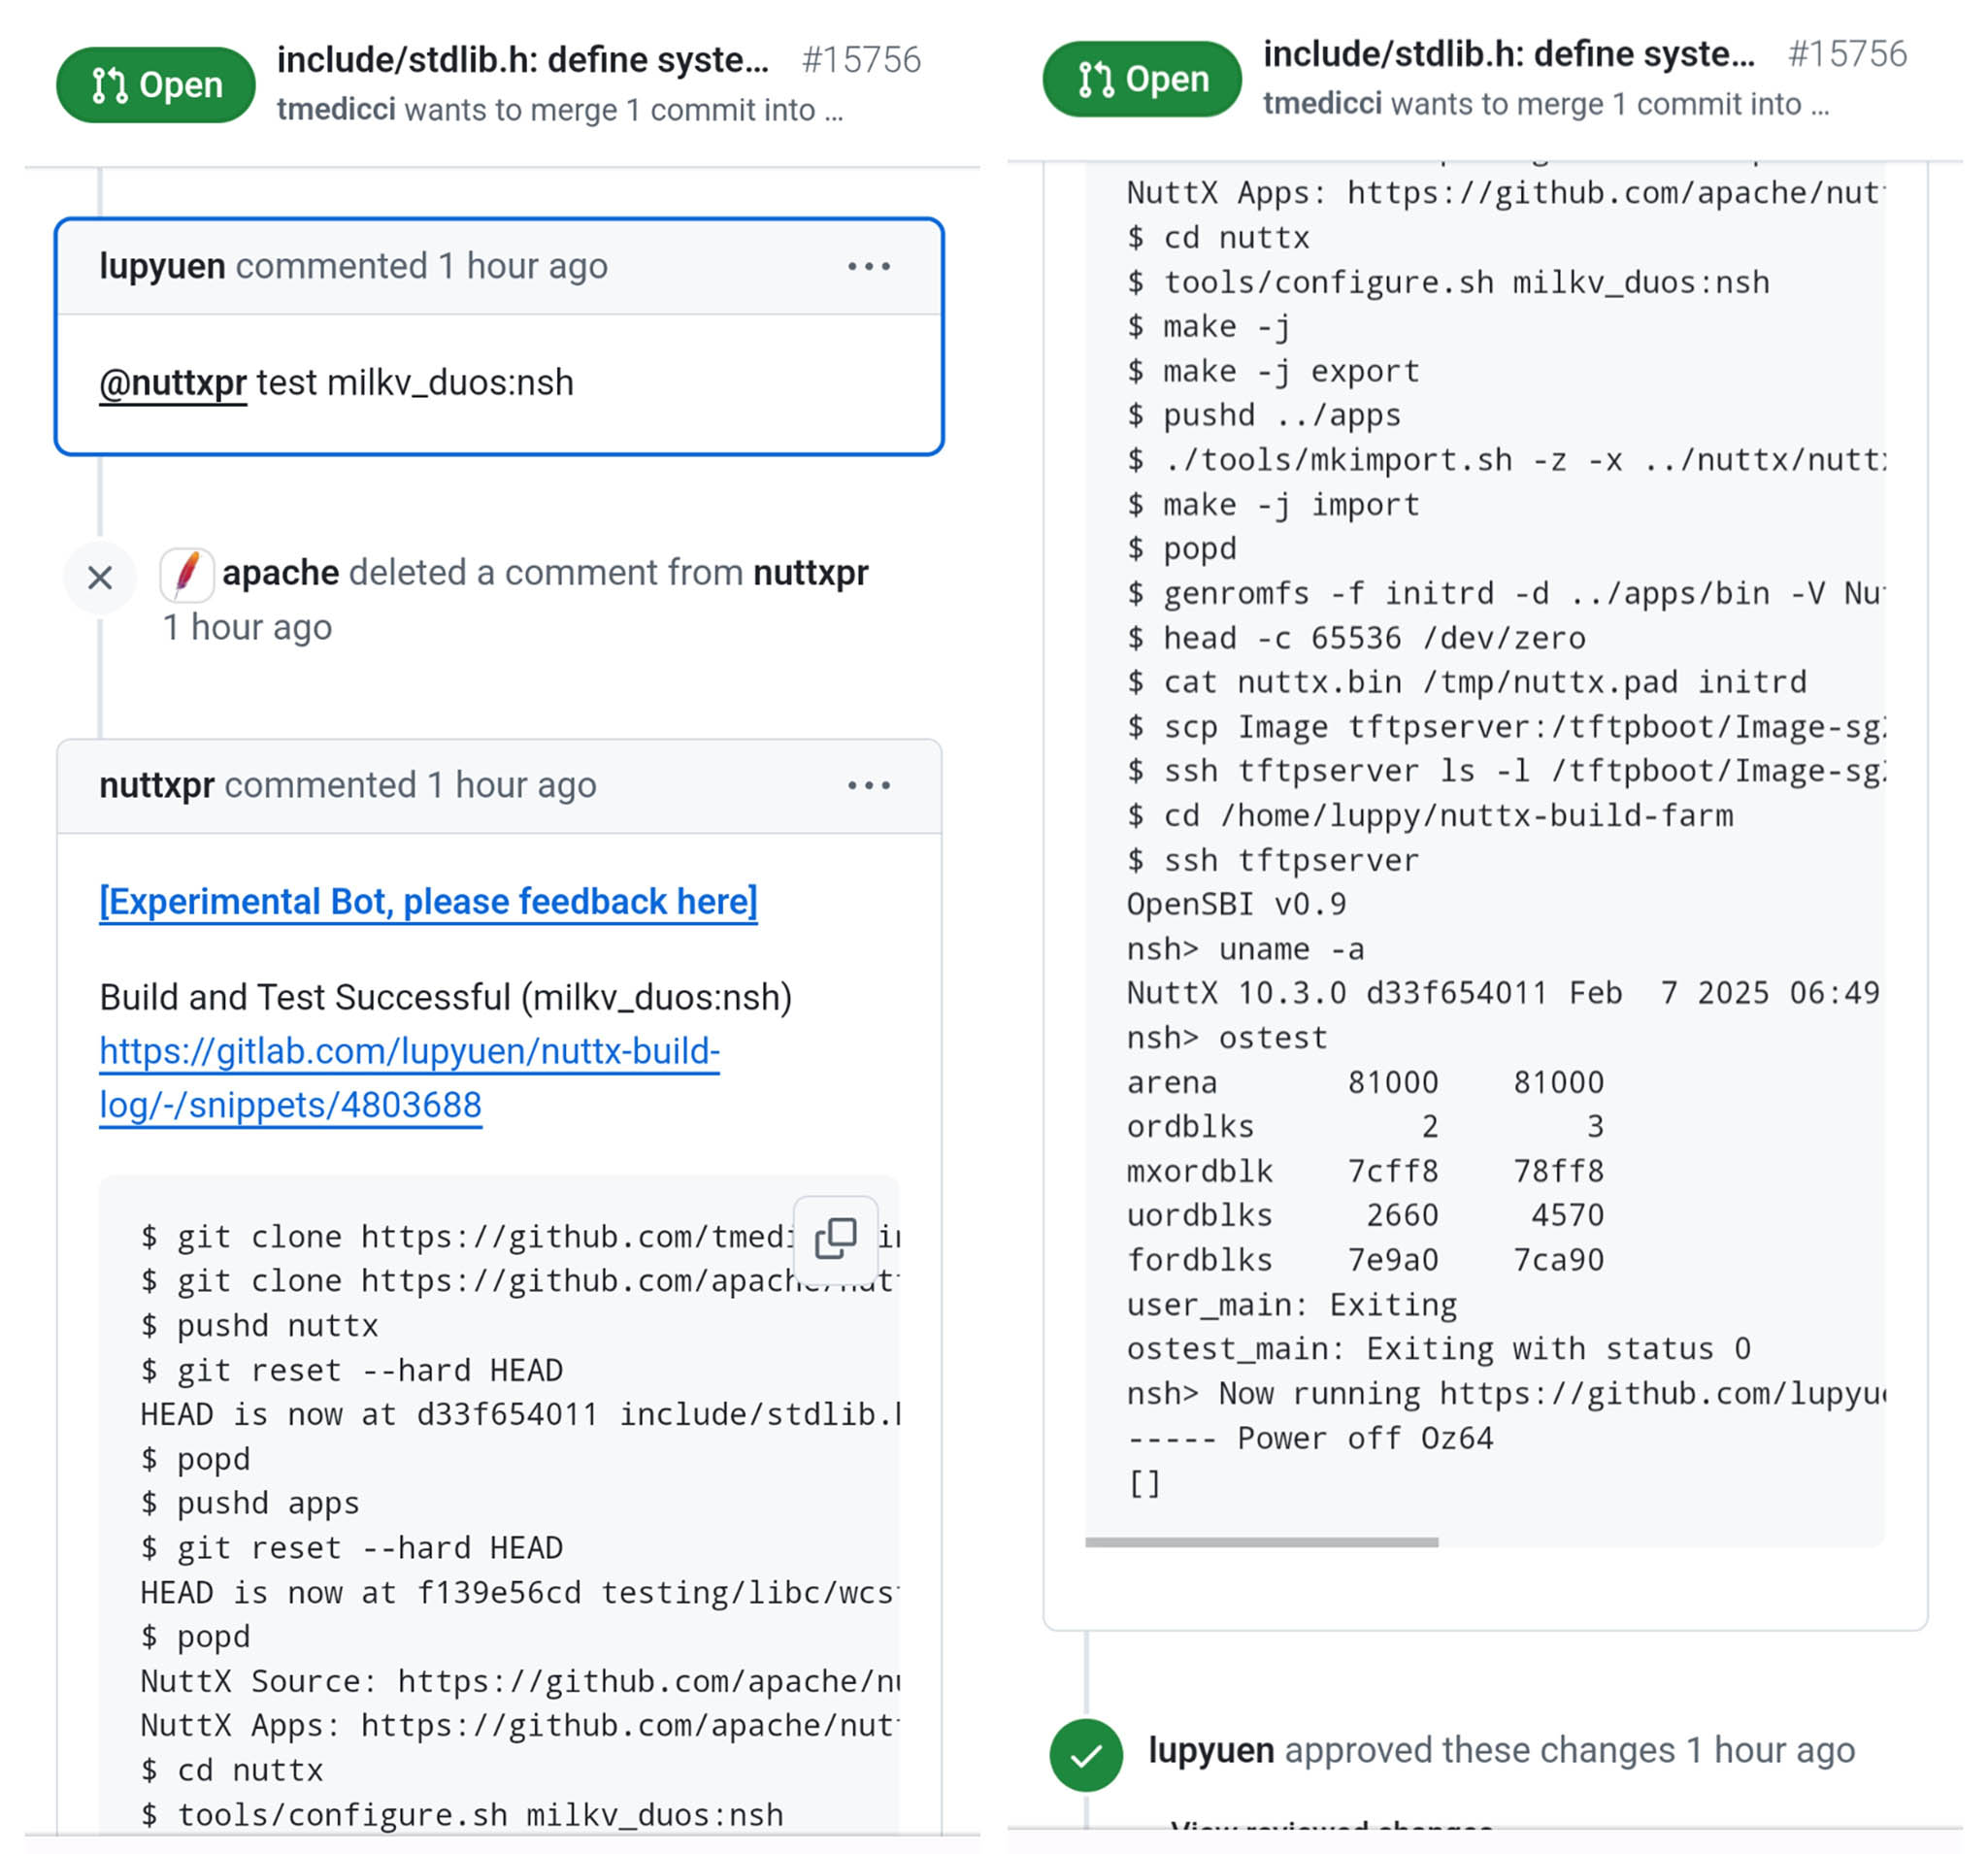
Test Bot shall watch for Comments on Pull Requests and start a NuttX Build + Test on Real Hardware. This PR Comment…
@nuttxpr test oz64:nshWill trigger our PR Test Bot to Download, Build and Test the PR Code on Oz64 SG2000 RISC-V SBC (pic above). Which is mighty helpful for Validating Pull Requests (pic below) before Merging.
Why are we doing this?
Testing a Pull Request on Real Hardware is a Compulsory, Cumbersome Chore. Executed by our Unpaid Volunteers who care about Code Quality. Let’s make it a little less painful! 👍
(Be Mindful: Pull Requests might have Security Concerns)
(Thanks to PINE64 for sponsoring the Oz64 SBC)
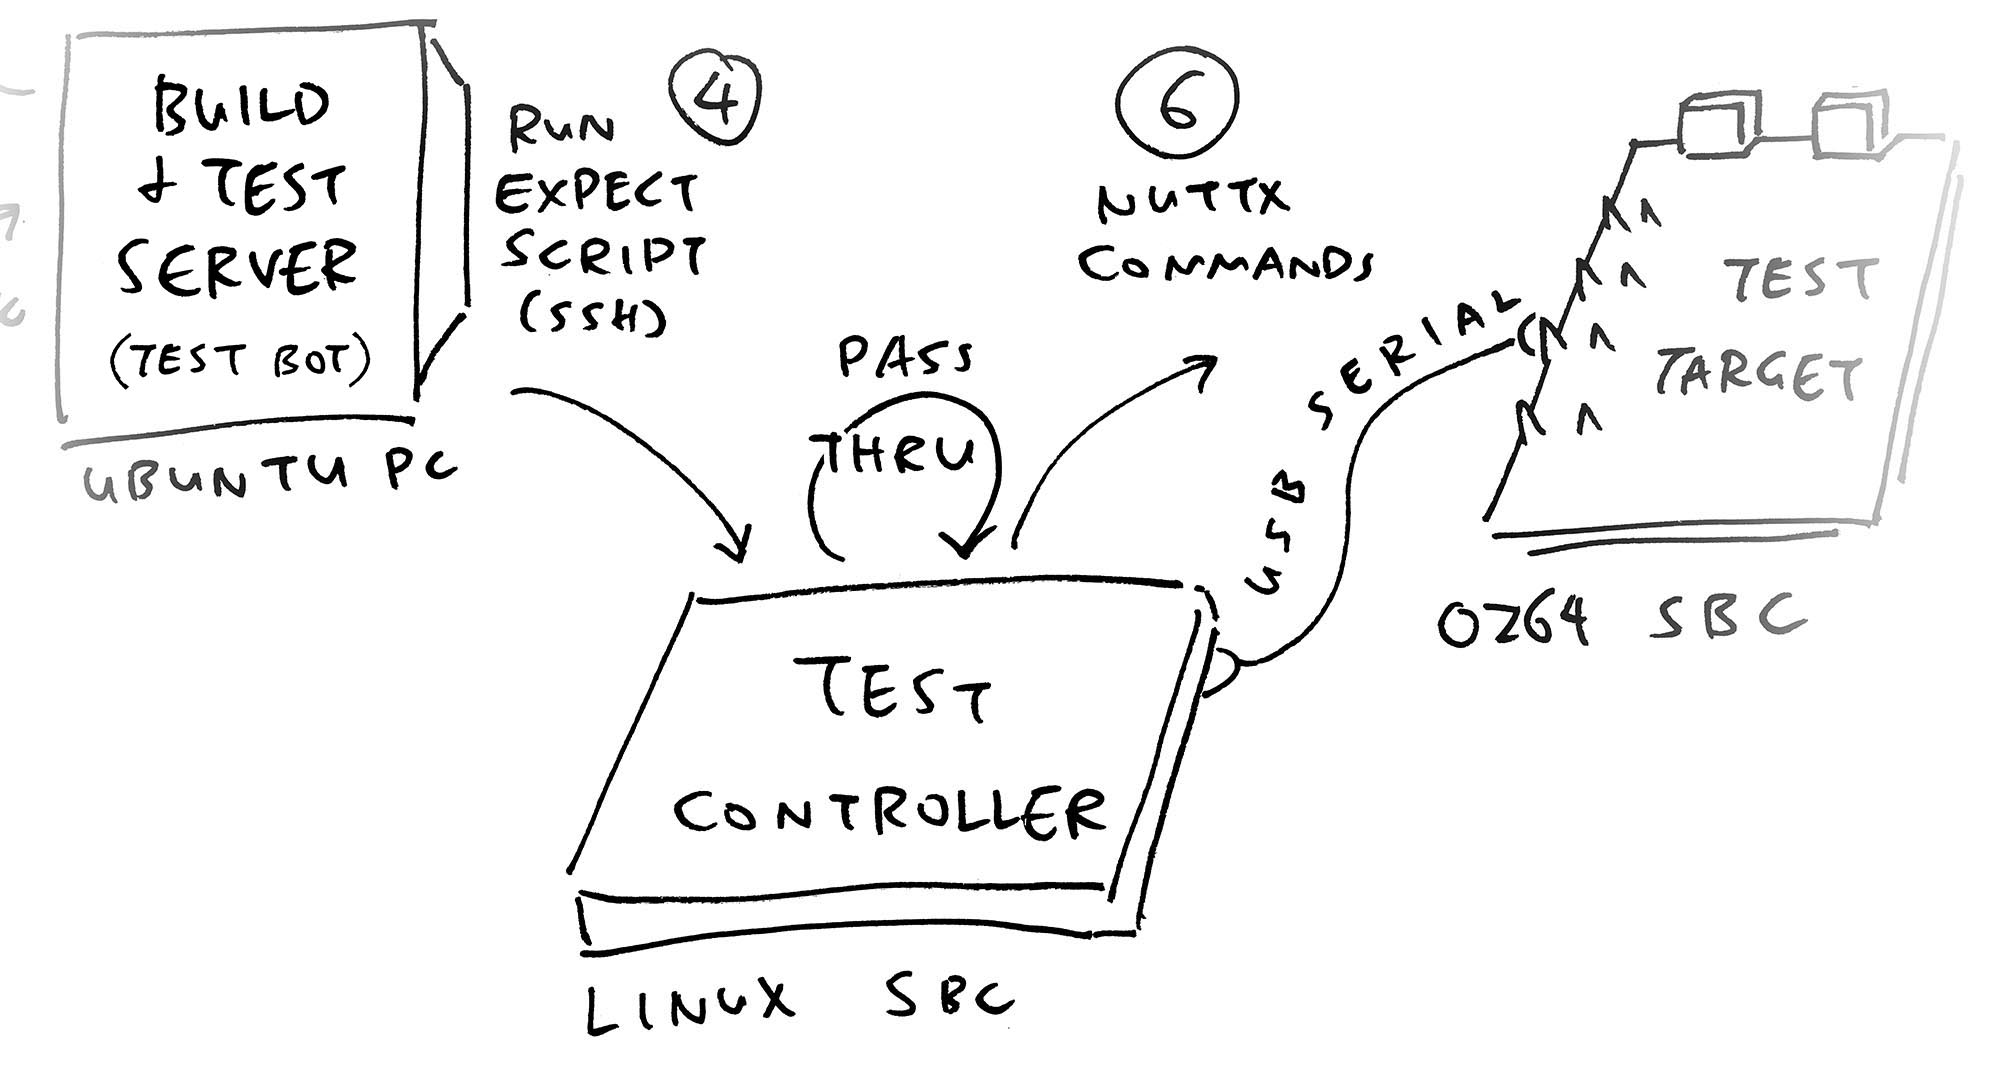
Our Test Bot shall control Oz64. How?
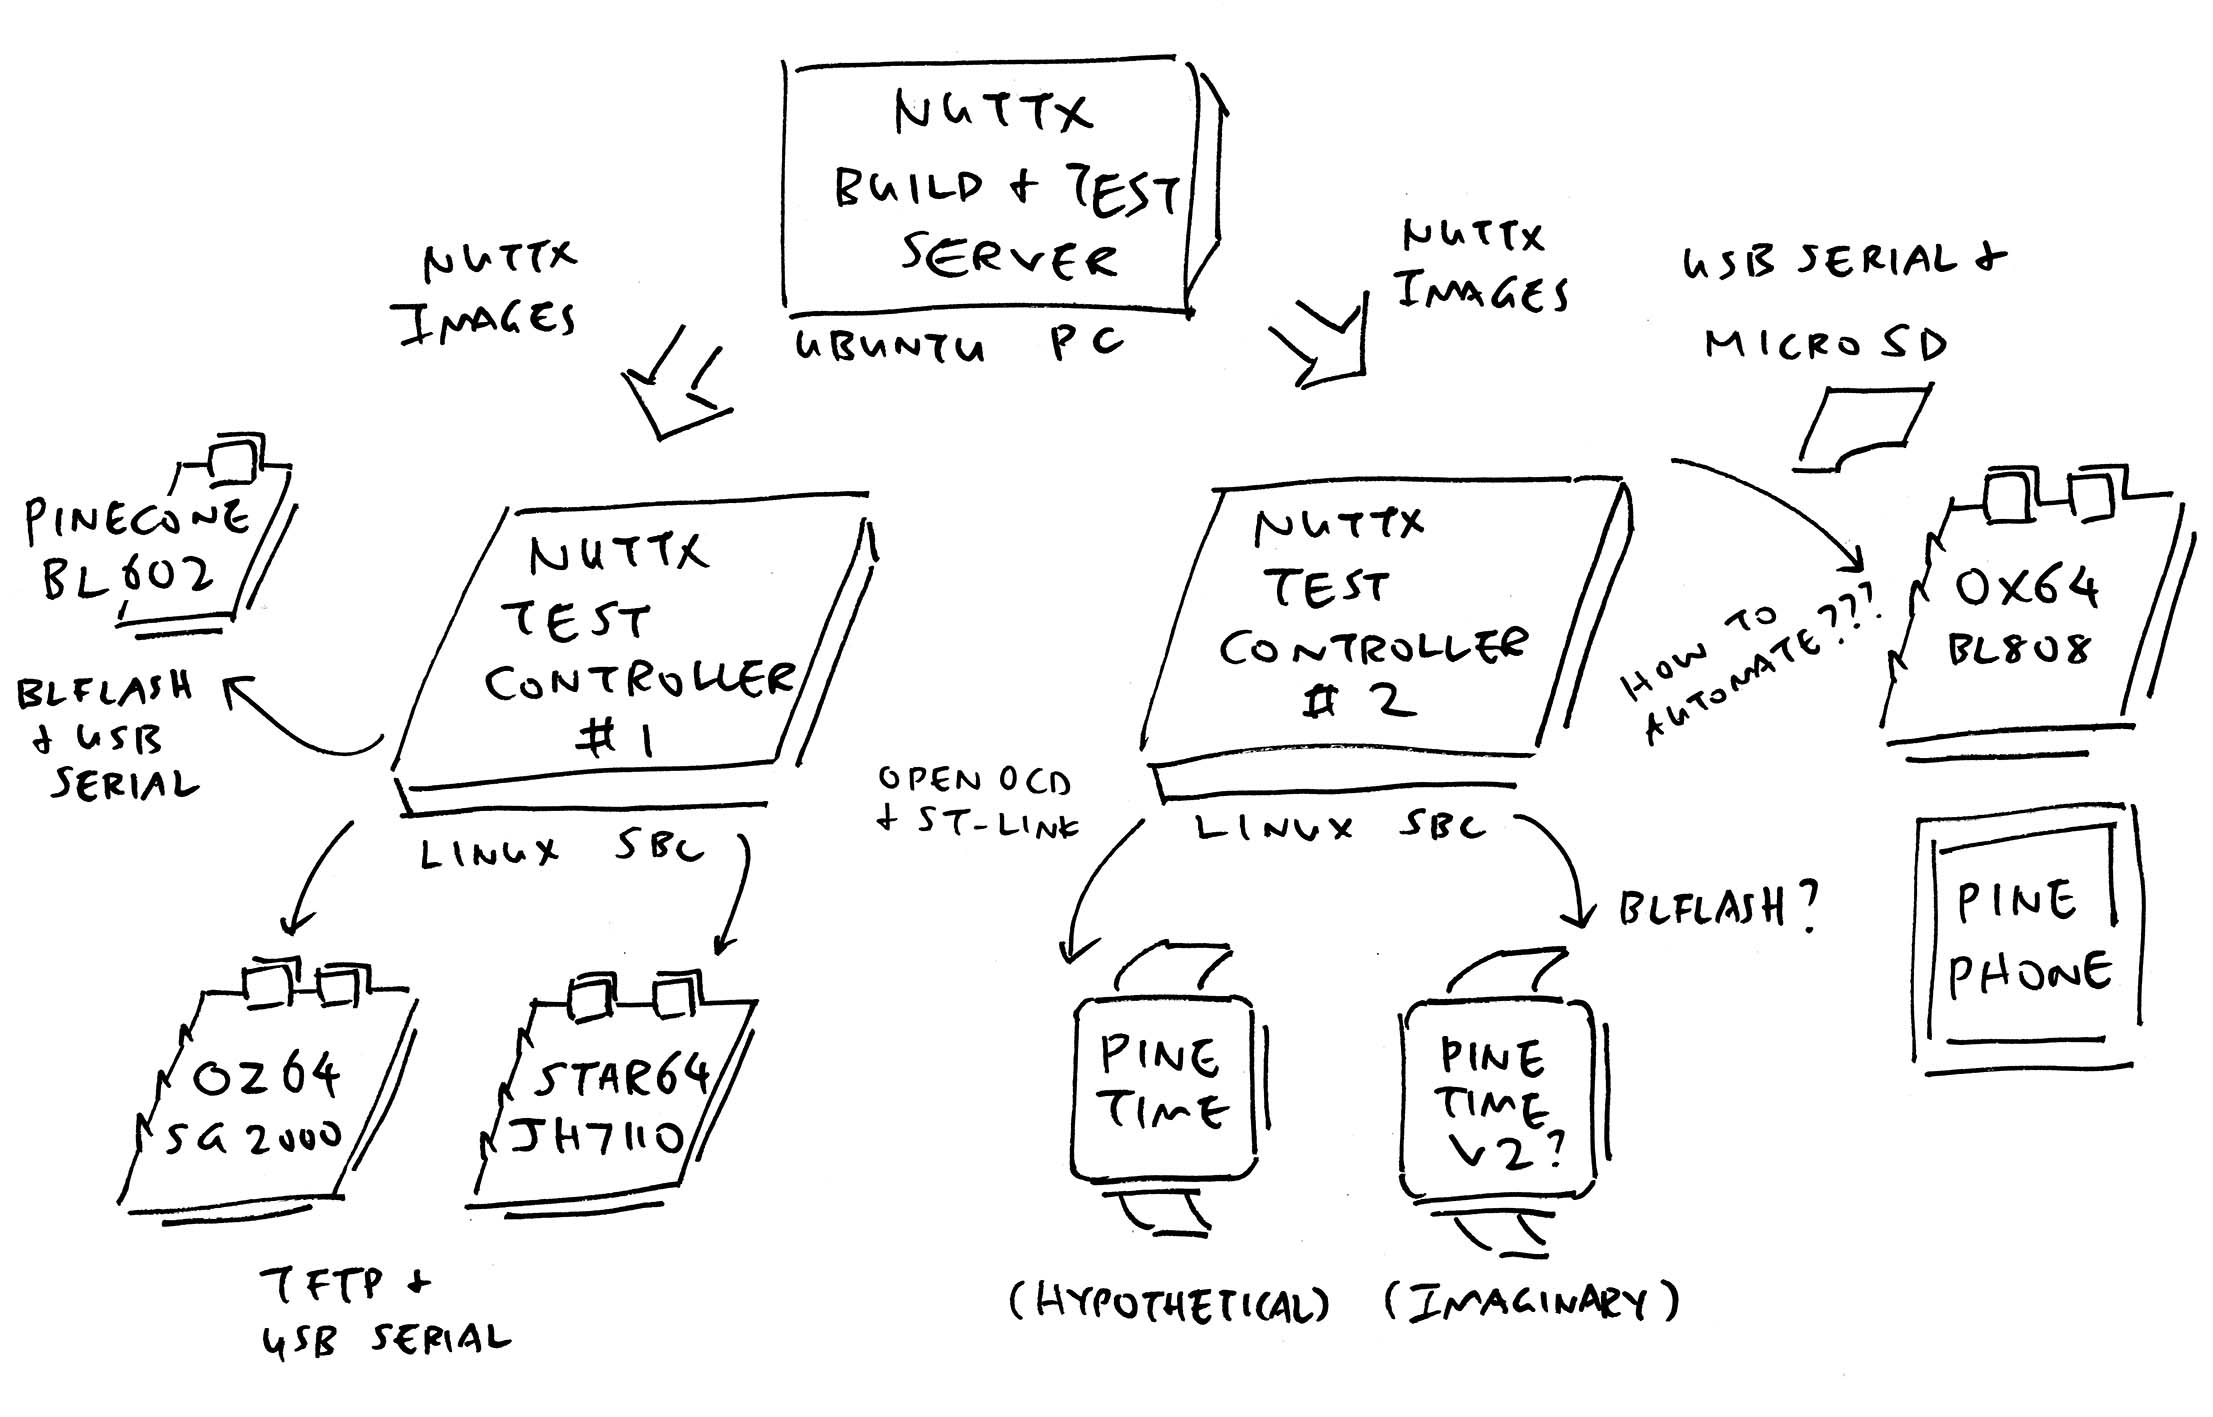
With an (inexpensive) Arm64 Linux SBC, called the Test Controller. Oz64 won’t boot over USB or Serial, we’ll connect these instead…
Wired Ethernet: For booting NuttX over TFTP (Trivial File Transfer Protocol)
UART0 Port: For receiving NuttX Shell Commands (TX: Pin 8, RX: Pin 10)
Which connects to our Test Controller (Linux SBC) via a USB Serial Dongle
Test Controller is also our TFTP Server for booting NuttX on Oz64

(Arm32 Boards: STM32 and nRF52? Use OpenOCD + ST-Link)
(GPIO Wiring might be needed for RISC-V Boards)
How shall we test Oz64?
Test Controller will send these NuttX Commands to Oz64: oz64.exp
## Record the NuttX Commit Hash
nsh> uname -a
NuttX 10.3.0 d33f654011 ...

## Check the Heap Memory
nsh> free
total: 2061312 / used: 11624 / free: 2049688 ...

## Show what's running
nsh> ps
/system/bin/init ...

## List the Device Drivers
nsh> ls -l /dev
console ...

## Simple App
nsh> hello
Hello, World!!

## App with Threading and Timers
nsh> getprime
getprime took 279 msec

## Omitted: Test `hello` and `getprime` again
## To verify the swapping of Address Spaces

## Exercise everything in NuttX
nsh> ostest
ostest_main: Exiting with status 0(Why we test hello and getprime twice)
Responses to the above commands are validated by another machine…

Who controls our Test Controller?
Our Test Controller (Linux SBC) will accept commands from the Build & Test Server (Ubuntu PC, pic above).
Remember the NuttX Commands from Previous Section? Our Build & Test Server will run this Expect Script to send the commands to Oz64, passing through the Test Controller: oz64.exp
## Wait at most 300 seconds for each command
set timeout 300

## Expect Script for Testing NuttX on Oz64 SG2000, over SSH to SBC
send -s "uname -a\r"

## Wait for the prompt and enter `free`
expect "nsh> "
send -s "free\r"

## Wait for the prompt and enter `ps`
expect "nsh> "
send -s "ps\r"

## Omitted: Send the other commands
...

## Wait for the prompt and enter `ostest`
expect "nsh> "
send -s "ostest\r"
The same script shall Validate the Responses from Oz64: oz64.exp
## Check the response from OSTest...
expect {

  ## If OSTest completes successfully...
  "ostest_main: Exiting with status 0" {

    ## Terminate the `screen` session: Ctrl-A k y
    ## Exit the SSH Session
    send -s "\x01ky"
    send -s "exit\r"

    ## Power off Oz64 and Exit normally
    system "./oz64-power.sh off"
    exit 0
  }

  ## If OSTest Fails: Exit with an error
  ## Omitted: Power off Oz64. Terminate the `screen` session and SSH Session
  timeout { ...
    exit 1
  }
}
Even though it’s NOT running on Test Controller…
Erm this Expect Script will run on Build & Test Server? Not Test Controller?
Ah the NuttX Commands above will work, no worries! Build & Test Server (Ubuntu PC) will ask Test Controller (Linux SBC) to pass them through to Oz64.
That’s why our Expect Script does this on Build & Test Server: oz64.exp
## For every 1 character sent, wait 1 millisecond
## Wait at most 60 seconds for every command
set send_slow {1 0.001}
set timeout 60

## Connect from Build & Test Server (Ubuntu PC)
## to Test Controller (Linux SBC) over SSH
## Then wake up the SBC
spawn ssh test-controller
send -s "\r"

## Terminate the Previous Session for the `screen` command: Ctrl-A k y
expect "$"
send -s "screen -x\r" ; sleep 5
send -s "\x01ky\r"    ; sleep 5

## Connect to USB Serial Terminal via the `screen` command
## Test Controller (Linux SBC) now becomes a passthrough
expect "$"
send -s "screen /dev/ttyUSB0 115200\r"

## Power Oz64 Off and On
system "./oz64-power.sh off" ; sleep 5
system "./oz64-power.sh on"

## Wait for the NuttX Prompt
expect {
  "nsh> " {}

  ## If NuttX Crashes: Exit with an error
  ## Omitted: Power off Oz64. Terminate the `screen` session and SSH Session
  timeout { ...
    exit 1
  }
}

## Omitted: Enter the NuttX Commands and validate the responses
## send -s "uname -a\r"The Expect Script will turn our Test Controller into a Passthrough for NuttX Commands…
## Watch How It Works...
## Build & Test Server: Launches a shell on Test Controller...
$ ssh test-controller

## Test Controller: Connects to Oz64 Serial Terminal...
$ screen -x
$ screen /dev/ttyUSB0 115200

## Test Controller: Passes through the NuttX Commands...
nsh> uname -a
NuttX 10.3.0 d33f654011 ...

## Build & Test Server: Validates the responses
Before the testing, we need to build NuttX…
(Combining the Linux SBC and Ubuntu PC)

Who runs the above Expect Script?
The Expect Script above is called by our Build & Test Script that will…
Download the NuttX Code (from the Pull Request)
Compile the NuttX Kernel (plus NuttX Apps)
Copy them to Test Controller (Linux SBC)
Start the Expect Script (from above)
So Test Controller will Boot Oz64 (over TFTP)
And forward Test Commands (to NuttX Shell)
Like so: build-test-oz64.sh
## Build and Test NuttX for Oz64 SG2000 RISC-V SBC
## Download NuttX and Apps based on the Pull Request
git clone https://github.com/USERNAME/nuttx    nuttx --branch BRANCH
git clone https://github.com/apache/nuttx-apps apps  --branch master

## Configure the NuttX Build
cd nuttx
tools/configure.sh milkv_duos:nsh

## Build the NuttX Kernel
## And the NuttX Apps
make -j
make -j export
pushd ../apps
./tools/mkimport.sh -z -x ../nuttx/nuttx-export-*.tar.gz
make -j import
popd

## Generate the NuttX Image:
## NuttX Kernel + Padding + NuttX Apps
genromfs -f initrd -d ../apps/bin -V "NuttXBootVol"
head -c 65536 /dev/zero >/tmp/nuttx.pad
cat nuttx.bin /tmp/nuttx.pad initrd >Image

## Copy the NuttX Image to our Test Controller (TFTP Server)
scp Image test-controller:/tftpboot/Image-sg2000
ssh test-controller ls -l /tftpboot/Image-sg2000

## Start the Expect Script
## That runs the NuttX Test on Oz64
expect ./oz64.expWho calls this script? We find out…
How will a Pull Request trigger the script above?
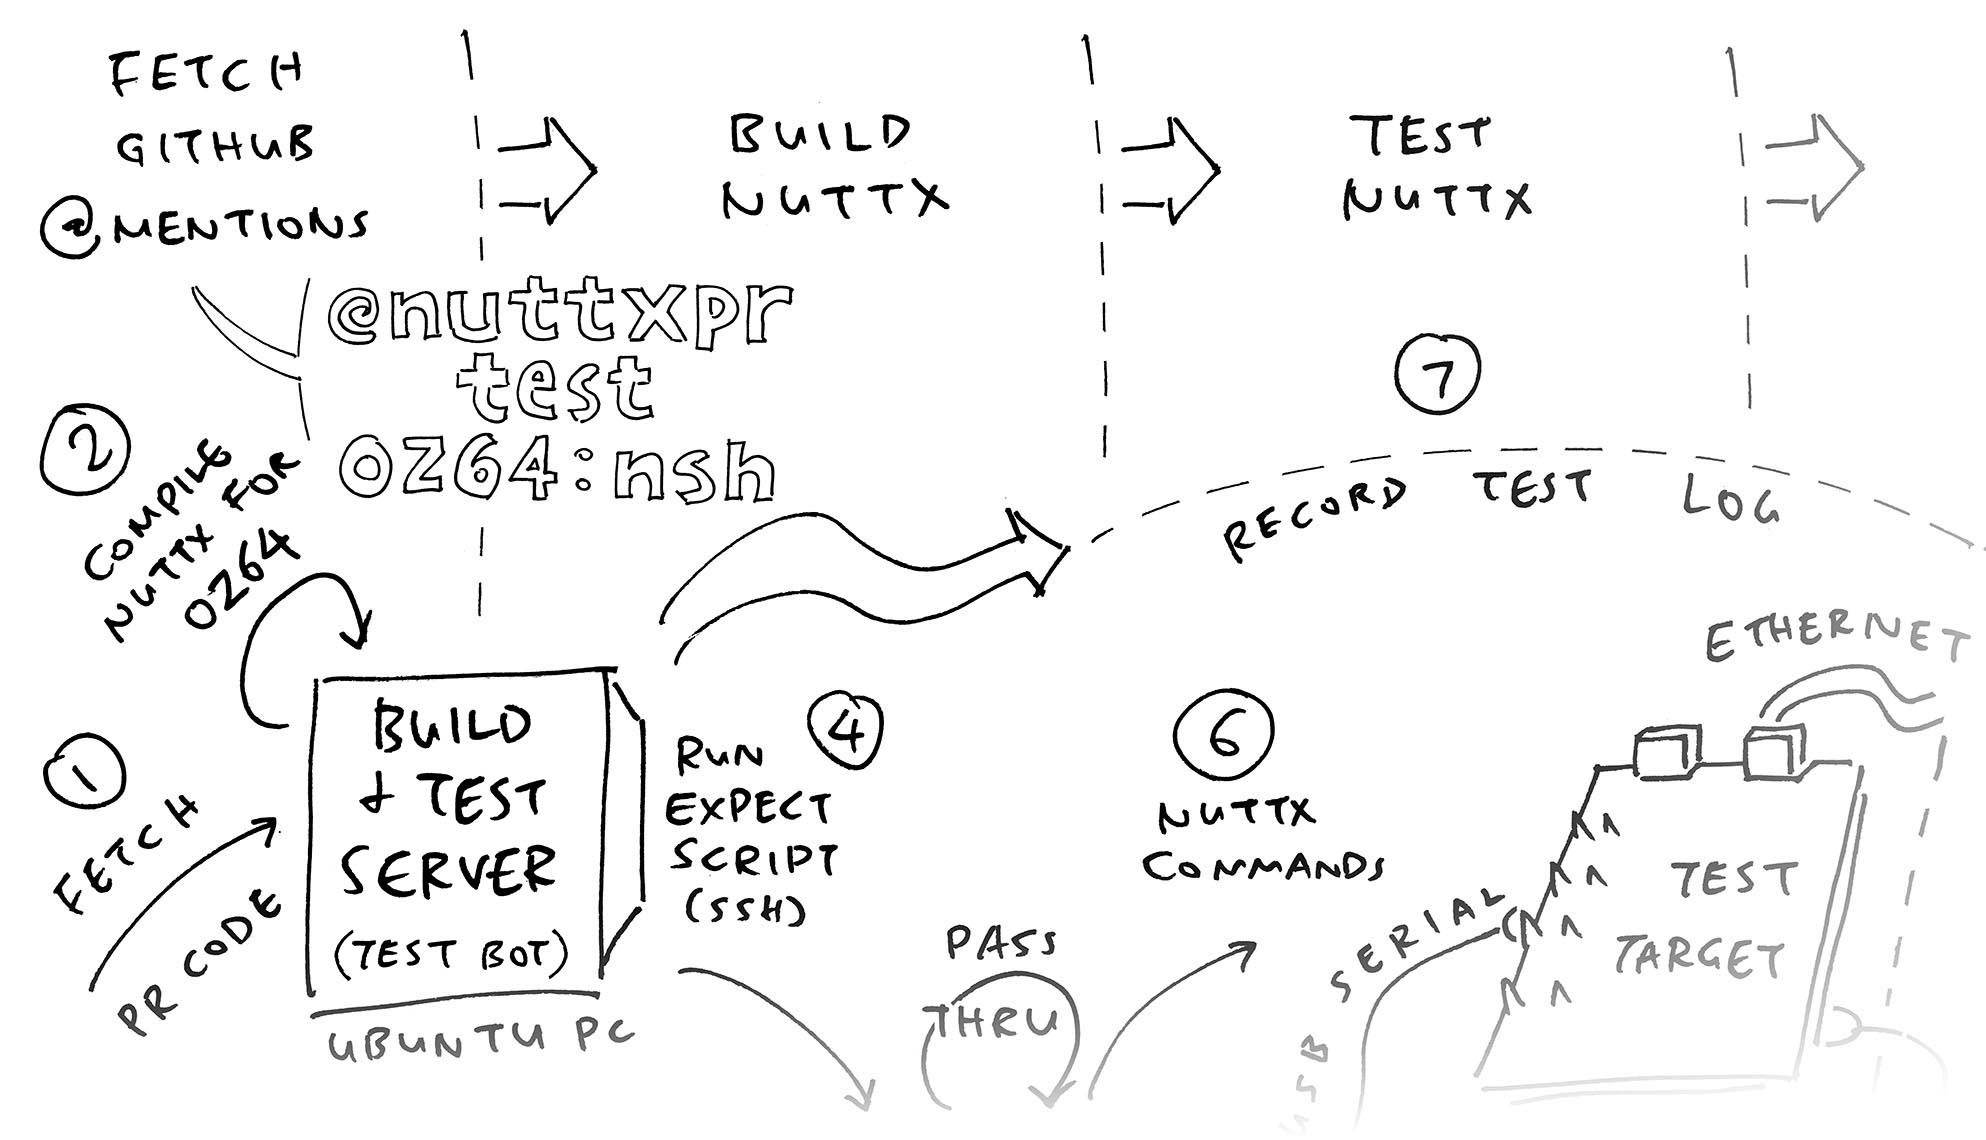
With a little help from GitHub API. Our Test Bot shall…
Fetch the Newest Notifications for @nuttxpr
Find a Mentioned Comment: “@nuttxpr test oz64:nsh”
Download NuttX Source Code (from the Pull Request)
Build and Test NuttX on Oz64 (script above)
Capture the Test Log (and extract the essential bits)
Post the Test Log as a PR Comment
This is how we Fetch Notifications for @nuttxpr: main.rs
// Fetch all Notifications for @nuttxpr
let notifications = octocrab
  .activity()       // Get User Activity from GitHub
  .notifications()  // Notifications specifically
  .list()           // Return as a list
  .all(true)        // All Notifications: Read and Unread
  .send()           // Send the Request to GitHub
  .await?;          // Wait until completed

// For Every Notification...
for n in notifications {

  // We handle only Mentions
  let reason = &n.reason;
  if reason != "mention" { continue; }

  // We handle only PR Notifications
  // Fetch the PR from the Notification
  let pr_url = n.subject.url.clone().unwrap();  // https://api.github.com/repos/lupyuen2/wip-nuttx/pulls/88
  if !pr_url.as_str().contains("/pulls/") { continue; }

  // Omitted: Extract the PR Number from PR URL
  // Allow only Specific Repos: apache/nuttx, apache/nuttx-apps
  ...

  // Execute the Build & Test for Oz64
  // Post the Test Log as a PR Comment
  process_pr(&pulls, &issues, pr_id).await?;
}
process_pr will execute the Build & Test for Oz64. Then post the Test Log as a PR Comment: main.rs
/// Execute the Build & Test for Oz64.
/// Post the Test Log as a PR Comment.
async fn process_pr(...) -> Result<...> {

  // Fetch the PR from GitHub
  let pr = pulls.get(pr_id).await?;

  // Get the Command and Args: ["test", "oz64:nsh"]
  // Omitted: Set target="milkv_duos:nsh", script="oz64"
  let args = get_command(issues, pr_id).await?;

  // Build and Test the PR on Oz64
  let response_text = build_test(
    &pr,     // Pull Request fetched from GitHub
    target,  // "milkv_duos:nsh"
    script   // "oz64"
  ).await?;

  // Post the PR Comment
  let comment_text =
    header.to_string() + "\n\n" +
    &response_text;
  issues.create_comment(pr_id, comment_text).await?;
  Ok(())
}
Finally we’re ready for the Big Picture…

Test Bot calls build_test. What’s inside build_test?
It will call a script to execute the Oz64 Build & Test. And record the Test Log as a GitLab Snippet: main.rs
/// Build and Test the PR. Return the Build-Test Result.
/// target="milkv_duos:nsh", script="oz64"
async fn build_test(pr: &PullRequest, target: &str, script: &str) -> Result<String, ...> {

  // Get the PR URL and PR Branch
  // Omitted: Set apps_url="https://github.com/apache/nuttx-apps", apps_ref="master"
  let head = &pr.head;
  let nuttx_ref = &head.ref_field;
  let nuttx_url = head.repo.clone().unwrap().html_url.unwrap();

  // Start the Build and Test Script
  // Record the Test Log
  let log = "/tmp/nuttx-test-bot.log";
  let mut child = Command
    ::new("../nuttx-build-farm/build-test.sh")
    .arg(script).arg(log)
    .arg("HEAD").arg("HEAD")
    .arg(nuttx_url).arg(nuttx_ref)
    .arg(apps_url).arg(apps_ref)
    .spawn().unwrap();

  // Wait for Build and Test to complete (0 if successful)
  let status = child.wait().unwrap();

  // Upload the Test Log as GitLab Snippet
  let log_content = fs::read_to_string(log).unwrap();
  let snippet_url = create_snippet(&log_content).await?;

  // Extract the essential bits from Test Log
  let log_extract = extract_log(&snippet_url).await?;
  let log_content = log_extract.join("\n");
  let mut result =
    if status.success() { format!("Build and Test Successful ({target})\n") }
    else { format!("Build and Test **FAILED** ({target})\n") };

  // Return the Extracted Test Log and Snippet URL
  result.push_str(&snippet_url);
  result.push_str(&log_content);
  Ok(result)
}(create_snippet publishes the GitLab Snippet)
Which will call our Generic Build & Test Script like so: build-test.sh
## Download this NuttX PR: URL, branch and commit hash
nuttx_url=https://github.com/USERNAME/nuttx
nuttx_ref=BRANCH
nuttx_hash=HEAD

## Download this Apps PR: URL, branch and commit hash
apps_url=https://github.com/apache/nuttx-apps
apps_ref=master
apps_hash=HEAD

## Start the Oz64 Build and Test
## Record the Test Log
build-test.sh \
  oz64 nuttx-test-bot.log \
  $nuttx_hash $apps_hash \
  $nuttx_url  $nuttx_ref \
$apps_url $apps_ref(build-test.sh is explained here)
(Calling the Build & Test Script we saw earlier)
What about the essential bits?
extract_log will pick out the evidence of a Successful Test: Commit Hash, Build Steps, OSTest Result (or Crash Dump)
## Extracted Test Log will look like this...
## Build and Test Successful (milkv_duos:nsh)
$ git clone https://github.com/USERNAME/nuttx    nuttx --branch BRANCH
$ git clone https://github.com/apache/nuttx-apps apps  --branch master

$ pushd nuttx ; git reset --hard HEAD ; popd
HEAD is now at d33f654011 include/stdlib.h: define system() prototype for the flat build
$ pushd apps  ; git reset --hard HEAD ; popd
HEAD is now at f139e56cd testing/libc/wcstombs: Add testing application for wcstombs

NuttX Source: https://github.com/apache/nuttx/tree/d33f6540113b8a5a4392f8a69b1a8b6258669f64
NuttX Apps:   https://github.com/apache/nuttx-apps/tree/f139e56cd62a30d6edcd7207c7e4cbc6e9b8b7d1

$ cd nuttx
$ tools/configure.sh milkv_duos:nsh
$ make -j
...
$ ssh test-controller
OpenSBI v0.9
nsh> uname -a
NuttX 10.3.0 d33f654011 Feb  7 2025 06:49:26 risc-v milkv_duos
nsh> ostest
ostest_main: Exiting with status 0
The Test Evidence becomes a PR Comment (pic above). With this evidence, we can safely Merge the Pull Request into NuttX!
We need to power up Oz64 so it will boot NuttX over TFTP. How to control the power?
With an IKEA Smart Power Plug and IKEA Zigbee Hub. Here’s our script that Flips the Oz64 Power, On and Off: oz64-power.sh
## This script will power Oz64 on or off...
## ./oz64-power on
## ./oz64-power off

## First Parameter is on or off
state=$1

## Set the Home Assistant Server
export HOME_ASSISTANT_SERVER=luppys-mac-mini.local:8123

## Get the Home Assistant Token, copied from http://localhost:8123/profile/security
## export HOME_ASSISTANT_TOKEN=xxxx
. $HOME/home-assistant-token.sh

## Call the Home Assistant API:
## Power Oz64 On or Off
curl \
  -X POST \
  -H "Authorization: Bearer $HOME_ASSISTANT_TOKEN" \
  -H "Content-Type: application/json" \
  -d "{\"entity_id\": \"automation.oz64_power_$state\"}" \
  http://$HOME_ASSISTANT_SERVER/api/services/automation/trigger
This script assumes that we have…
Installed a Home Assistant Server
(Works fine with Docker)
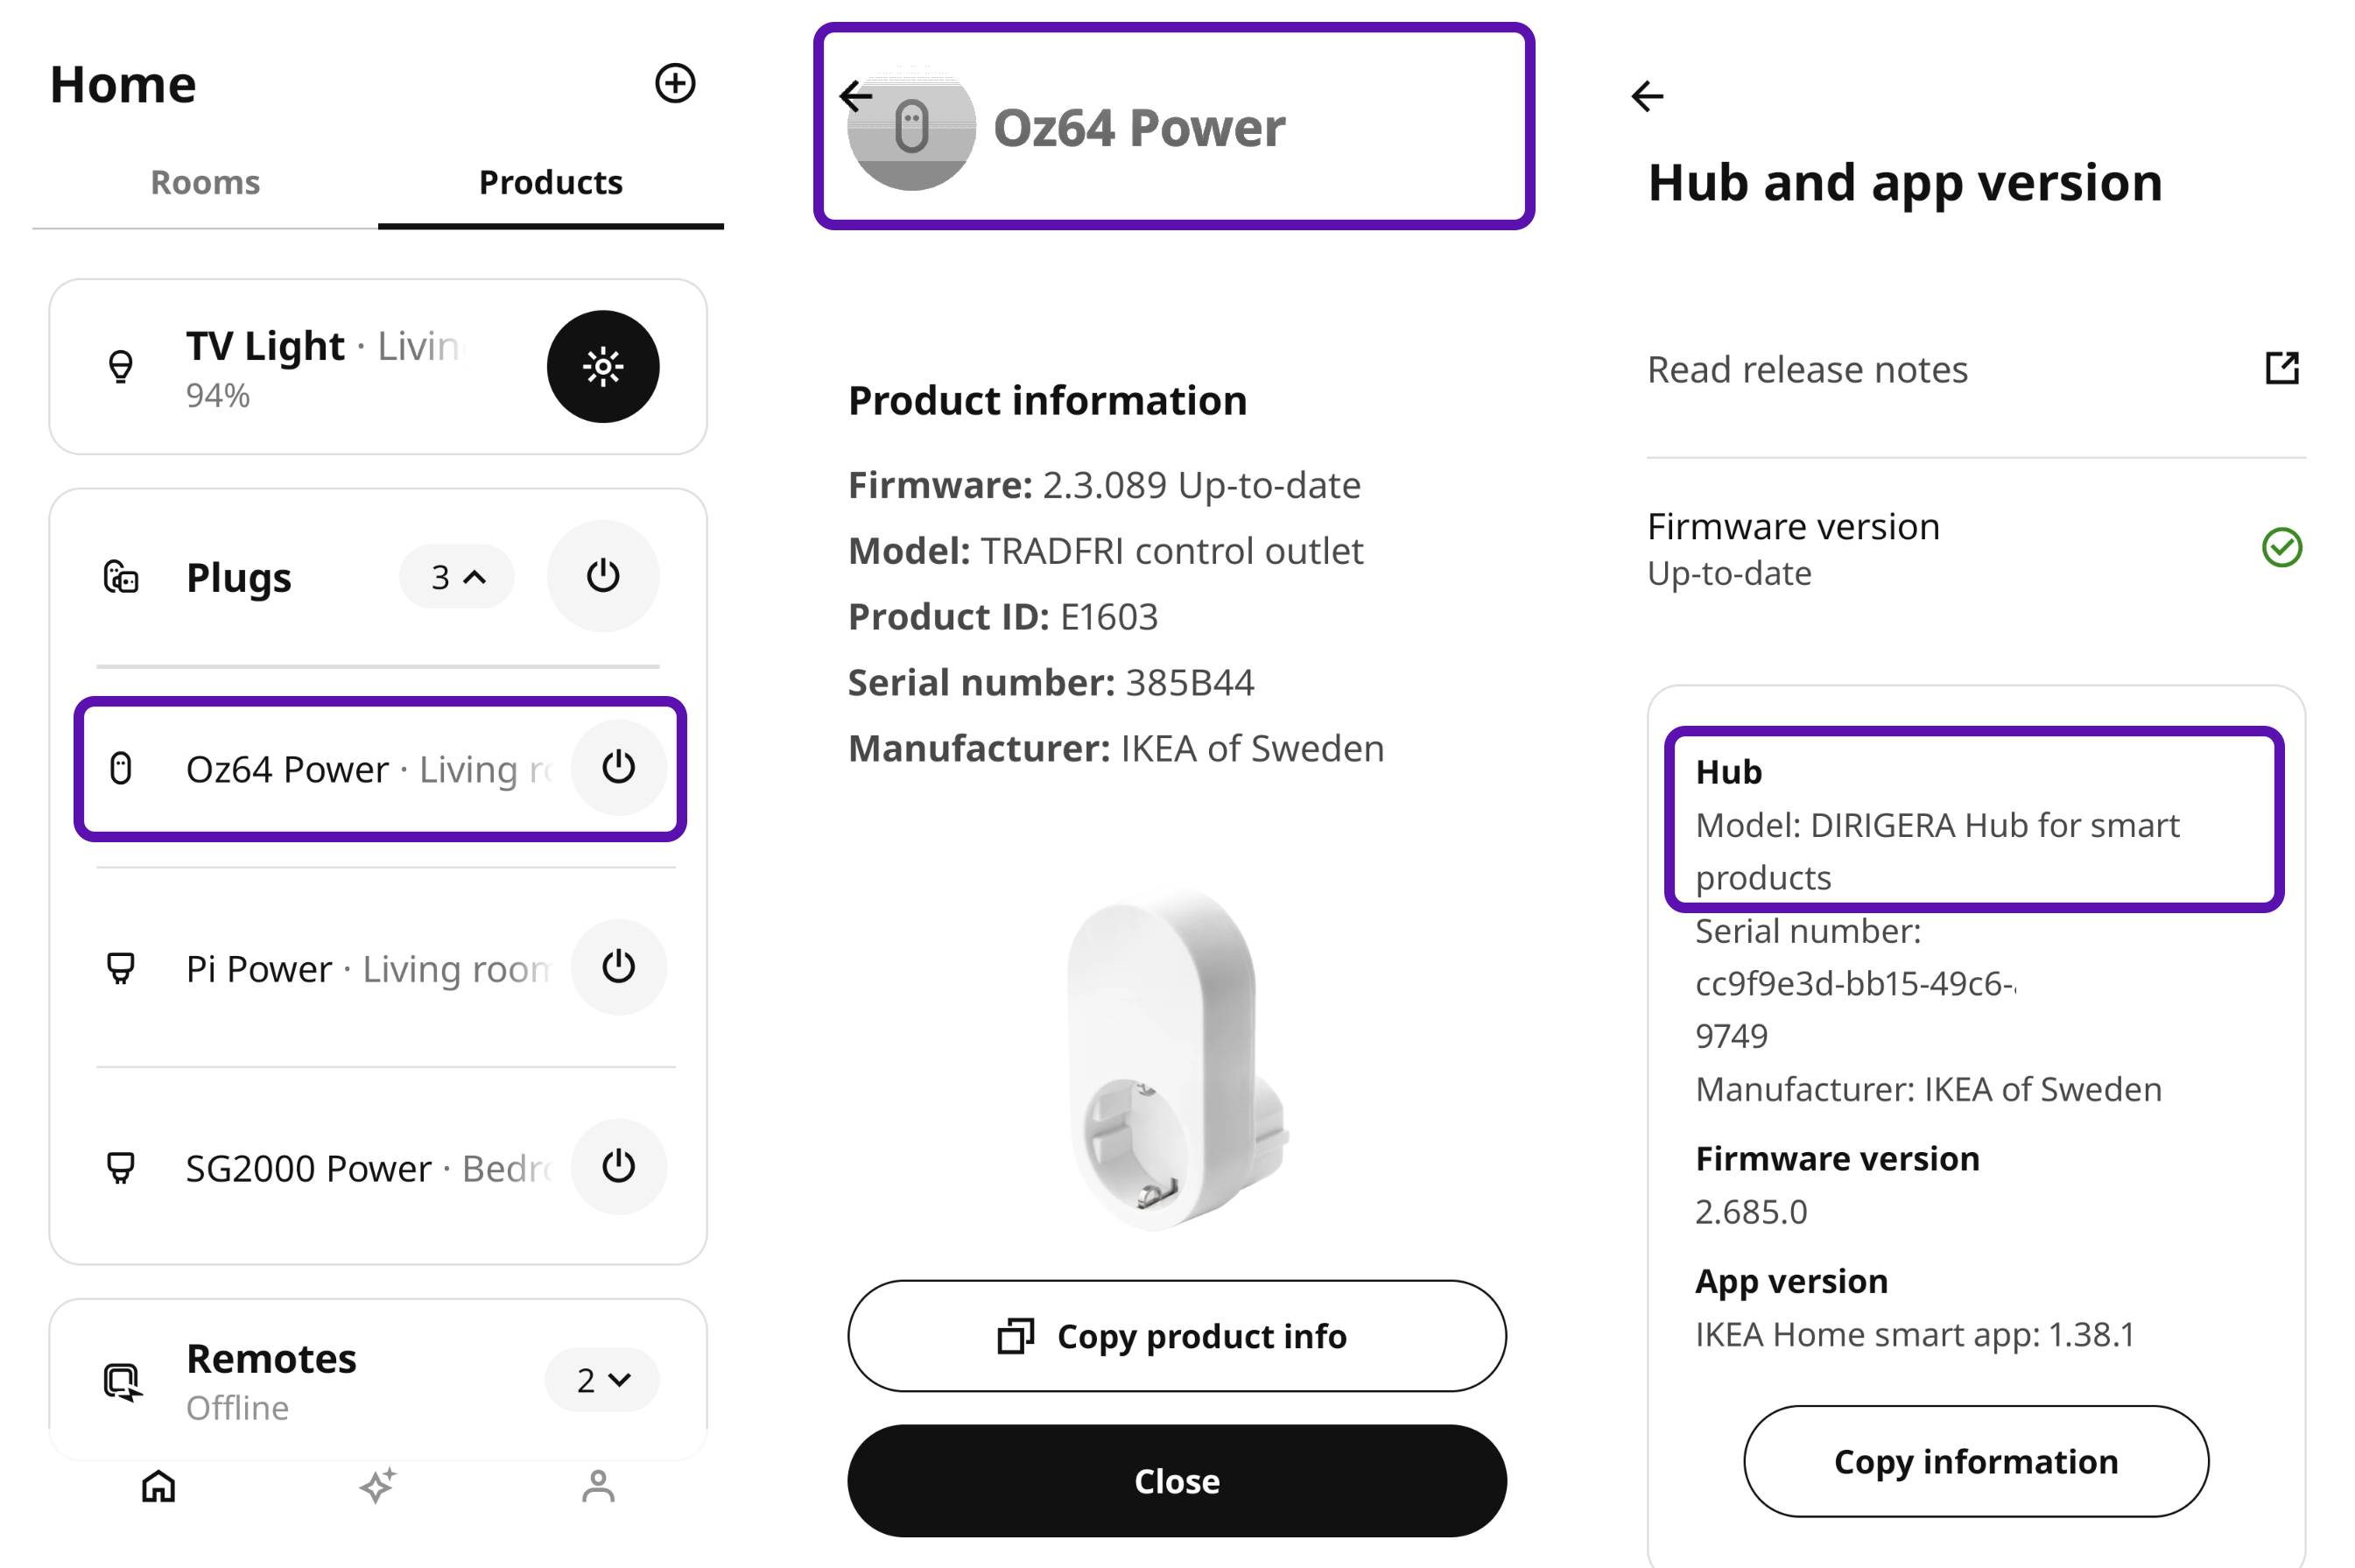
Added the Smart Power Plug to Google Assistant
“Oz64 Power” (pic above)
Installed the Google Assistant SDK for Home Assistant
(So we don’t need Zigbee programming)
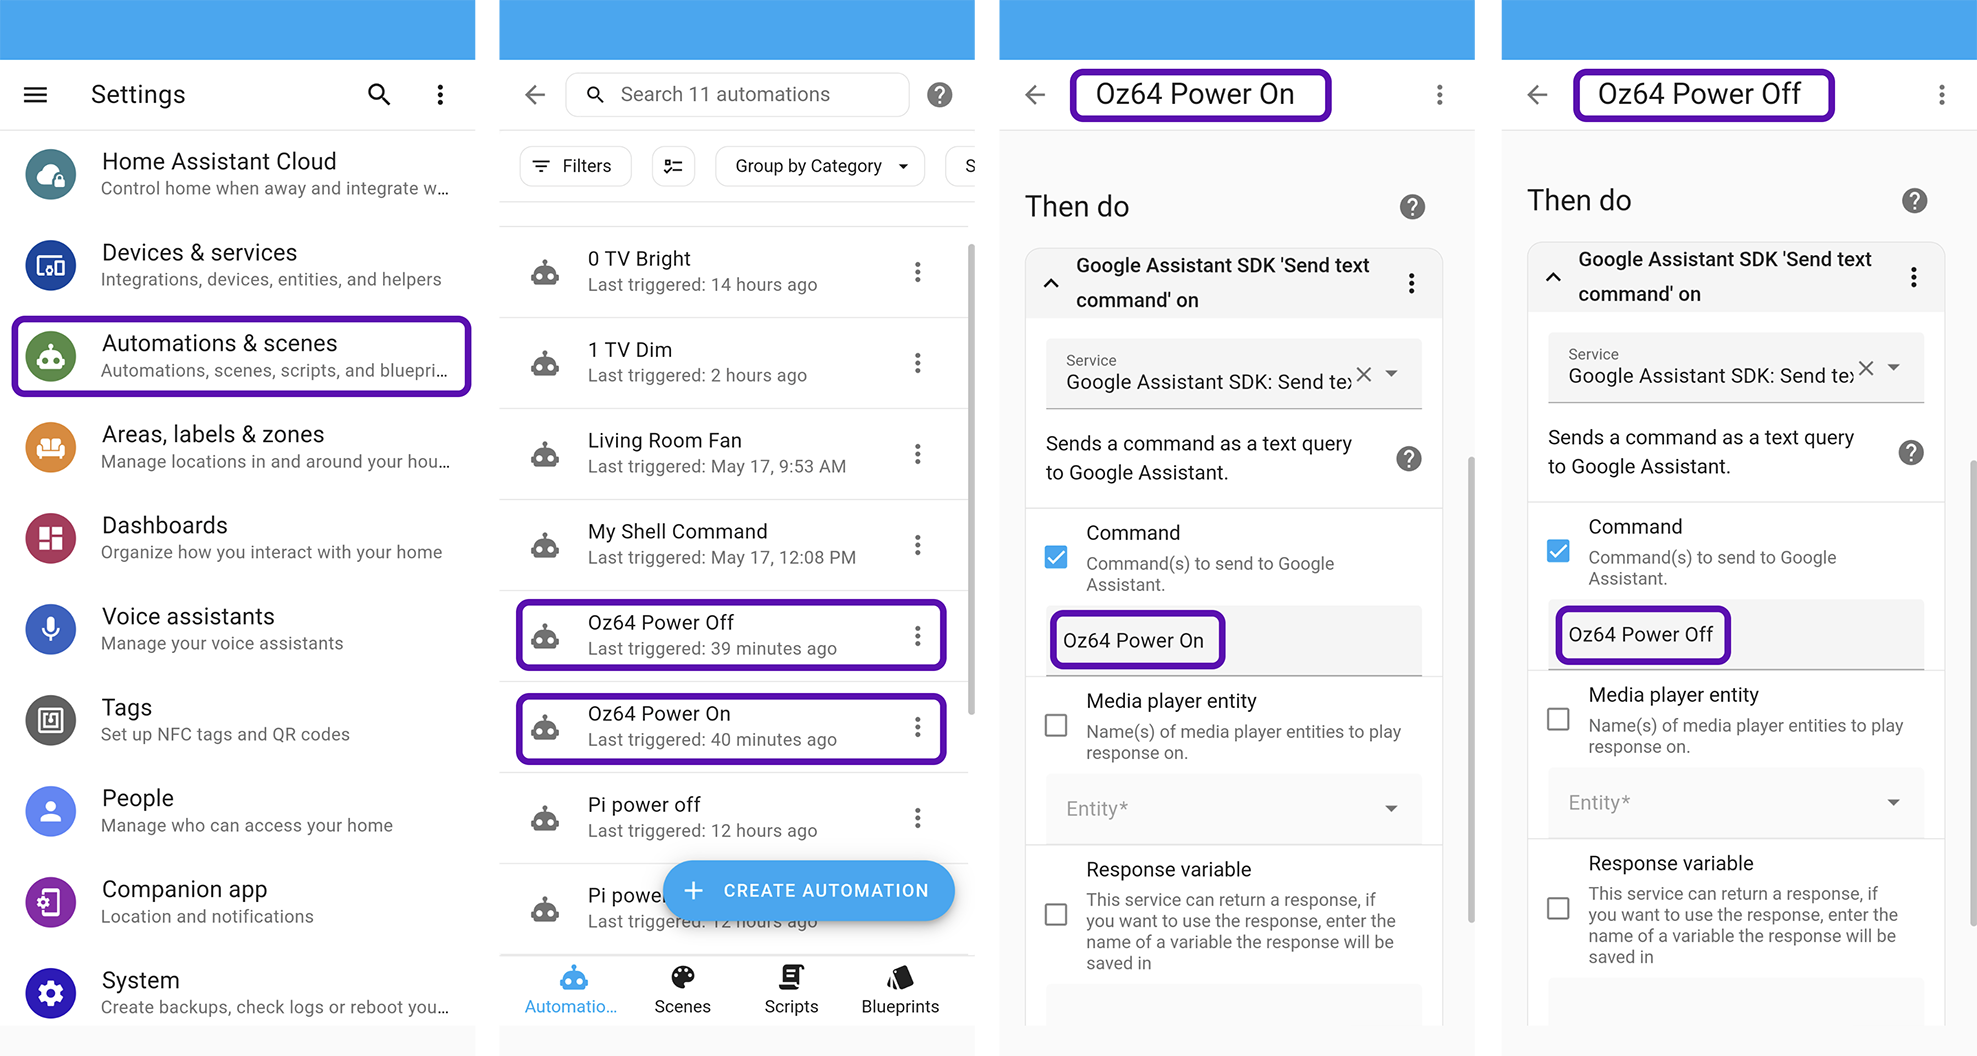
Created the Power Automation in Home Assistant
“Oz64 Power On” and “Oz64 Power Off” (pic below)
And our Test Bot is complete! Except for these security issues…
Our Bot shall Auto-Build and Auto-Test any Pull Request. What could possibly go wrong?
Plenty! The Pull Request is awaiting Manual Review. It might contain Unauthorised Code that will be executed by our Bot. (Think: Makefiles with Malicious Scripts inside)
Or the Runtime Code might disrupt the Local Network hosting our Bot. Also it might break out of the Semihosting Environment and mess up our Host Machine.
Has something happened before?
Five Years Ago: I connected a PineTime Smartwatch (Apache Mynewt) to the internet, for anyone to test their firmware. Some kind folks disclosed that they could break out of the Semihosting Environment and access my computer.
Thus we’re doing it the wiser, safer way?
Indeed. Today we Start Manually our Test Bot, after reviewing the code in the PR. We do this for all Pull Requests involving RISC-V Architecture.
It gets better! Soon: Test Bot will run non-stop and push a Mastodon Alert to our phones, when it’s triggered. To activate the PR Test, we review the PR and click “Like” on the PR Comment.

Speaking of PineTime: How shall we allow auto-testing of firmware?
Let’s assume NuttX has been ported to PineTime Smartwatch (Nordic nRF52832). On our Test Controller (Linux SBC), we’ll run OpenOCD + ST-Link + Semihosting for flashing and testing.
Watch Faces on PineTime will render on the LVGL Display (pic above). Our Test Controller shall have a MIPI CSI Camera, that will snap a pic of the LVGL Display. And attach the pic to the Test Log, for Manual Validation.
Can we combine the Test Controller with the Build & Test Server?
Yeah we could combine the Test Controller (Linux SBC) with the Build & Test Server (Ubuntu PC). Though the Current Design will scale better with Multiple Test Controllers and a MicroSD Multiplexer…
More Test Bots! Check the updates…
Special Thanks to Mr Gregory Nutt for your guidance and kindness. I’m also grateful to My Sponsors, for supporting my writing.
Got a question, comment or suggestion? Create an Issue or submit a Pull Request here…
Earlier we spoke about our Test Bot calling the Generic Build & Test Script…
## Download this NuttX PR: URL, branch and commit hash
nuttx_url=https://github.com/USERNAME/nuttx
nuttx_ref=BRANCH
nuttx_hash=HEAD

## Download this Apps PR: URL, branch and commit hash
apps_url=https://github.com/apache/nuttx-apps
apps_ref=master
apps_hash=HEAD

## Start the Oz64 Build and Test
## Record the Test Log
build-test.sh \
  oz64 nuttx-test-bot.log \
  $nuttx_hash $apps_hash \
  $nuttx_url  $nuttx_ref \
  $apps_url   $apps_ref
This section explains what’s inside build-test.sh.
Here are the parameters for our script: build-test.sh
## First Parameter is the Build & Test Script, like "oz64"
## Second Parameter is the Log File, like "/tmp/build-test.log"
## Other Parameters shall be passed through to the Build & Test Script:
##   nuttx_hash apps_hash
##   nuttx_url  nuttx_ref
##   apps_url   apps_ref
script=$1  ## oz64
log=$2     ## /tmp/build-test.log

## Get the Script Directory
script_path="${BASH_SOURCE}"
script_dir="$(cd -P "$(dirname -- "${script_path}")" >/dev/null 2>&1 && pwd)"

## Get the `script` option
if [ "`uname`" == "Linux" ]; then
  script_option=-c
else
  script_option=
fi

## Build and Test NuttX
build_test \
  $script \
  $log \
  $3 $4 $5 $6 $7 $8

## Return the Result Code to the caller
exit $res
build_test will call the Platform-Specific Build & Test Script, like for Oz64. The Test Log will be recorded into the Log File: build-test.sh
## Build and Test NuttX
function build_test {
  local script=$1  ## oz64
  local log=$2     ## /tmp/build-test.log

  ## Call the Platform-Specific Build & Test Script: build-test-oz64.sh
  ## Propagate the Return Status from Script
  pushd /tmp
  set +e  ## Ignore errors
  script $log \
    --return \
    $script_option \
    "$script_dir/build-test-$script.sh $3 $4 $5 $6 $7 $8"
  res=$?
  set -e  ## Exit when any command fails
  popd

  ## Find errors and warnings
  clean_log $log
  find_messages $log
}(Oz64 Build & Test Script is explained here)
The code above calls clean_log and find_messages.
clean_log will remove Special Characters from the Log File: build-test.sh
## Strip the Control Characters from the Log File
function clean_log {
  local log_file=$1  ## /tmp/build-test.log
  local tmp_file=$log_file.tmp  ## /tmp/build-test.log.tmp
  cat $log_file \
    | tr -d '\r' \
    | tr -d '\r' \
    | sed 's/\x08/ /g' \
    | sed 's/\x1B(B//g' \
    | sed 's/\x1B\[K//g' \
    | sed 's/\x1B[<=>]//g' \
    | sed 's/\x1B\[[0-9:;<=>?]*[!]*[A-Za-z]//g' \
    | sed 's/\x1B[@A-Z\\\]^_]\|\x1B\[[0-9:;<=>?]*[-!"#$%&'"'"'()*+,.\/]*[][\\@A-Z^_`a-z{|}~]//g' \
    | cat -v \
    >$tmp_file
  mv $tmp_file $log_file
}
find_messages will search for Warning and Errors, and insert them into the top of the Log File: build-test.sh
## Search for Errors and Warnings
function find_messages {
  local log_file=$1  ## /tmp/build-test.log
  local tmp_file=$log_file.tmp  ## /tmp/build-test.log.tmp
  local msg_file=$log_file.msg  ## /tmp/build-test.log.msg
  local pattern='^(.*):(\d+):(\d+):\s+(warning|fatal error|error):\s+(.*)$'
  grep '^\*\*\*\*\*' $log_file \
    > $msg_file || true
  grep -P "$pattern" $log_file \
    | uniq \
    >> $msg_file || true
  cat $msg_file $log_file >$tmp_file
  mv $tmp_file $log_file
}
Why the funny Regex Pattern?
The Regex Pattern above is the same one that NuttX uses to detect errors in our Continuous Integration builds: .github/gcc.json
## Filename : Line : Col : warning/error : Message
^(.*):(\d+):(\d+):\s+(warning|fatal error|error):\s+(.*)$
Which will match and detect GCC Compiler Errors like…
chip/stm32_gpio.c:41:11: warning: CONFIG_STM32_USE_LEGACY_PINMAP will be deprecatedBut it won’t match CMake Errors like this!
CMake Warning at cmake/nuttx_kconfig.cmake:171 (message):
  Kconfig Configuration Error: warning: STM32_HAVE_HRTIM1_PLLCLK (defined at
  arch/arm/src/stm32/Kconfig:8109) has direct dependencies STM32_HRTIM &&
  ARCH_CHIP_STM32 && ARCH_ARM with value n, but is currently being y-selected
And Linker Errors…
arm-none-eabi-ld: /root/nuttx/staging//libc.a(lib_arc4random.o): in function `arc4random_buf':
/root/nuttx/libs/libc/stdlib/lib_arc4random.c:111:(.text.arc4random_buf+0x26): undefined reference to `clock_systime_ticks'
Also Network and Timeout Errors…
curl: (6) Could not resolve host: github.com
make[1]: *** [open-amp.defs:59: open-amp.zip] Error 6
We might need to tweak the Regex Pattern and catch more errors.